It’s SO EASY to make yummy Créme Brulee Coffee Creamer from scratch in 10 minutes, using only 4 ingredients! A great addition to morning coffee!

Do you put creamer in your coffee? I sure do! As much as I WISH I could drink my coffee black, I just can’t do it! UGH. I LOVE coffee, but don’t want it to TASTE like COFFEE. Does that make sense? I seem to only enjoy coffee if it is flavored with creamer! Ha Ha!
Well, we have bought our fair share of coffee creamer at the grocery store, but I also like to know how to make my own from scratch at home! I also enjoy knowing exactly what is in my creamer! It’s also good to know I can make coffee creamer in a pinch, if necessary!
I’ve experimented with a recipe for cinnamon roll coffee creamer before, with great results, so it was time to try a new variety. Enter this recipe for Créme Brulee Coffee Creamer, from Aimee at Shugary Sweets! Since I love créme brulee for dessert, it seemed likely I would enjoy this creamer, too! The creamer is so very easy to make, and only takes 4 common ingredients!
Scroll Down For A Printable Recipe Card At The Bottom Of The Page
How To Make Créme Brulee Coffee Creamer
Start with a 12 ounce can of EVAPORATED milk. Note that it is NOT condensed milk. This recipe will use EVAPORATED milk. That is important!

Pour the evaporated milk and the brown sugar into a saucepan. Turn the heat to medium-low, and whisk these two ingredients, to combine. Continue whisking and cooking the créme brulee coffee creamer on medium-low heat for 2-3 minutes, until all the brown sugar has dissolved.

Remove the pan from the heat, and stir in the milk and vanilla extract. So far, so good, right? NOTE: Any type of milk is fine to use (low-fat, non-fat), but whole milk will yield a “creamier” taste to this coffee creamer.

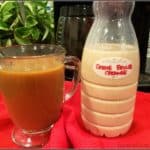
Once mixed fully, pour the créme brulee coffee creamer into a container. You can use a quart sized canning jar, OR a clean old coffee creamer bottle, as shown in the photo below. I find it easiest to use a funnel to fill the bottle, which I insert directly into the top. It helps to prevent spills!

There you have it! You just made créme brulee coffee creamer! I ended up with about 24 ounces of creamer. Now it is time to dress up that dark, plain cup of coffee!

Aw… that’s better. Now my coffee is ready to enjoy! I would point out that this creamer is not overly sweet, so if you like your creamer really sweet, you may want to slightly adjust the brown sugar amount that you add at the beginning.
Keep the coffee creamer stored (covered) in the refrigerator. It’s shelf life will be the same as the expiration date on the carton of milk that you used to make this recipe. Enjoy!

See how easy it is to make your own homemade créme brulee coffee creamer? I bet you hardly even broke a sweat! Hope you like this creamer. Enjoy your mug of coffee, and have a GREAT day! Be sure to check out ALL of my recipes in the Recipe Index, located at the top of the page.
Interested In More Recipes?
Thank you for visiting this website. I appreciate you using some of your valuable time to do so. If you’re interested, I publish a newsletter 2 times per month (1st and 15th) with all the latest recipes, and other fun info. I would be honored to have you join our growing list of subscribers, so you never miss a great recipe!
There is a Newsletter subscription box on the top right side (or bottom) of each blog post, depending on the device you use, where you can easily submit your e-mail address (only) to be included in my mailing list.
You Can Also Find Me On Social Media:
Facebook page: The Grateful Girl Cooks!
Pinterest: The Grateful Girl Cooks!
Instagram: jbatthegratefulgirlcooks

Original Recipe Source: https://www.shugarysweets.com/creme-brulee-coffee-creamer/
- 12 ounces evaporated milk (one can)
- 1/2 cup light brown sugar, packed
- 1½ cups milk
- 2 teaspoons vanilla extract
Pour the evaporated milk and brown sugar into a saucepan. Turn the heat to medium-low, and whisk these two ingredients together, to combine. Continue whisking and cooking the creamer on medium-low heat for 2-3 minutes, until all the brown sugar has dissolved.
- Remove the pan from the heat, and stir in the milk and vanilla extract. NOTE: Any type of milk is fine to use (low-fat, non-fat), but whole milk will yield a "creamier" taste to this coffee creamer.
Once mixed fully, pour the créme brulee coffee creamer into a container. You can use a quart sized canning jar, OR a clean old coffee creamer bottle. TIP: I find it easiest to use a funnel to fill the bottle, which I insert directly into the top. It helps to prevent spills!
Here’s one more to pin on your Pinterest boards!


