Month: April 2015

Creamy Deviled Eggs

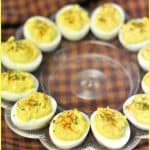
You’ll love these yummy, creamy deviled eggs. These classic bite sized appetizers are so simple to prepare, and will be a big hit at any celebration or potluck.You'll love these yummy, creamy deviled eggs. These classic bite sized appetizers are so simple to prepare, and will be a big hit at any celebration or potluck.
We really enjoyed having our family over for Easter brunch. I made a variety of different foods but when our sons arrived, the first thing they grabbed were the Creamy Deviled Eggs! Sneaky Ninjas! I guess I’d forgotten how much they love ’em.

We only have creamy deviled eggs a couple times a year, but they’re always a big hit! I’m pretty sure deviled eggs are the kind of food that everyone has their own method of making, or memory of how they should taste in their mind.

When I was growing up, I didn’t care for deviled eggs too much. My mom put diced onions and sweet pickle relish in them, so I was never the one grabbing them at family celebrations. As an adult however, I’ve discovered I really like deviled eggs made the simple, basic way I am sharing today.

Now I’ve been making ’em this way for over 35 years! So… for the sake of my sons having the way I make them down in writing long after I’m gone, I’m posting it here on the ol’ blog for their sake.

Scroll Down For A Printable Recipe Card At The Bottom Of The Page

Start By Boiling the Eggs

There must be a million ways to do this, but here’s the way I do it. Place the eggs in a large pan. Cover them fully with water.

Turn the heat to high, set a timer for 23 minutes, and walk away. (not too far away, like another city, but you get the idea, right?)

6 eggs cooking in water in saucepanEggs boiling in water in pan
As soon as they are done, immediately drain off the boiling hot water, and fill the pan with cold water. After about a minute, drain the water off and fill pan back up with cold water.

Hot water being poured off of eggs from panRinsing hot boiled eggs with cold water
Take each egg, and crack it all around the shell on the kitchen counter, then toss it back into the water (before peeling it). I crack all the eggs I will be using for the recipe and put them back into the water right after cracking them.

Letting the eggs sit with the shells “cracked” in water for a minute or two lets water seep into the cracks of the eggshell between the shell and the egg, which makes peeling them very easy!

Once they are all cracked, peel each one. Roll the egg between your hands to loosen the shells first, then peel.

Hand holding a cracked hard boiled egg over saucepan

Okay-  Now It’s Time To Make Some Creamy Deviled Eggs!

Once peeled and rinsed, carefully cut the eggs in half, length-wise, with a sharp knife.

6 hard boiled egg halves on white countertop
Use a teaspoon to carefully remove the egg yolk from the egg and place yolks into a small mixing bowl. To do this, turn egg yolk side down, gently pull back the egg white, then slide a teaspoon into it and pull out the yellow yolk.

Boom. Gravity takes the yolk right down into the bowl without a lot of work.

Removing egg yolk from hard boiled egg
Making The Filling For Creamy Deviled Eggs Is EASY

For this recipe I made 12 deviled eggs. Add three large heaping spoonfuls of mayonnaise and about a ½ teaspoon of yellow table mustard, salt & pepper (to taste) to the egg yolks.

Mayonnaise and mustard added to egg yolks
Smash the egg yolks with the back of a spoon or fork, and then mix the filling by hand until it is nice and creamy. You can also use an electric mixer if you want!

Egg yolks, mayo and mustard mixed together in silver mixing bowl
Carefully fill the empty eggs by spooning filling into the egg cavity. Fill each of the egg cavities first, then go back and add any extra filling to the top of the eggs.

Some people like to “pipe” the filling in, using a pastry bag for fancy looking eggs, but I like this easy (and less to clean up) way the best!

Spooning deviled egg filling into hard boiled egg whites
Ready For Serving

Once the eggs are all filled, garnish the creamy deviled eggs by sprinkling paprika and dried parsley flakes on top of each one.

Place the eggs in a covered container and refrigerate (a couple hours is best) until ready to serve. Enjoy!

Creamy deviled eggs with paprika and parsley garnish on platter

That’s it! I think you will find it very easy to make these delicious appetizers! Have a wonderful day!

Looking For More APPETIZER Recipes?

You can find all of my recipes in the Recipe Index, which is located at the top of the page. I have quite a few appetizer recipes, including:

Want More Recipes? Get My FREE Newsletter!

I publish a newsletter 2 times per month (1st and 15th) with lots of recipes, tips, etc..
Would you like to join our growing list of subscribers?

There is a Newsletter subscription box on the top right (or bottom) of each blog post, depending on the device you use.
You can submit your e-mail address there, to be added to my mailing list.

Find Me On Social Media:

Facebook page: The Grateful Girl Cooks!
Pinterest:
The Grateful Girl Cooks!
Instagram:
jbatthegratefulgirlcooks

Author's signature

Adapted 40 years ago from my Mom’s recipe

↓↓ PRINTABLE RECIPE BELOW ↓↓

0 from 0 votes
Creamy Deviled Eggs
Prep Time
10 mins
Cook Time
20 mins
Total Time
30 mins
 
You'll love these yummy, creamy deviled eggs. These classic bite sized appetizers are so simple to prepare, and will be a big hit at any celebration or potluck.
Category: Appetizer
Cuisine: American
Keyword: deviled eggs
Servings: 12 deviled eggs
Calories Per Serving: 50 kcal
Author: JB @ The Grateful Girl Cooks!
Ingredients
  • 6 large eggs , hard boiled (approx. 20 min)
  • 3 Tablespoons very large Tablespoons mayonnaise
  • 1/2 teaspoon prepared yellow mustard
  • salt and pepper , to taste
  • paprika (for use as a garnish)
  • dried parsley flakes (for use as a garnish)
Instructions
  1. Hard boil eggs. Peel, rinse. Cut eggs in half lengthwise. Carefully scoop out the yolk into a small bowl.

  2. Add the mayonnaise and mustard to egg yolk mixture. Season with salt and pepper (add a bit at a time... season to taste)

  3. Using electric mixer or a large spoon, completely mash and mix the ingredients together until mixture is smooth.
  4. Spoon or pipe mixture into eggs. Sprinkle with paprika and dried parsley flakes for garnish. Put eggs on serving plate in covered container. Refrigerate for a couple hours, until ready to serve. Enjoy!

Recipe Notes

The time for hard-boiling the eggs (23 minutes) is included in the prep time.

Nutrition Facts
Creamy Deviled Eggs
Amount Per Serving (1 egg half)
Calories 50 Calories from Fat 18
% Daily Value*
Fat 2g3%
Cholesterol 81mg27%
Sodium 33mg1%
Potassium 30mg1%
Protein 2g4%
Vitamin A 120IU2%
Calcium 12mg1%
Iron 0.4mg2%
* Percent Daily Values are based on a 2000 calorie diet.

Here’s one more to pin on your Pinterest boards!You'll love these yummy, creamy deviled eggs. These classic bite sized appetizers are so simple to prepare, and will be a big hit at any celebration or potluck.

Save

Save

Save

Save

The Pioneer Woman’s Salsa (and how to can it!)

Enjoy The Pioneer Woman’s salsa, an easy, scrumptious, restaurant-style salsa! Recipe also includes instructions for canning it for long term storage!Enjoy The Pioneer Woman's salsa, an easy, scrumptious, restaurant-style salsa! Recipe also includes instructions for canning it for long term storage!
Do you like Mexican food? Our family sure does! Occasionally we go OUT for Mexican food, which always includes a big basket of tortilla chips (or two) and salsa to munch on before dinner is served. Well… I found this recipe for The Pioneer Woman’s (Ree Drummond) Restaurant-Style Salsa on line, and adapted it for canning! It’s SOOOO good!

The thing I like the most about making this salsa is that I can make it (and can it) any time of the year. The recipe calls for canned tomatoes, which is kind of nice, because we all know the very best ripe tomatoes are available during our summer months.

You Can Make This Salsa Any Time Of The Year!

But what if you want to make or can great salsa in the middle of January? (those grocery store tomatoes are kinda gross at times!) Well, with this awesome recipe you can make wonderful restaurant-style salsa (and can it!!!) any month of the year!

I made this salsa and canned it for the first time last July. We saved some to eat “fresh”, and I canned the rest. I was able to can about 10 jars of the salsa (Note: I DOUBLED this recipe), and last month (March 2015), we ate the last of our canned salsa.

Each time we opened a jar, the salsa tasted just as good as the day I made it… and I didn’t have to buy salsa for 8 months! YeeHaw and Awesome!

Do I HAVE To Can This Salsa?

The quick answer is no. You do NOT have to can this salsa! If you are not going to can it, you need to know that this recipe makes a large quantity, AND is as easy as putting all the ingredients into a food processor or blender and pulsing until fully mixed.

Adjust seasonings to taste, and refrigerate salsa for an hour before serving. That’s how easy it is!

How To Make The Pioneer Woman’s Salsa

Get the ingredients together. Prep the onion and jalapeno according to the instructions in the printable recipe at the bottom of this post.

Ingredients used to make the salsa.
Place all ingredients in a large food processor or blender (you may have to prepare this in batches, and then mix all together in a large bowl or pot).

Ingredients for salsa are processed in a food processor.
Pulse or blend until salsa becomes the consistency you prefer. Taste the salsa, and adjust the seasonings to suit your taste.

If You Are NOT Canning This Salsa

The salsa is done at this point if you are not planning to can it for long term storage. Cover the salsa and refrigerate it for one hour before serving with a ginormous bowl of tortilla chips. That’s it!

A large saucepan full of The Pioneer Woman's salsa, ready to eat, or can for storage.

Planning To Can The Pioneer Woman’s Salsa For Long Term Storage?

If you are going to can and preserve the salsa, prepare 5 half-pint jars (or 10 if you are doubling the recipe). Wash canning jars in hot soapy water, rinse, drain, then heat the jars.

To heat the jars, I place the clean jars on a dish towel on a baking sheet. Place jars in a 250 degree oven for 20 minutes, before heating the salsa up for canning.

Jars are cleaned and heated prior to filling them up with salsa.
Heat water in a water bath canner while preparing the salsa and jars for canning (according to manufacturer instructions). Bring the salsa to a boil, then reduce the heat to a gentle boil for 5 minutes, stirring frequently. While this is cooking, put the jar’s flat lids into simmering hot water for 4-5 minutes.

Fill The Jars With The Pioneer Woman’s Salsa For Canning

Ladle the hot salsa into the hot, prepared canning jars, leaving 1/2 inch head space in each jar. Follow instructions in the printable recipe below, to remove air bubbles, and apply the flat lids and rings.

Place the prepared jars of The Pioneer Woman’s salsa onto a rack in canner. Process jars in a gently boiling water bath for 15 minutes (per instructions below in the recipe card).

Jars of salsa are processed in a water bath canner.
Once done, the hot jars of salsa are removed and rest on the counter for 12-24 hours. When completely cooled, test the jars to ensure they have sealed properly, wipe them clean, label the jars, and then they are ready for the pantry.

Processed jars of The Pioneer Woman's salsa ready for the pantry.
Hope you will give this wonderful restaurant-style salsa a try! We sure have enjoyed having absolutely delicious salsa available to us year-round, with only a couple of steps to our pantry to get it!

Looking For More CANNING Recipes?

You can find all of my recipes in the Recipe Index, located at the top of the page. These canning recipes include:

Interested In More Recipes?

Thank you for visiting this website. I appreciate you using some of your valuable time to do soIf you’re interested, I publish a newsletter 2 times per month (1st and 15th) with all the latest recipes, and other fun info. I would be honored to have you join our growing list of subscribers, so you never miss a great recipe!
There is a Newsletter subscription box on the top right side (or bottom) of each blog post, depending on the device you use, where you can easily submit your e-mail address (only) to be included in my mailing list.

You Can Also Find Me On Social Media:

Facebook page: The Grateful Girl Cooks!
Pinterest:
The Grateful Girl Cooks!
Instagram:
jbatthegratefulgirlcooks

Author's signatureRecipe Adapted From: http://thepioneerwoman.com/cooking/2010/01/restaurant-style-salsa/

↓↓ PRINTABLE RECIPE BELOW ↓↓

0 from 0 votes
The Pioneer Woman's Salsa (and how to can it!)
Prep Time
15 mins
Cook Time
0 mins
Canning Processing Time
15 mins
Total Time
30 mins
 

Enjoy The Pioneer Woman's salsa, an easy, scrumptious, restaurant-style salsa! Recipe also includes instructions for canning it for long term storage!

Category: Appetizer, Canning
Cuisine: Southwestern
Keyword: The Pioneer Woman's salsa
Servings: 40 ounces (approx. 5 half-pint jars)
Calories Per Serving: 4 kcal
Author: JB @ The Grateful Girl Cooks!
Ingredients
  • 1 large can (28 ounces) whole tomatoes with juice
  • 20 ounces canned Rotel Tomatoes (2 cans) (10 ounce cans each) (these are diced tomatoes w/ green chiles)
  • 1/4 cup chopped brown onion
  • 1 clove garlic , minced
  • 1 whole jalapeno (quartered, sliced thin, seeds and all)
  • 1/4 teaspoon granulated sugar
  • 1/4 teaspoon salt
  • 1/4 teaspoon ground cumin
  • 1/2 cup fresh cilantro (or more, to suit your taste)
  • the juice from 1/2 of a large lime
Instructions
To make basic salsa:
  1. Place all ingredients into a large food processor or blender (may have to process in batches). Pulse (or blend) until you reach the desired consistency you prefer. Taste the salsa; add more seasonings to suit your taste. If not canning this, refrigerate (covered) for 1 hour, then serve with tortilla chips.
If canning:
  1. Fill canner or large, deep soup pot (with metal rack on bottom) over half full with water. Bring to a simmer over medium heat.
  2. Wash canning jars in hot, soapy water. rinse well; drain. I put the clean jars on a dish towel on a baking sheet in a preheated 250 degree oven for about 25 minutes to heat up.
  3. Prepare salsa according to above directions. Place salsa in a separate large cooking pot.
  4. Once jars are heated, bring salsa to a boil, then reduce heat and simmer/low boil for 5 minutes. While this is cooking, place the jar lids in separate saucepan, cover with water and simmer over medium heat (do not boil) for 4-5 minutes. (Keep lids hot until ready to use).
  5. Work with one jar at a time: Insert funnel into mouth of jar. Ladle the hot salsa into hot jar. Leave 1/2 inch headspace from the top of the jar to the salsa. Slide a non-metallic utensil (plastic knife or rubber spatula work well) into salsa 2-3 times to remove air bubbles. Re-adjust headspace, if necessary, by adding more salsa (only if needed for 1/2 inch headspace).
  6. Wipe rims and threads of jars with a damp cloth so no sauce or food particles remain (food particles left on rim could cause jars to not seal). Place lid on jar (I use a magnetic utensil). Place screw band on jar. Tighten to fingertip tight (do not over-tighten). Place filled jar onto rack in canner. Repeat process until all jars are filled.
  7. Once all jars are in canner, adjust the water level until it covers the tops of the jars by at least one inch. Cover canner with lid; bring water to full rolling boil over high heat. Once water is boiling HARD, start the timing (15 minutes) for processing the salsa. Keep up the rolling boil throughout the cooking process. Process half-pint jars for 15 minutes. At end of processing time, turn the heat off. Remove the canner lid. Let the jars cool in the canner for 5 minutes before removing with tongs.

  8. Lift jars out of canner carefully. Place the jars on a dish towel on counter (where they can be undisturbed) for 24 hours to cool down. Within an hour or so, you should hear a "ping" sound as the jars seal. After 24 hours, check to make sure all jars have sealed, remove band from jar, wipe clean, label, then place in pantry for long term storage.

Recipe Notes

For the sake of the recipe instructions, the prep and cooking time is for making the salsa only.
If you are going to can the salsa, obviously the processing time indicated in recipe instructions will also be involved.
If making this in pint jars, the processing time is 15 minutes in a water bath canner. Making this recipe in half-pint jars yields approx. 5 jars. I DOUBLED the recipe easily, and was able to can 10 half-pint jars.

Nutrition Facts
The Pioneer Woman's Salsa (and how to can it!)
Amount Per Serving (1 Tablespoon)
Calories 4
% Daily Value*
Sodium 21mg1%
Potassium 43mg1%
Carbohydrates 1g0%
Vitamin A 40IU1%
Vitamin C 1.9mg2%
Calcium 6mg1%
Iron 0.2mg1%
* Percent Daily Values are based on a 2000 calorie diet.

Here’s one more to pin on your Pinterest boards!Enjoy The Pioneer Woman's salsa, an easy, scrumptious, restaurant-style salsa! Recipe also includes instructions for canning it for long term storage!


Save

Save

Egg, Cheese & Veggie Breakfast Casserole

My husband and I hosted Easter brunch at our home this year. One of the dishes I made was this Egg, Cheese & Veggie Breakfast Casserole. I wanted a “meatless” egg dish that our son and his girlfriend, who are vegetarians, could enjoy with the rest of us.Egg, Cheese & Veggie Breakfast Casserole / The Grateful Girl Cooks!So… in addition to our Easter ham, roasted potatoes, fresh asparagus, fruit platter, scones and deviled eggs, I made this breakfast casserole. It tasted fantastic… which was a GOOD thing, since I tweaked my own recipe for Ham n’ Cheese Breakfast Soufflé!

I substituted green chiles, broccoli, asparagus, green onions, and red pepper for the meat in the original recipe (and added pepper jack cheese).

The casserole needs to be prepared and refrigerated the night before you bake it, so the bread soaks up a lot of the egg mixture. Other than a little planning ahead, the rest of the casserole is a breeze to throw together… and it was wonderful to have it all assembled on Easter and ONLY have to put it in the oven. Here’s what I did:

I cut the crust off some french bread (any white bread will do), then cut it into cubes and placed it in a baking pan that had been sprayed with non-stick spray.

Egg, Cheese & Veggie Breakfast Casserole / The Grateful Girl Cooks!
I then spread green chiles over the bread cubes, followed by lightly steamed pieces of broccoli, asparagus, followed by green onions, and red peppers.

Egg, Cheese & Veggie Breakfast Casserole / The Grateful Girl Cooks!
The next thing I did was add a layer of grated pepper jack cheese.

Egg, Cheese & Veggie Breakfast Casserole / The Grateful Girl Cooks!
Next was a layer of cheddar cheese.

Egg, Cheese & Veggie Breakfast Casserole / The Grateful Girl Cooks!
I whisked together eggs, milk, half n’ half, salt and spices in a medium sized bowl.

Egg, Cheese & Veggie Breakfast Casserole / The Grateful Girl Cooks!
I poured the egg mixture evenly over the casserole.

Egg, Cheese & Veggie Breakfast Casserole / The Grateful Girl Cooks!
Casserole was covered with plastic wrap and refrigerated over night. The next day I brought the casserole out of the refrigerator about half an hour before baking (to take the chill off).  I baked the casserole for one hour, then removed it to a wire rack to cool down just a bit before cutting into 12 pieces and serving.

Egg, Cheese & Veggie Breakfast Casserole / The Grateful Girl Cooks!
It really was delicious! The leftovers are easily reheated in the microwave and stay quite yummy! Hope you will give this egg, cheese & veggie casserole a try!

Egg, Cheese & Veggie Breakfast Casserole / The Grateful Girl Cooks!

Hope you enjoy this delicious breakfast casserole! Have a great day.

Interested In More Recipes?

Thank you for visiting this website. I appreciate you using some of your valuable time to do soIf you’re interested, I publish a newsletter 2 times per month (1st and 15th) with all the latest recipes, and other fun info. I would be honored to have you join our growing list of subscribers, so you never miss a great recipe!
There is a Newsletter subscription box on the top right side (or bottom) of each blog post, depending on the device you use, where you can easily submit your e-mail address (only) to be included in my mailing list.

You Can Also Find Me On Social Media:

Facebook page: The Grateful Girl Cooks!
Pinterest:
The Grateful Girl Cooks!
Instagram:
jbatthegratefulgirlcooks

Egg, Cheese & Veggie Breakfast Casserole / The Grateful Girl Cooks!

0 from 0 votes
Egg, Cheese & Veggie Breakfast Casserole
Prep Time
20 mins
Cook Time
1 hr
Total Time
1 hr 20 mins
 
A delicious (and meatless) breakfast casserole filled with eggs, cheddar & pepper jack cheese, broccoli, asparagus, scallions, and red peppers.
Category: Breakfast, Casserole
Cuisine: American
Keyword: veggie breakfast casserole
Servings: 12 servings
Calories Per Serving: 226 kcal
Author: JB @ The Grateful Girl Cooks!
Ingredients
  • 10 slices white bread , crusts removed
  • 1 can (4 ounces) chopped green chiles, drained
  • 1 cup grated cheddar cheese
  • 1 cup grated pepper jack cheese
  • 1 cup chopped broccoli (chopped and lightly steamed)
  • 1 cup fresh asparagus (cut into 1 " pieces, and lightly steamed)
  • 2 green onion stalks (white and green sections), sliced
  • 1/4 cup chopped red pepper
  • 6 eggs , slightly beaten
  • 2 cups milk
  • 1 cup half n' half
  • 1 teaspoon salt
  • 3/4 teaspoon dry mustard powder
  • 2 Tablespoons dried parsley flakes
Instructions
  1. Spray a 9x13 pan with non-stick spray.
  2. Remove the crusts from the bread and discard. Cut remaining bread into cubes. Spread bread cubes in prepared baking dish. Add the following ingredients in layers, distributing evenly across the pan:
  3. Add diced green chiles.
  4. Add lightly steamed and chopped broccoli and asparagus. Next, add sliced green onions, and chopped red peppers.
  5. Add grated pepper jack cheese
  6. Add grated cheddar cheese.
  7. In a medium bowl, whisk together the eggs, milk, half n' half, salt, mustard powder, and dried parsley until fully combined. Pour this mixture evenly over the top of the casserole. Cover pan with plastic wrap; refrigerate overnight.
  8. On the day you are going to bake it, remove pan from refrigerator and let it sit for about 30-40 minutes, to take the chill off the pan. While it sits, preheat oven to 350 degrees.
  9. When ready, remove plastic wrap from casserole; place casserole in oven.
  10. Bake for 1 hour at 350 degrees (or until the eggs are "set" in the middle of pan).**If you forget, and end up taking the dish straight from refrigerator to oven, remember to add another 25-30 minutes of baking time!
  11. When casserole is done baking, remove pan to wire rack. Let it cool for about 10 minutes, then cut into serving pieces. This dish is at it's very best when it has had a chance to cool down just a bit. Enjoy!
Recipe Notes

The prep time does not include the overnight refrigeration required for this dish...FYI.

Nutrition Facts
Egg, Cheese & Veggie Breakfast Casserole
Amount Per Serving (1 g)
Calories 226 Calories from Fat 108
% Daily Value*
Fat 12g18%
Saturated Fat 6g38%
Cholesterol 111mg37%
Sodium 541mg24%
Potassium 314mg9%
Carbohydrates 16g5%
Fiber 1g4%
Sugar 5g6%
Protein 12g24%
Vitamin A 820IU16%
Vitamin C 14.4mg17%
Calcium 287mg29%
Iron 1.9mg11%
* Percent Daily Values are based on a 2000 calorie diet.

Here’s one more to pin on your Pinterest boards!Egg, Cheese & Veggie Breakfast Casserole / The Grateful Girl Cooks!


Save

Save

Save

Homemade “Everything” Bagels

Enjoy some delicious homemade everything bagels (New York style) that are made from scratch, boiled, and then baked until chewy and golden brown!Enjoy some delicious homemade everything bagels (New York style) that are made from scratch, boiled, and then baked until chewy and golden brown!

Last week I decided to try another homemade bagel recipe I found on Pinterest. This time I decided to make Homemade Everything Bagels… chewy, boiled-then-baked bagels. These bagels are topped with a mixture of poppy seeds, sesame seeds, minced garlic and dried onion on top.

The original recipe I found only used sesame and poppy seeds, but I added dried minced garlic and dried minced onions for a true “everything” bagel taste. YUM!!!  This recipe makes 8 delicious bagels! Believe it or not, chewy New York style bagels are actually fairly easy to make. Most of the prep time is spent hanging around, waiting for the dough to rise.

I decided about a year and a half ago to make my own bagels, to learn HOW to make bagels, and save some bucks by making my own. I’ve ended up making quite a few varieties of bagels since then.

Scroll Down For A Printable Recipe Card At The Bottom Of The Page

How To Make Homemade Everything Bagels

Here’s what you do to make these homemade everything bagels:  First you make the dough. It didn’t take long at all in my good ol’ stand mixer.

Dough for the bagels is made using a stand mixer.
Mix the dough up, cover it, and then let it rise in a warm spot for about an hour. So far pretty easy, right?

Once dough is mixed together, it is removed and covered while it rises.
After an hour, you can see that the dough has risen to nearly double it’s original size.

Bagel dough has risen to double it's original size.
Flatten the dough with a good punch, to deflate it. The dough is flattened to remove air bubbles and then it needs to rest for 10 minutes.

The dough is punched to deflate it after rising, and placed on flour covered work surface.
Shape The Homemade Everything Bagels

Divide the dough into 8 equal pieces, then form each piece into a ball. Using your fingers, open a hole in the middle of each dough ball. Let the dough rest for another 10 minutes.

Homemade everything bagel dough is shaped into 8 portions.
Make The Everything Seasoning To Top The Bagels

While the bagel dough is “resting”, make the “everything” topping by combining sesame seeds, poppy seeds, minced garlic, and dried onion in a small bowl. Once mixed together, set the mix aside.

Everything toppings are mixed together for the bagels.
Boil the Bagels

Before boiling the bagels, preheat the oven to 425 degrees. Once the dough has finished “resting”, place bagels, two at a time, into a large pan of lightly boiling water. Boil for 1 minute, then flip and cook the other side for 1 minute.

Bagels are boiled for a couple minutes before baking.
TIP FOR TURNING BAGELS: Use two chopsticks to flip the bagels. One on the outside, one in the middle. Works like a charm!

Chopsticks were used to flip bagels during the boiling process.
Top The Boiled Bagels With “Everything” Mixture

Once bagels have been removed from water, place them on a large baking sheet. Sprinkle the top of the wet bagel with the spice mixture, lightly pressing the mixture into the dough to adhere. Finish boiling the remaining bagels using the same process, until all are done and topped with spice mixture, and ready to bake. 

Boiled bagels are topped with everything mix before baking.Time To Bake The Homemade Everything Bagels

Bake the bagels in 425 degree oven for 22-26 minutes (or until golden brown). Remove the cooked bagels to a wire rack to cool slightly. Serve, and enjoy! They taste wonderful with butter and/or cream cheese.

The finished, baked homemade everything bagels are ready to eat.Time to eat these delicious bagels.

If you want to slice and toast the bagels after cooking, be sure to do this under an oven broiler, and not in a standard toaster (because of all the toppings!).

Hope you enjoy these bagels. If you enjoy homemade bagels, be sure to check out my recipes for NY Style blueberry bagels, cranberry orange, and jalapeno cheddar bagels. Other bagel recipes can be found in my Recipe Index, located at the top of the page. Have a great day!

Interested In More Recipes?

Thank you for visiting this website. I appreciate you using some of your valuable time to do soIf you’re interested, I publish a newsletter 2 times per month (1st and 15th) with all the latest recipes, and other fun info. I would be honored to have you join our growing list of subscribers, so you never miss a great recipe!
There is a Newsletter subscription box on the top right side (or bottom) of each blog post, depending on the device you use, where you can easily submit your e-mail address (only) to be included in my mailing list.

You Can Also Find Me On Social Media:

Facebook page: The Grateful Girl Cooks!
Pinterest:
The Grateful Girl Cooks!
Instagram:
jbatthegratefulgirlcooks

Author's signature

Recipe Source: http://deliciouslyyum.com/two-hour-bagels/

↓↓ PRINTABLE RECIPE BELOW ↓↓

0 from 0 votes
Homemade "Everything" Bagels
Prep Time
1 hr 30 mins
Cook Time
22 mins
Total Time
1 hr 52 mins
 

Enjoy some delicious homemade everything bagels (New York style) that are made from scratch, boiled, and then baked until chewy and golden brown!

Category: Breakfast
Cuisine: American
Keyword: homemade everything bagels
Servings: 8 bagels
Calories Per Serving: 241 kcal
Author: JB @ The Grateful Girl Cooks!
Ingredients
  • 2 1/4 teaspoons active dry yeast (1 packet)
  • 2 teaspoons granulated sugar
  • 3 1/2 cups bread flour (plus additional for kneading the dough)
  • 1 3/4 teaspoons salt
  • 1 1/3 cups warm water (110 degrees)
  • 2 Tablespoons Poppy seeds
  • 2 Tablespoons Sesame seeds
  • 1 Tablespoon Minced dried garlic
  • 1 Tablespoon Dried minced onion
Instructions
  1. Place a dough hook onto a stand mixer. Into the bowl of the mixer, add yeast, sugar, flour and salt (in that order). Pour the warm (110 degree) water slowly into the bowl, with machine on low and mix on low for 3-4 minutes to fully incorporate the ingredients together. Once fully combined, increase the speed on the mixer to Medium. Continue kneading the dough on Medium speed for 10 minutes.
  2. Lightly flour a large work surface. Punch down the dough to deflate it, and remove it from the mixer bowl to the floured surface. Cover dough with dish towel; let it rest for 10 minutes.
  3. Dive the dough into 8 equal sized pieces. Using your fingers, flatten each dough ball (to help get rid of air bubbles). Roll each piece into a ball, working the seams toward the underside of each ball with your fingers. Press your finger through the middle of each dough ball, Stretch the hole out a bit, as you form the bagel shape. Place each formed bagel onto parchment paper (or lined baking sheet). Let them rest for another 10 minutes (it's HARD work being bagel dough!)
  4. While the dough is "resting", mix the topping ingredients together into a small bowl. Add more, as desired. Set topping aside.
  5. Preheat oven to 425 degrees. Bring a large pan of water to a rolling boil, then reduce heat to a simmer/low boil.
  6. Carefully put two bagels at a time into the lightly boiling water. Cook for 1 minute. Flip the bagels over; cook for another minute. Remove to baking sheet. While bagels are wet, sprinkle the top with spice mixture, pressing lightly to adhere spices to bagel.
  7. Repeat process with remaining bagels until all are done, and ready to bake.
  8. Bake bagels at 425 degrees for 22-26 minutes (my oven took the full 26 minutes). Bagels should be light golden brown when done. Remove bagels to wire rack to cool slightly, then serve.
  9. Enjoy!
Nutrition Facts
Homemade "Everything" Bagels
Amount Per Serving (1 g)
Calories 241 Calories from Fat 27
% Daily Value*
Fat 3g5%
Sodium 513mg22%
Potassium 133mg4%
Carbohydrates 44g15%
Fiber 3g13%
Sugar 1g1%
Protein 8g16%
Vitamin C 0.2mg0%
Calcium 63mg6%
Iron 1.2mg7%
* Percent Daily Values are based on a 2000 calorie diet.

Here’s one more to pin on your Pinterest boards!Enjoy some delicious homemade everything bagels (New York style) that are made from scratch, boiled, and then baked until chewy and golden brown!


Save

Save

Save

Celebrating…

HappEaster crossy Easter… Happy Resurrection Day! Today I join millions upon millions of people across the world, from every walk of life, who are celebrating Jesus Christ’s resurrection from the dead!

Last evening I watched a TV show called “In An Instant”. It showed the true story of a young man who became buried alive in a huge metal grain mill, full of corn. The first responders and rescue crew absolutely thought he was dead, and went in on a recovery mission to retrieve his body. When interviewing the young man’s father, the father said “the day he went in to that darkness, was absolutely the worst day of my life”. However, when they found the young man alive, but completely submerged trapped in the corn, after several hours they were able to extract him safely. He survived, unbelievably due to a series of “coincidences”. The father then said, “the day he came out of that was the absolute best day of my life!” Hearing the Dad say those words instantly made me think of Easter.

On Good Friday we remember the price Jesus paid as he was horribly beaten, falsely judged, brutally crucified, and died. He entered the darkness of death to pay the price for my sins. The worst day ever. But the good news is HE DIDN’T REMAIN DEAD. Three days later HE ROSE FROM THE GRAVE. Light pierced the darkness, the huge stone rolled away, and  He came out into light… ALIVE. The BEST day ever, because IT CHANGED EVERYTHING. I am forever grateful that God “pursued” me… and because I have trusted in His son, I will spend eternity with Him… Because of Jesus!

Celebrating EasterAuthor's signature

Interested In More Recipes?

Thank you for visiting this website. I appreciate you using some of your valuable time to do soIf you’re interested, I publish a newsletter 2 times per month (1st and 15th) with all the latest recipes, and other fun info. I would be honored to have you join our growing list of subscribers, so you never miss a great recipe!
There is a Newsletter subscription box on the top right side (or bottom) of each blog post, depending on the device you use, where you can easily submit your e-mail address (only) to be included in my mailing list.

You Can Also Find Me On Social Media:
Facebook page: The Grateful Girl Cooks!
Pinterest: The Grateful Girl Cooks!
Instagram: jbatthegratefulgirlcooks


Quinoa Enchilada Casserole (Meatless!)

This meatless quinoa enchilada casserole, with black beans, corn, spices, enchilada sauce and cheese will be enjoyed by everyone, vegetarian or not!This meatless quinoa enchilada casserole, with black beans, corn, spices, enchilada sauce and cheese will be enjoyed by everyone, vegetarian or not!

I am always on the lookout for a meatless entree I can serve when we have our Vegetarian son and his girlfriend over for dinner!  I found a recipe for a Quinoa Enchilada Casserole on Pinterest and decided to give it a “taste-test” before offering it up for a family get-together!

Our youngest son (the one who used to love huge steaks and hamburgers) became a vegetarian a few years ago. His girlfriend is also a vegetarian. That complicated things a bit, making dinners more challenging for our “family get-togethers”, so I’m glad I tried this recipe! I only “tweaked” the original recipe just a little bit!

The quinoa enchilada casserole was delicious, and really easy to prepare! If you like a good enchilada, or enjoy a meatless meal occasionally like we do (one with loads of flavor), you will like this recipe… meat eater or not!

Scroll Down For A Printable Recipe Card At The Bottom Of The Page

How To Make Quinoa Enchilada Casserole

Prepare the quinoa according to package directions. When done, place quinoa in large bowl. Add the green chiles, corn, black beans, cilantro, green onion, cumin, garlic powder, and chili powder.

Cooked quinoa and other ingredients for casserole in mixing bowl.
Add the enchilada sauce, salt and pepper to the quinoa. Stir well, to fully blend all the ingredients.

Enchilada sauce is added to quinoa and casserole ingredients.
Add a half cup of cheddar cheese and a half cup of pepper jack cheese, and stir until fully combined.

Grated cheddar and jack cheeses are added to casserole ingredients.
Bake The Quinoa Enchilada Casserole

Pour the mixture into a lightly greased (or sprayed) 8×8 inch baking dish. Spread the casserole mixture evenly in the dish. Sprinkle the remaining jack and cheddar cheeses on top. Bake the quinoa enchilada casserole for 20-25 minutes at 375 degrees, or until the cheese is bubbly and fully melted. Remove the casserole to a wire rack.

Quinoa enchilada casserole is placed into an 8x8 baking dish
To Serve The Quinoa Enchilada Casserole

Garnish the top of the casserole with chopped tomato and cilantro. The tomatoes and cilantro not only add a pop of color, they add wonderful flavor to this quinoa enchilada casserole, too! Serve, and enjoy!

Baked quinoa enchilada casserole is garnished with cilantro and tomatoes.

A Note About SERVING This Casserole

When served piping HOT, fresh from the oven, the texture of the quinoa casserole makes it necessary that it be scooped out with a spoon, rather than cut into pieces with a knife.

I refrigerated the leftovers and the next day was able to cut it into pieces (while chilled) and get this photo so you can see accurately what it looks like on the inside. Once cut, I microwaved the quinoa enchilada casserole to reheat it… and it tasted fantastic!

Quinoa Enchilada Casserole (Meatless!) / The Grateful Girl Cooks!

Hope you will consider trying this recipe for quinoa enchilada casserole. It is packed with flavor (even without meat!) and tastes great! Have a great day, and come back soon.

Looking For More QUINOA Recipes?

All of my recipes can be found in the Recipe Index, located at the top of the page. A few favorite recipes using quinoa include:

Interested In More Recipes?

Thank you for visiting this website. I appreciate you using some of your valuable time to do soIf you’re interested, I publish a newsletter 2 times per month (1st and 15th) with all the latest recipes, and other fun info. I would be honored to have you join our growing list of subscribers, so you never miss a great recipe! 

There is a Newsletter subscription box on the top right side (or bottom) of each blog post, depending on the device you use, where you can easily submit your e-mail address (only) to be included in my mailing list.

You Can Also Find Me On Social Media:

Facebook page: The Grateful Girl Cooks!
Pinterest:
The Grateful Girl Cooks!
Instagram:
jbatthegratefulgirlcooks

Have a GREAT day!

Author's signature

Original Recipe (slightly adapted) from: http://damndelicious.net/2014/07/07/quinoa-enchilada-casserole/

0 from 0 votes
Quinoa Enchilada Casserole (Meatless!)
Prep Time
20 mins
Cook Time
20 mins
Total Time
40 mins
 
This meatless quinoa enchilada casserole, with black beans, corn, spices, enchilada sauce and cheese will be enjoyed by everyone, vegetarian or not!
Category: Meatless Entree
Cuisine: Mexican
Keyword: quinoa enchilada casserole
Servings: 6 servings
Calories Per Serving: 290 kcal
Author: JB @ The Grateful Girl Cooks!
Ingredients
For Casserole:
  • 1 cup quinoa (uncooked)
  • 1 10 ounce can (10 ounces) enchilada sauce
  • 1 4.5 ounce can (4.5 ounce) chopped green chiles (drained)
  • 3/4 cup corn kernels (frozen or canned...doesn't matter)
  • 3/4 cup canned black beans (drained, rinsed)
  • 2 Tablespoons chopped fresh cilantro
  • 1 green onion stalk (green/white parts, sliced)
  • 1/2 teaspoon cumin
  • 1/4 teaspoon garlic powder
  • 1/2 teaspoon chili powder
  • 1/4 teaspoon cayenne pepper
  • Pinch Salt and pepper (to taste)
  • 1 cup grated cheddar cheese (divided)
  • 1 cup pepper jack cheese (divided)
For Garnish:
  • 1 Roma tomato , (diced)
  • 2 Tablespoons chopped fresh cilantro
Instructions
  1. Preheat oven to 375 degrees. Spray an 8x8 inch baking pan with non-stick spray.
  2. Cook quinoa in 2 cups of water (per package directions).
  3. In a large mixing bowl, place the cooked quinoa, green chiles, corn, black beans, cilantro, green onion, cumin, chili powder, garlic powder and cayenne pepper.
  4. Add enchilada sauce, and salt and pepper to taste. Stir to combine.
  5. Add 3/4 cup of cheddar cheese and 3/4 cup of pepper jack cheese. Mix well to combine.
  6. Pour quinoa mixture into prepared baking dish. Spread evenly in dish. Top the casserole with the rest of the cheddar and pepper jack cheeses.
  7. Bake casserole (uncovered) in a 375 degree oven for about 20-25 minutes. Cheese should be melted and very bubbly around edges of pan.
  8. Remove baking dish to a wire rack. Let it cool for a couple minutes. Garnish the top of casserole with diced tomatoes and chopped cilantro. Spoon the casserole out onto serving plates. Serve, and enjoy!
Recipe Notes

Another option: Original recipe used chopped ripe avocados as a garnish (instead of cilantro).

Nutrition Facts
Quinoa Enchilada Casserole (Meatless!)
Amount Per Serving (1 g)
Calories 290 Calories from Fat 126
% Daily Value*
Fat 14g22%
Saturated Fat 7g44%
Cholesterol 36mg12%
Sodium 346mg15%
Potassium 312mg9%
Carbohydrates 26g9%
Fiber 4g17%
Sugar 1g1%
Protein 15g30%
Vitamin A 550IU11%
Vitamin C 2.7mg3%
Calcium 297mg30%
Iron 2.2mg12%
* Percent Daily Values are based on a 2000 calorie diet.

Here’s one more to pin on your Pinterest boards!This meatless quinoa enchilada casserole, with quinoa, black beans, corn, spices, enchilada sauce and cheese will be enjoyed by everyone, vegetarian or not!


Save

Save