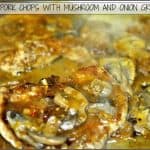
Pork chops with mushroom and onion gravy is a quick and easy meal for on-the-go families. Recipe makes 4 servings and tastes GREAT! 
A few weeks ago, I made these delicious Pork Chops With Mushroom And Onion Gravy for our dinner. I had some pork chops thawed out, that I wanted to use for our meal.
After thinking about HOW I wanted to cook them, I decided spontaneously to make a delicious gravy to cook with them for flavor, AND could be served on top of them.
I used a mushroom and onion gravy from a Salisbury Steak recipe I had posted previously, to cook with the pork chops. That was a very good decision!
These pork chops were easy to prepare AND incredibly delicious with the mushroom and onion gravy! We love them, and I’m confident you will too! Here’s how to make them.
Pan-Sear The Pork Chops Then Sauté The Onions
Sear bone-in pork chops in olive oil in a large skillet, over medium/high heat, until lightly browned on both sides. This usually will take about 3-4 minutes per side.
NOTE: You are not going to cook them all the way through at this point, but get them nice and browned on both sides.
OPTIONAL: If desired, you can lightly season the pork chops (before cooking) with seasoning salt (optional, but good).
Once the pork chops are nicely browned on both sides, transfer them out of the skillet and keep them warm while you make the gravy.


Drain off remaining grease left in the skillet (but do not wipe the pan clean!). Add thinly sliced onions and sauté them in the same skillet until tender.

Make The Mushroom And Onion Gravy
Now add the rest of the gravy ingredients to the tender onions, and cook, stirring often until the gravy thickens. These gravy ingredients are beef broth, sliced mushrooms, Worcestershire sauce, ketchup and corn starch. Add salt and pepper, to suit your taste.
Place the previously browned pork chops back into the gravy in the skillet, and spoon mushroom and onion gravy over the top. Continue cooking until the pork chops are fully cooked through.
This usually will take about 10-12 minutes to fully cook the pork chops through, but if the chops you are using are quite thick, it may take a couple minutes longer.
Serve The Pork Chops With Mushroom And Onion Gravy
Serve the hot pork chops with the gravy and lots of mushrooms and onions spooned over the top of each one.
 That’s it… I told you it was easy! And trust me when I tell you that these pork chops are wonderfully delicious. They are even better when accompanied by a serving of mashed potatoes, topped with a bit of the gravy. Yum, yum, yum.
Sure hope you’ll give this recipe for pork chops with mushroom and onion gravy a try! Thanks for stopping by, and please come back again soon for more family-friendly recipes!
Looking For More PORK CHOP Recipes?
You can find ALL of my recipes in the Recipe Index, which is located at the top of the page. I have some delicious recipes using pork chops, including:
- Easy Baked Pork Chops
- Creamy Honey Dijon Pork Chops
- Brown Sugar Pork Chops
- Air Fryer Pork Chops For Two
- Pork Chops In Sour Cream Sauce
Want More Recipes? Get My FREE Newsletter!
I publish a newsletter 2 times per month (1st and 15th) with lots of recipes, tips, etc..
Would you like to join our growing list of subscribers?
There is a Newsletter subscription box on the top right (or bottom) of each blog post, depending on the device you use.
You can submit your e-mail address there, to be added to my mailing list.
Find Me On Social Media:
Facebook page: The Grateful Girl Cooks!
Pinterest: The Grateful Girl Cooks!
Instagram: jbatthegratefulgirlcooks
 Original gravy recipe is from: http://tastykitchen.com/recipes/main-courses/salisbury-steak-4/
↓↓ PRINTABLE RECIPE BELOW ↓↓
Pork chops with mushroom and onion gravy is a quick and easy meal for on-the-go families. Recipe makes 4 servings and tastes GREAT!
- 4 bone-in pork chops can lightly season w/ seasoning salt (opt.)
- 1 Tablespoon olive oil
- 1 Tablespoon butter
- 1 whole brown onion , halved then thinly sliced
- 2 cups beef broth
- 1 small can sliced mushrooms
- 4 dashes Worcestershire sauce
- 1 Tablespoon ketchup
- 1 teaspoon corn starch , (mixed with a little bit of the beef broth to blend into a thin paste)
- Salt and pepper , to taste
In large skillet, heat the olive oil and butter on medium high until very hot.
Add pork chops in single layer to skillet. They should sizzle. Cook chops 3-4 minutes, then turn and cook other side for 3-4 minutes. Pork chops should be nicely browned in color. Remove pork chops to wire rack. Drain grease, but do NOT wipe the pan clean.
Prepare gravy: Reduce heat to medium; add sliced onions to the skillet. Cook onions, stirring occasionally, for several minutes until golden brown and tender.
Mix cornstarch with a little bit of beef broth to make a paste. Add this, plus remaining beef stock, mushrooms, Worcestershire sauce, and ketchup to onions in skillet. Stir well, to combine. If desired, season to taste with salt and pepper. Cook on medium heat until sauce comes to a light boil and thickens (1-2 minutes).
Gently add pork chops back into skillet. Spoon gravy, onions and mushrooms over the meat; continue to cook on medium heat for 10-12 minutes, until pork chops are fully cooked/heated through. Continue to spoon gravy, onions, and mushrooms over pork chops while they cook.
When done, transfer pork chops to serving plates. Spoon some mushrooms, onions, and gravy over top of meat. Serve, and enjoy!
The bone-in chops I used were about an inch thick. If using thicker pork chops, add more cooking time, to ensure they are fully cooked.
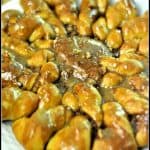
Here’s one more to pin on your Pinterest boards!


, so there's plenty for everyone to enjoy! / The Grateful Girl Cooks!")


, so there's plenty for everyone to enjoy! / The Grateful Girl Cooks!")