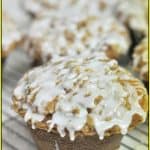
Enjoy one of these jumbo lemon coffee cake muffins with lemon glaze, and start the day with a smile! Make 6 JUMBO muffins or 12 regular muffins.
Anyone out there want a JUMBO sized Lemon Coffee Cake Muffin for breakfast? Here’s a recipe I found on Pinterest that makes 6 tasty jumbo sized (or 12 small) muffins!
I tried this recipe because it looked good, and I love lemon flavored muffins, cupcakes, scones, etc.). Anyways, I received a jumbo muffin pan (6 cups) as a gift, and was aching to give it a “test drive”, so this is the recipe I chose.
I made these muffins several months ago, but am just now getting around to posting the recipe. It’s fairly straightforward and easy to make these lemon coffee cake muffins. Because I chose to make JUMBO muffins, the calorie count is high, but you can easily make 12 “normal” sized muffins (for less calories).
Scroll Down For A Printable Recipe Card At The Bottom Of The Page
Make The Streusel Topping
Mix up the flour, brown sugar, salt and cold butter for the streusel with a pastry cutter. You could also use a food processor and give it a few pulses.

Once mixed, the butter in the streusel should be about the size of small peas. When the streusel is done, refrigerate it until ready to add to the muffin tops.

Make The Lemon Muffin Batter
To make the muffin batter, combine flour, baking powder, baking soda, and salt in a large bowl, and then set aside. In a mixing bowl (or stand mixer), beat the butter and granulated sugar on medium low power until creamy.

Stir in lemon zest, then add one egg at a time (while beating on LOW). Add the vanilla, and blend well (making sure to scrape down sides of bowl). Pour in 1/3 of the buttermilk, then 1/3 of flour mixture, and continue beating on low. Add the rest of the buttermilk and flour in 1/3 increments until all have been incorporated..

Evenly divide the batter into 6 large greased or buttered muffin cups (or 12, for smaller muffins).

Top each muffin with the streusel topping. Completely cover the top of each muffin.

Bake The Lemon Coffee Cake Muffins
Bake the muffins at 350 degrees for 45-55 minutes or until done. Stick a toothpick into the center of a muffin to test for doneness. If it comes out clean (without batter), then the lemon coffee cake muffins are done. Remove the muffin tin to a wire rack to let the muffins cool when they are finished baking. Let the muffins cool completely in the muffin tin.
Make The Lemon Glaze While Muffins Cool
While muffins are cooling, make the lemon glaze, by mixing powdered sugar and fresh squeezed lemon juice until smooth.

Time To Glaze The Lemon Coffee Cake Muffins!
Once the muffins have cooled, gently transfer them out of the muffin tin to a wire rack. Place aluminum foil under the rack to catch any drips from the glaze! When the lemon coffee cake muffins are at room temperature, drizzle the lemon glaze over the top of each one. I even let it run down the sides! Let the glaze firm up, then serve, and enjoy!

Hope you enjoy these lemon coffee cake muffins! Have a great day. The JUMBO muffins have lots of calories, so I’ve also included the caloric count for standard sized muffins in the printable recipe below, as well. Have a good day!
Looking For More MUFFIN Recipes?
You can find all of my muffin recipes in the Recipe Index, located at the top of the page. I have quite a few muffin recipes, including:
- Apple Raisin Muffins
- Banana Crumb Muffins
- Carrot Cake Muffins
- Blueberry Lemon Muffins
- Chocolate Chip Muffins
Interested In More Recipes?
Thank you for visiting this website. I appreciate you using some of your valuable time to do so. If you’re interested, I publish a newsletter 2 times per month (1st and 15th) with all the latest recipes, and other fun info. I would be honored to have you join our growing list of subscribers, so you never miss a great recipe!
There is a Newsletter subscription box on the top right side (or bottom) of each blog post, depending on the device you use, where you can easily submit your e-mail address (only) to be included in my mailing list.
You Can Also Find Me On Social Media:
Facebook page: The Grateful Girl Cooks!
Pinterest: The Grateful Girl Cooks!
Instagram: jbatthegratefulgirlcooks

Recipe Source: http://www.simplyscratch.com/2011/07/jumbo-lemon-coffee-cake-muffins.html
Enjoy one of these jumbo lemon coffee cake muffins with lemon glaze, and start the day with a smile! Make 6 JUMBO muffins or 12 regular muffins.
- 2 cups all purpose flour
- 1 teaspoon baking powder
- 1 teaspoon baking soda
- 1 teaspoon salt
- 1/2 cup butter , room temperature
- 1 cup granulated sugar
- 1 1/2 Tablespoons Lemon Zest
- 2 large eggs
- 1 teaspoon vanilla extract
- 1 cup buttermilk
- 1 3/4 cup all purpose flour
- 3/4 cup brown sugar
- 1 teaspoon salt
- 3/4 cup butter , chilled
- 1 cup powdered sugar
- 3 Tablespoons fresh squeezed lemon juice
- Preheat your oven to 350 degrees. Butter or spray a jumbo (6 cup) muffin pan OR a regular 12 cup muffin pan.
- Make the streusel by combining flour, brown sugar and salt. Cut in chilled butter with a pastry cutter OR pulse in a food processor until butter is size of small peas and evenly distributed. Refrigerate mix.
- To make muffins: Whisk the flour, baking powder, baking soda, and salt together in large bowl; set this aside. In a separate bowl (or stand mixer), beat the butter and sugar on medium low until mixture is creamy. Add the lemon zest, then slowly add one egg at a time (while beating on low and scraping down edges), until fully combined. Add vanilla extract and blend.
- Alternate adding 1/3 of buttermilk and 1/3 of the flour mixture, blending together until all has been added and mixed into batter. Divide batter into 6 greased jumbo muffin cups (or 12 regular muffin cups). Distribute the streusel over the entire surface of each muffin.
Bake muffins (jumbo sized) in 350 preheated oven for 45-55 minutes, or until done. (If you are making 12 regular sized muffins, make sure to reduce the cooking time!). You can test for doneness by inserting a toothpick into center of muffin. If it comes out clean, muffins are done. Let muffins cool completely in the pan, then remove muffins to a wire rack (with a piece of aluminum foil underneath to catch drips from glaze).
- To make glaze, whisk the powdered sugar and fresh lemon juice together. Drizzle the glaze over the tops of the cooled muffins. Let sit until glaze firms up, then serve and enjoy!
NOTE: If making 12 muffins (standard size), the calories per muffin is 492. Remember to reduce cooking time if you are preparing 12 muffins instead of 6 jumbo sized muffins.
Here’s one more to pin on your Pinterest boards!