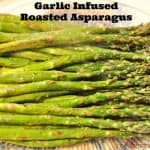
Fresh oven roasted asparagus, lightly drizzled with garlic infused olive oil, is easy to make, and a wonderfully flavored, delicious vegetable side dish!
There’s nothing like the abundance and great taste of fresh asparagus in the Springtime! It’s especially tasty when it is Garlic Infused Roasted Asparagus! Roasted in the oven, with garlic infused olive oil flavor… YUM!
I love fresh asparagus, either steamed or roasted, but roasting it is my favorite way to make it. It’s very simple to make this delicious vegetable side dish.
Scroll Down for A Printable Recipe Card At The Bottom Of The Page
Here’s How To Make Garlic Infused Roasted Asparagus
The first thing to do is infused garlic into oil. To do this, add olive oil to a small skillet. Turn heat to medium. Lightly smash 3 medium sized garlic cloves (if small, use 4). Remove the peel, then add the smashed cloves to the oil in skillet. Cook until the oil starts to get bubbly around the garlic pieces.
Once it starts bubbling, turn the heat down to LOW. Continue cooking until it gets heated through, but do not let the garlic turn brown or burn (if you overcook the garlic it will become very bitter tasting!)

Once the oil is heated through, remove the garlic from the oil; discard garlic. Trim the thick bottom ends off of each asparagus stalk (I snap the ends). Arrange the asparagus stalks in a single layer on a large baking sheet. Pour the garlic infused olive oil over the asparagus.

Toss to fully coat the asparagus with the garlic infused oil, and then season with salt and pepper.

Time to Cook The Garlic-Infused Roasted Asparagus
Roasted asparagus bakes in a preheated 450 degree oven for a total of 12-15 minutes. Note that the cooking time can vary, depending on the size of the asparagus stalks!
Keep an eye on the roasted asparagus at the 10 minute mark. We once had dinner guests and I forgot to check on them (got really busy in the kitchen). Because I was using teensy, tiny asparagus stalks, I killed them. True story! With dinner guests in attendance… oh the horror!
After the asparagus has cooked for 6 minutes (halfway through cooking time), flip the asparagus over to the other side, and continue baking for the remainder of baking time. See how the asparagus has begun to roast up in the photo below? This is a good thing!

Once the asparagus is done, remove from oven. It’s ready to serve! The asparagus is fantastic with a bit of shaved Parmesan cheese on top, too!
When I took these photos I was making this for a meal with a vegan in attendance (no dairy!), so I left the fresh Parmesan curls off as a garnish, but trust me… it’s delicious BOTH ways!
Do You Enjoy Vegetable Side Dishes?
If you enjoy vegetable dishes, be sure to check out my recipe for Oven Roasted Carrots, Brussel Sprouts with Bacon, Brown Butter Green Beans, or Fresh Corn Sauté, plus many vegetable dishes, all listed in the Recipe Index at the top of each page.
It’s a gorgeous day here in the great Pacific Northwest, so I’m gonna head outside in the fresh air and sunshine while it’s here! Have a fantastic day!
Interested In More Recipes?
Thank you for visiting this website. I appreciate you using some of your valuable time to do so. If you’re interested, I publish a newsletter 2 times per month (1st and 15th) with all the latest recipes, and other fun info. I would be honored to have you join our growing list of subscribers, so you never miss a great recipe!
There is a Newsletter subscription box on the top right side (or bottom) of each blog post, depending on the device you use, where you can easily submit your e-mail address (only) to be included in my mailing list.
You Can Also Find Me On Social Media:
Facebook page: The Grateful Girl Cooks!
Pinterest: The Grateful Girl Cooks!
Instagram: jbatthegratefulgirlcooks

- 2 bunches fresh asparagus , thick ends trimmed
- 2 1/2 Tablespoons olive oil
- 3 medium sized garlic cloves (4, if small), lightly smashed, then peeled.
- approx. 1/2 teaspoon salt and 1/2 teaspoon black pepper
- Freshly shaved Parmesan cheese curls , if desired, for garnish
- Preheat oven to 450 degrees.
- Smash and peel garlic cloves. Add them to olive oil in a small skillet. Heat oil on a MEDIUM heat. Once the oil around the cloves begins to bubble up a bit, make sure to turn the heat down to LOW. Cook until heated through, but be careful not to brown or burn the garlic (cause it makes the garlic have a bitter taste-not good!). Remove from heat; discard the garlic cloves.
- Place the trimmed asparagus stalks onto a large baking sheet, in a single layer. Pour the infused olive oil over the asparagus. Toss gently to fully coat with the oil, then season with salt and pepper.
- Bake in preheated 450 degree oven for 6 minutes. Flip the asparagus over, and cook for an additional 6-8 minutes, until roasted through. Check the stalks to ensure you do not overcook them (last half of cooking time will vary, due to various sizes of asparagus stalks).
- Serve while hot. Garnish with freshly shaved Parmesan cheese curls, if desired.
Caloric calculation does not include garnish of shaved Parmesan cheese (optional).
Here’s one more to pin on your Pinterest boards!
 , that can be made in 20 minutes, for a fraction of the cost of takeout! / The Grateful Girl Cooks!")


 , that can be made in 20 minutes, for a fraction of the cost of takeout! / The Grateful Girl Cooks!")


 / The Grateful Girl Cooks!")
 / The Grateful Girl Cooks!")
 / The Grateful Girl Cooks!")
 / The Grateful Girl Cooks!")
 / The Grateful Girl Cooks!")