Month: June 2021

Grandma’s Red Velvet Cake

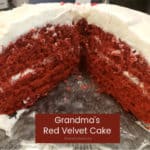
My Grandma’s Red Velvet Cake recipe (from scratch) was handed down to me 45 years ago and has been a delicious family favorite ever since!My Grandma's Red Velvet Cake recipe (from scratch) was handed down to me 45 years ago and has been a delicious family favorite ever since!

For the past several years, red velvet cakes have been all the rage, and that makes me happy. For me personally, red velvet cakes are a part of my heritage. My Grandma Grace in Texas made them, then gave her recipe to my mom (her daughter-in-law), who then gave me Grandma’s recipe over 45 years ago. Talk about handing down traditions! Grandma’s red velvet cake has always been special to me, because my mom made them for our birthdays when I was growing up. Guess what? I loved them then as much then as I do now.

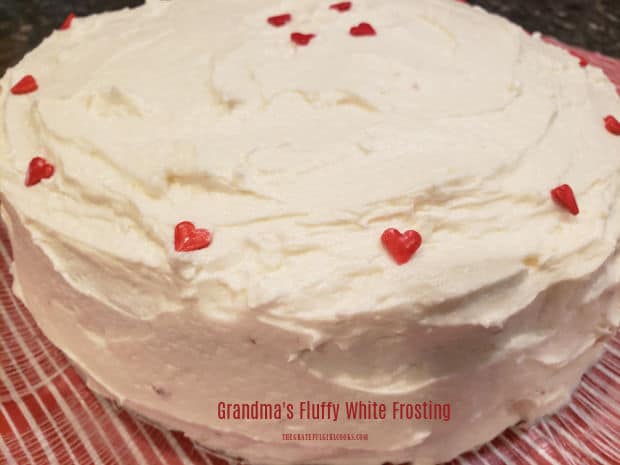
There’s just something about seeing that gorgeous red color in each slice that flood my heart with so many wonderful memories! A lot of red velvet cakes nowadays top the cake with cream cheese frosting, but my Grandma’s recipe uses a fluffy white frosting (without cream cheese). It takes just a bit longer to make the frosting, but that’s part of the charm! Plus, it’s delicious! Today I want to share my recipe for Grandma’s red velvet cake with you, and hope you will enjoy it, too. Here’s how to make it:

Scroll Down For A Printable Recipe Card At The Bottom Of The Page

Prepare the Cake Batter

Using an electric mixer or stand mixer, cream together granulated sugar and vegetable shortening until well combined. Add the red food coloring and two eggs. Continue mixing until the batter is deep red in color and creamy in texture.

Granulated sugar and vegetable shortening are creamed together with an electric mixer.Red food coloring and eggs are added and mixed into the cake batter.

In a separate bowl, SIFT together flour, salt and cocoa powder. Add these dry ingredients to the batter, and beat on low speed until the flour mixture has been fully incorporated.

Mix buttermilk and baking soda together in a separate bowl, and fold them into the batter. Next, add the vanilla extract and vinegar to the batter and stir until combined. This is the batter for Grandma’s red velvet cake.

Dry ingredients (with flour and cocoa, etc.) are added to the cake batter.After adding more ingredients, the batter for Grandma's Red Velvet Cake is ready for baking.

Bake Grandma’s Red Velvet Cake

Now it’s time to bake the cake. Generously grease and flour two 9″ round cake pans OR a 13×9″ baking pan on the bottom and sides, and then pour the batter into the pan(s). If using two round cake pans, evenly divide the batter between them.

Bake in a preheated 350°F. oven (on middle rack) for approximately 25 minutes, or until a toothpick inserted into the top of the cake comes out clean. Once done, transfer the cake pans to a wire rack to cool.

Greased/floured cake pans are filled with batter for the red velvet cake, and put in oven to bake.Two pans of red velvet cake cooling on wire racks after baking.

Make The Frosting For The Cake

While the cake is baking, you can make the fluffy white frosting for the finished cake. Mix milk, cornstarch and salt in a saucepan. Cook this on low heat, stirring often until the mixture thickens. Remove the pan from the heat, and set it aside to cool.

In a separate bowl, (or stand mixer bowl) place vegetable shortening, butter, granulated sugar, and part of the powdered sugar (2/3 cup). Beat these ingredients really well for 15 minutes (yes… 15 minutes!). When done, the sugar will have dissolved and no longer be “grainy”, and the mixture should be light and fluffy in texture. Add vanilla extract and the cooled, thickened milk mixture. Beat well, then add the remaining cup of powdered sugar, and mix well, until combined. This is your fluffy white frosting.

Milk, cornstarch and salt (for the cake frosting) cook until thickened.The frosting for Grandma's red velvet cake is mixed for at least 15 minutes, until very fluffy.

Frosting the Cake

If you baked this in a 13×9″ baking pan, you are ready to frost the cake (in the pan), once it has cooled completely. If you are using two round cake pans, you will need to remove them from the pans (by inverting pan upside down), once they have cooled completely. Place one layer onto a serving plate, and frost the top.

Lay the second cake layer on top of the frosting. Continue to frost the cake on top and and on all sides. Garnish or decorate the frosted cake any way you wish once fully frosted. This time I went simple, as you can tell from the photos below.

Layers of cake are frosted, and then the sides of the cake are frosted, too.Grandma's red velvet cake is completely frosted and ready to slice and eat!

Time For A Slice of Grandma’s Red Velvet Cake!

All that is left to do is cut a nice big slice of Grandma’s red velvet cake, grab a fork, and dig in! The fluffy white frosting is a nice, light touch that contrasts well with the beautiful red hue of the cake. Grandma’s red velvet cake is so yummy, moist, and RED! Sure hope you enjoy it, too!

A slice of Grandma's red velvet cake ready to eat, on a white plate.

Thank you for stopping by today. I really hope you have the opportunity to make this delicious dessert for those you love. Please come back again soon for more recipes. Have a wonderful day.

Looking For More CAKE Recipes?

You can find all of my recipes in the Recipe Index, located at the top of the page. I have quite a few cake recipes you’re gonna love, including:

Interested In More Recipes?

Thank you for visiting this website. I appreciate you using some of your valuable time to do soIf you’re interested, I publish a newsletter 2 times per month (1st and 15th) with all the latest recipes, and other fun info. I would be honored to have you join our growing list of subscribers, so you never miss a great recipe!
There is a Newsletter subscription box on the top right side (or bottom) of each blog post, depending on the device you use, where you can easily submit your e-mail address (only) to be included in my mailing list.

You Can Also Find Me On Social Media:

Facebook page: The Grateful Girl Cooks!
Pinterest:
The Grateful Girl Cooks!
Instagram:
jbatthegratefulgirlcooks

Author's signature

Original recipe source: my Grandma, Grace B.

5 from 3 votes
Grandma's Red Velvet Cake
Prep Time
20 mins
Cook Time
25 mins
Total Time
45 mins
 

My Grandma's Red Velvet Cake recipe (from scratch) was handed down to me 45 years ago and has been a delicious family favorite ever since!

Category: Dessert
Cuisine: American
Keyword: Grandma's red velvet cake
Servings: 12
Calories Per Serving: 545 kcal
Author: JB @ The Grateful Girl Cooks!
Ingredients
For Cake:
  • ½ cup vegetable shortening
  • cups granulated sugar
  • 2 ounces red food color
  • 2 large eggs
  • 2 cups all purpose flour
  • 1 teaspoon salt
  • 2 Tablespoons cocoa powder (for baking)
  • 1 cup buttermilk
  • 1 teaspoon baking soda
  • 2 Tablespoons vanilla extract
  • 1 Tablespoon white vinegar
For Frosting:
  • 1 cup milk
  • Tablespoons cornstarch
  • 1 pinch salt
  • ½ cup vegetable shortening
  • ½ cup butter , softened
  • cup granulated sugar
  • 1⅔ cups powdered sugar , divided use
  • 1 teaspoon vanilla extract
Instructions
  1. Preheat oven to 350°F. Generously grease and flour two 9" round cake pans or one 13"x9" baking pan on bottom and sides.

  2. Using electric mixer or stand mixer, cream together granulated sugar and vegetable shortening until well combined. Add red food coloring and eggs. Continue mixing until batter is deep red in color and creamy in texture.

  3. In separate bowl, SIFT together flour, salt and cocoa powder. Add this mixture to the batter; beat on low speed until fully incorporated. Mix buttermilk and baking soda together in a separate bowl; fold them into batter. Add vanilla and vinegar; stir until combined.

  4. Pour batter into prepared pan(s). If using two round cake pans, evenly divide batter between them. Bake at 350°F. (on middle rack) for approximately 25 minutes, or until a toothpick inserted into top of the cake comes out clean. Transfer pan(s) to a wire rack to cool.

Make Frosting While Cake Is Baking:
  1. Mix milk, cornstarch and salt in medium saucepan. Cook on low heat, stirring often until mixture thickens. Remove pan from heat; set aside to cool. In a separate bowl, (or stand mixer bowl) place shortening, butter, granulated sugar, and 2/3 cup of powdered sugar. Beat really well for 15 minutes (yes... 15 minutes!). When done, sugar will have dissolved and no longer be "grainy"; frosting should be light/fluffy in texture. Add vanilla extract and cooled, thickened milk mixture. Beat well, then add remaining cup of powdered sugar, and mix well, until combined.

Frost Cake After It Cools Completely:
  1. If using a 13x9" baking pan, frost the cake (still in the pan), once it has cooled completely. If using two round cake pans, remove them from the pans (by inverting pan upside down), once they have cooled completely. Place one layer onto a serving plate, and frost the top. Lay the second cake layer on top of the frosting. Continue to frost the cake on the top and and side. Once cake is completely frosted, decorate it any way you want. Slice and enjoy!

Nutrition Facts
Grandma's Red Velvet Cake
Amount Per Serving (1 slice (1/12th of total))
Calories 545 Calories from Fat 243
% Daily Value*
Fat 27g42%
Saturated Fat 10g63%
Trans Fat 3g
Cholesterol 55mg18%
Sodium 400mg17%
Potassium 110mg3%
Carbohydrates 72g24%
Fiber 1g4%
Sugar 55g61%
Protein 5g10%
Vitamin A 353IU7%
Calcium 60mg6%
Iron 1mg6%
* Percent Daily Values are based on a 2000 calorie diet.

Here’s one more to pin on your Pinterest boards!My Grandma's Red Velvet Cake recipe (from scratch) was handed down to me 45 years ago and has been a delicious family favorite ever since!

Italian Parmesan Pearl Couscous

Italian Parmesan Pearl Couscous is a delicious, easy to make side dish, seasoned with Italian seasoning, butter, and grated Parmesan cheese!Italian Parmesan Pearl Couscous is a delicious, easy to make side dish, seasoned with Italian seasoning, butter, and grated Parmesan cheese!

If you’re looking for a simple side dish with lots of flavor, may I suggest trying this Italian Parmesan Pearl Couscous? Creamy and full of flavor, this simple pasta side dish pairs well with many different varieties of beef, chicken, pork and fish! This recipe (as written) makes four servings of about 1/2 cup per serving, but can be easily doubled or tripled.

I created this recipe a couple of years ago by trial and error, and finally decided to get the recipe onto my blog. It really is a simple, easy to prepare recipe, but it sure is one we enjoy quite often. Sometimes the simplest recipes can become ones we return to, time and time again. This is one of those recipes, and I hope you will give it a try, and come to love it, too!

Pearl couscous (also known as Israeli couscous) is a tiny “pearl-sized” hard pasta that softens when boiled in water. For this recipe, after the pearl couscous cook, it is seasoned with butter, Parmesan cheese, and Italian-inspired spices like garlic, rosemary and Italian seasoning mix. The Parmesan cheese and butter melts into the hot couscous, and then the seasonings put it over the top as far as taste goes! Here’s how easy it is to make:

Scroll Down For A Printable Recipe Card At The Bottom Of The Page

Cook the Pearl Couscous

Pearl Couscous (also known as Israeli couscous) can be found in almost all grocery stores. It actually is a type of “pasta” that resembles a pearl in shape and size. It is very EASY to prepare.

Bring 1½ cups of water to a boil (on medium-high heat) in a medium-sized saucepan. Stir in the couscous, and then put a cover on the pan. Reduce the heat to LOW, and cook the couscous, stirring occasionally for between 8-10 minutes, or until the liquid has been fully absorbed. Remove the pan from the heat.

A container of pearl couscous (also known as Israeli couscous).Pearl couscous is cooked in boiling water for 8-10 minutes until liquid is absorbed.

Prepare The Italian-Inspired Spice Mixture

While the couscous is cooking, combine the spices in a small bowl. The spices you will use are salt, pepper, garlic powder, Italian seasoning, and dried rosemary. Once combined, set the seasoning mixture aside to add to the couscous when done cooking.

An Italian-inspired spice mixture is combined in a small bowl before adding to cooked couscous.

Finishing The Pearl Couscous For Serving

As soon as the pearl couscous has finished cooking, immediately remove it from the heat, and add butter and shredded Parmesan cheese. Stir them into the HOT couscous, until the cheese and butter melt.

Add the spice mix to the creamy Italian Parmesan Pearl Couscous, and stir well, to fully combine all the ingredients.

Butter and Parmesan cheese are stirred into hot cooked pearl couscous.Spice mix is added to season the Italian Parmesan Pearl Couscous.

Time To Serve The Italian Parmesan Pearl Couscous

Transfer the couscous to a serving bowl. Serve the Italian Parmesan pearl couscous while it is hot! The pearl couscous will be tender, creamy, and full of Italian-inspired flavor! If you want, you can garnish the top with more shredded Parmesan cheese, if desired, but that is optional.

This recipe makes four ½ cup servings. If you have any leftover Italian Parmesan Pearl Couscous, simply cover the bowl and refrigerate the couscous for up to 2-3 days. This dish can be easily microwaved to reheat, stirring occasionally during reheating to break up and re-fluff the couscous.

Once done, the creamy Italian Parmesan Pearl Couscous is transferred to a serving bowl.A fork holding a bite of Italian Parmesan Pearl Couscous.

I hope you have the opportunity to make this yummy side dish. We love to serve it alongside pork chops, chicken, beef, and some fish dishes. It’s really yummy. Thanks for stopping by today, and please come back soon. Have a GREAT day.

Looking For More Recipes Using Pearl Couscous?

You can find all of my recipes in the Recipe Index, located at the top of the page. I have several delicious recipes using pearl couscous I know you will enjoy, including:

Interested In More Recipes?

Thank you for visiting this website. I appreciate you using some of your valuable time to do soIf you’re interested, I publish a newsletter 2 times per month (1st and 15th) with all the latest recipes, and other fun info. I would be honored to have you join our growing list of subscribers, so you never miss a great recipe!
There is a Newsletter subscription box on the top right side (or bottom) of each blog post, depending on the device you use, where you can easily submit your e-mail address (only) to be included in my mailing list.

You Can Also Find Me On Social Media:

Facebook page: The Grateful Girl Cooks!
Pinterest:
The Grateful Girl Cooks!
Instagram:
jbatthegratefulgirlcooks

Author's signature

4.34 from 3 votes
Italian Parmesan Pearl Couscous
Prep Time
5 mins
Cook Time
10 mins
Total Time
15 mins
 

Italian Parmesan Pearl Couscous is a delicious, easy to make side dish, seasoned with Italian seasoning, butter, and grated Parmesan cheese!

Category: Side Dish
Cuisine: American, Italian
Keyword: Italian Parmesan Pearl Couscous
Servings: 4 (1/2 cup per serving)
Calories Per Serving: 214 kcal
Author: JB @ The Grateful Girl Cooks!
Ingredients
  • cups water
  • 1 cup pearl couscous (uncooked)
  • 1 Tablespoon butter
  • ¼ cup shredded Parmesan cheese
  • ½ teaspoon salt
  • teaspoon ground black pepper
  • ½ teaspoon Italian seasoning
  • ¼ teaspoon garlic powder
  • teaspoon dried, crushed rosemary (optional, but good)
Instructions
  1. Bring water to a boil (on medium-high heat) in a medium-sized saucepan. Stir in couscous, and then cover the pan. Reduce heat to LOW; cook couscous, stirring occasionally for 8-10 minutes, or until liquid has been fully absorbed. Remove pan from the heat.

  2. While couscous is cooking, combine spices (salt, pepper, Italian seasoning, garlic powder and rosemary) in a small bowl. (You want this ready to add to the hot couscous).

  3. As soon as couscous is done, immediately remove pan from the heat. Add butter and Parmesan cheese; stir until butter and cheese melt. Add spice mix; stir well, to fully combine. Transfer hot couscous to serving bowl. Garnish with extra Parmesan cheese, if desired..

  4. Leftover couscous can be stored, covered/refrigerated for up to 2-3 days. It can be reheated in microwave, stirring occasionally during reheating to break up and re-fluff the couscous.

Nutrition Facts
Italian Parmesan Pearl Couscous
Amount Per Serving (1 (1/2 cup))
Calories 214 Calories from Fat 45
% Daily Value*
Fat 5g8%
Saturated Fat 3g19%
Trans Fat 1g
Cholesterol 13mg4%
Sodium 420mg18%
Potassium 86mg2%
Carbohydrates 34g11%
Fiber 2g8%
Sugar 1g1%
Protein 8g16%
Vitamin A 146IU3%
Vitamin C 1mg1%
Calcium 88mg9%
Iron 1mg6%
* Percent Daily Values are based on a 2000 calorie diet.

Here’s one more to pin on your Pinterest boards!Italian Parmesan Pearl Couscous is a delicious, easy to make side dish, seasoned with Italian seasoning, butter, and grated Parmesan cheese!

Butternut Squash Risotto with Chicken

If you’re looking for a delicious, filling dish, try this Butternut Squash Risotto with Chicken! It’s an “all in one bowl” meal you’ll enjoy!
If you're looking for a delicious, filling dish, try this Butternut Squash Risotto with Chicken! It's an "all in one bowl" meal you'll enjoy!

My husband and I really love risotto. It’s hot, filling, delicious, creamy, and to us, a wonderful “comfort food” meal. The best part is that it is an all-in-one dish, with veggies, chicken and rice, so it’s practically perfect… in every way! If you’re a vegetarian and want to make this meal, simply substitute vegetable broth (for chicken broth) and leave out the chicken to enjoy this yummy dish.

I found the original recipe in one of my old cookbooks published in 2004, called “The Best Of Cooking Light”. After making a couple of tweaks (adding and changing ingredients a bit) to the original recipe, I made this delicious dinner and we’ve loved it ever since that first meal. Tender pieces of butternut squash, chicken, and onions, cooked with arborio rice, broth, butter and Parmesan cheese make this a risotto you’re gonna love! It is soooo good. Here’s how to make it:

Scroll Down For A Printable Recipe Card At The Bottom Of The Page

How To Make Butternut Squash Risotto with Chicken

In a large saucepan, bring 1½ cups of water, 1/4 cup of dry white wine, and 2 cans (14.5 oz. each) of low sodium chicken broth to a simmer (do not boil). Keep this liquid broth simmering on low heat while you prepare the risotto.

Heat olive oil on medium heat in a large Dutch oven. Once the oil is hot (but not smoking), add chopped onion, and cook them for 7-8 minutes, stirring often. When done, the onions should be golden brown and tender. Add additional 1/2 cup of water, butternut squash, salt, pepper and garlic powder to the pan, and stir to combine. Continue to cook for about 10 minutes, or until the squash has become tender and the liquid has almost evaporated.

Chopped onions are cooked in olive oil until tender.Lightly seasoned butternut squash cubes for the risotto are cooked in water until tender.

Making The Risotto

Add the arborio rice and pre-cooked chicken cubes to the pan, stirring to combine these ingredients. Ladle ½ cup of the warm simmering broth into the pan, and stir.

Cook this mixture on medium-low heat, stirring often, until almost all of the broth has been absorbed into the rice.

Continue to add warm broth to the pan, ½ cup at a time, cooking and stirring constantly until almost all the liquid is absorbed, before adding the next ½ cup of broth. Repeat this step (½ cup at a time), stirring constantly, until all the broth has been absorbed into the rice.

This should take about 30 minutes total to use up all the broth. Don’t rush this step, as the “low and slow” cooking of the liquid and rice is what will help make the finished risotto creamy and tender.

Arborio rice and cooked chicken pieces are added to the butternut squash in pan.Chicken broth is added to the butternut squash risotto and cooked until it is absorbed.More chicken broth is added and stirred into the risotto as it cooks.

Last Step Before The Butternut Squash Risotto Is Ready To Eat!

Once the broth has been absorbed into the risotto (and the rice is creamy and tender to the bite), remove the pan from the heat. Immediately stir in butter and shredded Parmesan cheese.

Continue stirring until the butter and cheese has melted and been incorporated into the butternut squash risotto.

Butter and parmesan cheese are added to the butternut squash risotto

Time To Serve The Butternut Squash Risotto with Chicken

Now it’s time to serve the butternut squash risotto with chicken while it is HOT! Serve it immediately for best results. For six total servings, each portion should be approx. ¾ cup.

If desired, top each portion with chopped fresh parsley and additional Parmesan cheese (this is optional, but nice!).

The creamy butternut squash risotto is delicious, and will be a wonderful meal for you and those you love. It’s a yummy chicken, veggie and rice dish I’m certain you will enjoy serving to those you love.

If you have any leftover risotto, it can be stored in an airtight container in the refrigerator. All you will need to do is microwave it, to reheat.

Butternut Squash Risotto with Chicken, garnished with parsley, served in a white bowl.

Thank you so much for stopping by my blog today. I truly hope you will have the opportunity to try this delicious Butternut Squash Risotto, and trust you will love it just as much as we do.

If you enjoy butternut squash, you might also want to check out my recipes for Butternut Squash Coconut Curry, or Butternut Squash Soup with Bacon!

Please come back again soon for more family-friendly recipes. Have a great day, and may God bless you with hope, the love of family and friends, and great joy.

Looking For Other RISOTTO Recipes?

You can find ALL of my recipes in the Recipe Index, which is located at the top of the page. I have a couple other delicious risotto recipes I’m confident you will also enjoy:

Interested In More Recipes?

Thank you for visiting this website. I appreciate you using some of your valuable time to do soIf you’re interested, I publish a newsletter 2 times per month (1st and 15th) with all the latest recipes, and other fun info. I would be honored to have you join our growing list of subscribers, so you never miss a great recipe!
There is a Newsletter subscription box on the top right side (or bottom) of each blog post, depending on the device you use, where you can easily submit your e-mail address (only) to be included in my mailing list.

You Can Also Find Me On Social Media:

Facebook page: The Grateful Girl Cooks!
Pinterest:
The Grateful Girl Cooks!
Instagram:
jbatthegratefulgirlcooks

Author's signature

Recipe adapted from: The cookbook “The Best Of Cooking Light”, page 143, published by Oxmoor House, Inc., 2004.

0 from 0 votes
Butternut Squash Risotto with Chicken
Prep Time
15 mins
Cook Time
50 mins
Total Time
1 hr 5 mins
 

If you're looking for a delicious, filling dish, try this Butternut Squash Risotto with Chicken! It's an "all in one bowl" meal you'll enjoy!

Category: Entree
Cuisine: Italian
Keyword: butternut squash risotto
Servings: 6 (approx. ¾ cup per serving)
Calories Per Serving: 388 kcal
Author: JB @ The Grateful Girl Cooks!
Ingredients
  • 2 cups water (divided use)
  • 29 ounces low sodium chicken broth (two 14.5 oz. cans)
  • ¼ cup dry white wine
  • 2 teaspoons extra-virgin olive oil
  • ½ cup onion, finely chopped
  • 3 cups cubed, peeled butternut squash (cut in 3/4" cubes)
  • ½ teaspoon salt
  • ¼ teaspoon black pepper
  • ½ teaspoon garlic powder
  • cups arborio rice (or other short grain rice) (uncooked)
  • cups pre-cooked chicken breast ,(cut in 1" cubes)
  • ½ cup shredded Parmesan cheese
  • 3 Tablespoons unsalted butter
Garnish (optional): additional Parmesan cheese and/or chopped parsley
    Instructions
    1. In large saucepan, bring 1½ cups of water, chicken broth and wine to a simmer (do not boil). Keep broth warming on low heat while you prepare risotto in a separate pan.

    2. Heat oil on medium heat in a Dutch oven (or large saucepan). Once hot (but not smoking), add onion; cook 7-8 minutes, stirring often. When done, onions should be golden brown and tender. Add remaining ½ cup water, butternut squash, salt, pepper and garlic powder; stir to combine. Cook 10 minutes, or until squash is tender and liquid has almost evaporated.

    3. Add arborio rice and cooked chicken cubes to pan, stirring to combine. Ladle ½ cup of warm broth into pan, and stir. Cook on medium-low heat, stirring often, until almost all of broth has been absorbed. Continue to add broth, ½ cup at a time, cooking and stirring often until almost all broth is absorbed, before adding the next ½ cup of broth. Repeat (½ cup at a time), stirring constantly, until all broth has been added and absorbed. This takes about 30 minutes. Don't rush this step- "low and slow" cooking will make risotto creamy and tender.

    4. Once all broth has been added (and absorbed), and rice is creamy/tender to the bite, remove pan from heat. Immediately stir in butter and shredded Parmesan cheese. Continue stirring until they've melted into the risotto.

    5. Serve immediately, garnishing each portion (if desired) with additional Parmesan cheese and/or chopped parsley. Enjoy!

    Nutrition Facts
    Butternut Squash Risotto with Chicken
    Amount Per Serving (1 (approx. 3/4 cup))
    Calories 388 Calories from Fat 108
    % Daily Value*
    Fat 12g18%
    Saturated Fat 6g38%
    Trans Fat 1g
    Cholesterol 46mg15%
    Sodium 415mg18%
    Potassium 584mg17%
    Carbohydrates 51g17%
    Fiber 3g13%
    Sugar 2g2%
    Protein 18g36%
    Vitamin A 7700IU154%
    Vitamin C 16mg19%
    Calcium 144mg14%
    Iron 3mg17%
    * Percent Daily Values are based on a 2000 calorie diet.

    Here’s one more to pin on your Pinterest boards!If you're looking for a delicious, filling dish, try this Butternut Squash Risotto with Chicken! It's an "all in one bowl" meal you'll enjoy!

    Baked Brown Bread

    You’re gonna love this easy recipe for a delicious large loaf of Baked Brown Bread! Molasses and cocoa powder add to the color and flavor!You're gonna love this easy recipe for a delicious large loaf of Baked Brown Bread! Molasses and cocoa powder add to the color and flavor!

    If you’ve been looking for a GREAT TASTING loaf of brown bread to make that is EASY, requires NO YEAST, and tastes fabulous, may I recommend this recipe for baked brown bread? I got the recipe originally from an older cookbook I have in my collection. It has truly become one of my most favorite breads!

    The recipe could not be easier! Combine dry ingredients, combine wet ingredients, and then pour them into a standard-sized loaf pan (9×5) and bake. BOOM! A yummy warm loaf of baked brown bread, ready to slather with soft butter OR eat it just as it is! YUM! Here’s how to make this simple bread loaf:

    Scroll Down For A Printable Recipe Card At The Bottom Of The Page

    Prepare The Batter For Baked Brown Bread

    The first thing you will do is preheat your oven to 350°F. It only takes a few minutes to prepare the bread batter, so you will want your oven hot and ready to roll once the batter is done, okay? OK.

    Whisk flour, cornmeal, sugar, cocoa powder, salt, baking powder and baking soda in a large bowl.  In a SEPARATE bowl, lightly beat an egg, then add milk and molasses, and whisk to combine these wet ingredients.

    Dry ingredients for the brown bread are whisked together in large bowl.In a separate bowl, milk, molasses and beaten egg are combined.

    Pour the wet ingredients into the dry ingredients. Add a Tablespoon of melted vegetable shortening, then stir the ingredients well to fully combine. This is the batter for the baked brown bread. See how easy that was to make?

    Wet brown bread batter is added to the dry ingredients and stirred, to combine.Batter for baked brown bread is now ready to add to prepared loaf pan for baking.

    Time To Make Some Baked Brown Bread!

    Generously spray or grease the bottom and sides of a 9×5 loaf pan. Pour all of the batter into the prepared pan. Place the pan on the middle rack of the oven, and bake for 55-60 minutes, or until a toothpick inserted into the top of the loaf comes out clean.

    HALFWAY through the baking time, quickly sprinkle the top of the loaf with old fashioned rolled oats, if desired. This is an optional step, but I think it looks great on the loaf once done.

    Standard sized loaf pan filled with brown bread batter, and ready to bake.Old fashioned oats are sprinkled on top of brown bread, halfway through baking.

    The Baked Brown Bread Is Ready To Enjoy!

    When the bread is done baking (and a toothpick comes out clean), remove the pan from the oven. Let the baked brown bread cool (still in the pan) for about 15 minutes. Run a butter knife carefully around the edges of the bread, then carefully turn the pan over, and the bread should release from the pan.

    Let the bread cool a bit longer on a wire rack before slicing. We like to eat this delicious bread while still warm (but not HOT).  Spread some softened butter on a slice, and dig in! It tastes wonderful. It has great flavor, a deep brown color. We enjoy eating slices of this bread as is, or toasted or broiled, and slathered with butter. 

    A loaf of delicious, baked brown bread, cooling on a wire rack.One warm slice of baked brown bread, spread with melting butter.

    I really hope you will give this yummy bread a try, and trust you will enjoy it as much as we do! Thank you for stopping by, and I sincerely hope you will come back for another visit again soon. Have a great day.

    Looking For More BREAD Recipes?

    You can find all of my recipes in the Recipe Index, located at the top of the page. I have lots of delicious bread recipes (yeast and no yeast), including:

    Interested In More Recipes?

    Thank you for visiting this website. I appreciate you using some of your valuable time to do soIf you’re interested, I publish a newsletter 2 times per month (1st and 15th) with all the latest recipes, and other fun info. I would be honored to have you join our growing list of subscribers, so you never miss a great recipe!
    There is a Newsletter subscription box on the top right side (or bottom) of each blog post, depending on the device you use, where you can easily submit your e-mail address (only) to be included in my mailing list.

    You Can Also Find Me On Social Media:

    Facebook page: The Grateful Girl Cooks!
    Pinterest:
    The Grateful Girl Cooks!
    Instagram:
    jbatthegratefulgirlcooks

    Author's signature

    Original recipe source: The cookbook “Church Suppers”, page 92, published in 2005 by Black Dog and Leventhal Publishers, New York

    0 from 0 votes
    Baked Brown Bread
    Prep Time
    10 mins
    Cook Time
    55 mins
    Total Time
    1 hr 5 mins
     

    You're gonna love this easy recipe for a delicious large loaf of Baked Brown Bread! Molasses and cocoa powder add to the color and flavor!

    Category: Bread/Breakfast, Snack
    Cuisine: American
    Keyword: baked brown bread
    Servings: 10
    Calories Per Serving: 246 kcal
    Author: JB @ The Grateful Girl Cooks!
    Ingredients
    • 2 cups all purpose flour
    • ½ cup yellow cornmeal
    • ½ cup granulated sugar
    • 1 Tablespoon cocoa powder (for baking)
    • 1 teaspoon baking powder
    • 1 teaspoon baking soda
    • ½ teaspoon salt
    • 1 large egg, lightly beaten
    • cups milk
    • ½ cup molasses
    • 1 Tablespoon vegetable shortening , melted
    • 1 Tablespoon old fashioned oats (optional) , to sprinkle on top of loaf
    Instructions
    1. Preheat oven to 350°F. Generously grease or spray a 9x5 loaf pan on bottom and sides.

    2. Whisk flour, cornmeal, sugar, cocoa powder, baking powder, baking soda and salt in a large bowl until combined. 

    3. In SEPARATE bowl, lightly beat egg, then add milk and molasses. Whisk until fully blended. Add to flour mixture. Add the melted vegetable shortening; stir ingredients in, until batter is fully combined.

    4. Pour batter into prepared loaf pan. Place pan on middle rack of oven. Bake for a total of 55-60 minutes, or until a toothpick inserted into the top of the loaf comes out clean. HALFWAY through the baking time, sprinkle top of loaf with oats, if desired.

    5. When done, remove pan from oven. Let bread cool (still in pan) for 15 minutes. Run a butter knife carefully around edges of bread, then carefully turn pan over to release bread from pan. Let bread cool a bit longer on wire rack before slicing and serving. Enjoy!

    Nutrition Facts
    Baked Brown Bread
    Amount Per Serving (1 slice (1/10th of total))
    Calories 246 Calories from Fat 27
    % Daily Value*
    Fat 3g5%
    Saturated Fat 1g6%
    Trans Fat 1g
    Cholesterol 20mg7%
    Sodium 256mg11%
    Potassium 409mg12%
    Carbohydrates 50g17%
    Fiber 2g8%
    Sugar 25g28%
    Protein 5g10%
    Vitamin A 96IU2%
    Calcium 104mg10%
    Iron 2mg11%
    * Percent Daily Values are based on a 2000 calorie diet.

    Here’s one more to pin on your Pinterest boards!You're gonna love this easy recipe for a delicious large loaf of Baked Brown Bread! Molasses and cocoa powder add to the color and flavor!


    Grandma’s Fluffy White Frosting

    Make my Grandma’s fluffy white frosting to decorate your favorite cakes or cupcakes! It’s a simple recipe I’ve used for over 45 years.

    Today I want to share my Grandma’s recipe for fluffy white frosting, which can be used to decorate cakes and cupcakes. This recipe was given to my Mom (her daughter-in-law) MANY years ago, who then handed down the recipe to me over 45 years ago. I feel a wonderful connection to my Grandma Grace whenever I have made this frosting over the years.

    Grandma’s Fluffy White Frosting is simple to make, but it DOES take a while to beat with an electric mixer (or stand mixer) to make it fluffy and fully dissolve the sugar. That being said, the end result is a light, fluffy frosting you will enjoy using. Here’s how to make it:

    Scroll Down For A Printable Recipe Card At the Bottom Of The Page

    How To Make Grandma’s Fluffy White Frosting

    Place the milk, cornstarch and a dash of salt in a medium saucepan. Use a spoon or wire whisk to combine these ingredients, and then cook on LOW heat, stirring often, until the mixture thickens. Once the mixture thickens, remove it from the heat and set it aside to FULLY cool. 

    Milk, cornstarch and salt are cooked in saucepan until thickened.Thickened milk, cornstarch and salt mixture is set aside to cool after it is cooked.

    In a separate large mixing bowl (or stand mixer), use an electric mixer to cream together the vegetable shortening, butter, granulated sugar and a portion of the powdered sugar. Mix these ingredients REALLY WELL for 15 minutes, until creamy. I use my stand mixer for this, because I can turn it on, walk away, and let it mix the frosting on its own.

    NOTE:  It is important to take the time to mix these ingredients really well, so the granulated sugar is dissolved and no longer “grainy”.

    Shortening, butter, powdered and granulated sugar are beaten well until creamy.

    Time To Finish Making Grandma’s Fluffy White Frosting

    Add vanilla extract to Grandma’s Fluffy White Frosting, and then add the cooled and thickened milk mixture. Make sure the thickened milk mixture has fully cooled before adding, so it doesn’t melt the frosting! Beat these ingredients well, until fully incorporated.

    Vanilla extract is added to the frosting mixture in stand mixer.Cooled and thickened milk mixture is added to Grandma's fluffy white frosting mixture and combined.

    Add the remaining portion of powdered sugar to the frosting, and mix well until fully combined. Now this yummy frosting is done, and it should be fluffy and light in texture, and ready to use.

    More powdered sugar is mixed into Grandma's fluffy white frosting to finish.A bowl of Grandma's fluffy white frosting is ready to use for decorating cakes or cupcakes.

    Decorating With Grandma’s Fluffy White Frosting

    There will be enough frosting made to easily decorate a two layer round cake fully with frosting, or cover 2 dozen cupcakes. I ALWAYS use this frosting on my Grandma’s Red Velvet Cake. When I was growing up, this was my favorite birthday cake that my Mom made. This light, fluffy frosting was the perfect topping! YUM! 

    Spreading Grandma's Fluffy White Frosting onto a red velvet cake.

    I hope you have the opportunity to try this recipe- it’s never failed me yet after all these years. If you’re looking for other cake or cupcake frosting recipes, you will love my recipe for Mom’s Chocolate Buttercream Frosting.  Thanks for stopping by this website today. I hope you have a wonderful day, and trust you will come back soon.

    Looking For More DESSERT Recipes?

    You can find all of my recipes in the Recipe Index, located at the top of the page. I have LOTS of yummy dessert recipes that might interest you, including:

    Interested In More Recipes?

    Thank you for visiting this website. I appreciate you using some of your valuable time to do soIf you’re interested, I publish a newsletter 2 times per month (1st and 15th) with all the latest recipes, and other fun info. I would be honored to have you join our growing list of subscribers, so you never miss a great recipe!
    There is a Newsletter subscription box on the top right side (or bottom) of each blog post, depending on the device you use, where you can easily submit your e-mail address (only) to be included in my mailing list.

    You Can Also Find Me On Social Media:

    Facebook page: The Grateful Girl Cooks!
    Pinterest:
    The Grateful Girl Cooks!
    Instagram:
    jbatthegratefulgirlcooks

    Author's signature

    Original recipe source: My grandma Grace B.

    5 from 1 vote
    Grandma's Fluffy White Frosting
    Prep Time
    20 mins
    Cook Time
    0 mins
    Total Time
    20 mins
     

    Make my Grandma's fluffy white frosting to decorate your favorite cakes or cupcakes! It's a simple recipe I've used for over 45 years.

    Category: Dessert
    Cuisine: American
    Keyword: Grandma's Fluffy White Frosting
    Servings: 1 (total amount)
    Calories Per Serving: 3170 kcal
    Author: JB @ The Grateful Girl Cooks!
    Ingredients
    • 1 cup milk
    • Tablespoons cornstarch
    • 1 dash salt
    • ½ cup vegetable shortening
    • ½ cup butter (or margarine) , softened
    • cup granulated sugar
    • 1⅔ cup powdered sugar , divided use
    • 1 teaspoon vanilla extract
    Instructions
    1. Place milk, cornstarch and a dash of salt in a medium saucepan. Stir or whisk to combine ingredients. Cook on LOW heat, stirring often, until mixture thickens. Once mixture thickens, remove it from the heat; set it aside to cool.

    2. In a separate large mixing bowl (or stand mixer), mix together vegetable shortening, butter, granulated sugar and a portion (2/3 cup) of the powdered sugar. Beat these ingredients REALLY WELL for about 15 minutes, until creamy. NOTE:  It is important to take the time to mix really well, so the granulated sugar is dissolved and is no longer "grainy".

    3. Add vanilla extract, and the completely cooled, thickened milk mixture. Beat ingredients well, until fully incorporated into the frosting.

    4. Add remaining cup of powdered sugar to the frosting. Mix well until fully combined. Now the frosting is done. It should be fluffy and light in texture, and ready to use. Will make enough frosting to fully cover a 2 layer round cake or 2 dozen cupcakes.

    Recipe Notes

    NOTE: The total amount of frosting is enough to cover two round cake layers, OR a 13x9 cake, OR 2 dozen cupcakes. * Caloric calculation is for total amount of frosting, using butter.

    Nutrition Facts
    Grandma's Fluffy White Frosting
    Amount Per Serving (1 (TOTAL AMT.))
    Calories 3170 Calories from Fat 1773
    % Daily Value*
    Fat 197g303%
    Saturated Fat 85g531%
    Trans Fat 17g
    Cholesterol 256mg85%
    Sodium 964mg42%
    Potassium 394mg11%
    Carbohydrates 356g119%
    Fiber 1g4%
    Sugar 342g380%
    Protein 9g18%
    Vitamin A 3299IU66%
    Calcium 327mg33%
    Iron 1mg6%
    * Percent Daily Values are based on a 2000 calorie diet.

    Here’s one more to pin on your Pinterest boards!Make my Grandma's fluffy white frosting to decorate your favorite cakes or cupcakes! It's a simple recipe I've used for over 45 years.


    Mini Lasagna Bowls

    Mini Lasagna Bowls (for 2) are a delicious Italian meal (they’re easy to make). They’re the perfect size, when you don’t want to make an entire lasagna!
    Mini Lasagna Bowls (for 2) are a delicious Italian meal (they're easy to make). Perfect size, when you don't want to make an entire lasagna!

    Today I want to share a fun recipe for making individual-sized mini lasagna bowls. A couple of years ago I decided I wanted lasagna to eat, but I didn’t want to make an entire recipe, because it would be way too much for just my husband and I.

    I fiddled around in our kitchen until I came up with this “recipe”, which I’ve used several times since! Made in oven-safe ceramic ramekins, the finished mini lasagna bowls are individually sized for a filling meal. This recipe, as written will make enough for TWO mini lasagna bowls, but can easily be doubled or tripled. Here’s how to make them:

    Scroll Down for A Printable Recipe Card At The Bottom Of The Page

    Prepare The Pasta Noodles And Cheese Filling

    The first things you will need to do is cook the lasagna noodles and mix together the ricotta cheese filling. Cook six lasagna pasta noodles in boiling salted water according to the manufacturer’s instructions on the box. Once done cooking, drain the lasagna noodles and place them on paper towels in a single layer to finish draining.

    To make the cheese filling, combine ricotta cheese, Parmesan, parsley, salt, pepper, garlic powder and oregano In a medium-sized bowl. Stir until these ingredients are fully blended.

    Lasagna noodles are cooked, then drained on paper towels.Ricotta cheese is seasoned with spices and combined to make a cheese filling.

    Ready To Make Mini Lasagna Bowls

    Now you’re ready to build your mini lasagna bowls, one layer at a time! Make sure to use 8 ounce, oven-safe ramekins for this recipe. The key here is to get the right portion size. EACH RAMEKIN will require 3 pasta noodles, 4 generous Tablespoonfuls of pasta sauce, 2 generous dollops of the ricotta cheese mixture, and 3 generous sprinkles of shredded Mozzarella and Parmesan cheese. Plan accordingly… and divide these ingredients well, so you have enough for all the layers.

    Spoon a generous Tablespoon of pasta sauce into each ramekin (to cover the bottom). Lay a cooked lasagna noodle on top of the sauce. Top each lasagna noodle with a Tablespoon of pasta sauce. Place a generous Tablespoon of the seasoned riccotta cheese on top of the sauce, and GENTLY spread it out, as much as possible. Sprinkle with some of the shredded Mozzarella and Parmesan cheese.

    Mini lasagna bowls begin with a layer of marinara sauce, topped with a cooked lasagna noodle.Marinara sauce and a seasoned ricotta cheese mixture is layered into the lasagna bowls.

    Building A Second Layer

    Place another lasagna noodle (crosswise to the first noodle) on top of the Mozzarella and Parmesan cheese. Add spoonful of sauce, another dollop of ricotta, and then top again with shredded Mozzarella and Parmesan cheese.

    Another layer of cooked lasagna noodles is added to the dish.Grated cheese is added to each of the mini lasagna bowls in layers.

    The final step is to place the last lasagna noodle in each ramekin (crosswise to the last one). Add a spoonful of sauce, and then top with the remaining Mozzarella and Parmesan cheese. Trim off any extra pasta around the top of the ramekin.

    Why trim the pasta? You don’t have too, BUT… If large pieces of the pasta are left sticking up too far exposed, they can get overly browned and crispy while baking. You can use a knife or kitchen scissors to cut off the pasta so it is fairly even with the top rim of the ramekin.

    Two mini lasagna bowls, ready for baking in the oven.

    Bake Then Serve The Mini Lasagna Bowls

    Bake the mini lasagna bowls in a preheated 350°F. oven for approximately 25 minutes. When done and heated through, the cheese on top should be melted and the sauce will likely be bubbling around the edges. TIP: Place a sheet of aluminum foil or baking sheet under the lasagna bowls in order to catch any sauce that might drip over the top while cooking.

    Let the mini lasagna bowls cool for a minute or two before serving, because they will be quite hot. Grab a fork, and dig in… they are really good!

    One of the mini lasagna bowls, after baking, and ready to enjoy!An empty dish means the dinner is all gone... and it was delicious!

    I hope you will consider making these mini lasagna bowls. We really enjoy them, and trust you will, too. Thanks for stopping by, and I sincerely hope you will come back again soon. Have a GREAT day!

    Looking For More Recipes Using Lasagna Noodles?

    You can find all of my recipes in the Recipe Index, located at the top of the page. I have several recipes that use lasagna noodles you might enjoy, including:

    Interested In More Recipes?

    Thank you for visiting this website. I appreciate you using some of your valuable time to do soIf you’re interested, I publish a newsletter 2 times per month (1st and 15th) with all the latest recipes, and other fun info. I would be honored to have you join our growing list of subscribers, so you never miss a great recipe!
    There is a Newsletter subscription box on the top right side (or bottom) of each blog post, depending on the device you use, where you can easily submit your e-mail address (only) to be included in my mailing list.

    You Can Also Find Me On Social Media:

    Facebook page: The Grateful Girl Cooks!
    Pinterest:
    The Grateful Girl Cooks!
    Instagram:
    jbatthegratefulgirlcooks

    Author's signature

    0 from 0 votes
    Mini Lasagna Bowls
    Prep Time
    20 mins
    Cook Time
    25 mins
    Total Time
    45 mins
     

    Mini Lasagna Bowls (for 2) are a delicious Italian meal (they're easy to make). Perfect size, when you don't want to make an entire lasagna!

    Category: Entree, Main Course
    Cuisine: Italian
    Keyword: mini lasagna bowls
    Servings: 2
    Calories Per Serving: 614 kcal
    Author: JB @ The Grateful Girl Cooks!
    Ingredients
    For Ricotta Filling:
    • ½ cup ricotta cheese , drained
    • 2 teaspoons Parmesan cheese , grated
    • ¼ teaspoon garlic powder
    • ¼ teaspoon dried parsley
    • teaspoon EACH salt and pepper
    • teaspoon dried oregano
    For Rest of Recipe:
    • 6 lasagna noodles cooked, drained
    • 8 Tablespoons spaghetti sauce (generous Tablespoons)
    • cup shredded mozzarella cheese
    • ½ cup shredded Parmesan cheese
    Instructions
    1. Preheat oven to 350°F.

    2. Cook lasagna noodles in salted, boiling water according to instructions on package. Once done, drain in a single layer on paper towels.

    3. Combine ricotta cheese, Parmesan, parsley, salt, pepper, garlic powder and oregano In a medium-sized bowl. Stir until fully blended.

    4. For each oven-safe ramekin: 1st layer- Spoon a generous Tablespoon of pasta sauce into each dish (cover the bottom). Lay lasagna noodle on top of sauce. Top with a generous Tablespoon of sauce. Place a generous Tablespoon of ricotta mixture on top of sauce. GENTLY spread it out, as much as possible. Sprinkle with 1/3 of the shredded Mozzarella and Parmesan cheese.

    5. 2nd Layer- Repeat same as first layer-Place another lasagna noodle (crosswise to the first noodle) on top of the Mozzarella and Parmesan cheese. Add spoonful of sauce, another dollop of ricotta, and then top again with 1/3 of shredded Mozzarella and Parmesan cheese.

    6. Final Layer- Place last lasagna noodle in each ramekin (crosswise to the last one). Add a generous spoonful of sauce, and then top with remaining Mozzarella and Parmesan cheese. Trim off any extra pasta around the top of the ramekin.

    7. Bake in preheated 350°F. oven for approx. 25 minutes. When done, cheese on top should be melted and sauce will be bubbly around edges. TIP: Place a baking sheet or aluminum foil under lasagna bowls in order to catch any sauce that might bubble over the top while cooking. When done, let cool for 1-2 minutes before serving. Enjoy!

    Nutrition Facts
    Mini Lasagna Bowls
    Amount Per Serving (1 lasagna bowl)
    Calories 614 Calories from Fat 198
    % Daily Value*
    Fat 22g34%
    Saturated Fat 13g81%
    Cholesterol 72mg24%
    Sodium 1055mg46%
    Potassium 506mg14%
    Carbohydrates 70g23%
    Fiber 4g17%
    Sugar 5g6%
    Protein 34g68%
    Vitamin A 911IU18%
    Vitamin C 4mg5%
    Calcium 557mg56%
    Iron 2mg11%
    * Percent Daily Values are based on a 2000 calorie diet.

    Here’s one more to pin on your Pinterest boards!Mini Lasagna Bowls (for 2) are a delicious Italian meal (they're easy to make). Perfect size, when you don't want to make an entire lasagna!


    Rainbow Rice

    Rainbow rice is a delicious way to “jazz up” plain white rice with the colors and flavors of carrots, bell peppers, onions and spices.
    Rainbow rice is a delicious way to "jazz up" plain white rice with the colors and flavors of carrots, bell peppers, onions and spices.

    I don’t know about you, but we eat a lot of rice in our home. Usually it is steamed white rice, only seasoned with butter, salt and pepper.

    HOWEVER… that is only because it is so easy to make in our rice cooker, and is a simple side dish to serve with chicken, pork, or fish. Occasionally we have wild rice, rice pilaf, rice salads, and other delicious rice side dishes.

    The recipe I am sharing today is for Rainbow rice, which gets its name from the colorful addition of red and green peppers, carrots, and onions.

    This original single serving recipe came from an old “Taste of Home” magazine I got way back in 2005, and so I adapted it to serve 4 people. The recipe is not only delicious… it is super easy to make and we really enjoy it! Here’s how to make this delicious side dish:

    Scroll Down For A Printable Recipe Card At The Bottom Of The Page

    Pre-Cook The Rice

    The recipe calls for 2 cups of pre-cooked long grain white rice, which will need to be hot when you add the additional ingredients, so plan accordingly. You can make the rice in a rice maker or on the stovetop.

    Use whichever method you prefer, but only cook the rice in water. DO NOT add additional butter or seasonings when you cook it. Those will be added later!

    Once the rice is done cooking, place it into a medium sized serving bowl, and fluff it with a fork.

    Long grain white rice is cooked in water, with no salt or butter.

    Cooking The Veggies

    While the rice is being prepared, cook the veggies to get them tender, before adding them to the rice. Melt 2 Tablespoons butter in a large skillet on medium-low heat.

    Add finely chopped onion, red and green bell peppers, and finely chopped carrots to the melted butter. Cook, stirring occasionally, for about 4-5 minutes, or until the veggies become tender.

    Bell peppers, carrots, onions, and butter cooking in large skillet.The cooked veggies and butter are now ready to add to pre-cooked white rice.

    Pour the cooked veggies (and any remaining butter in the skillet) onto the rice. Stir well, to fully incorporate the veggies (and butter) into the rice. 

    A white bowl with the cooked veggies added on top of cooked white rice.

    Season and Serve The Rainbow Rice

    Add salt, pepper, and garlic powder to the rainbow rice, and stir well, to combine. Take a taste, and add more seasonings to suit your taste. Now the rainbow rice is ready to serve! See how easy this dish is to make?

    The rice has great flavor from the melted butter, seasonings, and the tender (and did I mention colorful?) veggies.

    Make sure to serve this dish HOT, and enjoy it served alongside a favorite meat dish. It’s really quite delicious!

    Rainbow rice is mixed together and then seasoned with salt, pepper, and garlic powder.Colorful and delicious rainbow rice is served hot in a large white bowl.

    I hope you try this simple recipe for Rainbow Rice, and trust you will enjoy it as much as we do. Leftovers will keep up to 2-3 days in the fridge, if stored in an airtight container, and can be easily microwaved to reheat.

    Thanks for stopping by today, and I hope you will come back for more yummy recipes soon. Have a great day!

    Looking For More RICE Recipes?

    You can find all of my recipes in the Recipe Index, which is located at the top of the page. I have some yummy recipes featuring rice you’ll enjoy, including:

    Want More Recipes? Get My FREE Newsletter!

    I publish a newsletter 2 times per month (1st and 15th) with lots of recipes, tips, etc..
    Would you like to join our growing list of subscribers?

    There is a Newsletter subscription box on the top right (or bottom) of each blog post, depending on the device you use.
    You can submit your e-mail address there, to be added to my mailing list.

    Find Me On Social Media:

    Facebook page: The Grateful Girl Cooks!
    Pinterest:
    The Grateful Girl Cooks!
    Instagram:
    jbatthegratefulgirlcooks

    Author's signature

    Recipe adapted from: “Taste of Home” magazine, August/September 2005 edition, page 57, published by Reiman Publications, Inc.:

    ↓↓ PRINTABLE RECIPE BELOW ↓↓

    0 from 0 votes
    Rainbow Rice
    Prep Time
    10 mins
    Cook Time
    5 mins
    Total Time
    15 mins
     

    Rainbow rice is a delicious way to "jazz up" plain white rice with the colors and flavors of carrots, bell peppers, onions and spices.

    Category: Side Dish
    Cuisine: American
    Keyword: rainbow rice
    Servings: 4 (1/2 cup per serving)
    Calories Per Serving: 174 kcal
    Author: JB @ The Grateful Girl Cooks!
    Ingredients
    • 2 cups cooked long grain rice
    • ½ cup finely chopped green bell pepper
    • ½ cup finely chopped red bell pepper
    • ½ cup finely chopped yellow onion
    • ¼ cup finely chopped carrot , peeled
    • 2 Tablespoons butter
    • ½ teaspoon salt
    • teaspoon ground black pepper
    • teaspoon garlic powder
    Instructions
    1. Recipe calls for 2 cups of pre-cooked long grain white rice, which needs to be hot when you add cooked veggies, so plan accordingly. Cook the rice in water. DO NOT add additional butter or seasonings. Once done, put rice in serving bowl; fluff with a fork. Set aside (keep hot).

    2. Melt 2 Tablespoons butter in skillet on medium-low heat. Add onion, red and green bell peppers, and carrots to skillet. Cook, stirring occasionally, for 4-5 minutes, or until veggies become tender.

    3. Pour cooked veggies (and any remaining butter in skillet) onto the rice. Stir well, to combine. Add salt, pepper, and garlic powder. Stir again, to combine. Taste- add additional salt and pepper, if desired. Serve rainbow rice hot, and enjoy!

    Nutrition Facts
    Rainbow Rice
    Amount Per Serving (1 (approx. 1/2 cup))
    Calories 174 Calories from Fat 54
    % Daily Value*
    Fat 6g9%
    Saturated Fat 4g25%
    Trans Fat 1g
    Cholesterol 15mg5%
    Sodium 349mg15%
    Potassium 158mg5%
    Carbohydrates 27g9%
    Fiber 2g8%
    Sugar 3g3%
    Protein 3g6%
    Vitamin A 2164IU43%
    Vitamin C 41mg50%
    Calcium 21mg2%
    Iron 1mg6%
    * Percent Daily Values are based on a 2000 calorie diet.

    Here’s one more to pin on your Pinterest boards!Rainbow rice is a delicious way to "jazz up" plain white rice with the colors and flavors of carrots, bell peppers, onions and spices.

    Triple Berry French Toast Cups

    Triple Berry French Toast Cups (for 2) are filled with yummy raspberries, blueberries, blackberries, cream cheese and maple syrup, then baked.
    Triple Berry French Toast Cups (for 2) are filled with yummy raspberries, blueberries, blackberries, cream cheese and maple syrup, then baked.

    Today I want to share this delicious recipe for Triple Berry French Toast Cups. They are easy to prepare, and taste wonderful! I found the original recipe years ago in one of my old “Taste of Home” magazines (from 2006) and slightly adapted it for our taste preferences. You will need to have a couple of 8 ounce, oven-safe ramekins to make these single serving breakfast treats, but they are readily available in lots of retail stores or online.

    This simple recipe makes two servings, and I am confident you will enjoy it! You will need to plan a little bit ahead, because an important step is to refrigerate the French toast cups for at least an hour BEFORE baking, to give the egg filling time to soak into the bread cubes. Other than that, they are truly simple to make, and taste great, especially if you serve them topped with sifted powdered sugar and berry-flavored pancake syrup. Here’s how to make triple berry French toast cups:

    Scroll Down For A Printable Recipe Card At The Bottom Of The Page

    Prepare The Triple Berry French Toast Cups

    Lightly grease (or spray) two 8 ounce ramekins on the bottom and sides. Evenly divide HALF of the stale, day old bread cubes (can use French bread or sourdough) between the two dishes (reserve the other half of the bread cubes for later). The reason you use day old or stale bread cubes is because they are firmer than fresh bread cubes, and will hold up better after liquid is added. This helps the bread NOT to turn mushy.

    Add the raspberries, blueberries and blackberries, evenly diving the fruit between both ramekins. I used a total of 1/2 cup berries (divided) from a bag of triple berry blend, but this dish will still turn out perfectly if you don’t have access to all three fruits.  NOTE: We love the flavor combination of using all three berries, but if you only have raspberries? Use 1/2 cup total. Only have blueberries? Only use 1/2 cup total.  You get the picture. However you want to make these (whatever combination), just use a total amount of 1/2 cup of berries.

    Top the berries with softened cream cheese cubes, and then divide the remaining bread cubes on top of the cream cheese. Set aside while you make the easy egg filling.

    Stale bread cubes are placed into greased ramekins.A layer of blackberries, blueberries and raspberries is topped with cubes of cream cheese. The last layer to be added is the remaining day old bread cubes.

    Soak With Egg Mixture And Refrigerate

    Now it’s time to make the egg “filling. Place eggs, milk and maple syrup in a medium bowl, and whisk with a fork or wire whisk until combined. Pour the egg mixture into the ramekins, being sure to evenly divide the liquid between both dishes. Use the back of a spoon to gently press the bread cubes down as much as possible into the egg mixture. You need to do this, so the bread cubes can absorb the egg filling as much as possible before baking.

    Now comes the hard part… waiting! Cover with plastic wrap, and put the ramekins into a refrigerator for at least 1 hour (or more). The bread cubes need time to absorb as much of that egg mixture as possible. Sometimes I make these at night before going to bed, then they’re ready to go first thing in the morning. Occasionally I unwrap them, and push the bread cubes down again into the liquid. They won’t ever be fully covered… just get them into the liquid as much as possible for best results!

    TIP: Remove the triple berry French toast cups from the refrigerator 25-30 minutes before baking (to take the chill off). Preheat your oven to 350°F during this time.

    Eggs, milk and real maple syrup are whisked together before adding to the French toast cups.The top layer of bread cubes is pressed down into the egg filling to absorb the liquid.

    Bake The Triple Berry French Toast Cups

    Bake the triple berry French toast cups in a preheated 350°F. oven, uncovered, for 25-30 minutes. When done, they should be golden brown on top, and the egg filling will be “set” in the middle. Let them cool on a wire rack for 3-4 minutes. 

    After they have cooled for 3-4 minutes, and you’re ready to serve, carefully run a butter knife around the edges of the ramekin to loosen the edges. Using a large spoon, carefully remove the French toast cups in one piece out of the dish, and transfer to individual serving plates.

    Triple berry French toast cups are baked until golden brown and the egg filling has "set".Each of the triple berry French toast cups is removed from ramekin and transferred to a plate.

    Time To Eat!

    The French toast cups are not overly sweet, as is, so our absolute FAVORITE way to serve them is to sift a little bit of powdered sugar on top, and then drizzle it all with some berry-flavored pancake syrup! YUMMO! I like to use my homemade blackberry pancake syrup. It compliments this dish well, with even more berry flavor and sweetness.

    My husband and I love this breakfast (even though it’s an “occasional” treat!), and hope you (and those you love) will enjoy it, as well. It’s REALLY delicious, and looks good on the plate, too!

    Berry-flavored pancake syrup and powdered sugar are added to triple berry French toast cups for serving.Lots of fruit and cream cheese inside the triple berry French toast cups!

    I hope you enjoy this delicious breakfast recipe… we sure do! Thank you for stopping by, and I truly hope you will come back soon for another visit (and some delicious recipes). Take care, and have a GREAT day!

    Looking For More Delicious BREAKFAST Recipes?

    You can find all of my recipes in the Recipe Index, which is located at the top of the page. I have lots of delicious ideas for breakfast to choose from, including:

    Interested In More Recipes?

    Thank you for visiting this website. I appreciate you using some of your valuable time to do soIf you’re interested, I publish a newsletter 2 times per month (1st and 15th) with all the latest recipes, and other fun info. I would be honored to have you join our growing list of subscribers, so you never miss a great recipe!
    There is a Newsletter subscription box on the top right side (or bottom) of each blog post, depending on the device you use, where you can easily submit your e-mail address (only) to be included in my mailing list.

    You Can Also Find Me On Social Media:

    Facebook page: The Grateful Girl Cooks!
    Pinterest:
    The Grateful Girl Cooks!
    Instagram:
    jbatthegratefulgirlcooks

    Author's signature

    Recipe adapted from: “Taste of Home” magazine, Feb./March 2006 edition, page 57, published by Reiman Publications, Inc.

    ↓↓ PRINTABLE RECIPE BELOW ↓↓

    0 from 0 votes
    Triple Berry French Toast Cups
    Prep Time
    15 mins
    Cook Time
    25 mins
    Refrigeration Time (inactive prep)
    1 hr
    Total Time
    1 hr 40 mins
     

    Triple Berry French Toast Cups (for 2) are filled with yummy raspberries, blueberries, blackberries, cream cheese and maple syrup, then baked.

    Category: Breakfast
    Cuisine: American
    Keyword: triple berry french toast cups
    Servings: 2
    Calories Per Serving: 408 kcal
    Author: JB @ The Grateful Girl Cooks!
    Ingredients
    • 2 slices day old French bread (or sourdough) , cut into 1" cubes
    • ½ cup raspberry/blackberry/blueberry blend fresh or frozen (unthawed)
    • 2 ounces cream cheese , softened (cut in 1" cubes)
    • 2 large eggs
    • ½ cup milk
    • 2 Tablespoons pure maple syrup
    Optional Toppings: Sifted powdered sugar and berry flavored pancake syrup
      Instructions
      1. Lightly grease (or spray) two 8 ounce ramekins on the bottom and sides.

      2. Evenly divide HALF of the bread cubes between 2 ramekins (save other half for later). Add raspberries, blueberries and blackberries, evenly diving between both ramekins. Top berries with cream cheese cubes; add remaining bread cubes on top. Set aside.

      3. Whisk eggs, milk and maple syrup in a medium bowl until combined. Pour into ramekins, evenly dividing liquid between both. Use back of a spoon to gently press bread cubes down as much as possible into egg mixture. This helps bread cubes absorb liquid before baking.

      4. Cover with plastic wrap; put ramekins in refrigerator for at least 1 hour (or more). Unwrap occasionally; push bread cubes down again into liquid. They won't ever be fully covered... just get them into the liquid as much as possible for best results! TIP: Remove from refrigerator 25-30 minutes before baking (to take chill off). Preheat oven to 350°F during this time.

      5. Bake at 350°F., uncovered, for 25-30 minutes. When done, they should be golden brown, and egg filling will be "set" in the middle. Let cool on a wire rack 3-4 minutes. Carefully run a butter knife around inside edge of ramekins to loosen edges. Using a large spoon, carefully remove French toast cups in one piece from dish; transfer to serving plates.

      6. To serve (optional, but recommended), sift powdered sugar on top, and drizzle with berry-flavored pancake syrup!

      Recipe Notes

      NOTE: Caloric calculation was made using 1% milk, and does not include optional berry pancake syrup or powdered sugar toppings.

      Nutrition Facts
      Triple Berry French Toast Cups
      Amount Per Serving (1 g)
      Calories 408 Calories from Fat 99
      % Daily Value*
      Fat 11g17%
      Saturated Fat 5g31%
      Trans Fat 1g
      Cholesterol 204mg68%
      Sodium 561mg24%
      Potassium 400mg11%
      Carbohydrates 59g20%
      Fiber 3g13%
      Sugar 20g22%
      Protein 18g36%
      Vitamin A 552IU11%
      Vitamin C 8mg10%
      Calcium 201mg20%
      Iron 3mg17%
      * Percent Daily Values are based on a 2000 calorie diet.

      Here’s one more to pin on your Pinterest boards!Triple Berry French Toast Cups (for 2) are filled with yummy raspberries, blueberries, blackberries, cream cheese and maple syrup, then baked.