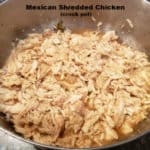
Make Mexican Shredded Chicken in a crock pot to use in tacos, burritos, quesadillas, taco salads, enchiladas, etc. It’s easy to make and delicious!

Today I want to share a recipe I use often for Mexican shredded chicken. There are only a couple simple steps to prep the chicken before adding it to a slow cooker to finish cooking. The meat is seasoned well, and adds great flavor to quite a variety of dishes! You should end up with enough shredded chicken for at least 8 servings (depending on how you choose to use it)
I’ve made shredded chicken this way for years now. I love it’s simple added ingredients that I almost always have in my kitchen. This recipe uses boneless, skinless chicken breasts, but you can make it with a combination of breasts and thighs, if that’s what you have. The recipe can also be easily doubled, and it freezes well! Here’s the way I make Mexican shredded chicken:.
Scroll Down For A Printable Recipe Card At The Bottom Of The Page
Prepare And Pan-Sear The Chicken
Cut boneless, skinless chicken breasts into cubes, about 2″ in size. Use paper towels to pat the chicken dry (drying the chicken helps it brown quickly instead of steaming it). Heat 2 Tablespoons of oil on medium-high heat in a large skillet.
Add the dried chicken pieces, and quickly sear them until browned on all sides. You do not have to cook them all the way through, because the crock pot will do that. You just want the outside of the chicken pieces to be nicely browned.
 / The Grateful Girl Cooks!")
 / The Grateful Girl Cooks!")
Into The Crock Pot It Goes!
When done, transfer the chicken pieces from the skillet into a crock pot. Reserve the remaining liquid in the skillet. Add a half cup of water to the “drippings” in the skillet, and cook for about a minute. This helps de-glaze the skillet and adds in any little browned bits of chicken to help flavor the sauce. Pour this liquid over the chicken pieces in the crock pot.
 / The Grateful Girl Cooks!")
 / The Grateful Girl Cooks!")
Add The Seasoning Sauce Then Cook!
Now it’s time to make the easy seasoning sauce. Combine soy sauce, lime juice, brown sugar, chopped green onions, red pepper flakes, cumin, chili powder and garlic powder in a medium bowl. Stir well, until the brown sugar has dissolved and the ingredients are fully incorporated.
Once combined, pour the seasoning sauce into the crock pot. Stir well, to coat the chicken with the sauce. Put the lid on the crock pot and cook the Mexican shredded chicken for 4-5 hours on LOW heat, OR for 3 hours on HIGH heat.
 / The Grateful Girl Cooks!")
 / The Grateful Girl Cooks!")
Time To Shred The Cooked Chicken
Once the chicken has finished cooking, transfer the chicken to a large bowl using a slotted spoon. There will still be quite a bit of liquid left in the crock pot. Hang on to that, because you can use some of it, okay?
Shred the cooked chicken using two forks. It should shred very easily and only takes a couple of minutes. Add a couple spoonfuls (or more, if desired) of the reserved crock pot sauce to the chicken. This will help ensure your Mexican shredded chicken is juicy (and not dry). Now the shredded chicken is ready to be used in your favorite recipes.
 / The Grateful Girl Cooks!")
 / The Grateful Girl Cooks!")
Serving Mexican Shredded Chicken
There are LOTS of ways to use Mexican shredded chicken. You can use this well-seasoned chicken for enchiladas, tostadas, flautas, taco salads, burritos and chimichangas. Some of our favorite ways to enjoy this shredded chicken are pictured below. The chicken is the featured ingredient in our chicken taco salad bowls, quesadillas and tacos.
 / The Grateful Girl Cooks!")
 / The Grateful Girl Cooks!")
 / The Grateful Girl Cooks!")
I hope you have the chance to try this recipe for Mexican Shredded Chicken. Once made, it is very versatile and can be used in a multitude of dishes. The shredded chicken also freezes well (if wrapped well and stored in an airtight container). Thanks for visiting my blog, and I hope you will come back soon for more family-friendly recipes. Have a good day!
Looking For More CHICKEN Recipes?
You can find ALL of my recipes in the Recipe Index, which is located at the top of the page. I have a LOT of yummy chicken recipes for you to enjoy, including:
Interested In More Recipes?
Thank you for visiting this website. I appreciate you using some of your valuable time to do so. If you’re interested, I publish a newsletter 2 times per month (1st and 15th) with all the latest recipes, and other fun info. I would be honored to have you join our growing list of subscribers, so you never miss a great recipe!
There is a Newsletter subscription box on the top right side (or bottom) of each blog post, depending on the device you use, where you can easily submit your e-mail address (only) to be included in my mailing list.
You Can Also Find Me On Social Media:
Facebook page: The Grateful Girl Cooks!
Pinterest: The Grateful Girl Cooks!
Instagram: jbatthegratefulgirlcooks
 / The Grateful Girl Cooks!")
Original recipe source: unknown (written down years ago on a piece of paper-no original source noted)
Make Mexican Shredded Chicken in a crock pot to use in tacos, burritos, quesadillas, taco salads, enchiladas, etc. Easy to make and delicious!
- 2 Tablespoons vegetable oil
- 4 large boneless, skinless chicken breasts approx. 2 lbs.
- ⅓ cup water
- ⅓ cup light soy sauce
- 1 Lime Juice of 1 lime
- 3 Tablespoons brown sugar
- 2 stems green onions (scallions) sliced (green + white parts)
- ½ teaspoon chili powder
- ½ teaspoon ground cumin
- ½ teaspoon garlic powder
- ½ teaspoon red pepper flakes
Cut chicken into 2" cubes. Pat chicken dry with paper towels. Heat 2 Tablespoons of oil on medium-high heat in a large skillet. Add chicken; quickly sear until nicely browned on all sides. Do not cook them all the way through (crock pot will finish).
Transfer browned chicken from skillet into crock pot. Reserve remaining liquid in skillet. Add water to "drippings" in skillet; cook/stir for one minute. Pour this liquid over chicken in crock pot.
Make the seasoning sauce: Combine all sauce ingredients in a medium bowl. Stir well, until brown sugar has dissolved and ingredients are fully incorporated. Pour seasoning sauce into crock pot. Stir well, to coat chicken with sauce. Put the lid on the crock pot. Cook for 4-5 hours on LOW heat, OR 3 hours on HIGH heat.
Once done cooking, transfer chicken to large bowl using a slotted spoon. There will still be liquid left in the crock pot. Shred chicken using two forks. Add a couple spoonfuls (or more) of reserved crock pot liquid to the chicken. This helps ensure the shredded chicken is juicy (and not dry). Now the shredded chicken is ready to be used in your favorite recipes. Enjoy!
Here’s one more to pin on your Pinterest boards!


 decadent desserts, drizzled with homemade caramel topping (2-3 servings per tart). SO GOOD! / The Grateful Girl Cooks!")


 decadent desserts, drizzled with homemade caramel topping (2-3 servings per tart). SO GOOD! / The Grateful Girl Cooks!")