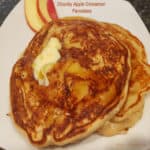
Category: Breakfast

Pear Pecan Bread

Make 2 loaves of absolutely delicious Pear Pecan Bread, drizzled with a sweet vanilla glaze. Make one loaf for you and another for a friend!

We were recently blessed with a grocery bag full of pears from one of our neighbors. He said they couldn’t handle any more and since it was the last of the harvest, they thought we might enjoy them! YES, PLEASE!  I let them ripen for about another week, then canned some pear butter to store in our pantry. YUM.

I’ve made pear bread before, but decided to try another recipe I found online that sounded wonderful. I doubled the original recipe, and added a vanilla glaze drizzled on top of each loaf. That way, we could eat one loaf, and give the other one to another family (or wrap it and freeze it for later. This pear pecan bread is so tasty, and it was no trouble at all for us to gobble it up within a matter of about 3 days!

The recipe makes two beautifully browned standard sized loaves of bread, using 8½” or a 9″ loaf pans. Small pieces of fresh pears and pecans dot each slice, and the bread is NOT dry (unless you over cook it… ha ha!). It is flavored with vanilla and the warm spices of cinnamon and nutmeg. Here’s how easy it is to make pear pecan bread:

Scroll Down For A Printable Recipe Card At The Bottom Of The Page

Mix The Wet Ingredients

Before making the batter, preheat your oven to 350°F, and lightly spray (or grease) two 8½” or 9″  loaf pans. Set aside. The batter doesn’t take too long to make, so you want your oven preheated and ready to go when you are!

To make the “wet” ingredients, place vegetable oil, granulated sugar and eggs in a large mixing bowl. Whisk (or beat) these well, until fully combined. Add the peeled and chopped pears, chopped pecans and vanilla extract to the bowl. Stir well, to fully combine these “wet” ingredients.

Oil, sugar and eggs are whisked together in mixing bowl until smooth.Chopped pears, pecans and vanilla extract are added to the batter.

Mix The Dry Ingredients And Add To the Wet Ingredients

In a separate bowl, stir (or whisk) together the “dry” ingredients. The dry ingredients used are all purpose flour, cinnamon, nutmeg, salt, baking powder and baking soda. Once combined, slowly add these “dry” ingredients, a little at a time, to the bowl containing the “wet” ingredients.

Stir as you add, and continue stirring just until all the dry ingredients are fully incorporated into the batter. When done combining the ingredients together, you will have the batter ready to make two loaves of pear pecan bread.

The dry ingredients, including flour and spices, are combined in a bowl.Dry ingredients are stirred into the pear pecan bread batter until combined.The batter for the bread is thoroughly combined and ready to pour into loaf pans.

Ready To Bake The Pear Pecan Bread

Evenly divide the batter between the two greased loaf pans, then place on a middle rack in your preheated oven. Bake at 350°F for 55-60 minutes. Oven temps can vary quite a bit, so check for doneness at the 55 minute mark.

When done, you can insert a toothpick into the center of a loaf, and if it comes out batter-free (clean), the bread is done. The loaves should be wonderfully browned, as well. Transfer the loaf pans to a wire rack, and let the bread cool for 10-15 minutes before trying to remove it from the pan. To remove from pan, slide a butter knife around all the edges of the pan to loosen the bread. Turn loaf pan upside down to release the bread. Cool the loaves on a wire rack after removing them from the pan.

Bread batter is poured evenly into two greased loaf pans before baking.After baking, the loaves of pear pecan bread are browned and cool on a wire rack.

Make The Vanilla Glaze For Drizzling

While the pear pecan bread is cooling, you can make the simple vanilla glaze that will be drizzled on the bread once cool. In a small bowl, mix together powdered sugar, vanilla extract, and a few drops of water. Stir, and continue to add a few drops of water at a time until the glaze is thinned just enough to drizzle over the top of the bread.

If you get it too thin, simply add a little bit more powdered sugar. If it is still too thick to drizzle with a fork, simply add a couple more drops of water until it reaches the desired consistency. Once the pear pecan bread has completely cooled, drizzle the top of each loaf decoratively with the vanilla glaze. I usually use a fork OR a honey dipper to do this. TIP: For easy cleanup, place a sheet of wax paper, parchment paper or aluminum foil UNDER the wire rack to catch drips while drizzling the glaze.

A vanilla glaze is made by combining powdered sugar, vanilla and water.Each of the pear pecan bread loaves is drizzled with vanilla glaze.

Time For A Slice Of Pear Pecan Bread!

Once the drizzled glaze has firmed up, the bread is ready to slice and serve! You can get about 8, one-inch slices per loaf. Serve with your favorite hot beverage (or a big glass of cold milk), and enjoy! We enjoy pear pecan bread for breakfast OR a great afternoon snack. It is delicious!

If you are interested, these loaves freeze very well. I usually wrap the loaf in plastic wrap, and then in aluminum foil when freezing. All you will need to do is let the loaf thaw completely before serving!

A peek at the inside of the loaf, and a slice of pear pecan bread.

I really hope you have the opportunity to make and enjoy this bread. We LOVE it! Thank you for taking time to visit my blog today. I hope you will come back soon for more family-friendly recipes. Take care, and have a wonderful day. God Bless You.

Looking For More BREAD Recipes?

You can find ALL of my recipes in the Recipe Index, which is located at the top of the page. I have some tried and true, delicious bread recipes there, including:

Interested In More Recipes?

Thank you for visiting this website. I appreciate you using some of your valuable time to do soIf you’re interested, I publish a newsletter 2 times per month (1st and 15th) with all the latest recipes, and other fun info. I would be honored to have you join our growing list of subscribers, so you never miss a great recipe!
There is a Newsletter subscription box on the top right side (or bottom) of each blog post, depending on the device you use, where you can easily submit your e-mail address (only) to be included in my mailing list.

You Can Also Find Me On Social Media:

Facebook page: The Grateful Girl Cooks!
Pinterest:
The Grateful Girl Cooks!
Instagram:
jbatthegratefulgirlcooks

Author's signature

Recipe adapted from Michaela Kenkel at: https://anaffairfromtheheart.com/pear-bread/

0 from 0 votes
Pear Pecan Bread
Prep Time
15 mins
Cook Time
55 mins
Total Time
1 hr 10 mins
 

Make 2 loaves of absolutely delicious Pear Pecan Bread, drizzled with a sweet vanilla glaze. Make one loaf for you and another for a friend!

Category: Bread/Breakfast, Snack
Cuisine: American
Keyword: pear pecan bread
Servings: 16 (8 slices per loaf)
Calories Per Serving: 414 kcal
Author: JB @ The Grateful Girl Cooks!
Ingredients
  • 1 cup vegetable oil
  • 2 cups granulated sugar
  • 4 large eggs
  • cups fresh pears peeled/cored/chopped
  • 1 cup chopped pecans
  • 2 teaspoons vanilla extract
  • 3 cups all purpose flour
  • 2 teaspoons cinnamon
  • 1 teaspoon nutmeg
  • 1 teaspoon salt
  • 1 teaspoon baking powder
  • 1 teaspoon baking soda
For Drizzle Glaze:
  • 1 cup powdered sugar
  • ½ teaspoon vanilla extract
  • drops water ,as needed to thin glaze
Instructions
  1. Preheat oven to 350°F. Lightly spray/grease two 8½" or 9" loaf pans. Set aside

  2. Place oil, granulated sugar and eggs in a large mixing bowl. Whisk or beat well, until combined. Add pears, pecans and vanilla extract. Stir well.

  3. In a separate bowl, stir (or whisk) together flour, cinnamon, nutmeg, salt, baking powder and baking soda. Slowly add this mixture, a little at a time, to the pear mixture, stirring as you add. Stir only until fully incorporated into the batter.

  4. Evenly divide batter in prepared pans; place on middle oven rack. Bake at 350°F. for 55-60 minutes. Oven temps can vary; check for doneness at the 55 minute mark. Insert a toothpick into the center of a loaf; if it comes out clean, bread is done. Transfer pans to a wire rack; let bread cool 10-15 minutes before removing from pan. Cool loaves on wire rack after removing from pan.

  5. Make vanilla glaze while bread is cooling. In a small bowl, combine powdered sugar, vanilla, and a few drops water. Stir; continue to add 2-3 drops of water at a time until glaze is thinned enough to drizzle on bread. Too thin? Add a little powdered sugar. Too thick to drizzle? Add a few drops of water until it reaches desired consistency. Once bread has cooled completely, drizzle each loaf with glaze, using a fork OR honey dipper. TIP: For easy cleanup, put wax paper, parchment paper or aluminum foil UNDER rack to catch glaze drips.

  6. Once glaze has hardened, bread is ready to slice and serve! Slice into 8, one-inch slices per loaf. Loaves can also be frozen if wrapped well. Enjoy!

Nutrition Facts
Pear Pecan Bread
Amount Per Serving (1 slice (1/16th of total))
Calories 414 Calories from Fat 180
% Daily Value*
Fat 20g31%
Saturated Fat 3g19%
Trans Fat 1g
Polyunsaturated Fat 10g
Monounsaturated Fat 6g
Cholesterol 47mg16%
Sodium 233mg10%
Potassium 128mg4%
Carbohydrates 56g19%
Fiber 2g8%
Sugar 35g39%
Protein 5g10%
Vitamin A 78IU2%
Vitamin C 1mg1%
Calcium 32mg3%
Iron 2mg11%
* Percent Daily Values are based on a 2000 calorie diet.

Here’s one more to pin on your Pinterest boards!Make 2 loaves of absolutely delicious Pear Pecan Bread, drizzled with a sweet vanilla glaze. Make one loaf for you and another for a friend!

Pumpkin Pecan Streusel Muffins

Pumpkin Pecan Streusel Muffins are full of pumpkin spice flavor and topped with a buttery pecan streusel. You’ll love these yummy muffins!
Pumpkin Pecan Streusel Muffins are full of pumpkin spice flavor and topped with a buttery pecan streusel. You'll love these yummy muffins!

Fall is the time for all things PUMPKIN! I have been making pumpkin muffins for years, but today I want to share our absolute FAVORITE recipe (found online) for these delicious breakfast treats. Full of flavor from pumpkin pie spices and topped with a decadent streusel topping, they are a real taste treat! Here’s how to make them:

Scroll Down For A Printable Recipe Card At The Bottom Of The Page

Prepare The Muffin Batter

Before mixing the batter, remember to preheat your oven to 375°F so it’s hot when the muffins are ready to bake. To make the batter, place pumpkin puree, milk, eggs, vanilla and butter (melted but cooled) in a large mixing bowl. Whisk these ingredients well, until combined and smooth. These are your “wet” ingredients.

Melted butter, pumpkin puree, eggs and vanilla extract are whisked together in large glass bowl.The wet ingredients for the muffins are whisked together until smooth.

In a separate bowl, combine all purpose flour, granulated sugar, pumpkin pie spice, baking soda and salt, and stir to combine. These are your “dry” ingredients. Stir or whisk the dry ingredients a little at a time into the wet ingredients. Continue to stir or whisk only until the ingredients have been incorporated into the batter. Don’t overmix!.

Flour, sugar, pumpkin pie spice mix, baking soda and salt make up the dry ingredients for muffins.The dry ingredients are combined with the wet ingredients for the pumpkin pecan streusel muffins.

Place 12 paper-liners into a standard sized muffin tin. I like to give each paper liner a little shot of non-stick baking spray before filling them with batter (a little trick a former professional baker told me over 25 years ago). Fill each muffin cup about halfway with batter, dividing the batter evenly. Set the pan aside and make the streusel topping.

The muffin batter is evenly divided into 12 paper-lined muffin cups.

Make The Pecan Streusel Topping

In a small bowl, combine flour, brown sugar, granulated sugar, chopped pecans, pumpkin pie spice, melted butter and salt. Once mixed together with a spoon or fork, it will be a crumbly streusel topping for your muffins.

If you don’t have any pumpkin pie spice mix in your pantry, you can use my simple recipe to make your own. It will make a bit more than you need for this recipe, so you can have extra for the NEXT batch of muffins! Get the pumpkin pie spice mix recipe HERE.

A streusel topping is made with butter, flour, brown sugar, granulated sugar, pecans, pumpkin pie spice and salt..After being combined, the streusel topping is ready to add to the muffin batter.

Time To Bake The Pumpkin Pecan Streusel Muffins!

Top each of the muffins with the pecan streusel, dividing it evenly between the 12 muffins. Now they’re ready to bake in your preheated oven. Bake the muffins for 20 minutes at 375°F.

When done, the muffins will be nicely browned, and a toothpick inserted into the top of a muffin should come out free of batter. Remove the muffins, and lightly sprinkle sifted powdered sugar over the top of each muffin. Transfer to a wire rack to finish cooling, and then they’re ready to serve and enjoy!

Each of the cups of pumpkin muffin batter is topped with pecan streusel before baking.Powdered sugar is sifted onto the muffins after they finish baking.

Who Wants A Yummy Muffin?

After the muffins have cooled slightly, they are ready to gobble up. We think they taste fantastic just slightly warm or at room temperature! Peel back those muffin paper-liners, and take a big bite.

These muffins are AMAZING! My husband says they are some of the best muffins he’s ever had (and he’s eaten a LOT of muffins over the years). Hope you enjoy them just as much as we do. YUM! They truly taste wonderful any time of year, but we especially love their warm pumpkin spice flavor during FALL! 

Pumpkin Pecan Streusel Muffins, cooling on a wire rack after baking.A close up of one of the pumpkin pecan streusel muffins.

I am confident you will really love these delicious Pumpkin Pecan Streusel Muffins. They are absolutely wonderful! Thanks for stopping by, and I sincerely invite you to come back soon for more family-friendly recipes. Have a great day.

Looking For More MUFFIN Recipes?

You can find ALL of my recipes in the Recipe Index, which is located at the top of the page. I have lots of delicious muffin recipes for you to enjoy, including:

Interested In More Recipes?

Thank you for visiting this website. I appreciate you using some of your valuable time to do soIf you’re interested, I publish a newsletter 2 times per month (1st and 15th) with all the latest recipes, and other fun info. I would be honored to have you join our growing list of subscribers, so you never miss a great recipe!
There is a Newsletter subscription box on the top right side (or bottom) of each blog post, depending on the device you use, where you can easily submit your e-mail address (only) to be included in my mailing list.

You Can Also Find Me On Social Media:

Facebook page: The Grateful Girl Cooks!
Pinterest:
The Grateful Girl Cooks!
Instagram:
jbatthegratefulgirlcooks

Author's signature

Original recipe source: Kathi and Rachel (a mother-daughter team), at laughingspatula.com/pumpkin-pecan-crunch-muffins/

3 from 1 vote
Pumpkin Pecan Streusel Muffins
Prep Time
15 mins
Cook Time
20 mins
Total Time
35 mins
 

Pumpkin Pecan Streusel Muffins are full of pumpkin spice flavor and topped with a buttery pecan streusel. You'll love these yummy muffins!

Category: Breakfast, Brunch, Snack
Cuisine: American
Keyword: pumpkin pecan streusel muffins
Servings: 12 muffins
Calories Per Serving: 332 kcal
Author: JB @ The Grateful Girl Cooks!
Ingredients
For Muffin Batter:
  • cups all purpose flour
  • ¾ cup granulated sugar
  • 2 teaspoons pumpkin pie spice (see NOTES below to make your own)
  • 1 teaspoon baking soda
  • ½ teaspoon salt
  • 1 cup pumpkin puree NOT pumpkin pie filling
  • 2 large eggs
  • ¼ cup milk
  • cup butter (melted and cooled) = 5½ Tablespoons
  • 1 teaspoon vanilla extract
For Streusel Topping:
  • 1 cup all purpose flour
  • ½ cup brown sugar
  • ½ cup chopped pecans can substitute walnuts
  • 2 Tablespoons granulated sugar
  • 1 teaspoon pumpkin pie spice (see NOTES below for substitution)
  • ¼ teaspoon salt
  • cup butter, melted = 5½ Tablespoons
Sprinkle Finished Muffins With A Small Amount Of SIFTED Powdered Sugar (if desired)
    Instructions
    1. Preheat oven to 375°F.

    2. Place pumpkin puree, milk, eggs, vanilla and melted (but cooled) butter in a large mixing bowl. Whisk well, until combined/smooth.

    3. In a separate bowl, combine flour, sugar, pumpkin pie spice, baking soda and salt; stir to combine. Stir or whisk these ingredients a little at a time into the pumpkin mixture. Stir or whisk only until ingredients have been incorporated into the batter. Don't overmix!

    4. Place 12 paper-liners into a standard sized muffin tin. Spray paper liners with non-stick baking spray, if desired. Fill each muffin cup about halfway with batter, dividing the batter evenly. Set pan aside; make streusel topping.

    5. MAKE STREUSEL TOPPING: In a small bowl, combine flour, brown sugar, granulated sugar, pecans, pumpkin spice, melted butter and salt. Streusel topping will be fairly crumbly. Top muffins with streusel, dividing evenly.

    6. Bake muffins for 20 minutes at 375°F. When done, muffins will be browned on top and a toothpick inserted into the top of a muffin should come out batter-free. Remove from oven; lightly sprinkle sifted powdered sugar on top of each muffin. Transfer to wire rack to finish cooling, then serve and enjoy!

    Recipe Notes

    NOTES: Don't have any pumpkin pie spice for this recipe? Make your own! HERE is the recipe for a handy mix (this makes extra), so you will have it handy. https://www.thegratefulgirlcooks.com/pumpkin-pie-spice-mix/

    Nutrition Facts
    Pumpkin Pecan Streusel Muffins
    Amount Per Serving (1 muffin)
    Calories 332 Calories from Fat 135
    % Daily Value*
    Fat 15g23%
    Saturated Fat 7g44%
    Trans Fat 1g
    Polyunsaturated Fat 2g
    Monounsaturated Fat 5g
    Cholesterol 59mg20%
    Sodium 345mg15%
    Potassium 126mg4%
    Carbohydrates 46g15%
    Fiber 2g8%
    Sugar 25g28%
    Protein 5g10%
    Vitamin A 3546IU71%
    Vitamin C 1mg1%
    Calcium 37mg4%
    Iron 2mg11%
    * Percent Daily Values are based on a 2000 calorie diet.

    Here’s one more to pin on your Pinterest boards!Pumpkin Pecan Streusel Muffins are full of pumpkin spice flavor and topped with a buttery pecan streusel. You'll love these yummy muffins!


    Chocolate Banana Berry Oatmeal

    Make your breakfast look AND taste good with a bowl of Chocolate Banana Berry Oatmeal! Filling and delicious, you’re gonna like it!
    Make your breakfast look AND taste good with a bowl of Chocolate Banana Berry Oatmeal! Filling and delicious, you're gonna like it!

    Do you enjoy oatmeal for breakfast? I sure do, and for years now have been enjoying it made in a variety of ways 2-3 times a week. It fills me up, and I truly think it tastes delicious, whether it’s made with nuts, raisins, cinnamon, apples, brown sugar, cranberries or other ingredients. THIS recipe is for chocolate oatmeal with fresh fruit. Yep. You heard me, and it’s so good.

    A few years ago I shared a recipe on my blog for “healthy chocolate oatmeal“. That recipe originally was discovered online from another blogger named Kristen at Dine And Dish. I loved that dish then and still do, but several months ago decided to make a couple changes, and this recipe is the result. The addition of several ingredients, plus a different cooking style and fresh fruit help this breakfast LOOK good, and it will definitely fill you up!

    Scroll Down For A Printable Recipe Card At The Bottom Of The Page

    Time To Make Some Oatmeal!

    Measure old fashioned oats and milk (I use low-fat) into a medium sized saucepan. Bring this mixture to a low boil, and then cook on low for about 3-4 more minutes. When done, most of the liquid will have reduced.

    Take the pan off of the heat source. Immediately stir in a couple Tablespoons of cocoa powder, a teaspoon of pure maple syrup (or honey) and a Tablespoon of almond butter. NOTE: The almond butter is optional, but I like to add it to the oatmeal for a little bit more protein.

    Stir these ingredients into the oatmeal until thoroughly incorporated (and almond butter has melted). If the oatmeal becomes too thick for your taste, simply stir in a tiny bit more milk.

    Old-fashioned oats and milk are cooked together in a saucepan.

    Maple syrup (or honey), cocoa powder and almond butter are added to the cooked oatmeal.

    Once fully incorporated, transfer the chocolate oatmeal into a small serving bowl. Now it’s time to “pretty it up” for serving and eating!

    The chocolate oatmeal is transferred to a serving bowl, to garnish before serving.

    To Serve Chocolate Banana Berry Oatmeal

    Now you’re almost ready to serve Chocolate Banana Berry Oatmeal. The only problem with that is you will still need to add bananas and strawberries, right? Right!

    Garnish the top of the finished oatmeal with thinly sliced bananas and strawberries. I love to do this, because the fresh fruit adds a nice “POP” of color which really makes the dish look inviting. The fresh fruit garnish also add additional sweetness, texture and flavor to the chocolate oatmeal

    Slices of banana and strawberries are added to make it chocolate banana berry oatmeal.A spoonful of chocolate banana berry oatmeal, ready to be eaten.

    I hope you enjoy this filling and delicious Chocolate Banana Berry Oatmeal! The recipe can be easily doubled or tripled if making it for more than one person. Thank you for stopping by, and I hope you will come back soon for more family-friendly recipes. Have a great day!

    Looking For More OATMEAL Recipes?

    You can find ALL of my recipes in the Recipe Index, located at the top of the page. I have a nice variety of oatmeal recipes you may enjoy, including:

    Interested In More Recipes?

    Thank you for visiting this website. I appreciate you using some of your valuable time to do soIf you’re interested, I publish a newsletter 2 times per month (1st and 15th) with all the latest recipes, and other fun info. I would be honored to have you join our growing list of subscribers, so you never miss a great recipe!
    There is a Newsletter subscription box on the top right side (or bottom) of each blog post, depending on the device you use, where you can easily submit your e-mail address (only) to be included in my mailing list.

    You Can Also Find Me On Social Media:

    Facebook page: The Grateful Girl Cooks!
    Pinterest:
    The Grateful Girl Cooks!
    Instagram:
    jbatthegratefulgirlcooks

    Author's signature

    0 from 0 votes
    Chocolate Banana Berry Oatmeal
    Prep Time
    5 mins
    Cook Time
    3 mins
    Total Time
    8 mins
     

    Make your breakfast look AND taste good with a bowl of Chocolate Banana Berry Oatmeal! Filling and delicious, you're gonna like it!

    Category: Breakfast
    Cuisine: American
    Keyword: chocolate banana berry oatmeal
    Servings: 1
    Calories Per Serving: 399 kcal
    Author: JB @ The Grateful Girl Cooks!
    Ingredients
    • cup old fashioned oats ,uncooked
    • cup low-fat milk ,or milk of choice
    • 2 Tablespoons unsweetened cocoa powder
    • 1 Tablespoon almond butter , optional but good!
    • 1 teaspoon pure maple syrup , or honey
    For Garnish:
    • 2 large strawberries , thinly sliced
    • ½ large banana , thinly sliced
    Instructions
    1. Measure old fashioned oats and milk into a medium saucepan. Bring mixture to a low boil, and then cook on low for 3-4 more minutes. When done, most of the liquid will have reduced.

    2. Take pan off the heat. Immediately stir in cocoa powder, maple syrup (or honey) and almond butter (if using). Stir until fully incorporated (and almond butter has melted). If oatmeal becomes too thick for your taste, stir in a bit more milk.

    3. Transfer chocolate oatmeal into a serving bowl. Garnish with thinly sliced bananas and strawberries. Serve, and enjoy!

    Recipe Notes

    NOTE: Caloric calculation was made using low-fat milk AND almond butter.

    Nutrition Facts
    Chocolate Banana Berry Oatmeal
    Amount Per Serving (1 g)
    Calories 399 Calories from Fat 144
    % Daily Value*
    Fat 16g25%
    Saturated Fat 4g25%
    Trans Fat 1g
    Polyunsaturated Fat 3g
    Monounsaturated Fat 7g
    Cholesterol 13mg4%
    Sodium 81mg4%
    Potassium 932mg27%
    Carbohydrates 59g20%
    Fiber 11g46%
    Sugar 24g27%
    Protein 15g30%
    Vitamin A 211IU4%
    Vitamin C 38mg46%
    Calcium 291mg29%
    Iron 4mg22%
    * Percent Daily Values are based on a 2000 calorie diet.

    Here’s one more to pin on your Pinterest boards!Make your breakfast look AND taste good with a bowl of Chocolate Banana Berry Oatmeal! Filling and delicious, you're gonna like it!

    Blueberry Banana Baked Oatmeal

    Blueberry Banana Baked Oatmeal is a cinch to make, and is full of juicy blueberries and banana slices! It’s an easy, yummy breakfast!
    Blueberry Banana Baked Oatmeal is a cinch to make, and is full of juicy blueberries and banana slices! It's an easy, yummy breakfast!

    Do you enjoy oatmeal? When I was a kid, if you had told me that someday I would actually ENJOY oatmeal, I would have laughed. Hilariously. Oatmeal? You have got to be kidding me. HOWEVER… I now LOVE it, whether it’s a big ol’ bowl of it (with brown sugar and cinnamon), a baked version, or in cookies. Go figure.

    I’ve made several varieties of BAKED oatmeal over the past few years, and today I want to share this simple recipe for blueberry banana baked oatmeal. It is VERY EASY to prepare, and then is popped in the oven to bake. Once it is done baking, I let it cool down to room temperature then cut it into slices for serving. EASY PEASY! And guess what? It is delicious! Here’s how to make this delicious breakfast treat:

    Scroll Down For A Printable Recipe Card At The Bottom Of The Page

    How To Make Blueberry Banana Baked Oatmeal

    Begin by preheating your oven to 350°F. It only takes a few minutes to get the oatmeal ready for the oven, so you want it to be nice and hot before you add it. Okay, now for the oatmeal…

    Stir together rolled oats (old fashioned, not quick or instant), sugar, baking powder and salt in a large mixing bowl. Add milk, melted (and cooled) butter, lightly beaten eggs, blueberries and vanilla extract. Stir gently to combine these ingredients.

    NOTE: You can use fresh OR frozen blueberries for this dish. I typically use fresh, but if you will be using frozen, there is no need to thaw them. Just toss them in there frozen.

    Oats, sugar, baking powder and salt are combined in a mixing bowl.Blueberries, milk, melted butter, vanilla and eggs are added to the batter and stirred in.

    Add the banana slices, and gently stir them into the batter, until fully incorporated into the batter. Once done, the oatmeal is ready for the oven!

    Sliced bananas are gently stirred into the blueberry banana baked oatmeal mixture.

    Time To Bake It!

    Lightly spray a 9×9 baking dish with non-stick cooking spray. Pour the oatmeal mixture into the baking dish, spreading it evenly to disperse the blueberries and bananas. OPTIONAL- you can also top the dish with ¼ cup chopped walnuts or pecans if desired, before baking. We don’t usually add the nuts, but that is completely your choice!

    Place the dish into the preheated oven, and bake at 350°F. for 45-50 minutes, or until the oatmeal has set. Since oven temps can vary quite a bit, I suggest checking it at 45 minutes, and then bake longer, if necessary. The top should be golden brown in color once done.

    TIP: If you wish the top to be more brown in color, you can put the baking dish under the broiler (5″-6″ away from heating element) and let it brown more. IMPORTANT NOTE: If you do this step, be sure to check it every 30 seconds and rotate the pan until browned to your liking (approx. 1 minute or so total). Keep a very close eye on it, so it does not BURN (and ruin your nice breakfast)! 

    A baking dish full of the oatmeal mixture, ready to go into the oven.Blueberry Banana Baked Oatmeal is golden brown on top, once taken out of the oven.

    When done, remove the blueberry banana baked oatmeal from the oven, and transfer the dish to a wire rack to cool. Of course, you CAN eat it hot, but we have found we enjoy this dish best at room temperature. It slices better, etc., but that is your choice, as to how you will enjoy your baked oatmeal best!

    Close up of the baked oatmeal, full of juicy blueberries and sliced bananas.

    Ready To Enjoy A Piece Of Blueberry Banana Baked Oatmeal?

    Once the blueberry banana baked oatmeal has cooled to room temperature, you can easily cut it into 9 pieces (about 3″ x 3″ each). Grab a fork, plop a piece on a plate, and enjoy your yummy breakfast, with some hot coffee or tea.

    Slice of blueberry banana baked oatmeal, served on a white plate with a fork.

    I really hope you enjoy this blueberry banana baked oatmeal. We sure do! It is best if eaten within 2-3 days after cooking (and it also freezes well, too, if wrapped securely). Thank you for stopping by today, and I hope you will come back again for more family-friendly recipes. Take care, and have a GREAT day!

    Looking For More OATMEAL Recipes?

    You can find ALL of my recipes in the Recipe Index, which is located at the top of the page. I have a nice variety of recipes that feature oatmeal you might enjoy checking out, including:

    Interested In More Recipes?

    Thank you for visiting this website. I appreciate you using some of your valuable time to do soIf you’re interested, I publish a newsletter 2 times per month (1st and 15th) with all the latest recipes, and other fun info. I would be honored to have you join our growing list of subscribers, so you never miss a great recipe!
    There is a Newsletter subscription box on the top right side (or bottom) of each blog post, depending on the device you use, where you can easily submit your e-mail address (only) to be included in my mailing list.

    You Can Also Find Me On Social Media:

    Facebook page: The Grateful Girl Cooks!
    Pinterest:
    The Grateful Girl Cooks!
    Instagram:
    jbatthegratefulgirlcooks

    Author's signature

    Original recipe source: A Fred Meyer booklet called “My Magazine” that was mailed to our home, Summer edition, page 22

    0 from 0 votes
    Blueberry Banana Baked Oatmeal
    Prep Time
    15 mins
    Cook Time
    50 mins
    Total Time
    1 hr 5 mins
     

    Blueberry Banana Baked Oatmeal is a cinch to make, and is full of juicy blueberries and banana slices! It's an easy, yummy breakfast!

    Category: Breakfast
    Cuisine: American
    Keyword: blueberry banana baked oatmeal
    Servings: 9 (3" square pieces)
    Calories Per Serving: 304 kcal
    Author: JB @ The Grateful Girl Cooks!
    Ingredients
    • 3 cups old fashioned rolled oats
    • ¾ cup granulated sugar
    • 2 teaspoons baking powder
    • ½ teaspoon salt
    • 1 cup milk
    • ½ cup butter (1 stick) melted, and cooled
    • 2 large eggs beaten
    • ½ teaspoon vanilla extract
    • ¾ cup blueberries fresh or frozen
    • 1 banana sliced (approx. 1/2" slices)
    Instructions
    1. Preheat oven to 350°F. Lightly grease a 9"x9" baking pan with non-stick spray.

    2. Stir together oats, sugar, baking powder and salt in a large bowl. Add milk, melted/cooled butter, beaten eggs, blueberries and vanilla extract. Stir gently to combine. Add banana slices; gently stir them into batter, until fully incorporated.

    3. Pour oatmeal mixture into prepared baking dish, spreading batter evenly. OPTIONAL- you can also top the dish with ¼ cup chopped walnuts or pecans if desired, before baking.

    4. Bake at 350°F. for 45-50 minutes, or until the oatmeal has set. Oven temps can vary;, I suggest checking it at 45 minutes, and then bake longer, if necessary. Oatmeal should be golden brown on top.

      TIP: If you wish the top to be more browned, put the baking dish under the broiler (5"-6" away from heating element) and let it brown more. IMPORTANT NOTE: If you do this step, be sure to check it every 30 seconds and rotate the pan until browned to your liking (approx. 1 minute or so total). Keep a very close eye on it, so it does not BURN (and ruin your nice breakfast)! 

    5. When done, remove baked oatmeal from oven and transfer to wire rack to cool. Once cooled to room temp., cut it into 9 pieces ( 3" x 3" each). Enjoy!

    Recipe Notes

    NOTE: You can use fresh OR frozen blueberries for this dish. If using frozen, there is no need to thaw them.

    Nutrition Facts
    Blueberry Banana Baked Oatmeal
    Amount Per Serving (1 3"x 3" square)
    Calories 304 Calories from Fat 117
    % Daily Value*
    Fat 13g20%
    Saturated Fat 7g44%
    Trans Fat 1g
    Polyunsaturated Fat 1g
    Monounsaturated Fat 4g
    Cholesterol 70mg23%
    Sodium 249mg11%
    Potassium 302mg9%
    Carbohydrates 42g14%
    Fiber 3g13%
    Sugar 21g23%
    Protein 6g12%
    Vitamin A 442IU9%
    Vitamin C 2mg2%
    Calcium 96mg10%
    Iron 2mg11%
    * Percent Daily Values are based on a 2000 calorie diet.

    Here’s one more to pin on your Pinterest boards!Blueberry Banana Baked Oatmeal is a cinch to make, and is full of juicy blueberries and banana slices! It's an easy, yummy breakfast!

    EASY Buttermilk Pancakes

    Make a batch of delicious, EASY Buttermilk Pancakes from scratch in under 10 minutes! Mix the batter, and onto a griddle or skillet they go!
    Make a batch of delicious, EASY Buttermilk Pancakes from scratch in under 10 minutes! Mix the batter, and onto a griddle or skillet they go!

    If you’re like me, you probably purchase store-bought pancake mix to make pancakes whenever you want to make a big breakfast.

    Did you know it is ridiculously simple  to make easy buttermilk pancakes from scratch in only a few minutes? That’s right! Buttermilk helps to lighten the batter and create airy pancakes!

    Making buttermilk pancakes from scratch only requires a few common ingredients you probably already have in your kitchen. Even if you don’t have buttermilk handy, you can very quickly make a great substitute with milk and white vinegar (tip shown in the printable recipe card).

    Here’s how to make some EASY buttermilk pancakes in practically no time at all.

    Scroll Down For A Printable Recipe Card At The Bottom Of The Page

    Make The Pancake Batter

    Whisk together flour, sugar, baking soda, salt and baking powder in a large bowl. Set this bowl of DRY ingredients aside while you mix the wet ingredients.

    In a SEPARATE bowl, whisk together the eggs and buttermilk. These are your WET ingredients.

    Dry pancake batter ingredients are whisked together in a large bowl.Eggs and buttermilk are whisked together in a separate bowl.

    Stir the WET ingredients (egg and buttermilk) into the bowl of dry ingredients. Stir, to combine, just until the ingredients are mixed, but do not OVERMIX.

    This is your batter for the easy buttermilk pancakes. See how easy it is to make the batter from scratch?

    Wet ingredients are combined with dry ingredients to make batter for easy buttermilk pancakes.

    Cooking The Easy Buttermilk Pancakes

    Lightly spray a griddle or large skillet with a non-stick cooking spray or brush on some cooking oil to cover the surface.

    Heat the griddle until hot. Using about 1/4 cup per pancake, pour the pancake batter onto the grill, forming a circle. The pancakes will be approximately 5″ in diameter.

    As the easy buttermilk pancakes cook, large bubbles will appear on the surface of the pancakes, as shown below.

    When there are lots of bubbles on top AND the bottoms of the pancakes are golden brown, carefully flip the pancakes to the other side.

    Pancakes are cooked until bubbles form on surface and bottom sides are golden brown.Time to turn over the pancakes when large bubbles appear on the top.

    Keep Going!

    Continue to cook the pancakes until set, and cooked through. Both sides should be golden brown when done.

    Remove the pancakes from the griddle (or skillet), and transfer them to serving plates. Repeat this process with all the batter, which will yield approximately 15 pancakes.

    You can wrap the pancakes in foil and keep them warm in a low temperature oven while you cook the rest of the pancakes, if you wish.

    Easy buttermilk pancakes cooking on an electric griddle.

    Let’s Eat Some EASY Buttermilk Pancakes!

    When ready to serve, place the hot pancakes onto serving plates, and top each stack with soft (or melted) butter, and some delicious maple syrup.

    I also enjoy easy buttermilk pancakes when served with my homemade Blackberry Pancake Syrup, as seen in the second photo below). YUM!

    A stack of three easy buttermilk pancakes, topped with butter and maple syrup.Blackberry syrup and whipped cream top this stack of easy buttermilk pancakes.

    I hope you will try this simple recipe to make homemade EASY buttermilk pancakes for those you love. They really are delicious, and I hope you enjoy them as much as we do!

    Have a wonderful day, and thank you for stopping by. Please come back again soon for more family-friendly recipes.

    Looking For More PANCAKE Recipes?

    You can find ALL of my recipes in the Recipe Index, located at the top of the page. I have some delicious pancake recipes you’ll enjoy, including:

    Want More Recipes? Get My FREE Newsletter!

    I publish a newsletter 2 times per month (1st and 15th) with lots of recipes, tips, etc..
    Would you like to join our growing list of subscribers?

    There is a Newsletter subscription box on the top right (or bottom) of each blog post, depending on the device you use.
    You can submit your e-mail address there, to be added to my mailing list.

    Find Me On Social Media:

    Facebook page: The Grateful Girl Cooks!
    Pinterest:
    The Grateful Girl Cooks!
    Instagram:
    jbatthegratefulgirlcooks

    Author's signature

    Original recipe source: “Taste of Home” magazine, Aug./Sept. 2006 issue, pages 16-17, published by Reiman Publications, Inc.

    ↓↓ PRINTABLE RECIPE BELOW ↓↓

    0 from 0 votes
    EASY Buttermilk Pancakes
    Prep Time
    5 mins
    Cook Time
    5 mins
    Total Time
    10 mins
     

    Make a batch of delicious, EASY Buttermilk Pancakes from scratch in under 10 minutes! Mix the batter, and onto a griddle or skillet they go!

    Category: Breakfast
    Cuisine: American
    Keyword: easy buttermilk pancakes
    Servings: 15 pancakes (approx.)
    Calories Per Serving: 97 kcal
    Author: JB @ The Grateful Girl Cooks!
    Ingredients
    • 2 cups all purpose flour
    • cup granulated sugar
    • 1 teaspoon baking soda
    • 1 teaspoon salt
    • ¾ teaspoon baking powder
    • 2 large eggs
    • 2 cups buttermilk (see NOTES below for substitution)
    Instructions
    1. Whisk together flour, sugar, baking soda, salt and baking powder in a large bowl. Set bowl aside. In a SEPARATE bowl, whisk together eggs and buttermilk.

    2. Stir egg/buttermilk mixture into the bowl of dry ingredients. Stir, to combine, only until ingredients are mixed; do not OVERMIX batter.

    3. Lightly spray griddle or large skillet with a non-stick cooking spray or brush with oil to cover surface. Heat greased griddle until hot. Using about 1/4 cup per pancake, pour batter onto grill, forming a circle, approx. 5" in diameter. As pancakes cook, bubbles will appear on surface of pancakes. When there are lots of bubbles on top AND bottoms of pancakes are golden brown, carefully flip pancakes to the other side. Continue to cook until set and bottom of pancakes are browned. Remove pancakes from griddle; transfer to plates. Repeat process with remaining batter.

    4. Serve pancakes with butter and pancake syrup. ENJOY!

    Recipe Notes

    Notes: BUTTERMILK SUBSTITUTE: Measure 2 cups whole milk into container. Remove 2 Tablespoons milk from container. Add 2 Tablespoons distilled white vinegar (or fresh lemon juice) and stir to combine. Let milk sit 5-10 minutes. Stir and use, as a substitute for buttermilk.

    Nutrition Facts
    EASY Buttermilk Pancakes
    Amount Per Serving (1 pancake)
    Calories 97 Calories from Fat 18
    % Daily Value*
    Fat 2g3%
    Saturated Fat 1g6%
    Trans Fat 1g
    Polyunsaturated Fat 1g
    Monounsaturated Fat 1g
    Cholesterol 28mg9%
    Sodium 272mg12%
    Potassium 90mg3%
    Carbohydrates 16g5%
    Fiber 1g4%
    Sugar 3g3%
    Protein 4g8%
    Vitamin A 89IU2%
    Calcium 52mg5%
    Iron 1mg6%
    * Percent Daily Values are based on a 2000 calorie diet.

    Here’s one more to pin on your Pinterest boards!Make a batch of delicious, EASY Buttermilk Pancakes from scratch in under 10 minutes! Mix the batter, and onto a griddle or skillet they go!

    Lemon Dutch Baby

    Make a Lemon Dutch Baby (serves 4) in only a few minutes! Ingredients for this fluffy German pancake are blended, then baked in a skillet!
    Make a Lemon Dutch Baby (serves 4) in only a few minutes! Ingredients for this fluffy German pancake are blended, then baked in a skillet!Have you ever had a Lemon Dutch Baby? Dutch Babies are also called German Pancakes, and this one is absolutely delicious! This fluffy baked pancake is flavored with vanilla extract and fresh grated lemon zest. It can be served with  powdered sugar and lemon wedges, if desired (YES, DO IT!). We love the sweetness a bit of sifted powdered sugar brings, and always squeeze a bit of lemon juice over each portion. It is so yummy!

    Guess what? This lemon Dutch baby recipe is super easy, too, which means it’s a keeper! I was inspired to make this after making some absolutely yummy miniature Dutch babies, so I modified the recipe a bit, and landed on this one!

    Lemon Dutch Babies are incredibly easy and delicious, and you can’t go wrong with that combo! The ingredients are blended, poured into a hot cast iron skillet, and then baked until golden brown and puffy! Let me show you how easy it is to make a delicious Lemon Dutch Baby that will serve 4!

    Scroll Down For a Printable Recipe Card At the Bottom Of The Page

    Make The Batter For The Lemon Dutch Baby

    Put the milk, eggs, flour, salt, vanilla extract, and freshly grated lemon zest into a blender. Put the lid on (kind of important, right?), and blend these ingredients, until they have been combined well. Make sure there are no lumps in the batter.

    The ingredients for the German pancake are blended until smooth.

    Blend in 2 Tablespoons of butter, that has been melted and cooled to room temperature, and set remaining ONE Tablespoon aside for later. Drizzle the melted butter (using the removable top as shown below) into the blender, while running the blender on low speed. Okay- now you’ve made the batter for your lemon Dutch baby. See how easy that is?

    Melted and cooled butter is added to the batter for the Dutch baby.

    Baking The Lemon Dutch Baby

    Heat a 9″ or 10″ cast iron skillet on medium heat. Once the skillet is hot, pour in the reserved Tablespoon of melted butter. Use a pastry brush to coat the bottom and sides of the skillet with butter. Pour the batter into the hot skillet, and immediately place the skillet into a preheated 425°F. oven.

    Bake the lemon Dutch baby at 425°F. for 13-15 minutes. When done, the Dutch baby should be puffy, and a light golden brown color, and cooked through. Remove the skillet from the oven.

    Batter is poured into a hot, buttered skillet before baking.The Lemon Dutch Baby is puffy and golden, once it has been removed from the oven.

    Serving The Lemon Dutch Baby

    Even though it is optional, I recommend generously dusting the surface with sifted powdered sugar, and lemon wedges. Each person can squeeze fresh lemon juice over their serving (one or two wedges per serving). You won’t need any syrup, because the lemon juice and powdered sugar combo is all you will need to sweeten it. Slice the lemon Dutch baby into 4 wedges, and serve immediately!

    A lemon Dutch baby, garnished with powdered sugar, lemon wedges and a strawberry.Lemon wedges and a strawberry garnish the powdered sugar covered Lemon Dutch Baby.

    I really hope you enjoy this Lemon Dutch Baby! We really think they are a wonderful breakfast treat. My favorite way to enjoy it is to squeeze fresh lemon juice over my powdered sugar dusted wedge, and eat it just like that – YUM. This breakfast treat is sweet, tangy, and absolutely delicious.

    If you enjoy eating Dutch Babies, please be sure to also check out my fun recipe for Mini Dutch Babies. They are fruit filled little miniature Dutch babies, and are perfect for serving at any brunch or special occasion! Thanks for stopping by, and I sincerely hope you will come back again soon for more yummy, family-friendly recipes. Have a fantastic day. friends.

    Looking For More BREAKFAST Recipes?

    You can find ALL of my recipes in the Recipe Index, located at the top of the page. I have a wonderful variety of recipes for breakfast I know you’ll enjoy, including:

    Interested In More Recipes?

    Thank you for visiting this website. I appreciate you using some of your valuable time to do soIf you’re interested, I publish a newsletter 2 times per month (1st and 15th) with all the latest recipes, and other fun info. I would be honored to have you join our growing list of subscribers, so you never miss a great recipe!
    There is a Newsletter subscription box on the top right side (or bottom) of each blog post, depending on the device you use, where you can easily submit your e-mail address (only) to be included in my mailing list.

    You Can Also Find Me On Social Media:

    Facebook page: The Grateful Girl Cooks!
    Pinterest:
    The Grateful Girl Cooks!
    Instagram:
    jbatthegratefulgirlcooks

    Author's signature

    0 from 0 votes
    Lemon Dutch Baby
    Prep Time
    5 mins
    Cook Time
    13 mins
    Total Time
    18 mins
     

    Make a Lemon Dutch Baby (serves 4) in only a few minutes! Ingredients for this fluffy German pancake are blended, then baked in a skillet!

    Category: Breakfast
    Cuisine: American
    Keyword: lemon Dutch baby
    Servings: 4
    Calories Per Serving: 218 kcal
    Author: JB @ The Grateful Girl Cooks!
    Ingredients
    • ½ cup milk
    • 4 large eggs
    • ½ cup all purpose flour
    • ¼ teaspoon salt
    • ½ teaspoon vanilla extract
    • teaspoons grated lemon zest
    • 3 Tablespoons butter melted, cooled and DIVIDED
    Garnish with sifted powdered sugar, and lemon wedges, for serving. (OPTIONAL, but recommended)
      Instructions
      1. Preheat oven to 425°F.

      2. Place milk, eggs, flour, salt, vanilla, and lemon zest into blender. Put lid on; blend well, until combined. Make sure there are no lumps in the batter. Drizzle in 2 Tablespoons of butter (melted/cooled to room temp.) slowly through removable top on blender. Reserve remaining Tablespoon of butter for later.

      3. Heat a 9" or 10" cast iron skillet on medium heat. Once skillet is hot, pour in reserved Tablespoon of melted butter. Use a pastry brush to coat bottom and sides of skillet with butter. Pour batter into hot skillet, and immediately place skillet into preheated 425°F. oven.

      4. Bake at 425°F. for 13-15 minutes. When done, the Dutch baby should be puffy, a light golden brown color, and cooked through. Remove skillet from oven.

      5. I highly recommend generously dusting the surface with sifted powdered sugar, and then top with lemon wedges. Each person can squeeze fresh lemon juice over their serving (one or two wedges per serving).  No syrup is really needed, because the lemon juice and powdered sugar combo will sweeten each serving. Slice into 4 wedges, and serve immediately! Enjoy!

      Recipe Notes

      NOTE: Caloric calculation is made without adding in calories from optional powdered sugar and lemon wedge garnish, as amounts used may vary from person to person.

      Nutrition Facts
      Lemon Dutch Baby
      Amount Per Serving (1 (1/4 of total))
      Calories 218 Calories from Fat 126
      % Daily Value*
      Fat 14g22%
      Saturated Fat 7g44%
      Trans Fat 1g
      Polyunsaturated Fat 1g
      Monounsaturated Fat 4g
      Cholesterol 210mg70%
      Sodium 305mg13%
      Potassium 134mg4%
      Carbohydrates 14g5%
      Fiber 1g4%
      Sugar 2g2%
      Protein 9g18%
      Vitamin A 591IU12%
      Vitamin C 1mg1%
      Calcium 71mg7%
      Iron 2mg11%
      * Percent Daily Values are based on a 2000 calorie diet.

      Here’s one more to pin on your Pinterest boards!Make a Lemon Dutch Baby (serves 4) in only a few minutes! Ingredients for this fluffy German pancake are blended, then baked in a skillet!


      Blackberry Pancake Syrup

      Learn how to make delicious Blackberry Pancake Syrup with fresh or frozen blackberries. Easy to make, and it’s yummy on waffles and ice cream, too!Learn how to make delicious Blackberry Pancake Syrup with fresh or frozen blackberries. Easy to make- yummy on waffles and ice cream, too!

      I love pancakes. I can’t help myself… they bring back so many memories of my childhood. Usually we eat our pancakes the traditional way- with maple syrup… BUT it is so awesome to make a batch of homemade blackberry pancake syrup for an occasional treat!

      In our little corner of Oregon, blackberries grow wild just about everywhere you turn during the heat of summer! We have several vines that grown up and over our back fence (from the neighborhood park), so I can get all the free blackberries I want! I can even store them in our freezer to use later in the year. WhooHoo!

      Blackberries growing over our back fence.

      Blackberry pancake syrup is one of the treats I can make with fresh (or frozen) blackberries, and it is really tasty! Other foods I have made with my treasure trove of blackberries are muffins, blackberry jam, crisps, handpies, scones, soda, and bar cookies, etc. Today I want to show you how to make blackberry pancake syrup using only a few ingredients. Here’s how:

      NOTE: The recipe (as written) will yield about 3 cups syrup. My photos reflect a doubled recipe. I also used frozen blackberries when I photographed this blog post.

      Scroll Down For A Printable Recipe Card At The Bottom Of The Page

      How To Make Blackberry Pancake Syrup

      Place blackberries, granulated sugar and water in a large pot (see NOTE section of printable recipe for details regarding using frozen berries). **Not sure why these turned out looking so red under the lights, but yep… they REALLY are blackberries that had been frozen**. Stir the mixture well, and turn the heat to medium-high. Bring the berries to a FULL BOIL, then reduce the heat to Low. Let the berries and liquid simmer 10-12 minutes, stirring occasionally, then remove the pot from the heat.

      Mash the berries really well. You can use a potato masher, the back of a large spoon, or a fork to do this. I vote for the potato masher, if you have access to one (quicker). Once mashed, let the berry mixture cool (off the heat) for 20-25 minutes.

      Blackberries, water and sugar cooking in order to make pancake syrup.Lots of blackberries cooking in large pot to make pancake syrup.

      Strain Berries to Remove The Seeds

      This step can be a bit time-consuming, but it will be worth it in the end, because it will remove almost all the seeds from your pancake syrup. First, place a large bowl on the counter, and place a wire sieve over it. Transfer a cup or two of the berry/juice mixture to the strainer.

      Using the back of a large spoon, firmly press the “syrupy” blackberry puree into the sieve. The juice for the syrup will drip through into the bowl below. Continue pressing until almost all of the juice and puree have been filtered through the sieve. Just keep on pressing!

      Pressing cooked blackberries through sieve to remove seeds from syrup below.Back of a spoon is used to press cooked blackberries through sieve to filter out seeds.

      Be sure to take a spoon and remove all the thick blackberry puree clinging to the underside bottom of the sieve and add it to the juices in the bowl. This thick puree is what will help thicken the syrup, so it is GOLD! Discard the seeds that remain inside of the sieve, then give the sieve a quick rinse. Process the next bit of berries and juice, continuing until all have been processed in this way.

      Continue to repeat this process until all the berries and juice have been “processed” this way. The blackberry pancake syrup that is in the bowl is what you will use. Your syrup may vary in thickness consistency, depending on whether you use frozen (tends to be thinner) or fresh blackberries, but there are ways to thicken it more, if necessary. See below.

      Thickened blackberry pulp is collected from bottom of sieve to thicken syrup.Spoon with blackberry pulp to add to the pancake syrup to thicken it.

      Tips for Thickening Syrup

      TIP: Do you want the syrup thicker? Here are two options: I have heard from others that if you want the finished syrup to be thicker in consistency, you can add 1/2 cup of light corn syrup to the blackberry syrup and stir to combine (after seeds have been removed). You can also cook the syrup again for 2-3 minutes more at this point to reduce the volume (and thicken it more). Your choice, if you think it’s necessary (usually it’s not), but it’s good to have options, right?

      Time to Enjoy Homemade Blackberry Pancake Syrup!

      Pour the finished blackberry syrup into the container of your choice. I like to use a clean, empty old pancake syrup bottle for this purpose, but you can use whatever you have available (with a lid, of course). 

      Because I doubled this recipe it made enough to fill a standard sized pancake syrup bottle, plus an “almost full” quart jar. Be sure to store the blackberry pancake syrup in the refrigerator when not using. TIP: You can also store extra blackberry pancake syrup in the freezer to use at a later date. Thaw and reheat to use.

      Serve blackberry pancake syrup warm or at room temperature on your favorite stack of pancakes! Enjoy this delicious treat- it’s a nice reminder year-round of summer’s bountiful blackberry harvest! It’s also yummy on ice cream, pound cake, cheesecake or other desserts! I even used it on my Triple Berry French Toast Cups (3rd photo below). YUM!

      A bottle full of homemade blackberry pancake syrup is ready to use.A stack of pancakes topped with homemade blackberry pancake syrup and whipped cream.Blackberry pancake syrup, served with a baked French Toast cup.

      I hope you have the opportunity to make this delicious blackberry pancake syrup. It’s really quite delicious, and it’s a very versatile syrup to have in the refrigerator for a number of desserts, too. Thanks for stopping by, and I sincerely hope you will come back soon.

      Looking For Some PANCAKE Recipes?

      You can find all of my recipes in the Recipe Index, which is located at the top of the page. I have several delicious pancake recipes you might enjoy, including:

      Interested In More Recipes?

      Thank you for visiting this website. I appreciate you using some of your valuable time to do soIf you’re interested, I publish a newsletter 2 times per month (1st and 15th) with all the latest recipes, and other fun info. I would be honored to have you join our growing list of subscribers, so you never miss a great recipe!
      There is a Newsletter subscription box on the top right side (or bottom) of each blog post, depending on the device you use, where you can easily submit your e-mail address (only) to be included in my mailing list.

      You Can Also Find Me On Social Media:

      Facebook page: The Grateful Girl Cooks!
      Pinterest:
      The Grateful Girl Cooks!
      Instagram:
      jbatthegratefulgirlcooks

      Author's signature

      0 from 0 votes
      Blackberry Pancake Syrup
      Prep Time
      30 mins
      Cook Time
      10 mins
      Total Time
      40 mins
       

      Learn how to make delicious Blackberry Pancake Syrup with fresh or frozen blackberries. Easy to make- yummy on waffles and ice cream, too!

      Category: Sauce
      Cuisine: American
      Keyword: blackberry pancake syrup
      Servings: 12 (1/4 cup per serving)
      Calories Per Serving: 107 kcal
      Author: JB @ The Grateful Girl Cooks!
      Ingredients
      • cups water
      • cups granulated sugar
      • 2 cups blackberries (fresh or frozen)
      Instructions
      1. Place blackberries, sugar and water in a large pot. Stir well; turn heat to medium-high. Bring berries to a FULL BOIL; reduce heat to Low. Let berries simmer 10-12 minutes, stirring occasionally, then remove from the heat. Mash the berries with potato masher, back of a large spoon, or fork. Once mashed, let berry mixture cool 20-25 minutes.

      2. Strain syrup from berry mixture: Place a wire sieve on top of a large bowl. Transfer 1-2 cups of berry/juice mixture into sieve. Using the back of a large spoon, firmly press blackberries and juice into sieve. The juice will drip through sieve into bowl below; seeds will remain in sieve. Continue pressing until almost all juice and puree have been filtered through sieve. Use a spoon to remove blackberry puree clinging to underside of sieve; add to juice in bowl. This puree will help thicken syrup.

      3. Discard seeds in sieve; give sieve a quick rinse. Repeat process until all berries and juice have been filtered through sieve. Pour syrup from bowl into container of your choice. Store (covered) in refrigerator. Serve blackberry pancake syrup warm (or at room temperature) on your favorite stack of pancakes! **Also good on ice cream, cheesecake, or other desserts.

      4. NOTE: You can store extra syrup in freezer to use at a later date. Thaw and reheat to use.

        If you feel your syrup is too thin (especially if you used frozen berries), you can cook the syrup for a few minutes after straining out seeds. This will reduce the volume slightly, but will help to thicken the syrup. Other people suggest adding 1/2 cup light corn syrup to thicken the finished syrup. Not really necessary, but it is another option.

      Recipe Notes

      Caloric calculation made using 1/4 cup serving size out of approximately 3 cups total syrup.

      Nutrition Facts
      Blackberry Pancake Syrup
      Amount Per Serving (1 (1/4 cup))
      Calories 107 Calories from Fat 9
      % Daily Value*
      Fat 1g2%
      Saturated Fat 1g6%
      Polyunsaturated Fat 1g
      Monounsaturated Fat 1g
      Sodium 3mg0%
      Potassium 39mg1%
      Carbohydrates 27g9%
      Fiber 1g4%
      Sugar 26g29%
      Protein 1g2%
      Vitamin A 51IU1%
      Vitamin C 5mg6%
      Calcium 9mg1%
      Iron 1mg6%
      * Percent Daily Values are based on a 2000 calorie diet.

      Original recipe source: biscuitsandburlap.com/blackberry-syrup/

      Here’s one more to pin on your Pinterest boards!Learn how to make delicious Blackberry Pancake Syrup with fresh or frozen blackberries. Easy to make- yummy on waffles and ice cream, too!

      Triple Berry French Toast Cups

      Triple Berry French Toast Cups (for 2) are filled with yummy raspberries, blueberries, blackberries, cream cheese and maple syrup, then baked.
      Triple Berry French Toast Cups (for 2) are filled with yummy raspberries, blueberries, blackberries, cream cheese and maple syrup, then baked.

      Today I want to share this delicious recipe for Triple Berry French Toast Cups. They are easy to prepare, and taste wonderful! I found the original recipe years ago in one of my old “Taste of Home” magazines (from 2006) and slightly adapted it for our taste preferences. You will need to have a couple of 8 ounce, oven-safe ramekins to make these single serving breakfast treats, but they are readily available in lots of retail stores or online.

      This simple recipe makes two servings, and I am confident you will enjoy it! You will need to plan a little bit ahead, because an important step is to refrigerate the French toast cups for at least an hour BEFORE baking, to give the egg filling time to soak into the bread cubes. Other than that, they are truly simple to make, and taste great, especially if you serve them topped with sifted powdered sugar and berry-flavored pancake syrup. Here’s how to make triple berry French toast cups:

      Scroll Down For A Printable Recipe Card At The Bottom Of The Page

      Prepare The Triple Berry French Toast Cups

      Lightly grease (or spray) two 8 ounce ramekins on the bottom and sides. Evenly divide HALF of the stale, day old bread cubes (can use French bread or sourdough) between the two dishes (reserve the other half of the bread cubes for later). The reason you use day old or stale bread cubes is because they are firmer than fresh bread cubes, and will hold up better after liquid is added. This helps the bread NOT to turn mushy.

      Add the raspberries, blueberries and blackberries, evenly diving the fruit between both ramekins. I used a total of 1/2 cup berries (divided) from a bag of triple berry blend, but this dish will still turn out perfectly if you don’t have access to all three fruits.  NOTE: We love the flavor combination of using all three berries, but if you only have raspberries? Use 1/2 cup total. Only have blueberries? Only use 1/2 cup total.  You get the picture. However you want to make these (whatever combination), just use a total amount of 1/2 cup of berries.

      Top the berries with softened cream cheese cubes, and then divide the remaining bread cubes on top of the cream cheese. Set aside while you make the easy egg filling.

      Stale bread cubes are placed into greased ramekins.A layer of blackberries, blueberries and raspberries is topped with cubes of cream cheese. The last layer to be added is the remaining day old bread cubes.

      Soak With Egg Mixture And Refrigerate

      Now it’s time to make the egg “filling. Place eggs, milk and maple syrup in a medium bowl, and whisk with a fork or wire whisk until combined. Pour the egg mixture into the ramekins, being sure to evenly divide the liquid between both dishes. Use the back of a spoon to gently press the bread cubes down as much as possible into the egg mixture. You need to do this, so the bread cubes can absorb the egg filling as much as possible before baking.

      Now comes the hard part… waiting! Cover with plastic wrap, and put the ramekins into a refrigerator for at least 1 hour (or more). The bread cubes need time to absorb as much of that egg mixture as possible. Sometimes I make these at night before going to bed, then they’re ready to go first thing in the morning. Occasionally I unwrap them, and push the bread cubes down again into the liquid. They won’t ever be fully covered… just get them into the liquid as much as possible for best results!

      TIP: Remove the triple berry French toast cups from the refrigerator 25-30 minutes before baking (to take the chill off). Preheat your oven to 350°F during this time.

      Eggs, milk and real maple syrup are whisked together before adding to the French toast cups.The top layer of bread cubes is pressed down into the egg filling to absorb the liquid.

      Bake The Triple Berry French Toast Cups

      Bake the triple berry French toast cups in a preheated 350°F. oven, uncovered, for 25-30 minutes. When done, they should be golden brown on top, and the egg filling will be “set” in the middle. Let them cool on a wire rack for 3-4 minutes. 

      After they have cooled for 3-4 minutes, and you’re ready to serve, carefully run a butter knife around the edges of the ramekin to loosen the edges. Using a large spoon, carefully remove the French toast cups in one piece out of the dish, and transfer to individual serving plates.

      Triple berry French toast cups are baked until golden brown and the egg filling has "set".Each of the triple berry French toast cups is removed from ramekin and transferred to a plate.

      Time To Eat!

      The French toast cups are not overly sweet, as is, so our absolute FAVORITE way to serve them is to sift a little bit of powdered sugar on top, and then drizzle it all with some berry-flavored pancake syrup! YUMMO! I like to use my homemade blackberry pancake syrup. It compliments this dish well, with even more berry flavor and sweetness.

      My husband and I love this breakfast (even though it’s an “occasional” treat!), and hope you (and those you love) will enjoy it, as well. It’s REALLY delicious, and looks good on the plate, too!

      Berry-flavored pancake syrup and powdered sugar are added to triple berry French toast cups for serving.Lots of fruit and cream cheese inside the triple berry French toast cups!

      I hope you enjoy this delicious breakfast recipe… we sure do! Thank you for stopping by, and I truly hope you will come back soon for another visit (and some delicious recipes). Take care, and have a GREAT day!

      Looking For More Delicious BREAKFAST Recipes?

      You can find all of my recipes in the Recipe Index, which is located at the top of the page. I have lots of delicious ideas for breakfast to choose from, including:

      Interested In More Recipes?

      Thank you for visiting this website. I appreciate you using some of your valuable time to do soIf you’re interested, I publish a newsletter 2 times per month (1st and 15th) with all the latest recipes, and other fun info. I would be honored to have you join our growing list of subscribers, so you never miss a great recipe!
      There is a Newsletter subscription box on the top right side (or bottom) of each blog post, depending on the device you use, where you can easily submit your e-mail address (only) to be included in my mailing list.

      You Can Also Find Me On Social Media:

      Facebook page: The Grateful Girl Cooks!
      Pinterest:
      The Grateful Girl Cooks!
      Instagram:
      jbatthegratefulgirlcooks

      Author's signature

      Recipe adapted from: “Taste of Home” magazine, Feb./March 2006 edition, page 57, published by Reiman Publications, Inc.

      ↓↓ PRINTABLE RECIPE BELOW ↓↓

      0 from 0 votes
      Triple Berry French Toast Cups
      Prep Time
      15 mins
      Cook Time
      25 mins
      Refrigeration Time (inactive prep)
      1 hr
      Total Time
      1 hr 40 mins
       

      Triple Berry French Toast Cups (for 2) are filled with yummy raspberries, blueberries, blackberries, cream cheese and maple syrup, then baked.

      Category: Breakfast
      Cuisine: American
      Keyword: triple berry french toast cups
      Servings: 2
      Calories Per Serving: 408 kcal
      Author: JB @ The Grateful Girl Cooks!
      Ingredients
      • 2 slices day old French bread (or sourdough) , cut into 1" cubes
      • ½ cup raspberry/blackberry/blueberry blend fresh or frozen (unthawed)
      • 2 ounces cream cheese , softened (cut in 1" cubes)
      • 2 large eggs
      • ½ cup milk
      • 2 Tablespoons pure maple syrup
      Optional Toppings: Sifted powdered sugar and berry flavored pancake syrup
        Instructions
        1. Lightly grease (or spray) two 8 ounce ramekins on the bottom and sides.

        2. Evenly divide HALF of the bread cubes between 2 ramekins (save other half for later). Add raspberries, blueberries and blackberries, evenly diving between both ramekins. Top berries with cream cheese cubes; add remaining bread cubes on top. Set aside.

        3. Whisk eggs, milk and maple syrup in a medium bowl until combined. Pour into ramekins, evenly dividing liquid between both. Use back of a spoon to gently press bread cubes down as much as possible into egg mixture. This helps bread cubes absorb liquid before baking.

        4. Cover with plastic wrap; put ramekins in refrigerator for at least 1 hour (or more). Unwrap occasionally; push bread cubes down again into liquid. They won't ever be fully covered... just get them into the liquid as much as possible for best results! TIP: Remove from refrigerator 25-30 minutes before baking (to take chill off). Preheat oven to 350°F during this time.

        5. Bake at 350°F., uncovered, for 25-30 minutes. When done, they should be golden brown, and egg filling will be "set" in the middle. Let cool on a wire rack 3-4 minutes. Carefully run a butter knife around inside edge of ramekins to loosen edges. Using a large spoon, carefully remove French toast cups in one piece from dish; transfer to serving plates.

        6. To serve (optional, but recommended), sift powdered sugar on top, and drizzle with berry-flavored pancake syrup!

        Recipe Notes

        NOTE: Caloric calculation was made using 1% milk, and does not include optional berry pancake syrup or powdered sugar toppings.

        Nutrition Facts
        Triple Berry French Toast Cups
        Amount Per Serving (1 g)
        Calories 408 Calories from Fat 99
        % Daily Value*
        Fat 11g17%
        Saturated Fat 5g31%
        Trans Fat 1g
        Cholesterol 204mg68%
        Sodium 561mg24%
        Potassium 400mg11%
        Carbohydrates 59g20%
        Fiber 3g13%
        Sugar 20g22%
        Protein 18g36%
        Vitamin A 552IU11%
        Vitamin C 8mg10%
        Calcium 201mg20%
        Iron 3mg17%
        * Percent Daily Values are based on a 2000 calorie diet.

        Here’s one more to pin on your Pinterest boards!Triple Berry French Toast Cups (for 2) are filled with yummy raspberries, blueberries, blackberries, cream cheese and maple syrup, then baked.

        Apple Cinnamon Baked Oatmeal Bites

        It’s easy to make a dozen moist Apple Cinnamon Baked Oatmeal Bites (no added sugar) in under 30 minutes for a yummy breakfast or snack!
        It's easy to make a dozen moist Apple Cinnamon Baked Oatmeal Bites (no added sugar) in under 30 minutes for a yummy breakfast or snack!

        If you’re looking for a tasty, easy to prepare breakfast treat that contains no extra added sugar, may I suggest these apple cinnamon baked oatmeal bites? I found the recipe on Pinterest a while ago, and am just now getting around to sharing the recipe here on my blog.

        These yummy, muffin-sized breakfast bites are sweetened naturally with two medium-ripe bananas and an apple! Another plus is… not only do they taste great, they are low calorie (under 90 calories each). That’s a WIN-WIN!

        This recipe makes one dozen apple cinnamon baked oatmeal bites, and they are ridiculously EASY to prepare (into the oven in about 10 minutes). Basically, if you can stir ingredients, you can make these yummy baked oatmeal bites. Here’s how easy they are to make:

        Scroll Down For A Printable Recipe Card At The Bottom Of The Page

        Make The Batter For Apple Cinnamon Baked Oatmeal Bites

        In a medium-sized bowl, mash two medium-ripe bananas with the backside of a fork. For this recipe it’s important the bananas are not overly ripe or too mushy (completely brown on the outside) OR not ripe enough (too firm- green on the peels). You want them soft and ripe enough they are easy to mash (a few brown spots on the peels). The bananas are the ingredient that will add most of the sweetness to the oatmeal bites, so you want them “just right”.

        Add one egg to the banana mixture, and continue to stir until the mashed bananas and egg are combined.

        Bananas are being mashed using the backside of a fork.An egg is added to the bananas mixture and beaten in with a fork until combined.

        Now you will add the old-fashioned oats, cinnamon, baking powder, milk and a pinch of salt to the banana mixture in the bowl. Stir these ingredients well, until the “batter” is mixed together. Add the diced apple pieces, and stir until they have been fully incorporated into the batter.

        NOTE: You can use unpeeled OR peeled apples in this recipe. Either way is perfectly fine! I tend to not peel them, because I like the pop of color in the apple cinnamon baked oatmeal bites! I also recommend using a firm sweet apple, like Fuji, Honeycrisp, Golden Delicious, McIntosh, etc. to help add sweetness to the baked oatmeal bites, since there is no added sugar in the recipe. 

        Old-fashioned oats, cinnamon, milk, salt and baking powder are added to banana mixture.Diced apples are added to the batter for the apple cinnamon baked oatmeal bites.

        Cooking Apple Cinnamon Baked Oatmeal Bites

        Line 12 standard-sized muffin cups with paper liners OR lightly spray each cup with non-stick baking spray. Because the batter is quite chunky, I recommend using the paper liners, but ultimately that’s your choice. Evenly divide the apple cinnamon baked oatmeal bites batter into the cups. Each cup will end up being about 2/3 full.

        Bake in a preheated 375°F. oven (on the middle rack) for 15-16 minutes, or until a toothpick inserted into the top center comes out clean. Remove the muffin pan from the oven, and let them cool for a few minutes, before removing each one out of the pan. As you can see in the 2 photos below, there is not much visible difference in the color before baking (top photo) and after baking (bottom photo).

        Apple cinnamon baked oatmeal bites batter is evenly divided into paper-lined muffin tins.After baking, the apple cinnamon baked oatmeal bites cool to room temperature.

        Transfer the apple cinnamon baked oatmeal bites to a wire rack to cool completely. As they cool, you may see them pull away from the paper liners a bit. That’s perfectly fine!

        After cooling on a wire rack, the 12 baked oatmeal bites are ready to eat.

        Ready To Enjoy Some Apple Cinnamon Baked Oatmeal Bites?

        Once they have cooled to room temperature, these little bites of oatmeal apple goodness are ready to eat! They are moist, flavorful, and filled with soft, tender pieces of apple! I truly feel these breakfast treats taste their best at room temperature (and not served hot). Again… that is your choice, whether to serve them at room temperature or slightly warm.

        You can store any leftovers in an airtight container on the counter. They do not have to be refrigerated, and will stay moist for 3-4 days. You can also wrap them really well and store them in your freezer for 2-3 months, if desired.

        The paper liner pulled away reveals one of the finished apple cinnamon baked apple bites.

        I really enjoy these simple breakfast bites and hope you will, too! Sometimes the simplest breakfasts can be filling and tasty, and this is one of them. I usually eat two of them for each meal, because of their low calorie count, Thank you so much for stopping by this blog. I hope you have a wonderful day… and come back soon! God Bless You!

        Looking For More Recipes Using Old-Fashioned OATS?

        You can find all of my recipes in the Recipe Index, which is located at the top of the page. I have lots of breakfast recipes, with quite a few featuring OATS, including:

        Interested In More Recipes?

        Thank you for visiting this website. I appreciate you using some of your valuable time to do soIf you’re interested, I publish a newsletter 2 times per month (1st and 15th) with all the latest recipes, and other fun info. I would be honored to have you join our growing list of subscribers, so you never miss a great recipe!
        There is a Newsletter subscription box on the top right side (or bottom) of each blog post, depending on the device you use, where you can easily submit your e-mail address (only) to be included in my mailing list.

        You Can Also Find Me On Social Media:

        Facebook page: The Grateful Girl Cooks!
        Pinterest:
        The Grateful Girl Cooks!
        Instagram:
        jbatthegratefulgirlcooks

        Author's signature

        The original recipe source: Lidia Simic, at: https://yummiestfood.com/apple-cinnamon-baked-oatmeal/

        0 from 0 votes
        Cinnamon Apple Baked Oatmeal Bites
        Prep Time
        10 mins
        Cook Time
        15 mins
        Total Time
        25 mins
         

        It's easy to make a dozen moist Apple Cinnamon Baked Oatmeal Bites (no added sugar) in under 30 minutes for a yummy breakfast or snack!

        Category: Breakfast, Snack
        Cuisine: American
        Keyword: apple cinnamon baked oatmeal bites
        Servings: 12
        Calories Per Serving: 87 kcal
        Author: JB @ The Grateful Girl Cooks!
        Ingredients
        • 2 cups old-fashioned oats
        • 2 bananas , medium-ripe
        • 1 large egg
        • ½ cup milk
        • 1 teaspoon ground cinnamon
        • 1 teaspoon baking powder
        • 1 pinch salt
        • 1 medium apple , diced (peeled or unpeeled)
        Instructions
        1. Preheat oven to 375°F. Insert paper liners into 12 standard-sized muffin cups OR lightly spray cups with non-stick baking spray.

        2. In medium-sized bowl, mash bananas with a fork. Add egg; continue stirring until bananas and egg are combined. Add oats, cinnamon, baking powder, milk and a pinch of salt to banana mixture. Stir well, until mixed. Add diced apple; stir until fully incorporated into batter.

        3. Evenly divide batter into prepared muffin cups (about 2/3 full). Bake at 375°F. on middle rack for 15-16 minutes, or until a toothpick inserted into the top center comes out clean. Remove pan from oven; let cool a few minutes, before removing them from the pan. Transfer apple cinnamon baked oatmeal bites to a wire rack to cool completely before serving.

        4. You can store these in an airtight container for 3-4 days on the counter (no refrigeration needed). They can be stored in freezer for 2-3 months IF well-wrapped in airtight container.

        Recipe Notes

        Caloric calculation was made using 1% milk.

        Nutrition Facts
        Cinnamon Apple Baked Oatmeal Bites
        Amount Per Serving (1 g)
        Calories 87 Calories from Fat 9
        % Daily Value*
        Fat 1g2%
        Saturated Fat 1g6%
        Trans Fat 1g
        Cholesterol 16mg5%
        Sodium 15mg1%
        Potassium 190mg5%
        Carbohydrates 17g6%
        Fiber 2g8%
        Sugar 5g6%
        Protein 3g6%
        Vitamin A 63IU1%
        Vitamin C 2mg2%
        Calcium 40mg4%
        Iron 1mg6%
        * Percent Daily Values are based on a 2000 calorie diet.

        Here’s one more to pin on your Pinterest boards!It's easy to make a dozen moist Apple Cinnamon Baked Oatmeal Bites (no added sugar) in under 30 minutes for a yummy breakfast or snack!

        Blueberry Breakfast Loaf

        A Blueberry Breakfast Loaf is easy to make, moist, delicious, filled with juicy sweet blueberries, and is ready to bake in 10 minutes.A Blueberry Breakfast Loaf is easy to make, moist, delicious, filled with juicy sweet blueberries, and is ready to bake in 10 minutes.

        If you’re looking for a simple and delicious loaf of blueberry bread, may I suggest this one? This blueberry breakfast loaf could not be any simpler to prepare. It can be made in about 10 minutes, then into the oven it goes!

        Moist and bursting with blueberries, it tastes amazing as a quick breakfast treat or a simple snack! The bread can be made using fresh or frozen blueberries, so it is a convenient and delicious recipe you can make all year long.

        I really think you’ll enjoy the taste of this blueberry breakfast loaf, so I’m sharing the recipe with you today. The original recipe was one I found over 20 years ago in one of my Taste of Home magazines. Here’s how to make it:

        Scroll Down For A Printable Recipe Card At The Bottom Of The Page

        Prepare The Batter

        Before you begin, preheat your oven to 350° F. This recipe comes together fast, so you want the oven hot, once the batter is ready to go.

        Place flour, granulated sugar, baking powder and salt in a large mixing bowl. Stir or whisk them to combine. Once combined, add fresh or frozen blueberries and orange zest to the mixture.

        NOTE: If using frozen blueberries, do NOT thaw them before adding them to the mixture.

        Flour, sugar, baking powder and salt are combined in a large bowl.Blueberries (fresh or frozen) and orange zest are added to dry ingredients.

        In a separate bowl, whisk eggs, milk and vegetable oil together. Pour these wet ingredients into the flour mixture, and stir only until all ingredients have been combined. Do not over mix.

        Eggs, milk and vegetable oil are whisked together before adding to batter.Wet ingredients are added to the blueberry breakfast loaf batter.

        Time To Bake The Blueberry Breakfast Loaf

        Pour the batter into a greased (bottom and sides) 9″ x 5″ x 3″ loaf pan. Place the loaf on the middle rack in the oven.

        Bake at 350°F. for 1 hour, or until a toothpick inserted in the middle of the loaf comes out clean. The blueberry breakfast loaf should be golden brown on top once done.

        Blueberry breakfast loaf batter in a greased loaf pan, ready for baking.The baked blueberry breakfast loaf is golden brown on top after cooking.

        Remove the pan from the oven, and let the bread cool, still in the pan, for 10 minutes. After it has rested 10 minutes, run a butter knife around the edges, then invert pan to remove the loaf.

        Transfer the loaf to a wire rack, and let it cool completely before slicing and serving.

        A side view of the blueberry breakfast loaf, out of the pan and on wire rack.

        Time For A Slice Of Blueberry Breakfast Loaf!

        Once the blueberry breakfast loaf has cooled to room temperature, it is ready to serve. Slice the loaf into 8 pieces, serve, and enjoy! It is filled with juicy blueberries, and tastes really GOOD!

        Slices of the blueberry breakfast loaf reveal the juicy blueberries inside.

        I really hope you enjoy this delicious bread. It turns out wonderful every time! Thanks so much for stopping by. I hope you will come back for another visit and more delicious recipes soon.

        Looking For More BREAD Recipes?

        You can find all of my recipes in the Recipe Index, located at the top of the page. I have some delicious bread recipes, including:

        Want More Recipes? Get My FREE Newsletter!

        I publish a newsletter 2 times per month (1st and 15th) with lots of recipes, tips, etc..
        Would you like to join our growing list of subscribers?

        There is a Newsletter subscription box on the top right (or bottom) of each blog post, depending on the device you use.
        You can submit your e-mail address there, to be added to my mailing list.

        Find Me On Social Media:

        Facebook page: The Grateful Girl Cooks!
        Pinterest:
        The Grateful Girl Cooks!
        Instagram:
        jbatthegratefulgirlcooks

        Author's signature

        Original recipe source: “Taste of Home Magazine”, Aug./Sept. 1997 edition, page 45, published by Reiman Publications, Inc.

        ↓↓ PRINTABLE RECIPE BELOW ↓↓

        0 from 0 votes
        Blueberry Breakfast Loaf
        Prep Time
        10 mins
        Cook Time
        1 hr
        Total Time
        1 hr 10 mins
         

        A Blueberry Breakfast Loaf is easy to make, moist, delicious, filled with juicy sweet blueberries, and is ready to bake in 10 minutes.

        Category: Bread, Breakfast
        Cuisine: American
        Keyword: blueberry breakfast loaf
        Servings: 8
        Calories Per Serving: 304 kcal
        Author: JB @ The Grateful Girl Cooks!
        Ingredients
        • 2 cups all purpose flour
        • 1 cup granulated sugar
        • 1 Tablespoon baking powder
        • ¼ teaspoon salt
        • cups fresh OR frozen blueberries (if frozen, do NOT thaw)
        • 1 teaspoon orange zest (finely grated peel)
        • 2 large eggs
        • 1 cup milk
        • 3 Tablespoons vegetable oil
        Instructions
        1. Preheat oven to 350° F. Grease or spray a 9" x 5" x 3" loaf pan. Set aside.

        2. Place flour, granulated sugar, baking powder and salt in a large mixing bowl. Stir or whisk to combine. Once combined, add fresh or frozen blueberries and orange zest to the mixture. NOTE: If using frozen blueberries, do NOT thaw them before adding them to the mixture.

        3. In a separate bowl, whisk eggs, milk and vegetable oil together. Pour into flour mixture; stir only until ingredients have been combined. Do not over mix.

        4. Pour batter into prepared loaf pan. Place loaf pan on the middle rack in oven. Bake at 350°F. for 1 hour, or until a toothpick inserted in the middle of the loaf comes out clean. Loaf should be golden brown on top when done.

        5. Remove from oven; let bread cool, still in the pan, for 10 minutes. After 10 minutes, run a butter knife around the edges, then invert pan to remove the loaf. Transfer bread to a wire rack; let cool completely before slicing and serving. Enjoy!

        Nutrition Facts
        Blueberry Breakfast Loaf
        Amount Per Serving (1 slice)
        Calories 304 Calories from Fat 63
        % Daily Value*
        Fat 7g11%
        Saturated Fat 5g31%
        Trans Fat 1g
        Cholesterol 48mg16%
        Sodium 106mg5%
        Potassium 269mg8%
        Carbohydrates 55g18%
        Fiber 2g8%
        Sugar 29g32%
        Protein 6g12%
        Vitamin A 141IU3%
        Vitamin C 3mg4%
        Calcium 116mg12%
        Iron 2mg11%
        * Percent Daily Values are based on a 2000 calorie diet.

        Here’s one more to pin on your Pinterest boards!A Blueberry Breakfast Loaf is easy to make, moist, delicious, filled with juicy sweet blueberries, and is ready to bake in 10 minutes.