Make homemade ground pork sausage patties to serve with pancakes, eggs, or other favorite breakfast dishes. Recipe makes 8 sausage patties.

We enjoy sausage with many different breakfasts, like eggs or pancakes, etc. Today I want to share a simple recipe for making homemade ground pork sausage patties from scratch!
This recipe is very simple and straightforward and the ground pork sausage patties are delicious! I’ve included some directions for how you can also freeze the prepared, uncooked patties and cook them once frozen, as needed.
I hope you enjoy this recipe, and have “fun” creating your own homemade breakfast sausage! Here’s how to make it.
Scroll Down For A Printable Recipe Card At The Bottom Of The Page
Make The Seasoning Mix
In a medium bowl, add the spices for the sausage. Stir well until they are blended together. The spices you will use are dried thyme, sage, fennel, salt, pepper.

Make The Ground Pork Sausage Patties
Add a pound of ground pork, minced garlic and an egg white to the spice mixture, then stir very well until the ingredients have been fully incorporated.
Use your hands, if preferred, to mix these ingredients easily.

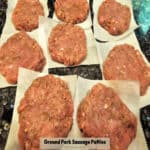
Divide the seasoned pork evenly into 8 balls. Use your (clean) hands to press each ball into a 2½ inch wide round disk.
TIP: Put each one on a small piece of parchment (or wax) paper, because this helps keep the patties separated, if you’re planning to freeze some of them.


At this point, if you want to freeze a few sausage patties for later, place them (with the parchment paper still underneath each one) in an airtight container or freezer bag. Freeze until needed.
Cook The Sausage (Fresh or Frozen)
COOKING FRESH? If cooking fresh sausage patties, heat a large skillet over High heat. Add 2 teaspoons vegetable oil and continue heating. When the oil is very hot (but not smoking), carefully place the sausage patties in the skillet in a single layer.
Fry them about 4 minutes per side until they are well-browned and fully cooked through.
COOKING FROZEN? (shown below): If cooking frozen sausage patties, you don’t have to thaw them. Add 3 Tablespoons water (instead of oil) to the skillet and place the frozen patties into the skillet in a single layer.
Cover the skillet and cook on High heat for 2-3 minutes, then remove the lid and continue to cook. As the patties cook (and thaw), the water will slowly evaporate, and the patties will begin to brown.

Turn the sausage patties over once most of the water has cooked away. Continue to cook for several minutes on each side (turning occasionally) until each sausage is well browned on all sides and fully cooked through.


Serve The Ground Pork Sausage Patties
Once the ground pork sausage patties are fully cooked, transfer them from the skillet onto paper towels before serving. The paper towels will help absorb any extra grease.
Serve the sausage patties immediately, with pancakes, French toast, eggs, on a breakfast sandwich, etc. You can also make gravy for biscuits using the sausage.

I hope you enjoy these simple, yet delicious ground pork sausage patties! I love to keep some in our freezer for when we want a couple sausage patties to go with our breakfast! Yum!
Thanks for stopping by, and I invite you to come back soon for more family-friendly recipes. Take care, may God bless you, and have a wonderful day!
Looking For More BREAKFAST Recipes?
You can find ALL of my recipes in the Recipe Index, which is located at the top of the page. I have lots of delicious breakfast recipes to choose from, including:
- Crispy Homemade Hash Browns
- Quiche Lorraine
- Blueberry Banana Baked Oatmeal
- Blueberry Lemon Muffins
- Classic French Toast
Want More Recipes? Get My FREE Newsletter!
I publish a newsletter 2 times per month (1st and 15th) with lots of recipes, tips, etc.
Would you like to join our growing list of subscribers?
There is a Newsletter subscription box on the top right (or bottom) of each blog post, depending on the device you use.
You can submit your e-mail address there, to be added to my mailing list.
Find Me On Social Media:
Facebook page: The Grateful Girl Cooks!
Pinterest: The Grateful Girl Cooks!
Instagram: jbatthegratefulgirlcooks

↓↓ PRINTABLE RECIPE BELOW ↓↓
Make homemade ground pork sausage patties to serve with pancakes, eggs, or other favorite breakfast dishes. Recipe makes 8 sausage patties.
- 1 pound ground pork
- 2 teaspoons dried sage crumbled
- 1½ teaspoons salt
- ¾ teaspoon dried thyme
- ½ teaspoon dried fennel crushed
- ½ teaspoon black pepper
- 1 clove garlic finely minced
- 1 large egg white (no yolk)
- 2 teaspoons vegetable oil
Stir sage, salt, thyme, fennel and pepper in a medium sized bowl until combined. Add minced garlic, ground pork and egg white. Stir (or use your hands) to fully combine these ingredients.
Divide pork mixture evenly into 8 balls. Use your hands to flatten each one into a 2½ inch wide round disk.
TIP: Put each one on a small piece of parchment paper to keep them separated. If freezing, place sausage patties (and paper) in airtight container or freezer bag. Freeze until needed.
COOKING FRESH?: Heat a large skillet over High heat. Add vegetable oil; continue heating. When oil is very hot (but not smoking), carefully place sausage patties in skillet in a single layer. Fry them about 4 minutes per side until well-browned and fully cooked through.
COOKING FROZEN?: You do not need to thaw sausage. Add 3 Tablespoons water (instead of oil) to skillet; place frozen patties in skillet in a single layer. Cover and cook on High heat for 2-3 minutes. Remove lid. As patties cook (and thaw), the water will slowly evaporate. Turn sausage patties over once most of the water has cooked away. Continue to cook several minutes on each side (turning occasionally) until well browned and fully cooked through.
Once sausage patties are fully cooked, transfer them out of the skillet onto paper towels to absorb any extra grease. Serve immediately after draining, while hot.
NOTE: Caloric calculation was made without including the vegetable oil, as all oil is not absorbed into patties, and frozen patties are cooked in water.
Here’s one more to pin on your Pinterest boards!