Enjoy delicious Beef Tips and Gravy on top of mashed potatoes or buttered noodles! One pan and minimal prep makes this a great dinner for 2.

If you’re looking for a simple recipe to make great tasting beef tips and gravy, I would suggest giving THIS one a try. I enjoy ordering beef tips at a one of our favorite restaurants, but also like making them at home using this recipe.
This recipe only takes a few minutes to prepare, and then it is cooked low and slow to ensure the beef turns out nice and tender. A simple gravy is stirred in once the meat is tender, and then this dish is ready to enjoy!
Truly this is an “easy” meal to prepare, and tastes wonderful, served on noodles or mashed potatoes (made while the beef cooks).
The recipe, as written below, makes about 3 servings, but can be easily modified to make more for larger families. Here’s how to make this yummy dinner:
Scroll Down For A Printable Recipe Card At The Bottom Of The Page
Pan-Sear The Beef And Onions
Heat oil on High in a large Dutch oven or soup pot until very hot but not smoking. Add stew meat and chopped onions to the oil, and cook, stirring often for 8-10 minutes.
The beef should be nicely browned on all sides, and the onions should be tender and lightly browned.

Cook The Beef Tips Until Tender
Add Worcestershire sauce, black pepper and garlic powder to the pan. Stir to combine these ingredients with the meat.
Pour a 14 ounce can of beef broth into the pan and stir again to combine. Bring the liquid up to a boil, then turn the heat down to a low simmer.
Put a cover on the pan and let the beef tips cook for about 90 minutes, or until they become fork tender. Be sure to check the meat at about 60 minutes.
If too much of the liquid has cooked out, simply add a tiny bit more broth (or water) to the pan, and stir it in. When the beef has become fork-tender, it is time to make the gravy.
TIP: Use the time available while the beef cooks to make mashed potatoes, noodles, or even rice, if desired. Serve the beef tips and gravy on top of any of these options for the best tasting finished meal.


Making The Gravy
TIP: Do not make the gravy until you’re sure the beef is fork-tender! To make the gravy, place ¼ cup of flour in a measuring cup. Add enough water to measure one cup.
Use a fork to blend the flour and water together until it is smooth and lump-free. This is called a “slurry”.
To make the gravy, remove the lid from the pan, and turn the heat up to High. Once the liquid begins to boil, slowly add about half the slurry to the pan. Be sure to stir the gravy very well while adding, to incorporate it with the remaining liquid in pan.
Continue to slowly add slurry until the gravy has thickened. Once thickened, remove the pan of beef tips and gravy from the heat.
NOTE: You may not need all of the slurry to achieve a thick gravy. If you had too much liquid left in the pan, you may need a bit more slurry added to thicken to your desired consistency. My experience has been that I do not use all of the slurry, but “almost all” of it.


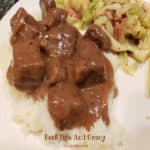
Time To Enjoy Beef Tips And Gravy!
Once the gravy has thickened, this delicious dish is ready to be served hot. Beef tips and gravy can be served over hot, buttered egg noodles OR on a bed of creamy mashed potatoes. Our favorite way to enjoy it is on top of mashed potatoes!
Spoon the beef chunks over the potatoes and then spoon additional gravy over the top and serve. YUM! The gravy tastes wonderful and goes perfectly with those mashed potatoes!


I hope you enjoy this recipe for beef tips and gravy! We sure do! The recipe will yield about 3 servings, if made as written, but can easily be doubled to serve more. The leftovers can be reheated easily in a microwave the next day, as well.
Thank you for stopping by today, and I hope you will come back soon for more delicious recipes. Take care, have a GREAT day, and may God bless you and yours.
Looking For More BEEF Recipes?
You can find ALL of my recipes in the Recipe Index, which is located at the top of the page. I have some wonderful beef recipes to choose from, including:
- Easy Stuffed Beef Rolls
- Really GOOD Meatloaf
- Classic Beef Stew
- Mom’s Swedish Meatballs And Rice
- Classic Pot Roast
Want More Recipes? Get My FREE Newsletter!
I publish a newsletter 2 times per month (1st and 15th) with lots of recipes, tips, etc.
Would you like to join our growing list of subscribers?
There is a Newsletter subscription box on the top right (or bottom) of each blog post, depending on the device you use.
You can submit your e-mail address there, to be added to my mailing list.
Find Me On Social Media:
Facebook page: The Grateful Girl Cooks!
Pinterest: The Grateful Girl Cooks!
Instagram: jbatthegratefulgirlcooks

Recipe adapted from: https:/www.101cookingfortwo.com/one-pan-beef-tips-with-gravy/
↓↓ PRINTABLE RECIPE BELOW ↓↓
Enjoy delicious Beef Tips and Gravy on top of mashed potatoes or buttered noodles! One pan and minimal prep makes this a great dinner for 2.
- 1 Tablespoon vegetable oil
- 1 pound stew beef in 1 - 1½ inch cubes
- ½ medium yellow onion peeled, diced
- 1 cup low sodium beef broth
- 2 Tablespoons Worcestershire sauce
- ½ teaspoon black pepper
- ½ teaspoon garlic powder
- ¼ cup all purpose flour
Heat oil on High in a large Dutch oven or soup pot until very hot, but not smoking. Add stew meat and chopped onions; cook, stirring often for 8-10 minutes. Beef should be well browned on all sides; onions should be tender.
Add Worcestershire sauce, black pepper and garlic powder to pan. Stir to combine. Pour beef broth into pan; stir to combine. Bring liquid to a boil, then reduce heat to a low simmer. Put lid on the pan. Let beef cook (covered) about 90 minutes, or until beef is fork-tender. Stir it a couple of time while cooking. Check it at about 60 minutes. If too much liquid has cooked out, add a tiny bit more broth (or water) to the pan, and stir it in. When you're sure the beef is fork-tender, make the gravy.
Place ¼ cup flour in measuring cup. Add enough water to measure 1 cup. Use a fork to blend flour/water together until smooth & lump-free. This is a "slurry". Remove lid from pan; turn heat to High. Once liquid begins to boil, slowly add about half the slurry, stirring well while adding, to combine it with remaining liquid in pan. Continue to slowly add slurry until gravy has thickened to desired consistency. NOTE: You may not need all of the slurry to achieve a thick gravy.
Once gravy has thickened, remove pan from the heat and serve over hot, buttered egg noodles, rice, OR mashed potatoes. Enjoy!
NOTE: Caloric calculation was made only for beef tips and gravy. Potatoes, rice or noodles are not included in final calculation.
Here’s one more to pin on your Pinterest boards!