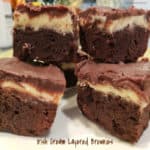
Air Fryer Sweet Potatoes

It’s EASY to make absolutely delicious air fryer sweet potatoes! Topped with cinnamon, brown sugar, and butter, this filling veggie tastes amazing!
It's EASY to make absolutely delicious air fryer sweet potatoes! Topped with cinnamon, brown sugar, and butter, this filling veggie tastes amazing!

Do you enjoy sweet potatoes? We’ve been enjoying them recently, especially since I began cooking them in our Cosori air fryer. Sweet potatoes are incredibly high in Vitamin A, and loaded with beta carotene and fiber, so they’re not only filling, but delicious, too!

Sweet potatoes taste wonderful just the way they are… plainly cooked and unadorned. BUT we like to “spruce ’em up” with a couple of “add-ons” (butter, cinnamon and brown sugar) after they cook for even more great flavor! YUM!

My Grandma And Her Sweet Potatoes!

When I think about sweet potatoes, I ALWAYS think of my Grandma Viola. My grandma lived in Texas until her death, but used to come spend a couple months at a time at my parents home in California in her later years.

I remember my mom telling me that my elderly Grandma would eat a baked sweet potato or yam every night for dinner. She did that because she’d take out her dentures each evening, so a baked sweet potato would be soft enough to eat “without her teeth”. Ha Ha! True story!

Scroll Down For A Printable Recipe Card At the Bottom Of The Page

Preparing Air Fryer Sweet Potatoes For Cooking

Making sweet potatoes in an air fryer is SUPER EASY and a bit quicker than baking them! NOTE: See the NOTES section of the printable recipe card below for instructions for baking them, if you do not have access to an air fryer.

Pick out sweet potatoes that are medium-sized, and both similar in weight. I made two, since I was only making them for my husband and myself. Scrub the potatoes very well, to remove any dirt. Once you’ve finished washing them, pat them dry with paper towels or a dish towel.

The sweet potatoes are washed, dried, and pieced with a fork before cooking.

Preheat your air fryer to 390°F. This typically takes 4-5 minutes. While the machine is preheating, lightly spritz or rub each sweet potato with vegetable or olive oil on all sides. Pierce the potatoes in several places (top and bottom) with a fork, because this helps them not to burst open during cooking!

When the air fryer is finished preheating, place the oiled and fork-pierced sweet potatoes into the basket.

Each sweet potato is rubbed or spritzed with oil lightly, before cooking.

Time To Cook Air Fryer Sweet Potatoes!

Cook the air fryer sweet potatoes at a temperature of 390°F for 30-35 minutes. Your cooking time may vary, due to differing weights of potatoes used. Each of the potatoes shown weighed about 9 ounces, and ended up taking 35 minutes to fully cook. If using larger or smaller potatoes, your cooking time will need to be altered slightly to adapt.

Check them at the 30 minute mark by pausing the machine and inserting a butter knife into the middle of the potatoes. When the knife meets no resistance, and the sweet potatoes are soft, they are fully cooked. If not quite done, place them back in the air fryer and continue cooking until ready.

Cook air fryer sweet potatoes at 390°F for 30 minutes, then check for doneness.

Once The Sweet Potatoes Are Fully Cooked

Once the potatoes are fully cooked, the skins will have darkened considerably, and be slightly crispy on the outside. Some of the juices may have also oozed out of the fork-punctures. Transfer the HOT potatoes directly to your serving plates.

When done, the skin on the sweet potatoes is very crisp and darkened in color.

Slice the sweet potatoes from top to bottom, and squeeze both ends of the potato to fluff up the insides.

Cut the sweet potato open, and fluff the insides with a fork.

Add 1 teaspoon butter and 1 heaping teaspoon brown sugar to each of the air fryer sweet potatoes, and then sprinkle lightly with cinnamon. Mix the toppings into the fluffed sweet potato, and then dig in! They are SO GOOD!

Two of the air fryer sweet potatoes, filled with butter, cinnamon and brown sugar.Mix the butter, brown sugar and cinnamon into the sweet potato and serve.

I hope you enjoy this recipe for air fryer sweet potatoes! We sure do. Have a wonderful day, friends, and thank you for taking the time to visit. Come back soon!

Looking For More AIR FRYER Recipes?

You can find all of my Air Fryer recipes in the Recipe Index, located at the top of the page. I have several, including:

Interested In More Recipes?

Thank you for visiting this website. I appreciate you using some of your valuable time to do soIf you’re interested, I publish a newsletter 2 times per month (1st and 15th) with all the latest recipes, and other fun info. I would be honored to have you join our growing list of subscribers, so you never miss a great recipe!
There is a Newsletter subscription box on the top right side (or bottom) of each blog post, depending on the device you use, where you can easily submit your e-mail address (only) to be included in my mailing list.

You Can Also Find Me On Social Media:
Facebook page: The Grateful Girl Cooks!
Pinterest: The Grateful Girl Cooks!
Instagram: jbatthegratefulgirlcooks

Author's signature

0 from 0 votes
Air Fryer Sweet Potatotes
Prep Time
5 mins
Cook Time
30 mins
Total Time
35 mins
 

It's EASY to make absolutely delicious air fryer sweet potatoes! Topped with cinnamon, brown sugar, and butter, this filling veggie tastes amazing!

Category: Vegetable Dish
Cuisine: American
Keyword: air fryer sweet potatoes
Servings: 2
Calories Per Serving: 288 kcal
Author: JB @ The Grateful Girl Cooks!
Ingredients
For Potatoes:
  • 18 ounces sweet potatoes , approx. 9 ounces each
  • vegetable oil or olive oil , to rub on sweet potato skin before cooking
To Serve:
  • 2 teaspoons butter , or more to taste
  • 2 teaspoons brown sugar , a heaping teaspoon
  • cinnamon , a light sprinkling over each potato
Instructions
  1. Pick sweet potatoes that are medium-sized, and similar in weight. Scrub potatoes well, to remove any dirt. Pat them dry with paper towels or a dish towel.

  2. Preheat air fryer to 390°F. Lightly spritz or rub each sweet potato with vegetable or olive oil on all sides. Pierce potatoes in several places (top and bottom) with a fork. When machine is preheated, place sweet potatoes into air fryer basket.

  3. Cook at 390°F for 30-35 minutes. Your cooking time may vary, due to differing weights of potatoes used. Check them at the 30 minute mark. Insert a butter knife into the middle of the potatoes. If knife meets no resistance, they are fully cooked. If not done, place them back in the air fryer and continue cooking until ready. Transfer potatoes to serving plates.

To Serve:
  1. Slice potatoes open lengthwise, and squeeze both ends of the potato to fluff up the insides. Add 1 teaspoon butter and 1 heaping teaspoon brown sugar to each potato, and then sprinkle lightly with cinnamon. Mix the toppings into the fluffed sweet potato, and then dig in! Enjoy!

Recipe Notes

Caloric calculations and cooking time for this recipe were made using one 9 ounce sweet potato per serving. Please note: As the weight of potatoes can vary widely, calories per serving and cooking times will tend to vary, as well.

NO AIR FRYER? NO PROBLEM! Follow all directions, but place prepared sweet potatoes on a foil or parchment paper-lined baking sheet. Bake at 425°F for between 45-60 minutes, time dependent on the weight of the potatoes.

Nutrition Facts
Air Fryer Sweet Potatotes
Amount Per Serving (1 potato + toppings)
Calories 288 Calories from Fat 54
% Daily Value*
Fat 6g9%
Saturated Fat 4g25%
Cholesterol 11mg4%
Sodium 177mg8%
Potassium 860mg25%
Carbohydrates 55g18%
Fiber 8g33%
Sugar 15g17%
Protein 4g8%
Vitamin A 36322IU726%
Vitamin C 6mg7%
Calcium 77mg8%
Iron 2mg11%
* Percent Daily Values are based on a 2000 calorie diet.

Here’s one more to pin on your Pinterest boards!It's EASY to make absolutely delicious air fryer sweet potatoes! Topped with cinnamon, brown sugar, and butter, this filling veggie tastes amazing!


Butterfinger Bars

Butterfinger Bars are incredible tasting, crisp, buttery oat bars, topped with a creamy milk chocolate/peanut butter icing. This easy recipe makes 24!

Many years ago (about 15), a friend, who was a parent of a student at the school I worked at, gave me a homemade dessert bar. She called her crisp, chocolate treats Butterfinger Bars. Not sure why she gave them this name, but since I LOVE Butterfinger candy bars, I “forced” myself to try one.

Ha Ha… I could have eaten 18 of them, they were so good. I asked her for the recipe, and she graciously wrote it down for me. Now, mind you, this is NOT A COPYCAT RECIPE for the delicious candy bar. This is its own bar cookie recipe that I’m confident you will LOVE, and I am happy to share it with you today!

Scroll Down For A Printable Recipe Card At The Bottom Of The Page

Okay… But What Is In This Bar Cookie?

Well, I’m glad you asked! The bar cookies are made with only FOUR common ingredients: old-fashioned oats, brown sugar, granulated sugar and butter. They are baked into a crisp bar cookie base, and then are frosted with a milk chocolate and peanut butter topping, once cool. Really, really simple!

The butterfinger bars have a crisp cookie base, and a creamy luscious topping of chocolate and peanut butter! These are seriously addicting bar cookies, especially if you enjoy chocolate and peanut butter. I think they’re even better the day AFTER you make them! Let me show you how EASY it is to make two dozen!

Make The Butterfinger Bars Base

Preheat your oven to 425°F. while you make the oat mixture base. It only takes a few minutes to make, so you will want your oven hot and ready to bake, once you’re done.

Mix oats (uncooked), brown and granulated sugars with melted butter in a large mixing bowl. Stir these ingredients together very well, until you have a crumbly, but butter-coated mixture.

Melted butter, oats, brown and granulated sugar in mixing bowl.The ingredients are fully combined before pressing mixture into baking pan.

Spray a 9×13 baking pan with non-stick spray, and pour the oat mixture into the dish. Spread the crumbs over the entire bottom of the pan. Use the back of a large spoon to firmly press the ingredients together in the pan.

When done, you should have a very firmly compacted oat mixture base in the pan (shown in the 2nd photo below, before baking). Now it is ready to bake! Bake the butterfinger bars at 425°F for 10-12 minutes. When done, they will be golden brown around the edges. Remove the pan to a wire rack to cool.

The bar cookie mixture is spread evenly into a lightly greased 9x13 baking dish.The mixture is packed down firmly into the pan before going into the oven.

Make The Chocolate Peanut Butter Frosting

While the butterfinger bars are cooling (after baking), make the chocolate peanut butter frosting! Fear not- it is SUPER EASY! Melt milk chocolate chips (or giant sized Hershey bar) in a double boiler, along with the peanut butter.

WHAT IS A DOUBLE BOILER? A double boiler has a bottom saucepan filled about 3/4 of the way with water, and then a slightly smaller pan (with chocolate and peanut butter in it) sitting in (on top of) the water. Bring the pan with water to a gentle boil, while stirring the chocolate and peanut butter. Be careful to not let any water get into the chocolate mixture.

The heat from the boiling water below will gently melt (without burning) the chocolate chips and the peanut butter in the upper pan. Continue to stir until you have a creamy frosting, and then remove from the heat. TIP: For this recipe, it is best to NOT use all natural peanut butter.

Milk chocolate chips and peanut butter for frosting are melted in a double boiler.

Time To Frost The Butterfinger Bars!

Okay… now you should have a creamy frosting and a tray of completely cooled butterfinger bars! Pour the frosting over the bars, and then spread it, to cover the entire surface. Let the bars cool completely, so the frosting can firm up, before attempting to slice.

The chocolate peanut butter frosting is poured onto cooled bar cookies, and spread.Frosting is spread over the top of the butterfinger bars, and then rests to firm up.

See How CRISP The Butterfinger Bars Are?

Getting the butterfinger bars out of the pan can be a bit of a challenge due to their crispness. Run a butter knife around the edges of the pan, and then use a really sharp knife to cut the butterfinger bars in half. Lift an entire half of the bars from the pan.

They are so crisp they should hold together very well. Cut the half into three equal portions, and then cut each third into 4 pieces, using a very sharp knife to make the cuts. Repeat with the other half of the bars!

Half of the crisp butterfinger bars are cut and lifted out of pan.Each half of the pan of bar cookies is cut into 3 pieces, then cut into 4 pieces per slice..

Now It’s Time To EAT!

Once the bars are cut into portions, you should have 24 square butterfinger bars! They are now ready to serve, and eat! The bars will be crisp, and the frosting creamy… and guess what? They also freeze well, so you can wrap up any leftovers really well, and save several for another time. They’re so good!

Grabbing a bite of one of the butterfinger bars to munch on!

Hope you enjoy these yummy chocolate frosted butterfinger bars! We sure do! Have a great day, and thank you for visiting!

Looking For More BAR COOKIE Recipes?

You can find all of my bar cookie recipes in the Recipe Index, located at the top of the page. A few favorites include:

Interested In More Recipes?

Thank you for visiting this website. I appreciate you using some of your valuable time to do soIf you’re interested, I publish a newsletter 2 times per month (1st and 15th) with all the latest recipes, and other fun info. I would be honored to have you join our growing list of subscribers, so you never miss a great recipe!
There is a Newsletter subscription box on the top right side (or bottom) of each blog post, depending on the device you use, where you can easily submit your e-mail address (only) to be included in my mailing list.

You Can Also Find Me On Social Media:
Facebook page: The Grateful Girl Cooks!
Pinterest: The Grateful Girl Cooks!
Instagram: jbatthegratefulgirlcooks

Author's signature

Recipe Source: My friend Annette Goetz gave me the recipe over 15 years ago

0 from 0 votes
Butterfinger Bars
Prep Time
10 mins
Cook Time
10 mins
Total Time
20 mins
 

Butterfinger Bars are incredible tasting, crisp, buttery oat bars, topped with a creamy milk chocolate/peanut butter icing. This easy recipe makes 24!

Category: Dessert
Cuisine: American
Keyword: butterfinger bars
Servings: 24
Calories Per Serving: 286 kcal
Author: JB @ The Grateful Girl Cooks!
Ingredients
  • non-stick cooking spray (for pan)
For Bars:
  • 4 cups old-fashioned oats
  • 1 cup brown sugar , I used dark
  • ½ cup granulated sugar
  • 1 cup butter (2 sticks) , melted
For Icing:
  • 11.5 ounces milk chocolate chips (1 bag) , or 12 ounce Hershey's milk chocolate bar
  • ¾ cup creamy peanut butter , do not use natural peanut butter
Instructions
  1. Preheat oven to 425°F.

  2. Mix oats, brown and granulated sugars with melted butter in a large mixing bowl. Stir well, until fully combined. Lightly coat a 9x13 baking pan (bottom and sides) with non-stick spray, then pour oat mixture into dish. Spread mixture over bottom of the pan. Use the back of a large spoon to firmly press the ingredients together. When done, you should have a very firmly compacted oat mixture base.

  3. Bake at 425°F for 10-12 minutes. When done, they will be crisp, golden brown around the edges. Transfer pan to a wire rack to cool.

Make The Frosting:
  1. Make the frosting while the bars are cooling. Melt milk chocolate chips (or 12 oz. milk chocolate Hershey bar) in a double boiler, along with the peanut butter. (See blog post for info on double boiler). Bring lower pan with water to a gentle boil, while stirring the chocolate chips and peanut butter in the pan above. Continue to stir until frosting is smooth and creamy, then remove from heat. TIP: For this recipe, it is best to NOT use all natural peanut butter. Once bars have cooled to room temp, they're ready to frost. Pour frosting over bars, and spread, to cover the entire surface. Let bars rest, so frosting can firm up, before attempting to cut or serve.

  2. To slice: Run a butter knife around edges of the pan, and then use a sharp knife to cut the pan of bars down the middle in half. Lift an entire half of the bars from pan. They are so crisp they should hold together well. Cut this half into three equal sized long slices. Now slice each third into 4 pieces, using a sharp knife to make the cuts. Repeat with remaining half of the bars, and you will have 24 square bars, ready to eat. Store leftovers in an airtight container. Enjoy!

Recipe Notes

TIP: If substituting a Hershey large milk chocolate bar for the chocolate chips, be sure to break it into smaller chunks before melting it with the peanut butter! It will melt a LOT faster that way!

Nutrition Facts
Butterfinger Bars
Amount Per Serving (1 bar cookie)
Calories 286 Calories from Fat 144
% Daily Value*
Fat 16g25%
Saturated Fat 8g50%
Cholesterol 22mg7%
Sodium 117mg5%
Potassium 116mg3%
Carbohydrates 33g11%
Fiber 2g8%
Sugar 22g24%
Protein 5g10%
Vitamin A 267IU5%
Vitamin C 1mg1%
Calcium 36mg4%
Iron 1mg6%
* Percent Daily Values are based on a 2000 calorie diet.

Here’s one more to pin on your Pinterest boards!Butterfinger Bars are incredible tasting, crisp, buttery oat bars, topped with a creamy milk chocolate/peanut butter icing. This easy recipe makes 24!

Orange Glazed Carrots

Orange Glazed Carrots are a simple but delicious side dish, featuring buttery, marmalade coated carrots, pecans, fresh ginger and cinnamon!
Orange Glazed Carrots are a simple but delicious side dish, featuring buttery, marmalade glazed carrots, pecans, fresh ginger and cinnamon!

Most of my life I have not been a huge fan of cooked carrots. We enjoy them in casseroles, or cooked with a pot roast, and have occasionally oven-roasted them (see here for my recipe). I think they taste pretty good cooked or roasted, it’s just not my favorite way to eat them.

Well, my opinion of cooked carrots changed recently because of THIS recipe for orange glazed carrots! The recipe uses frozen carrots, which is really convenient, too!

Oh. My. Goodness. These little orange things are so good I could have eaten the entire bowl of ’em by myself! But I didn’t (thank goodness!).

Cooked sliced carrots are coated in a simple marmalade glaze that also has cinnamon, butter, pecans, and finely grated ginger. Whoa… this veggie side dish is a treat for the taste buds! Here’s how to make this dish:

Scroll Down For A Printable Recipe Card At The Bottom Of The Page

First Things First – Cook the Carrots!

Cook the frozen sliced carrots, according to the package instructions. Using frozen sliced carrots makes this recipe sooo easy! When done, drain the water out of the pan. Set the carrots aside while you cook the marmalade glaze.

Frozen carrots are cooked before adding them to a marmalade glaze.

Making The Orange Marmalade Glaze Is EASY!

Melt the butter in a skillet on low heat. Add orange marmalade to the melted butter (I used my homemade!), and stir to combine. Continue to keep the heat on very low while you make the orange marmalade glaze.

Once the two ingredients are combined, grate fresh ginger into the glaze. Use a micro-plane or the very small section of your hand held box grater to do this.

Orange marmalade and melted butter are combined in skillet.Fresh ginger is finely grated and added to marmalade and butter in skillet.

Now add the chopped pecans, and stir everything to combine, while still cooking on low heat.

Add the cooked, well-drained carrots to the skillet. Stir well, to coat the carrots with the sweet, sticky orange glaze.

Chopped pecans are added to marmalade glaze in skillet.The cooked carrots are now added to the orange glaze in skillet.

Final Step!

The last thing you need to do is sprinkle the cinnamon over the carrots and stir well, to combine all the ingredients with that wonderful glaze.

Cook the orange glazed carrots until everything is fully heated through, and then it’s ready to eat! The glaze should be covering all the carrots, and be really hot at this point!

A light sprinkling of cinnamon adds to the flavor of the orange glazed carrots.

Time To Serve The Orange Glazed Carrots!

Carefully transfer the hot, orange glazed carrots to a serving bowl. Now this simple side dish is ready to dig into, alongside your favorite dinner entree! We enjoyed it alongside juicy pork tenderloin slices.

The buttery carrots will be tender, slightly sweet from the orange marmalade, and those yummy pecans give them a bit of crunch! Fresh ginger and cinnamon provide extra flavor to this yummy vegetable dish!

The orange glazed carrots with pecans are served in a white bowl.A close up view of a bowl of orange glazed carrots, ready to eat!

This Recipe Can Also Be Made In A Slow Cooker

This recipe can also be adapted to prepare in a slow cooker, using fresh, sliced carrots. I have included those instructions in the NOTES section of the printable recipe card at the bottom of this page, for your convenience!

Well, I trust you enjoy making and eating these yummy orange glazed carrots. They compliment many main dishes, and I hope you (and those you love), will really like them. Have a wonderful day, and may God bless you.

Looking For More VEGGIE SIDE DISHES?

You can find all of my side dish recipes in the Recipe Index, located at the top of the page. A few favorite veggie side dishes include:

Want More Recipes? Get My FREE Newsletter!

I publish a newsletter 2 times per month (1st and 15th) with lots of recipes, tips, etc..
Would you like to join our growing list of subscribers?

There is a Newsletter subscription box on the top right (or bottom) of each blog post, depending on the device you use.
You can submit your e-mail address there, to be added to my mailing list.

Find Me On Social Media:

Facebook page: The Grateful Girl Cooks!
Pinterest:
The Grateful Girl Cooks!
Instagram:
jbatthegratefulgirlcooks

Author's signature

Original recipe source: Unknown (found handwritten on a 3×5 card in an OLD recipe box)

↓↓ PRINTABLE RECIPE BELOW ↓↓

0 from 0 votes
Orange Glazed Carrots
Prep Time
8 mins
Cook Time
5 mins
Total Time
13 mins
 

Orange Glazed Carrots are a simple but delicious side dish, featuring buttery, marmalade glazed carrots, pecans, fresh ginger and cinnamon!

Category: Side Dish, Vegetable Dish
Cuisine: American
Keyword: orange glazed carrots
Servings: 4
Calories Per Serving: 180 kcal
Author: JB @ The Grateful Girl Cooks!
Ingredients
  • 12 ounces frozen sliced carrots
  • 3 Tablespoons butter
  • 3 Tablespoons orange marmalade
  • 1 teaspoon finely grated fresh ginger
  • 2 Tablespoons chopped pecans (or walnuts)
  • teaspoon cinnamon
Instructions
  1. Cook frozen sliced carrots until tender, according to package instructions (usually 6-8 minutes). When done, drain water from pan. Set carrots aside.

  2. Make The Glaze: Melt butter in a skillet, on very low heat. Add orange marmalade, and stir to combine. Continue to cook on low heat. Add finely grated fresh ginger, followed by the chopped pecans, stirring to combine.

  3. Now add the cooked, drained carrots to the skillet. Stir well, to coat carrots with glaze. Sprinkle with cinnamon. Stir to combine, and heat on low until the carrots are fully heated through. Serve hot, and enjoy!

Recipe Notes

NOTE: This recipe can also be made in a slow cooker. Place 6 peeled, sliced FRESH carrots with other ingredients into slow cooker, and cook on LOW HEAT for 2-3 hours, or until carrots have become tender.

Nutrition Facts
Orange Glazed Carrots
Amount Per Serving (1 g)
Calories 180 Calories from Fat 108
% Daily Value*
Fat 12g18%
Saturated Fat 6g38%
Cholesterol 23mg8%
Sodium 142mg6%
Potassium 294mg8%
Carbohydrates 19g6%
Fiber 3g13%
Sugar 13g14%
Protein 2g4%
Vitamin A 14471IU289%
Vitamin C 6mg7%
Calcium 41mg4%
Iron 1mg6%
* Percent Daily Values are based on a 2000 calorie diet.

Here’s one more to pin on your Pinterest boards!Orange Glazed Carrots are a simple but delicious side dish, featuring buttery, marmalade glazed carrots, pecans, fresh ginger and cinnamon!

Easy Ground Beef Stroganoff

Looking for a quick, inexpensive dinner that tastes good? Easy Ground Beef Stroganoff can be made in about 25 minutes from start to finish!

My husband and I love beef stroganoff. Most of the time I make classic beef stroganoff, with beef tenderloin (or occasionally stew meat), which needs to cook longer, to fully tenderize the meat.

Occasionally when I want the taste of the original recipe, but am pressed for time, or want to take the easy way out, I make this EASY ground beef stroganoff! Today I want to share this simple recipe with you.

This recipe can be cooked and on the table in under 30 minutes, and has great flavor! It’s also very easy to make, which is always a win-win! Using ground beef tends to be a fairly inexpensive way to feed 4 people. Here’s how to make this easy ground beef stroganoff!

Scroll Down For A Printable Recipe Card At The Bottom Of The Page

Cook The Ground Beef And Onions

Sauté the ground beef and chopped onions on medium heat in a large skillet. Continue to cook until meat is browned and cooked through. This will only take a few minutes. Once the meat is fully cooked, remove the skillet from the heat, and drain any accumulated grease from the pan.

Ground beef and chopped onions are pan-seared until fully cooked.Browned ground beef and onions have cooked, and grease has been drained.

Stir in the mushroom pieces, cream of mushroom soup, red wine (or beef broth or water), salt, pepper, and garlic powder. Cover the skillet and simmer on low for 15 minutes.

Mushrooms, red wine, and mushroom soup are added to ground beef stroganoff mixture.

While Stroganoff Cooks, Prepare Egg Noodles In Separate Pan

While the stroganoff is cooking, prepare the egg noodles in a separate saucepan, according to the package instructions. When the noodles are done cooking, drain, stir in butter, and keep the noodles warm.

Egg noodles are cooked, drained, then buttered before topping with stroganoff.

Hot, buttered noodles are a wonderful classic base for this dish, but you can also substitute steamed rice under the stroganoff, if you prefer.

Finish The Ground Beef Stroganoff

After the ground beef stroganoff has cooked (covered) for 15 minutes, remove the lid from the skillet. Add the sour cream, and stir this mixture well, to fully blend it in. Heat this meat mixture, uncovered, on medium-low heat until heated through. DO NOT LET IT BOIL AFTER ADDING SOUR CREAM.

Sour cream is added to the ground beef stroganoff.The ground beef stroganoff is heated through before serving.

Time To Serve Ground Beef Stroganoff

Divide the hot, buttered egg noodles on each plate . Top the noodles with some of the beef stroganoff. You can sprinkle the dish with fresh or dried parsley for garnish, if desired.

Hot, buttered egg noodles are topped with the ground beef stroganoff to serve.

We enjoyed my yummy broccoli corn casserole alongside the stroganoff. The ground beef stroganoff, hot buttered noodles, and a veggie dish made this a well-rounded and filling meal.

Easy ground beef stroganoff on noodles, with broccoli casserole on the side.

Thanks for visiting my blog today. I appreciate your time, and hope you have the opportunity to try this simple, but delicious recipe! It is really good, and I hope you enjoy it. Don’t forget to check out my yummy recipes for classic beef stroganoff or meatballs stroganoff! Have a wonderful day, and may God bless you!

Looking For More Recipes Using GROUND BEEF?

You can find all of my recipes in the Recipe Index, located at the top of the page. A few favorites include:

Interested In More Recipes?

Thank you for visiting this website. I appreciate you using some of your valuable time to do soIf you’re interested, I publish a newsletter 2 times per month (1st and 15th) with all the latest recipes, and other fun info. I would be honored to have you join our growing list of subscribers, so you never miss a great recipe!
There is a Newsletter subscription box on the top right side (or bottom) of each blog post, depending on the device you use, where you can easily submit your e-mail address (only) to be included in my mailing list.

You Can Also Find Me On Social Media:
Facebook page: The Grateful Girl Cooks!
Pinterest: The Grateful Girl Cooks!
Instagram: jbatthegratefulgirlcooks

Author's signature

Original recipe source: unknown (found handwritten on a recipe card in a very old recipe box)

0 from 0 votes
Easy Ground Beef Stroganoff
Prep Time
10 mins
Cook Time
15 mins
Total Time
25 mins
 

Looking for a quick, inexpensive dinner that tastes good? Easy Ground Beef Stroganoff can be made in about 25 minutes from start to finish!

Category: Entree
Cuisine: American
Keyword: ground beef stroganoff
Servings: 4
Calories Per Serving: 454 kcal
Author: JB @ The Grateful Girl Cooks!
Ingredients
  • 1 pound ground beef
  • 1 small brown onion , chopped
  • 4 ounces mushroom pieces (canned) , drained
  • 10.5 ounces cream of mushroom soup , one small can
  • ¼ cup red wine, water or beef broth , whichever you prefer (I used red wine)
  • ½ teaspoon salt
  • ¼ teaspoon (each) black pepper and garlic powder
  • ½ cup sour cream (regular or low-fat)
  • 2 cups dry egg noodles , cooked according to pkg. directions
  • 1 Tablespoon butter
Instructions
  1. Sauté ground beef and onions on medium heat in large skillet. Cook until meat is browned and cooked through. Remove skillet from heat, and drain accumulated grease from pan.

  2. Stir in mushrooms, cream of mushroom soup, red wine (or beef broth or water), salt, pepper, and garlic powder. Cover skillet and simmer on low heat for 15 minutes.

  3. **While the stroganoff is cooking, prepare egg noodles in a separate saucepan, according to package instructions. When noodles are done cooking, drain, and stir in butter. Keep warm.

  4. After it has cooked (covered) for 15 minutes, remove lid. Add sour cream, and stir well, to fully blend it in. Cook on medium-low heat (uncovered), until heated through. DO NOT LET IT BOIL AFTER ADDING SOUR CREAM. To Serve: Place egg noodles on plates. Top with beef stroganoff. Sprinkle with fresh or dried parsley, if desired. Enjoy!

Recipe Notes

NOTE: Recipe caloric calculation was calculated using red wine, and light sour cream. 

Nutrition Facts
Easy Ground Beef Stroganoff
Amount Per Serving (1 (1/4 of total))
Calories 454 Calories from Fat 234
% Daily Value*
Fat 26g40%
Saturated Fat 11g69%
Cholesterol 114mg38%
Sodium 1064mg46%
Potassium 617mg18%
Carbohydrates 23g8%
Fiber 2g8%
Sugar 2g2%
Protein 29g58%
Vitamin A 182IU4%
Vitamin C 2mg2%
Calcium 74mg7%
Iron 4mg22%
* Percent Daily Values are based on a 2000 calorie diet.

Here’s one more to pin on your Pinterest boards!Looking for a quick, inexpensive dinner that tastes good? Easy Ground Beef Stroganoff can be made in about 25 minutes from start to finish!

The Best Brownie Frosting

This easy to make, 6-ingredient recipe for The Best Brownie Frosting makes enough thick chocolate icing for a 9×13 pan of your favorite brownies!
This easy to make, 6-ingredient recipe for The Best Brownie Frosting makes enough thick chocolate icing for a 9x13 pan of your favorite brownies!

In our home, we LOVE brownies!  Typically I make them from scratch (see my recipe here), but occasionally I make them using a box mix, if I find an incredible SALE! Then I purchase a few boxes to keep around… in case of “must have chocolate” emergencies!

Once I make brownies, I love to put yummy chocolate frosting on them for a perfect finishing touch! My husband likes his brownies without frosting… NOT ME! How can he possibly not like more creamy chocolate spread all over the top of a chocolate brownie? I suppose that is one of life’s great mysteries. But I digress… so… back to the recipe.

Well, THIS recipe for the best brownie frosting is my favorite, because it’s super easy,  only has a few ingredients, and needs no special equipment to make. Just stir the ingredients up, and you’re done! Spread it on a pan of freshly made brownies, and enjoy! Here’s how to whip up a batch, which is enough to frost a 9×13″ pan full of brownies!

Scroll Down for A Printable Recipe Card At The Bottom Of The Page

How To Make The Best Brownie Frosting

Place softened, room temperature butter (NOT melted), unsweetened cocoa powder, light corn syrup, and vanilla extract in a medium sized bowl. Honey can be substituted for the corn syrup, if desired.

Stir these ingredients well with a spoon. That’s right, there’s no need for an electric mixer! Just keep on stirring until it comes together into a thick dark brown mixture.

Ingredients are mixed together in a small bowl for the brownie frosting.Once mixed together, the frosting becomes dark brown in color.

Now add the powdered sugar into the bowl, along with 2-3 Tablespoons of milk. Give the frosting a good stir until this also is completely mixed together. You will want the best brownie frosting to be thick, creamy and spreadable. If you find it is too thick, add a couple drops more of the milk.  If you get it too thin, simply add just a bit more powdered sugar.

Powdered sugar and a small amount of milk are mixed into the best brownie frosting.Now the icing is ready to spread on baked and cooled brownies.

Spread The Frosting Out On A Pan Of Brownies

Once you’ve made your pan of brownies, whether they are homemade or a box mix, remove the brownies from the oven, and LET THEM COOL COMPLETELY BEFORE FROSTING. Don’t frost while the brownies are warm, because that will end up making the softened butter in the frosting melt, which then changes the texture of the frosting. NO good.

A 9x13 pan of brownies, covered with the best brownie frosting!

Once the brownies are completely covered with the best brownie frosting, let them rest for about 15 minutes. This gives the frosting time to slightly firm up just a bit. Once they have “rested” (it’s so exhausting being a brownie, right?), slice and serve your brownies!

Here are the brownies, covered with the creamy chocolate frosting.

Hope you enjoy this wonderful creamy chocolate topping on your brownies! I’ve tried lots of homemade and canned frostings, and honestly still feel like this is the best brownie frosting ever! Enjoy… and have a GREAT day!

Looking For More BAR COOKIE Recipes?

You can find all of my recipes in the Recipe Index, located at the top of the page. I have quite a few bar cookie recipes, including:

Interested In More Recipes?

Thank you for visiting this website. I appreciate you using some of your valuable time to do soIf you’re interested, I publish a newsletter 2 times per month (1st and 15th) with all the latest recipes, and other fun info. I would be honored to have you join our growing list of subscribers, so you never miss a great recipe!
There is a Newsletter subscription box on the top right side (or bottom) of each blog post, depending on the device you use, where you can easily submit your e-mail address (only) to be included in my mailing list.

You Can Also Find Me On Social Media:
Facebook page: The Grateful Girl Cooks!
Pinterest: The Grateful Girl Cooks!
Instagram: jbatthegratefulgirlcooks

Author's signature

Original recipe source: Unknown. Wrote recipe down 30+ years ago, w/out author’s name.

0 from 0 votes
The Best Brownie Frosting
Prep Time
5 mins
Cook Time
0 mins
Total Time
5 mins
 

This easy to make, 6-ingredient recipe for The Best Brownie Frosting makes enough thick chocolate icing for a 9x13 pan of your favorite brownies!

Category: Desserts, Miscellaneous
Cuisine: American
Keyword: brownie frosting
Servings: 1 batch-for 9x13 pan of brownies
Calories Per Serving: 1753 kcal
Author: JB @ The Grateful Girl Cooks!
Ingredients
  • 6 Tablespoons butter (softened) , room temperature (not melted)
  • 6 Tablespoons unsweetened cocoa powder
  • 2 Tablespoons light corn syrup , or honey
  • 1 teaspoon vanilla extract
  • 2 cups powdered sugar
  • 2-3 Tablespoons milk , plus a few drops more, if necessary
Instructions
  1. Place softened, room temperature butter (NOT melted), unsweetened cocoa powder, light corn syrup, and vanilla extract in a medium sized bowl. Stir until fully combined.

  2. Add the powdered sugar, along with 2-3 Tablespoons of milk. Give the frosting a good stir until this is completely mixed together. You will want frosting to be thick, creamy and spreadable. If too thick, add a couple drops more of the milk.  If too thin, simply add a bit more powdered sugar.

  3. Once you've made your brownies, whether homemade or box mix, remove brownies from oven, and LET THEM COOL COMPLETELY BEFORE FROSTING. Spread frosting over top of brownies. Once completely covered with frosting, let them rest for 10-15 minutes. This gives the frosting time to slightly firm up. Slice and serve your brownies, and enjoy!

Recipe Notes

NOTE: The recipe calculation is for the entire batch of frosting. Since a 9x13 pan of brownies is typically cut into 24 servings, the caloric calculation for each serving of frosting averages out to about 74 calories (per serving of frosting).

Nutrition Facts
The Best Brownie Frosting
Amount Per Serving (1 batch)
Calories 1753 Calories from Fat 657
% Daily Value*
Fat 73g112%
Saturated Fat 46g288%
Cholesterol 182mg61%
Sodium 652mg28%
Potassium 502mg14%
Carbohydrates 293g98%
Fiber 10g42%
Sugar 271g301%
Protein 8g16%
Vitamin A 2158IU43%
Calcium 96mg10%
Iron 4mg22%
* Percent Daily Values are based on a 2000 calorie diet.

Here’s one more to pin on your Pinterest boards!This easy to make, 6-ingredient recipe for The Best Brownie Frosting makes enough thick chocolate icing for a 9x13 pan of your favorite brownies!

Hearty Minestrone Soup

Hearty Minestrone Soup is filling and DELICIOUS! This classic Italian soup, with meat, veggies, tomatoes, beans, and macaroni is sure to please.

The first time I had this hearty minestrone soup was when my Father-in-Law died over 40 years ago. A friend of the family was there for his memorial, and fixed a massive pot of this soup for the family at my in-laws home after the service.

The day of his memorial service was very cold and snowy (January), so this hot, delicious, filling meal was a God-send, as well as a sweet, thoughtful “gift” to our family!  A long-time family friend named Veda Quatro made the soup, gave me her recipe, and we’ve enjoyed this hearty, flavor-packed soup ever since that day!

The recipe makes 12 servings, and is CRAZY DELICIOUS. It takes a bit of time and prep work to make, but honestly, the results are wonderful, and will be worth your time! If you will only be serving a few people, you will enjoy having the leftovers for lunches or a quick meal! YUM!

Four Steps To Making Hearty Minestrone Soup!

There are basically 4 steps to making this soup. Cook the stew meat in broth, cook ground beef, onions and spices, cook the veggies, and add the final batch of veggies and pasta to the soup 30 minutes before serving!

It’s really not that hard to make… honest! Here’s how to cook a large batch of this yummy soup:

Step #1 – Cooking The Stew Meat

Place 5 quarts of water into a HUGE soup pot. Add the beef bouillon cubes and the stew meat. NOTE: You can substitute 5 quarts beef broth for water and bouillon, if more convenient. Cook on high for about 20 minutes, or until the stew meat is cooked through. Once done, turn off heat, and transfer the stew meat with a slotted spoon to a plate to rest.

NOTE: Trust me… you will want to use a LARGE soup pot or divide the recipe between two standard sized soup pots for this recipe, because it makes a LOT of soup, once completed!

Stew meat is cooked in beef broth in a large stock pot.

Step #2

Heat the oil in a large skillet on medium heat. Add the ground beef, drained stew meat, chopped onion, pepper, and chopped parsley. Cook this mixture until the ground beef is browned and fully cooked through.

As soon as the ground beef is fully cooked, add the minced garlic, and continue to cook, stirring often, for one minute.

Stew meat, ground beef, onions, and parsley are browned in skillet.

Minced garlic is added to the browned meat mixture.

Drain the grease from the skillet (discard) and then add the cooked beef and onion mixture into the broth and stir, to combine.

Cooked beef and onion mixture is added to beef broth.

Step #3

On to the next step! Gather the sliced celery, carrots and shredded cabbage, and add them to the pot of hearty minestrone soup! Pour in the canned diced tomatoes, Italian seasoning, and then give everything a good stir, to combine. Add the salt, stir then taste the soup, and add  additional salt, if desired, to suit your personal taste.

Continue to cook the hearty minestrone soup (uncovered) on medium heat for about 30 minutes, or until the veggies become tender. The soup liquid will reduce in volume slightly as the mixture cooks.

NOTE: If making soup ahead for serving later in the day… turn off the heat after this step, and let soup sit until 30 minutes before you want to serve, then go to Step #4.

Carrots, celery and green cabbage are prepped for the minestrone soup.Hearty minestrone soup is cooking away in a large stock pot.

Step #4 – The FINAL Step Before Serving

About 30 minutes BEFORE serving, add the uncooked macaroni noodles, frozen peas, kidney beans and zucchini slices to the pot of soup.

Cook the hearty minestrone soup on medium heat (still uncovered) for 30 minutes, and then it will be ready to serve! The broth will slightly reduce as it continues to cook, and the macaroni will fully cook in the soup!

Zucchini, peas, and uncooked macaroni noodles are added to the soup.The macaroni noodles cook fully in the hot minestrone soup.

Time To Serve Hearty Minestrone Soup!

After 30 minutes your huge pot of homemade, hearty minestrone soup is ready to serve! Give it a final taste, and add additional salt, if desired. Ladle the steaming soup into bowls, sprinkle with grated Parmesan cheese, and serve!

A bowl of hearty minestrone soup, topped with grated Parmesan cheese.Beef, veggies macaroni, tomatoes and beans are featured in hearty minestrone soup.

I really hope you will give this hearty minestrone soup a try! It is fabulous, and feeds a small village, or provides you with quite a few leftover bowls of delicious soup! YUM!!! Have a great day.

Looking For More SOUP Recipes?

You can find all of my soup recipes in the Recipe Index, located at the top of the page. I have many soup recipes on the blog, including:

Interested In More Recipes?

Thank you for visiting this website. I appreciate you using some of your valuable time to do soIf you’re interested, I publish a newsletter 2 times per month (1st and 15th) with all the latest recipes, and other fun info. I would be honored to have you join our growing list of subscribers, so you never miss a great recipe!
There is a Newsletter subscription box on the top right side (or bottom) of each blog post, depending on the device you use, where you can easily submit your e-mail address (only) to be included in my mailing list.

You Can Also Find Me On Social Media:
Facebook page: The Grateful Girl Cooks!
Pinterest: The Grateful Girl Cooks!
Instagram: jbatthegratefulgirlcooks

Author's signature

Recipe adapted from: Family friend Veda Quatro’s original recipe (1979)

0 from 0 votes
Hearty Minestrone Soup
Prep Time
30 mins
Cook Time
1 hr
Total Time
1 hr 30 mins
 

Hearty Minestrone Soup is filling and DELICIOUS! This classic Italian soup, with meat, veggies, tomatoes, beans, and macaroni is sure to please.

Category: Entree, Soup
Cuisine: Italian
Keyword: hearty minestrone soup
Servings: 12
Calories Per Serving: 241 kcal
Author: JB @ The Grateful Girl Cooks!
Ingredients
  • 5 quarts water
  • pounds beef stew meat , cut into cubes
  • 4 large beef bouillon cubes
  • 2 Tablespoons vegetable oil
  • ½ pound ground beef
  • 1 medium brown onion , chopped
  • ¼ teaspoon ground black pepper
  • ½ cup fresh parsley , finely chopped
  • 2 cloves garlic , minced
  • 1 cup celery , sliced
  • 2 cups green cabbage , shredded
  • cups carrots , sliced or diced
  • 43.5 ounces diced, canned tomatoes (=three 14.5 ounce cans)
  • teaspoons Italian seasoning
  • 2 teaspoons salt , plus additional, to desired taste
  • 1 cup zucchini , sliced thin, then cut slices in half
  • 1 cup frozen peas , do not thaw
  • 15.5 ounces kidney beans (canned) , rinsed and drained
  • 2 cups elbow macaroni , uncooked
  • grated Parmesan cheese for garnish (optional)
Instructions
  1. STEP #1: Place 5 quarts of water into a HUGE soup pot. Add the beef bouillon cubes and the stew meat. NOTE: Substitute 5 quarts beef broth for water and bouillon, if more convenient. Cook on high for 20 minutes, or until stew meat is cooked through. Once done, turn off heat, and transfer stew meat with a slotted spoon to a plate to rest.

  2. STEP #2: Heat oil in a large skillet on medium heat. Add ground beef, drained stew meat, chopped onions, black pepper, and parsley. Cook until ground beef is browned and cooked through. Add minced garlic, and cook, stirring often, for one minute. Drain grease from skillet (discard) and then add this mixture to the broth and stir to combine.

  3. STEP #3: Add celery, carrots and cabbage to the pot of soup. Pour in canned diced tomatoes and Italian seasoning; stir, to combine. Add salt, stir then taste the soup, and add additional salt, if desired. Continue to cook soup (uncovered) on medium heat for 30 minutes, or until the veggies become tender. The soup liquid will reduce in volume slightly as the mixture cooks. NOTE: If making soup ahead for serving later in the day -turn off heat after this step, and let soup sit until 30 minutes before you want to serve, then go to Step #4.

  4. STEP #4: 30 minutes BEFORE serving, add the uncooked macaroni noodles, frozen peas, kidney beans and zucchini slices to the soup. Cook on medium high heat (still uncovered) for 30 minutes, stirring occasionally, and then it's ready to serve! Give it a final taste; add additional salt, if desired. Ladle soup into bowls, sprinkle with grated Parmesan cheese, and serve! Enjoy!

Recipe Notes

TIP: The original author of this recipe (Veda) told me this tip: If you need to stretch out any leftover soup, just add another can of diced tomatoes or kidney beans, to make it go further!

Nutrition Facts
Hearty Minestrone Soup
Amount Per Serving (1 g)
Calories 241 Calories from Fat 54
% Daily Value*
Fat 6g9%
Saturated Fat 3g19%
Cholesterol 13mg4%
Sodium 974mg42%
Potassium 689mg20%
Carbohydrates 36g12%
Fiber 7g29%
Sugar 9g10%
Protein 12g24%
Vitamin A 3271IU65%
Vitamin C 26mg32%
Calcium 82mg8%
Iron 3mg17%
* Percent Daily Values are based on a 2000 calorie diet.

Here’s one more to pin on your Pinterest boards!Hearty Minestrone Soup is filling and DELICIOUS! This classic Italian soup, with meat, veggies, tomatoes, beans, and macaroni is sure to please.

Chicken Veggie TexMex Skillet

Southwest flavors shine in this deliciously seasoned, low-calorie Chicken Veggie TexMex Skillet, with zucchini, onion, yellow squash, & bell peppers!

Anybody out there enjoy fajitas? I sure do, and chicken fajitas (in flour tortillas) are my favorite. This recipe for chicken veggie TexMex skillet is one I came up with while trying to cut out some carbs from my diet a few years ago. I wanted to enjoy the TASTE of fajitas, but with far less calories from tortillas, sour cream and guacamole!

Well… here’s a tasty solution! Southwestern-inspired spices, chicken breast strips, onions, peppers and green and yellow zucchini squash are featured in this simple dish! Everything can be eaten as is (no tortillas), for a “healthier” yet delicious TexMex meal!

It’s REALLY GOOD, and you get your protein (chicken) AND veggies, without a lot of extra calories! Here’s how to make a chicken veggie TexMex skillet:

Scroll down For A Printable Recipe Card At The Bottom Of The Page

Prepare The Chicken

Pat two large boneless, skinless chicken breasts dry with paper towels. Slice into strips, about 2″ long and 1″ wide. Mix together the Southwest-inspired spices and sprinkle lightly over the chicken pieces. The spices used are ground cumin, garlic powder, chili powder, salt, pepper, and cayenne pepper.

Boneless, skinless chicken breasts are cut into strips before cooking.Salt, chili powder, cayenne pepper, pepper, cumin and garlic powder are the seasonings for chicken.

Pan-Sear The Seasoned Chicken

Heat 1½ Tablespoons vegetable oil in a large skillet, over medium-high heat. Once the oil is very hot (but NOT smoking), add the chicken pieces. They should sizzle when they hit the pan.

TexMex seasoned chicken is pan-seared in hot oil in a skillet.

Cook the chicken until the pieces are lightly browned on the bottom. This will take 2-3 minutes, depending on how hot the oil in the skillet is.

Turn each piece of chicken over, and finish cooking on the second side (a minute or two). Once the chicken is cooked all the way through and golden brown, remove the skillet from the heat, and set aside.

The chicken strips are turned halfway through cooking to brown the other side.

Prepare And Cook The Veggies

Prepare the veggies by slicing the onion and the red and green bell peppers into thin strips. Cut the squash into “planks”, as shown below, and then combine the all the veggies.

To cut the zucchini and yellow squash, remove both ends. Cut the squash in half, as shown in Step #1 below.  Now cut the half portion in half (step #2- below). Finally (step #3-below), slice each piece into planks, about 1/2″ wide.

Zucchini and yellow squash are cut into plank shapes using 3 steps, as shown.

Cook The Veggies

Heat the remaining 1½ Tablespoons of oil on medium-high heat in a large skillet. Once the oil is hot, but not smoking, add the prepared veggies, and stir. Lightly season with additional salt and pepper (if desired).

Continue to cook the veggies, stirring often, for 5-6 minutes, or until they have softened, and are fully heated through.

Veggies are cooked to add to the chicken veggie TexMex skillet.

Last Step For The Chicken Veggie TexMex Skillet!

Once the veggies have cooked through, add the seasoned chicken pieces back into the pan. Stir to combine all the ingredients in the chicken veggie TexMex skillet, and cook until the entire dish is heated through. When ready to serve, portion out the chicken and veggies onto plates.

We enjoy eating it, as is, as a delicious low-calorie dish of meat and veggies. HOWEVER, if you really want something else to go with it, place it on top of steamed rice, or throw it in a warmed tortilla!

You can even go crazy and top it with grated cheese, sour cream or guacamole, if calories aren’t a concern! .

Chicken Veggie TexMex Skillet is fully cooked and ready to eat!

 I truly hope you enjoy this dish. Thank you for spending a bit of your valuable time on this blog today, friends. I appreciate it, and hope you have the opportunity to make this meal for those you love.

Have a wonderful day, take care, and may God bless you!

Looking For More CHICKEN Recipes?

You can find ALL of my recipes in the Recipe Index, located at the top of the page. I have LOTS of recipes featuring chicken, including:

Interested In More Recipes?

Thank you for visiting this website. I appreciate you using some of your valuable time to do soIf you’re interested, I publish a newsletter 2 times per month (1st and 15th) with all the latest recipes, and other fun info. I would be honored to have you join our growing list of subscribers, so you never miss a great recipe!
There is a Newsletter subscription box on the top right side (or bottom) of each blog post, depending on the device you use, where you can easily submit your e-mail address (only) to be included in my mailing list.

You Can Also Find Me On Social Media:
Facebook page: The Grateful Girl Cooks!
Pinterest: The Grateful Girl Cooks!
Instagram: jbatthegratefulgirlcooks

Author's signature

0 from 0 votes
Chicken Veggie TexMex Skillet
Prep Time
15 mins
Cook Time
15 mins
Total Time
30 mins
 

Southwest flavors shine in this deliciously seasoned, low-calorie Chicken Veggie TexMex Skillet, with zucchini, onion, yellow squash, & bell peppers!

Category: Entree
Cuisine: Southwestern
Keyword: chicken veggie texmex skillet
Servings: 3
Calories Per Serving: 245 kcal
Author: JB @ The Grateful Girl Cooks!
Ingredients
  • 2 large chicken breasts (boneless skinless) , cut into 2" strips
  • Tablespoons vegetable oil , for cooking chicken
  • ¼ teaspoon ground cumin
  • ¼ teaspoon chili powder
  • ¼ teaspoon salt and pepper (¼ tsp. EACH)
  • teaspoon cayenne pepper
  • teaspoon garlic powder
  • Tablespoons vegetable oil , for cooking veggies
  • 3 cups zucchini and yellow squash (1½ cups EACH) , cut into 2" long x 1" wide planks
  • ½ medium red bell pepper , seeded and cut in thin strips
  • ¼ medium green bell pepper , seeded and cut in thin strips
  • ½ medium brown onion , thinly sliced
Instructions
  1. Pat two large boneless, skinless chicken breasts dry with paper towels. Slice into strips approx. 2" long by 1" wide. Mix spices together and sprinkle lightly over chicken, to season. Mix by hand, to distribute spices onto chicken.

  2. Heat 1½ Tablespoons vegetable oil in a large skillet, on medium-high heat. Once oil is very hot (but NOT smoking), add chicken. Chicken should sizzle when it hits the pan. Cook until lightly browned on the bottom (approx. 2-3 minutes). Turn each piece of chicken over, and finish cooking for and additional 1-2 minutes. Once chicken is fully cooked through and golden brown, remove skillet from heat, and set aside.

  3. Slice onion and red and green bell peppers into thin strips. Cut squash into "planks", and then combine all veggies. Heat 1½ Tablespoons of oil on medium-high heat in large skillet. Once oil is hot, but not smoking, add veggies, and stir. Lightly season with additional salt and pepper (optional- if desired). Continue to cook, stirring often, for 5-6 minutes, or until veggies have softened, and are fully cooked through.

  4. Once the veggies have cooked, add the seasoned chicken pieces to the veggies. Stir to combine all ingredients, and cook on medium heat until heated through. To serve, portion out chicken and veggies onto plates. Enjoy!

Nutrition Facts
Chicken Veggie TexMex Skillet
Amount Per Serving (1 (1/3 of total))
Calories 245 Calories from Fat 153
% Daily Value*
Fat 17g26%
Saturated Fat 12g75%
Cholesterol 48mg16%
Sodium 296mg13%
Potassium 688mg20%
Carbohydrates 8g3%
Fiber 2g8%
Sugar 5g6%
Protein 18g36%
Vitamin A 1012IU20%
Vitamin C 58mg70%
Calcium 28mg3%
Iron 1mg6%
* Percent Daily Values are based on a 2000 calorie diet.

Here’s one more to pin on your Pinterest boards!Southwest flavors shine in this deliciously seasoned, low-calorie Chicken Veggie TexMex Skillet, with zucchini, onion, yellow squash, & bell peppers!


Chocolate Espresso Muffins (Air Fryer)

Chocolate Espresso Muffins are a cinch to make in an Air Fryer! These delicious breakfast or snack treats take 25 minutes, from start to finish!

Today I want to share a delicious recipe for yummy chocolate espresso muffins COOKED IN AN AIR FRYER! These muffins are ridiculously EASY to make, and taste really GOOD! I’ve also included directions for preparing them in an oven (see recipe card below), in case you don’t have access to an air fryer.

We are sure enjoying the air fryer I ordered last year using gift cards I was given for my birthday. In air fryers, highly heated air cooks all types of food, and gives it the “effect” of frying without having to use lots of cooking oil. I found this particular recipe in the cookbook that came along with the Cosori air fryer I got last year.

Scroll Down For A Printable Recipe Cad At the Bottom Of the Page

TRUE STORY OF MUFFIN FAILURE!

When I first got my air fryer last year, I’m embarrassed to tell you this, BUT I made these muffins without a muffin tin! I filled up paper liners (cause the cookbook said to fill up the muffin cups, and paper liners are KINDA muffin cups, right?), then cooked them. Probably one of the dumbest things I’ve ever done in the kitchen!

I had NO idea what I was doing with this newfangled air fryer thing of mine! BIG MISTAKE! They cooked all right, but came out looking like hard chocolate hockey pucks! Ugh. Seriously… the batter had spread and flattened way out in the paper liners (probably begging for mercy). True Story. I was mortified! Into the trash they went.

**Moral of That Sad Story: Don’t Be Like ME. When making muffins in an air fryer, you will need to have muffin tins that fit in the basket of your air fryer. DUH. The End.** Once I figured it out, there have been no problems with ’em ever since! The ones I have hold 4 muffins each (I ordered them online). This recipe yields 8 muffins, so I cooked them in 2 batches!

Time To Make The Batter For Chocolate Espresso Muffins!

Measure all purpose flour, sugar, cocoa powder, espresso powder (or instant coffee), baking powder, salt and baking soda into a medium sized bowl. Whisk these “dry” ingredients together to fully combine them.

Dry ingredients for muffins are whisked together until blended.

In a separate bowl, whisk together the milk, egg, vanilla extract, oil and vinegar. Once combined, pour these “wet” ingredients into the bowl with the “dry” ingredients. Whisk well, to fully incorporate all ingredients. THIS is your batter for the chocolate espresso muffins! EASY!

Wet ingredients for the chocolate espresso muffins are added to dry ingredients.The muffin batter is mixed together before adding to paper liners.

Prepare To Cook The Chocolate Espresso Muffins In The Air Fryer

You will need muffin tins that are small enough to fit in your air fryer. Spray the muffin cups with non-stick cooking spray OR fill with paper liners, and then lightly spray. Divide the batter between 8 muffin cups. Each muffin cup should be about 3/4 of the way full.

Batter is poured into paper liners in muffin tins, and then cooked in an air fryer.

Cooking The Muffins In An Air Fryer

Preheat the air fryer to 300°F. Once the air fryer is preheated, quickly but carefully put your filled muffin tin into the basket. Be careful, because the air fryer is hot at this point!

Cook the chocolate espresso muffins at 300°F for 15 minutes. I recommend checking on them for “done-ness” at the 13 minute mark. Pause the machine and check by inserting a toothpick into the top center of a muffin. Continue to cook until done. This is important because temperatures can vary between different brands of air fryers.

Four chocolate espresso muffins are cooked at a time in the air fryer.

This is how the muffins looks like after cooking them in the air fryer. A little wonky at times (this was my 3rd batch), but absolutely delicious! Transfer the muffins from the pans to a wire rack to cool. Pop the remaining batch of muffins into the air fryer, and then you’re done!

The finished air fryer muffins turned out really nice!

Ready To Enjoy These Muffins!

The photo below shows one of the chocolate espresso muffins, sliced in half. The inside is perfectly cooked! This was a fun way to make breakfast muffins… in an air fryer… who knew?

A peek at the inside of one of the air fryer chocolate muffins.Chocolate espresso muffins on a plate, ready to eat!

Can Chocolate Espresso Muffins Be Baked In An OVEN?

Yes! If you do not have access to an air fryer, these muffins can be baked in a traditional oven. They will only take a few minutes more to bake! Prepare the batter using the  instructions below (in the recipe card). Cook them in a 375°F oven for between 15 and 20 minutes. Insert a toothpick into the center of the muffin to check for doneness. If it comes out clean, they are ready!

Thanks for visiting! Hope you enjoy these yummy tasting muffins. If you enjoy muffins, you will enjoy my recipes for cranberry orange muffins, dark chocolate almond chia muffins, and many others listed in the Recipe Index at the top of the page.  I hope you have a wonderful day, friends. Make it a good one!

Looking For More AIR FRYER Recipes?

You can find all of my recipes in the Recipe Index, located at the top of the page. I have several air fryer recipes, including:

Interested In More Recipes?

Thank you for visiting this website. I appreciate you using some of your valuable time to do soIf you’re interested, I publish a newsletter 2 times per month (1st and 15th) with all the latest recipes, and other fun info. I would be honored to have you join our growing list of subscribers, so you never miss a great recipe!
There is a Newsletter subscription box on the top right side (or bottom) of each blog post, depending on the device you use, where you can easily submit your e-mail address (only) to be included in my mailing list.

You Can Also Find Me On Social Media:
Facebook page: The Grateful Girl Cooks!
Pinterest: The Grateful Girl Cooks!
Instagram: jbatthegratefulgirlcooks

Author's signature

Original recipe source: “Cosori Air Fryer Recipes”, (this recipe booklet came with the purchase of my Cosori air fryer), page 108

0 from 0 votes
Chocolate Espresso Muffins (Air Fryer)
Prep Time
10 mins
Cook Time
15 mins
Total Time
25 mins
 

Chocolate Espresso Muffins are a cinch to make in an Air Fryer! These delicious breakfast or snack treats take 25 minutes, from start to finish!

Category: Breakfast, Snack
Cuisine: American
Keyword: chocolate espresso muffins
Servings: 8 muffins
Calories Per Serving: 247 kcal
Author: JB @ The Grateful Girl Cooks!
Ingredients
  • 1 cup all purpose flour
  • ¾ cup light brown sugar
  • ½ cup cocoa powder
  • ½ teaspoon baking powder
  • ½ teaspoon salt
  • ½ teaspoon espresso powder *see Notes Section
  • ½ teaspoon baking soda
  • 1 large eggs
  • ¾ cup milk
  • 1 teaspoon vanilla extract
  • 1 teaspoon apple cider vinegar
  • cup vegetable oil
  • non stick cooking spray
Instructions
  1. Measure flour, sugar, cocoa powder, espresso powder (or instant coffee), baking powder, salt and baking soda into a medium sized bowl. Whisk together to fully combine.

  2. In a separate bowl, whisk together milk, egg, vanilla, oil and vinegar. Once combined, pour into the bowl with the flour, cocoa powder, etc. Whisk well, to fully mix ingredients, and remove any lumps in the batter.

  3. You will need muffin tins small enough to fit your air fryer basket. Spray muffin cups with non-stick cooking spray OR fill with paper liners, and then lightly spray. Divide batter between 8 muffin cups. Each muffin cup should be about 3/4 of the way full.

For Air Fryer:
  1. Preheat air fryer to 300°F. Once preheated, quickly but carefully place filled muffin tin into the basket. Be careful, because air fryer is hot! Cook at 300°F for 15 minutes. Check for "done-ness" at the 13 minute mark. Pause machine and check, by inserting a toothpick into center of a muffin. Continue to cook until done, and toothpick comes out clean. Transfer pan from air fryer basket to a wire rack to cool. Let cool for 5 minutes, before removing muffins from pan. Cook remaining batch of muffins, and enjoy, once cooled to room temperature!

For Oven:
  1. Prepare muffins following instructions above. Cook muffins at 375°F for 15-20 minutes. Insert a toothpick into center of the muffin to check for doneness. If it comes out clean, they are ready! Let cool for 5 minutes before removing them from pan.

Recipe Notes

**No espresso powder? Substitute 3/4 teaspoon finely ground instant coffee granules!**

Nutrition Facts
Chocolate Espresso Muffins (Air Fryer)
Amount Per Serving (1 muffin)
Calories 247 Calories from Fat 99
% Daily Value*
Fat 11g17%
Saturated Fat 8g50%
Cholesterol 27mg9%
Sodium 241mg10%
Potassium 194mg6%
Carbohydrates 37g12%
Fiber 2g8%
Sugar 21g23%
Protein 4g8%
Vitamin A 82IU2%
Calcium 69mg7%
Iron 2mg11%
* Percent Daily Values are based on a 2000 calorie diet.

Here’s one more to pin on your Pinterest boards!Chocolate Espresso Muffins are a cinch to make in an Air Fryer! These delicious breakfast or snack treats take 25 minutes, from start to finish!

Cajun Chicken Strips

Making these yummy Cajun Chicken Strips couldn’t be easier! Dry spice seasoned chicken is pan-seared in butter for this EASY, quick lunch or dinner!
Making these yummy Cajun Chicken Strips couldn't be easier! Dry spice seasoned chicken is pan-seared in butter for this EASY, quick lunch or dinner!

Do you enjoy chicken strips, or tenders, as they are often called? We sure do, and today I want to share a ridiculously EASY way to make CAJUN chicken strips! There’s no long prep time, and before you know it, you can be munching on this delicious chicken!

Whether you prefer to call them chicken strips, chicken planks, or chicken tenders, these “pieces of chicken” are really yummy, and are a quick dish to whip up for lunch or dinner!

In this simple recipe, chicken breasts are cut into strips, coated in a mild Cajun spice mix, and then pan-seared and browned in butter until done. BOOM! Talk about EASY!!!! This is a GREAT recipe to have in your “bag of tricks”. Here’s how to make this dish:

Scroll Down For A Printable Recipe Card At The Bottom Of The Page

Prepare The Chicken

Place boneless, skinless chicken breasts on a cutting mat or board. Slice the chicken into strips, about 3/4″ wide. Pat the chicken pieces dry, using paper towels, to absorb some of the moisture.

Boneless chicken breasts are cut into strips before adding spices.

Season The Chicken Strips

Measure the spices for the seasoning mix into a resealable container or plastic bag. The spices you will need are flour, poultry seasoning (mine’s homemade), garlic powder, paprika, cayenne pepper, salt and pepper.

Once the spices are mixed, add the chicken strips, and mix together until the chicken is well coated. You “might” need to do this in batches, depending on the amount of chicken strips you will be making.

The spices for the chicken strips seasoning are ready to mix.

Chicken strips are added to spice mix in plastic bag, and combined to coat.

Time To Cook The Cajun Chicken Strips!

Once the chicken is seasoned, it’s time to cook the strips! You might need to cook the chicken in a couple batches, depending on the size skillet you are using.

Melt the butter in a large skillet, and let the skillet get very hot (but not smoking). Add the Cajun chicken strips in a single layer, but be sure to not overcrowd the skillet. Cook the chicken strips for about 4 minutes without moving them.

Butter is melted and heated in skillet before adding seasoned chicken strips.Cajun chicken strips are added to the hot skillet to brown.

Carefully flip the chicken strips to the other side after about four minutes. The chicken should be well-browned on the bottom before you turn them over.

Continue to sear the chicken for 4-5 minutes, or until the chicken is cooked all the way through. Remove the chicken from the skillet, once done. If your chicken strips are really thick, it may take a couple minutes longer to cook all the way through.

The chicken strips are flipped to cook the other side after browning.

Time To Eat Some Cajun Chicken Strips!

Once the chicken is cooked through and is golden brown on all sides, these yummy chicken strips are ready to serve! They have a very mild kick to them (but not too much), and taste wonderful served as is, or with a dipping sauce (Ranch dressing or Bleu cheese).

A plate full of cajun chicken strips, cooked and ready to eat!Close up of browned chicken strips with cajun seasoning on a plate.

We have even had these served alongside a delicious broccoli corn casserole (so we could get our veggies in, too!). The chicken is tender, seasoned nicely, and was a super simple twist on plain chicken strips!

A few Cajun chicken strips, served with broccoli corn casserole on the side.

Hope you will consider trying out this really easy recipe for Cajun chicken strips. They are flavorful, but mild enough for kids and adults who don’t like things too spicy! Thank you for stopping by and spending some of your valuable time on this blog. I hope you enjoy a wonderful day!

Looking For More CHICKEN Recipes?

You can find all of my recipes in the Recipe Index, located at the top of the page. I have many chicken recipes for you to enjoy, including:

Interested In More Recipes?

Thank you for visiting this website. I appreciate you using some of your valuable time to do soIf you’re interested, I publish a newsletter 2 times per month (1st and 15th) with all the latest recipes, and other fun info. I would be honored to have you join our growing list of subscribers, so you never miss a great recipe!
There is a Newsletter subscription box on the top right side (or bottom) of each blog post, depending on the device you use, where you can easily submit your e-mail address (only) to be included in my mailing list.

You Can Also Find Me On Social Media:
Facebook page: The Grateful Girl Cooks!
Pinterest: The Grateful Girl Cooks!
Instagram: jbatthegratefulgirlcooks

Author's signature

Original recipe source: unknown. Found handwritten on a 3×5 card in one of my old recipe boxes.

0 from 0 votes
Cajun Chicken Strips
Prep Time
10 mins
Cook Time
8 mins
Total Time
18 mins
 

Making these yummy Cajun Chicken Strips couldn't be easier! Dry spice seasoned chicken is pan-seared in butter for this EASY, quick lunch or dinner!

Category: Dinner
Cuisine: Cajun
Keyword: cajun chicken strips
Servings: 4
Calories Per Serving: 255 kcal
Author: JB @ The Grateful Girl Cooks!
Ingredients
  • pounds boneless, skinless chicken breasts , cut into 3/4" strips
  • 1 teaspoon poultry seasoning
  • ¼ teaspoon cayenne pepper
  • ½ teaspoon paprika
  • 1 Tablespoon flour
  • ¾ teaspoon garlic powder
  • ¼ teaspoon salt and pepper (¼ tsp. each)
  • 2 Tablespoons butter
Instructions
  1. Place boneless, skinless chicken breasts onto a cutting mat or board. Slice chicken into long strips, about 3/4" wide. Pat chicken pieces dry, using paper towels, to absorb some of the moisture. Set aside.

  2. Measure spices into a resealable container or plastic bag, and stir, to combine. Once mixed, add chicken strips; mix until chicken is well coated. You "might" need to do this in batches, depending on the amount of chicken you make.

  3. Melt butter in a large skillet. Once skillet is very hot, add chicken strips in a single layer. Don't overcrowd skillet. Cook for 4 minutes without moving them. Once bottom is well-browned, carefully flip chicken to the other side. Continue to cook for 4-5 minutes, until chicken is cooked through. Note: If your chicken strips are really thick, it may take a couple minutes longer to cook all the way through. Remove chicken from skillet, once done. Serve chicken strips as is, or with a dipping sauce! Enjoy!

Nutrition Facts
Cajun Chicken Strips
Amount Per Serving (1 (1/4 of total))
Calories 255 Calories from Fat 90
% Daily Value*
Fat 10g15%
Saturated Fat 5g31%
Cholesterol 124mg41%
Sodium 393mg17%
Potassium 629mg18%
Carbohydrates 2g1%
Fiber 1g4%
Sugar 1g1%
Protein 37g74%
Vitamin A 414IU8%
Vitamin C 2mg2%
Calcium 13mg1%
Iron 1mg6%
* Percent Daily Values are based on a 2000 calorie diet.

Here’s one more to pin on your Pinterest boards!Making these yummy Cajun Chicken Strips couldn't be easier! Dry spice seasoned chicken is pan-seared in butter for this EASY, quick lunch or dinner!

Broccoli Corn Casserole

Broccoli Corn Casserole is a delicious, easy to prepare, baked veggie side dish, with corn, broccoli, onions, spices, and a buttery crumb topping!

Over 40 years ago I got a recipe box, and started keeping track of ideas I found in magazines, books, etc. I would quickly scrawl them out on a 3×5 index card, and then file them away to cook “someday”.

Well… this recipe for broccoli corn casserole is one of those recipes! Recently I went rooting around in this very old recipe box, looking for ideas, and found this one.

Now it didn’t have the recipe source on it (had no idea so many years ago that I would blog about food), so I don’t know where it came from.

What I CAN tell you is that this broccoli corn casserole is EASY TO MAKE AND YUMMY. Cream-style corn, frozen or fresh broccoli, onion, egg, and simple spices are the foundation of this simple side dish!

The ingredients are mixed together, then the casserole is topped with a buttery topping and baked until done. It’s delicious! Here’s how to make it:

Scroll Down For A Printable Recipe Card At The Bottom Of The Page

A Little Bit Of Prep

Two things need to be done before assembling the casserole. I found it easy to do both at the same time, which shaved some time off the prep.

Cook broccoli florets whether you will be using frozen or fresh. EASY. Once cooked, you can cut them into smaller pieces.

In a separate skillet, cook the chopped onions for about 4-5 minutes until cooked through (no need for oil or anything!). Set broccoli and onions aside.

Broccoli and chopped onions are cooked before assembling casserole.

Assemble The Broccoli Corn Casserole

Okay… now it’s time to put this simple casserole together! Grab a medium sized mixing bowl, and add a can of cream-style corn, the cooked broccoli, onions, salt, pepper, and garlic powder.

Stir these ingredients together until fully combined. Once combined, add a well-beaten egg to the mixture, and stir, to incorporate.

NOTE: The reason to add the egg AFTER everything else is combined is so the onions and broccoli have cooled a bit, so the egg won’t scramble when added.

Creamed corn, onions, broccoli and spices are combined in bowl.Beaten egg is added to the broccoli corn casserole ingredients.

Spray a 1½ quart oven-safe dish with non-stick cooking spray. Pour the broccoli corn casserole ingredients into the dish.

The casserole is poured into a greased oven-safe dish before baking.

Add The Buttery Crumb Topping

Place crackers in a resealable plastic bag, and finely crush them using a rolling pin or mallet. I used Ritz crackers, but you can certainly use what you have available.

Once the crackers are crushed well, mix the crumbs with melted butter until a nice topping comes together. Sprinkle the crumb topping evenly over the surface of the casserole.

Crackers are smashed into crumbs and combined with melted butter for topping.Buttery crumb topping is added to top of broccoli corn casserole before cooking.

Bake The Bacon Corn Casserole

Place the dish onto the middle rack of a preheated 350°F oven, and let the veggie casserole bake for 30-35 minutes. When done, the crumb topping should be light golden brown and any liquid should be bubbly around the edges.

If you want the topping to be more deeply browned, leave the dish on the middle rack and turn the oven broiler on for just a couple minutes. Keep an eye on it!

After baking, the casserole cools for a couple minutes before serving.

Time To EAT!

Once the broccoli corn casserole is finished baking, remove it from the oven. Place the dish on a wire rack and let it cool for about 5 minutes before serving. This allows time for the casserole to firm up just a bit after cooking.

The veggie casserole will pair nicely with chicken, pork beef or fish. I served it with some simple Cajun chicken strips this time, and it was a wonderful side dish!

Leftovers can be stored (covered) in the refrigerator for several days. The casserole can be reheated in the oven or the microwave.

A peek at the insides of the broccoli corn casserole.Chicken strips are served with the broccoli corn casserole.

Hope you enjoy this simple side dish! We really did, and love the fact that it is so very easy to make! Have a wonderful day, and thanks for visiting. Come back soon!

Looking For More Vegetable Dishes?

You can find all of my recipes in the Recipe Index, located at the top of the page. I have lots of yummy vegetable recipes for you to choose from, including:

Want More Recipes? Get My FREE Newsletter!

I publish a newsletter 2 times per month (1st and 15th) with lots of recipes, tips, etc..
Would you like to join our growing list of subscribers?

There is a Newsletter subscription box on the top right (or bottom) of each blog post, depending on the device you use.
You can submit your e-mail address there, to be added to my mailing list.

Find Me On Social Media:

Facebook page: The Grateful Girl Cooks!
Pinterest:
The Grateful Girl Cooks!
Instagram:
jbatthegratefulgirlcooks

Author's signature

Original recipe source: unknown (recipe found on a 3×5 index card in an old recipe box).

↓↓ PRINTABLE RECIPE BELOW ↓↓

0 from 0 votes
Broccoli Corn Casserole
Prep Time
15 mins
Cook Time
30 mins
Total Time
45 mins
 

Broccoli Corn Casserole is a delicious, easy to prepare, baked veggie side dish, with corn, broccoli, onions, spices, and a buttery crumb topping!

Category: Side Dish, Vegetable Dish
Cuisine: American
Keyword: broccoli corn casserole
Servings: 6
Calories Per Serving: 143 kcal
Author: JB @ The Grateful Girl Cooks!
Ingredients
  • 14.75 ounces cream style corn (canned)
  • 10 ounces broccoli, cooked , fresh OR frozen
  • 1 large egg , beaten
  • 1 small brown onion , chopped and sauteed
  • ½ teaspoon salt
  • ¼ teaspoon pepper
  • ¼ teaspoon garlic powder
  • 2 Tablespoons butter , melted
  • ½ cup crackers (crushed) , I used 10 Ritz crackers
Instructions
  1. Cook broccoli florets (frozen or fresh). Once cooked, cut them into smaller pieces. In separate skillet, cook onions for 4-5 minutes until cooked through (no need for oil). Set broccoli and onions aside.

  2. In a medium bowl, add corn, broccoli, onions, salt, pepper, and garlic powder. Stir these ingredients together until combined. Add a beaten egg to the mixture, and stir until incorporated. NOTE: Add egg AFTER everything else is combined so onions and broccoli have cooled a bit, so the egg won't scramble when added. Spray a 1½ quart oven-safe dish with non-stick cooking spray, and then pour casserole ingredients into dish.

  3. Place crackers in a resealable plastic bag, and finely crush them using a rolling pin or mallet. Once crushed well, mix crumbs with melted butter to combine. Sprinkle crumb topping evenly over surface of casserole.

  4. Place dish onto the middle rack of a preheated 350°F oven, and bake for 30-35 minutes. When done, crumb topping should be golden brown and casserole should be bubbly around the edges. TIP: If you want topping to be deeply browned, leave the dish on middle rack and turn broiler on for a couple minutes. Keep an eye on it! Remove dish from oven. Place dish on wire rack to cool for 5 minutes before serving. This allows time for the casserole to firm up just a bit after cooking. Serve, and enjoy! Store leftovers (covered) in refrigerator.

Recipe Notes

For the cracker topping, I used Ritz crackers, but almost any type of cracker will work.

Nutrition Facts
Broccoli Corn Casserole
Amount Per Serving (1 g)
Calories 143 Calories from Fat 54
% Daily Value*
Fat 6g9%
Saturated Fat 3g19%
Cholesterol 45mg15%
Sodium 499mg22%
Potassium 279mg8%
Carbohydrates 20g7%
Fiber 2g8%
Sugar 4g4%
Protein 4g8%
Vitamin A 514IU10%
Vitamin C 46mg56%
Calcium 40mg4%
Iron 1mg6%
* Percent Daily Values are based on a 2000 calorie diet.

Here’s one more to pin on your Pinterest boards!Broccoli Corn Casserole is a delicious, easy to prepare, baked veggie side dish, with corn, broccoli, onions, spices, and a buttery crumb topping!