Month: March 2018

Blueberry and Cream Cheese-Stuffed French Toast

Blueberry Cream Cheese Stuffed French Toast is a delicious, flavor-filled, decadent breakfast treat you will really enjoy!
I’m “typically” an eggs, English muffin or oatmeal kind of girl for my breakfast choices, BUT… every now and then I do love a decadent, over the top breakfast. A real gut-buster, but oh soooo good! This one definitely fits the bill for DECADENT!

My husband and I had the opportunity to have a weekend getaway on the Oregon coast (the town of Newport) several years ago. We especially enjoyed a breakfast out at one particular restaurant.

I ordered this dish, and was blown away with how amazing it tasted (French toast calories aside… *cough cough). I’ve remembered that yummy breakfast ever since, and last Fall I decided to try making my own version of it at home, and it was delicious! Here’s how to make it:

Scroll Down For A Printable Recipe Card At The Bottom Of The Page

How To Make Blueberry and Cream Cheese-Stuffed French Toast

In medium sized bowl, combine cream cheese filling ingredients (with lemon zest for added flavor). Use a mixer or fork to blend well, until smooth. Set aside.

Cream cheese filling for french toast, mixed together in small bowl

In a medium sized saucepan, place blueberries, water, cornstarch and granulated sugar. Cook on low heat, stirring occasionally, until blueberries “pop” (burst), and mixture has thickened. (approx. 5-6 minutes). Set aside; stir occasionally to cool.

Thickened blueberries on spoon over saucepan

In a large bowl, whisk together the eggs, milk, vanilla, and cinnamon.

Whisking milk, eggs and cinnamon for french toast

Layering The French Toast For Cooking

To prepare, divide the cream cheese mixture evenly and spread on two pieces of French bread. Evenly top with some of the blueberry mixture. DO NOT USE ALL OF IT- SAVE SOME BLUEBERRY MIXTURE SEPARATELY TO SPOON OVER TOP OF FINISHED DISH.

Try hard to not place the blueberries all the way to the edge of the bread, or the sauce will run out while cooking. Place a piece of French bread on top of blueberries.

Blueberries and cream cheese filling on French bread slices

Time To Cook The Blueberry And Cream Cheese-Stuffed French Toast

Heat a large non-stick skillet (or grill pan) on medium heat. Melt butter in skillet.  Place each “sandwich” into egg mixture, one at a time, to soak up the egg mixture. Turn, to coat each side in the egg mixture.  Shake off excess, then place the French toast into a hot skillet.

Repeat with the other serving. Cook until bottom side is browned nicely, then very carefully turn the French toast to other side. Continue to cook until both sides are crispy and browned. This will take a few minutes.

Stuffed French toast soaking up egg mixture before cooking

Stuffed French Toast cooking on the grill

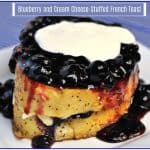
Once cooked/browned, transfer French toast to serving plate. Spoon some of the reserved blueberry sauce over the top of the blueberry and cream cheese-stuffed French toast, then add a dollop of whipped cream, if desired. You’ll notice my whipped cream on this serving melted from the heat by the time I finally got a photo… oh well… you get the idea, right?

Blueberry and cream cheese stuffed french toast with whipped cream, on small plate

Serve and enjoy every bit of this decadent breakfast, THEN go for a long walk to work it off! I totally recommend that, by the way… ha ha! It’s all about BALANCE!

The stuffed French toast is high in calories (the equivalent of one large Cinnabon, by the way – yikes!). If you want to consume less calories but still enjoy this dish, cut it in half once you’re done cooking it, THEN add the blueberry topping! It will be messy, but GOOOOOD!

Blueberry french toast, half eaten, on plate with fork

Have a great day! Make it a good one! And get those walking shoes out… you’re gonna need a walk after this scrumptious stuffed French toast breakfast!

Looking For More Decadent BREAKFAST Recipes?

You can find all of my recipes in the Recipe Index, located at the top of the page. I have some wonderfully decadent breakfast recipes, including:

Interested In More Recipes?

Thank you for visiting this website. I appreciate you using some of your valuable time to do soIf you’re interested, I publish a newsletter 2 times per month (1st and 15th) with all the latest recipes, and other fun info. I would be honored to have you join our growing list of subscribers, so you never miss a great recipe!
There is a Newsletter subscription box on the top right side (or bottom) of each blog post, depending on the device you use, where you can easily submit your e-mail address (only) to be included in my mailing list.

You Can Also Find Me On Social Media:

Facebook page: The Grateful Girl Cooks!
Pinterest:
The Grateful Girl Cooks!
Instagram:
jbatthegratefulgirlcooks

Author's signature

0 from 0 votes
Blueberry and Cream Cheese-Stuffed French Toast
Prep Time
15 mins
Cook Time
8 mins
Total Time
23 mins
 

Blueberry Cream Cheese Stuffed French Toast is a delicious, flavor-filled, decadent breakfast treat you will really enjoy!

Category: Breakfast
Cuisine: American
Keyword: blueberry stuffed french toast
Servings: 2 servings
Calories Per Serving: 803 kcal
Author: JB @ The Grateful Girl Cooks!
Ingredients
For Cream Cheese Filling
  • 1 teaspoon lemon zest
  • 4 ounces cream cheese , low fat
  • 1/4 cup powdered sugar
  • 1/4 teaspoon vanilla extract
For Blueberry Sauce
  • cups fresh blueberries
  • 1 teaspoon cornstarch
  • 2 Tablespoons granulated sugar
  • 2 Tablespoons water
For French Toast
  • 4 slices French bread , approx. 1" thick per slice
  • 3 eggs
  • 1/4 cup milk , low-fat
  • 1/2 teaspoon vanilla extract
  • 1/4 teaspoon cinnamon
  • 2 teaspoons butter
  • Whipped cream , OPTIONAL for topping
Instructions
  1. In medium sized bowl, combine cream cheese filling ingredients. Use a mixer to blend until smooth. Set aside.

  2. In a medium sized saucepan, place blueberries, cornstarch and granulated sugar.  Cook on low heat, stirring occasionally, until blueberries "pop" (burst), and mixture has thickened. (approx. 5-6 minutes). Set aside; stir occasionally to cool.

  3. In a large bowl, whisk together the eggs, milk, vanilla, and cinnamon.

  4. To prepare, divide the cream cheese mixture evenly and spread on two pieces of french bread. Evenly top with some of the blueberry mixture (DO NOT USE ALL OF IT-SAVE SOME BLUEBERRY MIXTURE SEPARATELY TO SPOON OVER TOP OF FINISHED DISH).  Try hard to not place the blueberries all the way to the edge of the bread, or the sauce will run out while cooking. Place a piece of french bread on top of blueberries.  

  5. Heat a large non-stick skillet (or grill pan) on medium heat. Melt butter in skillet.  Place each "sandwich" into egg mixture, one at a time, to soak up the egg mixture. Turn, to coat each side in the egg mixture.  Shake off excess, then place french toast onto hot skillet. Repeat with other serving.  Cook until bottom side is browned nicely, then very carefully turn french toast to other side and continue to cook until both sides are crispy and browned. This will take a few minutes.

  6. Once cooked/browned, transfer french toast to serving plate.  Spoon some of the reserved blueberry sauce over the top of the dish, then add a dollop of whipped cream, if desired. Serve and enjoy, THEN go for a long walk to work it off! (ha ha) 

Recipe Notes

NOTE: Caloric calculation does not include whipped cream topping (as it is optional).
TIP: If you wish to have less calories, cut the french toast in half after removing it from skillet, THEN cover the top with the blueberry filling, etc. Still all the taste, but half the calories!

Nutrition Facts
Blueberry and Cream Cheese-Stuffed French Toast
Amount Per Serving (2 slices)
Calories 803 Calories from Fat 189
% Daily Value*
Fat 21g32%
Saturated Fat 10g63%
Cholesterol 288mg96%
Sodium 1067mg46%
Potassium 524mg15%
Carbohydrates 123g41%
Fiber 5g21%
Sugar 46g51%
Protein 29g58%
Vitamin A 910IU18%
Vitamin C 12mg15%
Calcium 221mg22%
Iron 6.2mg34%
* Percent Daily Values are based on a 2000 calorie diet.

Here’s one more to pin on your Pinterest boards!Blueberry cream cheese stuffed French toast is a delicious, flavor-filled, decadent breakfast treat you will really enjoy!

Save

Save

Save

Hoisin Pork with Noodles and Broccoli

You’ll LOVE Hoisin Pork with Noodles and Broccoli, featuring marinated pork with noodles, broccoli and carrots cooked in an Asian inspired sauce!
You'll LOVE Hoisin Pork with Noodles and Broccoli, featuring marinated pork with noodles, broccoli and carrots cooked in an Asian inspired sauce!

I discovered this recipe on Pinterest, and decided to make it for dinner a few weeks ago… wow… it was fantastic!  Don’t let the long ingredient list deter you from making this! Almost all of the ingredients in this recipe are for the delicious Asian flavored sauce which is used to marinate pork strips.

The rest of the ingredients are few, and the recipe is not hard to make, either! Once the meat has been marinated, it is pan-seared, then combined with cooked noodles, broccoli florets, shredded carrots, chopped peanuts, and some additional sauce, mixed together… and BOOM- that’s it!

Scroll Down For A Printable Recipe Card At The Bottom Of The Page

Can I Still Make This Dish If I Have A Peanut Allergy?

If you have a peanut allergy, simply leave the peanut butter out of the marinade sauce (it will still taste fantastic), and leave the chopped peanuts out of the dish.

How To Make Hoisin Pork With Noodles And Broccoli

The recipe itself is very easy to make.  Because the pork needs to marinate for awhile, I highly recommend planning ahead… making the sauce and marinating the pork strips EARLY in the day (or even overnight), for absolute BEST flavor! Here’s how to make this dish:

Place all marinade ingredients in large bowl. Whisk together until smooth (or use a food processor, if desired). IMPORTANTOnce marinade is mixed, measure out 6 heaping Tablespoons, and place it in a separate bowl and set aside (reserving it to add to noodles later).

Hoisin marinade sauce for pork

Thinly slice the pork, and add to the marinade still in large bowl. Stir to fully coat pork slices. Cover bowl, and refrigerate at least 4 hours (overnight or 8 hours is best, for flavor saturation).

Slices of pork marinating in hoisin sauce

After Hoisin Pork Has Marinated

When ready to make this meal, remove pork from refrigerator. Heat a large, non-stick skillet on medium high. Once hot, remove pork strips from bowl with a slotted spoon (to drain off some of the marinade), and place pork into hot skillet (discard the rest of the marinade left in the bowl the pork was in).

Cook the hoisin pork, turning once, until both sides of the meat are browned.  When done, remove the skillet from the heat.

Hoisin pork cooking in large skillet

While the pork is cooking, cook noodles separately, according to package directions (do NOT discard the cooking water).  Lightly steam broccoli florets (or fully thawed, previously frozen chopped broccoli).

Finishing Making This Meal

Add the cooked noodles, broccoli, shredded carrots, chopped peanuts, and the 6 Tablespoons RESERVED hoisin sauce mixture to the skillet with the browned pork.

Noodles, hoisin pork, carrots and broccoli in skillet

Add 1/4 cup of the hot water used for cooking the noodles (the starch in the water will help the hoisin sauce stick to the noodles). Mix all the ingredients together, until coated with sauce.  Heat on low, stirring often, to ensure the hoisin pork is heated through before serving.

Pork, hoisin sauce, noodles and broccoli mixed in skillet

Close up of pork slices, broccoli, carrots and noodles in skillet

Serve the Hoisin Pork

If desired, garnish each serving with chopped cilantro, sliced green onions, and additional chopped peanuts. Serve immediately, and enjoy!

Hoisin pork, noodles and broccoli served in white bowl

I really hope you will consider trying this wonderful pork dish!  The flavors are wonderful, and it is a filling, satisfying “all in one” meal… meat, carbs, and veggies! Have a great day!

Looking For More PORK Recipes?

Interested In More Recipes?

Thank you for visiting this website. I appreciate you using some of your valuable time to do soIf you’re interested, I publish a newsletter 2 times per month (1st and 15th) with all the latest recipes, and other fun info. I would be honored to have you join our growing list of subscribers, so you never miss a great recipe!
There is a Newsletter subscription box on the top right side (or bottom) of each blog post, depending on the device you use, where you can easily submit your e-mail address (only) to be included in my mailing list.

You Can Also Find Me On Social Media:

Facebook page: The Grateful Girl Cooks!
Pinterest:
The Grateful Girl Cooks!
Instagram:
jbatthegratefulgirlcooks

Author's signature

Recipe adapted from: Lindsay, at https://pinchofyum.com/hoisin-pork-with-rice-noodles

0 from 0 votes
Hoisin Pork with Noodles and Broccoli
Prep Time
15 mins
Cook Time
15 mins
Total Time
30 mins
 

You'll LOVE Hoisin Pork with Noodles and Broccoli, featuring marinated pork with noodles, broccoli and carrots cooked in an Asian inspired sauce!

Category: Main Dish
Cuisine: Asian
Keyword: hoisin pork
Servings: 6 servings
Calories Per Serving: 683 kcal
Author: JB @ The Grateful Girl Cooks!
Ingredients
For Pork Marinade
  • 1/3 cup soy sauce , low sodium
  • 1/4 cup water
  • 3.5 Tablespoons sesame oil
  • 2 Tablespoons honey
  • 1 Tablespoon granulated sugar
  • 1 dash fish sauce
  • 3 Tablespoons vinegar
  • 1 teaspoon lime juice
  • 5 cloves garlic , finely minced
  • 2 Tablespoons ginger (fresh) ,finely grated
  • 1/4 teaspoon red pepper flakes
  • 3 Tablespoons hoisin sauce
  • 3 Tablespoons peanut butter
For Rest of Dish
  • 1.5 pounds pork , cut into thin strips
  • 9 ounces spaghetti noodles , or rice noodles
  • 1.5 cups broccoli , chopped
  • 1/2 cup carrots , grated
  • 1/4 cup peanuts , chopped
  • 6 Tablespoons Reserved Hoisin sauce mixture
Optional Garnish (not included in calorie count)- cilantro, additional chopped peanuts, sliced green onions
    Instructions
    1. Place all marinade ingredients in large bowl. Whisk together well, until smooth.  Once mixed, measure out 6 heaping Tablespoons and place it in a small, separate bowl (reserving it to add to noodles later). Thinly slice the pork, and add to the marinade still in large bowl. Stir to fully coat pork slices. Cover bowl; refrigerate at least 4 hours (overnight or 8 hours is recommended, for full flavor saturation). 

    2. Heat a large, non-stick skillet on medium high. Once hot, remove pork strips from bowl with a slotted spoon (to drain off some of the marinade-discard any remaining marinade in bowl), and place pork strips into hot skillet in a single layer. Cook pork, turning once, until both sides are browned. Remove skillet from heat. 

    3. While the pork is cooking, cook noodles in separate pan, according to package directions (do NOT discard the cooking water).  Lightly steam broccoli florets, or thawed (previously frozen) broccoli. Add cooked noodles, broccoli, shredded carrots, chopped peanuts, and the 6 Tablespoons RESERVED hoisin sauce mixture to the skillet with browned pork.

    4. Add 1/4 cup of the hot cooking water used for noodles to skillet (the starch in the water will help the hoisin sauce stick to the noodles). Mix all ingredients together, until  coated with sauce.  Heat on low, stirring often, to ensure dish is heated all the way through before serving. If desired, garnish each serving with chopped cilantro, sliced green onions, or additional chopped peanuts. Serve and enjoy!

    Nutrition Facts
    Hoisin Pork with Noodles and Broccoli
    Amount Per Serving (1 serving)
    Calories 683 Calories from Fat 360
    % Daily Value*
    Fat 40g62%
    Saturated Fat 11g69%
    Cholesterol 81mg27%
    Sodium 736mg32%
    Potassium 678mg19%
    Carbohydrates 50g17%
    Fiber 3g13%
    Sugar 13g14%
    Protein 30g60%
    Vitamin A 1950IU39%
    Vitamin C 22.8mg28%
    Calcium 58mg6%
    Iron 2.5mg14%
    * Percent Daily Values are based on a 2000 calorie diet.

    Here’s one more to pin on your Pinterest boards!You'll LOVE Hoisin Pork with Noodles and Broccoli, featuring marinated pork with noodles, broccoli and carrots cooked in an Asian inspired sauce!

    Broccoli Au Gratin Rice Pilaf

    You’ll love this easy, delicious, homemade broccoli au gratin rice pilaf side dish (a Rice a Roni copycat), with rice, orzo pasta, broccoli and cheese! It’s a wonderful accompaniment for beef, chicken, pork OR seafood!
    You'll love this easy, delicious Broccoli Au Gratin Rice Pilaf (a Rice a Roni copycat), with rice, orzo pasta, broccoli and cheese!

    I prepared this simple recipe for broccoli au gratin rice pilaf recently as a side dish for our salmon dinner.  What a delicious treat!  This filling recipe is basically a copycat version of the popular Rice-a Roni boxed Broccoli au Gratin mix, but guess what?

    This pilaf is just as easy to make from scratch, and is full of homemade flavors and fresh ingredients!  It doesn’t take much time or effort at all to make, and really tastes GOOD! Here’s how to make broccoli au gratin rice pilaf (4 generous servings):

    Scroll Down For A Printable Recipe Card At The Bottom OF The Page

    Brown The Rice And Orzo Pasta

    Start by heating olive oil on medium heat in large skillet. Add the orzo pasta and white rice to skillet. Stir mixture often (to prevent burning) and cook until the orzo turns a nice golden brown, as you can see in the photo below. This will only take a few minutes.

    Rice and orzo for pilaf cooking in skillet

    Cook The Broccoli Au Gratin Rice Pilaf

    The next simple step is to add vegetable broth to the pilaf mixture in skillet. Bring the liquid to a rolling boil, then reduce heat to Low.

    Cover the skillet (or pan), and cook for about 10-15 minutes, until almost all of the broth has been absorbed.  At that point, add finely chopped broccoli. (I used frozen broccoli, which I thawed and chopped finely, before beginning).

    Vegetable broth and broccoli added to rice pilaf in skillet

    Stir broccoli into the pilaf; cook mixture for another 3 minutes. Remove the skillet (or pan) from direct heat; add in the shredded cheddar cheese, butter, and season with salt and pepper (to taste). Stir until cheese and butter have melted and blended in completely. Put a lid on the pan, keep covered, and let the pilaf rest for 4-5 minutes.

    Pilaf with broccoli, cheese and butter in skillet

    Serve The Broccoli Au Gratin Rice Pilaf!

    When ready, remove lid from pan, fluff the broccoli rice pilaf with a fork, and dish this yummy food up straight from the pan, OR place it in a pretty serving bowl to dress it up a bit!

    Your family will really enjoy this tasty side dish, and you can smile, knowing you were able to get a yummy, healthy veggie into them!

    Broccoli au gratin rice pilaf in white bowl

    Broccoli and rice pilaf in close up photo

    Here is the finished broccoli rice pilaf on my husband’s plate, with Orange and Rosemary Glazed Salmon on the side.  Seafood, broccoli rice pilaf, all present and accounted for on the ol’ dinner plate, for the win!

    Broccoli au gratin rice pilaf on plate with salmon fillet

    Thank you for visiting my blog today. I appreciate it, and really hope you will consider trying this recipe for Broccoli Au Gratin Rice Pilaf. It’s truly easy to make, and tastes wonderful! You might also enjoy my recipe for Easy Homemade Rice Pilaf (a delicious, “plain” version). Have a great day, and may the work of your hands bring great joy to God, others, and YOU!

    Looking For More SIDE DISH Recipes?

    Interested In More Recipes?

    Thank you for visiting this website. I appreciate you using some of your valuable time to do soIf you’re interested, I publish a newsletter 2 times per month (1st and 15th) with all the latest recipes, and other fun info. I would be honored to have you join our growing list of subscribers, so you never miss a great recipe!
    There is a Newsletter subscription box on the top right side (or bottom) of each blog post, depending on the device you use, where you can easily submit your e-mail address (only) to be included in my mailing list.

    You Can Also Find Me On Social Media:

    Facebook page: The Grateful Girl Cooks!
    Pinterest:
    The Grateful Girl Cooks!
    Instagram:
    jbatthegratefulgirlcooks

    Author's signature

    Recipe Source: Debi, at  https://lifecurrentsblog.com/homemade-rice-a-roni/

    0 from 0 votes
    Broccoli Au Gratin Rice Pilaf
    Prep Time
    5 mins
    Cook Time
    12 mins
    Resting Time
    5 mins
    Total Time
    17 mins
     
    You'll love this easy, delicious Broccoli Au Gratin Rice Pilaf (a Rice a Roni copycat), with rice, orzo pasta, broccoli and cheese!
    Category: Side Dish
    Cuisine: American
    Keyword: broccoli au gratin rice pilaf
    Servings: 4 servings
    Calories Per Serving: 305 kcal
    Author: JB @ The Grateful Girl Cooks!
    Ingredients
    • 1 Tablespoon olive oil
    • 1/2 cup orzo pasta
    • 1/2 cup white long grain rice
    • 2 cups vegetable broth
    • 1 cup broccoli , finely chopped
    • 2 Tablespoons butter
    • 1/2 cup sharp cheddar cheese , shredded
    • 1 pinch salt , to taste
    • 1/4 teaspoon ground black pepper
    Instructions
    1. Begin by heating olive oil in large skillet or saucepan on medium heat. Add orzo and white rice to skillet;  stir, to cover orzo and rice well with the oil. Stir mixture often (to prevent burning) and cook until the orzo turns a nice golden brown. This will only take a few minutes.

    2. The next step is to add vegetable broth to the pilaf mixture in skillet. Bring the liquid to a rolling boil, then reduce heat to Low. Cover the skillet (or pan), and cook between 10-15 minutes, until ALMOST all of the broth has been absorbed (mine took 12 minutes, so keep an eye on it).  At that point, add chopped broccoli.  Stir broccoli into the pilaf; cook mixture for 3 more minutes.

    3. Remove skillet (or pan) from direct heat; add the shredded cheddar cheese, butter, salt and pepper.  Stir until cheese and butter have melted and blended in completely. Put a lid on the pan, keep covered, and let the pilaf rest for 4-5 minutes, then remove lid, and fluff pilaf with a fork. Transfer to a serving bowl, if desired, and serve. Enjoy!

    Nutrition Facts
    Broccoli Au Gratin Rice Pilaf
    Amount Per Serving (1 serving)
    Calories 305 Calories from Fat 126
    % Daily Value*
    Fat 14g22%
    Saturated Fat 7g44%
    Cholesterol 29mg10%
    Sodium 627mg27%
    Potassium 154mg4%
    Carbohydrates 35g12%
    Fiber 1g4%
    Sugar 1g1%
    Protein 8g16%
    Vitamin A 710IU14%
    Vitamin C 20.3mg25%
    Calcium 123mg12%
    Iron 0.7mg4%
    * Percent Daily Values are based on a 2000 calorie diet.

    Here’s one more to pin on your Pinterest boards!You'll love this easy, delicious Broccoli Au Gratin Rice Pilaf (a Rice a Roni copycat), with rice, orzo pasta, broccoli and cheese!

    Chocolate Banana Overnight Oats

    Creamy, filling, and absolutely delicious, Chocolate Banana Overnight Oats are a convenient, quick and satisfying breakfast that can be made ahead of time!Chocolate Banana Overnight Oats are creamy, filling, absolutely delicious, and a convenient, quick and satisfying breakfast that can be made ahead of time!

    If you appreciate having a “ready to eat breakfast” waiting for you when you stumble sleepy-eyed into the kitchen in the morning, you will enjoy the convenience of Chocolate Banana Overnight Oats! Simply make them before you go to bed, and BOOM… they will be ready and waiting for you… thick, creamy and delicious in the morning!

    I’ve made overnight oats many times, and really like the convenience of this filling, delicious breakfast item! I think you will enjoy them, too, so I’m sharing this recipe here today.

    Scroll Down For A Printable Recipe Card At The Bottom Of The Page 

    How Do I Make These Chocolate Banana Overnight Oats?

    Here are the cast of characters for this flavorful version: You will need old fashioned oats, cocoa powder, cinnamon, chia seeds, vanilla extract, lite coconut milk, a banana, and pure maple syrup.

    It only takes a couple of minutes to mix everything together. Once mixed, all you will need to do is cover and refrigerate them overnight. That’s it! All that’s left to do is enjoy them the next morning!

    Ingredients for overnight oats on counter

    The recipe, as written below, below makes 1 serving. I doubled the recipe to have two of these pint jars of creamy oats ready to eat, so my photos reflect that. These yummy chocolate banana overnight oats are so easy to make!

    Begin by adding all ingredients, except for banana and maple syrup to jar. You will need to give the ingredients a good stir, to fully mix them together. Once mixed, You can add the banana slices. Drizzle with maple syrup, if using. NOTE: maple syrup is optional; use only if a sweeter taste is desired.

    2 pint jars containing oats mixed with coconut milk

    Chopped bananas in jars with chocolate oats

    Once ALL ingredients are mixed, add a tiny bit more coconut milk (about a Tablespoon) to loosen up the oats a bit, then give it another good stir. You can see that the chocolate banana overnight oats mixture came right up to the top of the cute little pint jars!

    Coconut milk in jars of chocolate oats

    2 jars of overnight chocolate banana oats

    Ready To Eat Some Chocolate Banana Overnight Oats?

    Now you will need to cover containers tightly with plastic wrap! Place jars in the refrigerator overnight.  In the morning, the chocolate banana overnight oats will have firmed up quite a bit (almost to a pudding consistency) by the time you’re ready to eat!

    If desired, garnish each jar with a couple fresh slices of banana, then dig in and enjoy this simple, yet filling breakfast!

    Jar of chocolate oats with banana sliceschocolate overnight oats on a spoon

    That’s how easy it is to make this simple dish for a scrumptious, quick and convenient breakfast. If you enjoy this recipe you might enjoy my other overnight oat recipes for Blueberry Cinnamon Overnight OatsBanana Coconut, Apple Cinnamon, Peach Cobbler, or Strawberry Coconut Overnight Oats!

    The jars of chocolate banana overnight oats will keep in the refrigerator for 2-3 days after making them. You can make several jars ahead of time to conveniently grab when you are hungry! Sure hope you will consider trying these Chocolate Banana Overnight Oats! They’re really good!  Have a wonderful day, friends. Don’t forget to check out ALL of my recipes in the Recipe Index, which is located at the top of the page.

    Interested In More Recipes?

    Thank you for visiting this website. I appreciate you using some of your valuable time to do soIf you’re interested, I publish a newsletter 2 times per month (1st and 15th) with all the latest recipes, and other fun info. I would be honored to have you join our growing list of subscribers, so you never miss a great recipe! 

    There is a Newsletter subscription box on the top right side (or bottom) of each blog post, depending on the device you use, where you can easily submit your e-mail address (only) to be included in my mailing list.

    You Can Also Find Me On Social Media:

    Facebook page: The Grateful Girl Cooks!
    Pinterest:
    The Grateful Girl Cooks!
    Instagram:
    jbatthegratefulgirlcooks

    Author's signature

    Recipe Source: https://www.organizeyourselfskinny.com/2015/07/02/banana-chocolate-overnight-oats/

    0 from 0 votes
    Chocolate Banana Overnight Oats
    Prep Time
    5 mins
    Cook Time
    0 mins
    Overnight Refrigeration
    8 hrs
    Total Time
    5 mins
     
    Chocolate Banana Overnight Oats are creamy, filling, absolutely delicious, and a convenient, quick and satisfying breakfast that can be made ahead of time!
    Category: Breakfast
    Cuisine: American
    Keyword: chocolate banana overnight oats
    Servings: 1 serving
    Calories Per Serving: 318 kcal
    Author: JB @ The Grateful Girl Cooks!
    Ingredients
    • 1/2 cup old fashioned rolled oats
    • 1/2 Tablespoon cocoa powder
    • 1/2 teaspoon chia seeds
    • 1/8 teaspoon cinnamon
    • 1/4 teaspoon vanilla extract
    • 1/2 cup lite coconut milk , unsweetened
    • 1/2 banana , peeled/chopped
    • 1 teaspoon pure maple syrup (OPTIONAL) , plus more if desired
    Instructions
    1. Place all ingredients, except for banana and maple syrup into pint sized jar or container. Give the ingredients a good stir, to fully mix together. 

    2. Once mixed together, add banana slices. Drizzle with maple syrup, if using, (maple syrup is optional, use if a sweeter taste is desired) to jars. Stir. Once ALL ingredients are mixed together, add additional milk (if desired) to loosen up the oats a bit, then stir well, to blend.

    3. Cover jars with plastic wrap, and refrigerate overnight.  When ready to serve, garnish with additional banana slices (if desired).  Oats will keep for 2-3 days when stored tightly covered in refrigerator.

    Recipe Notes

    Maple syrup is optional, if a sweeter taste is desired. It is not calculated in the caloric count.

    Nutrition Facts
    Chocolate Banana Overnight Oats
    Amount Per Serving (1 serving)
    Calories 318 Calories from Fat 99
    % Daily Value*
    Fat 11g17%
    Saturated Fat 8g50%
    Sodium 98mg4%
    Potassium 395mg11%
    Carbohydrates 47g16%
    Fiber 7g29%
    Sugar 7g8%
    Protein 6g12%
    Vitamin C 5.1mg6%
    Calcium 34mg3%
    Iron 2.1mg12%
    * Percent Daily Values are based on a 2000 calorie diet.

    Here’s one more to pin on your Pinterest boards!Chocolate Banana Overnight Oats are creamy, filling, absolutely delicious, and a convenient, quick and satisfying breakfast that can be made ahead of time!Long pin for Chocolate Banana Overnight Oats

    Chicken Fried Chicken with Country Gravy

    If you enjoy comfort food meals, (or chicken fried steak, which is a staple breakfast menu item at many restaurants), then you’ll want to try this recipe for Chicken Fried CHICKEN with creamy Country Gravy for a tasty dinner! If you enjoy comfort food meals (or chicken fried steak), then you'll absolutely want to try Chicken Fried CHICKEN with creamy Country Gravy for a tasty dinner!

    I learned how to make this easy dish, after watching my Mom cook fried chicken for many years (and seeing how chicken fried steak is served in restaurants). I adapted this recipe from both of those methods by trial and error.  Typically this dish is made using beef in cubesteak form, lightly breaded and fried, and is called chicken-fried steak.

    I actually prefer to make it with chicken breasts, but still cover it with that signature delicious, creamy country gravy! It’s very easy to prepare, with a shortcut I use for making the gravy a nice time saver, too! If you enjoy fried chicken, you will enjoy this dish!

    Scroll Down For A Printable Recipe Card At The Bottom Of The Page

    True Story!

    One time, over 20 years ago, I made chicken fried chicken at dinnertime for our two young sons while my husband was out of state on business.  I flattened the chicken breasts out so much that when I put the finished, cooked piece of chicken on each of their plates, it nearly covered the entire plate.  You should have seen the look in their eyes when they first saw it and gasped!

    To make it even more “perfect”, we watched the movie Jurassic Park while we ate our dinner. BIG crazy dinosaurs… BIG crazy-good chicken fried chicken. Our boys have never forgotten that dinner… ha ha!!!

    While it definitely is not the “healthiest” dinner you could choose to eat, it sure tastes great every now and then!  It’s your typical “comfort food meal”, especially when served with creamy mashed potatoes.  Everything in moderation, right?  Here’s how easy it is to make:

    How To Make Chicken Fried Chicken

    Place a boneless, skinless chicken breast in between two pieces of plastic wrap, sealing the edges. Pound the chicken out with the flat side of a meat mallet, until it has flattened out considerably to about 1/2 inch thick, like a cutlet. Think of all that pounding as very inexpensive therapy…

    Chicken covered in plastic wrap, with meat mallet

    Mix flour and seasonings in a small bowl.  Place buttermilk in a separate bowl. Dredge the chicken breast in flour mixture until completely covered on all sides. Dip chicken in buttermilk, coating all sides.

    Let excess liquid drip back into bowl, then place chicken back into flour mixture, turning to cover completely. Set chicken onto dry platter, and repeat process for all pieces of chicken, coating one at a time.

    Dipping poultry in flour, buttermilk, and back in flour

    Heat vegetable oil on medium high heat, in large skillet. I like to use a cast iron skillet for this, but any type of skillet will work. When oil is hot (but not smoking), add chicken.  It should sizzle when chicken hits pan. You might need to cook the chicken in batches, due to the size of the flattened chicken.

    Cooking times will vary, due to different thicknesses of meat, but you will need to cook one side (without moving it around-that tends to pull the breading off) until deep golden brown on bottom, then carefully turn chicken over and cook other side. Cook until chicken is fully cooked through (total time between 12-18 minutes, depending on thickness of chicken). Remove from heat.

    Chicken cooking in skillet and browned

    Prepare The Country Gravy

    While chicken is cooking, prepare the gravy.  Most of the time I make gravy from scratch, BUT for a quick and easy way to make this creamy gravy for this recipe, I start with a “cheap” package of country gravy mix.

    Prepare according to package directions, but also add a small chicken bouillon cube, a teaspoon of butter, some black pepper, onion powder and garlic powder, and stir until completely blended in. I find this really helps the gravy to have more “homemade” flavor!

    Country gravy mix envelope and gravy in saucepan

    To serve this easy dish, I place the beautifully browned chicken cutlet onto each serving plate, then generously spoon some of the creamy country gravy over the top, and serve hot! See how big that one little chicken breast becomes when it’s flattened out… practically covers half the plate! P.S. The gravy is good on mashed potatoes, too!

    Chicken fried chicken and gravy, on plate with vegetables

    See how easy it is to make chicken fried chicken?  It really is a simple dish to prepare, and tastes delicious!  You might also want to check out my recipe for Crunchy Buttermilk Fried Chicken!  Hope you will consider trying this comfort food style recipe… and enjoy a little taste of the South!

    Looking For More CHICKEN Recipes?

    You can find all of my recipes in the Recipe Index, which is located at the top of the page. I have LOTS of chicken recipes you might enjoy, including:

    Interested In More Recipes?

    Thank you for visiting this website. I appreciate you using some of your valuable time to do soIf you’re interested, I publish a newsletter 2 times per month (1st and 15th) with all the latest recipes, and other fun info. I would be honored to have you join our growing list of subscribers, so you never miss a great recipe!
    There is a Newsletter subscription box on the top right side (or bottom) of each blog post, depending on the device you use, where you can easily submit your e-mail address (only) to be included in my mailing list.

    You Can Also Find Me On Social Media:

    Facebook page: The Grateful Girl Cooks!
    Pinterest:
    The Grateful Girl Cooks!
    Instagram:
    jbatthegratefulgirlcooks

    Author's signatureRecipe Source for chicken: My mom

    ↓↓ PRINTABLE RECIPE BELOW ↓↓

    0 from 0 votes
    Chicken Fried Chicken With Country Gravy
    Prep Time
    10 mins
    Cook Time
    15 mins
    Total Time
    25 mins
     
    If you enjoy comfort food meals (or chicken fried steak), then you'll absolutely want to try Chicken Fried CHICKEN with creamy Country Gravy for a tasty dinner!
    Category: Chicken, Dinner
    Cuisine: American
    Keyword: chicken fried chicken
    Servings: 2 servings
    Calories Per Serving: 465 kcal
    Author: JB @ The Grateful Girl Cooks!
    Ingredients
    For Chicken:
    • 2 chicken breasts (boneless, skinless)
    • 1 cup all purpose flour
    • 1/2 cup buttermilk
    • 1/2 teaspoon salt
    • 1/8 teaspoon black pepper, paprika, garlic powder, onion powder (1/8 teaspoon each)
    • 2 Tablespoons vegetable oil
    For Country Gravy
    • 1 envelope Country Gravy Mix (+ water indicated on pkg.)
    • 1 cube chicken bouillon (small cube, crumbled)
    • 1 teaspoon butter
    • 1/4 teaspoon black pepper
    • 1/8 teaspoon garlic powder and onion powder (1/8 teaspoon each)
    Instructions
    1. Place a boneless, skinless chicken breast in between two pieces of plastic wrap, sealing the edges. Pound the chicken with the flat side of a meat mallet, until it has flattened out considerably to about 1/2 inch thick (like a cutlet).

    2. Mix flour and seasonings in a small bowl.  Put buttermilk in a separate bowl. Dredge the chicken breast in flour mixture until completely covered on all sides, and shake off excess flour. Dip floured chicken into buttermilk, coating all sides. Let excess liquid drip back into bowl, then place chicken back into flour mixture, turning to cover completely. Set chicken onto dry platter; repeat process for all pieces of chicken, one at a time.

    3. Heat vegetable oil on medium high heat, in large skillet. When oil is hot (but not smoking), add chicken.  It should sizzle when chicken hits pan. You might need to cook chicken in batches, due to the size of the flattened chicken. Cooking times will vary, due to different thicknesses of meat, but you will need to cook one side (without moving it around-that tends to pull the breading off) until deep golden brown on bottom, then carefully turn chicken over and cook other side. Cook until chicken is fully cooked through (total time estimated between 12-18 minutes, depending on thickness of chicken). Remove from heat.

    4. While chicken is cooking, prepare the gravy per pkg. instructions. Once thickened, add chicken bouillon cube (crumbled), butter, black pepper, onion powder and garlic powder. Stir and continue cooking until ingredients are completely blended into gravy.

    5. To serve, place a browned chicken cutlet onto each serving plate, then generously spoon some of the creamy country gravy over the top, and serve hot!

    Nutrition Facts
    Chicken Fried Chicken With Country Gravy
    Amount Per Serving (1 piece (w/ gravy))
    Calories 465
    * Percent Daily Values are based on a 2000 calorie diet.

    Here’s one more to pin on your Pinterest boards!If you enjoy comfort food meals (or chicken fried steak), then you'll absolutely want to try Chicken Fried CHICKEN with creamy Country Gravy for a tasty dinner!


    Easy Sautéed Mushrooms

    Enjoy these easy to make, delicious sautéed mushrooms, with wine and butter, as a garnish for grilled steak or chicken, or as a simple side dish!Enjoy these easy to make, delicious sautèed mushrooms, with wine and butter, as a garnish for grilled steak or chicken, or as a simple side dish!

    One of my favorite ways to top a grilled steak or piece of chicken is with this side dish recipe for EASY Sautéed Mushrooms! Made easily in a few minutes, they’re also wonderful served simply as an accompaniment to a variety of other dishes.

    It only takes a few ingredients to make this tasty dish!  There are many varieties of mushrooms, but the personal favorites I use most often are baby portabellas or plain button mushrooms, both commonly found at most grocery stores.

    Scroll Down For A Printable Recipe Card At The Bottom Of The Page

    How To Make Sautéed Mushrooms

    Here’s how to whip up a batch of these mushrooms, lickety-split (photos are for a total of 2 servings)!

    In a medium sized skillet, melt 1 Tablespoon butter.  Add cleaned, thinly sliced mushrooms to skillet.  Sautè 3-4 minutes on medium heat, stirring often, until mushrooms begin to soften and turn light brown.

    Raw mushrooms cooking in melted butter in silver skillet

    Add 1/4 cup dry white wine to skillet, and continue cooking.

    Mushrooms and wine cooking in metal skillet with a wooden spoon

    Once liquid has cooked away and mushrooms are fully cooked, season lightly with garlic powder.  Stir. Season with salt and pepper, to suit your taste.

    Cooked mushrooms in a metal skillet

    Time to Enjoy Some Easy Sautéed Mushrooms

    When ready to serve, place the cooked mushrooms onto serving plate, or directly onto cooked steak (or chicken).  Lightly garnish with parsley flakes, then serve.

    Sautèed mushrooms on a white serving plate

    That’s it!  See how EASY it is to add these delicious tasting sautéed mushrooms to your meal? Hope you will enjoy this simple side dish. The recipe can be easily doubled, etc. for larger quantities.  Have a wonderful day!

    Looking For More VEGGIE SIDE DISH Recipes?

    You can find all of my recipes in the Recipe Index, located at the top of the page. I have a good variety of veggie side dish recipes you will enjoy, including:

    Interested In More Recipes?

    Thank you for visiting this website. I appreciate you using some of your valuable time to do soIf you’re interested, I publish a newsletter 2 times per month (1st and 15th) with all the latest recipes, and other fun info. I would be honored to have you join our growing list of subscribers, so you never miss a great recipe!
    There is a Newsletter subscription box on the top right side (or bottom) of each blog post, depending on the device you use, where you can easily submit your e-mail address (only) to be included in my mailing list.

    You Can Also Find Me On Social Media:

    Facebook page: The Grateful Girl Cooks!
    Pinterest:
    The Grateful Girl Cooks!
    Instagram:
    jbatthegratefulgirlcooks

    Author's signature

    0 from 0 votes
    Easy Sautéed Mushrooms
    Prep Time
    3 mins
    Cook Time
    10 mins
    Total Time
    13 mins
     

    Enjoy these easy to make, delicious sautéed mushrooms, as a garnish for grilled steak or chicken, or as a simple side dish!

    Category: Side Dish
    Cuisine: American
    Keyword: sauteed mushrooms
    Servings: 2 servings
    Calories Per Serving: 101 kcal
    Author: JB @ The Grateful Girl Cooks!
    Ingredients
    • 12 button mushrooms , thinly sliced
    • 1 Tablespoon butter
    • 1/4 cup dry white wine
    • 1/8 teaspoon garlic powder
    • Pinch salt and pepper , to taste
    • 1/4 teaspoon dried parsley flakes , for garnish (optional)
    Instructions
    1. In a medium skillet, melt 1 Tablespoon butter.  Add cleaned, thinly sliced mushrooms to skillet.  Cook 3-4 minutes on medium heat, stirring often, until mushrooms begin to soften and turn light brown.

    2. Add 1/4 cup dry white wine to skillet, and continue cooking. Once liquid has cooked away and mushrooms are fully cooked, season lightly with garlic powder.  Stir. Add salt and pepper, to taste.

    3. Place cooked mushrooms onto serving plate, or directly onto cooked steak (or chicken).  Lightly garnish with parsley flakes.
    Nutrition Facts
    Easy Sautéed Mushrooms
    Amount Per Serving (1 serving)
    Calories 101 Calories from Fat 54
    % Daily Value*
    Fat 6g9%
    Saturated Fat 3g19%
    Cholesterol 15mg5%
    Sodium 57mg2%
    Potassium 402mg11%
    Carbohydrates 4g1%
    Fiber 1g4%
    Sugar 2g2%
    Protein 3g6%
    Vitamin A 175IU4%
    Vitamin C 2.6mg3%
    Iron 0.6mg3%
    * Percent Daily Values are based on a 2000 calorie diet.

    Here’s one more to pin on your Pinterest boards!Enjoy these easy to make, delicious sautéed mushrooms, with wine and butter, as a garnish for grilled steak or chicken, or as a simple side dish!

    Banana Espresso Chocolate Chip Muffins

    You’ll LOVE these delicious Banana Espresso Chocolate Chip Muffins! EASY to make, flavorful treat for a family friendly breakfast, brunch, or snack!You'll LOVE these delicious Banana Espresso Chocolate Chip Muffins! EASY to make, flavorful treat for a family friendly breakfast, brunch, or snack!

    If you are the kind of person who enjoys banana muffins, coffee, and chocolate chips, then you will LOVE these absolutely delicious Banana Espresso Chocolate Chip Muffins! 

    They’re packed with flavor, incredibly SIMPLE to make, and will be a perfect treat for a breakfast, brunch buffet, or afternoon snack!

    I love banana muffins of all kinds… but if you add in some chocolate chips, and just a smidge of espresso powder giving them an extra level of flavor… whoa… those sounded like muffins I wanted to try!

    I found the original recipe on Pinterest and decided to whip up a batch to have around for breakfast or a yummy snack!

    The muffins have excellent flavor, and were super EASY to prepare!  The tiny bit of espresso powder in this recipe enhances the chocolate flavor, and does NOT overpower the muffins, by the way! Here’s how to make them:

    Scroll Down For A Printable Recipe Card At The Bottom Of The Page

    How To Make Banana Espresso Chocolate Chip Muffins

    First thing to do (try not to break a sweat!) is preheat your oven to 350 degrees, and spray a standard size 12 cup muffin tin with non-stick spray.

    Next, place some really ripe peeled bananas in a large mixing bowl, and mash them “silly” with a fork (use really ripe bananas, cause they are much sweeter!).

    Add granulated and brown sugars, melted butter, milk, and then the egg. Stir the ingredients really well together until blended. (No need for a mixer, just use a spoon!)

    3 photos: ripe bananas, mashed bananas, and muffin batterIn a large separate bowl, combine the flour, baking soda, salt, and espresso powder. Whisk them together. Create a well right in the middle of the dry ingredients, then carefully pour in the banana mixture, and stir to combine.

    Add the chocolate chips (I used mini chips), and fold them into the batter, stirring only until ingredients are combined.

    3 photos: flour with espresso powder, muffin batter, batter with chocolate chips

    Bake The Muffins

    Divide the muffin batter equally between the muffin cups. The mixture should fill each cup about 3/4 of the way full. Place the muffins in a preheated 350 degree oven on the middle rack.

    Bake them for between 20 and 25 minutes (oven temps very greatly- mine were ready at 22 minutes).

    Test their doneness by inserting a toothpick into center of muffin.  If it comes out clean, the muffins are ready to remove from oven! The muffin tops should be golden brown in color.

    Once the banana muffins are out of the oven, let them cool for about 15 minutes (still in the muffin tin) on a wire rack.

    Muffin batter in metal muffin tin cup holdersBanana muffins baked and golden brown in muffin tinAfter 15 minutes, transfer the banana muffins from the pan to the wire rack, and let them finish cooling down.

    Banana chocolate chip muffins cooling on wire rack12 muffins on a wire rackWhen you’re ready to enjoy these truly tasty banana muffins, pour yourself a big mug of coffee or tea, or even a tall glass of cold milk, and sink your teeth into them! I really think you’re gonna LOVE ’em!

    Inside look at banana espresso chocolate chip muffin with coffee behind itIf you enjoy muffins like we do, I’m confident you’ll like these yummy, unique muffins for breakfast or a quick snack.

    Thanks for stopping by, and I invite you to come back soon for more family-friendly recipes. Have a blessed day! May it be filled with JOY!

    Looking For More MUFFIN Recipes?

    You can find ALL of my recipes in the Recipe Index, which is located at the top of the page. I have lots of delicious muffin recipes to check out, including:

    Want More Recipes? Get My FREE Newsletter!

    I publish a newsletter 2 times per month (1st and 15th) with lots of recipes, tips, etc..
    Would you like to join our growing list of subscribers?

    There is a Newsletter subscription box on the top right (or bottom) of each blog post, depending on the device you use.
    You can submit your e-mail address there, to be added to my mailing list.

    Find Me On Social Media:

    Facebook page: The Grateful Girl Cooks!
    Pinterest:
    The Grateful Girl Cooks!
    Instagram:
    jbatthegratefulgirlcooks

    Author's signature

    Recipe Source: Tessa, at https://www.handletheheat.com/banana-espresso-chocolate-chip-muffins/

    ↓↓ PRINTABLE RECIPE BELOW ↓↓

    0 from 0 votes
    Banana Espresso Chocolate Chip Muffins
    Prep Time
    10 mins
    Cook Time
    25 mins
    Total Time
    35 mins
     
    You'll LOVE these delicious Banana Espresso Chocolate Chip Muffins! EASY to make, flavorful treat for a family friendly breakfast, brunch, or snack!
    Category: Bread/Breakfast
    Cuisine: American
    Keyword: banana espresso chocolate chip muffins
    Servings: 12 muffins
    Calories Per Serving: 304 kcal
    Author: JB @ The Grateful Girl Cooks!
    Ingredients
    • 4 medium bananas , very ripe (approx. 1.5 cups)
    • 1/2 cup granulated sugar
    • 1/4 cup brown sugar , firmly packed
    • 1/2 cup butter ,(1 cube) melted
    • 1/4 cup whole milk
    • 1 egg (large)
    • cups all purpose flour
    • 1 teaspoon instant espresso powder , see Tip
    • teaspoons baking soda
    • 1 teaspoon salt
    • 1 cup semi-sweet chocolate chips
    Instructions
    1. Preheat your oven to 350 degrees, and spray a standard size 12 cup muffin tin with non-stick spray. Place really ripe bananas in a large mixing bowl, and mash them "silly" with a fork. Add granulated and brown sugars, melted butter, milk, and then the egg. Stir the ingredients really well together until blended. (No need for a mixer; use a spoon!)

    2. In a separate, large bowl, combine flour, baking soda, salt, and espresso powder. Whisk together. Create a well right in the middle of the dry ingredients, then pour in the banana mixture, and stir to combine. Next add the chocolate chips (I used mini chips), and fold them into the batter, only until ingredients are combined.

    3. Divide the muffin batter equally between prepared muffin cups. The mixture should fill each cup about 3/4 of the way. Place muffins in preheated oven on the middle rack. Bake them for 20 to 25 minutes (oven temps very greatly- mine were ready at 22 minutes). Test their doneness by inserting a toothpick into center of muffin. If it comes out clean, the muffins are ready to remove from oven! The muffin tops should be golden brown in color. Once the muffins are out of the oven, let them cool for about 15 minutes (still in the muffin tin) on a wire rack. After 15 minutes, transfer muffins from the pan to the wire rack, and let them finish cooling down. Serve... and ENJOY!

    Recipe Notes

    TIP: If you don't have access to instant espresso powder, you can substitute 2 teaspoons of very finely ground dark roast coffee.

    Nutrition Facts
    Banana Espresso Chocolate Chip Muffins
    Amount Per Serving (1 muffin)
    Calories 304 Calories from Fat 126
    % Daily Value*
    Fat 14g22%
    Saturated Fat 8g50%
    Cholesterol 35mg12%
    Sodium 409mg18%
    Potassium 263mg8%
    Carbohydrates 41g14%
    Fiber 2g8%
    Sugar 23g26%
    Protein 3g6%
    Vitamin A 295IU6%
    Vitamin C 3.4mg4%
    Calcium 27mg3%
    Iron 1.9mg11%
    * Percent Daily Values are based on a 2000 calorie diet.

    Here’s one more to pin on your Pinterest boards!You'll LOVE these delicious Banana Espresso Chocolate Chip Muffins! EASY to make, flavorful treat for a family friendly breakfast, brunch, or snack!

    Creamy Italian Sausage Gnocchi

    If you’re looking for a flavorful, 30 minute, one pot, comfort food dinner to serve family or friends, then you’ll love this satisfying and filling Creamy Italian Sausage Gnocchi, with baby spinach, tomatoes and mozzarella!
     If you're looking for a flavorful, 30 minute, 1 pot, comfort food dinner, you'll love Creamy Italian Sausage Gnocchi, with spinach, tomatoes and mozzarella!

    I love gnocchi, those cute little Italian potato “dumplings”, usually found in the pasta section of the grocery store.  Have you tried them?  I first tried them in soup at a local restaurant, loved them, and went home to make my own Olive Garden Chicken Gnocchi Soup.

    Since then I’ve also used them to make other delicious gnocchi dishes! So when I discovered THIS recipe on Pinterest recently, I just KNEW it would be good! It most certainly WAS! The recipe is incredibly EASY to make, and tastes amazing!  This meal fills you up, and is so creamy and packed with Italian flavor!  Here’s how easy it is to make, all in ONE PAN, in about 30 minutes:

    Scroll Down For A Printable Recipe Card At The Bottom Of The Page

    Making Creamy Italian Sausage Gnocchi

    Place Italian sausage, diced onion, minced garlic, Italian seasoning, salt, pepper, and garlic powder in a large skillet (I used a cast iron skillet). Cook on medium high heat, until sausage has browned, stirring often. If there is any grease left in skillet, simply remove and discard.

    Sausage, onion, and garlic cooking in black skillet

    Browned Italian sausage and onion in cast iron skillet

    Add gnocchi (straight from the package), canned diced tomatoes, and whipping cream to the sausage in skillet. Carefully stir to combine ingredients.

    Cream and diced tomatoes added to skillet with gnocchi

    Tomatoes and cream added to gnocchi in skillet

    Add The Fresh Spinach

    Add handfuls of fresh baby spinach to the skillet. Stir and let spinach wilt just a bit in the hot liquid. If necessary, add spinach in batches (I added mine in two batches).  Cook mixture on low for about 10 minutes, stirring often, until the spinach has fully wilted down, the sauce has reduced in volume a bit, and the gnocchi is cooked and hot.

    Fresh spinach added to cast iron skillet and creamy sauce

    Spinach wilted into cast iron skillet with potato gnocchi

    Add the grated mozzarella cheese to the skillet; stir well, to fully incorporate cheese into the sauce and it melts.

    Mozzarella cheese added to skillet with creamy sausage gnocchi

    Cheese stringing from creamy sausage gnocchi on wooden spoon

    Time to Serve The Creamy Italian Sausage Gnocchi

    That’s it!  See how easy this dish is to make?  Sprinkle a tiny bit more Mozzarella cheese on top before serving it up into individual bowls, because, you know… it’s cheese! If you want even more pops of color, place a couple small spinach leaves on top, as well.

    Italian Sausage Gnocchi in cast iron skillet with wooden spoon

    Single serving Italian sausage gnocchi in white bowl

    This Italian sausage gnocchi was such an easy, delicious dish to prepare!  My husband and I really enjoyed it (and we’re looking forward to the leftovers, too)! Hope you will consider trying this recipe out… it tastes wonderful! Have a great day!

    Looking for More GNOCCHI Recipes?

    You can find all of my recipes in the Recipe Index, located at the top of the page. I have a couple more gnocchi recipes you might enjoy, including:

    Interested In More Recipes?

    Thank you for visiting this website. I appreciate you using some of your valuable time to do soIf you’re interested, I publish a newsletter 2 times per month (1st and 15th) with all the latest recipes, and other fun info. I would be honored to have you join our growing list of subscribers, so you never miss a great recipe!
    There is a Newsletter subscription box on the top right side (or bottom) of each blog post, depending on the device you use, where you can easily submit your e-mail address (only) to be included in my mailing list.

    You Can Also Find Me On Social Media:

    Facebook page: The Grateful Girl Cooks!
    Pinterest:
    The Grateful Girl Cooks!
    Instagram:
    jbatthegratefulgirlcooks

    Author's signature

    Recipe Source: Alli at https://tornadoughalli.com/2018/01/one-pot-creamy-sausage-gnocchi/

    0 from 0 votes
    Creamy Italian Sausage Gnocchi
    Prep Time
    10 mins
    Cook Time
    20 mins
    Total Time
    30 mins
     

    If you're looking for a flavorful, 30 minute, one pot, comfort food dinner, you'll love Creamy Italian Sausage Gnocchi, with spinach, tomatoes and mozzarella! 

    Category: Dinner
    Cuisine: Italian
    Keyword: Italian sausage gnocchi
    Servings: 6 servings
    Calories Per Serving: 559 kcal
    Author: JB @ The Grateful Girl Cooks!
    Ingredients
    • 1 pound Italian sausage *can substitute 3 links with casings removed
    • 1 brown onion , diced
    • 2 cloves garlic . minced
    • 2 teaspoons Italian seasoning
    • 1 teaspoon salt
    • 1 teaspoon black pepper
    • 1 teaspoon garlic powder
    • 1 15 ounce can petite diced tomatoes
    • 3/4 cup heavy whipping cream
    • 16 ounces gnocchi
    • 3 cups spinach , fresh
    • 1 cup Mozzarella cheese , grated
    Instructions
    1. Place Italian sausage, diced onion, minced garlic, Italian seasoning, salt, pepper, and garlic powder in a large skillet. Cook on medium high heat, until sausage has browned, stirring often. Drain and discard any grease accumulated in skillet.

    2. Add gnocchi, canned diced tomatoes, and whipping cream to the skillet. Carefully stir to combine ingredients. Add handfuls of fresh baby spinach to the skillet. Stir and let spinach wilt just a bit in the hot liquid. If necessary, add spinach in batches (I added mine in two batches).  Cook mixture on low for about 10 minutes, stirring often, until the spinach has fully wilted down and the gnocchi is cooked.

    3. Add the grated mozzarella cheese to the skillet; stir well, to fully incorporate cheese into the sauce and it melts. Once cheese is fully melted, serve the dish! May garnish with additional grated cheese, if desired.

    Recipe Notes

    Gnocchi does not have to be precooked before adding it to dish.

    Nutrition Facts
    Creamy Italian Sausage Gnocchi
    Amount Per Serving (1 serving)
    Calories 559 Calories from Fat 351
    % Daily Value*
    Fat 39g60%
    Saturated Fat 18g113%
    Cholesterol 112mg37%
    Sodium 1338mg58%
    Potassium 352mg10%
    Carbohydrates 32g11%
    Fiber 2g8%
    Sugar 1g1%
    Protein 19g38%
    Vitamin A 1980IU40%
    Vitamin C 7.6mg9%
    Calcium 174mg17%
    Iron 4.4mg24%
    * Percent Daily Values are based on a 2000 calorie diet.

    Here’s one more to pin on your Pinterest boards!

     If you're looking for a flavorful, 30 minute, 1 pot, comfort food dinner, you'll love Creamy Italian Sausage Gnocchi, with spinach, tomatoes and mozzarella!

    Balsamic Chicken with Asparagus and Mushrooms

    Pan-seared balsamic chicken with grilled asparagus and mushrooms, topped with a flavorful pan sauce, is an easy, delicious, and healthy dinner!Pan-seared balsamic chicken with grilled asparagus and mushrooms, topped with a flavorful pan sauce, is an easy, delicious, and healthy dinner!

    If you’re looking for a “new” chicken recipe that is healthy, packed with flavor and protein AND can be ready in about half an hour, check out this one for Balsamic Chicken with Asparagus and Mushrooms!

    I found the recipe on Pinterest, and it sounded really good, was low in calories, but high in flavor! I made this for my husband and I a couple of weeks ago, and we really enjoyed it!  Boneless, skinless chicken breasts are pan-seared, asparagus is steamed in a balsamic glaze, and mushrooms are cooked then added to a creamy balsamic sauce which covers it all! YUM!

    *NOTE: The recipe as posted serves 4, but I cut the recipe in half and only made two servings, so my photos reflect that. Here’s how to make this delicious dish:

    Scroll Down for A Printable Recipe Card At The Bottom Of The Page

    How To Make Balsamic Chicken

    Heat oil on medium-high heat in skillet until hot, but not smoking. Lightly season chicken breasts with salt and pepper. Place chicken in hot skillet. Cook each side for about 7 minutes (per side), until nicely browned.

    Add 1/3 cup chicken broth to skillet (reserve the rest for later); cook on low for 3-4 minutes, or until chicken is fully cooked through. Remove from heat; set aside (and cover, to keep warm).

    3 picture collage of raw chicken, then cooking and browning in skillet

    While chicken was cooking, I made the asparagus.  Trim ends off fresh asparagus (discard). Place asparagus onto a grill pan (or in a large skillet with 2 T. water). Drizzle with balsamic glaze, and season lightly with salt and pepper.

    Cook on medium heat, turning occasionally, until asparagus are crisp-tender. I put a lid on skillet to help steam the asparagus (you can place aluminum foil over grill pan to do same). When done, remove asparagus from skillet, but leave liquid IN the skillet.

    3 picture collage of asparagus, raw, and with sauce, cooking in skillet

    Once asparagus has been removed, add sliced mushrooms to balsamic sauce remaining in skillet.  Cook on medium-low to lightly brown mushrooms. Pour the reserved chicken broth into the skillet, and continue cooking.

    In a small cup, mix together 1-2 Tablespoons cornstarch with 1-2 Tablespoons cold water until completely smooth. Pour this liquid into mushroom mixture, stirring as you add it. Cook for a couple of minutes to thicken the mushroom balsamic sauce.

    3 picture collage of raw mushrooms, cooking with sauce added to skillet

    Place the cooked chicken onto individual serving plates; top with some of the cooked asparagus spears; then spoon some mushroom balsamic sauce over the top of it all.

    Serve, and enjoy this delicious balsamic chicken dinner!  The chicken is tender, the asparagus is delicious, and those mushrooms in the balsamic sauce… amazing!

    Chicken, covered with mushrooms and asparagus in balsamic sauce on plate

    Balsamic Chicken, asparagus and mushrooms in sauce with rice, on plate

    This balsamic chicken recipe is pretty straightforward and easy to prepare… I hope you will consider making this healthy meal for you and your loved ones!

    As I sit here typing this blog post, I am reminded once again how very grateful I feel to live in this country, and how blessed I am to have food to cook available 24 hours a day in our pantry! Others in this big old world are not as fortunate, so I remain incredibly thankful to God for this blessing in our lives. I do not take it lightly. Hope you have a really good day.

    Interested In More Recipes?

    Thank you for visiting this website. I appreciate you using some of your valuable time to do soIf you’re interested, I publish a newsletter 2 times per month (1st and 15th) with all the latest recipes, and other fun info. I would be honored to have you join our growing list of subscribers, so you never miss a great recipe!
    There is a Newsletter subscription box on the top right side (or bottom) of each blog post, depending on the device you use, where you can easily submit your e-mail address (only) to be included in my mailing list.

    You Can Also Find Me On Social Media:
    Facebook page: The Grateful Girl Cooks!
    Pinterest: The Grateful Girl Cooks!
    Instagram: jbatthegratefulgirlcooks

    Author's signature

    Recipe Source: http://fitnessfooddiva.com

    0 from 0 votes
    Balsamic Chicken with Asparagus and Mushrooms
    Prep Time
    20 mins
    Cook Time
    15 mins
    Total Time
    35 mins
     

    Pan-seared balsamic chicken with grilled asparagus and mushrooms, topped with a flavorful pan sauce, is an easy, delicious, and healthy dinner!

    Category: Entree
    Cuisine: American
    Keyword: balsamic chicken
    Servings: 4 servings
    Calories Per Serving: 226 kcal
    Author: JB @ The Grateful Girl Cooks!
    Ingredients
    • 4 chicken breasts , boneless and skinless
    • 1 Tablespoon olive oil
    • 14.5 ounces chicken broth , low sodium
    • 1 bunch asparagus , fresh (not frozen)
    • 2 Tablespoons balsamic glaze *see notes for substitute
    • 12 ounces button mushrooms , sliced
    • 1 Tablespoons corn starch , see Notes
    • Pinch salt and pepper , to taste
    Instructions
    1. Heat oil on medium-high heat in skillet until hot, but not smoking. Lightly season chicken breasts with salt and pepper. Place chicken in hot skillet. Cook each side for about 7 minutes (per side), until nicely browned. Add 1/3 cup chicken broth to skillet (reserve the rest for later); cook on low for 3-4 minutes, or until chicken is fully cooked through. Remove from heat; set aside (and cover, to keep warm).
    2. While chicken is cooking, make asparagus.  Trim ends off asparagus (discard). Place asparagus onto a grill pan (or in a large skillet with 2 T. water). Drizzle with balsamic glaze; season lightly with salt and pepper. Cook on medium heat, turning occasionally, until asparagus are crisp-tender. Put a lid on skillet to help steam the asparagus (you can place aluminum foil over grill pan to do same). When done, remove asparagus from skillet, but leave liquid IN the skillet.

    3. Once asparagus has been removed, add sliced mushrooms to balsamic sauce remaining in skillet.  Cook on medium-low to lightly brown mushrooms. Pour  reserved chicken broth into the skillet, and continue cooking.  In a small cup, mix together 1-2 Tablespoons cornstarch with 1-2 Tablespoons cold water until completely smooth. Pour this liquid into mushroom mixture, stirring as you add it. Cook for a couple of minutes to thicken the mushroom balsamic sauce.

    4. Place the cooked chicken onto individual serving plates; top with some of the cooked asparagus spears; then spoon some mushroom balsamic sauce over the top of it all. Serve, and enjoy! 

    Recipe Notes

    Don't have access to balsamic glaze? Place 5 Tablespoons balsamic vinegar in saucepan. Heat over medium heat, stirring occasionally until sauce has reduced by half and has thickened slightly.

    Nutrition Facts
    Balsamic Chicken with Asparagus and Mushrooms
    Amount Per Serving (1 serving)
    Calories 226 Calories from Fat 63
    % Daily Value*
    Fat 7g11%
    Saturated Fat 1g6%
    Cholesterol 72mg24%
    Sodium 513mg22%
    Potassium 998mg29%
    Carbohydrates 12g4%
    Fiber 3g13%
    Sugar 5g6%
    Protein 29g58%
    Vitamin A 885IU18%
    Vitamin C 16.7mg20%
    Calcium 41mg4%
    Iron 3.5mg19%
    * Percent Daily Values are based on a 2000 calorie diet.

    Here’s one more to pin on your Pinterest boards!Pan-seared balsamic chicken with grilled asparagus and mushrooms, topped with a flavorful pan sauce, is an easy, delicious, and healthy dinner!