Mini zucchini loaves (with creamy browned butter icing) are a delicious treat or snack. This easy recipe makes 2 mini loaves, which are perfect for gift-giving!

This past Fall, I saw a recipe for a zucchini cake that had amazing looking frosting on it, and knew I had to try it! The twist to the original recipe came when I decided to make mini zucchini loaves out of the recipe (instead of a cake), but still use the creamy frosting!
The recipe was very easy to make, and yielded two very moist, absolutely scrumptious mini zucchini loaves. My husband and I shared a loaf over the next couple of days, and we gave the second loaf to one of our neighbors. Oh YUM… what a great tasting treat!
Scroll Down For A Printable Recipe Card At The Bottom Of The Page
How To Make Mini Zucchini Loaves
The process is very easy to make this bread. Begin by preheating the oven to 350°F. Stir the flour, salt, baking powder, cinnamon, and baking soda together in a medium bowl. Set the bowl with these dry ingredients aside until later.
In a separate bowl, beat the eggs well. Add the granulated sugar to the eggs, and beat well again, until combined and sugar has dissolved. Stir vanilla extract and vegetable oil into the egg mixture, until fully combined. Add the dry ingredients to the bowl with the egg mixture, and stir the ingredients just until the mixture is combined.

Add the chopped walnuts (or pecans) and the grated, drained zucchini to the batter (see tip below for “draining” zucchini). Gently stir the zucchini and nuts in, until combined. This is the batter for the mini zucchini loaves. See how EASY that was?

TIP For “Draining” Zucchini
You can easily “drain” the shredded zucchini between layers of paper towels, to help absorb a lot of the moisture from the veggie. Trust me, you don’t want wet, soggy zucchini in your mini zucchini loaves!
To do this, lay out several layers of paper towel, and place all of the grated zucchini on top. Add a couple layers of paper towels on top of the zucchini, and press down to absorb lots of excess moisture. Who knew zucchini had so much moisture in it? You will be glad you did this!

Baking The Mini Zucchini Loaves
Once you have your batter prepared for the mini zucchini loaves, it’s time to BAKE! Divide the batter evenly into 2 greased mini sized bread loaf pans. Bake the mini zucchini loaves in a preheated 350°F oven for 40-45 minutes. Since oven temps vary greatly, be sure to check the loaves at 35 minutes, then 40, to make sure they are completely “done” .
To test their “doneness”, simply insert a toothpick into the top center of a loaf. If the toothpick comes out “clean” (with no wet batter hanging on for dear life), the loaves are done. The mini zucchini loaves should also be nice and golden brown on the outside. Transfer the loaves to a wire rack to cool completely before covering them with browned butter icing.

Making Browned Butter Icing For Mini Zucchini Loaves
To make the browned butter icing, melt 3 Tablespoons unsalted butter in a skillet on medium low heat. Cook the butter on this temperature until the color starts to change slightly to golden brown.
Turn the temperature down to low heat. The milk solids will begin to turn into brown specks in the liquid (see middle photo below). Continue cooking, taking care to not let it burn, until butter is a nice brown color (photo on right, below). Remove skillet from the heat.

Let the browned butter cool for 5-6 minutes, then add the powdered sugar. Add cinnamon and vanilla, and then thin the icing out by adding the milk. Stir to combine. If necessary, add a tiny bit more milk (if needed), to create a spreadable consistency for the icing for the mini zucchini loaves.

Evenly divide the browned butter icing between the two mini zucchini loaves. Spread as much (or as little) as you want onto the loaves. I used it all on the two loaves, and the icing was nice and thick on top!

Time To EAT!
Let the mini zucchini loaves sit for a few minutes, to give the icing a chance to firm up a little bit. The only remaining step left is to slice a nice piece… and EAT IT! YUMMY! The mini zucchini loaves are very moist, full of cute little pieces of zucchini and chopped nuts, flavored with cinnamon and taste WONDERFUL. The browned butter frosting takes it OVER THE TOP to Flavor Town! Enjoy!

Sure do hope you will consider trying this recipe for mini zucchini loaves, with browned butter icing. Pour yourself a hot cup of coffee or tea, and enjoy a slice (or two). Have a GREAT day!
By the way, if you are looking for more homemade sweet bread loaf recipes, I hope you will check out a few favorites. These and ALL my recipes can be found in the Recipe Index, located at the top of the page.
- Starbucks Lemon Loaf (copycat)
- Pumpkin Bread
- Double Chocolate Zucchini Bread
- Cranberry Orange Loaf with Orange Icing
- Starbucks Gingerbread (copycat)
Interested In More Recipes?
Thank you for visiting this website. I appreciate you using some of your valuable time to do so. If you’re interested, I publish a newsletter 2 times per month (1st and 15th) with all the latest recipes, and other fun info. I would be honored to have you join our growing list of subscribers, so you never miss a great recipe!
There is a Newsletter subscription box on the top right side (or bottom) of each blog post, depending on the device you use, where you can easily submit your e-mail address (only) to be included in my mailing list.
You Can Also Find Me On Social Media:
Facebook page: The Grateful Girl Cooks!
Pinterest: The Grateful Girl Cooks!
Instagram: jbatthegratefulgirlcooks

Recipe Adapted From: https://theviewfromgreatisland.com/end-of-summer-zucchini-cake-with-browned-butter-frosting/
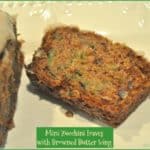
Mini zucchini loaves (with creamy browned butter icing) are a delicious treat or snack. This easy recipe makes 2 mini loaves, perfect for gift-giving!
- 1 cup all purpose flour
- 1 teaspoon baking soda
- 1 teaspoon cinnamon
- 1/2 teaspoon salt
- 1 pinch baking powder
- 1 cup granulated sugar
- 1/2 cup vegetable oil
- 2 teaspoons vanilla extract
- 1 cup shredded zucchini , drained and packed into cup
- 1/2 cup chopped walnuts (or pecans)
- 3 Tablespoons unsalted butter
- 2 cups confectioner's sugar (powdered)
- 1/4 teaspoon cinnamon
- 1/8 teaspoon vanilla extract
- 2 Tablespoons milk, to thin , plus additional if needed
Preheat oven to 350°F. Stir the flour, salt, baking powder, cinnamon, and baking soda together in a medium bowl. Set aside.
In a separate bowl, beat the eggs well. Add the granulated sugar to the eggs, and beat well again, until combined and sugar has dissolved. Stir vanilla extract and vegetable oil into the egg mixture, until fully combined. Add the dry ingredients to the bowl with the egg mixture, and stir the ingredients just until the mixture is combined. Add chopped walnuts (or pecans) and the grated, drained zucchini to the batter. Gently stir zucchini and nuts in, until combined. TIP TO DRAIN ZUCCHINI: Lay out several layers of paper towel, and place grated zucchini on top. Add a couple layers of paper towels on top of the zucchini, and press down to absorb lots of excess moisture.
Divide batter evenly into 2 greased mini sized bread loaf pans. Bake in 350°F oven for 40-45 minutes. Since oven temps vary greatly, be sure to check the loaves at 35 minutes, then 40 etc., to make sure they are done. To test "doneness", insert a toothpick into the top center of a loaf. If it comes out "clean" (with no wet batter hanging on for dear life), loaves are done. Transfer loaves to a wire rack to cool completely before removing from pan and covering with icing.
Melt butter in a skillet on medium low heat. Cook the butter at this temperature until the color starts to change slightly to golden brown. Once golden brown, lower the temperature to low heat. The milk solids will begin to turn into brown specks in the liquid. Continue cooking, taking care NOT to let it burn, until the butter is a deep brown color. Remove skillet from the heat.
Let the browned butter cool for 5-6 minutes, then add powdered sugar. Add cinnamon and vanilla, then thin the icing out by adding milk. Stir to combine. If necessary, add a tiny bit more milk, to create a spreadable consistency for the icing. Evenly divide the browned butter icing between the two mini zucchini loaves. Let the loaves sit for a few minutes, to give the icing a chance to firm up. Slice each mini loaf into 5 pieces, serve, and enjoy!
Here’s one more to pin on your Pinterest boards!


! This savory dish can be made in 10 minutes, a real timesaver! / The Grateful Girl Cooks!")


! This savory dish can be made in 10 minutes, a real timesaver! / The Grateful Girl Cooks!")