Month: January 2021

Flourless Chocolate Cake

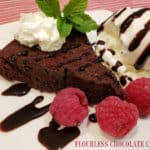
Flourless Chocolate Cake is a decadent dessert with only 5 ingredients! Easy to make, it’s a dense and fudgy cake, with incredible flavor!
Flourless Chocolate Cake is a decadent dessert with only 5 ingredients! Easy to make, it's a dense and fudgy cake, with incredible flavor!

Years ago I first tasted a flourless chocolate cake at a friends home, and it was AMAZING! Our friend, Shari, served the slices of cake with a scoop of raspberry sorbet on the side, and I was hooked! A couple weeks later I was able to track down the recipe she used, and the rest is history! This flourless chocolate cake tastes awesome, and is simple to make… what could be better than that?

Valentines Day is right around the corner, and this would be a delicious dessert to make and serve to that special person or persons in your life. Families or sweethearts will love this fudgy chocolate cake, and a few simple garnishes to “make it look good” will take it right over the top. Here’s how to make this yummy dessert cake:

Scroll Down For A Printable Recipe Card At The Bottom Of The Page

What Ingredients Do I Need To Make This Cake?

The ingredients you will need for this cake are bittersweet chocolate, butter, eggs, granulated sugar, and cocoa powder. That’s it! You will also need an 8″ round cake pan and some wax paper for baking this dessert. Got it? Okay. Preheat your oven to 375°F.

The cake ingredients are sugar, cocoa, butter, eggs, and bittersweet chocolate.

Preparing The Cake Pan

You will need a piece of wax paper, cut to fit the bottom of the 8″ cake pan you will use for the cake. I place the cake pan on top of the wax paper, trace around it, then cut the circle out with scissors.

Grease the bottom and sides of the pan with a small amount of butter, This will help the cake to release easily from the pan once baked (it will also hold the wax paper you will add, in place). Lay the wax paper cutout onto the butter in the bottom of the cake pan. Now butter the wax paper, as well. Set the pan aside while you make the cake batter.

Tracing the cake pan outline on wax paper to fit it into the pan.Pan is buttered, and wax paper insert on bottom of pan is buttered.

Melting The Bittersweet Chocolate

Melt chopped bittersweet chocolate and a stick of butter in a double boiler OR in a metal bowl set over the top of a saucepan of lightly simmering water. Stir the chocolate occasionally as it melts. TIP: Be careful to not let ANY of the water underneath get into the chocolate or it will “seize up” (not good).

Once the chocolate is completely smooth, remove the top pan or bowl from the heat. Now it’s time to add the remaining ingredients, one at a time to the melted chocolate and butter mixture.

Bittersweet chocolate and butter is melted over a double boiler on stove.Butter and chocolate are melted until smooth then removed from heat.

Preparing The Batter

Once the pan is off the heat, whisk the granulated sugar into the melted chocolate. Let the mixture cool for one minute, then add the eggs, one at a time, whisking constantly while you add them.

Once the eggs are blended in, sift the cocoa powder on top of the chocolate mixture, and whisk only until the cocoa powder has been combined into the batter.

Granulated sugar is whisked into melted butter and chocolate mixture.Eggs are whisked into the flourless chocolate cake mixture.Cocoa powder is sifted, then whisked into the chocolate cake batter.

Time To Bake The Flourless Chocolate Cake

Now it’s time to bake the flourless chocolate cake! Yee Haw! Pour the batter into the prepared cake pan, and gently spread until it has been evenly dispersed in the pan.

Place the cake pan on the middle rack of a preheated 375°F oven. Bake for 23-25 minutes, or until a toothpick inserted into the center of the cake comes out clean. Transfer the baked cake (still in the pan) to a wireless rack to cool for 5 minutes.

Batter for the flourless chocolate cake is spread evenly into prepared cake pan.After baking, the cake cools for 5 minutes before inverting onto a platter.

After the cake has rested for 5 minutes, it is time to “invert” (turn it upside down) onto a serving platter. To do this, place the platter upside down on top of the cake pan. Holding both the cake pan AND the platter tightly together, quickly flip them over. Once cake releases from the pan onto the platter, remove the cake pan, and peel off the wax paper.

The cake is inverted onto a serving platter, and then the cake pan is removed.Wax paper is removed from cake after inverting it onto platter.

Time To Serve The Flourless Chocolate Cake

After the cake has cooled to room temperature, it’s time to enjoy it! We always enjoy this decadent dessert served with a scoop of vanilla ice cream. That in itself, makes for a wonderful, fudgy chocolate dessert that just about anyone will love.

To make it extra special I garnish each serving with whipped cream, chocolate syrup, a fresh mint leaf, and some raspberries (or strawberry slices). Then it’s as “pretty as a picture” for special occasions, like a birthday or Valentines Day, etc. I think it’s worth the little bit more to jazz it up, cause, as they say, we “eat with our eyes first”, right? YUM.

Flourless chocolate cake is served with ice cream, raspberries, and chocolate syrup.Whipped cream, chocolate syrup and mint leaf garnish the top of the flourless chocolate cake.

I posted a lot of photos on this post to help you make this flourless chocolate cake absolutely perfect, but honestly, it’s one of the easiest cakes you can make. Sure hope you enjoy it, and trust you will make it for those you love. Have a great day, and come back soon!

Looking For More CAKE Recipes?

You can find all of my cake recipes in the Recipe Index, which is located at the top of the page. I have some delicious ones, including:

Interested In More Recipes?

Thank you for visiting this website. I appreciate you using some of your valuable time to do soIf you’re interested, I publish a newsletter 2 times per month (1st and 15th) with all the latest recipes, and other fun info. I would be honored to have you join our growing list of subscribers, so you never miss a great recipe!
There is a Newsletter subscription box on the top right side (or bottom) of each blog post, depending on the device you use, where you can easily submit your e-mail address (only) to be included in my mailing list.

You Can Also Find Me On Social Media:

Facebook page: The Grateful Girl Cooks!
Pinterest:
The Grateful Girl Cooks!
Instagram:
jbatthegratefulgirlcooks

Author's signature

Original recipe source: https://www.epicurious.com/recipes/food/views/flourless-chocolate-cake-14478

0 from 0 votes
Flourless Chocolate Cake
Prep Time
12 mins
Cook Time
23 mins
Total Time
35 mins
 

Flourless Chocolate Cake is a decadent dessert with only 5 ingredients! Easy to make, it's a dense and fudgy cake, with incredible flavor!

Category: Dessert
Cuisine: American
Keyword: flourless chocolate cake
Servings: 8
Calories Per Serving: 295 kcal
Author: JB @ The Grateful Girl Cooks!
Ingredients
  • 4 ounces bittersweet chocolate NOT unsweetened
  • ½ cup unsalted butter =1 stick
  • ¾ cup granulated sugar
  • 3 large eggs
  • ½ cup unsweetened cocoa powder + additional for sprinkling
Instructions
  1. Preheat oven to 375°F. Grease bottom and sides of 8" cake pan with a small amount of butter, This helps cake release easily from pan once baked. Line bottom of pan with round piece of wax paper (cut to fit). Butter wax paper, as well.

  2. Cut chocolate into small chunks. Melt chocolate and butter in double boiler OR in metal bowl set over the top of a saucepan of lightly simmering water, (without getting any water into the chocolate). Stir chocolate until it's completely smooth, then remove pan of chocolate from the heat. Whisk granulated sugar into chocolate. Let cool for one minute, then add eggs, one at a time, whisking constantly while adding until combined. Sift cocoa powder onto chocolate mixture; whisk only until cocoa has been incorporated into batter.

  3. Pour batter into prepared cake pan; evenly spread in pan. Place on middle rack of a preheated 375°F oven. Bake for 23-25 minutes, or until toothpick inserted into center of cake comes out clean. Transfer cake (still in the pan) to wireless rack; cool for 5 minutes.

  4. After cake has rested 5 minutes, carefully "invert" it (turn it upside down) onto a serving platter. Peel off wax paper. Dust cake with additional sifted cocoa powder, if desired. Serve with ice cream, etc. Store leftover, cooled cake in an airtight container for up to a week. Enjoy!

Nutrition Facts
Flourless Chocolate Cake
Amount Per Serving (1 slice (1/8 of total))
Calories 295 Calories from Fat 171
% Daily Value*
Fat 19g29%
Saturated Fat 11g69%
Trans Fat 1g
Cholesterol 101mg34%
Sodium 31mg1%
Potassium 192mg5%
Carbohydrates 29g10%
Fiber 3g13%
Sugar 24g27%
Protein 4g8%
Vitamin A 463IU9%
Calcium 30mg3%
Iron 2mg11%
* Percent Daily Values are based on a 2000 calorie diet.

Here’s one more to pin on your Pinterest boards!Flourless Chocolate Cake is a decadent dessert with only 5 ingredients! Easy to make, it's a dense and fudgy cake, with incredible flavor!

Chili-Lime Tortilla Chips (Air Fryer)

Make a quick batch of crunchy Chili-Lime Tortilla Chips in an air fryer! Corn tortillas, lime juice, oil, and a few spices are all you need!

Do you enjoy finding new recipes? I always love the search, and am thrilled when that search produces a recipe you will use again and again.

A few months ago I stumbled upon a recipe online for making homemade tortilla chips in an air fryer! It sounded really interesting to me, so I made chili-lime tortilla chips (with a slight tweak or two), and they didn’t take much time at all!

These tortilla chips are totally EASY to make, have great flavor, and are absolutely crispy (just how they should be, right?). Here’s how you can make them fairly quickly, using an air fryer:

Scroll Down For A Printable Recipe Card At The Bottom Of The Page

Make The Seasoning For the Chips

The first thing you will need to do is mix together the simple seasoning sauce that will be used to coat the tortilla chips. The sauce is made using extra-virgin olive oil, fresh lime juice, chili powder, salt, and ground cumin.

Place these ingredients in a small bowl, and whisk or stir until the ingredients are fully blended together.

Olive oil, lime juice and spices are combined to make sauce for tortilla chips.Chili-Lime Sauce is ready to brush onto tortilla chips for cooking.

Prepare The Corn Tortillas Before Air-Frying

For this recipe, I use six, 5″ corn tortillas. Use a pastry brush to lightly brush the sauce onto both sides of each tortilla. Once that has been done, evenly stack all six seasoned tortillas directly on top of each other.

Use a sharp knife to carefully slice the stack of tortillas in half, then cut each half stack in half. Got it? The stack of seasoned tortillas will be cut into four quarters of equal size.

Each corn tortilla is brushed with the spicy sauce before cooking.A stack of seasoned tortillas is cut in half.Tortillas are cut into quarters before placing them into an air fryer.

Cooking Chili-Lime Tortilla Chips In An Air Fryer

Now it’s time to cook the chili-lime tortilla chips! Preheat your air fryer to 350°F. Once heated, place the tortilla quarters in the basket of the air fryer in a single layer.

You will need to cook the chips in batches, because they need to have room for the hot air to circulate around them, to ensure they become crunchy. 

Cook them at 350°F. for between 6-8 minutes. Different air fryer machines tend to vary in temperatures and the heat they produce, so it is best to keep an eye on the chips as they cook. This will help make sure they don’t burn. I would say definitely check them at the 5 minute mark, and then go from there, a little at a time, until they are lightly browned.

Once done, remove the chili-lime tortilla chips from the air fryer and transfer to a wire rack to cool. The tortilla chips become more crunchy as they cool. Start another batch right away while the air fryer is still hot, and continue until all chips are cooked. 

Cooking Chili-Lime Tortilla Chips in air fryer one batch at a time.

Time To Enjoy Some Chili-Lime Tortilla Chips!

Once the chili-lime tortilla chips have fully cooled down to room temperature, they’re ready to eat! The chips are crunchy, and taste really good, especially when served with salsa or guacamole.

You can see in the photo below that they are crisp enough to hold the guacamole I whipped up the first time I made these chips!

Store any leftover chips in an airtight bag or container. They will be at their peak of crispiness and freshness for about 5-6 days, if stored properly. Because this recipe makes a fairly small batch, we never seem to have too many leftovers… ha ha!

Each seasoned, air fried chip is crunchy and ready for dipping!A plate of air fried chili-lime tortilla chips, served with guacamole.

I sincerely hope you enjoy this recipe for air fryer chili-lime tortilla chips. We sure have enjoyed it! TIP: If you are not a fan of seasoned tortilla chips, you can simply brush the tortillas with olive oil and a sprinkling of salt, for a more traditional tortilla chip.

Thank you for stopping by. I hope you have a wonderful day, and sincerely trust you will come back soon to explore more delicious recipes.

Looking For More AIR FRYER Recipes?

You can find all of my recipes in the Recipe Index, located at the top of the page. I have quite a few delicious air fryer recipes, including:

Want More Recipes? Get My FREE Newsletter!

I publish a newsletter 2 times per month (1st and 15th) with lots of recipes, tips, etc..
Would you like to join our growing list of subscribers?

There is a Newsletter subscription box on the top right (or bottom) of each blog post, depending on the device you use.
You can submit your e-mail address there, to be added to my mailing list.

Find Me On Social Media:

Facebook page: The Grateful Girl Cooks!
Pinterest:
The Grateful Girl Cooks!
Instagram:
jbatthegratefulgirlcooks

Author's signature

Recipe adapted from: Leanne at: crumbtopbaking.com/air-fryer-tortilla-chips/

↓↓ PRINTABLE RECIPE BELOW ↓↓

0 from 0 votes
Chili-Lime Tortilla Chips
Prep Time
5 mins
Cook Time
6 mins
Total Time
11 mins
 

Make a quick batch of crunchy Chili-Lime Tortilla Chips in an air fryer! Corn tortillas, lime juice, oil, and a few spices are all you need!

Category: Appetizer/Snack
Cuisine: American
Keyword: chili-lime tortilla chips
Servings: 4 (6 chips per serving)
Calories Per Serving: 118 kcal
Author: JB @ The Grateful Girl Cooks!
Ingredients
  • 6 5 inch corn tortillas
  • 1 Tablespoon extra virgin olive oil
  • ½ Tablespoon fresh lime juice
  • 1 teaspoon chili powder
  • ¼ teaspoon ground cumin
  • ¼ teaspoon salt
Instructions
  1. Place olive oil, lime juice, chili powder, salt and ground cumin in a small bowl; whisk or stir until the ingredients are fully blended together.

  2. Use a pastry brush to lightly brush sauce onto both sides of each tortilla. Once that has been done, stack all six tortillas on top of each other. Using a sharp knife, carefully slice the stack of tortillas in half, then cut each half stack in half. The stack of seasoned tortillas will be cut into four quarters of equal size.

  3. Preheat air fryer to 350°F. Place the tortilla quarters in the basket of the air fryer in a single layer. NOTE: Cook chips in batches, because they need room for hot air to circulate around them, to ensure they become crunchy. Cook at 350°F. for 6-8 minutes. Air fryers tend to vary in temperature and heat they produce, so keep an eye on chips as they cook, to make sure they don't burn. Check them at the 5 minute mark, and then go from there, a little at a time, until lightly browned.

  4. Once done, remove tortilla chips from air fryer; transfer to a wire rack to cool. The tortilla chips become more crunchy as they cool. Start another batch right away while the air fryer is still hot; continue until all chips are cooked. Store any leftovers in airtight bag or container for up to 5-6 days. Enjoy!

Nutrition Facts
Chili-Lime Tortilla Chips
Amount Per Serving (6 chips)
Calories 118 Calories from Fat 45
% Daily Value*
Fat 5g8%
Saturated Fat 1g6%
Sodium 171mg7%
Potassium 82mg2%
Carbohydrates 18g6%
Fiber 3g13%
Sugar 1g1%
Protein 2g4%
Vitamin A 148IU3%
Vitamin C 1mg1%
Calcium 32mg3%
Iron 1mg6%
* Percent Daily Values are based on a 2000 calorie diet.

Here’s one more to pin on your Pinterest boards!Make a quick batch of crunchy Chili-Lime Tortilla Chips in an air fryer! Corn tortillas, lime juice, oil, and a few spices are all you need!

Pasta in Wine and Garlic Sauce

Make delicious pasta in wine and garlic sauce in under 15 minutes! SIMPLE to make, then garnish with Parmesan cheese for a tasty main dish!

Do you enjoy pasta dishes? We sure do… especially my husband! Today I want to share a super simple, but “oh so tasty” recipe for Pasta in Wine and Garlic Sauce. It is sooo good, and I’m confident you’re gonna enjoy it as much as we do.

I love this recipe, because while fresh (or dried) pasta is cooking, you whip up a flavorful, EASY sauce to coat the pasta with as soon as it is finished. We try to have a meatless meal about once a week, and this one is pretty amazing! The sauce truly only takes a couple minutes to make while the pasta cooks, so the recipe definitely is “LOW MAINTENANCE!”

That’s why this is such a great recipe. This pasta (and sauce) tastes wonderful, and is the perfect solution when you don’t have much time, motivation or energy to make dinner. We’ve all been there, right? You can even add cooked shrimp or chicken to this pasta if you need some added protein! Trust me, you really can’t hurt this dish!

Do I Have To Use Fettucine Noodles For This Recipe?

No. You do NOT have to use fettucine pasta. Use whatever type of pasta you have, fresh or dried. For these photos I used homemade fresh fettucine, but the recipe works perfectly with any type of fresh or dried pasta. I recently used a Christmas gift card to purchase pasta rolling attachments for my stand mixer, so I made some fettucine pasta to try the attachments out to “show off” this simple pasta in wine and garlic sauce recipe. Here’s how easy it is to make this dish:

Scroll Down For A Printable Recipe Card At The Bottom Of The Page

Prepare The Pasta

Cook the pasta you will be using (dried or fresh) in boiling, heavily salted water, according to package directions. Continue until the pasta is cooked al dente. Please remember that fresh pasta takes less time to cook than dried pasta. You can make the sauce quickly while the pasta is cooking.

Fresh homemade fettucine pasta cooking in salted, boiling water.

Make The Wine And Garlic Sauce While Pasta Cooks

Using a large saucepan or skillet, heat olive oil on medium heat. To the oil, add minced garlic, and red pepper flakes, and stir to combine. Cook this mixture for one minute, stirring often so the garlic doesn’t burn. 

Garlic and red pepper flakes cook in hot oil before adding remaining ingredients.

Add butter (cut into chunks), white wine, salt and black pepper. *NOTE: Use any type of dry white wine you want, including chardonnay, pinot grigio, sauvignon blanc, pinot gris, etc.

Stir well as the butter melts, to combine the ingredients. Cook the sauce for two minutes on medium heat, and then remove the pan from the heat. BOOM! It’s DONE!

A white wine, butter, and garlic sauce cooking in skillet.Sauce cooks for a couple minutes before adding it to hot cooked pasta.

Time To Serve The Pasta In Wine And Garlic Sauce

As soon as the pasta is done, drain off the water, and then pour the hot pasta back into the saucepan or skillet. Immediately pour the wine and garlic sauce over the hot pasta, and toss really well, to coat the noodles with the sauce.

The pasta will not be “swimming” in the sauce- just make sure it’s all coated, so mix it well. Place the pasta in wine and garlic sauce into (or onto) serving bowls (or plates). Sprinkle with grated Parmesan cheese and chopped fresh parsley to garnish. If desired, you can also sprinkle on a few more red pepper flakes (if you want more “heat”), but that is optional!

Pasta in wine and garlic sauce is served, garnished with Parmesan cheese and parsley.

Because the pasta is not “doused” in sauce, it will tend to cool fairly quickly, so serve it immediately. TIP: Once pasta has been garnished with Parmesan and parsley, I like to put each portion into the microwave for 20-30 seconds to make sure it is served HOT! 

Close up photo of pasta in wine and garlic sauce, served in a white bowl.

I sure hope you enjoy this delicious pasta dish. We really do, and my husband loves to request this for dinner. What more could you want in a simple, meatless recipe? Full of flavor, filling, and easy to make in a flash… it’s a keeper!

Looking For More PASTA Recipes?

You can find all of my recipes in the Recipe Index, located at the top of the page. I have quite a few pasta recipes you’ll enjoy, including:

Interested In More Recipes?

Thank you for visiting this website. I appreciate you using some of your valuable time to do soIf you’re interested, I publish a newsletter 2 times per month (1st and 15th) with all the latest recipes, and other fun info. I would be honored to have you join our growing list of subscribers, so you never miss a great recipe!
There is a Newsletter subscription box on the top right side (or bottom) of each blog post, depending on the device you use, where you can easily submit your e-mail address (only) to be included in my mailing list.

You Can Also Find Me On Social Media:

Facebook page: The Grateful Girl Cooks!
Pinterest:
The Grateful Girl Cooks!
Instagram:
jbatthegratefulgirlcooks

Author's signature

Original recipe source: julieblanner.com/white-wine-sauce/

0 from 0 votes
Pasta in Wine and Garlic Sauce
Prep Time
3 mins
Cook Time
4 mins
Total Time
7 mins
 

Make delicious pasta in wine and garlic sauce in under 15 minutes! SIMPLE to make, then garnish with Parmesan cheese for a tasty main dish!

Category: Main Course, Meatless Entree
Cuisine: Italian
Keyword: pasta in wine and garlic sauce
Servings: 6
Calories Per Serving: 488 kcal
Author: JB @ The Grateful Girl Cooks!
Ingredients
For Sauce:
  • ¼ cup olive oil
  • 2 teaspoons minced garlic (fresh or jarred)
  • ½ teaspoon crushed red pepper
  • 5 Tablespoons butter (salted or unsalted)
  • ½ cup dry white wine (chardonnay/pinot grigio/sauvignon blanc)
  • 1 teaspoon salt
  • ½ teaspoon black pepper
For Pasta:
  • 1 pound pasta (fresh or dried, any type) See NOTE below.
  • 1/3 cup freshly grated Parmesan cheese (for garnish)
  • ¼ cup fresh parsley, chopped (for garnish)
Instructions
  1. Cook pasta (dried or fresh) in boiling, heavily salted water according to package directions. Continue until pasta is cooked al dente.

Make Sauce While Pasta Cooks:
  1. Heat olive oil on medium in a large saucepan or skillet. Add garlic and red pepper flakes to the oil; stir to combine. Cook for 1 minute, stirring often so garlic doesn't burn. Add butter (cut in chunks), white wine, salt and black pepper. Stir as butter melts, to combine ingredients. Cook for 2 minutes on medium heat, then remove pan from heat.

To Serve:
  1. When pasta is done, drain off water; pour pasta back into saucepan/skillet. Immediately pour sauce over hot pasta; toss well to coat pasta with sauce. Portion pasta into (or onto) serving bowls (or plates). Sprinkle with Parmesan and parsley. You can also sprinkle with a few red pepper flakes (if you want more "heat"), but that's optional! Serve hot, and enjoy. *Store any leftover pasta in a sealed container for up to 5-7 days. Reheat in microwave.

Recipe Notes

NOTE: Fresh pasta cooks the quickest, and is reflected in the cooking time. Dried pasta (any type may be used) will take longer to cook to al dente firmness, but is perfectly okay to use!

Nutrition Facts
Pasta in Wine and Garlic Sauce
Amount Per Serving (1 (1/6th of total))
Calories 488 Calories from Fat 189
% Daily Value*
Fat 21g32%
Saturated Fat 8g50%
Cholesterol 30mg10%
Sodium 566mg25%
Potassium 210mg6%
Carbohydrates 58g19%
Fiber 3g13%
Sugar 2g2%
Protein 12g24%
Vitamin A 600IU12%
Vitamin C 4mg5%
Calcium 89mg9%
Iron 1mg6%
* Percent Daily Values are based on a 2000 calorie diet.

Here’s one more to pin on your Pinterest boards!Make delicious pasta in wine and garlic sauce in under 15 minutes! SIMPLE to make, then garnish with Parmesan cheese for a tasty main dish!

Roasted Italian Veggie Medley

Roasted Italian Veggie Medley is yummy broccoli, carrots, and red peppers covered with Italian spices, baked, and topped with Parmesan cheese.

Roasted vegetables are so delicious! There’s something magical that happens when fresh veggies are roasted, rather than being boiled in water. There is more depth to their flavor, and the vegetables slightly caramelize on the outside, which makes it my favorite way to fix them. 

This roasted Italian veggie medley is very simple to prepare. It uses three fresh veggies: broccoli, carrots, and sweet, red bell peppers.

The veggies are then drizzled with olive oil and then seasoned with an Italian-inspired spice mix before baking. These finished veggies are topped with finely grated Parmesan cheese before serving, which adds another layer of FLAVOR. Here’s how to make this simple side dish:

Scroll Down For A Printable Recipe Card At The Bottom Of The Page

Make The Seasoning Mix

Making the seasoning mix is ridiculously EASY! Measure Italian seasoning, salt, garlic powder, onion powder, black pepper and a pinch of red pepper flakes into a tiny dish.

Stir well, to combine all the spices, then set aside until they are needed later.

An Italian-inspired seasoning mix is combined in a small dish.

Prepare The Veggies For Baking

Peel, slice off the ends, then cut six medium-sized carrots in half lengthwise. Once sliced in half lengthwise, cut the carrots into 1½-2 inch slices.

Cut the broccoli into florets, then cut the red bell pepper into bite sized chunks, after removing the seeds. Arrange the veggies in a single layer on a large baking sheet.

Drizzle the veggies with olive oil, and toss, to lightly coat all sides. Sprinkle the reserved spice mixture over the top of the vegetables, evenly distributing all the seasoning.

The vegetables are drizzled with olive oil before seasoning.Italian spice mixture is sprinkled over olive oil-drizzled veggies on baking sheet.

Bake The Seasoned Veggies

Roast the veggies, uncovered, in a preheated 400°F oven for 10 minutes. Remove the baking sheet from the oven, and quickly turn the veggies over, to roast the other side. Make sure to keep the veggies in a single layer.

Seasoned vegetables are baked in an oven for ten minutes before turning.

Place the veggies back into the oven and continue roasting them for 10 more minutes, and then they should be done (and tender).

Remove the baking sheet from the oven, and quickly transfer the hot roasted Italian veggie medley to a serving plate or bowl.

Immediately grate Parmesan cheese over the top of the veggies before serving. The heat from the vegetables will help melt the Parmesan cheese.

Flipping the veggies halfway through baking time helps roast both sides.

Serve the Roasted Italian Veggie Medley

Serve the roasted Italian veggie medley as soon as you have the cheese grated on top. I love to finely grate the cheese from a wedge of fresh Parmesan I usually keep in our refrigerator.

Adding Parmesan cheese adds a nice additional layer of Italian flavor to this simple dish. YUM!

TIP: If using bagged, pre-grated Parmesan, you might need to pop the dish in the microwave to help melt the cheese. 

Roasted Italian Veggie Medley is served, topped with finely grated Parmesan cheese.Grated Parmesan cheese garnishes the top of the roasted Italian veggie medley.

And there you have it… a lovely vegetable medley side dish, without a whole lot of work! I hope you will find the time to give this delicious dish a try, and I’m pretty confident you will enjoy it, too.

This is a wonderful and versatile side dish, which beautifully compliments a wide variety of chicken, fish, pork OR beef dishes. The recipe will yield four side servings, but can be EASILY doubled to serve more!

Have a wonderful day, and thank you for stopping by. I sincerely hope you will come back again soon for more family-friendly recipes.

Looking For More VEGGIE Recipes?

You can find all of my recipes in the Recipe Index, located at the top of the page. I have quite a few yummy vegetable dishes to choose from, including:

Want More Recipes? Get My FREE Newsletter!

I publish a newsletter 2 times per month (1st and 15th) with lots of recipes, tips, etc..
Would you like to join our growing list of subscribers?

There is a Newsletter subscription box on the top right (or bottom) of each blog post, depending on the device you use.
You can submit your e-mail address there, to be added to my mailing list.

Find Me On Social Media:

Facebook page: The Grateful Girl Cooks!
Pinterest:
The Grateful Girl Cooks!
Instagram:
jbatthegratefulgirlcooks

Author's signature

↓↓ PRINTABLE RECIPE BELOW ↓↓


0 from 0 votes
Roasted Italian Veggie Medley
Prep Time
10 mins
Cook Time
20 mins
Total Time
30 mins
 

Roasted Italian Veggie Medley is yummy broccoli, carrots, and red peppers covered with Italian spices, baked, and topped with Parmesan cheese.

Category: Side Dish, Vegetable Dish
Cuisine: American
Keyword: Roasted Italian Veggie Medley
Servings: 4
Calories Per Serving: 143 kcal
Author: JB @ The Grateful Girl Cooks!
Ingredients
For Italian Spice Mix:
  • teaspoons Italian seasoning
  • ½ teaspoon garlic powder
  • ½ teaspoon onion powder
  • ½ teaspoon salt
  • ¼ teaspoon black pepper
  • 1 pinch red pepper flakes (optional)
For Rest Of Dish:
  • 5 medium carrots , peeled
  • 3 cups broccoli florets , approx. 1/2 head broccoli
  • ½ large red bell pepper
  • 2 Tablespoons extra virgin olive oil
  • 3 Tablespoons finely grated Parmesan cheese
Instructions
  1. Preheat oven to 400°F.

  2. Measure Italian seasoning, salt, garlic powder, onion powder, black pepper and a pinch of red pepper flakes into a tiny dish. Stir well, to combine spices; set aside.

  3. Peel, slice off ends, then cut carrots in half lengthwise, then cut carrots into 1½-2 inch long slices. Cut broccoli into florets; cut red bell pepper into bite sized chunks, after removing the seeds. Arrange veggies in a single layer on a large baking sheet. Drizzle with olive oil, and toss, to lightly coat all sides. Evenly sprinkle spice mix over top of vegetables.

  4. Roast veggies, uncovered, at 400°F. for 10 minutes. Remove from oven; quickly turn veggies over, to roast other side, keeping them in a single layer. Place veggies back into oven; bake 10 more minutes, or until fork-tender. Remove from oven; transfer hot veggies to serving dish. Immediately grate Parmesan cheese over the top of the veggies before serving. Enjoy!

Nutrition Facts
Roasted Italian Veggie Medley
Amount Per Serving (1 (1/4 of total))
Calories 143 Calories from Fat 81
% Daily Value*
Fat 9g14%
Saturated Fat 2g13%
Cholesterol 3mg1%
Sodium 425mg18%
Potassium 512mg15%
Carbohydrates 14g5%
Fiber 5g21%
Sugar 6g7%
Protein 4g8%
Vitamin A 13851IU277%
Vitamin C 92mg112%
Calcium 111mg11%
Iron 1mg6%
* Percent Daily Values are based on a 2000 calorie diet.

Here’s one more to pin on your Pinterest boards!Roasted Italian Veggie Medley is yummy broccoli, carrots, and red peppers covered with Italian spices, baked, and topped with Parmesan cheese.


Easy Homemade Enchilada Sauce

Make a batch of Easy Homemade Enchilada Sauce in 10 minutes to use to make your favorite enchiladas, with this step by step EASY tutorial.

Do you like enchiladas? We sure do in our family! I typically keep a large can of store-bought enchilada sauce (for backup) in our pantry, but many times I forget to buy another one once it’s gone. If you’re like me, you don’t want to stop everything and run to the grocery store for one item (especially during Covid-19, right?). Have no fear!

It is so very simple to make it right at home. It’s a cinch to make 4 cups (32 ounces) of easy homemade enchilada sauce in only a few minutes! A LARGE can of enchilada sauce at the store is 28 ounces, so this recipe will give you a bit more that that (and it freezes well), so it’s a win-win.

Today I want to show you, step by step, how EASY it is to make this flavorful enchilada sauce. I found the handwritten recipe in my old recipe box, but there was no source noted to give credit where it is due! I’ve had the recipe for many years, and let me tell you, this is one great tasting red enchilada sauce! Here’s how to make it:

Scroll Down For A Printable Recipe At The Bottom Of The Page

What Ingredients Will I Need To Make The Sauce?

The ingredients you will use to make this delicious enchilada sauce are olive oil, flour, cocoa, tomato paste, sugar, water, and fresh garlic. You will also use the following spices to add the perfect flavor: chili powder, salt, oregano, basil, thyme, and ground cumin.

A collection of the ingredients used to make this enchilada sauce.

How To Make Easy Homemade Enchilada Sauce

Heat olive oil in a large saucepan on medium-low heat. Add flour, cocoa powder, salt, chili powder, sugar, minced fresh garlic, oregano, basil, cumin and thyme into a large saucepan. Stir these ingredients together until blended.

The mixture will be very thick and will be dark brown in color. Perfect! Cook for 1 minute on medium-low heat, stirring often.

Ingredients for the sauce are combined, then cooked until slightly thickened.Ingredients for easy homemade enchilada sauce are stirred before water is added.

Whisk or stir a small (6 oz.) can of tomato paste and 3 cups of water into the mixture until fully combined. Cook the easy homemade enchilada sauce on medium heat (uncovered) for 5-6 minutes. Stir often while it cooks. The enchilada sauce will thicken slightly as it cooks.

Once the sauce is slightly thickened, it is ready to be put to good use in a favorite enchilada recipe. That’s it! See how easy it is to make this sauce? 

Sauce is cooked until blended and slightly thickened.Easy Homemade Enchilada Sauce is now ready to use in recipes.

Time To USE Easy Homemade Enchilada Sauce!

I like to use a good flavored red sauce for my Easy Cheesy Enchiladas, and this sauce is perfect for that! Simply pour a base of the sauce on the bottom of the dish, add rolled filled enchiladas, and top them with more sauce, cheese and onions before baking. YUMMO!

A baking dish of enchiladas covered in easy homemade enchilada sauce.

After baking, I serve enchiladas (made with my easy homemade enchilada sauce) with dollops of sour cream and some chopped fresh cilantro. They’re delicious, and this wonderful homemade sauce plays a large part of that.

Baked enchiladas ready to serve, garnished with sour cream and cilantro.

I hope you will consider trying this easy to make homemade enchilada sauce. It really does taste GREAT! Any leftover sauce freezes well, so even if I only make 4-5 enchiladas for my husband and myself, I know I always have sauce ready for another round in our freezer.

Thank you so much for stopping by today. I hope you have a wonderful day, filled with love, laughter, and encouragement. Please come back for another visit soon to find more delicious recipes to make for those you love.

Looking For More MEXICAN-INSPIRED  Recipes?

You can find all of my recipes in the Recipe Index, located at the top of the page. I have quite a few Mexican-inspired recipes, including:

Interested In More Recipes?

Thank you for visiting this website. I appreciate you using some of your valuable time to do soIf you’re interested, I publish a newsletter 2 times per month (1st and 15th) with all the latest recipes, and other fun info. I would be honored to have you join our growing list of subscribers, so you never miss a great recipe!
There is a Newsletter subscription box on the top right side (or bottom) of each blog post, depending on the device you use, where you can easily submit your e-mail address (only) to be included in my mailing list.

You Can Also Find Me On Social Media:

Facebook page: The Grateful Girl Cooks!
Pinterest:
The Grateful Girl Cooks!
Instagram:
jbatthegratefulgirlcooks

Author's signature

Original recipe source: unknown (old recipe found written on a recipe card from years ago)

0 from 0 votes
EASY Homemade Enchilada Sauce
Prep Time
5 mins
Cook Time
5 mins
Total Time
10 mins
 

Make a batch of Easy Homemade Enchilada Sauce in 10 minutes to use to make your favorite enchiladas, with this step by step EASY tutorial.

Category: Sauce
Cuisine: Mexican
Keyword: easy homemade enchilada sauce
Servings: 12 (1/3 cup per serving)
Calories Per Serving: 66 kcal
Author: JB @ The Grateful Girl Cooks!
Ingredients
  • ¼ cup extra virgin olive oil
  • 3 Tablespoons all purpose flour
  • 6 cloves fresh garlic finely minced
  • 1 Tablespoon chile powder
  • 1 Tablespoon cocoa powder
  • 1 Tablespoon salt
  • ¼ teaspoon dried oregano
  • ¼ teaspoon dried thyme
  • ¼ teaspoon ground cumin
  • ¼ teaspoon dried basil
  • 2 teaspoons sugar
  • 6 ounces tomato paste (canned)
  • 3 cups water
Instructions
  1. Heat olive oil on medium-low heat in a large saucepan. Add flour, cocoa, salt, chili powder, sugar, garlic, oregano, basil, cumin and thyme to pan. Stir until blended. Mixture will be thick and dark brown in color. Cook for 1 minute on medium-low heat, stirring often.

  2. Whisk or stir tomato paste and water into the mixture until fully combined. Cook sauce on medium heat (uncovered) for 5-6 minutes. Stir often while it cooks. The enchilada sauce will thicken slightly as it cooks.

  3. Once sauce has slightly thickened, remove from heat, and use in your favorite recipes. Sauce may be frozen, if stored in a sealed, airtight container. Thaw fully before using.

Recipe Notes

The recipe makes approx. 4 cups enchilada sauce. Caloric calculation is made based on using 1/3 cup per portion.

Nutrition Facts
EASY Homemade Enchilada Sauce
Amount Per Serving (1 (1/3 cup portion))
Calories 66 Calories from Fat 45
% Daily Value*
Fat 5g8%
Saturated Fat 1g6%
Sodium 708mg31%
Potassium 169mg5%
Carbohydrates 6g2%
Fiber 1g4%
Sugar 2g2%
Protein 1g2%
Vitamin A 414IU8%
Vitamin C 4mg5%
Calcium 12mg1%
Iron 1mg6%
* Percent Daily Values are based on a 2000 calorie diet.

Here’s one more to pin on your Pinterest boards!Make a batch of Easy Homemade Enchilada Sauce in 10 minutes to use to make your favorite enchiladas, with this step by step EASY tutorial.

Oatmeal Cinnamon Chip Cookies

Make a batch of 4 dozen delicious Oatmeal Cinnamon Chip Cookies (with raisins), for family or friends to enjoy! Easy, chewy, and so yummy!

I don’t know about you, but I really love oatmeal raisin cookies. My husband isn’t the biggest fan (“oatmeal is for breakfast”), but I’ll take one of those cookies any time of day. I’ve had a recipe for many years for the oatmeal cinnamon chip cookies I am sharing with you today. The recipe (from one of my old recipe boxes) had been cut out of a magazine and didn’t have a source listed, so I don’t know who to give credit to for this yummy recipe.

Cinnamon chips can be a bit difficult to find in the grocery stores (in the chocolate chip section) unless it is around the holidays. I discovered about a year ago that they are available for purchase in bulk (three 10oz. bags per package) on Amazon, so at least I can keep them on hand in my pantry to make cinnamon chip scones or these cookies any time I want!

This cookie recipe uses a whole bag of cinnamon chips, so the flavor is amazing! It’s such an easy recipe to make, and yields about 4 dozen of these super flavor-filled chewy cookies. Here’s how to make them:

Scroll Down For A Printable Recipe Card At The Bottom Of The Page

Make The Batter

Before making the batter, preheat your oven to 350°F. The batter doesn’t take long at all to prepare, so you want your oven heated and ready to go! Place the softened butter, packed brown sugar, and the granulated sugar in a large mixing bowl. Beat these ingredients until they become creamy.

Butter, brown sugar and granulated sugar are beaten well in large bowl.

Add two eggs and vanilla extract to the mixing bowl, and beat well, until they have been incorporated into the batter. In a separate bowl, combine the all purpose flour and baking soda, and then add these dry ingredients to the mixing bowl full of batter. Beat well, until the flour mixture has been fully incorporated into the batter.

Eggs and vanilla are mixed into the cookie batter, then dry ingredients are added.

To finish off the batter for the oatmeal cinnamon chip cookies, it’s time to add the three remaining ingredients. Add old fashioned oats (or substitute quick-cooking oats), raisins, and a 10 oz. bag of cinnamon chips to the bowl. STIR them into the batter. The finished cookie batter will be very thick!

Cinnamon chips, raisins, and oats are stirred into the cookie batter.

Time To Bake Some Oatmeal Cinnamon Chip Cookies!

Drop the batter by generous Tablespoons onto UNGREASED cookie sheets, leaving a little space between each cookie. NOTE: You will probably need to make a couple batches, since the recipe makes approximately 48 cookies. I used two baking sheets per batch, so all the cookies were done in two batches.

Bake the oatmeal cinnamon chip cookies at 350°F for 10-12 minutes. When done they should be light brown on top. Remove the baking sheets from the oven, and let the cookies rest in the pan for 1 minute, before trying to remove them. 

Batter for the oatmeal cinnamon chip cookies on baking sheet ready for oven.

After they rest a minute, transfer them from the pan to a wire rack to finish cooling. They will firm up a little bit more as they cool, and then they are ready to gobble up! There are a lot of cinnamon chips in these cookies, which makes them POP with cinnamon flavor!

After baking, the oatmeal cinnamon chip cookies cool on wire racks.Chewy, flavorful oatmeal cinnamon chip cookies taste wonderful!

I sure hope you get the chance to try these delicious oatmeal cinnamon chip cookies. They’re really good, and truly are a cinch to make! Thank you for stopping by, and I hope you will come back soon.

Looking For More COOKIE Recipes?

You can find all of my cookie recipes in the Recipe Index, located at the top of the page. I have lots of ’em you will enjoy, including:

Interested In More Recipes?

Thank you for visiting this website. I appreciate you using some of your valuable time to do soIf you’re interested, I publish a newsletter 2 times per month (1st and 15th) with all the latest recipes, and other fun info. I would be honored to have you join our growing list of subscribers, so you never miss a great recipe!
There is a Newsletter subscription box on the top right side (or bottom) of each blog post, depending on the device you use, where you can easily submit your e-mail address (only) to be included in my mailing list.

You Can Also Find Me On Social Media:

Facebook page: The Grateful Girl Cooks!
Pinterest:
The Grateful Girl Cooks!
Instagram:
jbatthegratefulgirlcooks

Author's signature

0 from 0 votes
Oatmeal Cinnamon Chip Cookies
Prep Time
15 mins
Cook Time
11 mins
Total Time
26 mins
 

Make a batch of 4 dozen delicious Oatmeal Cinnamon Chip Cookies (with raisins), for family or friends to enjoy! Easy, chewy, and so yummy!

Category: Desssert, Snack
Cuisine: American
Keyword: oatmeal cinnamon chip cookies
Servings: 48 cookies (approx.)
Calories Per Serving: 129 kcal
Author: JB @ The Grateful Girl Cooks!
Ingredients
  • 1 cup butter, softened *equals 2 sticks
  • 1 cup light brown sugar (packed)
  • cup granulated sugar
  • 2 large eggs
  • teaspoons vanilla extract
  • cups all-purpose flour
  • 1 teaspoon baking soda
  • 10 ounces Hershey's cinnamon chips *equals 1 bag
  • cups old-fashioned oats *can substitute quick cooking oats
  • ¾ cup raisins
Instructions
  1. Preheat oven to 350°F.

  2. Place softened butter, brown sugar, and granulated sugar in a large mixing bowl. Beat until they become creamy. Add eggs and vanilla; beat well, until incorporated into the batter.

  3. In separate bowl, combine flour and baking soda; add to the batter. Beat well, until flour mixture has been fully mixed into the batter. Stir in oats, raisins, and cinnamon chips. Cookie batter will be thick!

  4. Drop batter by generous Tablespoons onto UNGREASED cookie sheets, leaving space between each cookie. Bake at 350°F for 10-12 minutes. When done they should be lightly browned on top. Remove baking sheets from oven; let cookies rest for 1 minute before removing them from baking sheet. Transfer cookies to wire rack to finish cooling before serving. Enjoy!

Nutrition Facts
Oatmeal Cinnamon Chip Cookies
Amount Per Serving (1 cookie)
Calories 129 Calories from Fat 54
% Daily Value*
Fat 6g9%
Saturated Fat 4g25%
Cholesterol 18mg6%
Sodium 76mg3%
Potassium 70mg2%
Carbohydrates 17g6%
Fiber 1g4%
Sugar 9g10%
Protein 2g4%
Vitamin A 129IU3%
Vitamin C 1mg1%
Calcium 25mg3%
Iron 1mg6%
* Percent Daily Values are based on a 2000 calorie diet.

Here’s one more to pin on your Pinterest boards!Make a batch of 4 dozen delicious Oatmeal Cinnamon Chip Cookies (with raisins), for family or friends to enjoy! Easy, chewy, and so yummy!

Bacon Lover’s Spinach Salad

Enjoy Bacon Lover’s Spinach Salad for two! Baby spinach leaves topped with hard-boiled eggs, red onion, crisp bacon, and warm bacon dressing!Enjoy Bacon Lover's Spinach Salad for two! Baby spinach leaves topped with hard-boiled eggs, red onion, crisp bacon, and warm bacon dressing!

I really love a good spinach salad… do you? Today I want to share a great recipe for a Bacon Lover’s Spinach Salad. I called it that, because, between the abundance of crispy crumbled bacon ON the salad, there is also a warm bacon dressing that is poured OVER the salad when serving.

If you LOVE BACON and enjoy spinach salads like I do, then this simple, flavor-packed salad will be a big hit. The recipe as written makes two servings, and can be used as a side salad for a variety of entrees.

Hard-boiled eggs on top add wonderful protein to the salad, so it can be a delicious main dish salad if you choose to enjoy it that way, as well.

With just a bit of prep ahead of time, this delicious salad can be ready to enjoy! Let me show you how easy it is to make:

Scroll Down For A Printable Recipe Card At The Bottom Of The Page

First Things First!

You will need to have two hard-boiled eggs cooked and cooled for this salad. Get them ready first using your favorite method, so they will have time to cool, peel, and slice before adding to the salad.

I usually cover them with water in a saucepan, and bring them to a boil, cooking them for 22 minutes total, from start to finish.

Hard-boiled eggs are used in this recipe for spinach salad.

You will also need cooked, crispy crumbled bacon for the salad. You can also pre-cook this ingredient or make this while the eggs are cooking, if more convenient time-wise.

I usually cut the bacon into small pieces with either a knife or kitchen scissors. Cook the bacon in a large skillet until very crispy. It cooks much faster when pre-chopped into small pieces!

Once the bacon is cooked and crispy, remove it to paper towels to cool. Set aside a generous Tablespoon of the bacon crumbles to add to the warm bacon dressing later, keeping the rest set aside for the salad itself.

NOTE:  LEAVE 1 Tablespoon of the bacon grease in the skillet for the salad dressing (discard the rest).

Chopped bacon is quickly fried until crispy in a skillet.

Prepare The Warm Bacon Salad Dressing

In the same skillet, cook the chopped red onion in the reserved Tablespoon of bacon grease for 3-4 minutes on medium heat. Stir occasionally until done. Add apple cider vinegar, maple syrup, water, black pepper and Dijon mustard to the red onion mixture, and stir, to combine.

Cook for approx. 3-4 minutes on medium heat, stirring occasionally. The dressing will thicken very slightly as the water cooks away.

During the last minute of cooking, add the reserved 1 Tablespoon of the crumbled crisp bacon to the salad dressing. Make sure the salad dressing is served warm! TIP: Build the salad while the bacon dressing is heating!

Chopped red onion is cooked in a small bit of bacon drippings.Vinegar, Dijon mustard and maple syrup is added to the cooked red onion.Warm bacon dressing is heated until sugar dissolves.

Prepare The Bacon Lover’s Spinach Salad For Two

Line each plate with baby spinach leaves. Evenly distribute thin slices of red onion, and the remaining bacon crumbles to each salad.

Slice each hard-boiled egg, and decoratively fan them out on top of each serving. Spoon the warm bacon dressing over the top of each salad, and then you’re ready to enjoy this delicious dish for two.

I think you will love the bacon flavor that shines in this simple, but absolutely yummy salad!

Two plates full of the Bacon Lover's Spinach Salad, before adding salad dressing.Warm bacon dressing tops each plate full of Bacon Lover's Spinach Salad.

The warm bacon dressing really MAKES this salad, in my opinion! Don’t leave it out! The crisp bacon, combined with warm salad dressing, red onions and hard-boiled eggs provide taste, texture, protein, and color for this simple salad. It’s so very good!

Crispy bacon, hard-boiled eggs, red onion, and warm bacon dressing on each salad.

I truly hope you enjoy this Bacon Lover’s Spinach Salad. The recipe can be easily doubled, and is sure to be a favorite! Thanks for stopping by… come back soon.

Looking For More SALAD Recipes?

You can find all of my SALAD recipes in the Recipe Index, located at the top of the page. I have quite a few, including:

Interested In More Recipes?

Thank you for visiting this website. I appreciate you using some of your valuable time to do soIf you’re interested, I publish a newsletter 2 times per month (1st and 15th) with all the latest recipes, and other fun info. I would be honored to have you join our growing list of subscribers, so you never miss a great recipe!
There is a Newsletter subscription box on the top right side (or bottom) of each blog post, depending on the device you use, where you can easily submit your e-mail address (only) to be included in my mailing list.

You Can Also Find Me On Social Media:

Facebook page: The Grateful Girl Cooks!
Pinterest:
The Grateful Girl Cooks!
Instagram:
jbatthegratefulgirlcooks

Author's signature

Original recipe source: unknown (found a handwritten recipe card-no source noted- in a really OLD recipe box.)

0 from 0 votes
Bacon Lover's Spinach Salad
Prep Time
25 mins
Cook Time
4 mins
Total Time
29 mins
 

Enjoy Bacon Lover's Spinach Salad for two! Baby spinach leaves topped with hard-boiled eggs, red onion, crisp bacon, and warm bacon dressing!

Category: Salad/Side Dish
Cuisine: American
Keyword: Bacon lover's spinach salad
Servings: 2
Calories Per Serving: 407 kcal
Author: JB @ The Grateful Girl Cooks!
Ingredients
  • 5 slices bacon cooked crisp, crumbled, divided use
  • 2 large eggs hardboiled
  • 4 cups fresh baby spinach
  • ¼ medium red onion divided use *SEE NOTE*
  • 1 Tablespoon bacon grease
  • Tablespoons apple cider vinegar
  • teaspoons Dijon mustard
  • 2 teaspoons maple syrup
  • 2 Tablespoons water
  • ¼ teaspoon ground black pepper
Instructions
Prep:
  1. Hard boil the eggs. Let cool, then peel. Cook bacon in large skillet until very crispy. It cooks much faster chopped into small pieces! Once the bacon is crispy, remove to paper towels to cool. Set aside a generous Tablespoon of bacon crumbles to add to warm bacon dressing later, keeping the rest set aside for the salad itself. NOTE:  LEAVE 1 Tablespoon of the bacon grease in the skillet for the salad dressing (discard the rest).

Make Bacon Dressing:
  1. Cook chopped red onion in reserved Tablespoon of bacon grease in skillet 3-4 minutes on medium heat. Stir occasionally. Add apple cider vinegar, maple syrup, water, black pepper and Dijon mustard; stir to combine. Cook 3-4 minutes on medium heat, stirring occasionally. Dressing will thicken slightly as water cooks away. During last minute of cooking, add reserved Tablespoon of crumbled crisp bacon to salad dressing. Dressing is served warm.

Build Salad:
  1. Line plates with baby spinach. Evenly distribute thin slices of red onion and remaining bacon crumbles over spinach. Slice each hard-boiled egg into thin rounds, and decoratively fan slices out on top of each serving. Spoon warm bacon dressing over the top of each salad, serve and enjoy!

Recipe Notes

NOTES:

  • Use one thin round slice of red onion to garnish salads. Cut the round slice in half, and use one half of the slice (separated) to garnish each salad.
  • Chop the remaining red onion (approx. 1/8 cup) to use in the warm bacon salad dressing.
Nutrition Facts
Bacon Lover's Spinach Salad
Amount Per Serving (1 (1/2 of total))
Calories 407 Calories from Fat 306
% Daily Value*
Fat 34g52%
Saturated Fat 12g75%
Cholesterol 229mg76%
Sodium 538mg23%
Potassium 533mg15%
Carbohydrates 10g3%
Fiber 2g8%
Sugar 5g6%
Protein 15g30%
Vitamin A 5896IU118%
Vitamin C 18mg22%
Calcium 95mg10%
Iron 3mg17%
* Percent Daily Values are based on a 2000 calorie diet.

Here’s one more to pin on your Pinterest boards!Enjoy Bacon Lover's Spinach Salad for two! Baby spinach leaves topped with hard-boiled eggs, red onion, crisp bacon, and warm bacon dressing!

Easy Baked BBQ Chicken

Easy Baked BBQ Chicken is just that… EASY! The homemade BBQ sauce is simple to make, and compliments the browned, baked chicken perfectly!
Easy Baked BBQ Chicken is just that... EASY! The homemade BBQ sauce is simple to make, and compliments the browned, baked chicken perfectly!

Today I want to share a recipe (from my trusty old recipe box) that I’ve had for years and years, for easy baked BBQ chicken. I don’t know the source of the original recipe, because I jotted the ingredients/directions down on an index card over 20 years ago, but it is very easy! Basically, you will cook a quick and delicious BBQ sauce, lightly pan-sear chicken pieces, then douse the chicken with the sauce and put it all in the oven to bake.

This recipe is a perfect way to enjoy good BBQ chicken when it’s just too cold, rainy or snowy to get out and cook BBQ chicken on the old family grill.

The prep time is only about 20 minutes total, and then the chicken bakes for about an hour, filling your kitchen with a delicious aroma as it cooks. You can start watching a Hallmark movie, remodel your house, or play with the kids while the chicken bakes… yahoo! The end result? Absolutely DELICIOUS easy baked BBQ chicken, with minimal hands-on time! Here’s how easy it is to make:

Scroll Down For A Printable Recipe Card At The Bottom Of The Page

What Ingredients Will I Need?

First and foremost, you will need approx. 8 pieces of chicken. Use whatever type of pieces you want (legs, thighs, breasts, skinless, skin-on, bone-in, boneless, or any combo, etc.). IT’S YOUR CHOICE.

The ingredients you will need for the easy BBQ sauce are: onion, butter, ketchup, brown sugar, vinegar, mustard, worcestershire sauce, water, salt and pepper.

The ingredients used to make BBQ sauce for chicken.

Make The BBQ Sauce

In a medium saucepan, sauté chopped onion in melted butter. Cook for a couple minutes, stirring often, then add the rest of the ingredients (except for the chicken). Let the sauce simmer (uncovered) on low heat for 15 minutes, stirring occasionally. When done, set aside.

TIP: If you are a multi-tasker and like to save time, you can brown the chicken pieces (see below) while the sauce cooks. That way they will be done about the same time.

Chopped onion is cooked in melted butter to start the bbq sauce.The BBQ sauce is fully cooked and ready to use.

Lightly Brown The Chicken Pieces Before Baking

Pat each of the chicken pieces you will be using with paper towels to absorb extra moisture before cooking. Pour just enough oil into a large skillet to cover the bottom. Heat the oil on medium-high heat until very hot but not smoking.

Carefully add the chicken pieces in a single layer to the hot oil and do not move them once they hit the pan. You may find it necessary to brown the chicken in batches, but it doesn’t take long at all to brown them, so nor worries! Brown the first side for 2-3 minutes, then carefully turn over each piece to lightly brown the other side.

Place the lightly browned chicken pieces in a single layer in a 13″x9″ baking dish. Repeat browning process with 2nd batch, if necessary. I cooked mine in two batches. You do not want them to be fully cooked or very brown, just enough to lightly brown and to help seal the juices in the meat.

Chicken pieces are lightly browned in hot oil on both sides.Lightly browned chicken pieces are placed in baking dish.

Time To Cook Easy Baked BBQ Chicken

Once all the chicken has been browned and added to the baking dish, pour all of the BBQ sauce over the chicken. Turn to make sure both sides are fully coated in that yummy BBQ sauce!

Bake the chicken (uncovered) at 350°F. for 1 hour, or until the chicken reaches a safe internal temperature of 165°F. Once done, remove from oven. Let chicken “rest” for 3-4 minutes, and then the easy baked BBQ chicken is ready to be served.

Homemade BBQ sauce is poured over chicken, to coat, before baking.Easy Baked BBQ Chicken, hot from the oven!

Time To Eat Some Easy Baked BBQ Chicken!

Place chicken onto a platter or individual plates. Before serving, spoon some of the extra sauce from the baking dish over the top of each piece of chicken.

That’s it! With minimal prep, and a lot of “inactive” baking time, this meal is ready to be enjoyed. The flavor of the bbq sauce-coated chicken is wonderful, in my humble opinion. We enjoyed our meal of easy baked BBQ chicken with mashed potatoes and a spinach salad (with warm bacon dressing) on the side. It was wonderful! 

The easy baked bbq chicken, served with mashed potatoes and spinach salad.

I truly hope you have the opportunity to make this easy chicken recipe for those you love. It doesn’t matter what kind of chicken pieces you use (breasts, legs, thighs or a combo); the result will be delicious. Have a great day, and thank you for visiting. Come back again soon!

Looking For More CHICKEN Recipes?

You can find all of my chicken recipes (there’s a LOT) in the Recipe Index, located at the top of the page. There are many delicious chicken recipes there, including:

Interested In More Recipes?

Thank you for visiting this website. I appreciate you using some of your valuable time to do soIf you’re interested, I publish a newsletter 2 times per month (1st and 15th) with all the latest recipes, and other fun info. I would be honored to have you join our growing list of subscribers, so you never miss a great recipe!
There is a Newsletter subscription box on the top right side (or bottom) of each blog post, depending on the device you use, where you can easily submit your e-mail address (only) to be included in my mailing list.

You Can Also Find Me On Social Media:

Facebook page: The Grateful Girl Cooks!
Pinterest:
The Grateful Girl Cooks!
Instagram:
jbatthegratefulgirlcooks

Author's signature

Original Recipe Source: unknown

0 from 0 votes
Easy Baked BBQ Chicken
Prep Time
20 mins
Cook Time
1 hr
Total Time
1 hr 20 mins
 

Easy Baked BBQ Chicken is just that... EASY! The homemade BBQ sauce is simple to make, and compliments the browned, baked chicken perfectly!

Category: Dinner, Main Dish
Cuisine: American
Keyword: easy baked bbq chicken
Servings: 8
Calories Per Serving: 217 kcal
Author: JB @ The Grateful Girl Cooks!
Ingredients
For BBQ Sauce:
  • 3 Tablespoons butter
  • cup chopped yellow onion
  • ¾ cup ketchup
  • cup white vinegar
  • ½ cup water
  • 3 Tablespoons brown sugar , light or dark
  • 2 teaspoons prepared yellow mustard
  • Tablespoons worchestershire sauce
  • ¼ teaspoon salt
  • ¼ teaspoon black pepper
For Rest of Dish:
  • 8 pieces chicken (breasts, thighs, legs)
  • vegetable oil (enough to cover bottom of large skillet)
Instructions
  1. Preheat oven to 350°F.

  2. In a medium saucepan, sauté chopped onion in melted butter. Cook 2-3 minutes, stirring often, then add remaining ingredients (except for chicken). Let sauce simmer uncovered on low heat for 15 minutes, stirring occasionally. When done, set aside. TIP: If you are a multi-tasker and like to save time, you can brown the chicken pieces (see below) while the sauce cooks. That way they will be done about the same time.

  3. Pat each of the chicken pieces you will be using with paper towels to absorb extra moisture before cooking. Pour just enough oil into a large skillet to cover the bottom. Heat oil on medium-high heat until very hot but not smoking. Carefully add chicken pieces in a single layer to hot oil. Do not move them once they hit the skillet. Brown first side for 2-3 minutes, then carefully turn over each piece to lightly brown other side. Place chicken in single layer in a 13"x9" baking dish. Repeat browning process with 2nd batch, if necessary.

  4. Pour all of the BBQ sauce over chicken. Turn to make sure all sides are fully coated with sauce before baking. Bake chicken (uncovered) at 350°F. for 1 hour, or until chicken reaches a safe internal temperature of 165°F. Once done, remove from oven. Let chicken "rest" for 3-4 minutes. then place chicken on platter or individual plates. Spoon extra sauce from baking dish over each piece, then serve. Enjoy!

Recipe Notes

***PLEASE NOTE: This caloric calculation is an estimate only, because the sizes/weights, and variety of chicken pieces (bone-in or boneless, skinless or skin-on) YOU use will be different. The caloric calculation for this recipe was made using boneless, skinless chicken breasts as a point of reference. Using thighs and legs or any combination of pieces/sizes, will result in a different caloric value per serving.

Nutrition Facts
Easy Baked BBQ Chicken
Amount Per Serving (1 breast)
Calories 217 Calories from Fat 63
% Daily Value*
Fat 7g11%
Saturated Fat 3g19%
Cholesterol 84mg28%
Sodium 493mg21%
Potassium 530mg15%
Carbohydrates 12g4%
Fiber 1g4%
Sugar 10g11%
Protein 24g48%
Vitamin A 281IU6%
Vitamin C 3mg4%
Calcium 19mg2%
Iron 1mg6%
* Percent Daily Values are based on a 2000 calorie diet.

Here’s one more to pin on your Pinterest boards!Easy Baked BBQ Chicken is just that... EASY! The homemade BBQ sauce is simple to make, and compliments the browned, baked chicken perfectly!