Month: September 2021

Coconut Pecan Frosting

Make yummy coconut pecan frosting from scratch in 15 minutes! This frosting tastes fantastic on German chocolate cake, cupcakes, or brownies.

If you’re searching for a delicious cake, cupcake or brownie frosting that is super easy to make, may I suggest this coconut pecan frosting? It is incredibly simple to prepare (just cook and stir!), and it will impress you with it’s wonderful taste. Why buy it in a plastic container, when you can easily make your own from scratch?

We especially love it on German chocolate cake, but it is also awesome as a topping on chocolate brownies or cupcakes, too! My Mom has been making this frosting for as long as I can remember, and she gave me this recipe at least 30 years ago. Here’s how to make coconut pecan frosting from scratch:

Time to Cook And Stir!

Place evaporated milk, sugar, butter, egg yolks and vanilla extract into a medium saucepan. Cook these ingredients over medium-low heat, stirring to combine. Continue to cook for a FULL 12 minutes, stirring often, so it doesn’t stick to the bottom of the pan and burn.

As it cooks, the mixture will begin to thicken. That is perfect, and is exactly what you want to happen! Once the 12 minutes is up, and the mixture has thickened, remove the saucepan from the direct heat.

Evaporated milk, sugar, butter, egg yolks and vanilla cook in a saucepan.After cooking, the evaporated milk, sugar, butter, egg yolks and vanilla are creamy and yellow in color.

Add the Coconut And Chopped Pecans To Finish

As soon as you take the pan off of the heat, add the shredded coconut and chopped pecans. Stir well, to make sure all the ingredients in the coconut pecan frosting are fully combined.

The finished frosting will be fairly thick, and still quite hot at this point. Set the pan aside and let the coconut pecan frosting cool completely before attempting to frost a cake, etc.

Shredded coconut and chopped pecans are added to saucepan.Coconut Pecan Frosting being stirred in the saucepan.

Ready To Use the Coconut Pecan Frosting!

You can stir the frosting often, to help speed up the cooling process, if desired. When the coconut pecan frosting has cooled completely, you are ready to frost your cake, cupcakes or brownies!

Once the coconut pecan frosting has cooled, it is ready to use to decorate cakes, etc.

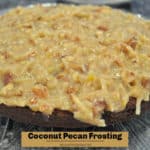
See how pretty the frosting looks on this German chocolate cake? You can see all the shredded coconut and the small pieces of pecans. I’m not kidding, this frosting is so good you might want to just eat it by the spoonful… ha ha!

Here is a 2 layer German chocolate cake with coconut pecan frosting.

I hope you have the opportunity to make this delicious coconut pecan frosting. I am confident you’ll enjoy using it (and eating it, too)! Thank you for stopping by today, and I sincerely hope you will come back again soon. Have a wonderful day, friends.

Looking For More FROSTING Recipes?

You can find ALL of my recipes in the Recipe Index, which is located at the top of the page. I have several delicious, made from scratch frosting recipes you might enjoy, including:

Interested In More Recipes?

Thank you for visiting this website. I appreciate you using some of your valuable time to do soIf you’re interested, I publish a newsletter 2 times per month (1st and 15th) with all the latest recipes, and other fun info. I would be honored to have you join our growing list of subscribers, so you never miss a great recipe!
There is a Newsletter subscription box on the top right side (or bottom) of each blog post, depending on the device you use, where you can easily submit your e-mail address (only) to be included in my mailing list.

You Can Also Find Me On Social Media:

Facebook page: The Grateful Girl Cooks!
Pinterest:
The Grateful Girl Cooks!
Instagram:
jbatthegratefulgirlcooks

Author's signature

Original recipe source: I got this recipe from my Mom (over 30 years ago!)

0 from 0 votes
Coconut Pecan Frosting
Prep Time
15 mins
Cook Time
0 mins
Total Time
15 mins
 

Make yummy coconut pecan frosting from scratch in 15 minutes! This frosting tastes fantastic on German chocolate cake, cupcakes, or brownies.

Category: Frosting, Topping
Cuisine: American
Keyword: coconut pecan frosting
Servings: 1 (total amt. for 13x9 cake or 2 layer cake)
Calories Per Serving: 3783 kcal
Author: JB @ The Grateful Girl Cooks!
Ingredients
  • 1 cup evaporated milk
  • 1 cup granulated sugar
  • ½ cup butter , equal to 1 stick
  • 3 large egg yolks , beaten slightly
  • 1 teaspoon vanilla extract
  • cups shredded coconut
  • 1 cup chopped pecans
Instructions
  1. Place evaporated milk, sugar, butter, egg yolks and vanilla into a medium saucepan. Cook on medium-low heat, stirring to combine. Continue to cook for a FULL 12 minutes, stirring often. As it cooks, it will begin to thicken. Once the 12 minutes is up, and mixture has thickened, remove pan from the heat.

  2. Immediately stir in coconut and chopped pecans. Stir well, until fully combined. Set pan aside and let frosting cool completely before attempting to frost a cake, brownies, etc. You can stir often, if desired, to "speed up" the cooling process.

  3. Once cooled to room temperature the frosting is ready to use. Enjoy!

Recipe Notes

NOTE: This amount of frosting is enough for a 13x9" cake OR a round 2 layer cake. Makes approx. 4½ cups total frosting total. Caloric calculation is for the entire amount.

Nutrition Facts
Coconut Pecan Frosting
Amount Per Serving (1 Total Amount (approx. 4½ cups))
Calories 3783 Calories from Fat 2637
% Daily Value*
Fat 293g451%
Saturated Fat 161g1006%
Trans Fat 4g
Polyunsaturated Fat 31g
Monounsaturated Fat 84g
Cholesterol 872mg291%
Sodium 1160mg50%
Potassium 2073mg59%
Carbohydrates 276g92%
Fiber 33g138%
Sugar 241g268%
Protein 46g92%
Vitamin A 4245IU85%
Vitamin C 8mg10%
Calcium 876mg88%
Iron 9mg50%
* Percent Daily Values are based on a 2000 calorie diet.

Here’s one more to pin on your Pinterest boards!Make yummy coconut pecan frosting from scratch in 15 minutes! This frosting tastes fantastic on German chocolate cake, cupcakes, or brownies.

Ham and Cheddar Gnocchi

Ham and Cheddar Gnocchi is a delicious, creamy, easy, one skillet meal, with ham, potato gnocchi, green beans, cheese, onions and garlic!

Do you enjoy eating gnocchi? I sure do… those little fluffy potato bundles can be combined with a number of sauces and/or meats for a delicious meal. Over the past few years I’ve enjoyed using them for a number of recipes, because they are easy and quick to cook!

I found the original recipe for the ham and cheddar gnocchi online, and made several changes to suit our taste buds! This recipe is pretty straightforward in that you add ingredients to a skillet, cook, add more ingredients, and cook again. Cover it all with a blanket of cheddar cheese then eat. You get the picture. It doesn’t take a rocket scientist to make this yummy all-in-one-skillet dish! Here’s how to make it:

Scroll Down for A Printable Recipe Card At The Bottom Of The Page

Ready, Get Set… And Go!

You will need a large, oven-proof skillet for this dish. Melt a Tablespoon of butter over medium heat in the skillet. Add two cups of chopped onions to the butter, and sauté them for approximately 4-5 minutes, or until they become tender and are golden brown.

Toss in the diced or shredded ham, and stir to combine. Cook the ham, onions and butter until heated through, approx. 2-3 minutes.

Chopped onions are cooked in melted butter in a large skillet.
Shredded (or cubed) ham is added to the cooked onions in the skillet.

Stir in the water and the chicken broth, and bring this mixture to a simmer. Once the liquid is simmering, add the gnocchi and sliced green beans. Stir everything well, then put a lid on the skillet.

Cook (covered) on medium-low heat for about 5 minutes, stirring once or twice during the cooking time. When done, the green beans AND the gnocchi should be tender to the bite.

Chicken broth and water are stirred into the skillet with ham and onions.Potato gnocchi and sliced green beans are added to the skillet.

Finishing The Ham And Cheddar Gnocchi

Turn on the broiler in your oven. to preheat. Add garlic powder, and season to taste with salt and black pepper. Stir in the half and half (or whipping cream, if using), then stir to combine these ingredients.

Sprinkle the gnocchi with grated cheddar cheese. If you don’t enjoy cheddar, you can use the cheese of your choice (such as Pepper Jack, Swiss, etc.). I use cheddar, because we always have it around, and it adds nice color to the dish. 

Put the skillet on a rack, positioned about 4-5 inches from the broiler heating element. Let the ham and cheddar gnocchi heat under the broiler about 2-3 minutes, until the cheese has melted and is bubbly on top. Be sure to keep an eye on it, so you don’t burn it! When done, remove from the oven and it’s ready to serve!

Seasonings and half and half are added to the ingredients for ham and cheddar gnocchi.Grated cheddar cheese is added to ham and cheddar gnocchi, then skillet is put under a broiler.

Serve The Ham And Cheddar Gnocchi

Serve the ham and cheddar gnocchi straight from the skillet. It is a rather rustic presentation, but it works! Besides, who needs one more serving dish to wash, right? Just grab a large spoon and dish it up onto individual serving plates Enjoy this flavorful all in one skillet meal!

Ham and cheddar gnocchi has been removed from broiler nd is ready to eat.A close up photo of the ham and cheddar gnocchi, ready for serving.

I really hope you enjoy this dish. We sure do, and enjoy how simple it is to make. The leftovers can be easily reheated using a microwave. Thank you for stopping by today, and I hope you will come back soon for more family-friendly recipes. Have a wonderful day, friends.

Looking For More Recipes Using GNOCCHI?

You can find ALL of my recipes in the Recipe Index, which is located at the top of the page. I have several delicious gnocchi recipes you might enjoy, including:

Interested In More Recipes?

Thank you for visiting this website. I appreciate you using some of your valuable time to do soIf you’re interested, I publish a newsletter 2 times per month (1st and 15th) with all the latest recipes, and other fun info. I would be honored to have you join our growing list of subscribers, so you never miss a great recipe!
There is a Newsletter subscription box on the top right side (or bottom) of each blog post, depending on the device you use, where you can easily submit your e-mail address (only) to be included in my mailing list.

You Can Also Find Me On Social Media:

Facebook page: The Grateful Girl Cooks!
Pinterest:
The Grateful Girl Cooks!
Instagram:
jbatthegratefulgirlcooks

Author's signature

Recipe adapted from: http://www.kevinandamanda.com/ham-and-cheese-gnocchi/

0 from 0 votes
Ham and Cheddar Gnocchi
Prep Time
5 mins
Cook Time
15 mins
Total Time
20 mins
 

Ham and Cheddar Gnocchi is a delicious, creamy, easy, one skillet meal, with ham, potato gnocchi, green beans, cheese, onions and garlic!

Category: Main Course
Cuisine: American
Keyword: ham and cheddar gnocchi
Servings: 4
Calories Per Serving: 593 kcal
Author: JB @ The Grateful Girl Cooks!
Ingredients
  • 1 Tablespoon butter
  • 2 cups diced yellow onion (approx. 1 large)
  • 12 ounces ham (diced or shredded)
  • ¾ cup water
  • ½ cup low-sodium chicken broth
  • 16 ounces potato gnocchi (1 pound pkg.)
  • ¾ cup sliced fresh green beans
  • ¼ cup half and half (or substitute heavy whipping cream)
  • ¼ teaspoon garlic powder
  • salt & pepper, to taste
  • 1 cup shredded cheddar cheese (sharp or mild)
Instructions
  1. Melt butter over medium heat in a large (ovenproof) skillet. Add chopped onions to skillet; sauté approx. 4-5 minutes, or until tender and translucent. Stir in diced or shredded ham. Cook 2-3 minutes until heated through,

  2. Stir in water and chicken broth; bring this mixture to a simmer. Once simmering, add gnocchi and sliced green beans. Stir well, then put a lid on the skillet. Cook (covered) on medium-low heat for about 5 minutes, stirring once or twice. When done, green beans AND gnocchi should be tender. Remove skillet from heat. **Turn on oven broiler to preheat while you finish making the gnocchi.**

  3. To gnocchi add garlic powder, and then salt and pepper (to taste). Stir in half and half (or whipping cream, if using), combining all ingredients. Sprinkle gnocchi with grated cheddar cheese.

  4. Put skillet on a rack, positioned about 4-5 inches from the broiler heating element. Broil 2-3 minutes, or until cheese has melted and is bubbly on top. Be sure to keep an eye on it, so you don't burn it! When done, remove skillet from oven, serve immediately and enjoy!

Nutrition Facts
Ham and Cheddar Gnocchi
Amount Per Serving (1 (1/4 of total))
Calories 593 Calories from Fat 261
% Daily Value*
Fat 29g45%
Saturated Fat 14g88%
Trans Fat 1g
Polyunsaturated Fat 2g
Monounsaturated Fat 11g
Cholesterol 96mg32%
Sodium 1616mg70%
Potassium 479mg14%
Carbohydrates 51g17%
Fiber 5g21%
Sugar 4g4%
Protein 32g64%
Vitamin A 568IU11%
Vitamin C 9mg11%
Calcium 278mg28%
Iron 5mg28%
* Percent Daily Values are based on a 2000 calorie diet.

Here’s one more to pin on your Pinterest boards!Ham and Cheddar Gnocchi is a delicious, creamy, easy, one skillet meal, with ham, potato gnocchi, green beans, cheese, onions and garlic!


Zucchini Carrot Lime Coleslaw

Looking for a yummy low-calorie side salad? Try Zucchini Carrot Lime Coleslaw, with grated zucchini and carrots in a lime, cumin cilantro dressing!

If you enjoy the crunch and taste of traditional coleslaw, then I believe you will really like this zucchini carrot lime coleslaw. I found this low calorie recipe in one of my old Weight Watcher cookbooks. The freshly grated zucchini and carrots give this side salad it’s crunch, and a lime cilantro and ground cumin dressing gives it a delicious flavor.

This coleslaw is super easy to prepare, and since it makes 4 servings, it’s a quick and easy side dish for your family or friends. Basically a salad dressing is made, and then used to top the fresh grated veggies. That’s it!

Zucchini Carrot Lime Coleslaw is easy to make, colorful, tasty, and low in calories (about 51 calories per serving)! That’s what I call a great side dish! Here’s how to make it:

Scroll Down For A Printable Recipe Card At The Bottom Of The Page

Prepare The Coleslaw Dressing

The first thing you will need to do is prepare the coleslaw dressing. Before combining the ingredients, you will need to lightly “toast” the ground cumin spice. To do this, place the ground cumin in a “dry” skillet. Stir and cook, over low heat for about one minute, or until you begin to smell it’s fragrance. Transfer the cumin to a small bowl.

To the cumin, add mayonnaise (light or regular), fresh lime juice, lime zest, chopped cilantro, salt and pepper. Stir these ingredients until they are combined well. This is the dressing for your zucchini carrot lime coleslaw.

Ground cumin is lightly "toasted" in a skillet over low heat to enhance the flavor.Mayonnaise, cumin, cilantro, lime juice, zest, salt and pepper are used to make the coleslaw dressing.

Prepare The Zucchini Carrot Lime Coleslaw

Now it’s time to grate (or shred) the zucchini and carrots.  Cut off the ends of the zucchini, and grate it, using the largest size holes on a grater (can also use a food processor with a grating blade). Place the shredded zucchini on several thicknesses of paper towels. Press down firmly with more paper towels to remove as much of the natural wetness of the zucchini as possible.

Peel the carrots, and cut off both ends of each carrot. Grate the carrots, using the largest size holes on the grater (can use a food processor with a grating blade for this, too). 

A zucchini is shredded, then moisture is blotted out using paper towels.Two carrots are shredded to use in the zucchini carrot lime coleslaw.

Place the shredded zucchini and carrots in a medium-sized serving bowl. Pour the coleslaw dressing over the top (using ALL the dressing). Toss the coleslaw until all ingredients are fully combined. Now your zucchini carrot lime coleslaw is ready to be served, OR you can cover the bowl and refrigerate until ready to be served.

The dressing is combined with shredded zucchini and carrots in a mixing bowl.

Serve The Zucchini Carrot Lime Coleslaw

Transfer the zucchini carrot lime coleslaw to a serving dish (if desired), and garnish the top with a slice of lime, and a couple of cilantro sprigs. This side dish is best served on the same day you make it!

This coleslaw still tastes great (and crunchy) on subsequent days, but you may have to remove a bit of liquid that accumulates on the bottom of the bowl (thanks again to those juicy zucchini!). No big deal! Store any leftovers covered in the refrigerator for 2-3 days.

Zucchini Carrot Lime Coleslaw is garnished with lime wedge and cilantro sprigs to serve.Delicious zucchini carrot lime coleslaw is served in a white bowl, with cilantro/lime garnish.

I really hope you enjoy this simple veggie side dish. We sure do! Thank you for stopping by today, and I sincerely hope you will come back soon for more family friendly recipes. Take care, and have a wonderful day! May God bless you with encouragement, and His peace today.

Looking For More Coleslaw Recipes?

You can find ALL of my recipes in the Recipe index, located at the top of the page. I have some delicious coleslaw recipes you might be interested in, including:

Interested In More Recipes?

Thank you for visiting this website. I appreciate you using some of your valuable time to do soIf you’re interested, I publish a newsletter 2 times per month (1st and 15th) with all the latest recipes, and other fun info. I would be honored to have you join our growing list of subscribers, so you never miss a great recipe!
There is a Newsletter subscription box on the top right side (or bottom) of each blog post, depending on the device you use, where you can easily submit your e-mail address (only) to be included in my mailing list.

You Can Also Find Me On Social Media:

Facebook page: The Grateful Girl Cooks!
Pinterest:
The Grateful Girl Cooks!
Instagram:
jbatthegratefulgirlcooks

Author's Signature

Original recipe source: “Weight Watchers New Complete Cookbook, page 305, published in 1998 by Wiley Publishing, Inc.

↓↓ PRINTABLE RECIPE BELOW ↓↓

0 from 0 votes
Zucchini Carrot Lime Coleslaw
Prep Time
7 mins
Cook Time
0 mins
Total Time
7 mins
 

Want a yummy low-calorie side salad? Try Zucchini Carrot Lime Coleslaw, with grated zucchini and carrots in a lime, cumin cilantro dressing!

Category: Salad/Side Dish
Cuisine: American
Keyword: zucchini carrot lime coleslaw
Servings: 4
Calories Per Serving: 51 kcal
Author: JB @ The Grateful Girl Cooks!
Ingredients
For Coleslaw Dressing:
  • 3 Tablespoons light mayonnaise , can substitute regular
  • 1 Tablespoon fresh lime juice
  • ½ teaspoon lime zest* , *finely grated peel
  • 1 teaspoon ground cumin
  • 1 teaspoon chopped fresh cilantro
  • ¼ teaspoon salt
  • teaspoon ground black pepper
For Coleslaw:
  • 2 large carrots , peeled/grated
  • 1 medium zucchini , grated
Instructions
  1. Place cumin in a "dry" skillet. Stir and cook on low heat for one minute, or until smell it's fragrance. Transfer cumin to a small bowl. Add mayonnaise, lime juice and zest, cilantro, salt and pepper. Stir until combined well. Set aside.

  2. Cut off both ends of zucchini. Grate, using large holes on a grater (or food processor with grating blade). Place shredded zucchini on several thicknesses of paper towels. Press down firmly with more paper towels to blot out as much of the natural wetness of zucchini as possible. Peel carrots; cut off both ends. Grate carrots, using large holes on grater (or food processor with grating blade).

  3. Place shredded zucchini/carrots in a medium bowl. Pour dressing over the top (use ALL the dressing). Toss until all ingredients are combined. May serve immediately, or can be covered/refrigerated for later.

  4. To serve, transfer to serving dish. Garnish with lime wedge, and 2-3 cilantro sprigs. Coleslaw is best served on the same day you make it! Coleslaw still tastes great on subsequent days, but you may have to remove liquid from bottom of bowl (thanks juicy zucchini!). Store leftovers (covered) in refrigerator for 2-3 days.

Recipe Notes

Caloric calculation is based on the use of light mayonnaise.

Nutrition Facts
Zucchini Carrot Lime Coleslaw
Amount Per Serving (1 (1/4 of total))
Calories 51 Calories from Fat 27
% Daily Value*
Fat 3g5%
Saturated Fat 1g6%
Trans Fat 1g
Polyunsaturated Fat 1g
Monounsaturated Fat 1g
Cholesterol 2mg1%
Sodium 253mg11%
Potassium 261mg7%
Carbohydrates 7g2%
Fiber 2g8%
Sugar 3g3%
Protein 1g2%
Vitamin A 6130IU123%
Vitamin C 12mg15%
Calcium 26mg3%
Iron 1mg6%
* Percent Daily Values are based on a 2000 calorie diet.

Here’s one more to pin on your Pinterest boards!Looking for a yummy low-calorie side salad? Try Zucchini Carrot Lime Coleslaw, with grated zucchini and carrots in a lime, cumin cilantro dressing!

Blueberry Banana Baked Oatmeal

Blueberry Banana Baked Oatmeal is a cinch to make, and is full of juicy blueberries and banana slices! It’s an easy, yummy breakfast!
Blueberry Banana Baked Oatmeal is a cinch to make, and is full of juicy blueberries and banana slices! It's an easy, yummy breakfast!

Do you enjoy oatmeal? When I was a kid, if you had told me that someday I would actually ENJOY oatmeal, I would have laughed. Hilariously. Oatmeal? You have got to be kidding me. HOWEVER… I now LOVE it, whether it’s a big ol’ bowl of it (with brown sugar and cinnamon), a baked version, or in cookies. Go figure.

I’ve made several varieties of BAKED oatmeal over the past few years, and today I want to share this simple recipe for blueberry banana baked oatmeal. It is VERY EASY to prepare, and then is popped in the oven to bake. Once it is done baking, I let it cool down to room temperature then cut it into slices for serving. EASY PEASY! And guess what? It is delicious! Here’s how to make this delicious breakfast treat:

Scroll Down For A Printable Recipe Card At The Bottom Of The Page

How To Make Blueberry Banana Baked Oatmeal

Begin by preheating your oven to 350°F. It only takes a few minutes to get the oatmeal ready for the oven, so you want it to be nice and hot before you add it. Okay, now for the oatmeal…

Stir together rolled oats (old fashioned, not quick or instant), sugar, baking powder and salt in a large mixing bowl. Add milk, melted (and cooled) butter, lightly beaten eggs, blueberries and vanilla extract. Stir gently to combine these ingredients.

NOTE: You can use fresh OR frozen blueberries for this dish. I typically use fresh, but if you will be using frozen, there is no need to thaw them. Just toss them in there frozen.

Oats, sugar, baking powder and salt are combined in a mixing bowl.Blueberries, milk, melted butter, vanilla and eggs are added to the batter and stirred in.

Add the banana slices, and gently stir them into the batter, until fully incorporated into the batter. Once done, the oatmeal is ready for the oven!

Sliced bananas are gently stirred into the blueberry banana baked oatmeal mixture.

Time To Bake It!

Lightly spray a 9×9 baking dish with non-stick cooking spray. Pour the oatmeal mixture into the baking dish, spreading it evenly to disperse the blueberries and bananas. OPTIONAL- you can also top the dish with ¼ cup chopped walnuts or pecans if desired, before baking. We don’t usually add the nuts, but that is completely your choice!

Place the dish into the preheated oven, and bake at 350°F. for 45-50 minutes, or until the oatmeal has set. Since oven temps can vary quite a bit, I suggest checking it at 45 minutes, and then bake longer, if necessary. The top should be golden brown in color once done.

TIP: If you wish the top to be more brown in color, you can put the baking dish under the broiler (5″-6″ away from heating element) and let it brown more. IMPORTANT NOTE: If you do this step, be sure to check it every 30 seconds and rotate the pan until browned to your liking (approx. 1 minute or so total). Keep a very close eye on it, so it does not BURN (and ruin your nice breakfast)! 

A baking dish full of the oatmeal mixture, ready to go into the oven.Blueberry Banana Baked Oatmeal is golden brown on top, once taken out of the oven.

When done, remove the blueberry banana baked oatmeal from the oven, and transfer the dish to a wire rack to cool. Of course, you CAN eat it hot, but we have found we enjoy this dish best at room temperature. It slices better, etc., but that is your choice, as to how you will enjoy your baked oatmeal best!

Close up of the baked oatmeal, full of juicy blueberries and sliced bananas.

Ready To Enjoy A Piece Of Blueberry Banana Baked Oatmeal?

Once the blueberry banana baked oatmeal has cooled to room temperature, you can easily cut it into 9 pieces (about 3″ x 3″ each). Grab a fork, plop a piece on a plate, and enjoy your yummy breakfast, with some hot coffee or tea.

Slice of blueberry banana baked oatmeal, served on a white plate with a fork.

I really hope you enjoy this blueberry banana baked oatmeal. We sure do! It is best if eaten within 2-3 days after cooking (and it also freezes well, too, if wrapped securely). Thank you for stopping by today, and I hope you will come back again for more family-friendly recipes. Take care, and have a GREAT day!

Looking For More OATMEAL Recipes?

You can find ALL of my recipes in the Recipe Index, which is located at the top of the page. I have a nice variety of recipes that feature oatmeal you might enjoy checking out, including:

Interested In More Recipes?

Thank you for visiting this website. I appreciate you using some of your valuable time to do soIf you’re interested, I publish a newsletter 2 times per month (1st and 15th) with all the latest recipes, and other fun info. I would be honored to have you join our growing list of subscribers, so you never miss a great recipe!
There is a Newsletter subscription box on the top right side (or bottom) of each blog post, depending on the device you use, where you can easily submit your e-mail address (only) to be included in my mailing list.

You Can Also Find Me On Social Media:

Facebook page: The Grateful Girl Cooks!
Pinterest:
The Grateful Girl Cooks!
Instagram:
jbatthegratefulgirlcooks

Author's signature

Original recipe source: A Fred Meyer booklet called “My Magazine” that was mailed to our home, Summer edition, page 22

0 from 0 votes
Blueberry Banana Baked Oatmeal
Prep Time
15 mins
Cook Time
50 mins
Total Time
1 hr 5 mins
 

Blueberry Banana Baked Oatmeal is a cinch to make, and is full of juicy blueberries and banana slices! It's an easy, yummy breakfast!

Category: Breakfast
Cuisine: American
Keyword: blueberry banana baked oatmeal
Servings: 9 (3" square pieces)
Calories Per Serving: 304 kcal
Author: JB @ The Grateful Girl Cooks!
Ingredients
  • 3 cups old fashioned rolled oats
  • ¾ cup granulated sugar
  • 2 teaspoons baking powder
  • ½ teaspoon salt
  • 1 cup milk
  • ½ cup butter (1 stick) melted, and cooled
  • 2 large eggs beaten
  • ½ teaspoon vanilla extract
  • ¾ cup blueberries fresh or frozen
  • 1 banana sliced (approx. 1/2" slices)
Instructions
  1. Preheat oven to 350°F. Lightly grease a 9"x9" baking pan with non-stick spray.

  2. Stir together oats, sugar, baking powder and salt in a large bowl. Add milk, melted/cooled butter, beaten eggs, blueberries and vanilla extract. Stir gently to combine. Add banana slices; gently stir them into batter, until fully incorporated.

  3. Pour oatmeal mixture into prepared baking dish, spreading batter evenly. OPTIONAL- you can also top the dish with ¼ cup chopped walnuts or pecans if desired, before baking.

  4. Bake at 350°F. for 45-50 minutes, or until the oatmeal has set. Oven temps can vary;, I suggest checking it at 45 minutes, and then bake longer, if necessary. Oatmeal should be golden brown on top.

    TIP: If you wish the top to be more browned, put the baking dish under the broiler (5"-6" away from heating element) and let it brown more. IMPORTANT NOTE: If you do this step, be sure to check it every 30 seconds and rotate the pan until browned to your liking (approx. 1 minute or so total). Keep a very close eye on it, so it does not BURN (and ruin your nice breakfast)! 

  5. When done, remove baked oatmeal from oven and transfer to wire rack to cool. Once cooled to room temp., cut it into 9 pieces ( 3" x 3" each). Enjoy!

Recipe Notes

NOTE: You can use fresh OR frozen blueberries for this dish. If using frozen, there is no need to thaw them.

Nutrition Facts
Blueberry Banana Baked Oatmeal
Amount Per Serving (1 3"x 3" square)
Calories 304 Calories from Fat 117
% Daily Value*
Fat 13g20%
Saturated Fat 7g44%
Trans Fat 1g
Polyunsaturated Fat 1g
Monounsaturated Fat 4g
Cholesterol 70mg23%
Sodium 249mg11%
Potassium 302mg9%
Carbohydrates 42g14%
Fiber 3g13%
Sugar 21g23%
Protein 6g12%
Vitamin A 442IU9%
Vitamin C 2mg2%
Calcium 96mg10%
Iron 2mg11%
* Percent Daily Values are based on a 2000 calorie diet.

Here’s one more to pin on your Pinterest boards!Blueberry Banana Baked Oatmeal is a cinch to make, and is full of juicy blueberries and banana slices! It's an easy, yummy breakfast!

Creamy Garlic Mashed Cauliflower

If you like mashed potatoes, you’ll enjoy Creamy Garlic Mashed CAULIFLOWER! Seasoned with garlic & onions, this healthy side dish is amazing!
If you like mashed potatoes, you'll enjoy Creamy Garlic Mashed CAULIFLOWER! Seasoned with garlic & onions, this healthy side dish is amazing!

We love mashed potatoes! However, sometimes you feel the need to eat a bit healthier variety of foods! This creamy garlic mashed cauliflower is a fantastic way to enjoy a side dish that looks and tastes like mashed potatoes, without the additional calories.

Cauliflower florets are boiled (or steamed), then cooked with sautéed onions. This mixture is then pureed, and lightly browned garlic cloves are added to the party, for extra flavor. Once pureed until smooth (in a food processor or blender), this healthy veggie side dish is ready to serve! It doesn’t take too much effort, and tastes wonderful. Here’s how to make it:

Scroll Down For A Printable Recipe Card At The Bottom Of The Page

Preparing The Cauliflower

Okay… first thing you will need to do is prepare the cauliflower! Unwrap the cauliflower, and begin by removing the leafy green leaves around the bottom of the cauliflower. Then turn the cauliflower upside down and very carefully cut out the core, and discard it.

The outer leaves of a head of cauliflower are removed first.The core of the cauliflower is cut out of the underside (and then discarded)

Cut and separate the cauliflower into florets, removing/discarding some of the longer thick, hard stems. Bring a large pan of water to a boil. Place the florets into the pan of boiling water and continue to cook until tender (approx. 5-6 minutes). Drain the cauliflower, once done. NOTE: You can also steam the cauliflower, if you prefer.

Cauliflower is cut into florets before cooking.Boiling the cauliflower florets until tender.

Putting It Together

While the cauliflower cooks, melt 2 teaspoons of butter in a large skillet, and sauté the chopped onions for 3-4 minutes. When done, add the cooked cauliflower florets to the onions in the skillet. Cook the onions and cauliflower on medium-low heat for about 7-8 minutes, stirring often.

Once they are finished cooking, transfer the onion/cauliflower mixture to a food processor or blender, and process until it becomes somewhat smooth. Scrape down the sides of the processor, as needed during processing.

Chopped onions cooking in butter, in a large skillet.Onions and cauliflower are cooked together in skillet for about 7-8 minutes.

Finishing The Creamy Garlic Mashed Cauliflower

Melt a teaspoon of butter in a skillet on low heat. Add the chopped garlic. Cook and stir this ONLY until the garlic is just beginning to turn brown (about a minute). Don’t let the garlic get too browned or burn, or it will become bitter. Remove this from the heat as soon as it is done.

Add the cooked garlic, and the remaining Tablespoon of butter to the pureed cauliflower, and continue processing until the mixture is fully smooth. Scrape down the sides as it is processed. It should be similar in texture to mashed potatoes, once done. Season to taste with a couple pinches of salt, if desired.

Cooking chopped garlic in butter until lightly browned.Butter and chopped garlic are added to pureed cauliflower in a food processor.

Time To Serve The Creamy Garlic Mashed Cauliflower!

Once the cauliflower is completely mixed and is very smooth (like mashed potatoes in texture), remove from the food processor (or blender). Transfer the hot creamy garlic mashed cauliflower to a serving dish, and add a few chives for garnish, if desired. Dish it up, and dig in while it’s hot! This mashed cauliflower recipe makes four servings, and I really think you will enjoy it.

Our favorite way to have it is served alongside meatloaf and other veggies (shown below). It looks so much like mashed potatoes it will fool your eyes, but is a bit healthier, in the long run. YUM.

A serving bowl filled with creamy garlic mashed cauliflower, ready to eat.Creamy Garlic Mashed Cauliflower is served along with green beans and meatloaf.

I truly hope you enjoy this delicious veggie side dish! It pairs very well with beef, pork and chicken dishes, and it’s flavorful, creamy texture will surprise those to whom you serve it. Thank you for stopping by, and I hope you will come back for more family-friendly recipes soon! Take care, and have a GREAT day!

Looking For More VEGETABLE SIDE DISH Recipes?

You can find ALL of my recipes in the Recipe Index, located at the top of the page. I have lots of delicious veggie recipes to choose from, including:

Interested In More Recipes?

Thank you for visiting this website. I appreciate you using some of your valuable time to do soIf you’re interested, I publish a newsletter 2 times per month (1st and 15th) with all the latest recipes, and other fun info. I would be honored to have you join our growing list of subscribers, so you never miss a great recipe!
There is a Newsletter subscription box on the top right side (or bottom) of each blog post, depending on the device you use, where you can easily submit your e-mail address (only) to be included in my mailing list.

You Can Also Find Me On Social Media:

Facebook page: The Grateful Girl Cooks!
Pinterest:
The Grateful Girl Cooks!
Instagram:
jbatthegratefulgirlcooks

Author's signature

Recipe Adapted From: The book “New Life Promise- Food Meets Faith, Total Trifecta Of Weight Loss”, by Isabel D. Price, published 2019, page 87

0 from 0 votes
Creamy Garlic Mashed Cauliflower
Prep Time
15 mins
Cook Time
15 mins
Total Time
30 mins
 

If you like mashed potatoes, you'll enjoy Creamy Garlic Mashed CAULIFLOWER! Seasoned with garlic & onions, this healthy side dish is amazing!

Category: Side Dish, Vegetable Dish
Cuisine: American
Keyword: creamy garlic mashed cauliflower
Servings: 4
Calories Per Serving: 100 kcal
Author: JB @ The Grateful Girl Cooks!
Ingredients
  • 1 medium cauliflower
  • 2 Tablespoons butter
  • 1 medium yellow onion , chopped
  • 3 medium garlic cloves , finely chopped
  • teaspoon salt , or more- season to taste
  • chives (optional for garnish)
Instructions
  1. Unwrap cauliflower; remove green leaves. Turn cauliflower upside down; carefully cut out the core. Cut/separate cauliflower into florets, removing/discarding thick, hard stems. Bring large pan of water to a boil. Place florets into boiling water; cook until tender (approx. 5-6 minutes). Drain once done. *You can also steam the cauliflower, if you prefer.

  2. While cauliflower cooks, melt 2 teaspoons of butter in large skillet. Sauté chopped onions for 3-4 minutes. When done, add cooked cauliflower to onions in skillet. Cook on medium-low heat for 7-8 minutes, stirring often. Transfer onion/cauliflower mixture to food processor or blender. Process until mixture becomes fairly smooth.

  3. Melt a teaspoon of butter in skillet on low heat. Add chopped garlic. Cook and stir ONLY until garlic begins to turn brown (about a minute). Don't let garlic get too browned or burn, or it will become bitter. Remove from the heat when done. Add cooked garlic and remaining Tablespoon of butter to pureed cauliflower. Continue processing until fully smooth. Scrape down sides, if necessary. Finished texture should be similar to mashed potatoes, once done. Season with salt, to taste.

  4. Once cauliflower is smooth (like mashed potatoes in texture), remove from food processor. Transfer to serving dish; add a few chives to the top for garnish, if desired. Serve hot, and enjoy!

Nutrition Facts
Creamy Garlic Mashed Cauliflower
Amount Per Serving (1 (1/4 of total))
Calories 100 Calories from Fat 54
% Daily Value*
Fat 6g9%
Saturated Fat 4g25%
Trans Fat 1g
Polyunsaturated Fat 1g
Monounsaturated Fat 1g
Cholesterol 15mg5%
Sodium 191mg8%
Potassium 481mg14%
Carbohydrates 10g3%
Fiber 3g13%
Sugar 4g4%
Protein 3g6%
Vitamin A 176IU4%
Vitamin C 72mg87%
Calcium 44mg4%
Iron 1mg6%
* Percent Daily Values are based on a 2000 calorie diet.

Here’s one more to pin on your Pinterest boards!If you like mashed potatoes, you'll enjoy Creamy Garlic Mashed CAULIFLOWER! Seasoned with garlic & onions, this healthy side dish is amazing!

Homemade Vanilla Ice Cream

Nothing says summer like homemade vanilla ice cream! Grab your ice cream maker and whip up a delicious batch of this simple, frozen treat!

Homemade vanilla ice cream is practically a part of my genetic DNA makeup. I have such wonderful memories of my parents AND even my aunts and grandmother making homemade ice cream as far back as I can remember. When I was little I would watch my Dad cranking our old ice cream maker on the patio, full to the brim with ice and rock salt, until glorious ice cream was finished freezing.

Such fantastic memories of a simpler childhood that I treasure. Nowadays, I use my handy dandy electric ice cream maker (that doesn’t need ice OR salt), and plug it in, on our kitchen counter. I still get excited to make it though, and enjoy every creamy bite! Homemade vanilla ice cream was my Dad’s favorite, so I post this today in his memory.

Plain old ordinary vanilla ice cream goes with just about any dessert… pie, cake, cobblers, brownies, cookies, etc. It truly is timeless! I’ve made so many varieties of homemade ice cream over the years, but finally am posting my tried and true, simple, basic vanilla ice cream recipe. Go figure! Here’s how I make it, quickly and easily!

Scroll Down For A Printable Recipe Card At The Bottom Of The Page

How To Make This Homemade Vanilla Ice Cream

When I make ice cream nowadays, I use my Cuisinart Indoor electric ice cream maker, and it is super easy to make homemade ice cream. It has a cannister which needs to be solidly frozen BEFORE making the ice cream, so I plan ahead and freeze it overnight. This recipe will yield approximately 1½ quarts of ice cream.

To make this version of homemade vanilla ice cream, you will need to whisk together the whipping cream, milk, sugar and vanilla in a medium mixing bowl or a large measuring cup (4 cup). Mix until the sugar has dissolved into the whipping cream mixture.

Once the sugar has dissolved, pour it into the cannister of your ice cream machine, and freeze, according to the manufacturer directions for your particular ice cream maker. Using the Cuisinart machine, after pouring in the ingredients, I simply turn it on by flipping a switch. (See how easy that is?)

Milk, whipping cream, vanilla and sugar are whisked together for the ice cream.The blended ingredients for the vanilla ice cream are poured into the cannister before freezing.

Freezing And “Ripening” Homemade Vanilla Ice Cream

The paddle attachment inside the cannister keeps the ice cream mixture moving during the freezing process, so no need for cranking a handle! It’s effortless! As the homemade vanilla ice cream churns, it will thicken considerably, until it is a thick “soft serve” consistency. This usually takes about 20-22 minutes in my ice cream maker.

As soon as the ice cream reaches the desired consistency, I transfer it from the cannister into an airtight container and place the ice cream in my freezer for at least an hour to “ripen” and freeze it a bit firmer before serving. Of course, if you can’t wait that long, by all means dig in to it, straight from the ice cream machine! We’ve been known to do BOTH!

Ice Cream mixture churning in the Cuisinart ice cream machine.When done, the ice cream will be a thick soft-serve consistency.

Anyone Want Some Homemade Vanilla Ice Cream?

Once the ice cream has firmed up some more, scoop it up and enjoy it with your favorite toppings! My dad always enjoyed his plain (no toppings), but we love it, especially with my homemade hot fudge sauce, fresh fruit, or on a banana split with multiple toppings! YUM! You can’t go wrong with this simple ice cream!

A scoop of homemade vanilla ice cream in a glass dish.Homemade vanilla ice cream is used to make a banana split.

I hope you enjoy this ridiculously EASY recipe for homemade vanilla ice cream. It’s a family favorite, and I cannot even begin to fathom how many times we’ve made it over the years. Way too many times to count, and it is always yummy!

Thank you for stopping by, and I hope you will come back again soon for more family-friendly recipes. Take care, friends. Have a wonderful day, and may God bless you with His love, peace and JOY today.

Looking For More HOMEMADE ICE CREAM Recipes?

You can find ALL of my recipes in the Recipe Index, located at the top of the page. I have some absolutely yummy homemade ice cream recipes you’ll enjoy, including:

Interested In More Recipes?

Thank you for visiting this website. I appreciate you using some of your valuable time to do soIf you’re interested, I publish a newsletter 2 times per month (1st and 15th) with all the latest recipes, and other fun info. I would be honored to have you join our growing list of subscribers, so you never miss a great recipe!
There is a Newsletter subscription box on the top right side (or bottom) of each blog post, depending on the device you use, where you can easily submit your e-mail address (only) to be included in my mailing list.

You Can Also Find Me On Social Media:

Facebook page: The Grateful Girl Cooks!
Pinterest:
The Grateful Girl Cooks!
Instagram:
jbatthegratefulgirlcooks

Author's signature

Original recipe source: Cuisinart Ice Cream and Yogurt Maker User Manual (came with the ice cream machine)

0 from 0 votes
Homemade Vanilla Ice Cream
Prep Time
5 mins
FREEZING TIME (approx.)
22 mins
Total Time
27 mins
 

Nothing says summer like homemade vanilla ice cream! Grab your ice cream maker and whip up a delicious batch of this simple, frozen treat!

Category: Dessert
Cuisine: American
Keyword: homemade vanilla ice cream
Servings: 12 (1/2 cup per serving)
Calories Per Serving: 200 kcal
Author: JB @ The Grateful Girl Cooks!
Ingredients
  • 2 cups heavy whipping cream , well chilled
  • 1 cup whole milk , well chilled
  • ¾ cup granulated sugar
  • 2 teaspoons vanilla extract
Instructions
NOTE: If your ice cream maker requires it, make sure to place the cannister in a freezer overnight BEFORE making the ice cream. Plan ahead.
  1. Whisk together whipping cream, milk, sugar and vanilla in a medium mixing bowl or a large measuring cup (4 cup). Mix until sugar has dissolved into the whipping cream mixture.

  2. Once sugar has dissolved, pour ice cream mixture into the prepared cannister of your ice cream machine. Freeze, according to the manufacturer directions for your particular ice cream maker. Mine usually takes between 20-22 minutes to reach thick, soft-serve consistency.

  3. As soon as ice cream reaches the desired consistency (for your ice cream machine), transfer it from the cannister into an airtight container. Place ice cream into freezer for at least an hour to "ripen" and freeze it firmer before serving. Serve, and enjoy, plain, or with desired toppings.

Nutrition Facts
Homemade Vanilla Ice Cream
Amount Per Serving (1 1/2 cup serving))
Calories 200 Calories from Fat 135
% Daily Value*
Fat 15g23%
Saturated Fat 10g63%
Polyunsaturated Fat 1g
Monounsaturated Fat 4g
Cholesterol 56mg19%
Sodium 24mg1%
Potassium 58mg2%
Carbohydrates 15g5%
Sugar 14g16%
Protein 1g2%
Vitamin A 616IU12%
Vitamin C 1mg1%
Calcium 49mg5%
Iron 1mg6%
* Percent Daily Values are based on a 2000 calorie diet.

Here’s one more to pin on your Pinterest boards!Nothing says summer like homemade vanilla ice cream! Grab your ice cream maker and whip up a delicious batch of this simple, frozen treat!

Smoked Macaroni And Cheese

Smoked Macaroni And Cheese is a tasty side OR main dish, cooked on a Traeger or smoker grill. The cheese sauce is easily made from scratch!

Do you enjoy homemade macaroni and cheese? It is a favorite “comfort food” of ours. Most of the time we make an EASY version on the stove top in our kitchen (recipe here on my blog). However, we also enjoy it when we use our smoker grill to make it, which imparts a unique smoky taste we really like. I came up with this recipe to in order to use our Traeger to make this handy dandy, beloved pasta dish. 

That is the recipe I am sharing here today. We tend to make this as a side dish when we are smoking meat low and slow on our Traeger grill. This smoked macaroni and cheese is smoked at a low temperature, and tastes wonderful once done. The cheese sauce and the pasta are pre-cooked inside, then combined to put on the smoker grill. Topped with sharp cheddar and bread crumbs, this is one delicious side dish OR main dish! You can make it ahead, and then smoke it when ready, which is definitely convenient. Here’s how to make it:

Scroll Down For A Printable Recipe Card At The Bottom Of The Page

Prepare The Cheese Sauce

TIP: While making the cheese sauce, cook the macaroni pasta in another saucepan, but cook it for 2 MINUTES LESS than the package instructions say. This will give you time to cook and drain the macaroni before adding the hot, completed cheese sauce.

To make the cheese sauce, melt butter in a medium saucepan on medium-low heat. Gradually whisk in the all purpose flour and dry mustard powder, being sure to whisk constantly. Cook for approx. 2 minutes, whisking constantly, to ensure the butter does not brown. Slowly whisk in the milk, and continue to mix until the sauce is slightly thickened and smooth.

Butter, mustard powder and flour are cooked in saucepan to begin making the cheese sauce.Milk is whisked into the flour/butter sauce, and cooked until slightly thickened and smooth.

Stir the Velveeta cheese OR American cheese chunks into the hot sauce in the saucepan. Stir until the cheese has melted. If you feel the sauce is too thick once done, simply add a small amount of milk to thin it out just a little bit.

TIP#1: I’ve also made this sauce using 1 cup of shredded mozzarella and 1/2 cup of sharp cheddar. That will also make a nice, creamy sauce. TIP #2: If you are a real cheese lover, you can substitute a full pound of Velveeta or American cheese in the sauce (instead of the 12 ounces called for in the recipe). It is delicious, too!

American or Velveeta cheese is added to the creamy sauce mixture and cooked until melted.The creamy cheese sauce is seasoned, then is ready to add to cooked macaroni noodles.

Preparing The Macaroni And Cheese For The Smoker Grill

When the macaroni has finished cooking, drain the water, but do not rinse the noodles. Place the hot noodles in a large mixing bowl. Pour the hot cheese sauce over the top, then stir well to fully combine the ingredients. 

Macaroni pasta is cooked, drained, then placed in a large mixing bowl.Cheese sauce is added to the cooked pasta, and stirred until combined.

Take a quick taste, and add salt and pepper to suit your personal taste, if desired. Spray the baking pan with non-stick cooking spray (or coat with melted butter), then add the macaroni and cheese. Spread it out evenly in the pan.

Evenly sprinkle the surface with grated cheddar cheese. Next sprinkle with the bread crumbs, followed by a few sprinkles of paprika. Now your smoked macaroni and cheese is ready for the smoker grill.

Macaroni and cheese is placed into a greased or buttered baking pan.The macaroni and cheese is topped with shredded cheddar, bread crumbs and paprika.

Time For The Smoker Grill

Preheat your smoker grill to 225°F, according to the manufacturer’s instructions. Once at temperature, place the smoked macaroni and cheese pan onto the grate, leaving the pan uncovered. Close the lid of the smoker. Smoke the macaroni and cheese (pan uncovered) for 20 minutes.

After the first 20 minutes, cover the pan securely with aluminum foil, and continue cooking for another 25-30 minutes (we usually do 30), or until heated through and the cheese on top is melted.

Ready To EAT Some Smoked Macaroni And Cheese!

Now it’s time to enjoy your smoked macaroni and cheese! Serve this dish hot, grab a fork, and dig in. It has a subtle smoky taste (which we love) and tastes wonderful! This dish will yield approximately 8 small servings (can be served as a side OR a main dish. I hope you enjoy it!

Smoked macaroni and cheese, straight from the Traeger grill, hot and ready to serve.

Thank you for stopping by today. I truly hope you will come back again for more family-friendly recipes you can make for those you love. Have a great day, friends.

Looking for More Traeger Or Smoker Grill Recipes?

You can find ALL of my recipes in the Recipe Index, located at the top of the page. I have a variety of recipes utilizing a smoker grill for you to enjoy, including:

Interested In More Recipes?

Thank you for visiting this website. I appreciate you using some of your valuable time to do soIf you’re interested, I publish a newsletter 2 times per month (1st and 15th) with all the latest recipes, and other fun info. I would be honored to have you join our growing list of subscribers, so you never miss a great recipe!
There is a Newsletter subscription box on the top right side (or bottom) of each blog post, depending on the device you use, where you can easily submit your e-mail address (only) to be included in my mailing list.

You Can Also Find Me On Social Media:

Facebook page: The Grateful Girl Cooks!
Pinterest:
The Grateful Girl Cooks!
Instagram:
jbatthegratefulgirlcooks

Author's signature

0 from 0 votes
Smoked Macaroni and Cheese
Prep Time
15 mins
Cook Time
50 mins
Total Time
1 hr 5 mins
 

Smoked Macaroni And Cheese is a tasty side OR main dish, cooked on a Traeger or smoker grill. The cheese sauce is easily made from scratch!

Category: Main Dish, Side Dish
Cuisine: American
Keyword: smoked macaroni and cheese
Servings: 8
Calories Per Serving: 516 kcal
Author: JB @ The Grateful Girl Cooks!
Ingredients
For Pasta:
  • quarts water =10 cups water
  • 1 pound elbow macaroni
For Cheese Sauce:
  • 4 Tablespoons butter
  • ¼ cup all purpose flour
  • ½ teaspoon dry mustard powder
  • 1 cup milk + more to thin sauce, if desired
  • 12 ounces American cheese (or Velveeta) , cut into small chunks
  • salt and pepper, to taste
  • 1 cup grated sharp cheddar cheese
  • ¼ cup dried bread crumbs
  • ¼ teaspoon paprika
Melted butter or cooking spray to grease the baking dish (bottom and sides)
    Instructions
    1. Cook Pasta- Bring water to a boil in a large saucepan. Add macaroni. Cook macaroni for 2 MINUTES LESS than the package instructions say. If you cook the pasta while making the cheese sauce in a separate pan, it will save you time.

    2. Make Cheese Sauce- Melt butter in a medium saucepan on medium-low heat. Gradually whisk in all purpose flour and mustard powder, being sure to whisk constantly. Cook 2 minutes, whisking constantly, to ensure butter does not brown. Slowly whisk in milk; continue to whisk until sauce is smooth and has thickened slightly. Stir Velveeta OR American cheese chunks into sauce. Stir until cheese has melted. If sauce is too thick once done, simply add a small amount of milk to thin it out a bit.

    3. When macaroni has finished cooking, drain off water, but do not rinse noodles. Place drained macaroni in a large bowl. Pour cheese sauce over the top, then stir well to fully combine ingredients. Taste, then season with salt/pepper to suit your taste. Spray baking pan with non-stick cooking spray (or coat with melted butter), then add the macaroni and cheese, spreading evenly in pan. Sprinkle top with grated cheddar, then bread crumbs, followed by a few sprinkles of paprika.

    4. Preheat smoker grill to 225°F, according to manufacturer's instructions. Once at temperature, place macaroni and cheese pan onto the grate, LEAVING PAN UNCOVERED. Close the smoker lid. Cook for 20 minutes. After 20 minutes, cover the pan securely with aluminum foil. Continue cooking another 25-30 minutes, or until heated through and cheese on top is melted. Remove from grill; serve hot.

    Recipe Notes

    TIP#1: You can make sauce using 1 cup of shredded mozzarella and 1/2 cup of sharp cheddar. 

    TIP #2: If you're a cheese lover, you can add a full pound of cheese to the sauce (instead of the 12 ounces called for in recipe). 

    Nutrition Facts
    Smoked Macaroni and Cheese
    Amount Per Serving (1 (1/8 of total))
    Calories 516 Calories from Fat 225
    % Daily Value*
    Fat 25g38%
    Saturated Fat 15g94%
    Trans Fat 1g
    Polyunsaturated Fat 1g
    Monounsaturated Fat 7g
    Cholesterol 74mg25%
    Sodium 890mg39%
    Potassium 255mg7%
    Carbohydrates 51g17%
    Fiber 2g8%
    Sugar 4g4%
    Protein 21g42%
    Vitamin A 807IU16%
    Vitamin C 1mg1%
    Calcium 604mg60%
    Iron 1mg6%
    * Percent Daily Values are based on a 2000 calorie diet.

    Here’s one more to pin on your Pinterest boards!Smoked Macaroni And Cheese is a tasty side OR main dish, cooked on a Traeger or smoker grill. The cheese sauce is easily made from scratch!


    Mini-Loaf Pound Cake

    It’s easy to make a yummy, mini-loaf pound cake with simple ingredients! Enjoy this small loaf, flavored with lemon zest and lemon juice!
    It's easy to make a yummy, mini-loaf pound cake with simple ingredients! Enjoy this small loaf, flavored with lemon zest and lemon juice!

    Today I want to share a recipe I originally got from one of the old food magazines I’ve kept for years with my collection of cookbooks. Occasionally I will scan through old magazines just for fun, and look for recipes I may not have tried before. That is where I first discovered this recipe for mini-loaf pound cake. I tweaked a couple of the ingredients, and we really enjoy the results- a small loaf of lemon-infused pound cake. YUM!

    This simple miniature loaf of pound cake is perfect when you don’t want (or need) a standard sized loaf. It is completely easy to make, and will yield 6 small slices. That is a nice size to nibble on with coffee or tea, or serve dolloped with your favorite fruit topping or ice cream for a quick dessert! Here’s how to make one mini-loaf pound cake:

    Scroll Down For A Printable Recipe Card At The Bottom Of The Page

    Making The Batter

    Before beginning, preheat your oven to 350°F. Since it only takes a few minutes to prepare the batter, you want it preheated and hot when the loaf is ready for baking! In a medium sized bowl, beat together softened butter and sugar, until well creamed and combined.

    Add an egg, and continue to beat until the batter is smooth, and the egg is fully incorporated. These are your “wet” ingredients.

    Softened butter and granulated sugar will be creamed together to begin making the batter.An egg is beaten into the creamed butter and sugar.

    In a SEPARATE bowl, whisk together all purpose flour and baking soda. These are your “dry” ingredients. Alternate adding buttermilk and these dry ingredients into the creamed wet ingredients, stirring as you add.

    Stir in the vanilla extract, lemon juice and lemon zest, and then the batter is ready! Now you’ve made the batter for the mini-loaf pound cake! See how easy that was?

    Buttermilk , flour, baking soda, and baking powder are stirred into the batter for the mini-loaf pound cake.Lemon juice, vanilla and lemon zest are added to and stirred into the batter until fully combined.

    Baking The Mini-Loaf Pound Cake

    Now it’s time to bake!  Grease (or spray with non-stick spray) a 5¾” x 3″ x 2″ mini loaf pan. Pour the batter into the pan, and spread it out evenly. Bake the mini-loaf pound cake for 30-35 minutes.

    When done, the loaf should be golden brown on top, and a toothpick inserted into the top of the loaf should come out clean. Remove the pan from the oven and transfer it to a wire rack to cool.

    The batter for the mini-loaf pound cake is poured into a greased loaf pan, for baking.When done baking, the mini-loaf pound cake is golden brown on top.

    Slice And Serve The Mini-Loaf Pound Cake

    Let the pound cake cool (still in the pan) for at least 10 minutes before removing the loaf from the pan. This mini-loaf pound cake is best served at room temperature, in my opinion. I make a couple little loaves at a time, so we can enjoy one now, and then I freeze one for later!

    Once completely cooled, you can slice it up and serve it plain and unadorned (it’s great), or top it with ice cream, fruit toppings, etc. It tastes wonderful as a base for strawberry shortcake, too!

    Two loaves, cooling on a wire rack after being removed from the loaf pan.A look inside the pound cake, which is ready to serve after slicing.

    I really hope you will give this simple recipe a try. The hint of lemon in this loaf cake is a wonderful touch, and I trust you will enjoy this mini-loaf pound cake as much as we do. Thanks for stopping by, and please come back again soon for more family-friendly recipes.

    Looking For More CAKE Recipes?

    You can find ALL of my recipes in the Recipe Index, located at the top of the page. I have a nice variety of cake recipes you might enjoy, including:

    Interested In More Recipes?

    Thank you for visiting this website. I appreciate you using some of your valuable time to do soIf you’re interested, I publish a newsletter 2 times per month (1st and 15th) with all the latest recipes, and other fun info. I would be honored to have you join our growing list of subscribers, so you never miss a great recipe!
    There is a Newsletter subscription box on the top right side (or bottom) of each blog post, depending on the device you use, where you can easily submit your e-mail address (only) to be included in my mailing list.

    You Can Also Find Me On Social Media:

    Facebook page: The Grateful Girl Cooks!
    Pinterest:
    The Grateful Girl Cooks!
    Instagram:
    jbatthegratefulgirlcooks

    Author's sgnature

    Original recipe source: “Taste of Home” magazine, Feb./March 1998 edition, page 10, published by Reiman Publications

    0 from 0 votes
    Mini-Loaf Pound Cake
    Prep Time
    10 mins
    Cook Time
    35 mins
    Total Time
    45 mins
     

    It's easy to make a yummy, mini-loaf pound cake with simple ingredients! Enjoy this small loaf, flavored with lemon zest and lemon juice!

    Category: Dessert
    Cuisine: American
    Keyword: mini-loaf pound cake
    Servings: 6 slices
    Calories Per Serving: 140 kcal
    Author: JB @ The Grateful Girl Cooks!
    Ingredients
    • 3 Tablespoons butter (no substitutes) , softened
    • 6 Tablespoons granulated sugar
    • 1 large egg
    • 6 Tablespoons all purpose flour
    • teaspoon baking soda
    • 7 teaspoons buttermilk
    • ¼ teaspoon vanilla extract
    • ¼ teaspoon lemon juice
    • ½ teaspoon lemon zest (finely grated peel)
    Instructions
    1. Preheat oven to 350°F. Grease or spray a miniature loaf pan (5¾" x 3" x 2").

    2. In a medium sized bowl, beat softened butter and sugar, until well creamed and combined. Add an egg, and continue to beat until batter is smooth, and egg is fully incorporated.

    3. In separate bowl, whisk together flour and baking soda. Alternate adding buttermilk and these dry ingredients into the creamed butter mixture, stirring as you add. Once combined, stir vanilla, lemon juice and lemon zest into the batter until incorporated.

    4. Pour batter into greased loaf pan; spread it evenly. Bake loaf at 350°F for 30-35 minutes. When done, loaf should be golden brown on top, and a toothpick inserted into the top of the loaf should come out clean.

    5. Remove pan from oven; transfer it to wire rack to cool. Let cool (still in the pan) for at least 10 minutes before removing loaf from the pan. Let pound cake cool completely, then slice, serve, and enjoy!

    Nutrition Facts
    Mini-Loaf Pound Cake
    Amount Per Serving (1 slice (1/6 of total))
    Calories 140 Calories from Fat 63
    % Daily Value*
    Fat 7g11%
    Saturated Fat 4g25%
    Trans Fat 1g
    Polyunsaturated Fat 1g
    Monounsaturated Fat 2g
    Cholesterol 47mg16%
    Sodium 91mg4%
    Potassium 47mg1%
    Carbohydrates 18g6%
    Fiber 1g4%
    Sugar 12g13%
    Protein 2g4%
    Vitamin A 230IU5%
    Vitamin C 1mg1%
    Calcium 22mg2%
    Iron 1mg6%
    * Percent Daily Values are based on a 2000 calorie diet.

    Here’s one more to pin on your Pinterest boards!It's easy to make a yummy, mini-loaf pound cake with simple ingredients! Enjoy this small loaf, flavored with lemon zest and lemon juice!