Month: October 2022

Spaghetti Squash Italiano

Enjoy delicious (and filling) Spaghetti Squash Italiano, with Italian sausage links, roasted spaghetti squash, tomatoes, garlic and basil.

Spaghetti Squash Italiano is a delicious meal that uses strands of roasted spaghetti squash to act as a low carb (and low calorie) substitute for traditional pasta. If you want to enjoy a meal with delicious Italian flavors but are trying to cut calories, may I suggest this delicious main course?

The only “downside” is that it takes about an hour to roast a medium-sized spaghetti squash, but if you’ve got the time, this is a GREAT recipe to try! You can use either traditional Italian PORK sausage OR Italian CHICKEN sausage (use chicken if you want to cut out even more calories!). It’s your choice, and either type of Italian sausage will be fabulous in this Italian dish. Here’s how to make Spaghetti Squash Italiano!

Scroll Down For A Printable Recipe Card At The Bottom Of The Page

Roast The Spaghetti Squash

Preheat your oven to 375°F before starting. Rinse the spaghetti squash, then pierce the skin (on all sides) a total of about 8-10 times using a sharp knife. Place the spaghetti squash on a parchment paper (or silpat lined) baking sheet. For this recipe I use a medium-sized spaghetti squash.

Bake the spaghetti squash for 1 hour at 375°F, or until it can easily be pierced with a sharp knife. Baking times might be shorter or longer depending on the size squash you’re using and taking into account the temperature variations in various ovens. Know that if the squash can EASILY be pierced with a sharp knife stuck deep into it, it is done.

A spaghetti squash is pierced several times with a knife before roasting in the oven.

Pan Sear The Italian Sausage Links

While the spaghetti squash is roasting, cook the Italian sausage links. I have prepared this meal using traditional Italian sausages (hot or mild) AND have also used Italian flavored chicken sausage links. Both taste wonderful in this dish, but I find that traditional Italian sausage links are more readily available in our local grocery stores.

Cook the sausages (you need 4 links, not 5 as shown below) in a little bit of olive oil in a large non-stick skillet. Cook the sausages on Medium-Low heat, turning to cook all sides, per package instructions, until fully cooked through. Let the sausages cool, then cut them into thin round slices. Set aside.

Italian sausages are cooked through by pan-searing them in a skillet with oil.

Prepare The Sauce

NOTE: Try to prepare the tomato sauce about 15 minutes before the spaghetti squash is done cooling. That way the sauce is HOT when the squash is shredded for serving. 

Heat a large skillet on Medium-Low heat until quite hot. Add 1 Tablespoon of extra virgin olive oil to the skillet, and once it becomes hot, add 2 finely minced garlic cloves. Stir, and cook the garlic for about 30-45 seconds, then add fresh, chopped tomatoes.

Stir well, to combine, then add dried oregano, a pinch of red chili pepper flakes, salt and black pepper to the tomato mixture. Cook on Medium-Low heat for 10 minutes, stirring occasionally. This will enable the tomatoes time to cook down into more of a sauce-like consistency.

Stir thinly sliced, fresh basil leaves and cooked sausage slices into the tomato sauce, until well combined. Cook for 5 minutes, stirring occasionally, until heated through and the basil leaves have wilted.

Diced tomatoes, garlic and spices are cooked in a large skillet to make a sauce.Fresh chopped basil is added to tomatoes and garlic for Spaghetti Sauce Italiano.Cooked Italian sausage is added to the skillet with the tomato basil sauce and heated through.

Prepare The Roasted Spaghetti Squash For Serving

After the spaghetti squash has cooled for about 30 minutes, cut a thin slice off of both ends, then carefully slice the squash lengthwise. Use a large spoon to remove all the seeds and pulp from the center of each squash half (and discard).

Use a fork to gently scrape the squash lengthwise, which will remove the strands of spaghetti squash. Remove as many strands as you can from both halves, without breaking through the outer skin. Keep the spaghetti squash warm, and prepare the dish for serving.

Seeds are removed from the spaghetti squash after it is roasted.

A fork is used to pull long strands of spaghetti squash away from the squash peel.A large white bowl on the right, filled with roasted spaghetti squash strands.

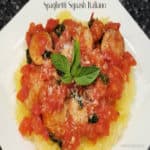
Serve The Spaghetti Squash Italiano

To serve, place a portion of the warm spaghetti squash strands onto each serving plate (recipe serves 4). Top each portion with the hot tomato and sausage mixture. Sprinkle with finely grated Parmesan cheese and garnish with a fresh basil sprig on top (if desired). Serve while hot, and enjoy this wonderful meal!

Spaghetti Squash Italiano is served with grated Parmesan and fresh basil sprig on top.

I hope you have the chance to try this recipe for yourself and for those you love. It’s really quite delicious, and full of great Italian flavor! Thank you for stopping by, and I invite you to come back soon for more delicious, family-friendly recipes. Take care, and have a GREAT day.

Looking For More ITALIAN Recipes?

You can find ALL of my recipes in the Recipe Index, which is located at the top of the page. I have lots of yummy Italian recipes for you to choose from, including:

Interested In More Recipes?

Thank you for visiting this website. I appreciate you using some of your valuable time to do soIf you’re interested, I publish a newsletter 2 times per month (1st and 15th) with all the latest recipes, and other fun info. I would be honored to have you join our growing list of subscribers, so you never miss a great recipe!
There is a Newsletter subscription box on the top right side (or bottom) of each blog post, depending on the device you use, where you can easily submit your e-mail address (only) to be included in my mailing list.

You Can Also Find Me On Social Media:

Facebook page: The Grateful Girl Cooks!
Pinterest:
The Grateful Girl Cooks!
Instagram:
jbatthegratefulgirlcooks

Author's signature

Recipe adapted from: Live Smart digital magazine, volume 1, page 35, New Life Promise by isabeldprice.com

↓↓ PRINTABLE RECIPE BELOW ↓↓

0 from 0 votes
Spaghetti Squash Italiano
Prep Time
10 mins
Cook Time
1 hr 10 mins
Total Time
1 hr 20 mins
 

Enjoy delicious (and filling) Spaghetti Squash Italiano, with Italian sausage links, roasted spaghetti squash, tomatoes, garlic and basil.

Category: Main Dish
Cuisine: Italian
Keyword: spaghetti squash Italiano
Servings: 4
Calories Per Serving: 348 kcal
Author: JB @ The Grateful Girl Cooks!
Ingredients
  • 1 medium spaghetti squash
  • ½ Tablespoon extra virgin olive oil for sausages
  • 4 links Italian chicken sausage OR Italian pork sausage (see note below)
  • 2 Tablespoons extra virgin olive oil for squash
  • 4 medium fresh tomatoes diced
  • 2 cloves garlic minced
  • ¼ teaspoon dried oregano
  • 1 pinch red chili flakes
  • salt and pepper (to taste)
  • 1 cup fresh basil leaves cut in thin strips
For Garnish (optional but good): Grated Parmesan Cheese and fresh basil leaves
    Instructions
    1. Preheat oven to 375°F . Line a baking sheet with parchment paper OR silpat.

    2. Prepare Squash: Rinse squash; pierce its skin (on all sides) a total of 8-10 times using sharp knife. Put squash on prepared baking sheet. Bake for 1 hour at 375°F, or until it can easily be pierced with a sharp knife. Baking time may vary depending on the size squash. and oven temperature variations. Remove from oven; let cool 30 minutes.

    3. Cook Sausages While Squash Bakes: Cook Italian sausages in ½ T. olive oil on Medium-Low heat in a large skillet, turning to cook all sides until fully cooked. Remove sausages, let cool; cut into thin round slices. Set aside.

    4. Make Sauce (15 minutes before squash is done cooling): Heat 2 T. olive oil in a large skillet on Medium-Low heat. When oil is hot, add minced garlic. Stir and cook garlic for 30 seconds, then add tomatoes. oregano, red chili flakes, salt and pepper. Cook, stirring occasionally, on Medium-Low heat for 10 minutes. Stir basil leaves and sausage slices into the sauce, until combined. Cook 5 minutes, stirring occasionally, until heated through and basil leaves wilt.

    5. Shred Squash: After squash has cooled 30-40 minutes, cut slice off of both ends; slice squash lengthwise. Use large spoon to remove seeds and pulp from each half (discard). Use a fork to gently scrape squash lengthwise into strands of spaghetti squash. Remove squash strands from both halves, without breaking through outer skin.

    6. To Serve: Divide squash strands onto individual plates (recipe serves 4). Top each portion with hot tomato sauce and sausage mixture. If desired, garnish with grated Parmesan cheese and fresh basil leaves. Serve hot, Enjoy!

    Recipe Notes

    NOTE: I have used both Chicken and Pork Italian sausages at times, for this recipe. The caloric calculation indicated for this recipe was made using Italian CHICKEN sausage links. If PORK Italian sausage links are used, the caloric calculation would be approx. 550 calories per serving.

    Nutrition Facts
    Spaghetti Squash Italiano
    Amount Per Serving (1 (1/4 of total))
    Calories 348 Calories from Fat 198
    % Daily Value*
    Fat 22g34%
    Saturated Fat 4g25%
    Polyunsaturated Fat 2g
    Monounsaturated Fat 7g
    Cholesterol 60mg20%
    Sodium 1112mg48%
    Potassium 578mg17%
    Carbohydrates 26g9%
    Fiber 5g21%
    Sugar 11g12%
    Protein 16g32%
    Vitamin A 1940IU39%
    Vitamin C 25mg30%
    Calcium 83mg8%
    Iron 2mg11%
    * Percent Daily Values are based on a 2000 calorie diet.

    Here’s one more to pin on your Pinterest boards!Enjoy delicious (and filling) Spaghetti Squash Italiano, with Italian sausage links, roasted spaghetti squash, tomatoes, garlic and basil.


    Lemon Garlic Cauliflower Rice

    Lemon Garlic Cauliflower Rice is a tasty, low calorie vegetable side dish that goes well with chicken, beef and pork, and is simple to make!
    Lemon Garlic Cauliflower Rice is a tasty, low calorie vegetable side dish that goes well with chicken, beef and pork, and is simple to make!

    If you’re looking for an easy to prepare veggie side dish that is very low calorie and still tastes good, how about trying this recipe for lemon garlic cauliflower rice? The recipe makes enough for about four (1/3 cup) servings. Of course, if you’re really hungry, this dish can be split between two servings, and no one will be the wiser… wink wink!

    Cauliflower is a vey versatile vegetable to cook. I’ve mashed it, grilled it, used it in casseroles, soups, appetizers, and a variety of main and side dishes. Today I am sharing this recipe for riced cauliflower which is used as a side dish.

    Cauliflower rice LOOKS a bit like long grain white rice, so if you’re trying to cut out carbs or calories, it is considered a viable substitute that is far lower in calories. Typically I use a frozen bag of cauliflower rice (found in most grocery stores), and thaw it before using. That makes it VERY convenient to make, with a lot less prep time. Of course, you can also finely grate fresh cauliflower by hand, if desired! Here’s how to make lemon garlic cauliflower rice.

    Scroll Down For A Printable Recipe Card At The Bottom Of The Page

    How To Make Lemon Garlic Cauliflower Rice

    Melt a Tablespoon of butter in a large skillet on LOW heat. Add minced garlic to the melted butter, and stir, while cooking the garlic for about 45 seconds to 1 minute. Make sure to not burn the garlic, because garlic becomes bitter when that happens.

    Add the cauliflower rice to the skillet. Mix these ingredients together until combined, and cook, stirring often, for 2 minutes. NOTE: If you’re using frozen cauliflower rice, make sure it has been fully thawed and drained before adding it to the skillet.

    Minced garlic is cooked in melted butter in a large skillet.Riced cauliflower is added to melted butter and garlic and cooked for a couple minutes.

    Final Steps To Finish This Dish

    Stir chicken broth, dried parsley, Italian seasoning and lemon zest into the cauliflower rice. Mix well, to ensure the spices and grated lemon zest are distributed well throughout the cauliflower rice.

    Chicken broth, dried parsley, Italian seasoning, and lemon zest is added to season the cauliflower rice.

    Pour lemon juice over the cauliflower, and stir until it has been fully incorporated into the lemon garlic cauliflower rice. Cook on medium heat, stirring often for 1-2 minutes, or until the cauliflower rice is completely heated through. That’s it… now it’s ready to be served!

    Fresh lemon juice is added to the seasoned riced cauliflower and stirred to combine.

    Serving The Lemon Garlic Cauliflower Rice

    Transfer the lemon garlic cauliflower rice to a small serving bowl, and garnish with fresh parsley, if desired (optional). Serve the hot rice alongside a favorite main dish, and enjoy this delicious, low calorie veggie dish!

    The lemon garlic cauliflower rice pairs especially well with chicken, beef and pork! It has a bit of a garlic and citrus “pop” when eaten, which is a nice feature. When I photographed the preparation of the rice, I served it with a wedge of Tamale Pie (recipe coming soon), and they actually “played well” together.

    Lemon Garlic Cauliflower Rice is served in a blue bowl, and garnished with fresh parsley.Shown, served alongside Tamale Pie, the lemon garlic cauliflower rice is a great side dish!

    I hope you have the opportunity to prepare this simple side dish for yourself or for those you love, and hope you enjoy it. Thank you very much for stopping by, and I invite you to come back soon for more family-friendly recipes. Take care, and have a blessed day.

    Looking For More CAULIFLOWER Recipes?

    You can find ALL of my recipes in the Recipe Index, which is located at the top of the page. I have lots of delicious vegetable side dish recipes for you to enjoy, including:

    Interested In More Recipes?

    Thank you for visiting this website. I appreciate you using some of your valuable time to do soIf you’re interested, I publish a newsletter 2 times per month (1st and 15th) with all the latest recipes, and other fun info. I would be honored to have you join our growing list of subscribers, so you never miss a great recipe!
    There is a Newsletter subscription box on the top right side (or bottom) of each blog post, depending on the device you use, where you can easily submit your e-mail address (only) to be included in my mailing list.

    You Can Also Find Me On Social Media:

    Facebook page: The Grateful Girl Cooks!
    Pinterest:
    The Grateful Girl Cooks!
    Instagram:
    jbatthegratefulgirlcooks

    Author's signature

    Recipe adapted from: The online magazine called “LiveSmart”, volume 11, page 34, available through isabeldprice.com 

    ↓↓ PRINTABLE RECIPE BELOW ↓↓

    0 from 0 votes
    Lemon Garlic Cauliflower Rice
    Prep Time
    5 mins
    Cook Time
    4 mins
    Total Time
    9 mins
     

    Lemon Garlic Cauliflower Rice is a tasty, low calorie vegetable side dish that goes well with chicken, beef and pork, and is simple to make!

    Category: Side Dish, Vegetable Dish
    Cuisine: American
    Keyword: lemon garlic cauliflower rice
    Servings: 4 approx. (1/2 cup per serving)
    Calories Per Serving: 59 kcal
    Author: JB @ The Grateful Girl Cooks!
    Ingredients
    • 1 Tablespoon butter
    • 3 cloves garlic minced
    • 16 ounces cauliflower rice thawed, if frozen
    • 2 Tablespoons chicken broth
    • 1 teaspoon dried parsley
    • teaspoon Italian seasoning
    • 1 teaspoon grated lemon zest (yellow peel)
    • 1 Tablespoon lemon juice
    • fresh parsley for garnish, if desired
    Instructions
    1. Melt butter in a large skillet on LOW heat. Add minced garlic; cook about 45 seconds to 1 minute. Stir often, to not burn garlic, or it becomes bitter.

    2. Add cauliflower rice to the skillet. Mix with butter/garlic until combined. Cook on Medium-Low,, stirring often, for 2 minutes. NOTE: If using frozen cauliflower rice, make sure it's fully thawed/drained before adding to skillet.

    3. Stir chicken broth, seasonings (parsley and Italian seasoning), and lemon zest into the cauliflower rice. Add lemon juice; stir until combined with other ingredients.

    4. Cook on Medium-Low heat for 1-2 minutes, stirring often, until the cauliflower rice is heated through.

    5. Transfer lemon garlic cauliflower rice to serving bowl; garnish with fresh parsley, if desired. Enjoy.

    Nutrition Facts
    Lemon Garlic Cauliflower Rice
    Amount Per Serving (1 (1/2 cup per serving))
    Calories 59 Calories from Fat 27
    % Daily Value*
    Fat 3g5%
    Saturated Fat 2g13%
    Trans Fat 0.1g
    Polyunsaturated Fat 0.1g
    Monounsaturated Fat 1g
    Cholesterol 8mg3%
    Sodium 85mg4%
    Potassium 357mg10%
    Carbohydrates 7g2%
    Fiber 2g8%
    Sugar 2g2%
    Protein 2g4%
    Vitamin A 90IU2%
    Vitamin C 57mg69%
    Calcium 33mg3%
    Iron 1mg6%
    * Percent Daily Values are based on a 2000 calorie diet.

    Here’s one more to pin on your Pinterest boards!Lemon Garlic Cauliflower Rice is a tasty, low calorie vegetable side dish that goes well with chicken, beef and pork, and is simple to make!


    Szechuan Chicken

    Szechuan Chicken is a delicious, easy to make stir-fry with chicken, bell peppers, green onions and nuts cooked in an Asian-inspired sauce.

    If you enjoy making delicious, classic meals at home for a fraction of the cost of what a restaurant would charge for the same dish, may I suggest this recipe for Szechuan chicken? The recipe requires using two chicken breasts, a red and green bell pepper, green onions, and some chopped nuts. Cook them in a simple Asian sauce, combine them, and serve over rice or noodles. BOOM! You just made a tasty, classic Chinese dish for 4 people!

    We enjoy this dish, and because it is made using only one skillet,  I find it pretty easy to make, when we get hungry for Chinese food! I have no recollection of how or when I got this recipe, but found it in an old recipe box years ago, where the recipe was cut out and taped onto a 3×5″ index card. So I truly don’t know who I can give credit to for this yummy dish… BUT, I think you’re going to love it! Here’s how to make it.

    Scroll Down For A Printable Recipe Card At The Bottom Of The Page

    Prepare The Chicken For Marinating

    You will need two large boneless, skinless chicken breasts. The recipe calls for 16 ounces of chicken, so two large 8 ounce breasts will be perfect. Slice the chicken breasts across the width of the breast, holding a sharp knife almost parallel to the surface (angled at a slant). Cut each chicken breast into 1/4″ slices, then put the slices into a medium-sized bowl, and set aside.

    Chicken breasts are cut into 1/4" long slices before marinating.

    Now it’s time to make the sauce which is used to marinate the chicken. In a medium bowl, combine soy sauce, sherry, cornstarch, ginger, sugar, red pepper flakes, and garlic powder. Stir until the sauce is smooth, with no lumps.

    Pour the sauce over the chicken slices, and toss until the chicken slices are coated with sauce. Once fully coated, set the chicken aside to marinate in the sauce while you pan-sear the other ingredients.

    An Asian-inspired sauce is mixed together to marinate the pieces of chicken breast.Chicken breast chunks are marinated in an Asian-inspired sauce before pan-searing.

    Preparing The Pan-Seared Veggies And Nuts

    Slice six green onions (bulb and stalk) into 2″ long pieces. Remove the stem and seeds from the bell peppers, and cut them into “bite-sized” pieces. Heat ONE Tablespoon of oil over Medium-High heat in a large (10-12 inch) skillet. Once oil is hot, but not smoking, add the green onions and bell peppers to the skillet.

    Stir often until the veggies are “tender-crisp” in texture. This usually takes only about 2 minutes! Transfer the veggies out of the skillet into a bowl, using a slotted spoon (so excess oil can drip back into skillet).

    Add 2 more Tablespoons of oil to skillet and heat until hot once again on Medium heat. Add chopped cashews (or dry roasted peanuts if using) to the hot oil, and cook (stirring frequently) only until the nuts are lightly browned. Transfer the browned nuts to the bowl of cooked veggies using a slotted spoon.

    Green onions and red and green bell peppers are quickly stir-fried in hot oil in skillet.Chopped cashews ae quickly pan fried until lightly browned in hot oil.Cooked bell peppers, green onions and cashews rest in bowl before being added to chicken.

    Cooking The Szechuan Chicken

    Now it’s time to quickly cook the marinated chicken and sauce. You will use the same skillet for this (and any leftover oil in the skillet). Heat remaining oil in skillet over high heat until HOT but not smoking. Add the chicken mixture to the hot oil, and cook, stirring frequently. Continue to cook the chicken for 2-3 minutes, or until it is cooked through and no longer pink in color.

    Quickly add the veggies and nuts (plus any accumulated juices in the bowl) back into the skillet, and stir to combine. Heat on medium heat until all ingredients are heated through (a couple minutes). When thoroughly heated through, the dish is ready to serve!

    Marinated Szechuan chicken is quickly cooked in hot oil in a large black skillet.Green and red bell peppers, green onions and roasted cashews are added to the chicken in skillet.

    Serving Szechuan Chicken

    We really enjoy serving the Szechuan chicken on top of a bed of steamed rice! TIP: If you begin cooking the rice at the beginning of your prep time for this recipe, it should be ready to go when you’re ready to serve. The bed of rice is optional, but I highly recommend it, as it pairs very well with this chicken dish!

    Transfer the Szechuan chicken to individual plates, then lightly sprinkle the surface of each portion with sesame seeds, if desired, for a nice finishing touch! Serve the Szechuan chicken immediately (while hot), and enjoy this tasty dish! I really hope you enjoy it, because it has great flavor and color! It’s not too spicy and really tastes amazing!

    Sesame seeds are sprinkled on top of the Szechuan chicken before serving.A close up of the rice bed below the serving of Szechuan chicken on a white plate.

    I hope you have the opportunity to try this delicious Asian-style main dish. If you have any leftovers, they can be refrigerated for 2-3 days and easily reheated in a microwave. Thanks for stopping by, and I hope you will come back again soon for more family-friendly recipes. Take care, and have a GREAT day!

    Looking For More ASIAN-STYLE Recipes?

    You can find ALL of my recipes in the Recipe Index, which is located at the top of the page. I have a wonderful variety of Asian-style recipes for you to enjoy, including:

    Interested In More Recipes?

    Thank you for visiting this website. I appreciate you using some of your valuable time to do soIf you’re interested, I publish a newsletter 2 times per month (1st and 15th) with all the latest recipes, and other fun info. I would be honored to have you join our growing list of subscribers, so you never miss a great recipe!
    There is a Newsletter subscription box on the top right side (or bottom) of each blog post, depending on the device you use, where you can easily submit your e-mail address (only) to be included in my mailing list.

    You Can Also Find Me On Social Media:

    Facebook page: The Grateful Girl Cooks!
    Pinterest:
    The Grateful Girl Cooks!
    Instagram:
    jbatthegratefulgirlcooks

    Author's signature

    Original recipe source: unknown (found recipe cut out & taped onto a 3×5 card in an OLD recipe box)

    ↓↓ PRINTABLE RECIPE BELOW ↓↓

    0 from 0 votes
    Szechuan Chicken
    Prep Time
    10 mins
    Cook Time
    15 mins
    Total Time
    25 mins
     

    Szechuan Chicken is a delicious, easy to make stir-fry with chicken, bell peppers, green onions and nuts cooked in an Asian-inspired sauce.

    Category: Main Course
    Cuisine: Asian
    Keyword: Szechuan chicken
    Servings: 4
    Calories Per Serving: 354 kcal
    Author: JB @ The Grateful Girl Cooks!
    Ingredients
    • 16 ounces chicken breasts (boneless, skinless) = approx. two 8 oz. chicken breasts
    • 2 Tablespoons soy sauce
    • 2 Tablespoons dry sherry
    • 2 teaspoons cornstarch
    • ¼ teaspoon ground ginger
    • ¼ teaspoon granulated sugar
    • ¼ teaspoon red chili pepper flakes
    • ¼ teaspoon garlic powder
    • 6 green onions
    • 1 medium green bell pepper
    • 1 medium red bell pepper
    • 3 Tablespoons vegetable oil DIVIDED USE
    • ½ cup chopped cashews can substitute dry roasted peanuts
    • sesame seeds (OPTIONAL) sprinkle as garnish, if desired
    Instructions
    1. Slice chicken across the width of the breast, using a sharp knife almost parallel to the surface (angled at a slant). Cut each chicken breast into 1/4" slices; put slices in a medium bowl; set aside.

    2. Make sauce: In separate bowl, combine soy sauce, sherry, cornstarch, ginger, sugar, red pepper flakes, and garlic powder. Stir until smooth (no lumps). Pour sauce over chicken; toss until slices are coated with sauce. Set chicken aside.

    3. Slice green onions (bulb and stalk) into 2" pieces. Remove stem/seeds from bell peppers, then cut into "bite-sized" pieces.

    4. Heat ONE Tablespoon oil on medium-High heat in a large (10"-12") skillet. Once oil is hot, but not smoking, add green onions/bell peppers. Cook, stirring often until veggies are "crisp-tender" (about 2 minutes). Transfer veggies from skillet to a bowl, using slotted spoon (so excess oil can drip back into skillet).

    5. Add TWO Tablespoons of oil to skillet and heat on Medium heat. Add cashews (or dry roasted peanuts) to hot oil. Cook (stirring frequently) only until nuts are lightly browned. Transfer nuts to bowl of cooked veggies using slotted spoon.

    6. Heat remaining oil in skillet on high heat until HOT but not smoking. Add chicken mixture and cook, stirring frequently. Continue to cook chicken for 2-3 minutes, or until cooked through and no longer pink in color. Quickly add reserved veggies and nuts (plus any juices) back into the skillet; stir to combine. Cook on medium heat 2-3 minutes or until all ingredients are heated through. Once fully heated, the dish is ready to serve!

    7. We enjoy serving Szechuan chicken on top of a bed of steamed rice! The bed of rice is optional, but I recommend it. Transfer Szechuan chicken to individual plates, then lightly sprinkle each portion with sesame seeds, if desired, Serve immediately, and enjoy

    Recipe Notes

    NOTE: Caloric calculation does NOT include rice or noodles that may be served with the chicken.

    Nutrition Facts
    Szechuan Chicken
    Amount Per Serving (1 (1/4 of total))
    Calories 354 Calories from Fat 189
    % Daily Value*
    Fat 21g32%
    Saturated Fat 4g25%
    Trans Fat 0.1g
    Polyunsaturated Fat 8g
    Monounsaturated Fat 8g
    Cholesterol 73mg24%
    Sodium 430mg19%
    Potassium 721mg21%
    Carbohydrates 12g4%
    Fiber 2g8%
    Sugar 4g4%
    Protein 28g56%
    Vitamin A 1292IU26%
    Vitamin C 67mg81%
    Calcium 35mg4%
    Iron 2mg11%
    * Percent Daily Values are based on a 2000 calorie diet.

    Here’s another to pin on your Pinterest boards!Szechuan Chicken is a delicious, easy to make stir-fry with chicken, bell peppers, green onions and nuts cooked in an Asian-inspired sauce.

    Blueberry Dessert Sauce

    Make a delicious Blueberry Dessert Sauce to spoon on top of cheesecake or ice cream, etc.! It’s made using either fresh or frozen blueberries.
    Make a delicious Blueberry Dessert Sauce to spoon on top of cheesecake or ice cream, etc.! It's made using either fresh or frozen blueberries.

    One of my all time FAVORITE desserts is cheesecake. Seriously. I can never get enough of that decadent dessert, especially when it is topped with a sweet fruit sauce (strawberry, cherry or blueberry, to name a few).

    Today I want to show you how simple it is to make a delicious blueberry dessert sauce with just a few ingredients. It tastes wonderful on many desserts (ice cream, pound cake, etc.), but my favorite way to enjoy it is on top of a big ol’ piece of cheesecake! The sauce not only LOOKS good when served, it adds another layer of plump, juicy blueberry flavor to the dessert! Here’s how to make this yummy, sweet sauce.

    Scroll Down For A Printable Recipe Card At The Bottom Of The Page

    Making The Blueberry Sauce

    Place 6 Tablespoons of blueberry jam and 2 Tablespoons of fresh squeezed lemon juice in a medium sized saucepan. Stir the mixture to combine the two ingredients and heat on low, only until the mixture is heated through.

    NOTE: This recipe is unique because of its use of blueberry jam. Because the jam is already sweetened, there is no need for additional sugar. Blueberry jam can be found in most grocery stores nowadays which is quite convenient, but I like to use my homemade jam. If you like to can foods, here is my recipe for making homemade blueberry jam (enough to can and keep in long term storage).

    Blueberry jam and lemon juice are warmed in a saucepan on low heat.

    In a separate small bowl, whisk or stir together water and cornstarch until the mixture is smooth and lump-free. Stir the cornstarch “slurry” into the saucepan with the jam mixture until well-combined.

    Water and cornstarch are mixed together in a small bowl until smooth and lump-free.A water and cornstarch slurry is added to the blueberry jam and lemon juice in pan.

    Continue cooking the blueberry dessert sauce on low heat until the sauce has thickened slightly. This usually only takes a couple minutes, so keep an eye on it, stirring occasionally. Once the sauce has thickened, remove the pan from the heat.

    The blueberry dessert sauce is cooked until it has slightly thickened, then it's cooled.

    Final Step For Making The Sauce

    When the sauce has cooled down slightly, add the blueberries and grated lemon zest to the pan. Stir gently, to incorporate these ingredients into the sauce. Let the blueberry dessert sauce finish cooling to room temperature, then it’s ready to use as a dessert topping.

    NOTE: If you are using frozen blueberries, make sure they are thawed and drained before adding them to the sauce.

    Grated lemon zest and fresh (or frozen, but thawed) blueberries are added to the saucepan.A saucepan with the finished blueberry dessert sauce, ready to be used on desserts.

    Serve The Blueberry Dessert Sauce

    My favorite way to use this blueberry sauce is to spoon it over a nice slice of cheesecake! The sauce has a small pop of fresh citrus flavor, thanks to the addition of lemon zest, which makes it taste so good!

    Blueberry dessert sauce also tastes wonderful as a topping for vanilla ice cream or pound cake. This recipe will yield approximately 12 servings (2 Tablespoons per serving), and any leftover sauce can be covered and refrigerated for 3-4 days.

    A slice of cheesecake is topped with some of the blueberry dessert sauce for serving. We served it as a dessert topping on cheesecake recently to dinner guests, and it was a big hit with them! I hope you enjoy this dessert sauce as much as we do. Thanks for stopping by today, and I invite you to come back soon for more family-friendly recipes. Take care, and have a GREAT day!

    Looking For More DESSERT SAUCE Recipes?

    You can find ALL of my recipes in the Recipe Index, which is located at the top of the page. I have some delicious, sweet dessert sauces you might enjoy, including:

    Interested In More Recipes?

    Thank you for visiting this website. I appreciate you using some of your valuable time to do soIf you’re interested, I publish a newsletter 2 times per month (1st and 15th) with all the latest recipes, and other fun info. I would be honored to have you join our growing list of subscribers, so you never miss a great recipe!
    There is a Newsletter subscription box on the top right side (or bottom) of each blog post, depending on the device you use, where you can easily submit your e-mail address (only) to be included in my mailing list.

    You Can Also Find Me On Social Media:

    Facebook page: The Grateful Girl Cooks!
    Pinterest:
    The Grateful Girl Cooks!
    Instagram:
    jbatthegratefulgirlcooks

    Author's signature

    Original recipe source: “Treasury of Christmas”, page 404, published in 1996 by Publications International., Inc.

    ↓↓ PRINTABLE RECIPE BELOW ↓↓

    0 from 0 votes
    Blueberry Dessert Sauce
    Prep Time
    10 mins
    Total Time
    10 mins
     

    Make a delicious Blueberry Dessert Sauce to spoon on top of cheesecake or ice cream, etc.! It's made using either fresh or frozen blueberries.

    Category: Dessert Sauce, Sauces
    Cuisine: American
    Keyword: blueberry dessert sauce
    Servings: 12 (2 T. per serving)
    Calories Per Serving: 37 kcal
    Author: JB @ The Grateful Girl Cooks!
    Ingredients
    • 6 Tablespoons blueberry jam
    • 2 Tablespoons lemon juice
    • 2 Tablespoons water
    • 2 teaspoons cornstarch
    • 1 cup blueberries fresh OR frozen (thawed/drained)
    • 1 teaspoon lemon zest (finely grated yellow peel)
    Instructions
    1. Place blueberry jam and lemon juice in a medium saucepan. Stir to combine ingredients. Heat on low, only until heated through.

    2. In a separate bowl, whisk (or stir) water and cornstarch until smooth and lump-free. Add to jam mixture in pan, stirring until well-combined. Cook on low heat until sauce has thickened slightly (a couple minutes), stirring occasionally. Once sauce thickens, remove pan from the heat; let sauce cool for 2-3 minutes.

    3. Once sauce has cooled slightly, add blueberries and lemon zest. Stir gently, to incorporate these ingredients into the sauce. Let sauce cool to room temperature before serving.

    4. Blueberry dessert sauce tastes wonderful as a topping for cheesecake, vanilla ice cream or pound cake. Recipe will yield about 12 servings (2 Tablespoons per serving). Leftover sauce can be covered and refrigerated for 3-4 days. Enjoy!

    Nutrition Facts
    Blueberry Dessert Sauce
    Amount Per Serving (2 Tablespoons)
    Calories 37 Calories from Fat 1
    % Daily Value*
    Fat 0.1g0%
    Saturated Fat 0.01g0%
    Polyunsaturated Fat 0.02g
    Monounsaturated Fat 0.01g
    Sodium 4mg0%
    Potassium 20mg1%
    Carbohydrates 9g3%
    Fiber 0.4g2%
    Sugar 6g7%
    Protein 0.1g0%
    Vitamin A 7IU0%
    Vitamin C 3mg4%
    Calcium 3mg0%
    Iron 0.1mg1%
    * Percent Daily Values are based on a 2000 calorie diet.

    Here’s one more to pin on your Pinterest boards!Make a delicious Blueberry Dessert Sauce to spoon on top of cheesecake or ice cream, etc.! It's made using either fresh or frozen blueberries.

    Bacon Wrapped Jalapeño Poppers

    Make a dozen Bacon Wrapped Jalapeño Poppers for your next party! They’re yummy, filled with 2 cheeses and coated in brown sugar-chili spice!
    Make a dozen Bacon Wrapped Jalapeño Poppers for your next party! They're yummy, filled with 2 cheeses and coated in brown sugar-chili spice!

    Today I want to share a yummy recipe for bacon wrapped jalapeño poppers! The recipe makes 12 of them, so it’s a perfect appetizer to serve at a small get together or party. I love these so much, they are difficult to stay out of once made!

    I found the recipe online a while ago, and loved the idea of wrapping “poppers” in bacon, then covering it in brown sugar and spice mix for added flavor! It is an easy to make appetizer, too. The whole recipe only takes about 30 minutes from start to finish, and I’m sure you’ll enjoy these tasty treats. Here’s how to make a dozen amazing “poppers”.

    Scroll Down For A Printable Recipe Card At The Bottom Of The Page

    Prepare The Peppers For Stuffing

    The first thing you’ll need to do is preheat your oven to 350°F. Now you will need to prepare the jalapeños, to get them ready for the cheese filling. If you’ve never worked with hot peppers before, remember to wear gloves OR to not touch your eyes after handling the peppers and seeds. Just a word of caution, because those seeds contain the heat!

    Cut off the stem end, then slice each jalapeño in half, lengthwise. Carefully remove all the seeds (I use a small spoon), then discard them (the seeds). Wash your hands well, then move forward with stuffing the peppers.

    Six medium-sized jalapeño peppers are used to make poppers.The peppers are sliced lengthwise in half, then the seeds are removed (and discarded).

    Time To Stuff The Jalapeño Peppers!

    To make the filling, beat 4 oz. of cream cheese and 2 Tablespoons of grated cheddar cheese together in a medium bowl. Spoon the cheese mixture into the jalapeño halves, dividing it evenly between the 12 peppers. Place the stuffed peppers onto a lightly sprayed piece of aluminum foil placed on a baking sheet, leaving space between each popper.

    Cream cheese and grated cheddar cheese are beaten together to make the filling.Jalapeño halves are stuffed with the cream cheese/cheddar filling.

    Final Steps And Baking

    Cut each of the 6 slices of bacon in half, width-wise (across the short side). You will be left with 12 half slices of bacon. Carefully wrap a piece of bacon around each stuffed pepper. I find it helpful to insert a toothpick or two through the bacon, as needed, to hold it secure on the pepper.

    Mix ¼ cup of packed brown sugar and 1 Tablespoon of chili seasoning mix on a small plate. Roll the bacon wrapped jalapeño poppers around a bit in the spice mix until lightly coated on all sides. Place the seasoned poppers back onto the baking sheet.

    Bake the bacon wrapped jalapeño poppers at 350°F for 18-20 minutes, OR until the bacon is firm and fully cooked through. NOTE: Thick cut bacon slices may require a couple more minutes baking time, due to their thickness. Remove from oven, once done. Before serving, REMEMBER TO REMOVE ALL TOOTHPICKS!

    Half a slice of bacon is wrapped around each of the stuffed jalapeños.Bacon wrapped jalapeño poppers are coated in a brown sugar-chili mix seasoning before baking.The poppers resting after being removed from the oven after baking.

    Time To Enjoy Some Bacon Wrapped Jalapeño Poppers!

    Serve the bacon wrapped jalapeno poppers hot from the oven! The cheese filling will be gooey and melted and the born sugar-chili mix coated bacon will add to the amazing taste of these jalapeño poppers! YUM! They are such a delicious appetizer, and we love them!

    Please note that these poppers are always best if eaten immediately following baking on the same day they’re first made. This type of finger food looks great on a platter, and you’ll see just how quickly they are gobbled up at a party or family get together! They are not too spicy, since the seeds were removed, so just about anyone will enjoy them!

    A close up photo of a couple of the bacon wrapped jalapeño poppers on serving plate.A white platter holding a dozen bacon wrapped jalapeño poppers, ready to be eaten.

    Thanks for taking the time to stop by this blog today. I hope you have the opportunity to make these scrumptious appetizers. Have a great day, take care, and please come back again soon for more family-friendly recipes.

    Looking For More APPETIZER Recipes?

    You can find ALL of my recipes in the Recipe Index, which is located at the top of the page. I have some delicious appetizers for you to choose from, including:

    Interested In More Recipes?

    Thank you for visiting this website. I appreciate you using some of your valuable time to do soIf you’re interested, I publish a newsletter 2 times per month (1st and 15th) with all the latest recipes, and other fun info. I would be honored to have you join our growing list of subscribers, so you never miss a great recipe!
    There is a Newsletter subscription box on the top right side (or bottom) of each blog post, depending on the device you use, where you can easily submit your e-mail address (only) to be included in my mailing list.

    You Can Also Find Me On Social Media:

    Facebook page: The Grateful Girl Cooks!
    Pinterest:
    The Grateful Girl Cooks!
    Instagram:
    jbatthegratefulgirlcooks

    Author's signature

    Original recipe source: www.tasteofhome.com/recipes/sweet—spicy-jalapeno-poppers

    ↓↓ PRINTABLE RECIPE BELOW ↓↓

    0 from 0 votes
    Bacon Wrapped Jalapeño Poppers
    Prep Time
    10 mins
    Cook Time
    20 mins
    Total Time
    30 mins
     

    Make a dozen Bacon Wrapped Jalapeño Poppers for your next party! They're yummy, filled with 2 cheeses and coated in brown sugar-chili spice!

    Category: Appetizer/Snack
    Cuisine: Southwestern
    Keyword: bacon wrapped jalapeño poppers
    Servings: 12 poppers
    Calories Per Serving: 95 kcal
    Author: JB @ The Grateful Girl Cooks!
    Ingredients
    • 6 medium jalapeño peppers approx. 4 inches long
    • 4 ounces cream cheese softened
    • 3 Tablespoons grated cheddar cheese
    • 6 bacon strips cut in half widthwise
    • ¼ cup packed dark brown sugar
    • 1 Tablespoon chili seasoning mix
    Instructions
    1. Preheat oven to 350°F. Lay a sheet of aluminum foil on a baking sheet, and lightly spray with non-stick baking spray.

    2. Cut off the stem end, then slice each jalapeño in half, lengthwise. Carefully remove seeds (use a small spoon), then discard them (the seeds). Wash hands well, then move forward with stuffing the peppers. NOTE: If you've never worked with hot peppers before, remember to wear gloves OR not touch your eyes after handling peppers/seeds. Just a word of caution, because the seeds contain the heat!

    3. Beat cream cheese and grated cheddar together in medium bowl. Spoon cheese into jalapeño halves, dividing evenly between the 12 peppers. Place stuffed peppers on prepared baking sheet, leaving space between each one.

    4. Cut each slice of bacon in half, width-wise. You should have 12 half slices of bacon. Carefully wrap a piece of bacon around each stuffed pepper. NOTE: Insert a toothpick through bacon, as needed, to hold it secure on the pepper.

    5. Mix brown sugar and chili seasoning mix on a small plate until combined. Roll poppers around in spice mix until lightly coated on all sides. Place seasoned poppers back on baking sheet.

    6. Bake at 350°F for 18-20 minutes, OR until bacon is firm and fully cooked through. NOTE: Thick cut bacon slices may require a couple more minutes baking time, due to their thickness. Remove from oven and place onto serving plate. Before serving, REMEMBER TO REMOVE ALL TOOTHPICKS! Serve, and enjoy!

    Nutrition Facts
    Bacon Wrapped Jalapeño Poppers
    Amount Per Serving (1 popper)
    Calories 95 Calories from Fat 63
    % Daily Value*
    Fat 7g11%
    Saturated Fat 3g19%
    Trans Fat 0.01g
    Polyunsaturated Fat 1g
    Monounsaturated Fat 2g
    Cholesterol 14mg5%
    Sodium 123mg5%
    Potassium 84mg2%
    Carbohydrates 6g2%
    Fiber 0.4g2%
    Sugar 5g6%
    Protein 3g6%
    Vitamin A 440IU9%
    Vitamin C 8mg10%
    Calcium 36mg4%
    Iron 0.2mg1%
    * Percent Daily Values are based on a 2000 calorie diet.

    Here’s one more to pin on your Pinterest boards!Make a dozen Bacon Wrapped Jalapeño Poppers for your next party! They're yummy, filled with 2 cheeses and coated in brown sugar-chili spice!

    Cheesy Bread Wedges

    Cheesy Bread Wedges are an easy to make side dish using biscuit mix! They’re buttery, and filled with cheddar cheese, onions, and parsley.
    Cheesy Bread Wedges are an easy to make side dish using biscuit mix! They're buttery, and filled with cheddar cheese, onions, and parsley.

    If you’re looking for an easy side dish to serve with a favorite salad or main dish, may I suggest these yummy, cheesy bread wedges? They are incredibly simple to make, and have great flavor! With only 10 minutes of prep time needed before baking, they’re a perfectly easy side dish to whip up after a long, busy day.

    The recipe utilizes biscuit mix which helps cut down on the number of ingredients needed. Cheddar cheese is used IN the bread batter, and is added to the top of the batter also, so there is plenty of cheesy goodness in each bite. Here’s how to make eight delicious, cheesy bread wedges.

    Scroll Down For A Printable Recipe Card At The Bottom Of The Page

    Make The Batter

    Preheat your oven to 350°F before mixing the batter, and spray or grease the sides/bottom of an 8″ or 9″ round cake pan. This batter doesn’t take long at all to make, and you’ll want your oven and prepared baking pan ready to go, once the batter is done!

    Whisk together an egg and milk in a large mixing bowl. Add biscuit mix (like Bisquick), minced onion, ½ cup of grated cheese, and chopped fresh parsley. Stir well, just until the ingredients have been combined.

    Egg and milk are whisked together in a large mixing bowl.Cheddar cheese, chopped parsley, minced onion, and biscuit mix are combined with egg mixture. Pour the batter into the prepared pan, and spread it out evenly in the dish. Sprinkle the batter with the remaining ½ cup of grated cheddar cheese.

    After batter for the cheesy bread wedges is combined, it's placed in a greased cake pan.More grated cheese is added to the top of the bread batter in pan.

    Bake The Cheesy Bread

    Melt a half stick of butter (4 T.) in a pan or microwave, and pour it evenly over the top of the grated cheese. Place the baking pan on the middle rack in a preheated oven.

    Bake the cheesy bread wedges at 350°F. for 25 minutes, or until the surface of the bread becomes set and golden brown in color. Transfer the baking pan to a wire rack and let the bread cool slightly before slicing.

    Melted butter is added to the top of the batter for the cheesy bread wedges.When finished baking, the bread is set and golden brown in color on the top.

    Time To Enjoy Some Cheesy Bread Wedges!

    Cut the cheesy bread into eight wedges, and serve hot. NOTE: You can cut the cheesy bread wedges IN the pan OR you can remove the entire round loaf to a cutting board and slice it on the board.

    You probably will NOT need additional butter, because the melted butter has already been added! That’s it… see how easy this recipe is to prepare? Now you can go ahead and serve the cheesy bread wedges with your favorite salads and/or main dishes.

    One of the pieces of cheesy bread wedges is sliced, and is ready to eat.A side view of one of the cheesy bread wedges, showing cheese and parsley inside.

    I really hope you enjoy this recipe for cheesy bread wedges, and know you’ll see just how easy it is to make. Thank you for stopping by today, and I hope you will come back again soon for more yummy recipes. Take care, and have a GREAT day!

    Looking For More BREAD Recipes?

    You can find ALL of my recipes in the Recipe Index, which is located at the top of the page. I have some delicious bread recipes for you to check out, including:

    Interested In More Recipes?

    Thank you for visiting this website. I appreciate you using some of your valuable time to do soIf you’re interested, I publish a newsletter 2 times per month (1st and 15th) with all the latest recipes, and other fun info. I would be honored to have you join our growing list of subscribers, so you never miss a great recipe!
    There is a Newsletter subscription box on the top right side (or bottom) of each blog post, depending on the device you use, where you can easily submit your e-mail address (only) to be included in my mailing list.

    You Can Also Find Me On Social Media:

    Facebook page: The Grateful Girl Cooks!
    Pinterest:
    The Grateful Girl Cooks!
    Instagram:
    jbatthegratefulgirlcooks

    Author's signature

    Original recipe source: “Church Suppers” Cookbook, page 94, published by Black Dog & Leventhal Publishers, Inc. in 2005

    ↓↓ PRINTABLE RECIPE BELOW ↓↓

    0 from 0 votes
    Cheesy Bread Wedges
    Prep Time
    10 mins
    Cook Time
    25 mins
    Total Time
    35 mins
     

    Cheesy Bread Wedges are an easy to make side dish using biscuit mix! They're buttery, and filled with cheddar cheese, onions, and parsley.

    Category: Bread, Side Dishes
    Cuisine: American
    Keyword: cheesy bread wedges
    Servings: 8 wedges
    Calories Per Serving: 221 kcal
    Author: JB @ The Grateful Girl Cooks!
    Ingredients
    • 1 large egg lightly beaten
    • ½ cup milk
    • cups biscuit mix like Bisquick
    • 2 Tablespoons chopped parsley
    • 1 Tablespoon minced yellow onion
    • 1 cup grated cheddar DIVIDED USE!
    • ¼ cup butter = 4 Tablespoons, melted
    Instructions
    1. Preheat oven to 350°F. Spray or grease sides/bottom of 8" or 9" round cake pan.

    2. Whisk egg and milk together in large mixing bowl. Add biscuit mix, onion, ½ cup grated cheese, and parsley. Stir well just until ingredients are combined. Don't overmix. Pour batter into prepared pan; spread it evenly.

    3. Sprinkle batter with remaining ½ cup grated cheese. Melt butter (4 T.) in pan or microwave. Pour it evenly over the top of the cheese.

    4. Place pan on middle rack in oven. Bake at 350°F. for 25 minutes, or until surface of bread is set and golden brown in color. Transfer baking pan to a wire rack; let bread cool slightly before slicing.

    5. Cut bread into eight wedges, and serve hot. You probably will NOT need additional butter, because melted butter has already been added! Enjoy!

    Nutrition Facts
    Cheesy Bread Wedges
    Amount Per Serving (1 wedge)
    Calories 221 Calories from Fat 135
    % Daily Value*
    Fat 15g23%
    Saturated Fat 8g50%
    Trans Fat 0.2g
    Polyunsaturated Fat 1g
    Monounsaturated Fat 5g
    Cholesterol 54mg18%
    Sodium 440mg19%
    Potassium 89mg3%
    Carbohydrates 16g5%
    Fiber 1g4%
    Sugar 3g3%
    Protein 6g12%
    Vitamin A 467IU9%
    Vitamin C 1mg1%
    Calcium 166mg17%
    Iron 1mg6%
    * Percent Daily Values are based on a 2000 calorie diet.

    Here’s one more to pin on your Pinterest boards!Cheesy Bread Wedges are an easy to make side dish using biscuit mix! They're buttery, and filled with cheddar cheese, onions, and parsley.

    Air Fryer Crusted Mahi Mahi

    Air Fryer Crusted Mahi Mahi is a delicious, easy dish! Mahi Mahi fillets are coated in seasoned Panko breadcrumbs and air fried until crispy!
    Air Fryer Crusted Mahi Mahi is a delicious, easy dish! Mahi Mahi fillets are coated in seasoned Panko breadcrumbs and air fried until crispy!

    Today I want to share a recipe for air fryer crusted mahi mahi (its Hawaiian name) that we really enjoy! Boneless fillets of this firm white fish are covered with a seasoned panko breadcrumb topping, and then cooked in an air fryer until browned and crispy!

    The recipe could not be more simple, and if you happen to own an air fryer you’ll appreciate how easy is to prepare this crispy fish.

    We love mahi mahi! It does not have a “fishy taste”, but is a mild flavored piece of fish. Frozen individually wrapped fillets can be found in the frozen food department of many grocery stores (or Costco), and whole fillets can often be found at a local fish market.

    The prep time for this is only about 5 minutes, then the mahi mahi cooks in the air fryer, with only a quick flip over, about halfway through the cooking. That’s it! 

    Perhaps you are unfamiliar with this delicious piece of seafood. If you’re interested in learning more about this type of fish, be sure to check out the information HERE, which tells you the origins of this fish, where it is commonly found, and lots of other cool facts! Here’s how to make air fryer crusted mahi mahi.

    Scroll Down For A Printable Recipe Card At The Bottom Of The Page

    Prepare The Panko And Spice Topping

    NOTE: Before making the topping for the fish, preheat your air fryer to 400°F. The prep for this dish only takes a few minutes, so you want the air fryer hot, in order to save time!

    Combine panko breadcrumbs, paprika, garlic powder, onion powder, salt and black pepper in a shallow bowl or dish. Stir to fully combine these ingredients.

    This is the panko topping that will coat and season the mahi mahi. The crispy panko breadcrumbs are what will give the fish its crunchy texture on the outside!

    Panko breadcrumbs are combined with a variety of spices to coat the fish fillets.

    Prepare The Fish Fillets

    Use several paper towels to pat each of the mahi mahi fillets dry. Use a pastry brush to coat all sides of each piece of fish with olive oil.

    Please note that we only used three fillets this time instead of four, as the recipe calls for. 

    Mahi Mahi fillets are dried off with paper towels then wait to be breaded.Each fish fillet is brushed on all sides with olive oil.

    Add Breadcrumb Seasoning To The Mahi Mahi

    Place the mahi mahi fillets (one at a time) onto the breadcrumb seasoning mixture. Press the breadcrumbs on gently, to help adhere them to the fish. Coat all sides of the fish with the seasoned panko.

    Place each coated fillet onto a large plate, then lightly spritz the top and bottom of each piece of fish with additional olive oil. This will help the panko breadcrumb coating to become very crisp on both sides.

    The oiled Mahi Mahi fillets are coated, one at a time in seasoned panko breadcrumbs.Panko coated fish fillets are spritzed with olive oil before being put into air fryer to cook.

    Cooking The Mahi Mahi Fillets

    Place the breaded/sprayed mahi mahi fillets (in a single layer) in the basket of the air fryer. Cook at 400°F. for 6-7 minutes, then gently turn the fish fillets over to the other side.

    They should be nicely browned on the surface. Continue cooking for an additional 6-8 minutes until cooked through. The panko crust on the fish should be nicely browned and crispy, as well.

    Be careful to not overcook the fish. Because mahi mahi is a very lean fish, if overcooked, it runs the risk of being dry, and we don’t want that, do we?

    Three crusted mahi mahi fillets are placed in the air fryer basket to be cooked.Halfway through the air frying time, the fillets are flipped to cook the other side.

    Serve The Air Fryer Crusted Mahi Mahi

    Transfer the air fryer crusted mahi mahi to individual serving plates. Garnish each piece of fish with a lemon wedge or two (for squeezing) and fresh parsley for additional color and flavor.

    We also love to add peach/mango salsa (which we get at Costco), and lightly spoon it over the top of each piece. That is optional, but oh so good!

    The air fryer crusted mahi mahi pairs well with a great variety of side dishes. When I made the dish this time, I served it with Pineapple Topped Sweet Potato Puff. That was a unique pairing, but they actually ended up complimenting each other very well!

    An Air fryer crusted mahi mahi filet is served with a lemon wedge on the side.This piece of air fryer crusted mahi mahi is served with fruit salsa on top and lemon on the side.

    I hope you have the chance to try this delicious seafood recipe, and trust you’ll enjoy it as much as we do. If you enjoy mahi mahi, be sure to try Easy Baked Mahi Mahi, or Mahi Mahi with Corn & Avocado Salsa,too!

    Thanks for stopping by, and I invite you to come back again soon for more family-friendly recipes. Take care, may God bless you, and have a GREAT day!

    Looking For More AIR FRYER Recipes?

    You can find ALL of my recipes in the Recipe Index, which is located at the top of the page. I have some delicious air fryer recipes for you to enjoy, including:

    Interested In More Recipes?

    Thank you for visiting this website. I appreciate you using some of your valuable time to do soIf you’re interested, I publish a newsletter 2 times per month (1st and 15th) with all the latest recipes, and other fun info. I would be honored to have you join our growing list of subscribers, so you never miss a great recipe!
    There is a Newsletter subscription box on the top right side (or bottom) of each blog post, depending on the device you use, where you can easily submit your e-mail address (only) to be included in my mailing list.

    You Can Also Find Me On Social Media:

    Facebook page: The Grateful Girl Cooks!
    Pinterest:
    The Grateful Girl Cooks!
    Instagram:
    jbatthegratefulgirlcooks

    Author's signature

    Recipe adapted from Samantha at: everydayfamilycooking.com/air-fryer-mahi-mahi

    ↓↓ PRINTABLE RECIPE BELOW ↓↓

    0 from 0 votes
    Air Fryer Crusted Mahi Mahi
    Prep Time
    5 mins
    Cook Time
    13 mins
    Total Time
    18 mins
     

    Air Fryer Crusted Mahi Mahi is a delicious, easy dish! Mahi Mahi fillets are coated in seasoned Panko breadcrumbs and air fried until crispy!

    Category: Entree-Seafood, Main Dish
    Cuisine: American
    Keyword: air fryer crusted mahi mahi
    Servings: 4
    Calories Per Serving: 285 kcal
    Author: JB @ The Grateful Girl Cooks!
    Ingredients
    • pounds Mahi Mahi fillets (4 fillets)
    • 2 Tablespoons extra virgin olive oil + additional for spritzing
    • cups panko breadcrumbs
    • 1 teaspoon paprika
    • ½ teaspoon garlic powder
    • ½ teaspoon onion powder
    • ½ teaspoon salt
    • ½ teaspoon black pepper
    OPTIONAL: Lemon wedges, fresh parsley sprigs, and/or salsa, to serve
      Instructions
      1. Preheat air fryer to 400°F.

      2. Combine panko breadcrumbs, paprika, garlic powder, onion powder, salt and pepper in shallow bowl or dish. Stir to combine.

      3. Pat mahi mahi fillets dry with paper towels. Use a pastry brush to coat all sides of each fillet with olive oil.

      4. Lay fillets (one at a time) on breadcrumbs. Press breadcrumbs onto fish to adhere and coat each with breadcrumbs on all sides. Place each coated fillet onto a large plate; lightly spritz top and bottom sides of each fillet with additional olive oil. This helps panko breadcrumb coating to become very crisp.

      5. Place fish in a single layer in air fryer basket. Cook at 400°F. for 6-7 minutes, then gently turn fish over to the other side. Continue cooking for 6-8 minutes. Fish should be fully cooked; breadcrumb crust should be crisp and browned when done. Be careful to not overcook the fish (or it can become dry).

      6. Transfer mahi mahi to individual serving plates. Garnish each piece with lemon wedges (for squeezing) and fresh parsley., if desired. Also can spoon salsa over the top of each piece, for additional flavor (optional). Enjoy!

      Nutrition Facts
      Air Fryer Crusted Mahi Mahi
      Amount Per Serving (1 fillet (1/4 of total))
      Calories 285 Calories from Fat 81
      % Daily Value*
      Fat 9g14%
      Saturated Fat 2g13%
      Polyunsaturated Fat 1g
      Monounsaturated Fat 6g
      Cholesterol 124mg41%
      Sodium 579mg25%
      Potassium 766mg22%
      Carbohydrates 14g5%
      Fiber 1g4%
      Sugar 1g1%
      Protein 34g68%
      Vitamin A 554IU11%
      Vitamin C 0.1mg0%
      Calcium 64mg6%
      Iron 3mg17%
      * Percent Daily Values are based on a 2000 calorie diet.

      Here’s one more to pin on your Pinterest boards!Air Fryer Crusted Mahi Mahi is a delicious, easy dish! Mahi Mahi fillets are coated in seasoned Panko breadcrumbs and air fried until crispy!

      Pineapple Topped Sweet Potato Puff

      Pineapple Topped Sweet Potato Puff is a delicious side dish featuring cinnamon vanilla mashed sweet potatoes, with a pineapple crumb topping!
      Pineapple Topped Sweet Potato Puff is a delicious side dish featuring cinnamon vanilla mashed sweet potatoes, with a pineapple crumb topping!

      Today I want to share a yummy recipe for a fruit topped veggie side dish! I found the original recipe in an old cookbook, and we loved the taste of this simple dish. The recipe, as written, makes 8 servings, so it’s not only great for dinner (and leftovers!), but would be a wonderful addition to a holiday table, as well.

      The recipe uses fresh sweet potatoes (also known as yams), and I typically use the red-skinned variety. This side dish does require a bit of planning ahead because it is necessary to boil the fresh sweet potatoes for about 40 minutes to get them soft enough to mash. Once you get past that part, the rest of the dish is easy! This dish has two distinct layers of flavor… a bottom layer of cinnamon vanilla seasoned mashed sweet potatoes, and a final layer of crumbly pineapple topping. Here’s how to make this delicious veggie side dish.

      Scroll Down For A Printable Recipe Card At The Bottom Of The Page

      Prepare The Sweet Potatoes

      Wash the sweet potatoes, then piece each potato 5-6 times with the tines of a fork, or with a sharp knife. Place them in a large pan of boiling water and cook them on medium high heat for about 40 minutes or until softened. To test for doneness, simply insert a knife into the middle of a sweet potato. The knife should be able to pierce the potato very easily once done.

      Remove potatoes from the water, and let them cool for 1-2 minutes, then remove the peel (discard the peels). Cut the peeled sweet potatoes into slices or chunks, and place them in a medium sized bowl. At this point, you should also preheat your oven to 350°F. so it is ready to go, once the dish is assembled.

      Three medium sized sweet potatoes cooking in boiling water in a large saucepan.After cooking, sweet potatoes are peeled and then mashed using an electric mixer.

      Make The Sweet Potato Filling

      Use an electric mixer to “mash” the sweet potatoes until mostly smooth and lump-free. Add sugar, softened butter, eggs, milk, cinnamon, vanilla and salt, and mix these ingredients together, until fully incorporated. Pour the sweet potato mixture into an UNGREASED 2 quart baking dish, then set the dish aside while making the pineapple topping.

      The sweet potatoes are mashed to remove chunks before adding other ingredients.Sugar, eggs, milk, vanilla, butter, cinnamon and salt are mixed with the mashed sweet potatoes.Sweet potato mixture is poured into an ungreased, 2 quart casserole dish.

      Make The Pineapple Topping

      Measure all purpose flour, sugar, egg and softened butter into a medium sized bowl. Stir the ingredients together until it becomes a thick, “wet” looking batter. Fold an 8 oz. can of well-drained crushed pineapple into the batter until combined. This is the pineapple topping for the sweet potatoes, and it will be slightly “lumpy” in texture..

      Flour, sugar, softened butter and an egg are combined in a medium bowl.A well-drained 8 ounce can of crushed pineapple is added to the topping mixture.

      Ready… Set… Bake!

      Drop the pineapple topping (by the spoonful) over the top of the sweet potatoes, trying to cover as much of the surface as possible. Place the casserole dish on the middle rack of your preheated oven.

      Bake the pineapple topped sweet potato puff at 350°F for 30-35 minutes. When done, the top will be light golden brown in color, and the sweet potato filling will have “puffed up” a bit as it was baking. Remove the dish from the oven and let it rest for 1-2 minutes before serving (it’s quite HOT).

      A layer of pineapple topping is added to the top of the sweet potato mixture in casserole dish.Once baked, the pineapple topped sweet potato puff is golden brown and rises slightly in dish.

      Serve The Pineapple Topped Sweet Potato Puff

      To serve this dish, spoon up the pineapple topped sweet potato puff and place on individual serving dishes. The sweet potato puff is so colorful, sweet and buttery, and pairs wonderfully with the sweet pineapple topping!

      The day I photographed this recipe, we enjoyed this vegetable dish served alongside yummy Air Fryer Crusted Mahi Mahi. This dish would also compliment a variety of main dishes, such as beef, pork, turkey or chicken, etc. Any leftovers can be easily reheated in the oven or in a microwave, so don’t worry about having too much!

      A look at the insides of the pineapple topped sweet potato puff in the serving dish.The pineapple topped sweet potato puff was served alongside a piece of crusty, air fried fish.

      I hope you have the opportunity to make this tasty vegetable side dish for yourself and/or for those you love. Thanks for stopping by, and I invite you to come back soon for more family friendly recipes. Take care, and have a GREAT day!

      Looking For More SWEET POTATO (OR YAM) Recipes?

      You can find ALL of my recipes in the Recipe Index, which is located at the top of the page. I have some really delicious sweet potato/yam recipes you might enjoy, including:

      Interested In More Recipes?

      Thank you for visiting this website. I appreciate you using some of your valuable time to do soIf you’re interested, I publish a newsletter 2 times per month (1st and 15th) with all the latest recipes, and other fun info. I would be honored to have you join our growing list of subscribers, so you never miss a great recipe!
      There is a Newsletter subscription box on the top right side (or bottom) of each blog post, depending on the device you use, where you can easily submit your e-mail address (only) to be included in my mailing list.

      You Can Also Find Me On Social Media:

      Facebook page: The Grateful Girl Cooks!
      Pinterest:
      The Grateful Girl Cooks!
      Instagram:
      jbatthegratefulgirlcooks

      Author's signature

      Recipe adapted from: Gooseberry Patch “Big Book of Holiday Cooking”, page 199, submitted by Linda Littlejohn, published in 2012 by Oxmoor House and Time Home Entertainment, Inc.

      ↓↓ PRINTABLE RECIPE BELOW ↓↓

      5 from 1 vote
      Pineapple Topped Sweet Potato Puff
      Prep Time
      40 mins
      Cook Time
      30 mins
      Total Time
      1 hr 10 mins
       

      Pineapple Topped Sweet Potato Puff is a delicious side dish featuring cinnamon vanilla mashed sweet potatoes, with a pineapple crumb topping!

      Category: Side Dish, Vegetable Dish
      Cuisine: American
      Keyword: pineapple topped sweet potato puff
      Servings: 8
      Calories Per Serving: 338 kcal
      Author: JB @ The Grateful Girl Cooks!
      Ingredients
      For Sweet Potato Filling:
      • 2 cups sweet potatoes boiled, peeled, mashed
      • 1 cup granulated sugar
      • ¼ cup butter softened
      • 2 large eggs
      • ¼ cup milk
      • 1 teaspoon vanilla extract
      • ¼ teaspoon ground cinnamon
      • ¼ teaspoon salt
      For Pineapple Topping:
      • ¼ cup all purpose flour
      • ½ cup granulated sugar
      • 1 large egg slightly beaten
      • ¼ cup butter softened
      • 8 ounces crushed pineapple (canned) well drained
      Instructions
      1. Wash sweet potatoes; piece each potato 5-6 times with the tines of a fork, or with a sharp knife. Place them in large pan of boiling water; cook on medium high heat for 40 minutes or until softened. To test for doneness, insert a knife into the middle of a sweet potato. Knife should easily pierce potato very once done. Remove potatoes from water; let cool 1-2 minutes. Remove peel (discard peels). Cut sweet potatoes into slices or chunks; place in medium bowl.

      2. Preheat oven to 350°F. so it's ready to go, once dish is assembled.

      3. Use electric mixer to "mash" sweet potatoes until smooth and lump-free. Add sugar, butter, eggs, milk, cinnamon, vanilla and salt. Mix until fully incorporated. Pour in UNGREASED 2 qt. baking dish. Set aside while making pineapple topping.

      4. Measure flour, sugar, egg and softened butter into medium bowl. Stir together until it becomes a thick, wet batter. Fold pineapple into batter until combined. Drop pineapple topping (by the spoonful) over the top of the sweet potatoes; cover as much of the surface as possible.

      5. Place baking dish on middle rack of oven. Bake at 350°F for 30-35 minutes. When done, the top will be light golden brown in color, and sweet potato filling will have "puffed up". Remove from the oven; let rest 1-2 minutes before serving.

      Nutrition Facts
      Pineapple Topped Sweet Potato Puff
      Amount Per Serving (1 (1/8 of total))
      Calories 338 Calories from Fat 126
      % Daily Value*
      Fat 14g22%
      Saturated Fat 8g50%
      Trans Fat 0.5g
      Polyunsaturated Fat 1g
      Monounsaturated Fat 4g
      Cholesterol 101mg34%
      Sodium 212mg9%
      Potassium 194mg6%
      Carbohydrates 52g17%
      Fiber 2g8%
      Sugar 43g48%
      Protein 4g8%
      Vitamin A 5202IU104%
      Vitamin C 3mg4%
      Calcium 39mg4%
      Iron 1mg6%
      * Percent Daily Values are based on a 2000 calorie diet.

      Here’s one more to pin on your Pinterest boards!Pineapple Topped Sweet Potato Puff is a delicious side dish featuring cinnamon vanilla mashed sweet potatoes, with a pineapple crumb topping!