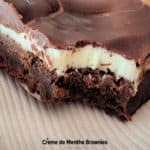
Crème de Menthe Brownies are decadent dessert bars, with a fudgy brownie layer, mint filling layer and chocolate top. Recipe yields 16 bars!

Today I want to share an amazing recipe for crème de menthe brownies, delectable and decadent dessert bars I’m confident you’re going to love.
If you love chocolate (like I do-sigh) then I’m sure these brownies will be a big hit. The brownies have three distinct layers consisting of a baked brownie base, spread with a peppermint flavored filling, then topped off with a hardened chocolate glaze. They are amazing!
The prep work does take a bit of time as each layer is made separately and has to cool or be refrigerated before the next layer goes on.
That’s not a problem for me; it’s just something you will need to take into account if you plan to make them.
Believe me, these fudgy, layered brownies are worth every minute of your time once you taste them! Here’s how to make crème de menthe brownies.
Scroll Down For A Printable Recipe Card At The Bottom Of The Page
Make The Brownie Layer
Before beginning, preheat your oven to 350°F. and lightly grease a 9″ x 9″ square baking dish on the bottom and sides. You will want your oven and prepared pan ready to go after mixing the brownie layer!
In a double boiler, heat unsweetened baking chocolate with butter on low heat until they melt. **This involves putting the chocolate and butter in a small saucepan and placing it over a larger pan of simmering water. Be careful to not let any water get into the pan with the chocolate or butter.
Once they are fully melted, stir to combine, then remove the pan up and out of the simmering water and let the mixture cool slightly.

While the chocolate mixture cools, prepare the batter for the brownie layer. In a medium-sized mixing bowl, whisk eggs well, then add granulated sugar and whisk again until the mixture is fluffy, and fully combined.
Add flour, vanilla extract, crème de menthe liqueur and salt, then pour the cooled chocolate and butter mixture into the bowl.
TIP: The chocolate needs to be cooled before adding so it doesn’t “scramble” the eggs! Whisk (or stir) until all these ingredients are fully combined together.

Prepare The Batter To Bake The Brownie Layer
Once the batter is fully combined, you will have your brownie batter ready to go. Pour the brownie batter into the greased baking dish.

Bake the brownie layer at 350°F for about 20-22 minutes. When done, the brownie layer should have slightly pulled away from the sides of the dish.
If you insert a toothpick into the center of the brownie layer, it should come out clean (free of batter).
Place the baking dish on a wire rack, set aside and let the brownie layer cool (still in the pan) to room temperature.

Make The Crème de Menthe Filling Layer
While the brownie layer is cooling, make the crème de menthe filling for the second layer. Beat the butter, cream cheese and powdered sugar using an electric mixer on medium speed until they’re well-blended.

Add crème de menthe liqueur to the filling mixture. Crème de Menthe is a liqueur found in grocery or liquor stores and is known for its bold peppermint flavor. It can be used to flavor drinks, cakes, frostings, grasshopper pie, etc.
I make my own from scratch; here’s the recipe on my blog for homemade crème de menthe. It’s simple to make and adds a lot of mint flavor to many recipes!

Beat the batter very well until it becomes thick and creamy. The batter for layer #2 will have a slight, pale green color, as well.
TIP: If you want the filling to look greener, simply add a drop or two of green food color (making it greener is perfect for St. Patrick’s Day!).

Spread the Mint Filling
When you’re sure the brownie layer is cool, spread the crème de menthe filling on top to cover. Place the pan in the refrigerator and chill until the mint layer is very cold and firm.
Keep the dish in the refrigerator while you make the final chocolate topping layer. Remove it from the fridge only when you are ready to pour the warm (not hot) chocolate topping glaze on!

Make A Chocolate “Glaze” Layer
The final layer for the crème de menthe brownies is a chocolate “glaze”. Use a double boiler to make it (once again using a small pan over a larger pan of simmering water).
Put chocolate chips and butter in a double boiler. Cook, stirring often, until they melt and the glaze is completely smooth.
Remove the pan from the heat once it is done and let it cool down until it is “WARM” (but not hot).

Pour the WARM chocolate glaze over the mint layer, spreading or tilting the baking dish until the entire surface is covered. Place the brownies back in the refrigerator until the chocolate hardens.

Serve And Enjoy Crème de Menthe Brownies
Take the brownies out of the refrigerator about 15 minutes before slicing (to avoid cracking the cold, hardened chocolate glaze). Cut the brownies into 16 portions, serve and enjoy!

Creme de menthe brownies are absolutely fudgy and delicious, with that lovely little pop of peppermint flavor from the middle layer! We absolutely LOVE these brownies, and hope you will, too!
Any leftovers you may have can be stored in the refrigerator (for best results) for several days. However, I need to warn you that they may not last too long because they are so GOOD!

I hope you have the chance to make, enjoy and share these delicious brownies with those you love. They are quite decadent and are such a yummy treat!
Thanks for stopping by, and I invite you to come back again soon for more family friendly recipes. Take care, may God bless you, and have an absolutely wonderful day.
Looking For More BAR COOKIE Recipes?
You can find ALL of my recipes in the Recipe Index, which is located at the top of the page. I have many delicious bar cookie recipes to choose from, including:
- Blackberry Pie Bars
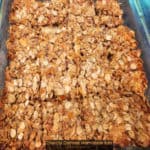
- Chocolate Chip Granola Bars
- JB’s Best Brownies
- Lemon Bars
- Banana Chocolate Chip Bars
Want More Recipes? Get My FREE Newsletter!
I publish a newsletter 2 times per month (1st and 15th) with lots of recipes, tips, etc.
Would you like to join our growing list of subscribers?
There is a Newsletter subscription box on the top right (or bottom) of each blog post, depending on the device you use.
You can submit your e-mail address there, to be added to my mailing list.
Find Me On Social Media:
Facebook page: The Grateful Girl Cooks!
Pinterest: The Grateful Girl Cooks!
Instagram: jbatthegratefulgirlcooks

Recipe adapted from: Paula Deen’s Creme De Menthe Brownies Recipe – Food.com
↓↓ PRINTABLE RECIPE BELOW ↓↓
Crème de Menthe Brownies are decadent dessert bars, with a fudgy brownie layer, mint filling layer and chocolate top. Recipe yields 16 bars!
- 2 ounces unsweetened baking chocolate
- ½ cup butter =1 stick
- 2 large eggs
- 1 cup granulated sugar
- ½ cup all purpose flour
- ⅛ teaspoon crème de menthe liqueur
- ¾ teaspoon vanilla extract
- ¼ teaspoon salt
- ½ cup butter softened (but not melted)
- ¼ cup cream cheese softened
- 2 cups powdered sugar (sifted)
- 2 Tablespoons crème de menthe liqueur
- 3 ounces semi-sweet chocolate chips
- 3 Tablespoons butter
Preheat oven to 350°F. Lightly grease bottom/sides of a 9" x 9" baking dish.
BROWNIE LAYER (#1): In a double boiler, melt unsweetened baking chocolate with butter on low heat, stirring often until smooth. Remove from heat; let mixture cool slightly.
In a medium bowl, whisk eggs; add granulated sugar; whisk until mixture is fluffy and fully combined. Add flour, crème de menthe and salt; pour cooled chocolate mixture into the bowl. TIP: Chocolate must be cooled before adding so it doesn't "scramble" the eggs! Stir until fully combined. Pour batter into prepared dish.
Bake brownie layer at 350°F. for 20-22 minutes. When done, brownies should have slightly pulled away from sides of the dish. Insert a toothpick into the center; it should come out clean (free of batter). Place baking dish on wire rack; set aside/let cool (still in the pan) to room temperature.
MINT LAYER (#2): While brownies cool, make mint filling. Beat butter, cream cheese and powdered sugar with electric mixer on Medium until well-blended. Add crème de menthe. Beat well until it becomes smooth, thick and creamy. TIP: If you want greener filling, add 1-2 drops of green food color.
Once brownie layer is cool, gently spread mint filling on top. Place pan in refrigerator; chill until mint layer is cold/firm. Keep refrigerated while you make chocolate topping.
CHOCOLATE TOPPING (#3): Put chocolate chips and butter in a double boiler. Cook over simmering water, stirring often until melted and smooth. Remove pan from heat; let it cool down until "WARM" (but not hot). Pour WARM chocolate glaze over the mint layer, spreading or tilting baking dish until covered. Place brownies back in refrigerator- chill them until chocolate hardens.
TO SERVE: Remove brownies from refrigerator 15 minutes before slicing (to avoid cracking the hardened chocolate glaze). Cut into 16 portions, serve and enjoy!
NOTE: This recipe's prep time does not include the time needed to cool down layers after baking or refrigerate the layers (times may vary), so plan accordingly.
Here’s one more to pin on your Pinterest boards!