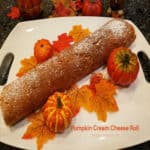
Make a delicious Pumpkin Cream Cheese Roll for the holidays (or any time)! This classic dessert has sweet cream cheese filling rolled inside!

I don’t know about you, but I LOVE the classic Fall flavors of pumpkin, cinnamon, nutmeg and cloves! This is a perfect dessert recipe to serve during the FALL season!
This dessert takes those flavors and imports them into a thin cake that is spread with sweet cream cheese filling and rolled into a long “log” of sorts. After chilling, the pumpkin roll is sliced, revealing the spiral shaped cream cheese filling. This pumpkin cream cheese roll not only LOOKS good, but it also tastes WONDERFUL!
Don’t be scared off by the number of photos or the long recipe card instructions! I only want to give you explicit instructions so you, too, can be confident in making this recipe! Today I want to share all this, so you see how simple it actually is to make this lip-smacking dessert!
My sister Joni recently visited us in Oregon from her home in Georgia. I asked her before she got here to email me this recipe that she’s used for years and told her we’d make it together (and photograph the steps), so I could share it here on my blog.
We had fun making this pumpkin roll and shared it with our extended family at a dessert night. So- here’s how to make a delicious pumpkin cream cheese roll for holidays, Fall, or any time of year!
Scroll Down For A Printable Recipe Card At The Bottom Of The Page
First Things First
Preheat your oven to 350°F. while you prepare the pumpkin roll. Grease and flour a 10″ by 15″ cookie sheet or jelly roll pan GENEROUSLY. I can’t say this enough.
You need to generously grease then generously flour the bottom and sides of the pan, so the cake will release easier when you flip it out of the pan later. This is the method I used in the photos below.
Another option for preparing the baking sheet is to lightly grease the pan, then place a large sheet of parchment paper in the pan (to fit).
Use softened butter to then generously “grease” the parchment paper (all of it) before adding the pumpkin batter to the pan.
Make The Pumpkin Batter
Beat eggs and granulated sugar using an electric mixer on High speed in a large bowl (or stand mixer bowl). Continue beating these two ingredients for about 1-2 minutes until well-combined and the sugar has dissolved.
Mix in the pumpkin puree and lemon juice on LOW speed but only mix until they have been incorporated into the egg mixture.


In a separate medium bowl, whisk together flour, baking powder, salt, nutmeg, cinnamon and cloves. STIR the dry ingredients into the pumpkin batter until combined.

Time To Bake!
Pour the pumpkin batter into the prepared baking pan, and spread it out, evenly filling the pan. Place the pan into a preheated 350° oven.
Bake at 350°F. for 12-15 minutes, or until a toothpick inserted into the top center of the cake comes out clean and batter-free.
Another way to test for doneness is by lightly touching the surface of the cake with a finger. If the “cake” springs back, it should be done.

Prepare Damp Towel For Cake While It’s Baking
A few minutes before the cake is done baking, wet a large kitchen dish towel with water and then wring the excess water out.
Lay the very damp towel on the kitchen counter and GENEROUSLY sift powdered sugar over the surface. You want enough powdered sugar to be the same size/shape as the baking pan.
The cake will be turned out onto the towel, and the addition of powdered sugar will help the cake to not stick to the towel.

Remove Cake From Pan Immediately After Baking
As soon as the cake is finished baking, check for doneness, and remove the pan from the oven. Use an offset spatula (or regular long one) to loosen all the edges (sides and under) the cake.
You may find you need to really get the spatula under that pumpkin roll to loosen it from the pan. Carefully slide the spatula around under the cake, trying not to cut up the cake with the spatula as much as possible.
NOTE: If using the alternative parchment paper method, simply go around the edges of the cake to loosen from the sides.
Using oven mitts, hold the pan on both of the short sides of the pan, and immediately invert (flip over) the pan of “loosened” cake onto the powdered sugar on the damp towel. It may not look perfect but remember that this “top surface” will be covered with the cream cheese filling later!
NOTE: Remove the parchment paper carefully (if you used that method). NOW it’s time to roll the cake up while it is still hot.


Rolling Up The Cake With The Towel Inside
Beginning with the LONG side of the pumpkin roll, fold the still damp towel over the bottom edge of the cake (about 2″ or so).
Carefully and tightly roll the towel INTO the cake as you go. Roll until it is completely rolled up and the “seam” side is on the bottom.
Once rolled (with the towel inside), let the pumpkin roll sit and rest/cool on the counter for 30 minutes, before proceeding to the next step.


Fill the Pumpkin Roll And Roll Again
Okay… once the cake is rolled in the towel and “resting”, it’s time to make the simple cream cheese filling which will go inside the pumpkin roll!
Place cream cheese, butter, a cup of powdered sugar and vanilla extract in a medium bowl. Use an electric mixer to beat these ingredients until smooth, fully combined and lump-free.
After the pumpkin roll has cooled (rolled in the towel) for 30 minutes, carefully unroll the cake. Evenly spread the cream cheese filling over the surface of the cake, all the way to the edges.
Now you need to re-roll the cake, but this time only use the towel to help guide the rolling. Roll the cream cheese covered cake up tightly, starting again on the long side, but rolling the cake by itself (no towel IN the cake).


The towel is simply used to help roll the cake as one long unit (shown below). Your pumpkin roll should now be fully rolled up only as cake and filling.

Wrap And Chill for Best Results
Carefully transfer the finished pumpkin roll to a large sheet of parchment paper and carefully seal the cake. Place the parchment paper-wrapped roll onto a large sheet of aluminum foil and wrap and seal the package.
At this point, you can either freeze the pumpkin roll to be thawed later OR refrigerate it to serve it chilled that same day.
This pumpkin cream cheese roll freezes well and only needs to thaw for 15-25 minutes before slicing and serving it. This makes it very convenient to make this dessert ahead of time if that works best for you!
When you want to enjoy the pumpkin roll, just pull it out of the freezer, unwrap, and let it thaw slightly! The pumpkin roll tastes best when served slightly chilled.

Serve The Pumpkin Cream Cheese Roll
Transfer the pumpkin cream cheese roll to a large serving platter and give it a good dusting of sifted powdered sugar right before slicing.
The cake may absorb some of the powdered sugar, so if you see that, simply sift a bit more on top for a light dusting! It’s so pretty to decorate the platter with some Autumn colors or garnishes of your choice to add to the Fall theme!
 Cut the pumpkin roll with a sharp knife into 10 slices, then serve, sliced side up! Once sliced, you will be able to see the spiraled cream cheese filling inside the pumpkin roll.
The combination of the pumpkin flavored cake (seasoned with cinnamon, nutmeg and cloves) screams “Fall”, and the cream cheese filling sends it over the top!
It’s so yummy, and we think it’s a perfect Fall or Thanksgiving dessert! Be sure to store any leftovers (wrapped well) in the refrigerator.

I hope you have the opportunity to make this fabulous pumpkin cream cheese roll for those you love and trust you enjoy its great flavor!
Thanks for taking time out of your busy day to stop by! I invite you to come back again soon for more family-friendly recipes. Take care, may God bless you, and have a GREAT day!
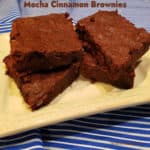
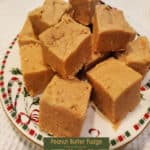
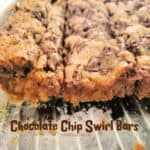
Looking for More PUMPKIN Recipes?
You can find ALL of my recipes in the Recipe Index, which is located at the top of the page. I have some delicious recipes featuring pumpkin to choose from, including:
Want More Recipes? Get My FREE Newsletter!
I publish a newsletter 2 times per month (1st and 15th) with lots of recipes, tips, etc.
Would you like to join our growing list of subscribers?
There is a Newsletter subscription box on the top right (or bottom) of each blog post, depending on the device you use.
You can submit your e-mail address there, to be added to my mailing list.
Find Me On Social Media:
Facebook page: The Grateful Girl Cooks!
Pinterest: The Grateful Girl Cooks!
Instagram: jbatthegratefulgirlcooks

Original recipe source: my sister Joni (she does not remember where she got the recipe from many years ago)
↓↓ PRINTABLE RECIPE BELOW ↓↓
Make a delicious Pumpkin Cream Cheese Roll for the holidays (or any time)! This classic dessert has sweet cream cheese filling rolled inside!
Category: Dessert, Holidays
Cuisine: American
Keyword: pumpkin cream cheese roll
Servings: 10 slices
Calories Per Serving: 272 kcal
Author: JB @ The Grateful Girl Cooks!
For Pumpkin Roll:
- 3 large eggs
- 1 cup granulated sugar
- ⅖ cup pumpkin puree NOT pie filling!
- 1 teaspoon lemon juice
- ¾ cup all purpose flour
- 1 teaspoon baking powder
- ½ teaspoon salt
- 1 teaspoon ground cloves
- 1 teaspoon ground cinnamon
- 1 teaspoon ground nutmeg
- **damp dish towel and powdered sugar for dusting
For Filling:
- 8 ounces cream cheese softened
- 4 Tablespoons butter softened
- 1 cup powdered sugar
- 1 teaspoon vanilla extract
- powdered sugar for dusting
Preheat oven to 350°F. Option #1: Generously grease/flour a 10" x 15" cookie sheet or jelly roll pan. Option#2: Lightly grease pan; place parchment paper in pan (to fit). Use butter to generously "grease" parchment paper (all of it).
Beat eggs and sugar in large bowl with electric mixer on High. Continue beating for 1-2 minutes until well-combined/sugar dissolves. Add pumpkin and lemon juice. Beat on Low only until incorporated into egg mixture. In a separate bowl, whisk together flour, baking powder, salt, nutmeg, cinnamon and cloves. STIR this into pumpkin mixture until combined.
Pour batter into prepared pan; spread it evenly in pan. Place in oven. Bake at 350°F for 12-15 minutes, or until a toothpick inserted into the top/middle comes out clean, OR lightly touching the cake surface with a finger. If cake springs back, it should be done.
3-4 minutes before cake is done, soak a kitchen dish towel with water; wring excess water out. Lay damp towel on counter; GENEROUSLY sift powdered sugar over towel in same size/shape as the baking pan. Cake will be turned out onto the towel; powdered sugar will help it to not stick.
When cake is done, remove from oven and immediately use an offset or regular metal spatula to loosen all edges (sides and under) the cake. Carefully slide spatula around under cake, to loosen it as much as possible. NOTE: If using alternative parchment paper method, simply run spatula around edges of cake to loosen. Using oven mitts, hold pan on both short sides; immediately invert (flip over) pan of "loosened" cake onto powdered sugar on towel. It may not look perfect, but this will be covered with cream cheese filling later! NOTE: Peel parchment paper carefully off cake (if you used that method).
Roll the cake while it's still hot. Beginning with the LONG side, fold damp towel over bottom edge of the cake (about 2"). Carefully and tightly roll towel INTO the cake, forming a log-shaped roll. Continue until fully rolled and "seam" side is on the bottom. Once rolled (with towel inside), let it cool for 30 minutes.
While cake cools, place cream cheese, butter, a powdered sugar and vanilla in a medium bowl. Beat with electric mixer until combined/lump-free. After pumpkin roll has cooled for 30 minutes, carefully unroll cake. Evenly spread cream cheese filling over the top of the cake, all the way to the edges.
Re-roll the cake, but this time only use the towel to help guide the rolling. Starting rolling again on the long side, but roll cake into itself (no towel IN the cake). Use the towel to help roll cake as one long unit, with seam on bottom.
Carefully transfer pumpkin roll to parchment paper and wrap it, then cover with aluminum foil and seal. You can freeze the pumpkin roll at this point OR refrigerate it to serve later the same day. Note; If freezing, frozen roll needs to be thawed for 15-20 minutes before slicing.
To serve: Place unwrapped chilled pumpkin roll on serving platter. Sift powdered sugar on top just before slicing. Cut pumpkin roll into 10 slices, then serve, with the sliced side up! Wrap any leftovers well, and store in refrigerator. Enjoy!
NOTE: Caloric calculation does not include additional powdered sugar used to sprinkle on the damp dish towel or dust the finished cake, as the amounts may vary per cook.
Nutrition Facts
Pumpkin Cream Cheese Roll
Amount Per Serving (1 slice (1/10 of total))
Calories 272 Calories from Fat 90
% Daily Value*
Fat 10g15%
Saturated Fat 6g38%
Trans Fat 0.2g
Polyunsaturated Fat 1g
Monounsaturated Fat 3g
Cholesterol 80mg27%
Sodium 257mg11%
Potassium 154mg4%
Carbohydrates 42g14%
Fiber 1g4%
Sugar 34g38%
Protein 5g10%
Vitamin A 1872IU37%
Vitamin C 1mg1%
Calcium 69mg7%
Iron 1mg6%
* Percent Daily Values are based on a 2000 calorie diet.
Here’s one more to pin on your Pinterest boards!