Make Grilled Unshucked Corn On The Cob on your BBQ grill! Soak them in water, then cook them on the grill, for delicious, fresh ears of corn!

There are many ways to cook fresh corn on the cob, and all are absolutely wonderful! Today I would like to show you how to make grilled unshucked corn on the cob on a BBQ.
This method is very simple, user friendly, the prep is minimal, and always yields delicious, juicy, fresh corn on the cob!
The corn will need to soak in water first, then you can simply throw it on your BBQ with the meat(s) you are cooking, and let them cook, still in the husk.
YUM! I think you’ll enjoy how easy it is to make corn this way. Here’s how to prepare this easy veggie side dish.
Scroll Down For A Printable Recipe Card At The Bottom Of The Page
Prepare The Corn
It goes without saying that you should start with FRESH corn on the cob. Okay? It only takes a few minutes to get the corn “ready to roll”.
You can make as many ears of corn you need using this method, however my photos will reflect using only two ears of corn.

Peel back the husks on the corn almost to the bottom, but do not remove them from the corn. Leave 1-2 inches of husk unopened.
Once the husks on each piece are pulled back, remove as much of the stringy “corn silk” attached to the corn kernels as possible.
Discard the “corn silks”, then carefully (and gently) pull the husks back up and around the corn cobs.


Time For The Corn To Go “Swimming”!
If desired, use a thin outer husk to “tie” the husks back in place on the corn before soaking them. It helps close the husk around the corn, so the corn doesn’t char as much later, while cooking.
This step is optional (I’ve tied them and left them untied- have done both ways). Place the unshucked corn in a LARGE bowl, then add enough water to cover the corn.
TIP: I find it helpful to set a large heavy mug, filled with some water on top of the corn while it is soaking in the bowl.
This acts as a weight to keep the corn submerged in the water, so it is fully immersed (and not floating on top).


Soak, Soak, Soak
Let the corn soak in the water for 1-2 hours, then drain the water from the bowl, leaving only the corn.
Once drained, stand the ears of corn up (open side down) in the bowl. This allows excess water to continue draining off the corn before grilling.

Cooking Grilled Unshucked Corn On The Cob
Place the drained corn directly onto the BBQ grill over direct Medium-high heat, whether it is over hot coals or on a gas grill.
Put a lid on the BBQ and let the corn cook for between 12-14 minutes. Turn the corn over (using tongs) about halfway through the cooking time.
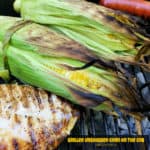
The outer husks will begin to turn brown and get a bit charred as the corn cooks.


Ready To Eat!
After the corn has cooked on all sides for between 13-14 minutes, it is ready to be served and enjoyed.
NOTE: The time may vary slightly, due to the heat and temperature of YOUR BBQ. We usually take the corn off around the 14-minute mark.
The outside husks will be browned, but the kernels of corn will be golden and juicy, with some slight browning where the open husk kernels were exposed to direct heat!
Remove the grilled unshucked corn on the cob from the grill. You can serve them “as is” to your guests, OR you can pull off the husks yourself, before placing the corn onto plates.
The outer husks will come off the grilled corn very easily. You shouldn’t have to mess with the corn “silks” inside, because you removed them previously!
Serving The Corn
Now it is time to season the ears of corn with butter, salt and pepper, serve it… and dig in!


I hope you have a chance to try this method (one of many ways) to make grilled UNSHUCKED corn on the cob this summer.
The prep is minimal, because it only takes about 5 minutes to prepare the corn, then the “soaking in water” time is inactive, which frees you up to do other things.
Thanks for stopping by today, and I invite you to come back soon for more family-friendly recipes. Take care, may God bless you, and have a GREAT day!
Looking For More CORN Recipes?
You can find ALL of my recipes in the Recipe Index, which is located at the top of the page. I have a nice variety of recipes featuring corn to choose from, including:
- Fresh Corn Sauté with Red Peppers And Onions
- Corn, Bacon & Potato Chowder
- Southwestern Skillet Corn
- How To Can Corn
- Broccoli Corn Casserole
Want More Recipes? Get My FREE Newsletter!
I publish a newsletter 2 times per month (1st and 15th) with lots of recipes, tips, etc.
Would you like to join our growing list of subscribers?
There is a Newsletter subscription box on the top right (or bottom) of each blog post, depending on the device you use.
You can submit your e-mail address there, to be added to my mailing list.
Find Me On Social Media:
Facebook page: The Grateful Girl Cooks!
Pinterest: The Grateful Girl Cooks!
Instagram: jbatthegratefulgirlcooks

↓↓ PRINTABLE RECIPE BELOW ↓↓
Make Grilled Unshucked Corn On The Cob on your BBQ grill! Soak them in water, then cook them on the grill, for delicious, fresh ears of corn!
Peel back corn husks almost to the bottom, but do not remove them from corn. Leave 1-2 inches of husk unopened. Remove as much stringy "corn silk" as possible. Discard "corn silks", then carefully pull husks back up/around the corn. *If desired (optional), use a thin outer husk to "tie" the husks back in place.
Place corn in a LARGE bowl; add enough water to cover. TIP: It's helpful to set a large heavy mug, filled with some water on top of the corn. This acts as a weight to keep corn submerged in the water, so it is not floating on top.
Let corn soak in water for 1-2 hours, then drain water from bowl. Stand corn up on end (open side down) in the bowl to continue draining off water.
Place corn directly onto BBQ grill over Medium-high heat. Put a lid on the BBQ; let corn cook for 12-14 minutes. Turn corn over halfway through cooking time. The outer husks will begin to turn brown and get a bit charred as the corn cooks.
Remove cooked corn from grill. You can serve them "as is", OR you can pull off the husks yourself, before placing corn on plates. Husks should come off easily. Season corn with butter, salt and pepper, and dig in! Enjoy!
Here’s one more to pin on your Pinterest boards!