Thai Green Curry Mussels are a delicious dish! Mussels are served in a coconut curry sauce, with ginger, garlic, lime, shallots and peppers.

Do you enjoy eating fresh steamed mussels? If so, you may enjoy this slight twist on traditional mussels! Today I want to share with you a recipe I developed for Thai Green Curry Mussels.
The flavor palette is slightly spicy from the green curry paste but is balanced well with coconut milk and other veggies.
The sauce tastes wonderful not only on the steamed mussels, but it’s a perfect dipping sauce for crusty slices of hot sourdough or French bread. We always try to have hot bread on the side to use to dip in the sauce from the bowls! YUM!
This recipe is fairly simple to prepare but has the look and taste of a meal you could get at a nice seafood restaurant! Here’s how to make Thai Green Curry Mussels:
Scroll Down For A Printable Recipe Card At The Bottom Of The Page
Before Starting
IMPORTANT: Before cooking fresh mussels, it is very important to check them. If any of the shells have already opened, discard them as they are not safe to eat. You want those shells CLOSED before cooking! The mussel shells will open on their own, once they have been successfully cooked.
Prepare The Veggies For The Sauce
Heat coconut oil in a LARGE skillet (one that also has a lid) on medium heat. When the oil is hot, add 1/3 cup (total) of chopped red/yellow bell peppers, minced shallot, and a grated 1″ piece of fresh ginger. Add a small pinch of red chili pepper flakes, then season lightly with a couple pinches of salt and pepper.
Stir to combine and cook these veggies on MEDIUM heat for a couple minutes until they begin to become tender. Add minced garlic and cook for another 30 seconds, stirring often so the garlic doesn’t burn. Pour in 1/2 cup of chicken broth, and stir again, to combine these ingredients.


Cook The Mussels
Now it’s time to cook the mussels. You will cook the mussels in the same skillet. Add the mussels to the skillet and quickly stir to cover them with the “veggies” and broth.
Put a lid on the skillet and let the mussels steam for 4-5 minutes on MEDIUM heat or until all the mussel shells have opened. Give the cooked mussels another stir to coat with the broth.
Remove the skillet from the heat. Discard any mussels that did NOT open while cooking, as they’re not safe for consumption. Cover the skillet again (off heat) and keep the mussels warm.

Make The Green Curry Sauce
TIP: Make the green curry sauce while the mussels are cooking, because they take about the same time to cook. To make the green curry sauce you will need a can of unsweetened coconut milk (NOT coconut cream). Use lite or regular canned coconut milk, whichever you prefer. You can typically find this in the Asian foods section at the grocery store.
You will also need Thai style green curry paste, which is usually found in the Asian foods section. I have found various brands available at our local Safeway, Kroger and Wal Mart.
This recipe uses 3 Tablespoons GREEN curry paste, so buy a small jar and refrigerate the leftover paste. If you happen to prefer a really hot and spicy green curry sauce, feel free to add another Tablespoon.


To make the curry sauce, add 3 Tablespoons of green curry paste into a separate large skillet. Cook the sauce on low heat for two minutes, stirring occasionally.
Open the can of coconut milk and stir it until mixture is well blended. Add the canned coconut milk and the juice of one lime to the curry sauce.
Stir again, then let the sauce simmer on low heat 2-3 minutes, or until heated through. Stir in half of the total amount of cilantro leaves.


Serve The Thai Green Curry Mussels
To serve, evenly divide the cooked mussels (and veggies) into individual serving bowls. Pour the hot green curry sauce over the mussels, dividing all the sauce evenly between the portions.
Garnish each serving with the remaining cilantro leaves, then serve and enjoy! Be sure to serve some warm crusty bread on the side to dip up some of that curry sauce out of the bowl.


I hope you have the opportunity to make this tasty recipe for Thai green curry mussels and trust that you and those you love will enjoy this dish as much as we do.
Thanks for taking the time to visit my blog today, and I invite you to come back soon for more delicious recipes. Take care, may God bless you, and have a great day!
Looking for More SEAFOOD Recipes?
You can find ALL of my recipes in the Recipe Index, which is located at the top of the page. I have a large variety of seafood recipes to choose from including:
- Mussels In Wine Garlic Butter Sauce
- Baked Dover Sole Rollatini
- Honey Garlic Shrimp
- Cedar Plank Grilled Salmon
- Pan-Seared Rockfish with Fresh Herbs
Want More Recipes? Get My FREE Newsletter!
I publish a newsletter 2 times per month (1st and 15th) with lots of recipes, tips, etc.
Would you like to join our growing list of subscribers?
There is a Newsletter subscription box on the top right (or bottom) of each blog post, depending on the device you use.
You can submit your e-mail address there, to be added to my mailing list.
Find Me On Social Media:
Facebook page: The Grateful Girl Cooks!
Pinterest: The Grateful Girl Cooks!
Instagram: jbatthegratefulgirlcooks

↓↓ PRINTABLE RECIPE BELOW ↓↓
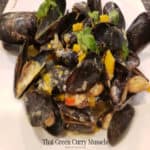
Thai Green Curry Mussels are a delicious dish! Mussels are served in a coconut curry sauce, with ginger, garlic, lime, shallots and peppers.
- 1 Tablespoon coconut oil
- ⅓ cup red/orange bell peppers combined/chopped
- ¼ cup shallot minced
- 1 inch piece of fresh ginger finely grated
- 1 pinch red pepper flakes
- ¼ teaspoon salt and pepper ¼ tsp. EACH
- 4 cloves garlic minced
- ½ cup low sodium chicken broth
- 2½ pounds fresh mussels
- 3 Tablespoons green curry paste
- 13.7 ounces lite coconut milk (canned)
- 1 lime (juice only)
- 4 Tablespoons cilantro leaves Divided Use
*Note: Before cooking fresh mussels it is very important to check them. If any of the shells have already opened, discard them, as they are not safe to eat. You want shells CLOSED before cooking! The mussel shells will open on their own, once they've been cooked.
Heat coconut oil in large skillet on Medium heat. When oil is hot, add chopped red/yellow peppers, shallot, and grated ginger. Add a pinch of red pepper flakes; season with salt/pepper. Stir to combine; cook on Medium for a couple minutes until veggies begin to soften. Add minced garlic; cook another 30 seconds, stirring often. Pour in chicken broth; stir again to combine ingredients.
Add mussels to the same skillet; quickly stir to coat mussels with veggies/broth. Put a lid on the skillet. Steam mussels for 4-5 minutes on Medium heat or until you see the shells have opened. Give mussels another stir to coat with broth. Remove skillet from heat. Discard any mussels (if there are any) that did NOT open while cooking. Cover skillet (off heat); keep mussels warm.
Place curry paste into separate skillet. Cook on Low heat for two minutes, stirring occasionally. Open can of coconut milk; stir until contents are well blended. Add coconut milk and lime juice to skillet. Stir again; let simmer on Low 2-3 minutes, or until heated through. Stir in ½ of the cilantro leaves, then serve.
To serve, evenly divide cooked mussels (and veggies) into serving bowls. Pour hot green curry sauce over mussels, dividing all the sauce evenly between portions. Garnish each serving with remaining cilantro. Serve and enjoy!
Here’s one more to pin on your Pinterest boards!