Cajun-Seasoned Burger Patties have great flavor, whether BBQ grilled or skillet-cooked. Eat them “as is”, or on a bun with all the fixin’s!

If you’re looking for a way to boost the flavor of cooked burgers, may I suggest this SIMPLE recipe for Cajun-seasoned burger patties?
Whether you enjoy eating burger patties PLAIN on a plate OR eaten as a full-fledged burger on a bun with condiments, etc., I believe you’ll enjoy these patties.
You can pan-fry them, grill on a BBQ, cook in an air fryer, or broil them in the oven! You can make them using your preferred method of cooking burgers!
As written, this recipe will yield two burger patties (which is enough for my husband and myself), but can easily be increased in quantity. Here’s how to make this simple recipe.
Scroll Down For A Printable Recipe Card At The Bottom Of The Page
What Spices Will I Need?
Spices are what give these Cajun-seasoned burger patties their wonderful taste! The burger patties have lots of flavor and a tiny bit of “heat”, but not too much (in case you’re wondering).
The dried spices you will need are cumin, smoked paprika, garlic powder, salt and pepper, onion powder, cayenne pepper and thyme.

Make The Cajun-Seasoned Burger Patties
Place the ground beef in a large mixing bowl. Add all of the spices and then mix them together using a fork or your clean hands.
Combine until all the spices have been incorporated into the ground beef. Try not to overwork or compact the ground beef too much.

Remember- this recipe will yield two burger patties (as written) but can easily be doubled or tripled to make the quantity you need.
Divide the meat into two balls then use your hands to flatten and shape them into two round circles. Place each patty on wax paper or parchment paper.

To Grill Or Not To Grill?
We LOVE to grill our burger patties outside, however the weather here in Oregon can be hard to predict. NEWS ALERT: It rains a lot here!
Our crazy weather patterns make it difficult at times to plan a good old-fashioned BBQ! To grill or not to grill is a constant question. Cooking inside or outside is your choice!
When it’s nice outside, we grill these burger patties on our Weber BBQ. If it is raining (often) or freezing cold outside, we cook them inside, in a large skillet (cast iron is the best).
Cooking The Burger Patties- BBQ or Skillet
NOTE: If grilling outside, prepare them as you would any burger on the BBQ grill. Cook them until they reach the desired “doneness” you prefer.

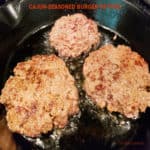
As you can see in the photo below, we cooked these in a large cast iron skillet. One patty is not seasoned and the other two are the Cajun-seasoned burger patties from this recipe.
Heat a large cast iron skillet on medium heat until it is really hot (but not smoking). Place the patties into the hot skillet (they should sizzle when they hit the skillet).
NOTE: If using a NON cast iron skillet, lightly spray the skillet with non-stick spray before adding the patties.

Do not move or disturb them for about 3 minutes, while they sear (and set) in the skillet. When they have browned well on the bottom, carefully turn each patty over to the other side.
Continue to cook the Cajun-seasoned burger patties to your preferred doneness, turning (if desired) to further brown the outside.


Time To Eat!
Once the burger patties are cooked to your taste, they are ready to be served. At times we enjoy them plain, served as is on a plate with side dishes.
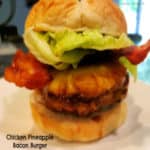
Our FAVORITE way to enjoy them is to go “full on burger” with the patties! Place them on toasted hamburger buns, and top with your favorite condiments.
If you’re looking for a delicious, unique condiment for your hamburgers, check out my recipe for Bacon Jam for Burgers!
Now all you have to do is add some delicious sides (like potato salad or fruit salad) and dig in! The well-seasoned patties will add a nice pop of flavor to the burgers.

I hope you’ll have the chance to try these Cajun-seasoned burger patties. They’re a cinch to make, and I’m confident you’ll enjoy them.
Thanks for stopping by, and I invite you to come back soon for more family-friendly recipes. Take care, may God bless you, and have a GREAT day!
Looking For More BEEF Recipes?
You can find ALL of my recipes in the Recipe Index, which is located at the top of the page. I have some delicious recipes featuring beef to choose from, including:
- Really GOOD Meatloaf
- Beef Tips And Gravy
- Easy Stuffed Beef Rolls
- Easy Garlic Butter Steak Bites
- Instant Pot Beef Stew
Want More Recipes? Get My FREE Newsletter!
I publish a newsletter 2 times per month (1st and 15th) with lots of recipes, tips, etc.
Would you like to join our growing list of subscribers?
There is a Newsletter subscription box on the top right (or bottom) of each blog post, depending on the device you use.
You can submit your e-mail address there, to be added to my mailing list.
Find Me On Social Media:
Facebook page: The Grateful Girl Cooks!
Pinterest: The Grateful Girl Cooks!
Instagram: jbatthegratefulgirlcooks

Recipe adapted from: Isabel D. Price, via the book “Food Meets Faith”, page 77, published in 2019 by Live Smart Solutions, LLC
↓↓ PRINTABLE RECIPE BELOW ↓↓
Cajun-Seasoned Burger Patties have great flavor, whether BBQ grilled or skillet-cooked. Eat them "as is", or on a bun with all the fixin's!
- ½ pound ground beef (85%) see NOTE section below*
- ½ teaspoon salt
- ¾ teaspoon ground cumin
- ½ teaspoon smoked paprika
- ½ teaspoon garlic powder
- ¼ teaspoon onion powder
- ¼ teaspoon cayenne pepper
- ¼ teaspoon black pepper
- ¼ teaspoon ground thyme
Place ground beef in mixing bowl. Add all spices; mix together using a fork or clean hands, until spices are distributed in the meat. Don't overwork the beef.
Divide meat into 2 balls; use your hands to flatten/shape them into 2 round circles. Place each patty on wax paper or parchment paper.
BBQ: If grilling outside, cook as you would any burger on the BBQ grill. Cook until they reach your preferred "doneness".
SKILLET: Heat a cast iron skillet on medium heat until really hot (but not smoking). Place patties into hot skillet (they should sizzle when they hit the skillet).
NON CAST IRON SKILLET: If using NON cast iron skillet, lightly spray skillet with non-stick spray before adding patties.
Do not move/disturb patties for about 3 minutes, while they sear (and set) in the skillet. Once nicely browned on the bottom, carefully flip each patty to the other side. Continue to cook to your preferred doneness, turning (if desired) to further brown the outside.
Serve plain (as is), on a plate with side dishes OR place them on toasted hamburger buns, and top with your favorite burger condiments. Enjoy!
*NOTE: 85% ground beef was used for the caloric calculation of 253 calories per patty. If using LEAN ground beef, caloric calculation would lower to about 165 calories per patty.
Here’s one more to pin on your Pinterest boards!