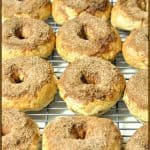
Cinnamon crunch bagels are New York-style chewy bagels, easily made from scratch, with a cinnamon-sugar crunchy top, and are a tasty breakfast treat!
Well, I tried a new bagel recipe this past weekend… Cinnamon Crunch Bagels! Oh my goodness – they were absolutely delicious!!!
I love the Cinnamon Crunch Bagels (my favorite!) at Panera Bread, and love the cinnamon-sugar coating on top of the bagels that crisps up as they bake, AND the cinnamon flavor that permeates the bread dough. Recently I found this recipe on Pinterest and decided to make my own! I’m so glad I tried this recipe… these “cinnamon-y” bagels are amazing!
Scroll Down For A Printable Recipe Card At The Bottom Of The Page
I Enjoy Making Bagels From Scratch
I enjoy making bagels. They’re easy to prepare, and this recipe for cinnamon crunch bagels makes a dozen! I’ve already made New York Style Blueberry Bagels, Gingerbread Bagels, Cranberry Orange Bagels, Everything Bagels, and Jalapeño Cheddar Bagels, so I was excited to try a new variety. And, wow… these were so good!
Basically, the process for making bagels is: dough is mixed, rises, bagels formed, boiled, then baked, and the result is a chewy New York style bagel, for the fraction of the cost of buying them. Here’s how you make them:
How To Make Cinnamon Crunch Bagels
Combine yeast, warm water and brown sugar in the bowl of a stand mixer, and let it rest for 10 minutes, to activate the yeast. Once the yeast is bubbly, add cinnamon, salt and flour.

Knead the dough (with a dough hook) on low speed, and and additional flour slowly. Knead the dough for approximately 10 minutes, until a smooth, slightly elastic ball of dough is formed.
Place the dough ball in a large, greased bowl, and turn the dough over to make sure all sides are lightly coated (so it won’t dry out). Cover the bowl and leave it in a warm place (for the dough to rise) for an hour, or until the dough has doubled in size.

While the dough is rising, mix up the ingredients for the cinnamon sugar topping in a small bowl, and set aside. Easy.

Once the dough for the cinnamon crunch bagels has doubled in size, it’s ready to go!

Give the dough a good punch with your fist, which helps to “deflate” the dough. “BOOM”.

Shaping The Cinnamon Crunch Bagels
Divide the bagel dough into 12 equal sized dough balls. Smooth the dough by pulling the edges (with your hands) toward the bottom of the dough ball. This will make for a more rounded, uniform appearance on top. Place the 12 dough balls on a lightly floured work surface, with the seam side down.

Working on one bagel at a time, use your thumb to make a hole in the center of the dough ball. Open the hole up through the bottom of the dough, and slightly pull on the dough to expand the hole a bit.
Repeat process for all 12 bagels. By the way… can you see all the little specks of cinnamon in dough? I can, and love the extra flavor the cinnamon provides.

Let The Formed Cinnamon Crunch Bagels REST
Here they are after all the holes have been formed, in the photo below, so you can see what they will look like. Let the formed bagels rest for 10 minutes, undisturbed.

Boil the Cinnamon Crunch Bagels
While the cinnamon crunch bagels are resting (for 10 minutes), bring a LARGE pan of water to a full boil. Add a Tablespoon of brown sugar to the water.
Once the water in pan is boiling, add 2-3 bagels at a time. Boil for 45 seconds, then flip them to the other side and boil for an additional 45 seconds. I use 2 chopsticks to flip them (one in the middle of hole and one on the outside).
Once done, remove the cinnamon crunch bagels with a slotted spoon (to drain), and place on a paper towel to absorb any extra water. Place the drained bagels seam side down onto a greased baking sheet. Repeat process until all the bagels are boiled and on the baking sheet.

Here are the cinnamon crunch bagels on the greased baking sheet after boiling. Not too glamorous, right? Just wait! By the way, boiling the bagels helps ensure a nice chewy bagel!

Topping The Bagels Before Baking
Grab the cinnamon topping mixture and evenly sprinkle it over the tops of the bagels. It’s a bit messy, because the topping will fall onto the baking sheet, but just keep going. Use all the topping mixture!

See how much topping fell onto the baking sheet below? I used a pastry brush to brush as much of it as I could get onto a plate, then simply added it back onto the tops of the bagels.

Bake The Cinnamon Crunch Bagels
The bagels are baked in a 400° F. oven for 18-20 minutes (mine took a bit longer to get them the golden brown color I desired). Check on them around the 18 minute mark, and don’t hesitate to cook them a few minutes longer until they’re a golden brown color.

Let the bagels cool on a wire rack. They taste great broiled, with cream cheese! NOTE: Do NOT put these bagels into a toaster or you will be sorry, as the sugar will melt into the appliance.
If you are going to broil them (which is what I do), gently slice them in half with a serrated knife. Place them, topping side down, on a baking sheet to broil. Please note that a bit of the topping will probably crumble or melt a bit when broiling, but no worries. Just scoop it right back up onto the bagel once it’s done, slap some cream cheese on it… and ENJOY these amazing bagels!

I am thrilled with the way these cinnamon crunch bagels turned out. They are so GOOD! I took several bagels and some cream cheese over to my friend Stephanie’s home as a surprise, and her family ate them for Valentines Day breakfast. She told me they really enjoyed them.
Don’t be afraid to try making bagels at home… be FEARLESS! These cinnamon crunch bagels are fairly easy and FUN to make, and even better to EAT! Hope you’ll give these a try! Have a GREAT day, and don’t forget to check out ALL of my recipes in the Recipe Index, located at the top of the page.
Interested In More Recipes?
Thank you for visiting this website. I appreciate you using some of your valuable time to do so. If you’re interested, I publish a newsletter 2 times per month (1st and 15th) with all the latest recipes, and other fun info. I would be honored to have you join our growing list of subscribers, so you never miss a great recipe!
There is a Newsletter subscription box on the top right side (or bottom) of each blog post, depending on the device you use, where you can easily submit your e-mail address (only) to be included in my mailing list.
You Can Also Find Me On Social Media:
Facebook page: The Grateful Girl Cooks!
Pinterest: The Grateful Girl Cooks!
Instagram: jbatthegratefulgirlcooks

Recipe Source: http://www.bunsinmyoven.com/2014/03/31/cinnamon-crunch-bagels/
Cinnamon crunch bagels are New York-style chewy bagels, easily made from scratch, with a cinnamon-sugar crunchy top, and are a tasty breakfast treat!
Category: Breakfast
Cuisine: American
Keyword: cinnamon crunch bagels
Servings: 12 bagels
Calories Per Serving: 249 kcal
Author: JB @ The Grateful Girl Cooks!
For Bagels:
- 2 teaspoons active dry yeast
- 1 1/2 cups warm water (110-120 degrees)
- 1/4 cup brown sugar , divided
- 3 teaspoons cinnamon
- 1 1/2 teaspoons salt
- 5 cups all purpose flour
For Topping:
- 1/4 cup granulated white sugar
- 1/4 cup brown sugar
- 3 teaspoons cinnamon
Place yeast, warm water and 3 Tablespoons brown sugar into the bowl of a stand mixer. Stir gently, then let rest for 10 minutes for yeast to activate. Yeast should be foamy and bubbly when ready.
Stir in cinnamon, salt, and 2 cups of the all purpose flour. Turn the mixer onto LOW and begin kneading the dough (using the dough hook attachment). Slowly add in the rest of the flour, a little at a time, until the dough begins form a ball. (You may or may not need to use all of the remaining 3 cups cups of the flour-I used it all). Continue to knead the dough on low for approximately 10 minutes or until a dough ball has formed that is both smooth and elastic in texture.
Place the dough into a greased or sprayed large bowl. Flip the dough over to ensure it is coated with the grease or spray, enough to ensure dough doesn't dry out. Cover the bowl with a dish towel or plastic wrap, and set in a warm place. Let dough rise for an hour or until it has doubled in size.
While dough is rising, make the topping by mixing granulated sugar, brown sugar and cinnamon in small bowl. Set aside.
Once dough has doubled in size, punch the dough down; divide evenly into 12 dough balls. Using your thumb, push down into the center of each one, breaking through the bottom. Use your fingers to gently spread the hole a bit more. Repeat process for all 12, then let the bagels rest for 10 minutes on a lightly floured surface.
While bagels are "resting", bring a large pan full of water to a boil. Add the last Tablespoon of brown sugar to the water. Once the bagels have rested and water is boiling, gently place 2-3 bagels at a time into the boiling water. Boil for 45 seconds, then carefully flip each to the other side, and cook for another 45 seconds. Remove bagels, using a slotted spoon. Place on paper towel (to absorb water). Repeat process with remaining bagels. Put all boiled bagels onto a greased baking sheet about 2 inches apart. Evenly distribute the cinnamon sugar topping over the tops of the bagels.
Bake bagels at 400 degrees for 18-20 minutes (or more) until lightly golden brown. Remove to wire rack to cool.
Nutrition Facts
Cinnamon Crunch Bagels
Amount Per Serving (1 bagel)
Calories 249
% Daily Value*
Sodium 295mg13%
Potassium 87mg2%
Carbohydrates 54g18%
Fiber 2g8%
Sugar 13g14%
Protein 6g12%
Calcium 25mg3%
Iron 2.6mg14%
* Percent Daily Values are based on a 2000 calorie diet.
Here’s one more to pin on your Pinterest boards!
Save
Save


, are an EASY meal to BBQ or broil for dinner!")


, are an EASY meal to BBQ or broil for dinner!")
, with pico de gallo and tortilla strips! / The Grateful Girl Cooks!")
 / The Grateful Girl Cooks!")
 / The Grateful Girl Cooks!")
 / The Grateful Girl Cooks!")
 / The Grateful Girl Cooks!")
 / The Grateful Girl Cooks!")
 / The Grateful Girl Cooks!")
 / The Grateful Girl Cooks!")
 / The Grateful Girl Cooks!")
 / The Grateful Girl Cooks!")
 / The Grateful Girl Cooks!")
 / The Grateful Girl Cooks!")
 / The Grateful Girl Cooks!")

, with pico de gallo and tortilla strips! / The Grateful Girl Cooks!")