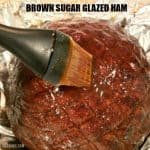
Brown Sugar Glazed Ham is perfect for dinners or holiday feasts! A honey, brown sugar, OJ and spice glaze coats the ham (boneless or bone-in).. / The Grateful Girl Cooks!")
My husband LOVES ham! We don’t have it that much during the year, but wow, does he ever love it at Christmas time and at Easter. In the past we’ve bought pre-glazed hams (at Honey-Baked using gift certificates).
We’ve also bought hams at the grocery that come with the cute little glaze package attached (where all you add is water).
Those are all wonderful options, but truthfully, it is sooo easy to make your own homemade brown sugar glazed ham. Today I will show you how you can make your own sauce to baste your holiday ham.
The “recipe” is incredibly simple, and the ham tastes wonderful after being fully glazed at 3 different points during the baking time.
The recipe as written is for a six pound ham, but can be easily adapted for a much larger one, too! Here’s how easy it is to make this delicious glazed ham:
Scroll Down For A Printable Recipe Card At The Bottom Of The Page
Make The Brown Sugar Glaze
Simple, simple, simple. The sweet glaze is super easy to make! Basically it involves placing the ingredients in a pan and cooking for a couple minutes. That’s it!
Place brown sugar, orange juice, honey, white vinegar, mustard, onion powder, garlic powder and cinnamon in a medium saucepan. Whisk the ingredients together. Once combined, bring the sauce to a simmer on medium-low heat.
Let it cook for about 2 minutes (stirring occasionally) or until the sauce has slightly thickened, then remove the pan from the heat source.


Time To Glaze The Ham – Glaze #1
TIP: Take the ham out of the refrigerator about an hour before beginning, so some of the “chill” can be take off the meat. *It will cook more evenly if you do this.
Lay two large pieces of aluminum foil on counter (overlapping slightly in middle). Place your ham right in the middle of the foil. Use 1/3 of the brown sugar glaze to cover the entire outside surface of the ham.
If you are using a spiral sliced ham, let some of the glaze drizzle down between slices, if desired. Wrap up the ham tightly with the aluminum foil, until it is well sealed.
Place the ham in a large baking dish, flat side of the ham facing down in the dish, then place the dish into a preheated 325°F oven (on a middle rack).


Baking The Brown Sugar Glazed Ham – Glaze #2
Bake the brown sugar glazed ham at 325°F for 15 minutes for every pound of meat you are cooking, OR until the internal temperature of the ham reaches 100-110°F. For example, this 6 pound ham was cooked for 90 minutes. As the weight of your ham may vary, it is important to follow these guidelines to ensure a juicy ham!
Remove the ham from the oven, but TURN up the oven temperature to 400°F, as you remove it. Carefully open the foil wrap, and brush the ham with another 1/3 of the brown sugar glaze all over. Place the ham STILL UNCOVERED back into the now 400°F oven. Cook for 15-20 minutes more. Keeping it uncovered will help the sugar to slightly caramelize on the ham.
Glaze # 3- The Final Glaze
Remove the ham from the oven after 15-20 minutes OR when the internal temperature reaches 160°F. Brush the remaining glaze over the surface of the ham, then tightly seal the foil back up, and let the ham rest for 10 minutes (covered), before slicing.
The ham’s internal juices will redistribute throughout the meat during this 10 minute “resting” time. This will help it to stay juicy when serving. Once “rested”, the ham is ready to slice and eat.


Ready To Eat
Slice the ham and serve to your hungry family or guests. This boneless brown sugar glazed ham sliced easily, the meat was fully cooked and juicy, and the glaze added extra flavor!

You can also use this glaze for your spiral-sliced bone-in hams, too. The simple, but sweet glaze adds a wonderful layer of extra flavor to any ham.

We enjoyed our delicious ham slices with French-style green beans and maple cinnamon sweet potatoes. It was a simple, but absolutely delicious meal.
The ham leftovers were pretty incredible too, and were used to make ham and cheese scrambled eggs, ham sandwiches, and more. YUM.

I hope you will consider trying this simple brown sugar glazed ham. I’m confident you will enjoy it on your favorite variety of ham.
Thank you so much for visiting this blog. May God bless and keep you, and make His face shine upon you. Have a GREAT day, friends.
Looking For More HAM Recipes?
You can find my recipes that use ham (or pork) in the Recipe Index, located at the top of the page. I have some delicious recipes, including:
Want More Recipes? Get My FREE Newsletter!
I publish a newsletter 2 times per month (1st and 15th) with lots of recipes, tips, etc..
Would you like to join our growing list of subscribers?
There is a Newsletter subscription box on the top right (or bottom) of each blog post, depending on the device you use.
You can submit your e-mail address there, to be added to my mailing list.
Find Me On Social Media:
Facebook page: The Grateful Girl Cooks!
Pinterest: The Grateful Girl Cooks!
Instagram: jbatthegratefulgirlcooks

Recipe adapted from: Melissa, at: https://www.blessthismessplease.com/brown-sugar-glazed-ham/
↓↓ PRINTABLE RECIPE BELOW ↓↓
Brown Sugar Glazed Ham is perfect for dinners or holiday feasts! A honey, brown sugar, OJ and spice glaze coats the ham (boneless or bone-in).
Category: Entree
Cuisine: American
Keyword: brown sugar glazed ham
Servings: 12
Calories Per Serving: 598 kcal
Author: JB @ The Grateful Girl Cooks!
- 6 pound ham (bone-in or boneless) pre-cooked (intact or spiral cut)
- ½ cup dark brown sugar (firmly packed)
- ¼ cup orange juice
- 1 Tablespoon white vinegar
- 1 Tablespoon yellow mustard
- 1½ Tablespoons honey
- ⅓ teaspoon ground cinnamon
- 1 pinch nutmeg
- ¼ teaspoon garlic powder
- ¼ teaspoon onion powder
Remove ham from fridge 1 hour before beginning, to take chill off. Preheat oven to 325°F.
Place remaining ingredients in a medium saucepan. Whisk together, to combine, and bring to a simmer on medium-low heat. Cook for 2 minutes (stirring occasionally) or until sauce has slightly thickened. Remove pan from heat source.
Lay two large pieces of aluminum foil on counter (overlapping slightly in middle). Place ham in middle of the foil. Brush 1/3 of the brown sugar glaze on, to cover surface of ham. If using spiral sliced ham, let glaze drizzle down between slices. Wrap ham with foil, until well sealed. Place ham in a large baking dish, flat side down. Place dish on middle rack in 325°F oven.
Bake at 325°F for 15 minutes for every pound of meat you are cooking, OR until the internal temperature of the ham reaches 100-110°F. As ham weights vary, it is important to follow these guidelines to ensure juicy ham! Remove ham from oven, and TURN up oven temperature to 400°F. Carefully open foil, and pull it slightly away from the meat (but leave it in pan); brush ham with another 1/3 of the brown sugar glaze.
Place ham (STILL UNCOVERED) back into 400°F oven. Cook 15-20 minutes more. Remove ham after 15-20 minutes OR when the internal temperature reaches 160°F. Brush ham with remaining 1/3 glaze; seal the foil back up, and let ham rest for 10 minutes (covered), before slicing to allow juices to redistribute through meat. Once "rested", it's ready to slice and serve.
Nutrition Facts
Brown Sugar Glazed Ham
Amount Per Serving (1 (8 ounce slice))
Calories 598 Calories from Fat 342
% Daily Value*
Fat 38g58%
Saturated Fat 14g88%
Cholesterol 141mg47%
Sodium 2709mg118%
Potassium 671mg19%
Carbohydrates 12g4%
Fiber 1g4%
Sugar 12g13%
Protein 49g98%
Vitamin A 10IU0%
Vitamin C 3mg4%
Calcium 23mg2%
Iron 2mg11%
* Percent Daily Values are based on a 2000 calorie diet.
Here’s one more to pin on your Pinterest boards!. / The Grateful Girl Cooks!")