Deep dish boysenberry pie is easy to prepare with fresh or frozen berries. The perfect summer dessert, especially with a scoop of vanilla ice cream! One of my favorite fruit pies is Boysenberry Pie…so it stands to reason that one of my absolute favorite DEEP-DISH pies is Deep Dish Boysenberry Pie!
I figure it’s just MORE of a good thing, so how can that be anything but DELICIOUS? It just SCREAMS Summer to me!
Scroll Down For A Printable Recipe Card At The Bottom Of The Page
Deep dish boysenberry pie is easy to prepare with fresh or frozen berries, and is the perfect summer dessert, especially with a scoop of vanilla ice cream!
I love to go berry picking each summer here in the fertile farmlands surrounding Portland. It’s fun to get out and pick boysenberries during their short growing season. YUM! See how big they are?
I have great memories of my Great Aunt Juanita in Southern California growing boysenberries and making us cobblers when we came to visit her in the summer.

I usually end up making cobblers, jams, and “regular sized” pies when I pick my berries, but I also wanted to try my hand at making a DEEP-DISH boysenberry pie!
You know… the kind bursting with fresh sun-ripened boysenberries and crowned with a large scoop of homemade vanilla ice cream. I make my deep-dish pie in a baking dish, and not in a pie pan. It is easy. Here’s what you do:
Make The Boysenberry Pie Filling
Preheat your oven to 425°F. While the oven preheats, rinse and completely drain the boysenberries. Place the drained boysenberries in a large bowl.

Add granulated sugar, flour (or cornstarch), and ground cinnamon then gently stir to combine these ingredients.
Roll Out Pie Crust and Fit It In Baking Dish
Roll out two pie crusts and fit one of the pie crusts into the baking dish. Make sure the pie dough crust comes up to the rim of the dish (shown below).
Prick the dough with the tines of a fork all over the sides and bottom of crust. Gently pour in the berry mixture once the pie crust is ready.

Dot the top of the deep-dish boysenberry pie filling with small chunks of butter.

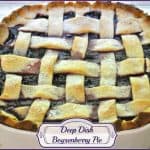
Making the Lattice Crust
Roll out the remaining pie crust (I use my Mom’s recipe for all my pie crusts). Cut strips for a lattice crust (use a pizza cutter for easy cutting- a sharp knife will also work well).

Weave the top crust onto the top of pie and pinch the edges together with the bottom crust to seal crust. Flute the edges of the dough to form the crust.
Lightly brush the top weaved crust with a little milk (or water), then sprinkle with sugar (lightly). This will give the top crust a little shine and a sugary top.

Bake The Deep-Dish Boysenberry Pie
Bake the deep-dish boysenberry pie in preheated 425°F. oven for 45-50 minutes (or longer), until crust is light golden brown and juices are bubbling up in the center and around the sides of the pie.
Carefully remove the hot pie from the oven and allow the pie cool to down a bit on a wire rack before attempting to slice it and serve it. This gives the juices time to coagulate a bit.
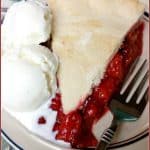
Here’s a peek at the inside of the pie, once that first piece was dished up!

Here is a portion of the deep-dish boysenberry pie on the plate with a large scoop of homemade vanilla ice cream. You can’t really tell in this picture, but the height of the pie is about 2 ½ inches high.
Well… at least it was that high BEFORE I dumped a large scoop of ice cream on it. Ha Ha! That big ol’ scoop of ice creams mashed that piece right down!

Here’s another shot from the other side of this yummy pie!

I hope you will consider making this delicious deep dish boysenberry pie! If you are interested in my recipe for a “regular sized” boysenberry pie (not deep dish), you can find it here.
Looking For More PIE Recipes?
You can find ALL of my recipes in the Recipe Index, which is located at the top of the page. I have quite a few delicious pie recipes to choose from, including:
- Awesome Pecan Pie
- Dutch Crumb Apple Pie
- Old Fashioned Banana Cream Pie
- Mint Brownie Pie
- Sour Cream Lemon Meringue Pie
Want More Recipes? Get My FREE Newsletter!
I publish a newsletter 2 times per month (1st and 15th) with lots of recipes, tips, etc.
Would you like to join our growing list of subscribers?
There is a Newsletter subscription box on the top right (or bottom) of each blog post, depending on the device you use.
You can submit your e-mail address there, to be added to my mailing list.
Find Me On Social Media:
Facebook page: The Grateful Girl Cooks!
Pinterest: The Grateful Girl Cooks!
Instagram: jbatthegratefulgirlcooks
 Recipe Adapted From: The New Pillsbury Family Cookbook, Published by the Pillsbury Company, 1973, page 149
↓↓ PRINTABLE RECIPE BELOW ↓↓
- 6 cups fresh boysenberries (rinsed and drained)
- 1 1/4 cup granulated sugar
- 1/2 cup flour OR 1/4 cup plus 2 Tablespoons corn starch
- 1/2 teaspoon cinnamon
- 2 Tablespoons cold butter (cut into chunks)
- 2 Pastry Pie Dough Crusts (homemade or store bought)
- A little bit of granulated sugar to sprinkle on top of crust
- Preheat oven to 425 degrees F.
- Place boysenberries, sugar, flour (or cornstarch), and cinnamon in a large mixing bowl. Gently toss to combine fully.
- Roll out pie dough so you have 2 .Place 1 crust into 2 quart baking dish. Press it into dish so that it covers bottom and comes all the way up to rim of dish. Prick bottom and sides of crust with tines of fork.
- Gently pour the berry mixture into prepared pie crust. Dot the top of pie with chunks of butter. Cover the pie filling with the other pie crust. Seal edges. Flute edges. Cut vents to let out steam. IF MAKING LATTICE TOP CRUST: Roll out dough. Cut into approx. 1/2 inch wide strips. Lay half of strips in parallel rows on top of pie filling (about 1 inch apart). To weave, place another row of strips parallel to first rows, but lift every other strip as new strips are added. (up, under, up, under). Seal edges of crusts together. Form standing edge/rim. Flute edges.
- Brush top crust lightly with milk or water. Immediately sprinkle wet crust lightly with granulated sugar.
- Bake at 425 degrees for 45-50 minutes, or until crust is golden brown, and juices are bubbling. Remove to a wire rack and let cool down slightly, before serving. Serve with ice cream...enjoy!
NOTE: Unsweetened frozen boysenberries may be used if fresh berries are unavailable. Mix frozen fruit in with the sugar and flour, etc. Do not use sweetened frozen fruit, as that would mess up the recipe (and be WAY TOO SWEET and the syrup consistency would change!)
Here’s one more to pin on your Pinterest boards!


 - The Grateful Girl Cooks!")
 - The Grateful Girl Cooks!")
 - The Grateful Girl Cooks!")
 - The Grateful Girl Cooks!")
 - The Grateful Girl Cooks!")
 - The Grateful Girl Cooks!")
 - The Grateful Girl Cooks!")
 - The Grateful Girl Cooks!")
 - The Grateful Girl Cooks!")


