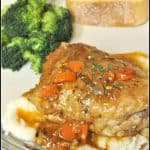
Category: Chicken

Sweet Fire Chicken (Panda Express Copycat)

It’s easy to make Sweet Fire Chicken (Panda Express copycat) at home, with chicken breast, bell peppers and pineapple in a sweet Thai chili sauce. It's easy to make Sweet Fire Chicken (Panda Express copycat) at home, with chicken breast, bell peppers and pineapple in a sweet Thai chili sauce.

We recently had a day of snow, followed by 2 days of ICE here in Portland, which made trips to the grocery store nearly impossible. While searching my cupboards, I realized we had all the ingredients for a copycat version of Sweet Fire Chicken from Panda Express, so I made it for my husband and myself.  It was fantastic (which made the whole “iced in” thing not so bad)!

This sweet fire chicken dinner was absolutely delicious! A little sweet, and a little spicy! Even though we were “house-bound”, it was just as good (if not better) than getting takeout! Yummy good!

It was a very easy recipe to prepare (even if my fingers got a bit messy during the process!) Here’s how you make this dish:

Scroll Down For A Printable Recipe Card At The Bottom Of The Page

How To Make Sweet Fire Chicken

Cut up boneless skinless chicken breasts into bite sized cubes.  I used two large chicken breasts for 4 servings.

Chicken breasts for sweet fire chicken are cut into cubes before cooking.

Chop and slice the red pepper and green onions, and then set them aside until you are ready to use.

Red bell peppers and green onions are chopped to add to the sweet fire chicken.

Dredge all of the chicken pieces in flour, making sure to to coat all sides.

Chicken breast cubes are dredged in flour before cooking them for sweet fire chicken.

Dip the flour coated chicken pieces in beaten eggs. THIS is the “kind of messy” part! I started with tongs, then switched to using my fingers for this step.

Once the flour coated pieces of chicken has been dipped in the egg mixture, dredge them again in the flour mixture. Got it? Flour. Egg. Flour. Amen.

Flour coated chicken (for sweet fire chicken) is dipped in egg mixture before cooking.

The chicken (for sweet fire chicken) is dredged in flour for a second time, before cooking.

Cooking The Sweet Fire Chicken

Cook the chicken in batches. Cook about 2 minutes per side until brown and crispy. Try to not let the pieces touch each other (or they will bond and cook together).

Chicken pieces (for sweet fire chicken) are cooked in hot oil in a large skillet in batches.

When done, place cooked chicken pieces on paper towels to drain. Repeat this step until all of the chicken is cooked.

Cooked chicken (for sweet fire chicken) is drained on paper towels after cooking.

Clean out the skillet, then heat the olive oil in it. Cook the red bell pepper and pineapple for 3-4 minutes, stirring occasionally.  Add the Thai sweet chili sauce to the skillet, and stir to combine.

Red bell pepper, pineapple and sweet chili sauce are heated for the sweet fire chicken sauce.

This is the sweet chili sauce I used for the sweet fire chicken. It can be found in most grocery stores Asian Food specialty sections.

Mae Ploy sweet chili sauce was used in this recipe for sweet fire chicken.

Ready To Serve The Sweet Fire Chicken

Add in the pieces of chicken and gently stir, to coat the chicken, bell pepper and pineapple with the sauce. Heat through and garnish with sliced green onions. Remove the sweet fire chicken from the heat, and serve!

Browned chicken is added to the sauce in skillet, to make sweet fire chicken.

Serve the sweet fire chicken with rice or noodles, and ENJOY! It tastes wonderful (and it’s really not too spicy… honest!). The flavors are wonderful!

Sweet fire chicken is served on top of white rice.

The recipe makes 4 generous servings of sweet fire chicken. The dish is easy to prepare, economical, and tastes DELICIOUS! Who needs take-out when you can make it yourself? Sure hope you will give this recipe a try.

Have a great day. Be a positive influence today, in a world that’s hurting in so many ways. Take care, friend.

Looking For More ASIAN-INSPIRED Recipes?

You can find all of my recipes in the Recipe Index, located at the top of the page. A few favorites include:

Want More Recipes? Get My FREE Newsletter!

I publish a newsletter 2 times per month (1st and 15th) with lots of recipes, tips, etc..
Would you like to join our growing list of subscribers?

There is a Newsletter subscription box on the top right (or bottom) of each blog post, depending on the device you use.
You can submit your e-mail address there, to be added to my mailing list.

Find Me On Social Media:

Facebook page: The Grateful Girl Cooks!
Pinterest:
The Grateful Girl Cooks!
Instagram:
jbatthegratefulgirlcooks

Author's signatureRecipe Source (and with thanks to) Chungah An, at http://damndelicious.net/2014/08/02/panda-express-sweet-fire-chicken-copycat/

↓↓ PRINTABLE RECIPE BELOW ↓↓

0 from 0 votes
Sweet Fire Chicken (Panda Express Copycat)
Prep Time
15 mins
Cook Time
15 mins
Total Time
30 mins
 

It's easy to make Sweet Fire Chicken (Panda Express copycat) at home, with chicken breast, bell peppers and pineapple in a sweet Thai chili sauce.

Category: Entree
Cuisine: Asian
Keyword: sweet fire chicken
Servings: 4 servings
Calories Per Serving: 565 kcal
Author: JB @ The Grateful Girl Cooks!
Ingredients
For chicken:
  • 1/2 cup vegetable oil
  • 1 pound boneless , skinless chicken breasts (I use 2 large), (cut into one inch cubes)
  • 1 cup all purpose flour
  • 2 large eggs , beaten
For sauce, etc:
  • 1 Tablespoon olive oil
  • 1 red bell pepper , chopped into one inch pieces
  • 1 1/2 cups pineapple chunks (fresh or canned/drained)
  • 1/2 cup Thai Sweet Chili Sauce (note: I added 1/4 cup more!)
  • 2 green onions , sliced thinly
Instructions
  1. Dredge chicken chunks (a few at a time) into flour, coating all sides. Place each floured piece into beaten egg mixture (a few at a time), then back into the flour again, coating all sides. Repeat until all chicken is coated and ready to cook.
  2. Heat vegetable oil on medium-high in a large skillet. When oil is hot, add the chicken pieces in batches (try to not let the pieces touch). Cook for about 2 minutes per side until golden brown. Remove cooked chicken to a paper towel covered plate, and repeat process until all chicken is cooked.
  3. In a large skillet (if using same skillet, clean it first), heat the olive oil on medium-high heat. Add chopped red bell pepper chunks and pineapple chunks. Cook these for 3-4 minutes (this will help soften the peppers).
  4. Add Thai chili sauce. Add chicken pieces. Stir gently, to fully combine ingredients and coat with sauce. Cook for 1-2 minutes, until heated through.,
  5. Garnish with green onion slices, and serve while hot on a bed or rice or noodles! Enjoy!
Nutrition Facts
Sweet Fire Chicken (Panda Express Copycat)
Amount Per Serving (1 serving)
Calories 565 Calories from Fat 144
% Daily Value*
Fat 16g25%
Saturated Fat 7g44%
Cholesterol 154mg51%
Sodium 463mg20%
Potassium 825mg24%
Carbohydrates 73g24%
Fiber 4g17%
Sugar 45g50%
Protein 31g62%
Vitamin A 1250IU25%
Vitamin C 60.5mg73%
Calcium 61mg6%
Iron 3.1mg17%
* Percent Daily Values are based on a 2000 calorie diet.

Here’s one more to pin on your Pinterest boards!It's easy to make Sweet Fire Chicken (Panda Express copycat) at home, with chicken breast, bell peppers and pineapple in a sweet Thai chili sauce.


Save

Save

Grandma’s Southern-Style Chicken n’ Dumplings

You will LOVE these Southern-Style Chicken n’ Dumplings just the way my Texas Grandma used to cook them! A big bowl of this filling hot soup is comfort food at it’s very best!You will LOVE these "Southern Style" chicken n' dumplings just the way my Texas Grandma used to cook them! A big bowl of this filling hot soup is comfort food at it's very best!

Fall is upon us, and Old Man Winter is just around the corner. Not too sure about you, but I tend to “hunker down” during this season of the year, and yearn for fires in the fireplace, a warm home, and good old comfort food, like a big pot of my Grandma’s Southern-Style Chicken n’ Dumplings! Yum!

Scroll Down For A Printable Recipe Card At The Bottom Of The Page

Why Are These Dumplings Flat Like Noodles?

I used to wonder about the use of the word “dumplings” in the name, since a lot of people make biscuit-like dumplings (and these look more like noodles), but if my beloved  Southern Grandma called them “dumplings”, well then “dumplings” they will be! Even Wikipedia tells us “dumplings” can be either PUFFY (typical in the Northeast) or ROLLED FLAT(Southern style!).

My Grandma, who lived in East Texas before she passed away, used to make this wonderful chicken n’ dumpling soup for us when we would visit on family vacations. My mom also made Grandma’s recipe for our family, then I began making this same recipe for my family many, many years ago. Our grown sons love this soup, as well, and I can’t even begin to count how many times they have eaten this meal.

Our oldest son, who is now 33 years old, still requests this as part of his birthday celebration, which amazes me to this day! It is REALLY simple, absolutely delicious, comforting and filling, and is very inexpensive to make… which is probably why I’ve been making this meal for so long!

Why Is This Recipe Good On The Old Wallet?

I start with a whole chicken. That’s the main ingredient in this soup, and I only use half the meat from the chicken, so I get another entire other meal out of the rest. That, to me, is a win-win.  Any time I can spend about $5 on a chicken and get two meals (plus leftovers) out of the deal is a good thing! I am sharing lots of pics for this recipe, but don’t let that scare you. This is simple, people!

So How Do I Make These Yummy Southern-Style Chicken n’ Dumplings?

Place a whole thawed chicken (that is rinsed and cavity cleared) into a large stockpot. Cover with water. (If you want you can add 1/2 cup each of chopped onion, celery, and carrots to help flavor the broth, but it really is not necessary). Bring the water to boiling and cook the chicken for 1 hour.

Whole chicken cooking in stockpotWhen done, remove the chicken to a large bowl to cool down.

Fully cooked chicken ready for soup with dumplingsPour the broth through a sieve to strain out any veggies, particles, etc. Pour broth back into stockpot. I discard the veggies I flavored the broth with, but if you want to leave them in, go for it!

Straining chicken broth for soupWhen the chicken has cooled, remove the skin. You can usually just pull it off from the different pieces using your clean hands.

Removing skin from cooked chicken before adding to soupCutting The Meat Off The Chicken

The chicken will be so tender the legs and thighs will easily tear off. I like to put a flexible cutting board on a baking sheet with edges, to help catch any liquid run-off.

Chicken for dumpling soup is tender and practically falls off boneCut or pull off all the meat from the chicken, and place into a large bowl. The chicken should be cut into bite sized pieces. I usually end up with between 4-5 cups of shredded chicken.

Shredded chicken to add to the soup and dumplingsStore Extra Chicken For Use In Another Recipe!

I like to use about 2 -2 1/2 cups of chicken for this recipe. You can use all of the chicken if you want, but I prefer to put the rest of the chicken into a freezer bag and into my freezer, so I have cooked chicken ready for another meal (like quesadillas, enchiladas, casseroles, etc.), as well!

Leftover chicken pieces not used for soup are frozen in storage bagsAdd The Chicken Pieces To The Broth

At this point, you will need to add 2 to 2 1/2 cups of shredded chicken back into the pot of chicken broth.

Shredded chicken is added back into broth before dumplings are addedI add two large cubes of chicken bouillon to the hot broth to add additional flavor. The cubes will break down and dissolve as the southern-style chicken ‘n dumplings cook.

Additional flavor is added to chicken n' dumplings soup base with bouillon seasoningMake The Dumplings

Heat the broth back up on medium high heat. While it is coming to a boil, I make the dumplings. I know a lot of people make big puffy biscuit-like “dumplings”, but this is how my Grandma made Southern-style chicken n’ dumplings, and that is why they look like large noodles.

Start by blending flour, salt, and shortening together using a pastry cutter, cutting it in until the shortening is the size of small peas. Easy!

Mixing up the dumplings dough with pastry blenderHot water and more flour is added and mixture is firmed up into a large dough ball. Let the chicken n’ dumplings dough rest for about 10 minutes, then shape into 3 equal sized portions.

Hot water is added to dumplings dough, then mixed together.Dumpling dough is separated into 3 equal sized pieces

Roll And Slice The Dumplings

Roll out the dough on a flour covered surface, one dough ball at a time, until it is thinly rolled out, and about the size of a pie crust.

Each dumpling dough ball is rolled out on a floured surfaceDumpling dough is rolled out until very thin on floured sufaceUse a pizza cutter (or a very sharp knife) to cut the chicken n’ dumpling dough into long strips about an inch wide. Repeat the entire rolling/cutting process with the other two dough balls, adding additional flour to cutting board before rolling each one.

A pizza cutter is used to slice dough for dumplings into thin strips

Add The Dumplings To The Soup Broth

Once the broth is boiling, carefully drop the “dumplings” a few at a time into the boiling broth, continuing until all the dumplings are in the pot.

Southern style dumplings are added to boiling chicken and brothAs dumplings cook, they float to surface of soupAdd a small amount of butter, as well as salt and pepper to the soup to help season it. Taste the broth, then add additional salt and/or pepper to suit your taste. I usually add a LOT of pepper to ours.

Butter, salt and pepper are added to chicken n' dumplings in potMix a couple spoonfuls of flour with some cold water (blend it well with a fork), and add it to the soup. This will help to thicken up the broth.

A flour slurry is added to chicken n' dumplings to thicken soup

Time To Eat Grandma’s Southern-Style Chicken n’ Dumplings!

Cook the Southern-style chicken n’ dumplings until broth has thickened a bit, and is very hot. When ready to serve, ladle the soup into individual serving bowls, and serve with a big piece of crusty French bread on the side. That’s it! This is so yummy… and is “comfort food” at its best! Not only that, but the leftovers are amazing!

Grandma's Southern-Style Chicken n' Dumplings served hot in a bowl

Sure hope you will give these Southern-style chicken n’ dumplings a try. You might even enjoy a few other soups I have here on the blog, like Albondigas Soup, Chicken Wild Rice and Bacon Soup, or any of the soups you can find in the Recipe Index at the top of the page.

There’s nothing better than having a big pot of Grandma’s Southern-Style Chicken n’ Dumplings available to slurp on during the cold Fall and Winter seasons! Enjoy!

Interested In More Recipes?

Thank you for visiting this website. I appreciate you using some of your valuable time to do soIf you’re interested, I publish a newsletter 2 times per month (1st and 15th) with all the latest recipes, and other fun info. I would be honored to have you join our growing list of subscribers, so you never miss a great recipe!
There is a Newsletter subscription box on the top right side (or bottom) of each blog post, depending on the device you use, where you can easily submit your e-mail address (only) to be included in my mailing list.

You Can Also Find Me On Social Media:

Facebook page: The Grateful Girl Cooks!
Pinterest:
The Grateful Girl Cooks!
Instagram:
jbatthegratefulgirlcooks

Author's signatureRecipe Source: My Grandma B.

↓↓ PRINTABLE RECIPE BELOW ↓↓

5 from 12 votes
Grandma's Southern-Style Chicken n' Dumplings
Prep Time
15 mins
Cook Time
1 hr 15 mins
Total Time
1 hr 30 mins
 
You will LOVE these "Southern Style" chicken n' dumplings just the way my Texas Grandma used to cook them! A big bowl of this filling hot soup is comfort food at it's very best!
Category: Soup
Cuisine: American
Keyword: chicken n' dumplings
Servings: 8 servings
Calories Per Serving: 341 kcal
Author: JB @ The Grateful Girl Cooks!
Ingredients
To Cook Chicken And Make Broth:
  • 1 whole chicken , thawed and cleaned (remove and discard giblets from cavity)
  • 1/2 cup carrots , celery, and onion (OPTIONAL-to flavor the chicken broth)
  • Water to completely cover chicken in a large stockpot.
To Make The Dumplings:
  • 1 cup all purpose flour
  • 1 teaspoon salt
  • 2 heaping Tablespoons vegetable shortening
  • 1/2 cup HOT water
  • 1/2 cup plus 2 Tablespoons all purpose flour
To finish soup:
  • Two large chicken bouillon cubes
  • 1 Tablespoon butter
  • 1/4 cup water mixed with 2 Tablespoons flour
  • Salt and Pepper , to taste (approx. 1 teaspoon salt, 1/2 teaspoon pepper)
Instructions
  1. Put the chicken and the veggies (if using) in a large stockpot. Cover completely with water. Bring to a quick boil, then continue cooking chicken for one hour. When done, remove chicken to large bowl to cool. Strain broth to remove leftover veggies or other particles. Return broth to stockpot.
  2. Once chicken is cool, remove skin, then cut chicken into bite sized pieces. (At this point I divide the chicken pieces in half, and freeze half for use in another meal).
  3. Add chicken pieces (approx. 2 1/2 cups) back into chicken broth. Heat the chicken and broth back up to boiling. Add bouillon cubes, salt and pepper (to taste).
  4. While chicken is coming to a boil, make the dumplings. In a large bowl, using a pastry blender or two knives, cut the shortening and salt into the cup of flour, until shortening is the size of small peas. Add 1/2 cup HOT water and 1/2 cup, plus 2 Tablespoons of flour to the mixture. Stir and work the mixture until a soft dough ball forms (firm enough to roll out). Divide dough into 3 equal sized balls, then let the dough rest for 10 minutes.
  5. Generously flour a work surface. Roll each dough ball out (one at a time), sprinkling with flour (if necessary) to keep dough from sticking to work surface. Roll out to about the size of a large pie crust (roll out thin). Cut dough into strips about an inch wide using a pizza cutter or knife. Repeat process for remaining dough balls.
  6. Drop dumplings a couple at a time into hot boiling chicken/broth mixture until all have been added to pot; add butter, and continue cooking.
  7. Make a slurry by mixing 1/4 cup water with 2 large Tablespoons flour. Stir well to combine, then add to soup pot, and stir well. (this helps to thicken broth a bit). Cook an additional 10 minutes on high to fully cook dumplings. Taste test broth, and add additional salt and pepper, if desired. Ladle hot soup into bowls, serve, and enjoy (especially with crusty french bread on the side!)
Recipe Notes

If you are pressed for time, you can always start with store bought chicken broth (cook the chicken in water/drain, THEN use broth in pot), and can also use a pre-cooked rotisserie chicken to get the chicken from, BUT I prefer to make it the way I have posted it, as it is far less expensive... but, hey... whatever works, right?

Nutrition Facts
Grandma's Southern-Style Chicken n' Dumplings
Amount Per Serving (1 serving)
Calories 341 Calories from Fat 171
% Daily Value*
Fat 19g29%
Saturated Fat 5g31%
Cholesterol 75mg25%
Sodium 435mg19%
Potassium 230mg7%
Carbohydrates 20g7%
Protein 20g40%
Vitamin A 1515IU30%
Vitamin C 2mg2%
Calcium 15mg2%
Iron 2.1mg12%
* Percent Daily Values are based on a 2000 calorie diet.

Here’s one more to pin on your Pinterest boards!You'll LOVE "Southern Style" chicken n' dumplings just the way my Grandma made them! A big bowl of this filling hot soup is comfort food at it's very best!


Save

Save

Save

Save

Save

Save

Save

Save

Honey Garlic Chicken (For Crock Pot)

Honey Garlic Chicken (for crockpot) is an easy, delicious slow cooker recipe for chicken thighs, coated in in a thick honey and garlic sauce.Honey Garlic Chicken (for crockpot) is an easy, delicious slow cooker recipe for chicken thighs, coated in in a thick honey and garlic sauce.

A few days ago I was scanning Pinterest and came upon a recipe for Honey Garlic Chicken (for crock pot). The recipe caught my eye because it looked so good AND it was SO EASY!

Seriously…how ridiculously easy is it to mix up the sauce, pour it over some chicken in a crock pot, set the timer and walk away? Since I’m always on the lookout for an easy, tasty dish, I decided to give the recipe a try… and guess what?  THIS HONEY GARLIC CHICKEN IS CRAZY EASY AND DELICIOUS… and it took all of 10 minutes to prep. 

I prepared the sauce (boy is it good!), poured it over the chicken around lunch time and turned on the crock pot. By 6:00 pm, my husband and I had a fantastic dinner waiting for us. The smell of the chicken as it cooked was amazing. We really couldn’t wait for this meal to be done, so we could try it.

This chicken recipe is PERFECT for anyone who has a busy day and doesn’t want to take a lot of time preparing dinner. Throw the recipe together in 10 minutes or less, throw it in a crock pot, turn it on, then walk away, and do whatever you want until it is done! Bam! Fantastic, delicious dinner… just like that! Here’s what you do:

Make The Honey Garlic Sauce

Mix up the sauce in a medium sized bowl. The ingredients you will need are garlic, honey, ketchup, soy sauce, oregano, and parsley. You won’t believe just how quickly the sauce can be made.

Honey Garlic Chicken (for crock pot) / The Grateful Girl Cooks!
Time To Make Honey Garlic Chicken (for crockpot)

Place 6 boneless, skinless chicken thighs in the bottom of a slow cooker. Try NOT to break a sweat doing this, (ha ha)! See how easy this recipe is coming together?

Honey Garlic Chicken (for crock pot) / The Grateful Girl Cooks!
Pour the honey garlic sauce over the chicken, turning to make sure all the pieces are covered with the sauce.

Honey Garlic Chicken (for crock pot) / The Grateful Girl Cooks!
Cook the chicken for 6-7 hours on HIGH temperature OR on LOW for 4-5 hours. I typically cook mine on high, but it is really convenient to set the temperature on low and head out for the day.

Here’s what the honey garlic chicken (for crockpot) looked like when I took a peek at the 3 hour mark. They sure looked and smelled pretty good by then!

Honey Garlic Chicken (for crock pot) / The Grateful Girl Cooks!
Time To Serve The Chicken!

When the chicken has finished cooking, transfer the pieces to a serving plate. Spoon the sauce over the chicken, and then sprinkle the chicken with toasted sesame seeds and parsley, and serve.

The honey garlic chicken (for crockpot) is really tender, and the sauce is so delicious, you won’t believe it! We enjoy it served it with steamed white rice and broccoli on the side. YUM!

Honey Garlic Chicken (for crock pot) / The Grateful Girl Cooks!
Sure hope you will give this easy recipe for honey garlic chicken (for crockpot) a try. My husband and I loved this meal, and it was a real time saver, so I will definitely be making this again!

Thank you for stopping by, and I hope you’ll come back again soon for more delicious recipes. Take care, and have a great day!

Looking For More CHICKEN Recipes?

You can find ALL of my recipes in the Recipe Index, which is located at the top of the page. I have LOTS of delicious chicken recipes to check out, including:

Interested In More Recipes?

Thank you for visiting this website. I appreciate you using some of your valuable time to do soIf you’re interested, I publish a newsletter 2 times per month (1st and 15th) with all the latest recipes, and other fun info. I would be honored to have you join our growing list of subscribers, so you never miss a great recipe!
There is a Newsletter subscription box on the top right side (or bottom) of each blog post, depending on the device you use, where you can easily submit your e-mail address (only) to be included in my mailing list.

You Can Also Find Me On Social Media:

Facebook page: The Grateful Girl Cooks!
Pinterest:
The Grateful Girl Cooks!
Instagram:
jbatthegratefulgirlcooks

Author's signatureRecipe Source: http://diethood.com/crock-pot-honey-garlic-chicken/

0 from 0 votes
Honey Garlic Chicken (For Crock Pot)
Prep Time
10 mins
Cook Time
6 hrs
Total Time
6 hrs 10 mins
 

Honey Garlic Chicken (for crockpot) is an easy, delicious slow cooker recipe for chicken thighs, coated in in a thick honey and garlic sauce.

Category: Entree
Cuisine: American
Keyword: honey garlic chicken
Servings: 6 servings
Calories Per Serving: 233 kcal
Author: JB @ The Grateful Girl Cooks!
Ingredients
  • 6 large boneless, skinless chicken thighs
  • 4 garlic cloves , minced
  • 1/3 cup honey
  • 1/2 cup ketchup
  • 1/2 cup soy sauce (low sodium or regular)
  • 1/2 teaspoon dried oregano
  • 2 Tablespoons dried parsley
  • 1/2 Tablespoon toasted sesame seeds
Instructions
  1. Make the sauce by combining garlic, honey, ketchup, soy sauce, oregano and parsley in a small mixing bowl. Mix until thoroughly combined.
  2. Place the thawed chicken thighs on the bottom of a crock pot. Pour the sauce over the chicken, turning to ensure all sides of chicken are coated with sauce. Put the lid on crock pot; cook on LOW for 6-7 hours OR cook on HIGH for 4-5 hours.

  3. When chicken is done cooking, transfer the chicken to a serving platter or to individual serving plates. Spoon some of the extra sauce over the chicken.
  4. Garnish each piece of chicken with sesame seeds and a little parsley. Serve, and enjoy!

Nutrition Facts
Honey Garlic Chicken (For Crock Pot)
Amount Per Serving (1 thigh)
Calories 233 Calories from Fat 45
% Daily Value*
Fat 5g8%
Saturated Fat 1g6%
Trans Fat 0.02g
Polyunsaturated Fat 1g
Monounsaturated Fat 2g
Cholesterol 107mg36%
Sodium 1051mg46%
Potassium 449mg13%
Carbohydrates 23g8%
Fiber 1g4%
Sugar 20g22%
Protein 24g48%
Vitamin A 146IU3%
Vitamin C 2mg2%
Calcium 41mg4%
Iron 2mg11%
* Percent Daily Values are based on a 2000 calorie diet.

Here’s one more to pin on your Pinterest boards!Honey Garlic Chicken (for crockpot) is an easy, delicious slow cooker recipe for chicken thighs, coated in in a thick honey and garlic sauce.


Save

Save

Cobb Salad

Cobb Salad is a delicious “all in one” meal, with chicken breast, chilled salad greens, bacon, avocado, bleu cheese crumbles, and crunchy veggies!Cobb Salad is a delicious "all in one" meal, featuring chicken breast, chilled salad greens, bacon, avocado, bleu cheese crumbles, and crunchy veggies!
This past week I made a Cobb Salad for my husband and I for dinner. Cobb Salads are one of my favorite meals, because of all the chopped veggies, chicken, bacon, etc. that go into it. It’s an entire meal… we are always full when done eating, that’s for sure!

Scroll Down For A Printable Recipe Cad At The Bottom Of the Page

Making A Cobb Salad

The majority of work involved in making this chopped Cobb Salad is simply that… chopping! Chopping up cooked, crisp bacon, grilled chicken breasts, tomatoes, hard boiled eggs, tomatoes, cucumber and avocados.

The prep work is not so bad… it’s easy!  Once you have THAT done, all that is involved is layering the ingredients onto the cold crisp salad greens, adding your favorite dressing and enjoying this great salad!

Cobb salad, with chicken, bleu cheese, bacon and avocado!
If you have already have cooked chicken (I used leftover grilled chicken breasts!) and hard-boiled eggs, then this salad comes together very quickly!

The recipe makes enough for two meal sized salads. It could easily be adapted to make 4 smaller salads as a side dish.  You know what else I like about this yummy salad?  It not only TASTES good, it LOOKS good!

Chunks of chicken, avaocado, cucumber and bacon on cobb salad
Once you’ve “assembled” this cobb salad, all that is left to do is add your favorite salad dressing, grab a fork, and dig in!!! Sure hope you will give this salad a try. I really think you will LOVE it!

Salad dressing is drizzled over cobb salad, ready to serve!

I hope you have the chance to make and enjoy this delicious Cobb Salad. Have a fantastic week, friends. May God bless the work of your hands as you journey through each day you are given!

Looking For More SALAD Recipes?

You can find all of my recipes in the Recipe Index, located at the top of the page. I have some wonderful salad recipes that include:

Interested In More Recipes?

Thank you for visiting this website. I appreciate you using some of your valuable time to do soIf you’re interested, I publish a newsletter 2 times per month (1st and 15th) with all the latest recipes, and other fun info. I would be honored to have you join our growing list of subscribers, so you never miss a great recipe!
There is a Newsletter subscription box on the top right side (or bottom) of each blog post, depending on the device you use, where you can easily submit your e-mail address (only) to be included in my mailing list.

You Can Also Find Me On Social Media:

Facebook page: The Grateful Girl Cooks!
Pinterest:
The Grateful Girl Cooks!
Instagram:
jbatthegratefulgirlcooks

Have a GREAT day!

Author's signature

0 from 0 votes
Cobb Salad
Prep Time
15 mins
Cook Time
0 mins
Total Time
15 mins
 

Cobb Salad is a delicious "all in one" meal, featuring chicken breast, chilled salad greens, bacon, avocado, bleu cheese crumbles, and crunchy veggies!

Category: Entree Salad
Cuisine: American
Keyword: cobb salad
Servings: 2 entree salads
Calories Per Serving: 701 kcal
Author: JB @ The Grateful Girl Cooks!
Ingredients
  • Iceberg Lettuce and assorted Spring Greens
  • 4 slices bacon , cooked until crispy, then crumbled
  • 2 grilled or cooked skinless , boneless chicken breasts, cut into 1 inch cubes
  • 1/2 cup bleu cheese crumbles
  • 1 medium tomato , chopped
  • 2 hard boiled eggs , chopped
  • 1 medium cucumber , peeled and cubed
  • 1 avocado , cubed
  • Salt and pepper to taste
Instructions
  1. Place mixed chilled salad greens on serving plate.
  2. Place layers (lines) of remaining ingredients on top of salad greens in any order you wish, remembering to divide all ingredients in half (half for each salad).
  3. Top with your favorite salad dressing; serve and enjoy!
Recipe Notes

FYI-The prep time does not include time for boiling the eggs or cooking the chicken. It's really quick and easy to throw this salad together when those are already pre-cooked.

Caloric calculation is based on TWO salads. If recipe is divided into 4 servings, the calorie count will be cut in half.

Nutrition Facts
Cobb Salad
Amount Per Serving (1 main course salad)
Calories 701 Calories from Fat 450
% Daily Value*
Fat 50g77%
Saturated Fat 16g100%
Cholesterol 313mg104%
Sodium 969mg42%
Potassium 1514mg43%
Carbohydrates 16g5%
Fiber 8g33%
Sugar 5g6%
Protein 46g92%
Vitamin A 1400IU28%
Vitamin C 25.1mg30%
Calcium 248mg25%
Iron 2.3mg13%
* Percent Daily Values are based on a 2000 calorie diet.

Here’s one more to pin on your Pinterest boards!Cobb Salad is a delicious "all in one" meal, featuring chicken breast, chilled salad greens, bacon, avocado, bleu cheese crumbles, and crunchy veggies!


Save

Save

Easy Grilled Chicken with Jerk Seasoning

I found a new recipe for seasoning grilled chicken. It’s called EASY Grilled Chicken With Jerk Seasoning, and the jerk seasoning is made from scratch!  The recipe is really, really simple… and there are layers of flavors to the jerk spiced chicken that completely surprised me. EASY Grilled Chicken With Jerk Seasoning / The Grateful Girl Cooks!
Wanna know a little secret? Until I made this easy recipe, I had NEVER used Jerk seasoning before on anything. ANYTHING. I’d heard of chicken with jerk seasoning, but never had madeany meals that included this spice mix. Hmmm. What about you? Have you ever tried Jerk Seasoning? Well, here’s a simple recipe to give it a try!

All I had heard before trying this spice was that it is filled with layers of amazing flavors, was a dry rub for pork or chicken, and that it is thought to be native to Jamaica. So I decided to give it a try with this super easy recipe for mixing up the Jerk seasoning, and then grilling chicken with the spices on it. How hard can THAT be, right? NOT. This is ridiculously EASY.

To make the Jerk spice rub, here’s what ya do… First you mix the spices  in a small bowl. (Easy, right?)

EASY Grilled Chicken With Jerk Seasoning / The Grateful Girl Cooks!
Add a tablespoon of oil to the spices.

EASY Grilled Chicken With Jerk Seasoning / The Grateful Girl Cooks!
Give it a good stir to fully blend it all together. It will look like this (and it only took a second to make!)

EASY Grilled Chicken With Jerk Seasoning / The Grateful Girl Cooks!
Now use your hands and rub the spices onto both sides of the chicken. Coat it as thin or as thick as you like. I did a fairly thin layer, and the flavors were wonderful!

EASY Grilled Chicken With Jerk Seasoning / The Grateful Girl Cooks!Time To Cook The Chicken With Jerk Seasoning!

Put the chicken onto your hot BBQ grill (or you can also make this in a hot skillet in the kitchen). Note: Recipe makes enough spice for 4 chicken breasts; I only cooked 3 (FYI).

EASY Grilled Chicken With Jerk Seasoning / The Grateful Girl Cooks!
Cook the chicken (time will vary depending on size of pieces) until done, turning to cook both sides. (We cooked ours for about 10 minutes per side).

When the chicken is done, the outside will be a very deep brown color, and the insides will not be pink.

EASY Grilled Chicken With Jerk Seasoning / The Grateful Girl Cooks!
I served the chicken with a side of white rice (nice and bland went well with the flavorful and full of taste chicken, and a green salad. That’s it!  See how easy that was?

EASY Grilled Chicken With Jerk Seasoning / The Grateful Girl Cooks!
The chicken with jerk seasoning was delicious. It’s hard to describe, but each bite had many levels of flavor… at times a tiny bit spicy, other bites I got the sweet flavor of the brown sugar, and various spices that complimented the chicken well. I would definitely make this recipe again!

Hope you will give this recipe a try. Next time I’ll try this seasoning rub on pork, and see how that tastes, as well! Have a great day!

Interested In More Recipes?

Thank you for visiting this website. I appreciate you using some of your valuable time to do soIf you’re interested, I publish a newsletter 2 times per month (1st and 15th) with all the latest recipes, and other fun info. I would be honored to have you join our growing list of subscribers, so you never miss a great recipe!
There is a Newsletter subscription box on the top right side (or bottom) of each blog post, depending on the device you use, where you can easily submit your e-mail address (only) to be included in my mailing list.

You Can Also Find Me On Social Media:
Facebook page: The Grateful Girl Cooks!
Pinterest: The Grateful Girl Cooks!
Instagram: jbatthegratefulgirlcooks

EASY Grilled Chicken With Jerk Seasoning / The Grateful Girl Cooks!Recipe Source: http://pinchofyum.com/super-simple-jerk-chicken

0 from 0 votes
Easy Grilled Chicken with Jerk Seasoning
Prep Time
5 mins
Cook Time
20 mins
Total Time
25 mins
 
Enjoy the many levels of flavor of Jamaican Jerk Seasoning in this easy grilled chicken dish.
Category: Entree
Cuisine: Jamaican
Keyword: chicken with jerk seasoning
Servings: 4 servings
Calories Per Serving: 187 kcal
Author: JB @ The Grateful Girl Cooks!
Ingredients
For Jerk Seasoning:
  • 2 teaspoons allspice
  • 2 Tablespoons brown sugar
  • 1/2 teaspoon cumin
  • 1/4 teaspoon cloves
  • 1/4 teaspoon cinnamon
  • 1 teaspoon salt
  • 1/2 teaspoon ground black pepper
  • 1/8 teaspoon cayenne pepper
  • 1 Tablespoon canola oil (or vegetable oil)
  • 4 boneless, skinless chicken breasts , (4 oz. each)
Instructions
  1. Mix all the spices and oil in a small bowl.
  2. Using your hands, rub the spice mixture over both sides of each chicken breast to fully coat (spread spices thin or thick-your choice!).
  3. Preheat your BBQ grill or a skillet. You want both of them to be really hot when you add the chicken.
  4. Cook chicken on both sides until done (dark brown on outside, not pink on inside). Our chicken breasts which were fairly large, cooked for about 8-10 minutes on each side. Yours may take less time or more time, depending on how large or small the pieces of chicken are.
  5. Once chicken is done, remove it from heat, cover with foil and let it "rest" for about 5 minutes before serving. This will help the juices to stay in and soak in to the meat.
  6. Serve, and enjoy!
Nutrition Facts
Easy Grilled Chicken with Jerk Seasoning
Amount Per Serving (1 breast)
Calories 187 Calories from Fat 54
% Daily Value*
Fat 6g9%
Cholesterol 72mg24%
Sodium 716mg31%
Potassium 430mg12%
Carbohydrates 7g2%
Sugar 5g6%
Protein 24g48%
Vitamin A 60IU1%
Vitamin C 1.7mg2%
Calcium 17mg2%
Iron 0.6mg3%
* Percent Daily Values are based on a 2000 calorie diet.

Here’s one more to pin on your Pinterest boards!EASY Grilled Chicken With Jerk Seasoning / The Grateful Girl Cooks!


Save

Save

Save

Chicken Salad

This easy to prepare, delicious chicken salad, with cranberries, celery and pecans can be eaten as is, or served in pita bread or rolls for a great sandwich.This easy to prepare, delicious chicken salad, with cranberries, celery and pecans can be eaten as is, or served in pita bread or rolls for a great sandwich.
We’ve had lots of sunshine and hot weather the past several weeks in the Pacific Northwest. A few nights ago I decided to make my old standby recipe for Chicken Salad, serve it with some fresh pineapple, strawberries, and cantaloupe, and have dinner out on our back deck.

This was a perfect entree salad on a hot night! I was even able to use some of the red leaf lettuce from our garden to serve the salad on- whoo-hoo!  I’ve been making chicken salad this way for over 25 years. I’ve never had a recipe that I’ve used, so I had to be deliberate about writing it down this time, so I could post the right quantities for this blog post.

We really enjoy the salad, with chunks of chicken breast, crisp celery, the sweet chewy raisins, dried cranberries, red onion and crunchy pecans! This salad is really easy to make, too! Quick and easy, it’s my idea of a perfect meal! Here’s how to make it:

Scroll Down For A Printable Recipe Card At The Bottom Of The Page

Cook The Chicken Breasts

The first thing you need to do is cook the chicken. Put frozen chicken breasts (yep-right out of the freezer) into a large pan. Cover them with water, bring water to a boil, then cook on high heat for about 45-50 minutes (until fully cooked). *Note: I use 4 chicken breasts, but this picture shows 5 because I was cooking an extra one for another recipe.

Cooking chicken breasts to make chicken salad
When the chicken has finished cooking, remove the chicken breasts from the water and let the pieces cool a little. Once the chicken has cooled enough to handle, cut the pieces into 1 inch cubes and set aside.

Preparing The Chicken Salad

While the chicken is cooking, chop the pecans, celery and red onion, and place them into a medium sized bowl, along with the raisins and dried cranberries.

Pecans, raisins, red onion and celery ready to add to chicken salad.
Place the chunks of cooked chicken breast into the bowl with the other ingredients.

Cooked chicken breast chunks added to salad ingredients in bowl.
Add the mayonnaise to the bowl, and then season the chicken salad with salt and pepper. Give it a good stir to mix it all together (making sure it is all coated). Give it a taste, then add more salt and pepper, if necessary to suit your taste preference.

Ingredients are mixed with condiments and seasoning to make chicken salad.

Serving The Chicken Salad

Cover the chicken salad with plastic wrap and refrigerate it for about 2-3 hours. We feel this salad is at it’s best served nice and cold, plus the flavors have had time to develop.  Once the salad has fully chilled, it’s ready to serve! By the way… it tastes GREAT on sandwiches, too. I love to stuff a pita full of this chicken salad!  Yum.

Chicken salad can be served in pita bread for sandwiches.
Delicious, stuffed with chicken salad!

My absolute favorite way to serve this is… just as it is!!!!! When ready to serve, I place red lettuce leaves onto a serving plate, then arrange the chicken salad on top, for a nice presentation.

Chicken salad, served on top of red leaf lettuce.
This chicken salad is a great quick bite for lunch OR for a light dinner! I sure hope you will try making this for yourself… it’s really delicious! Hope you have a wonderful day and enjoy each minute of life you are blessed with!

Looking For More Chicken Salad Recipes?

You can find all of my recipes in the Recipe Index, located at the top of the page. I have a few chicken salad recipes, including:

Interested In More Recipes?

Thank you for visiting this website. I appreciate you using some of your valuable time to do soIf you’re interested, I publish a newsletter 2 times per month (1st and 15th) with all the latest recipes, and other fun info. I would be honored to have you join our growing list of subscribers, so you never miss a great recipe!
There is a Newsletter subscription box on the top right side (or bottom) of each blog post, depending on the device you use, where you can easily submit your e-mail address (only) to be included in my mailing list.

You Can Also Find Me On Social Media:

Facebook page: The Grateful Girl Cooks!
Pinterest:
The Grateful Girl Cooks!
Instagram:
jbatthegratefulgirlcooks

Author's signature

0 from 0 votes
Chicken Salad
Prep Time
45 mins
Cook Time
0 mins
Total Time
45 mins
 
This easy to prepare, delicious chicken salad, with cranberries, celery and pecans can be eaten as is, or served in pita bread or rolls for a great sandwich.
Category: Entree Salad
Cuisine: American
Keyword: chicken salad
Servings: 8 small servings
Calories Per Serving: 467 kcal
Author: JB @ The Grateful Girl Cooks!
Ingredients
  • 4 boneless , skinless chicken breasts (frozen)
  • 1 1/2 cups diced celery (I use 3 stalks-slice each stalk in thirds lengthwise, then chop)
  • 1 cup chopped pecans (can also use walnuts)
  • 3/4 cup raisins
  • 1/4 cup dried cranberries
  • 1/2 cup diced red onion
  • 1 1/3 cups mayonnaise
  • salt and pepper , to taste (approx. 1/2 teaspoon salt, 1/4 teaspoon pepper-more, as needed)
  • Red leaf lettuce leaves (to serve salad on top of-this is optional, but it looks pretty!)
Instructions
  1. Place frozen chicken breasts into a large saucepan. Cover completely with water. Cook on HIGH for 45-50 minutes (until chicken is done). Remove from heat. Remove chicken to a cutting board and let cool.
  2. In a large salad bowl, place the celery, pecans, raisins, dried cranberries, and red onion.
  3. Once the chicken has cooled off (to the touch), cut it into 1 inch cubes. Add the chicken to the salad bowl.
  4. Add the mayonnaise, salt and pepper. Mix well to combine all ingredients.
  5. Taste salad. Add additional salt and pepper, to suit your taste. I usually have to add a bit more. When ready, cover salad with plastic wrap, and place in refrigerator to chill for 2-3 hours or more (the longer the flavors have time to come together, the better!)
  6. When ready to serve, place a few red leaf lettuce leaves onto serving plate. Arrange salad into a mound in the center of the lettuce. Serve, and enjoy!
  7. Keep leftovers covered and refrigerated. Will keep for several days!
Recipe Notes

Prep time includes time for cooking the chicken, but does not include refrigeration time.

Nutrition Facts
Chicken Salad
Amount Per Serving (1 serving)
Calories 467 Calories from Fat 351
% Daily Value*
Fat 39g60%
Saturated Fat 5g31%
Cholesterol 51mg17%
Sodium 321mg14%
Potassium 433mg12%
Carbohydrates 16g5%
Fiber 2g8%
Sugar 4g4%
Protein 14g28%
Vitamin A 210IU4%
Vitamin C 2.1mg3%
Calcium 27mg3%
Iron 1mg6%
* Percent Daily Values are based on a 2000 calorie diet.

Here’s one more to pin on your Pinterest boards!This easy to prepare, delicious chicken salad, with cranberries, celery and pecans can be eaten as is, or served in pita bread or rolls for a great sandwich.

Save

Save

Save

Save

Hawaiian “Huli Huli” Chicken

Hawaiian Huli Huli Chicken is absolutely delicious and SO EASY to make! Chicken is marinated in a simple Polynesian inspired sauce, then grilled on a BBQ. Hawaiian Huli Huli Chicken is absolutely delicious and SO EASY to make! Chicken is marinated in a simple Polynesian inspired sauce, then grilled on a BBQ.

The last thing I wanted to do, or had time for this week, was blogging, OR cooking anything that required using my brain and a lot of energy!  BUT… I tried this EASY recipe for Hawaiian “Huli Huli” Chicken (a Pinterest find) for dinner, and I’m sure glad I did! It was FANTASTIC!

Man oh man, it’s been crazy! My husband is working LONG hours and is also recovering from a back injury, so I spent a good part of the week tackling BIG home projects. My first project was pressure washing our brick patio and wood deck. UGH. Then I worked my tail off rolling 2 coats of paint onto our back (big) deck! DOUBLE UGH.

I needed something EASY to make at night for our dinner that didn’t require a lot of WORK. That’s where this delicious Hawaiian Huli Huli Chicken came in to the picture.

Scroll Down For A Printable Recipe Card At The Bottom Of The Page

What Does “Huli Huli” Mean?

Huli Huli is a very popular marinade or sauce in Hawaii. It is both slightly sweet and slightly savory! The words “huli huli” mean “to turn” in Hawaiian, referring to the turning of pork or chicken on the BBQ grill as it cooks.

It’s SO EASY To Make Hawaiian Huli Huli Chicken

The marinade for the Hawaiian Huli Huli chicken only takes 5-10 minutes to make!  Whisk the ingredients together, and it’s DONE! The only other prep step needed is to pour half of the marinade over some boneless, skinless chicken breasts and thighs. Once the chicken is covered with the marinade, it sits and bathes in it overnight (minimum of 4 hours for best flavor) in the fridge.

The other half of the marinade is refrigerated to baste the chicken with, as it grills. If you marinade the chicken ahead of time, this Hawaiian Huli Huli Chicken really is one quick dinner to make on a crazy, busy day!

Ingredients for Hawaiian Huli Huli Chicken marinade are placed in small bowl.Hawaiian Huli Huli Chicken marinade is whisked to blend ingredients in bowl.
Time To Cook The Hawaiian Huli Huli Chicken

When you’re ready to cook the chicken, remove the chicken from the refrigerator.  I try to take it out of the fridge about half an hour before we cook it, to take the chill off. The marinade that the raw chicken has soaked in can be discarded so there is no cross contamination (nobody wants that bacteria in their meal).

My husband grilled the Hawaiian Huli Huli Chicken on our trusty Weber grill. He made sure to occasionally baste the chicken with the reserved “fresh” marinade and turn it, while it cooked. When the chicken was finished cooking, he brought it into the house so we could gobble it up!

Hawaiian Huli Huli Chicken is grilled on our BBQ

That’s it! See how incredibly EASY Hawaiian Huli Huli Chicken is to make?  When the chicken is done, garnish the pieces with sliced green onions before serving. I served the chicken with a side of steamed white rice, and a crisp green salad, and it was delicious!!!

My husband and I both think it tastes fantastic!  The Hawaiian Huli Huli chicken has a great Polynesian/teriyaki flavor going on, with just a teensy bit of heat from the cayenne pepper!

Hawaiian Huli Huli Chicken, garnished with green onions, ready to eat!

Next time I make this dish, I will also grill some pineapple  to serve alongside it. Don’t you think think grilled pineapple would be a perfect side dish for the chicken? YUM.

Hawaiian Huli Huli Chicken on white platter, ready to eat!
We absolutely loved this easy to prepare dish! Hawaiian Huli Huli Chicken was a perfect main course to serve on a very hot night. All you have to do is plan a little bit ahead to marinate the chicken. Make the marinade for the chicken at the beginning of the day (or before you leave for work). Then when you’re ready for dinner, throw the marinated chicken on the ol’ BBQ grill and keep your kitchen cool!

Sure hope you will try this recipe for Hawaiian Huli Huli Chicken. The original recipe calls for using all boneless chicken thighs, but I preferred the combo of chicken thighs and breasts! Have a great day!

Looking For More GRILLED CHICKEN Recipes?

You can find all my recipes in the Recipe Index, located at the top of the page. I have quite a few delicious grilled chicken recipes, including:

Interested In More Recipes?

Thank you for visiting this website. I appreciate you using some of your valuable time to do soIf you’re interested, I publish a newsletter 2 times per month (1st and 15th) with all the latest recipes, and other fun info. I would be honored to have you join our growing list of subscribers, so you never miss a great recipe!
There is a Newsletter subscription box on the top right side (or bottom) of each blog post, depending on the device you use, where you can easily submit your e-mail address (only) to be included in my mailing list.

You Can Also Find Me On Social Media:

Facebook page: The Grateful Girl Cooks!
Pinterest:
The Grateful Girl Cooks!
Instagram:
jbatthegratefulgirlcooks

Author's signatureRecipe Adapted From: http://cookinginstilettos.com/huli-huli-chicken/

0 from 0 votes
Hawaiian "Huli Huli" Chicken
Prep Time
5 mins
Cook Time
20 mins
Total Time
25 mins
 
Hawaiian Huli Huli Chicken is absolutely delicious and SO EASY to make! Chicken is marinated in a simple Polynesian inspired sauce, then grilled on a BBQ.
Category: Entree
Cuisine: Hawaiian
Keyword: Hawaiian huli huli chicken
Servings: 4 servings
Calories Per Serving: 287 kcal
Author: JB @ The Grateful Girl Cooks!
Ingredients
For tThe Marinade:
  • 1/2 cup soy sauce
  • 1/2 cup ketchup
  • 1/2 cup brown sugar
  • 1/4 cup chicken broth
  • 1 1/4 teaspoons fresh minced ginger
  • 1 1/4 teaspoons minced garlic
  • 1/8 teaspoon cayenne pepper
For The Chicken:
  • 4-5 boneless skinless chicken thighs and/or breasts
  • Olive oil (use to oil the grill before adding chicken)
  • 1 stalk green onion , chopped (use the green part), for garnish
Instructions
  1. Whisk the marinade ingredients together in a large covered container, until fully combined. Set aside about half of the marinade in a separate container (cover and refrigerate the reserved marinade until ready to grill).

  2. Add the thawed chicken pieces to the large container; turn to coat in the sauce. Make sure container is covered. Refrigerate chicken overnight, or at least 4-6 hours.
  3. Prepare BBQ. Lightly oil the grill with the olive oil. When coals are hot and ready to go, add the chicken pieces. Discard the marinade that the raw chicken was in. 

  4. Grill the chicken until done (larger pieces of chicken will require longer cooking time). Use the reserved marinade (from step #1) to baste the chicken continually while it cooks. When chicken is fully cooked (approx. 20-25 minutes or so, depending on size), remove chicken from grill to a serving platter. Garnish chicken with sliced green onions. Serve and enjoy!

Recipe Notes

REMEMBER!!!! The PREP time as indicated, does NOT include the time to marinade the chicken! Prepare ahead, and this will go quick!

Caloric calculation was determined using boneless, skinless chicken breasts.

Nutrition Facts
Hawaiian "Huli Huli" Chicken
Amount Per Serving (1 breast)
Calories 287 Calories from Fat 27
% Daily Value*
Fat 3g5%
Cholesterol 72mg24%
Sodium 1527mg66%
Potassium 618mg18%
Carbohydrates 38g13%
Sugar 33g37%
Protein 26g52%
Vitamin A 245IU5%
Vitamin C 4.5mg5%
Calcium 39mg4%
Iron 1.4mg8%
* Percent Daily Values are based on a 2000 calorie diet.

Here’s one more to pin on your Pinterest boards!Hawaiian Huli Huli Chicken is absolutely delicious and SO EASY to make! Chicken is marinated in a simple Polynesian inspired sauce, then grilled on a BBQ. YUM!


Save

Save

Save

Sticky Orange Chicken

Sticky orange chicken is pan-seared chicken breasts, cooked in an orange marmalade, chicken stock, and rosemary herb based sweet and sticky sauce!Sticky orange chicken is pan-seared chicken breasts, cooked in an orange marmalade, chicken stock, and rosemary herb based sweet and sticky sauce!
Good morning!  It’s going to be a great day in the Pacific Northwest. We’re headed into several days in a row of warm, sunny weather for Memorial Day weekend. With temps in the mid 70’s and higher, it could even get to be warm and “sticky” outside. Yes- that is my horrible line to transition over to this wonderful dinner I made last night called “Sticky Orange Chicken”.

Scroll Down For A Printable Recipe Card At The Bottom Of The Page

About This Dish

I found this recipe from Rachael Ray (celebrity cook) on Pinterest a while back, but finally took the opportunity to make it last evening. This sticky orange chicken was so easy to make, and it really has a great fresh flavor!

Lots of flavor is there, thanks in part to the orange marmalade sauce, which is infused with extra flavor from chicken stock, fresh rosemary and thyme. YUM! The whole dish took under 30 minutes to prepare, from start to finish, and was absolutely delicious! This would be a great meal to fix, at the end of a long and busy day!

Note: The recipe as written serves 4.  My pictures only show 2 pieces of chicken. I only prepared 2 chicken breasts for my husband and myself, but kept the original quantity of sauce (just a little Public Service Announcement).

How To Make Sticky Orange Chicken

Here’s what you do to make this simple dish… first, gather the ingredients together.  I’m fortunate enough to make my own orange marmalade, so that was easy!

I also grow rosemary and thyme in my garden, so gathering this part of the recipe was a cinch! Some apple cider vinegar, salt, and chicken stock from our pantry finished out the pile of ingredients.

Sticky Orange Chicken / The Grateful Girl Cooks!
Cook The Chicken Breasts

Heat olive oil in a skillet until very hot, but not smoking. Lightly salt the chicken, then add the chicken breasts to the hot skillet. The chicken breasts should sizzle as you put them into the hot skillet. Let them sear, untouched, for 5 minutes, then turn them to the other side and cook for another 5 minutes.  The chicken breasts are cooked for 10 minutes total.

Raw chicken breasts are pan-seared in oil, to brown them.
Once the chicken is seared and browned on BOTH sides, transfer the chicken to a plate, and keep them warm.

Browned chicken breasts are transferred to a plate, while sauce for sticky orange chicken is made.

Make The Sauce For The Sticky Orange Chicken

Pour the apple cider vinegar into the hot skillet to de-glaze the pan. Add the orange marmalade, chicken stock, fresh chopped rosemary and thyme, and stir to combine.

Chicken stiock, apple cider vinegar, orange marmalade and other ingredients are added to skillet.
Whisk the sticky orange chicken sauce together and continue cooking it for 2-3 minutes. The sauce will begin to thicken up just a bit as it cooks.

Sticky orange sauce is mixed, and begins to thicken as it cooks.
Add The Chicken Back Into The Sticky Orange Sauce

Once the sauce has thickened, add the chicken breasts back into the sauce. Continue to cook the chicken in the sauce for 5-6 additional minutes. While it cooks, spoon the sauce over the top of the chicken often.

The chicken is added to the sauce, and is covered with the sticky orange sauce.
Serve The Sticky Orange Chicken

Once the chicken is done cooking, remove it from the skillet and transfer the breasts to individual serving plates. Spoon a little of the sauce over the top of each chicken breast for even more great flavor. I served the sticky orange chicken with a side of rice, and some easy, steamed broccoli. 

A piece of sticky orange chicken is served with rice and broccoli on the side,.
I sure hope you will give this recipe for sticky orange chicken a try. The recipe is really EASY, QUICK, and YUMMY! Have a great day!

Looking For More CHICKEN Recipes?

You can find all of my chicken recipes in the Recipe Index, located at the top of the page. I have a LOT of chicken recipes you will enjoy, including:

Interested In More Recipes?

Thank you for visiting this website. I appreciate you using some of your valuable time to do soIf you’re interested, I publish a newsletter 2 times per month (1st and 15th) with all the latest recipes, and other fun info. I would be honored to have you join our growing list of subscribers, so you never miss a great recipe! 

There is a Newsletter subscription box on the top right side (or bottom) of each blog post, depending on the device you use, where you can easily submit your e-mail address (only) to be included in my mailing list.

You Can Also Find Me On Social Media:

Facebook page: The Grateful Girl Cooks!
Pinterest:
The Grateful Girl Cooks!
Instagram:
jbatthegratefulgirlcooks

Author's signatureRecipe Source: http://www.rachaelrayshow.com/recipe/14441_Sticky_Orange_Chicken_with_Herbs_and_Sweet_Potatoes_with_Cider/

↓↓ PRINTABLE RECIPE BELOW ↓↓

0 from 0 votes
Sticky Orange Chicken
Prep Time
10 mins
Cook Time
15 mins
Total Time
25 mins
 
Sticky orange chicken is pan-seared chicken breasts, cooked in an orange marmalade, chicken stock, and rosemary herb based sweet and sticky sauce!
Category: Entree
Cuisine: American
Keyword: sticky orange chicken
Servings: 4
Calories Per Serving: 283 kcal
Author: JB @ The Grateful Girl Cooks!
Ingredients
  • 2 Tablespoons Extra Virgin Olive Oil
  • 4 boneless , skinless chicken breasts
  • Salt (just a pinch, to season each chicken breast lightly)
  • 2 Tablespoons apple cider vinegar
  • 1/3 cup (heaping) orange marmalade
  • 1 cup chicken stock
  • 1 Tablespoon fresh rosemary leaves , finely chopped
  • 2 Tablespoons fresh thyme leaves , finely chopped
Instructions
  1. Coat a stainless steel skillet with the olive oil. Heat until very hot.
  2. Lightly sprinkle each chicken breast with a tiny bit of salt. Add the chicken breasts to hot skillet. You should hear the oil sizzle when you add the chicken. Sear the chicken breasts, without moving them, for 5 minutes. Turn chicken over and continue to cook for 5 more minutes. Chicken should be golden brown on BOTH sides. When cooking time (total of 10 minutes) is done, remove chicken to a plate. Set aside.
  3. Add the apple cider vinegar back into the skillet and de-glaze the pan.
  4. Add the orange marmalade, chicken stock, chopped rosemary and thyme. Whisk these together to combine. Continue cooking on medium heat for 2-3 minutes. The sauce will slightly thicken just a bit.
  5. Add the chicken breasts back into the sauce in the skillet. Continue to cook for 5-6 more minutes, spooning the sauce over the tops of each chicken breasts continuously, as they cook. Once chicken is done, remove chicken breasts to serving platter or individual plates. Spoon some of the sauce over each chicken breast.
  6. Serve with a side of rice or potatoes, and a veggie... and ENJOY!
Nutrition Facts
Sticky Orange Chicken
Amount Per Serving (1 g)
Calories 283 Calories from Fat 90
% Daily Value*
Fat 10g15%
Saturated Fat 1g6%
Cholesterol 74mg25%
Sodium 232mg10%
Potassium 512mg15%
Carbohydrates 20g7%
Sugar 16g18%
Protein 25g50%
Vitamin A 230IU5%
Vitamin C 8.3mg10%
Calcium 30mg3%
Iron 1.2mg7%
* Percent Daily Values are based on a 2000 calorie diet.

Here’s one more to pin on your Pinterest boards!Sticky orange chicken is pan-seared chicken breasts, cooked in an orange marmalade, chicken stock, and rosemary herb based sweet and sticky sauce!

Save

Save

Save

Save

Crunchy Buttermilk Fried Chicken

Why pay for a bucket of chicken for dinner when it’s easy to make delicious, crunchy buttermilk fried chicken at home for a fraction of the cost?Why pay for a bucket of chicken for dinner when it's easy to make delicious, crunchy buttermilk fried chicken at home for a fraction of the cost?Today I want to share with you the way I cook Crunchy Buttermilk Fried Chicken. It’s delicious!  Really crispy/crunchy on the outside, and moist, tender, and flavorful on the inside!

Scroll Down For A Printable Recipe Card At The Bottom Of The Page

Family Memories With Crunchy Buttermilk Fried Chicken

My Mom and Dad were raised in Texas, and both grew up eating fried chicken. As a result, I also grew up eating my Mom’s fried chicken. In fact, when we drove from Los Angeles to Texas each summer to visit my grandparents, my Mom ALWAYS made fried chicken before we left.

Our family of five didn’t have a lot of money to eat at restaurants back in those days. Mom lovingly packed her crunchy buttermilk fried chicken in an ice chest in the car so we could have it for dinner, along with cheese and crackers.

My husband’s parents were also from Texas, and he loves fried chicken, too. Guess you could say our mutual love of crunchy buttermilk fried chicken part of both of our family heritage!. I guess we both come by our love of Southern style buttermilk fried chicken honestly.  I don’t make it too often, but when I do, it’s a delicious “old-school” treat.

How To Cook Buttermilk Fried Chicken

First,  mix together a variety of spices with some all purpose flour in a bowl.

Flour and spices for chicken in bowl
Pour cold buttermilk into a separate bowl. Now you should have a bowl of the flour/spice mixture, a bowl of buttermilk, and the chicken (skin on), ready to go.

Chicken, flour and buttermilk on counter
Time To Batter the Chicken

Coat each piece of chicken on all sides with the flour mixture. I use my clean hands to do this. It will get a little messy, but I can live with that. You can also use tongs.

Chicken dipped in flour in bowl
Next, completely coat each piece of chicken with buttermilk, letting the excess liquid drip back into the bowl.

Floured chicken dipped in buttermilk
Put each piece of chicken back into the flour and coat it completely, again. That’s right… this buttermilk fried chicken is double coated.

Chicken thigh dredged in flour for 2nd time
After the coating of flour/buttermilk/flour has been applied to each piece, I set the chicken on a platter to rest while I wash my flour-coated fingers, and heat up the pan of oil.

Chicken thighs and legs on platter
Time To Fry The Chicken!

It’s wonderful if you have a large skillet (or large Dutch oven) to cook the chicken in. I put about 3 inches of vegetable oil in the skillet (or pan), and heat it on high until it reaches 370 – 375 degrees. NOTE: It is very important to get the oil this hot to ensure a good crisp coating on the chicken. Be VERY careful… this oil is HOT!

Thermometer for frying chicken in oil
Using tongs, carefully (and GENTLY) place each of the pieces of chicken into the hot oil. It will bubble, etc.  The chicken should begin to brown on the bottom pretty quickly. After 4-5 minutes (once golden brown), turn the chicken carefully to the other side. I usually use a splatter screen on top of the skillet to help keep the “splatter” down to a minimum.

Chicken pieces frying in hot oil
Continue to cook chicken, turning and browning for about 5 minutes. After chicken has cooked for about 10 minutes total (since adding the chicken), reduce the heat from high to medium/low and continue cooking an additional 10 minutes.

If you are using extra large pieces of chicken, adapt cooking time to ensure chicken is fully cooked. Chicken should be a wonderful brown color before removing. Place a wire rack on top of some paper towels. The paper towels will help absorb any oil that might drip off the hot chicken.

Wire rack to drain crunchy buttermilk fried chicken on
Hot And Delicious Crunchy Buttermilk Fried Chicken

When the crunchy  buttermilk fried chicken is done cooking, carefully remove the pieces to wire rack to cool just a bit.

Crunch fried chicken, draining on wire rack
Serve the chicken with some good ol’ mashed potatoes and a veggie on the side, and you will have comfort food at it’s very best! Enjoy the crunch as you bite into this delicious Southern style crunchy buttermilk fried chicken!

Buttermilk fried chicken on plate with vegetablesIt’s really not that hard at all to make good old Southern Style Crunchy Buttermilk Fried Chicken. Why pay someone else (KFC) to make it for you when you can make it yourself for a fraction of the cost?

Sure hope you will give it a try! This buttermilk fried chicken is DELICIOUS! Have a great day, and please come back soon.

Looking for More CHICKEN Recipes?

You can find all of my recipes in the Recipe Index, located at the top of the page. I have LOTS of chicken recipes you’ll enjoy, including:

Interested In More Recipes?

Thank you for visiting this website. I appreciate you using some of your valuable time to do soIf you’re interested, I publish a newsletter 2 times per month (1st and 15th) with all the latest recipes, and other fun info. I would be honored to have you join our growing list of subscribers, so you never miss a great recipe!
There is a Newsletter subscription box on the top right side (or bottom) of each blog post, depending on the device you use, where you can easily submit your e-mail address (only) to be included in my mailing list.

You Can Also Find Me On Social Media:
Facebook page: The Grateful Girl Cooks!
Pinterest: The Grateful Girl Cooks!
Instagram: jbatthegratefulgirlcooks

Author's signature

0 from 0 votes
Crunchy Buttermilk Fried Chicken
Prep Time
15 mins
Cook Time
20 mins
Total Time
35 mins
 

Why pay for a bucket of chicken for dinner when it's easy to make delicious, crunchy buttermilk fried chicken at home for a fraction of the cost?

Category: Entree
Cuisine: American
Keyword: buttermilk fried chicken
Servings: 5 pieces
Calories Per Serving: 499 kcal
Author: JB @ The Grateful Girl Cooks!
Ingredients
  • 5 Chicken thighs and legs total of 5 pieces (see note)
  • 1 1/2 cups all purpose flour
  • 1/2 teaspoon salt
  • 1/2 teaspoon pepper
  • 1/4 teaspoon garlic powder
  • 1/4 teaspoon onion powder
  • 1/4 teaspoon celery salt
  • 1/4 teaspoon dried thyme
  • 1/4 teaspoon seasoning salt
  • 1 1/2 cups buttermilk
  • Vegetable oil (enough for about 3 inches in bottom of pan)
Instructions
  1. In a medium bowl, mix together the flour and spices.
  2. Place the buttermilk in a separate medium bowl.
  3. Dredge chicken pieces in flour to coat all sides.
  4. Dredge chicken pieces in buttermilk to coat all sides.
  5. Re-dredge chicken pieces in flour to coat all sides. Lay chicken pieces on platter to rest while oil is heating.
  6. In a large skillet or large Dutch oven, pour enough vegetable oil to cover bottom with about 3 inches of oil. Turn heat to high, and heat until oil reaches 370 or 375 degrees F.
  7. When oil temperature is at 370 degrees, carefully add chicken pieces to hot oil, using tongs. Let cook for 4-5 minutes (should start to turn golden brown on bottom), then carefully turn each piece of chicken over and cook for an additional 4-5 minutes.
  8. After chicken has cooked for 10 minutes, reduce heat to medium/low and continue cooking (and turning) chicken for an additional 10 minutes. Chicken should be medium brown and cooked through when time is up. Remove chicken with tongs to a wire rack (which is on top of paper towels), to drain and cool down just a bit.
  9. Serve chicken with side dishes of your choice, and enjoy the crunch!
Recipe Notes

If you are going to be cooking a large quantity of chicken, you will need to increase the amount of flour/spice mixture, and buttermilk slightly to adequately cover all the chicken.

Nutrition calculation is based on 5 chicken thighs (bone-in). Caloric count will be lower if using chicken legs and/or breasts. Oil that chicken is cooked in was not factored into caloric calculation (as almost all of oil is for cooking, and is not eaten)

Nutrition Facts
Crunchy Buttermilk Fried Chicken
Amount Per Serving (1 piece)
Calories 499 Calories from Fat 234
% Daily Value*
Fat 26g40%
Saturated Fat 7g44%
Cholesterol 149mg50%
Sodium 652mg28%
Potassium 433mg12%
Carbohydrates 32g11%
Fiber 1g4%
Sugar 3g3%
Protein 29g58%
Vitamin A 230IU5%
Calcium 100mg10%
Iron 2.8mg16%
* Percent Daily Values are based on a 2000 calorie diet.

Here’s one more to pin on your Pinterest boards!Why pay for a bucket of chicken for dinner when it's easy to make delicious, crunchy buttermilk fried chicken at home for a fraction of the cost?

Save

Save

Baked Parmesan Chicken

Baked Parmesan Chicken – You’ll enjoy these easy to make, seasoned, baked chicken breasts with a creamy Parmesan cheese coating! Delicious, and 5 minute prep!Baked Parmesan Chicken - You'll enjoy these easy to make, seasoned, baked chicken breasts with a creamy Parmesan cheese coating! Delicious, and 5 minute prep!

A couple of nights ago I made Baked Parmesan Chicken for dinner.  I didn’t use a recipe, but just made it up as I went along.  Sometimes experimenting is the way I find a recipe to keep. The chicken took only 5 minutes to prep, then it baked in the oven while I didn’t even give it another thought (how rude of me…). How easy is that?  It was DELICIOUS.

It was one of those nights where we seriously considered “just having a bowl of cereal for dinner”. Earlier that day I thawed chicken breasts, but both my husband and I were so exhausted at dinner time after a long work day, we wanted something “simple”.

I ended up deciding to just throw the chicken breasts in the oven and let them bake… figured we needed the protein more than we needed a bowl of cereal… haha!

Anyways, the chicken turned out wonderful! I based the “recipe” (if you can call it that!) on an old recipe I have that uses mayonnaise as one of the ingredients in a wonderful dinner bread. Sounds weird, huh? But wait – it’s amazing! (Here’s the original recipe: Italian Biscuit Flat Bread).

So for this dish I went with what I thought would taste good on chicken, and poof… dinner was served, and we really liked it! Hope you will give it a try! Here’s how to make this dish:

Scroll Down For A Printable Recipe Card At The Bottom Of The Page 

How To Make Baked Parmesan Chicken 

Boneless, skinless chicken breasts are lightly seasoned with salt, pepper, Italian seasoning, garlic powder, and thyme.

Four raw seasoned chicken breasts on plate

Believe it or not, mayonnaise is spread over the entire top surface of the chicken. this helps the Parmesan to adhere to the chicken AND keeps the chicken moist (trust me… it works!)

Four chicken breasts with mayonnaise on top

Bake The Parmesan Chicken

Cover the top of the chicken with grated Parmesan cheese, then sprinkle with paprika and parsley. Throw it in the ol’ oven at this point!  SEE HOW EASY THE PREP WAS?

Chicken, covered with Parmesan cheese and spices

Baked Parmesan chicken is cooked, uncovered, at 350 degrees for 45 minutes.  This is how it looks when it comes out of the oven. The chicken breasts should be lightly browned on top.

Chicken is baked and out of oven

And that’s it!!! One of the easiest recipes I know of!  The best part? It tastes GOOD… AND you can make the other side dishes while the chicken is baking. EASY PEASY!

We always enjoy this simple dish, especially when served with mashed potatoes and a small green salad on the side.

Baked poultry on beige plate with potatoes and salad

Hope you will give this recipe a try. It’s so easy and will save you LOTS of time fixing a yummy dinner your family will enjoy! Have a great day!

Looking For More CHICKEN Recipes?

You can find all of my recipes in the Recipe Index, which is located at the top of the page. I have LOTS of chicken recipes you’re gonna enjoy, including:

Interested In More Recipes?

Thank you for visiting this website. I appreciate you using some of your valuable time to do soIf you’re interested, I publish a newsletter 2 times per month (1st and 15th) with all the latest recipes, and other fun info. I would be honored to have you join our growing list of subscribers, so you never miss a great recipe!
There is a Newsletter subscription box on the top right side (or bottom) of each blog post, depending on the device you use, where you can easily submit your e-mail address (only) to be included in my mailing list.

You Can Also Find Me On Social Media:

Facebook page: The Grateful Girl Cooks!
Pinterest:
The Grateful Girl Cooks!
Instagram:
jbatthegratefulgirlcooks

Author's signature

↓↓ PRINTABLE RECIPE BELOW ↓↓

0 from 0 votes
Baked Parmesan Chicken
Prep Time
5 mins
Cook Time
45 mins
Total Time
50 mins
 
You'll enjoy these easy to make, seasoned, baked chicken breasts with a creamy Parmesan cheese coating for dinner! Delicious, and prep time is only 5 minutes!
Category: Entree
Cuisine: American
Keyword: parmesan chicken
Servings: 4 servings
Calories Per Serving: 211 kcal
Author: JB @ The Grateful Girl Cooks!
Ingredients
  • 4 chicken breasts , boneless, skinless
  • 1 dash Salt and pepper (to season chicken)
  • 1 dash Italian seasoning (to season chicken)
  • 1 dash Garlic powder (to season chicken)
  • 1 dash Thyme (dried - to season chicken)
  • 4 teaspoons mayonnaise
  • 1/2 cup Grated Parmesan cheese
  • 1 dash Paprika (for garnish)
  • 1 dash Dried Parsley (for garnish)
Instructions
  1. Preheat oven to 350 degrees. Spray a baking pan with non-stick spray.
  2. Sprinkle the chicken breasts with salt, pepper, Italian seasoning, and dried thyme. (Don't need to measure, just season the meat with a good sprinkling of each of the spices.)
  3. Spread 1 teaspoon mayonnaise over the entire top surface of each chicken breast, to cover.
  4. Sprinkle the top of each chicken breast with the Parmesan cheese shreds (to cover the mayonnaise). Press down the cheese if necessary, to adhere it to the mayo.
  5. Place chicken breasts into a baking pan. Bake chicken, uncovered, at 350 degrees for 45 minutes. Remove from oven. Sprinkle top of each chicken breast with paprika and dried parsley. Serve, and enjoy!
Nutrition Facts
Baked Parmesan Chicken
Amount Per Serving (1 piece)
Calories 211 Calories from Fat 81
% Daily Value*
Fat 9g14%
Saturated Fat 3g19%
Cholesterol 85mg28%
Sodium 358mg16%
Potassium 433mg12%
Protein 28g56%
Vitamin A 140IU3%
Vitamin C 2.1mg3%
Calcium 151mg15%
Iron 0.7mg4%
* Percent Daily Values are based on a 2000 calorie diet.

Here’s one more to pin on your Pinterest boards!Baked Parmesan Chicken - You'll enjoy these easy to make, seasoned, baked chicken breasts with a creamy Parmesan cheese coating! Delicious, and 5 minute prep!

Save