You’re going to LOVE this delicious Skillet Monterey Chicken, which can be made in 20 minutes, and features chicken breasts, bacon, BBQ sauce, and cheese!
I tried a new recipe for a quick dinner the other night… Skillet Monterey Chicken! This delicious one pan (copycat) dish features chicken breasts, bacon, BBQ sauce, cheddar and jack cheese, and can be prepared and on the kitchen table in 20 minutes! Yum… it was perfect!
I saw this recipe on Pinterest (thanks Trish, at Mom On Timeout) and knew I wanted to try it. Let’s be real… I mean, come on… chicken AND bacon AND BBQ sauce AND cheese? It’s true. This skillet Monterey chicken was calling to me!
Turns out, it was really good, and only took 20 minutes to prepare! My hubby loved this dish, as well! Now I know why it was such a popular menu item at Chilis restaurants for so long! Our local Chilis restaurant permanently closed, so I am really glad I can make this dish at home! Here’s how to make this dish:
Scroll Down For A Printable Recipe Card At The Bottom Of The Page
How To Make Skillet Monterey Chicken
Using an oven-proof skillet, fry bacon until crisp. Once bacon has cooled, cut each piece in half. Leave some of the bacon grease in pan (to cook chicken breast in), but discard the rest.

Brown The Chicken
While bacon is cooking, salt and pepper the chicken breasts. Once bacon has been removed from pan, add the chicken breasts cutlets to the hot skillet. Cook about 3 minutes per side on medium-high, until golden brown.
TIP: I cut two large chicken breasts in half lengthwise, so the pieces were fairly thin. This helps to cook them faster, and is still a good portion size. If using whole chicken breasts, make sure to pound them out thinner, between sheets of plastic wrap, before cooking.

The little bit of bacon grease you left in the skillet when you cooked it really adds great flavor to the chicken.

Once chicken has cooked on both sides, pour chicken broth over the chicken. Put a lid on the skillet, and continue to cook 4-5 more minutes (covered) or until the chicken is cooked through. The time will vary, depending on how thick the chicken breasts are).

Once chicken is done, remove lid from skillet and remove skillet from heat. Before continuing, PREHEAT YOUR OVEN BROILER.

Building The Layers On The Chicken
While broiler is pre-heating, spread BBQ sauce over each piece of chicken (1 Tablespoon on each piece).

Place two (half) pieces of bacon on top of the BBQ sauce.

Divide the cheese evenly and place on top of the bacon, covering the entire piece of chicken.

Place the skillet and chicken (see why you need an oven-proof skillet?) on the middle rack of oven under the broiler. Keep an eye on it. Once cheese is fully melted (anywhere from 30 seconds to 1-2 minutes), remove the hot skillet Monterey chicken from the oven.
Garnish And Serve The Skillet Monterey Chicken
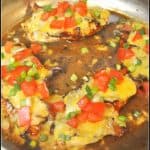
Top each piece of chicken with diced tomato and sliced green onions. The skillet Monterey chicken looks and smells real good, right about now!

Transfer portions to individual serving plates, dig in, and enjoy delicious Skillet Monterey Chicken!

Hope you will consider making skillet Monterey chicken. It truly was very easy to make, and we loved it! Have a fantastic weekend!
Looking For More CHICKEN Recipes?
You can find ALL my chicken recipes in the Recipe Index, located at the top of the page. A few favorites include:
- BBQ Chicken Tortilla Pizza
- Chicken Cutlets with Pecan Sauce
- Hawaiian Huli Huli Chicken
- Chicken Thigh Osso Bucco
Interested In More Recipes?
Thank you for visiting this website. I appreciate you using some of your valuable time to do so. If you’re interested, I publish a newsletter 2 times per month (1st and 15th) with all the latest recipes, and other fun info. I would be honored to have you join our growing list of subscribers, so you never miss a great recipe!
There is a Newsletter subscription box on the top right side (or bottom) of each blog post, depending on the device you use, where you can easily submit your e-mail address (only) to be included in my mailing list.
You Can Also Find Me On Social Media:
Facebook page: The Grateful Girl Cooks!
Pinterest: The Grateful Girl Cooks!
Instagram: jbatthegratefulgirlcooks

Recipe Source: http://www.momontimeout.com/2016/02/20-minute-skillet-monterey-chicken/
- 4 boneless , skinless chicken breasts, pounded thin (or use 2 large breasts, cut in half horizontally)
- salt and pepper (to season chicken breasts)
- 4 slices bacon
- 1/2 cup chicken stock
- 4 Tablespoons BBQ sauce
- 4 ounces Colby Jack cheese (or a combo of cheddar and jack), grated
- 1 medium tomato , seeded and diced (discard seeds)
- 2 green onions , sliced
- Fry bacon slices in a large oven-proof skillet until crispy. Remove bacon to paper towels, to drain. When cool, cut each piece of bacon in half. Leave about 2 Tablespoons bacon grease in skillet; discard the rest.
- While you are cooking bacon, pound the chicken breasts out until they are fairly thin so they will cook faster (I cut two LARGE chicken breasts in half horizontally, so I skipped this step). Season chicken with salt and pepper.
- Heat reserved bacon grease on medium-high. When skillet is hot, cook the chicken for 2-3 minutes per side, until golden brown (times may vary due to thickness of chicken).
- Pour the chicken broth over chicken. Put a lid on the skillet. Continue to cook chicken (covered) for 4-5 minutes. When done, turn off heat.
- Preheat your oven broiler.
- Spread 1 Tablespoon of BBQ sauce over the top of each piece of chicken. Place 2 bacon halves onto BBQ sauce covered chicken. Divide cheese evenly and cover top of chicken.
- Place skillet with chicken in the middle of the oven under preheated broiler. Broil only until the cheese is completely melted. Remove hot skillet from broiler.
- Garnish each piece of chicken with diced tomato and sliced green onions. Serve and enjoy.
Here’s one more to pin on your Pinterest boards!


 / The Grateful Girl Cooks!")
 / The Grateful Girl Cooks!")
 / The Grateful Girl Cooks!")
 / The Grateful Girl Cooks!")
 / The Grateful Girl Cooks!")


