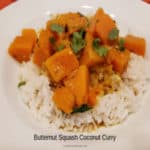
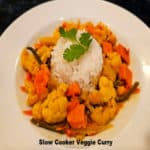
Category: Meatless Meals

Pasta in Wine and Garlic Sauce

Make delicious pasta in wine and garlic sauce in under 15 minutes! SIMPLE to make, then garnish with Parmesan cheese for a tasty main dish!

Do you enjoy pasta dishes? We sure do… especially my husband! Today I want to share a super simple, but “oh so tasty” recipe for Pasta in Wine and Garlic Sauce. It is sooo good, and I’m confident you’re gonna enjoy it as much as we do.

I love this recipe, because while fresh (or dried) pasta is cooking, you whip up a flavorful, EASY sauce to coat the pasta with as soon as it is finished. We try to have a meatless meal about once a week, and this one is pretty amazing! The sauce truly only takes a couple minutes to make while the pasta cooks, so the recipe definitely is “LOW MAINTENANCE!”

That’s why this is such a great recipe. This pasta (and sauce) tastes wonderful, and is the perfect solution when you don’t have much time, motivation or energy to make dinner. We’ve all been there, right? You can even add cooked shrimp or chicken to this pasta if you need some added protein! Trust me, you really can’t hurt this dish!

Do I Have To Use Fettucine Noodles For This Recipe?

No. You do NOT have to use fettucine pasta. Use whatever type of pasta you have, fresh or dried. For these photos I used homemade fresh fettucine, but the recipe works perfectly with any type of fresh or dried pasta. I recently used a Christmas gift card to purchase pasta rolling attachments for my stand mixer, so I made some fettucine pasta to try the attachments out to “show off” this simple pasta in wine and garlic sauce recipe. Here’s how easy it is to make this dish:

Scroll Down For A Printable Recipe Card At The Bottom Of The Page

Prepare The Pasta

Cook the pasta you will be using (dried or fresh) in boiling, heavily salted water, according to package directions. Continue until the pasta is cooked al dente. Please remember that fresh pasta takes less time to cook than dried pasta. You can make the sauce quickly while the pasta is cooking.

Fresh homemade fettucine pasta cooking in salted, boiling water.

Make The Wine And Garlic Sauce While Pasta Cooks

Using a large saucepan or skillet, heat olive oil on medium heat. To the oil, add minced garlic, and red pepper flakes, and stir to combine. Cook this mixture for one minute, stirring often so the garlic doesn’t burn. 

Garlic and red pepper flakes cook in hot oil before adding remaining ingredients.

Add butter (cut into chunks), white wine, salt and black pepper. *NOTE: Use any type of dry white wine you want, including chardonnay, pinot grigio, sauvignon blanc, pinot gris, etc.

Stir well as the butter melts, to combine the ingredients. Cook the sauce for two minutes on medium heat, and then remove the pan from the heat. BOOM! It’s DONE!

A white wine, butter, and garlic sauce cooking in skillet.Sauce cooks for a couple minutes before adding it to hot cooked pasta.

Time To Serve The Pasta In Wine And Garlic Sauce

As soon as the pasta is done, drain off the water, and then pour the hot pasta back into the saucepan or skillet. Immediately pour the wine and garlic sauce over the hot pasta, and toss really well, to coat the noodles with the sauce.

The pasta will not be “swimming” in the sauce- just make sure it’s all coated, so mix it well. Place the pasta in wine and garlic sauce into (or onto) serving bowls (or plates). Sprinkle with grated Parmesan cheese and chopped fresh parsley to garnish. If desired, you can also sprinkle on a few more red pepper flakes (if you want more “heat”), but that is optional!

Pasta in wine and garlic sauce is served, garnished with Parmesan cheese and parsley.

Because the pasta is not “doused” in sauce, it will tend to cool fairly quickly, so serve it immediately. TIP: Once pasta has been garnished with Parmesan and parsley, I like to put each portion into the microwave for 20-30 seconds to make sure it is served HOT! 

Close up photo of pasta in wine and garlic sauce, served in a white bowl.

I sure hope you enjoy this delicious pasta dish. We really do, and my husband loves to request this for dinner. What more could you want in a simple, meatless recipe? Full of flavor, filling, and easy to make in a flash… it’s a keeper!

Looking For More PASTA Recipes?

You can find all of my recipes in the Recipe Index, located at the top of the page. I have quite a few pasta recipes you’ll enjoy, including:

Interested In More Recipes?

Thank you for visiting this website. I appreciate you using some of your valuable time to do soIf you’re interested, I publish a newsletter 2 times per month (1st and 15th) with all the latest recipes, and other fun info. I would be honored to have you join our growing list of subscribers, so you never miss a great recipe!
There is a Newsletter subscription box on the top right side (or bottom) of each blog post, depending on the device you use, where you can easily submit your e-mail address (only) to be included in my mailing list.

You Can Also Find Me On Social Media:

Facebook page: The Grateful Girl Cooks!
Pinterest:
The Grateful Girl Cooks!
Instagram:
jbatthegratefulgirlcooks

Author's signature

Original recipe source: julieblanner.com/white-wine-sauce/

0 from 0 votes
Pasta in Wine and Garlic Sauce
Prep Time
3 mins
Cook Time
4 mins
Total Time
7 mins
 

Make delicious pasta in wine and garlic sauce in under 15 minutes! SIMPLE to make, then garnish with Parmesan cheese for a tasty main dish!

Category: Main Course, Meatless Entree
Cuisine: Italian
Keyword: pasta in wine and garlic sauce
Servings: 6
Calories Per Serving: 488 kcal
Author: JB @ The Grateful Girl Cooks!
Ingredients
For Sauce:
  • ¼ cup olive oil
  • 2 teaspoons minced garlic (fresh or jarred)
  • ½ teaspoon crushed red pepper
  • 5 Tablespoons butter (salted or unsalted)
  • ½ cup dry white wine (chardonnay/pinot grigio/sauvignon blanc)
  • 1 teaspoon salt
  • ½ teaspoon black pepper
For Pasta:
  • 1 pound pasta (fresh or dried, any type) See NOTE below.
  • 1/3 cup freshly grated Parmesan cheese (for garnish)
  • ¼ cup fresh parsley, chopped (for garnish)
Instructions
  1. Cook pasta (dried or fresh) in boiling, heavily salted water according to package directions. Continue until pasta is cooked al dente.

Make Sauce While Pasta Cooks:
  1. Heat olive oil on medium in a large saucepan or skillet. Add garlic and red pepper flakes to the oil; stir to combine. Cook for 1 minute, stirring often so garlic doesn't burn. Add butter (cut in chunks), white wine, salt and black pepper. Stir as butter melts, to combine ingredients. Cook for 2 minutes on medium heat, then remove pan from heat.

To Serve:
  1. When pasta is done, drain off water; pour pasta back into saucepan/skillet. Immediately pour sauce over hot pasta; toss well to coat pasta with sauce. Portion pasta into (or onto) serving bowls (or plates). Sprinkle with Parmesan and parsley. You can also sprinkle with a few red pepper flakes (if you want more "heat"), but that's optional! Serve hot, and enjoy. *Store any leftover pasta in a sealed container for up to 5-7 days. Reheat in microwave.

Recipe Notes

NOTE: Fresh pasta cooks the quickest, and is reflected in the cooking time. Dried pasta (any type may be used) will take longer to cook to al dente firmness, but is perfectly okay to use!

Nutrition Facts
Pasta in Wine and Garlic Sauce
Amount Per Serving (1 (1/6th of total))
Calories 488 Calories from Fat 189
% Daily Value*
Fat 21g32%
Saturated Fat 8g50%
Cholesterol 30mg10%
Sodium 566mg25%
Potassium 210mg6%
Carbohydrates 58g19%
Fiber 3g13%
Sugar 2g2%
Protein 12g24%
Vitamin A 600IU12%
Vitamin C 4mg5%
Calcium 89mg9%
Iron 1mg6%
* Percent Daily Values are based on a 2000 calorie diet.

Here’s one more to pin on your Pinterest boards!Make delicious pasta in wine and garlic sauce in under 15 minutes! SIMPLE to make, then garnish with Parmesan cheese for a tasty main dish!

Creamy Avgolemono Soup

Creamy Avgolemono Soup is a classic Greek dish (with rice) that is delicious, rich and lemony, and very easy to make in under 30 minutes.Creamy Avgolemono Soup is a classic Greek dish (with rice) that is delicious, rich and lemony, and very easy to make in under 30 minutes.

For many years I have read about, looked at recipes, and wondered about Avgolemono soup. It sounded quite unusual. I was tempted many times to give it a try, but never did, until last month. Whoa! I LOVED this soup! Who knew that a lemon-flavored creamy rice soup could taste so incredibly GOOD?

Creamy avgolemono soup is a classic Greek beloved soup, one of their signature dishes, to be sure. Avgolemono” comes from the Greek language. “AVGO” means egg, and “LEMONO” means lemon. This light and creamy simple soup only uses a few ingredients, is EASY to make, and tastes wonderfully bright and fresh! I hope you will give it a try… it will surprise you, most likely. Here’s how to make it:

Scroll Down For A Printable Recipe Card At The Bottom Of The Page

How To Make Creamy Avgolemono Soup

Heat six cups of chicken broth in a large saucepan over medium-high heat. Bring it to a boil, and then pour in a half cup of uncooked long grain rice. Stir well, to combine.

Cook the broth and rice, uncovered, for 15-20 minutes on medium-high heat, until the rice becomes tender. Stir the rice occasionally while it is cooking, to prevent it from sticking to the bottom of the pan.

Uncooked rice is added to boiling chicken broth to cook.

Temper The Egg Mixture Before Adding To Hot Soup

In a medium-sized bowl, whisk four egg yolks lightly, and then add fresh lemon juice and finely grated lemon zest, whisking to combine. Now it’s time to “temper” the egg mixture. This is a VERY important step!

*Tempering the eggs means slowly adding in hot broth VERY SLOWLY. This raises the temperature of the eggs, so that when they’re added to very hot soup, they won’t become “scrambled eggs”. Here’s how to temper the egg mixture:

Slowly drizzle 1 cup of the hot broth into the egg mixture, whisking constantly as you add it. Continue whisking until all the cup of broth has been added. Turn the heat down to medium-low under the broth in the pan , and then slowly add the warmed egg mixture back into the hot broth in the pot, whisking as you add it. 

Egg yolks, lemon juice and zest are whisked together until combined.Hot broth is slowly drizzled/whisked into egg mixture to temper the eggs.

Finish Cooking The Soup

Let the soup continue to cook on medium-low heat for 3-4 minutes, stirring often. DO NOT LET THE SOUP COME TO A BOIL!  The creamy avgolemono soup will thicken up a little bit as it continues to cook. Once it has fully heated through (about 3-4 minutes), remove the pan from the heat. Season lightly (to suit your taste) with salt and pepper.

Avgolemono soup is cooked 3-4 minutes after adding tempered egg mixture.The soup is lemony, rich, thick and creamy after heating through.

Ready For A Bowl Of Creamy Avgolemono Soup!

Once heated through, the creamy avgolemono soup is ready to eat! Ladle the hot soup into serving bowls, and garnish each serving with chopped fresh flat-leaf parsley (and strips of lemon peel, if desired).

The parsley and lemon peel add a “pop” of color, and another layer of flavor, but are not absolutely essential if you don’t have them handy! The soup is thick and creamy, bursting with lemon flavor, and the rice is very tender (and filling). We enjoy this soup with crusty slices of garlic bread on the side. YUM!

A bowl of Creamy Avgolemono Soup, garnished with chopped parsley and lemon peel.Garlic bread served on the rim of a bowl of creamy avgolemono soup.

I truly hope you will give this creamy avgolemono soup a try- it’s quite delicious! The leftovers were microwaved for lunch the next day, and were wonderful, as well! Thank you for stopping by, and I hope you will come back soon. Take care.

Looking For More SOUP Recipes?

You can find all of my recipes in the Recipe Index, which is located at the top of the page. I have lots of soup recipes you’ll enjoy, including:

Interested In More Recipes?

Thank you for visiting this website. I appreciate you using some of your valuable time to do soIf you’re interested, I publish a newsletter 2 times per month (1st and 15th) with all the latest recipes, and other fun info. I would be honored to have you join our growing list of subscribers, so you never miss a great recipe!
There is a Newsletter subscription box on the top right side (or bottom) of each blog post, depending on the device you use, where you can easily submit your e-mail address (only) to be included in my mailing list.

You Can Also Find Me On Social Media:

Facebook page: The Grateful Girl Cooks!
Pinterest:
The Grateful Girl Cooks!
Instagram:
jbatthegratefulgirlcooks

Author's signature

Original recipe source: The cookbook: “Williams-Sonoma Soup Of The Day”, by Kate McMillan, published by Weldon Owen, Inc. 2011, page 15

5 from 3 votes
Creamy Avgolemono Soup
Prep Time
5 mins
Cook Time
20 mins
Total Time
25 mins
 

Creamy Avgolemono Soup is a classic Greek dish (with rice) that is delicious, rich and lemony, and very easy to make in under 30 minutes.

Category: Dinner, Soup
Cuisine: Greek
Keyword: creamy avgolemono soup
Servings: 4
Calories Per Serving: 200 kcal
Author: JB @ The Grateful Girl Cooks!
Ingredients
  • 6 cups low-sodium chicken broth
  • ½ cup long grain white rice , uncooked
  • 4 large egg yolks , slightly beaten
  • ¼ cup fresh lemon juice
  • 1 teaspoon lemon zest (finely grated lemon peel)
  • salt/pepper, to taste
  • 2 Tablespoons fresh parsley (flat leaf) , chopped for garnish
Instructions
  1. Heat broth in large saucepan on medium-high heat. Bring to a boil; add uncooked rice. Cook uncovered, 15-20 minutes on medium-high heat, until rice is tender. .Stir occasionally while it cooks, to prevent rice from sticking to bottom of pan.

  2. In a medium bowl, whisk egg yolks lightly. Add lemon juice and zest, whisking to combine. "Temper" the egg mixture. *Tempering eggs means slowly adding in hot broth VERY SLOWLY. This raises the temperature of the eggs, so that when added to hot soup, they won't scramble. Here's how: Measure out, then slowly drizzle 1 cup of the hot broth into the egg mixture, whisking constantly as you add it. Continue whisking until the entire cup of broth is added.

  3. Turn the heat down to medium-low under the broth in pan; slowly add the warmed egg mixture back into the broth in pan, constantly whisking as you add it back in. Let the soup continue cooking on medium-low heat for 3-4 minutes, stirring often. DO NOT LET THE SOUP COME TO A BOIL! Soup will thicken up a bit as it cooks. Once hot (3-4 minutes), remove pan from the heat.

  4. Season lightly (to suit your taste) with salt and pepper. Ladle hot soup into bowls, and garnish each serving with chopped parsley (and strips of lemon peel, if desired). Enjoy!

Nutrition Facts
Creamy Avgolemono Soup
Amount Per Serving (1 g)
Calories 200 Calories from Fat 63
% Daily Value*
Fat 7g11%
Saturated Fat 2g13%
Cholesterol 184mg61%
Sodium 117mg5%
Potassium 376mg11%
Carbohydrates 25g8%
Fiber 1g4%
Sugar 1g1%
Protein 12g24%
Vitamin A 414IU8%
Vitamin C 9mg11%
Calcium 45mg5%
Iron 2mg11%
* Percent Daily Values are based on a 2000 calorie diet.

Here’s one more to pin on your Pinterest boards!Creamy Avgolemono Soup is a classic Greek dish (with rice) that is delicious, rich and lemony, and very easy to make in under 30 minutes.

Black Beans And Rice

Black Beans and Rice is a scrumptious, budget-friendly, meatless meal for the family! A lot of flavor, fiber, and protein in this easy dish!

If you’re looking for a “meatless Monday” kind of meal, may I suggest this easy recipe for black beans and rice? Not only is it meatless, it is fairly inexpensive to prepare, and tastes fantastic! My husband and I recently began setting aside at least one night a week for meatless meals. We are true meat-eaters, but find it to be a wonderful break for us. I originally found this recipe while searching for meatless meals online. I only “tweaked” the original recipe I used very slightly.

This recipe features black beans, brown rice, veggies and spices, which are great options in any tasty meal. Black beans are a wonderful source of protein and have lots of fiber, which helps add to a feeling of fulness. Brown rice also has more fiber, antioxidants, vitamins & minerals than white rice, so it will also help “fill you up”. That’s a win-win, in my book. Here’s how to make black beans and rice:

Scroll Down For A Printable Recipe Card At The Bottom Of The Page.

Prepare The Spice Mixture

Before beginning to cook this simple dish, I start by getting the spices together, so they’ll be ready to dump into the skillet later! The spices used add wonderful flavor (and is not too spicy) to the black beans and rice.

The spices you will need for this dish are dried parsley, onion powder, garlic powder, thyme, oregano, cayenne pepper, salt and black pepper. Measure them into a small bowl, and give them a stir, to combine. Set the spice mixture aside until later.

Spices for the black beans and rice are combined in a small bowl.

A Note About Cooking The Brown Rice

You will need to cook the brown rice in broth (vegetable OR chicken). Brown rice tends to take a bit longer to cook than white rice, so plan a bit ahead on this one, ok? I try to get the rice almost fully cooked before preparing the rest of the dish. You can make it ahead to save time, and then fluff it with a fork before adding it to this dish, if that’s more convenient.

Cook the rice according to the package instructions, but substitute vegetable or chicken broth for the water needed. The broth adds another layer of flavor. It is not absolutely essential to do this, but I highly recommend it! Once the rice is fully cooked, and the liquid has been absorbed, remove it from the heat source, fluff it with a fork, and set aside.

Brown rice is cooked in vegetable or chicken broth.

Preparing The Black Beans And Rice

Now it’s time to put this meal together. Heat olive oil on medium heat in a large skillet until very hot. Add chopped green peppers and yellow onion to the hot oil. Sauté the veggies for 4-5 minutes, stirring often to prevent sticking or burning.

Once done, add drained black beans, minced garlic, diced fresh tomatoes, and the spice mixture to the skillet. Stir well, to fully combine all the spices with the ingredients. I was happy to be able to use a jar of my homemade canned black beans in this meal (YAY).

Chopped green pepper and onions are cooked in olive oil in skillet.Green peppers, tomatoes, black beans and spices are added to the skillet to cook.

Add one more cup of vegetable or chicken broth to the skillet. Cook the mixture, uncovered, on medium heat for 10 minutes, stirring often. This just adds in another layer of flavor. When finished cooking, the liquid should be reduced/absorbed.

The ingredients are cooked for 10 minutes before adding rice.

Add the cooked brown rice to the skillet, and stir well, to incorporate it into the veggies. Cook on medium heat for a couple minutes, stirring often, until the black beans and rice are heated through. Remove the skillet from the heat source.

Cooked brown rice is added to the skillet, and stirred in, to combine.All the black beans and rice ingredients are combined in skillet... time to eat!

Time To Serve The Black Beans And Rice

Now the black beans and rice are ready to serve immediately, while hot. The recipe make 3 good sized servings, or 4 smaller servings, and can be easily doubled. When we enjoy this meal, we like to top each portion with a few fresh avocado slices, and a dollop of sour cream (optional). These toppings add color, extra flavor, creamy texture and taste to perfectly complete this yummy, filling meal!

Black beans and rice is served, topped with sour cream and avocado slices.

We really love flavor-filled black beans and rice, and I hope you have the opportunity to try this meal soon! Pretty sure you won’t even miss the meat! Thanks for stopping by, and I hope you will come back for a visit again soon.

Looking For More MEATLESS MEALS?

You can find all of my recipes in the Recipe Index, located at the top of the page. I have a variety of meatless meals you might enjoy, including:

Interested In More Recipes?

Thank you for visiting this website. I appreciate you using some of your valuable time to do soIf you’re interested, I publish a newsletter 2 times per month (1st and 15th) with all the latest recipes, and other fun info. I would be honored to have you join our growing list of subscribers, so you never miss a great recipe!
There is a Newsletter subscription box on the top right side (or bottom) of each blog post, depending on the device you use, where you can easily submit your e-mail address (only) to be included in my mailing list.

You Can Also Find Me On Social Media:

Facebook page: The Grateful Girl Cooks!
Pinterest:
The Grateful Girl Cooks!
Instagram:
jbatthegratefulgirlcooks

Author's signature

Original recipe source:  Ginny, at https://veganinthefreezer.com/acadian-black-beans/

0 from 0 votes
Black Beans and Rice
Prep Time
15 mins
Cook Time
20 mins
Total Time
35 mins
 

Black Beans and Rice is a scrumptious, budget-friendly, meatless meal for the family! A lot of flavor, fiber, and protein in this easy dish!

Category: Entree, Meatless Entree
Cuisine: American
Keyword: black beans and rice
Servings: 3
Calories Per Serving: 352 kcal
Author: JB @ The Grateful Girl Cooks!
Ingredients
Spice Mix:
  • ½ teaspoon garlic powder
  • ½ teaspoon dried parsley
  • ½ teaspoon onion powder
  • ½ teaspoon dried thyme
  • ½ teaspoon dried oregano
  • ½ teaspoon salt
  • ¼ teaspoon cayenne pepper
  • teaspoon black pepper
For Remainder Of Dish:
  • cup vegetable or chicken broth , low sodium
  • ¾ cup uncooked brown rice
  • ½ Tablespoon extra virgin olive oil
  • ¼ medium yellow onion , peeled and chopped
  • ½ medium green bell pepper , seeded and chopped
  • 15 ounces canned black beans , rinsed and drained
  • ¼ cup diced fresh tomatoes
  • 1 large garlic clove , minced
  • 1 cup vegetable or chicken broth (additional) , low sodium
Instructions
  1. Measure spices into small bowl. Stir to combine/set aside.

  2. Cook rice according to pkg. instructions, substituting 1¾ cups vegetable or chicken broth for water called for. Once done, and liquid has fully reduced, remove from heat; set aside.

  3. Heat olive oil (medium heat) in a large skillet until hot. Add green peppers and onion. Sauté 4-5 minutes, stirring often to prevent sticking/burning. When done, add black beans, minced garlic, diced tomatoes, and spice mixture to skillet. Stir well.

  4. Add one add'l. cup of broth to skillet. Cook uncovered, on medium heat for 10 minutes, stirring often. When finished, liquid should be fully reduced/absorbed. Add brown rice. Stir well. Cook on medium heat 2-3 minutes, stirring often, until heated through.

  5. Serve immediately, topping each portion with avocado slices/sour cream dollop, if desired, Enjoy!

Nutrition Facts
Black Beans and Rice
Amount Per Serving (1 g)
Calories 352 Calories from Fat 36
% Daily Value*
Fat 4g6%
Saturated Fat 1g6%
Sodium 936mg41%
Potassium 641mg18%
Carbohydrates 66g22%
Fiber 13g54%
Sugar 2g2%
Protein 14g28%
Vitamin A 246IU5%
Vitamin C 22mg27%
Calcium 71mg7%
Iron 4mg22%
* Percent Daily Values are based on a 2000 calorie diet.

Here’s one more to pin on your Pinterest boards!Black Beans and Rice is a scrumptious, budget-friendly, meatless meal for the family! A lot of flavor, fiber, and protein in this easy dish!

Easy Cheesy Enchiladas

Make a yummy batch of Easy Cheesy Enchiladas in a flash, with cheddar and jack cheese, canned enchilada sauce, onions, and corn tortillas.

One of my lifetime friends gave me her family’s “recipe” for making basic cheese enchiladas over 42 years ago. I have been making them, in one form or another ever since! The recipe (as shown in the printable recipe card at the bottom of the page) is her recipe for basic cheese enchiladas, perfect for “Meatless Mondays” (or anytime, for that matter!).

My friend, Nadine, says lightly frying the corn tortillas in hot oil BEFORE filling them, is the secret to making them. Nadine says it’s because the slightly cooked tortillas won’t tear as easily as dry tortillas might when filling them.

I’ve always made our enchiladas this way, and now (42 years later), I’ve probably used this little basic recipe hundreds of times! You can even go WILD (ha ha) and add seasoned ground beef, chicken, turkey or shredded pork, if you want to add some “meat”.

We have enjoyed these little enchiladas so long now, I feel like they are part of our family! It really doesn’t take much effort to make a pan of eight enchiladas (and the recipe can be easily doubled). Here’s how to make them:

Scroll Down For A Printable Recipe Card At The Bottom Of The Page

Preparing To Make Enchiladas

Preheat your oven to 350° Place the chopped onion, and grated jack and cheddar cheeses into individual bowls. NOTE: Set aside about 1/4 cup each of the two cheeses and save for later. You will need this cheese to sprinkle on top of the filled enchiladas before baking.

I like to set the bowls close together, right next to where I will be filling the enchiladas, so it is easy for me to grab the ingredients.

Chopped onion, grated cheddar and jack cheese are ready to fill tortillas.

Quick Fry To Soften Tortillas

Heat the oil in a small skillet (large enough for the tortillas, though!). You only need a small amount of oil, (usually about 3 Tablespoons) to barely cover the bottom of the skillet. You amount may vary, based on the size skillet you are using.

Heat the oil on medium-high heat until it is very hot, but NOT smoking. Lay a tortilla in the hot oil, and let it cook for about 15 seconds, then flip it to the other side, using tongs.

Cook 15 more seconds, and then carefully (using tongs) lift the tortilla out of the hot oil, letting the excess oil drip back into skillet, and place tortilla on a paper towel.

Repeat process with all 8 tortillas. When done, carefully blot the tortillas with paper towels to soak up any extra oil. Stack the tortillas on top of each other. Now you’re ready to fill the tortillas, and they should be nice and pliable, so they don’t tear.

Corn tortillas are quickly fried in hot oil to soften before adding enchilada filling.Quickly fried tortillas are blotted dry with paper towels before adding enchilada filling.

Filling And Rolling Easy Cheesy Enchiladas

Before filling the enchiladas, spoon just enough of the enchilada sauce in a 9×13 baking dish to cover the bottom. Then, as you fill each enchilada, place it directly on top of the enchilada sauce.

To fill the enchiladas, place a small handful of grated cheddar cheese right down the middle of the tortilla. Top with the grated jack cheese, and then sprinkle with chopped onion.

TIP: You will have to “guesstimate” on the amount of cheese used to fill each tortilla. Remember you need to divide the cheeses and onions evenly between 8 tortillas!

Once filled, roll the tortilla tightly up and over the filling. Place it in the prepared baking dish, with the seam side DOWN. Repeat this process for each enchilada. Your fingers can get a little messy, but who cares? It’s homemade enchiladas!

Each corn tortilla is filled with jack and cheddar cheese and chopped onions.Tortillas and filling are rolled, then placed on top of enchilada sauce in baking pan.

Finishing Enchiladas BEFORE Baking

Lay each remaining filled enchilada tightly next to the others. Pour or spoon the remaining enchilada sauce over the top of the enchiladas, until all are fully covered. Cover any exposed tortilla with the sauce (that will help them not dry out while baking).

Use all the sauce to cover those enchiladas! Once done, sprinkle the reserved cheddar and jack cheeses over the top of the enchiladas. If you want more, simply add as much as you wish. Sometimes I even add a bit more chopped onion or chopped black olives, too!

Additional enchilada sauce is put on top of the enchiladas in the baking pan.Grated cheeses are sprinkled on top of the easy cheesy enchiladas before baking.

Time To Bake

Easy cheesy enchiladas should be baked in a preheated 350°F. oven. Bake them for approximately 20 minutes. When done, the sauce and cheese should be bubbly around the edges, the cheese on top will be melted, and enchiladas will be heated through.

Transfer the baking dish to a wire rack, and let the easy cheesy enchiladas cool for just a couple minutes. This lets the cheese slightly firm up, so they are easier to remove from the dish for serving.

Enchiladas are baked for 20 minutes until cheese melts and they're heated through.

Serving Easy Cheesy Enchiladas

Use a spatula to remove each enchilada from the pan, and transfer to individual serving plates. These enchiladas go really well with my crock pot refried beans or Spanish rice.

Some of our favorite ways to serve cheesy enchiladas include adding chopped cilantro the the top of each enchilada. It’s really your own personal taste that will determine how you top them (and totally optional to add any extra topping at all!).

You can also just go with a dollop of sour cream on each one, OR you can go wild, and add fresh guacamole AND sour cream. However you serve these enchiladas, I’m pretty sure you will enjoy them. We sure do!

Easy cheesy enchiladas, garnished with chopped cilantro for serving.

The easy cheesy enchiladas can be garnished with sour cream for serving.Fresh guacamole and sour cream are another garnish for the baked cheese enchiladas.

I hope you enjoy these easy cheesy enchiladas. We sure do! It’s a perfectly delicious tasting “meatless meal”. Thank you for stopping by, and I sincerely hope you will stop by again. The printable recipe card is below.

Looking for for Mexican/Southwestern Main Dishes?

You can find all of my recipes in the Recipe Index, located at the top of the page. I have several Mexican or Southwestern inspired recipes, including:

Want More Recipes? Get My FREE Newsletter!

I publish a newsletter 2 times per month (1st and 15th) with lots of recipes, tips, etc..
Would you like to join our growing list of subscribers?

There is a Newsletter subscription box on the top right (or bottom) of each blog post, depending on the device you use.
You can submit your e-mail address there, to be added to my mailing list.

Find Me On Social Media:

Facebook page: The Grateful Girl Cooks!
Pinterest:
The Grateful Girl Cooks!
Instagram:
jbatthegratefulgirlcooks

Author's signature

Original recipe source: my friend Nadine Massey, over 42 years ago

↓↓ PRINTABLE RECIPE BELOW ↓↓

0 from 0 votes
Easy Cheesy Enchiladas
Prep Time
15 mins
Cook Time
20 mins
Total Time
35 mins
 

Make a yummy batch of Easy Cheesy Enchiladas in a flash, with cheddar and jack cheese, canned enchilada sauce, onions, and corn tortillas.

Category: Main Dish
Cuisine: Mexican, Southwest
Keyword: easy cheesy enchiladas
Servings: 8 enchiladas
Calories Per Serving: 305 kcal
Author: JB @ The Grateful Girl Cooks!
Ingredients
  • 8 medium corn tortillas
  • 19 ounces red enchilada sauce (canned) , 1 lb. 3 ounce can
  • 2 cups grated cheddar cheese , divided
  • 2 cups grated jack cheese , divided
  • cup onion (yellow) , chopped
  • enough oil to cover bottom of small skillet (approx. 3 Tablespoons)
OPTIONAL GARNISH: sour cream, guacamole, chopped cilantro
    Instructions
    PREP:
    1. Preheat oven to 350° Place chopped onion, and grated jack and cheddar cheeses into individual bowls. NOTE: Set aside about 1/4 cup each of the two cheeses and save for later. You will need this cheese to sprinkle on top of the filled enchiladas before baking. Pour just enough of the enchilada sauce in a 9x13 baking dish to cover the bottom.

    Making Enchiladas:
    1. Heat oil in a small skillet (large enough for tortillas) on medium-high heat until very hot, but NOT smoking. Lay a tortilla in hot oil; let it cook for about 15 seconds, then flip it to other side, using tongs. Cook 15 seconds, and then carefully (using tongs) lift tortilla from oil, letting excess oil drip into skillet; place on a paper towel. Repeat process with all tortillas. Blot tortillas with paper towels to soak up oil.

    2. Fill enchiladas: place a small handful of grated cheddar cheese down the middle of the tortilla. Top with grated jack cheese, and then sprinkle with chopped onion, dividing cheeses and onion evenly between 8 tortillas. Once filled, roll tortilla tightly up and over the filling. Place in prepared baking dish, seam side DOWN. Repeat process with each enchilada.

    3. Pour or spoon remaining sauce over enchiladas, until fully covered. Once done, sprinkle reserved cheddar and jack cheeses over the top.

    4. Baked at 350°F. for approx. 20 minutes. When done, sauce and cheese should be bubbly around the edges, cheese melted, and enchiladas heated through. Transfer dish to a wire rack; let cool for 2 minutes, before serving. OPTIONAL: Serve, topped with sour cream, cilantro, guacamole or other toppings of your choice. Enjoy.

    Recipe Notes

    Oil used to quickly "fry" tortillas not included in caloric calculation. Most oil remains unused (and amount to cover skillet bottom will vary per user).

    Nutrition Facts
    Easy Cheesy Enchiladas
    Amount Per Serving (1 enchilada)
    Calories 305 Calories from Fat 171
    % Daily Value*
    Fat 19g29%
    Saturated Fat 11g69%
    Cholesterol 55mg18%
    Sodium 923mg40%
    Potassium 109mg3%
    Carbohydrates 18g6%
    Fiber 3g13%
    Sugar 5g6%
    Protein 17g34%
    Vitamin A 949IU19%
    Vitamin C 2mg2%
    Calcium 437mg44%
    Iron 1mg6%
    * Percent Daily Values are based on a 2000 calorie diet.

    Here’s one more to pin on your Pinterest pages!Make a yummy batch of Easy Cheesy Enchiladas in a flash, with cheddar and jack cheese, canned enchilada sauce, onions, and corn tortillas.

    Black Bean Butternut Squash Chili

    Black Bean Butternut Squash Chili is a hearty meatless dish, with all the flavor of a traditional chili. It’s thick, delicious, and simple to prepare!
    Black Bean Butternut Squash Chili is a hearty meatless dish, with all the flavor of a traditional chili. It's thick, delicious, and simple to prepare!

    Do you enjoy chili? We sure do. Every couple of months I make my Mom’s old-fashioned chili, and it is my absolute favorite “go to” chili recipe. One of our sons and his girlfriend are vegetarians, and my sister-in-law is a vegan. When they come over for a chili dinner, I make my traditional chili recipe and simply leave the meat out. I am always on the “hunt” for vegetarian recipes I can fix for them.

    However, sometimes ya just gotta try new recipes, and for me, the thrill of the hunt for a “new” recipe is exciting. I found this yummy, meatless chili recipe on the app called My Fitness Pal. It’s a fiber and protein-filled dish, and is another GREAT alternative for anyone looking for a meatless chili, with all the flavors you know and love.

    It’s also low-calorie, easy to make, and I know my vegetarian and vegan family members will love it. I can’t wait for them to try it, too! Here’s how to make this yummy black bean butternut squash chili (a printable recipe card is at the bottom of this post):

    Scroll Down For A Printable Recipe Card At The Bottom Of The Page

    How To Prepare The Butternut Squash

    The first thing you will need to do is prepare the butternut squash. I prefer to use fresh, but you can substitute frozen butternut squash, if necessary. Preparing the fresh squash is not difficult at all (but it will take 4-5 minutes). HINT: You won’t need to use the entire squash for your chili. Perhaps you would enjoy using the leftover squash to make Maple Cinnamon Butternut Squash for another meal’s side dish?

    Use a vegetable peeler to remove the outer peel from the butternut squash. Once peeled, carefully slice off both ends of the squash. Slice the squash in half horizontally. Scoop out the seeds and “stringy pith” from the cavity of the squash, and discard.

    Slice the squash into half-moon shaped rings (1″ thickness), and then cut the rings into bite-sized cubes of butternut squash. Try to keep them around 1″, because they will cook faster than large chunks.

    Use a vegetable peeler to peel the butternut squash.Cut butternut squash in half length-wise, and remove seeds.Slice the squash, then cut into small cubes before cooking.

    Make The Black Bean Butternut Squash Chili

    Now it’s time to get the black bean butternut squash chili ready to cook. No worries… it’s simple! Place all the ingredients into a large stock pot. Add the water and give the chili a good stir, to fully combine ingredients. See how easy that is? Now the chili is ready to cook!

    The ingredients for the black bean butternut squash chili in a large stockpot.Water is added to the soup pot and then chili is cooked.

    Cook The Chili

    Cook the black bean butternut squash chili on medium-low heat for 30-40 minutes. Cover the pot of chili for the first 15 minutes, then uncover the pot for the rest of the cooking time.

    You will know it is done when the cubes of butternut squash become tender. Take a bite of the squash at the 30 minute mark, then continue cooking, if necessary until the squash is softened. The chili will thicken as the water reduces during the cooking time. Take a small sample bite, and add salt, if desired, to suit your taste.

    After cooking, the chili will thicken and butternut squash will be tender.

    Serve The Black Bean Butternut Squash Chili

    Once your chili is done cooking, it is ready to serve! Ladle the black bean butternut squash chili into serving bowls, and if desired, garnish each bowl of chili with a dollop of sour cream and/or fresh cilantro, for a pop of color and added flavor.

    A bowl of black bean butternut squash chili garnished with cilantro and sour cream.

    Hope you enjoy a nice hot bowl of this delicious black bean butternut squash chili.  The black beans and butternut squash provide a nice dose of fiber, which helps to fill the old tummy up! Plus, it really does taste wonderful, and I am confident you will really enjoy it.

    Black Bean Butternut Squash Chili, ready to enjoy!

    Hope you have the opportunity to try this recipe for yummy, meatless chili. You might also enjoy my recipe for Tasty Turkey Chili. Thank you so much for stopping by. I hope you will come by for a visit again. Take care, and have a great day!

    Looking For More MEATLESS MEALS?

    You can find all of my recipes in the Recipe Index, which is located at the top of the page. I have several meatless meals you might enjoy, including:

    Interested In More Recipes?

    Thank you for visiting this website. I appreciate you using some of your valuable time to do soIf you’re interested, I publish a newsletter 2 times per month (1st and 15th) with all the latest recipes, and other fun info. I would be honored to have you join our growing list of subscribers, so you never miss a great recipe!
    There is a Newsletter subscription box on the top right side (or bottom) of each blog post, depending on the device you use, where you can easily submit your e-mail address (only) to be included in my mailing list.

    You Can Also Find Me On Social Media:
    Facebook page: The Grateful Girl Cooks!
    Pinterest: The Grateful Girl Cooks!
    Instagram: jbatthegratefulgirlcooks

    Author's signature

    Recipe adapted from: https://blog.myfitnesspal.com/butternut-squash-black-bean-chili-recipe/

    0 from 0 votes
    Black Bean Butternut Squash Chili
    Prep Time
    15 mins
    Cook Time
    35 mins
    Total Time
    50 mins
     

    Black Bean Butternut Squash Chili is a hearty meatless dish, with all the flavor of a traditional chili. It's thick, delicious, and simple to prepare!

    Category: Entree, Soup
    Cuisine: Southwestern
    Keyword: black bean butternut squash chili
    Servings: 6
    Calories Per Serving: 224 kcal
    Author: JB @ The Grateful Girl Cooks!
    Ingredients
    • 30 ounces canned black beans (2 cans) , rinsed and drained
    • 2 cups butternut squash , peeled, cut into 1" cubes
    • 15 ounces canned diced tomatoes , including juice
    • 1 cup corn kernels , fresh or frozen
    • 1 medium red onion , diced
    • 2 Tablespoons chili powder
    • 2 Tablespoons ground cumin
    • 2 Tablespoons smoked paprika
    • 1 teaspoon minced garlic
    • 3 cups water
    • salt, to taste
    • Sour cream, cilantro (OPTIONAL for garnish)
    Instructions
    1. Remove peel from squash. Carefully slice off both ends; cut squash in half horizontally. Scoop out seeds and stringy pith; discard. Slice into half-moon shaped rings (1" thickness); cut rings into 1" bite-sized cubes, for a total of 2 cups. (you won't use the whole squash).

    2. Place ingredients into a large stock pot; stir well. Cook on medium-low heat for 30-40 minutes. **Cover pot of chili for the first 15 minutes, then uncover for the rest of the cooking time**. Taste a bite of squash after 30 minutes. If soft and tender, chili is done. If not, continue cooking until tender. Chili will thicken as water reduces while cooking. Taste; season with salt, as desired.

    3. Serve chili with a dollop of sour cream and fresh cilantro, if desired (optional, but good). Enjoy!

    Recipe Notes

    NOTE: I use fresh corn kernels (cut off one cob) and fresh butternut squash, but you can substitute frozen corn kernels or butternut squash, if necessary. If using frozen butternut squash, your cooking time may vary, as it might take less time to become tender.

    Nutrition Facts
    Black Bean Butternut Squash Chili
    Amount Per Serving (1 g)
    Calories 224 Calories from Fat 18
    % Daily Value*
    Fat 2g3%
    Saturated Fat 1g6%
    Sodium 740mg32%
    Potassium 1014mg29%
    Carbohydrates 44g15%
    Fiber 15g63%
    Sugar 6g7%
    Protein 12g24%
    Vitamin A 7091IU142%
    Vitamin C 22mg27%
    Calcium 133mg13%
    Iron 6mg33%
    * Percent Daily Values are based on a 2000 calorie diet.

    Here’s one more to pin on your Pinterest boards!Black Bean Butternut Squash Chili is a hearty meatless dish, with all the flavor of a traditional chili. It's thick, delicious, and simple to prepare!

    Easy Tortellini Soup

    Enjoy a piping hot bowl of yummy, Italian-inspired, Easy Tortellini Soup, made in under 30 minutes with only a few key ingredients and spices.
    Enjoy a piping hot bowl of yummy, Italian-inspired, Easy Tortellini Soup, made in under 30 minutes with only a few key ingredients and spices.

    Even though the weather has been heating up this week, I want to share this soup recipe with you, cause it’s YUMMY, no matter what time of year it is. This recipe for easy tortellini soup is just that… EASY! It also happens to be delicious (in case that matters, too – ha ha!).

    If you enjoy Italian food, and the spices associated with it, you’re gonna enjoy this soup. It has a tomato-based broth, with Italian spices, fragrant garlic, cheese tortellini pasta, chopped spinach, and is topped with a sprinkling of grated Parmesan cheese. Because it doesn’t require a long cooking time, you’ll be slurping up this delicious soup in NO TIME! Here’s how simple it is to make:

    Scroll Down For A Printable Recipe Card At The Bottom Of The Page

    Prepare The Tortellini

    Cook the fresh, frozen, or dry tortellini in salted water, according to the package directions. Once done cooking, drain the tortellini, and set aside. I like to cook the tortellini AND the spinach (see below) at the same time, to save time.

    Cheese tortellini are cooked per package directions, and then drained.

    Prepare The Spinach

    Cook the chopped spinach according to the package instructions. Once cooked, put the spinach into a strainer which is placed on top of a bowl.  Press down with the back of a spoon to press out the spinach juice into the bowl below.

    The juice will collect in the bowl sitting underneath the strainer. Keep pressing (a lot) to drain off as much of the juice as you can. Discard the juice once finished. Set the spinach aside. Now it’s SOUP time, and it will come together REALLY quickly!

    Frozen chopped spinach is thawed, then drained of excess liquid in a strainer.

    How To Make Easy Tortellini Soup

    Place the butter into the saucepan you will be using. Melt the butter on medium heat, and then add the minced garlic. Cook on medium heat for about a minute, stirring constantly, so the garlic doesn’t burn. Burnt garlic has a bitter taste, and you do NOT want that in your tortellini soup!

    Now add the chicken broth to the pan, and heat it until it comes to a boil. Once boiling, reduce the heat to a low simmer, and then add the cooked, drained tortellini. Simmer for 5 minutes on low heat, stirring occasionally.

    Butter and garlic is cooked in the soup pan for about a minute.Cooked and drained tortellini is added to the broth in the soup pan.

    Finish Making This Easy Tortellini Soup

    Once the soup has simmered for 5 minutes, add the diced tomatoes (including juice), drained spinach, salt, and Italian seasoning. Stir well, to fully combine the ingredients. Continue to heat the tortellini soup on low heat for 5 more minutes, or until the soup is fully heated through.

    Drained spinach, tomatoes, and spices are added to the tortellini soup.The easy tortellini soup is cooked until heated through.

    Serving Easy Tortellini Soup

    Once the soup is fully heated through, it is ready to be served and gobbled up! Ladle the soup into individual bowls, and sprinkle grated Parmesan cheese on top. The Parmesan cheese garnish is optional, but trust me, it makes this Italian-inspired soup taste SO GOOD!

    This wonderfully easy tortellini soup tastes great, especially if you serve it with a nice piece of crusty garlic bread on the side! Yum… I really hope you enjoy it. Store any leftover soup (covered) in your refrigerator for up to 2-3 days.

    The finished tortellini soup is topped with finely grated Parmesan cheese.A close up photo of the easy tortellini soup.

    This truly is a simple soup to make, and it tastes wonderful. We were able to share some with one of our neighbors who lives alone, and he enjoyed it, too!  I hope you have the opportunity to make it for those you love, and trust you will enjoy it, too! Thanks for stopping by, take care, and have a great day.

    Looking For More TORTELLINI Recipes?

    You can find all of my recipes in the Recipe Index, located at the top of the page. I have several tortellini recipes, which include:

    Looking For More SOUP Recipes?

    You can find all of my soup recipes in the Recipe Index, located at the top of the page. I have quite a few delicious soup recipes I think you will enjoy, including:

    Interested In More Recipes?

    Thank you for visiting this website. I appreciate you using some of your valuable time to do soIf you’re interested, I publish a newsletter 2 times per month (1st and 15th) with all the latest recipes, and other fun info. I would be honored to have you join our growing list of subscribers, so you never miss a great recipe!
    There is a Newsletter subscription box on the top right side (or bottom) of each blog post, depending on the device you use, where you can easily submit your e-mail address (only) to be included in my mailing list.

    You Can Also Find Me On Social Media:
    Facebook page: The Grateful Girl Cooks!
    Pinterest: The Grateful Girl Cooks!
    Instagram: jbatthegratefulgirlcooks

    Author's signature

    0 from 0 votes
    Easy Tortellini Soup
    Prep Time
    15 mins
    Cook Time
    10 mins
    Total Time
    25 mins
     

    Enjoy a piping hot bowl of yummy, Italian-inspired, Easy Tortellini Soup, made in under 30 minutes with only a few key ingredients and spices.

    Category: Entree, Soup
    Cuisine: American, Italian
    Keyword: tortellini soup
    Servings: 6
    Calories Per Serving: 191 kcal
    Author: JB @ The Grateful Girl Cooks!
    Ingredients
    • 8 ounces fresh, frozen, or dried cheese tortellini
    • 10 ounces frozen chopped spinach
    • 1 Tablespoon butter
    • 2 cloves garlic , minced
    • 28 ounces chicken broth
    • 14.5 ounces diced tomatoes (canned) , undrained
    • 1 Tablespoon Italian seasoning
    • ½ teaspoon salt
    • 6 Tablespoons grated Parmesan cheese (optional, for garnish)
    Instructions
    1. Cook fresh, frozen, or dry tortellini in salted water, according to pkg. directions. Once done, drain tortellini; set aside.

    2. Cook spinach according to pkg. directions. When done, put spinach into a strainer placed on top of a bowl.  Press down with the back of a spoon to press out juice into bowl below. Drain off as much juice as possible. Discard juice, and set spinach aside.

    3. Melt butter on medium heat in large soup pan. Once melted, add minced garlic. Cook for 1 minute, stirring constantly, so garlic doesn't burn. Add chicken broth to pan, and heat until it comes to a boil. Once boiling, reduce heat to a low simmer. Add tortellini. Simmer for 5 minutes on low heat, stirring occasionally. Add diced tomatoes (including juice), spinach, salt, and Italian seasoning. Stir well, to combine ingredients. Continue to heat soup for 5 more minutes, or until fully heated through.

    4. Ladle hot soup into bowls, and sprinkle grated Parmesan cheese on each serving. Serve, and enjoy! Store any leftover soup (covered), in refrigerator, for up to 2-3 days.

    Nutrition Facts
    Easy Tortellini Soup
    Amount Per Serving (1 (1/6 of total))
    Calories 191 Calories from Fat 63
    % Daily Value*
    Fat 7g11%
    Saturated Fat 3g19%
    Cholesterol 24mg8%
    Sodium 1068mg46%
    Potassium 415mg12%
    Carbohydrates 23g8%
    Fiber 4g17%
    Sugar 3g3%
    Protein 11g22%
    Vitamin A 5736IU115%
    Vitamin C 19mg23%
    Calcium 214mg21%
    Iron 3mg17%
    * Percent Daily Values are based on a 2000 calorie diet.

    Here’s one more to pin on your Pinterest boards!Enjoy a piping hot bowl of yummy, Italian-inspired, Easy Tortellini Soup, made in under 30 minutes with only a few key ingredients and spices.

    Easy Potato Chowder

    Make four servings of yummy, filling, easy potato chowder in about 30 minutes, from start to finish, using a few simple and common ingredients!
    Make four servings of yummy, filling, easy potato chowder in about 30 minutes, from start to finish, using a few simple and common ingredients!

    My mom used to make this easy potato chowder for our family as I was growing up. The recipe is incredibly EASY, inexpensive, and can be made fairly quickly (about 30 minutes) with common pantry items. It is a delicious, filling soup, which tastes wonderful on a chilly day!

    The end result is a creamy chowder with cubes of tender potatoes, celery, and onions, seasoned with salt, pepper, butter, and a few green onions for garnish. These simple ingredients, along with milk, make up this delicious potato chowder! Here’s how easy it is to make!

    Scroll Down For A Printable Recipe Card At The Bottom Of The Page

    Prepare The Veggies

    First things first… prepare the veggies! Chop onions, thinly slice celery, and peel and cut the potato into small 1″ cubes. Don’t make the cubes of potato too big, so they will cook fairly quickly. NOTE: I used Russet potatoes, but other varieties can be easily substituted.

    Melt butter in a large saucepan, and then add the chopped onions and sliced celery. Cook on medium heat, stirring often, for 4-5 minutes, until the onions and celery have softened.

    Chopped onions and celery are cooked in butter to tenderize.

    Add the cubed raw potatoes to the saucepan, and stir to combine. Continue to cook on medium heat for 10 minutes, stirring often. The small cubes of potato will begin to soften as they cook.

    Cubed raw potatoes are added to onions, celery and butter in pan to cook and soften.

    Season Veggies And Add Flour To Thicken Chowder

    After the potatoes have cooked for 10 minutes (and have become tender), remove the pan from the heat. Season the veggies with salt and black pepper. Add the all purpose flour to the pan, and stir to fully combine. The flour coats the vegetables, and will act as a thickener for the chowder, once the milk has been added.

    The potatoes are seasoned with salt and pepper.Flour is added into the potatoes to thicken soup as it cooks.

    Time To Turn This Into Easy Potato Chowder!

    Now it is time to add the milk to the saucepan! Slowly pour 4 cups of milk into the saucepan. I used 1% milk, but feel free to use any kind you prefer. Stir well, once all the milk is in, to fully combine the ingredients.

    Return the pan to the stove top and cook on medium, bringing it up to heat slowly. Be careful to not let the soup boil after adding the milk. Just bring it up to a very hot serving temperature slowly. As it cooks, the soup will thicken.

    Milk is added to the pan to thicken and cook into the soup.

    When the easy potato chowder has thickened and is very hot (but not boiling), taste test a potato cube to make sure they are tender. At this point, adjust the seasoning to your taste by adding more salt and pepper, if desired.

    Want Your Chowder Even Thicker?

    If at the last minute you decide you want the chowder to be even thicker (a personal choice), here’s a little secret tip I’ve used a couple of times to do that: Once the chowder is at serving temp, simply stir in about 1/2 cup of instant potato flakes! Yep… give them a stir into the soup, and instant thickener! This is completely OPTIONAL, but it does work!

    The potato chowder has thickened, is heated through, and is ready to serve.

    Serve The Easy Potato Chowder

    Once the soup is heated to serving temp, ladle it out into individual serving bowls. Sprinkle some thinly sliced green onions over the top, if desired, and grab a spoon! Go ahead… dig in!

    The easy potato chowder is delicious, and we love to serve it with warm bread or rolls on the side. We usually get about 4 good sized bowls of chowder from this recipe (as written), but it can EASILY be doubled! Hope you enjoy it!

    Sliced green onions are added to the easy potato chowder, right before serving.You can see the chunks of potatoes in the finished chowder.

    Well, this really is an easy soup to make for lunch OR dinner! Sure hope you have the opportunity to try it soon, and trust you will enjoy it, too. Have a wonderful day, and thank you for visiting.

    Looking For More Potato SOUP Recipes?

    You can find all of my soup recipes in the Recipe Index, located at the top of the page. A few of our favorite soups that include potatoes are:

    Interested In More Recipes?

    Thank you for visiting this website. I appreciate you using some of your valuable time to do soIf you’re interested, I publish a newsletter 2 times per month (1st and 15th) with all the latest recipes, and other fun info. I would be honored to have you join our growing list of subscribers, so you never miss a great recipe!
    There is a Newsletter subscription box on the top right side (or bottom) of each blog post, depending on the device you use, where you can easily submit your e-mail address (only) to be included in my mailing list.

    You Can Also Find Me On Social Media:
    Facebook page: The Grateful Girl Cooks!
    Pinterest: The Grateful Girl Cooks!
    Instagram: jbatthegratefulgirlcooks

    Author's signature

    Original recipe source: My Mom

    0 from 0 votes
    Easy Potato Chowder
    Prep Time
    15 mins
    Cook Time
    15 mins
    Total Time
    30 mins
     

    Make four servings of yummy, filling, easy potato chowder in about 30 minutes, from start to finish, using a few simple and common ingredients!

    Category: Dinner, Soup
    Cuisine: American
    Keyword: easy potato chowder
    Servings: 4
    Calories Per Serving: 309 kcal
    Author: JB @ The Grateful Girl Cooks!
    Ingredients
    • ¼ cup butter (½ stick or 4 Tablespoons)
    • 1 cup brown onion , finely chopped
    • ½ cup celery , thinly sliced
    • cup potatoes (approx. 2 medium) , peeled and cut into 1" cubes-I used russets.
    • teaspoons salt ( + more to taste as desired)
    • ½ teaspoon black pepper
    • cup all purpose flour
    • 4 cups milk
    • ½ cup instant potato flakes (OPTIONAL) (if desired for thicker soup)
    • 1 stem green onion (green part) (OPTIONAL GARNISH) , thinly sliced
    Instructions
    1. Chop onions, thinly slice celery; peel/ cut potato into small 1" cubes. Small potato cubes are important, so they cook quickly. Melt butter in a large saucepan; add the onions and celery. Cook on medium heat, stirring often, for 4-5 minutes, until onions/celery have softened.

    2. Add potato cubes to the pan; stir to combine. Cook on medium for 10 minutes, stirring often. Remove pan from heat. Season with salt and pepper. Add flour to the pan; stir to combine.

    3. Add 4 cups of milk into the pan. Stir well, to fully combine ingredients. Return pan to the heat and cook on medium, bringing it up to serving temperature slowly. Don't let soup boil after adding milk. As it cooks, the soup will thicken. Taste test a potato cube to make sure they are tender (if not tender, let chowder cook a couple more minutes). Adjust seasonings to your taste by adding additional salt and pepper, if desired.

    4. Once chowder is heated to serving temp (and potatoes are tender), ladle it into individual bowls. Sprinkle thinly sliced green onions over the top, if desired. Serve, and enjoy!

    5. OPTIONAL TIP: Want Your Chowder Even Thicker? When chowder has thickened and is very hot , if you decide you want the chowder to be even thicker (a personal choice), here's a little tip I've used a couple of times: Simply stir in about 1/2 cup of instant potato flakes! Yep... give them a stir into the soup, and instant thickener! This is completely OPTIONAL, but it does work!

    Recipe Notes

    NOTE: Caloric calculation was made using 1% milk, and NO instant potato flakes.

    Nutrition Facts
    Easy Potato Chowder
    Amount Per Serving (1 g)
    Calories 309 Calories from Fat 126
    % Daily Value*
    Fat 14g22%
    Saturated Fat 9g56%
    Cholesterol 42mg14%
    Sodium 1092mg47%
    Potassium 730mg21%
    Carbohydrates 36g12%
    Fiber 2g8%
    Sugar 15g17%
    Protein 11g22%
    Vitamin A 874IU17%
    Vitamin C 7mg8%
    Calcium 321mg32%
    Iron 1mg6%
    * Percent Daily Values are based on a 2000 calorie diet.

    Here’s one more to pin on your Pinterest boards!Make four servings of yummy, filling, easy potato chowder in about 30 minutes, from start to finish, using a few simple and common ingredients!

    Black Bean Burgers

    Looking for a recipe for fantastic tasting black bean burgers, that vegetarians and meat lovers both will LOVE? Look no further – here it is!
    Looking for a recipe for fantastic tasting black bean burgers, that vegetarians and meat lovers both will LOVE? Look no further - here it is!

    I recently saw a recipe for the BEST black bean burgers ever on Pinterest. Being curious, I KNEW I just HAD TO TRY THEM!

    So I pinned the recipe, made them, and the rest is history. Oh yeah… they truly just might be the BEST black bean burgers ever. Amen!

    Scroll Down For A Printable Recipe Card At The Bottom Of The Page

    What’s The Story Behind These Black Bean Burgers?

    One of our grown sons is now a vegetarian. He used to be our STEAK eating guy… sigh. He is now a grown man who happens to be vegetarian.

    What’s a meat-lovin’ mom supposed to do when he and his girlfriend (also a vegetarian) come over for a burger BBQ?

    Well, up to this point, I would just buy those thin little veggie or vegetarian black bean burgers in the frozen section at the grocery store! That way I could offer them a vegetarian burger to eat, along with all of our traditional BBQ sides.

    No longer! THIS will now be my new “go to” recipe for veggie burgers, because they’re delicious!

    What Makes THESE Black Bean Burgers So “Special”?

    These black bean burgers are special, I believe, in part due to one little bitty step that is taken before making the patties, that ensures the burgers will be firm and not MUSHY! 

    What is this little bitty step, you ask? Popping the rinsed beans into the oven for a few minutes, which helps to partially dry out the canned beans. Yep, you heard that right! Brilliant tip!

    The Secret To Making Nice, Firm, Black Bean Burgers

    Preheat your oven to 325° F. Rinse, and then drain two cans of black beans in a colander. Pour the drained beans onto a couple layers of paper towels, and pat them dry.

    Spread the beans out onto a parchment paper-lined large baking sheet. Bake the beans for 15 minutes, which will help to slightly dry them out. Trust me on this – don’t skip this step! This one little step will help those burger patties to really hold firmly together, and not break down into MUSH!!

    Once done, remove the beans from the oven, and set aside.

    Canned black beans are drained, blotted dry, then baked, to make black bean burgers.

    While the beans are baking, place olive oil, chopped bell peppers, onion, and minced garlic in a skillet. Cook this mixture on medium heat, stirring occasionally, for 5-6 minutes, until the veggies have softened.

    Once cooked, pat the veggies gently with a paper towel, to help absorb a bit of their moisture.

    Onion, green peppers, and garlic is cooked in oil to add to black bean burgers mix.

    Prepare The Patties For Black Bean Burgers

    Place the cooked veggies into a large mixing bowl.  Add the remaining ingredients, except for the black beans. Give this mixture a good stir to fully combine the ingredients.

    Eggs, feta cheese, bread crumbs, ketchup and spices added to black bean burgers mix.

    Now add the baked black beans to the bowl. Use a potato masher or a fork to really “mash” this patty mixture together, making sure to leave some of the black beans intact.

    NOTE: This step can also be done in a food processor. PULSE the ingredients, but do not fully blend.

    The baked black beans are added to the black bean burgers mixture, and mashed to combine.

    Form The Patties

    For each patty, use 1/3 cup of bean mixture. Scoop out 1/3 cup, then transfer to a parchment paper lined baking sheet.

    This recipe makes 6 thick black bean burgers. After placing all 6 scoopfuls on the paper, flatten them down and round out, using your hands.

    Black bean burgers mix is portioned out into 6 (1/3 cup) patties, then flattened.

    Cook The Black Bean Burgers

    There are TWO ways to cook these burgers. 1) Bake at 375° F., and cook for 10 minutes on each side, OR 2) Lay the patties onto aluminum foil (on your BBQ grill), and grill each side for 8 minutes.

    I chose to BAKE the black bean burgers. The photo below shows what the patties look like up close and personal before baking.  You can see there are some whole black beans in each one.

    One of the black bean burgers, up close, before baking.

    After the black bean burgers have cooked for 10 minutes on each side, they are done!  They hold together VERY well, and are nice and thick, firm burgers!

    Six black bean burgers on parchment paper, after baking.

    Black Bean Burgers Can Be Frozen, Too!

    IMPORTANT NOTE: These burgers freeze well, too! Six burgers was way too many for just my hubby and I to eat, so I was able to freeze a few after cooking! You can also freeze the raw patties this way, also.

    Once the burgers have cooled, stack the patties between sheets of parchment paper and place in freezer bags or freezer container. Perfect for future use (just thaw and reheat)!

    The black bean burgers can be frozen between sheets of parchment paper in a freeze bag.

    All that is left to do… is EAT one of these delicious, thick, black bean burgers!  The burgers were served on a toasted bun, with tomato slices, crisp lettuce, red onion slices and some homemade guacamole (as a condiment)!

    That’s it!  Oh my goodness, such great flavor… this burger was soooo good! The guacamole was a perfect substitute for mayo, mustard or ketchup…never even missed them!

    One of the black bean burgers, served on bun with tomato, red onion, lettuce and guacamole!

    Believe me when I tell you… these black bean burgers taste fantastic! Hope you will consider trying them, too! This is a perfect dish for “Meatless Mondays” or any other day, for that matter!

    If you’re looking for another “healthy” delicious burger recipe, be sure to check out my Turkey, Feta and Spinach Burgers! Have a GREAT day!

    Looking for More SANDWICH Recipes?

    You can find all of my recipes in the Recipe Index, located at the top of the page. I have some delicious sandwich recipes, including:

    Interested In More Recipes?

    Thank you for visiting this website. I appreciate you using some of your valuable time to do soIf you’re interested, I publish a newsletter 2 times per month (1st and 15th) with all the latest recipes, and other fun info. I would be honored to have you join our growing list of subscribers, so you never miss a great recipe!
    There is a Newsletter subscription box on the top right side (or bottom) of each blog post, depending on the device you use, where you can easily submit your e-mail address (only) to be included in my mailing list.

    You Can Also Find Me On Social Media:

    Facebook page: The Grateful Girl Cooks!
    Pinterest:
    The Grateful Girl Cooks!
    Instagram:
    jbatthegratefulgirlcooks

    Author's signature

    Original Recipe Source: https://sallysbakingaddiction.com/best-black-bean-burgers/

    0 from 0 votes
    Black Bean Burgers
    Prep Time
    20 mins
    Cook Time
    20 mins
    Total Time
    40 mins
     
    Looking for a recipe for fantastic tasting black bean burgers, that vegetarians and meat lovers both will LOVE? Look no further - here it is!
    Category: Meatless Entree
    Cuisine: American
    Keyword: black bean burgers
    Servings: 6 burgers
    Calories Per Serving: 264 kcal
    Author: JB @ The Grateful Girl Cooks!
    Ingredients
    • 28 ounces canned black beans (two 14 oz. cans) , drained/rinsed/patted dry
    • 1 Tablespoon extra virgin olive oil
    • 3/4 cup green bell pepper , finely chopped
    • 1 cup yellow onion , finely chopped
    • 1 Tablespoon minced garlic cloves (approx. 3 cloves)
    • teaspoons ground cumin
    • 1 teaspoon chili powder
    • 1/2 teaspoon garlic powder
    • 1/4 teaspoon smoked paprika
    • 1/2 cup feta cheese , crumbled
    • 1/2 cup bread crumbs
    • 1 Tablespoon Worcestershire sauce
    • 2 large eggs
    • 2 Tablespoons ketchup or BBQ sauce
    • 1 pinch (each) salt and pepper
    Instructions
    1. Preheat oven to 325° F. Rinse, and drain black beans. Blot the beans dry on paper towels. Spread beans out onto parchment paper-lined large baking sheet. Bake the beans for 15 minutes, to slightly dry them out. Don't skip this step! Once done, remove beans from oven, and set aside. NOTE: If you will be baking the burger patties, turn oven up to 375° once you remove the beans from oven.

    2. While beans bake, place olive oil, chopped bell peppers, onion, and minced garlic in a skillet. Cook on medium heat, stirring occasionally, for 5-6 minutes, until veggies have softened. Once cooked, pat the veggies gently with a paper towel, to absorb a bit of their moisture. 

    3. Place cooked veggies into a large mixing bowl. Add remaining ingredients, except for the black beans. Stir to combine. Add the black beans. Use a potato masher or fork to "mash" this together, making sure to leave some black beans intact. NOTE: This step can also be done in a food processor. PULSE the ingredients, but do not fully blend.

    4. For each patty, use 1/3 cup of bean mixture. Scoop out 1/3 cup, then transfer to parchment paper lined baking sheet. After placing 6 scoopfuls on the paper, flatten them down and round out into thick patties, using your hands.

    5. There are TWO ways to cook these burgers. 1) Bake at 375° F., and cook for 10 minutes on each side, OR 2) Place the patties onto aluminum foil (on your BBQ grill), and grill each side for 8 minutes. After the black bean burgers have baked for 10 minutes on each side (or grilled for 8 on each side), they are done! Prepare burgers with your favorite toppings. Enjoy!

    Recipe Notes

    NOTE: The caloric calculation is for one black bean burger patty only. Any additions (bun, condiments, etc.) will need to be calculated separately, as they will differ for each person.

    Nutrition Facts
    Black Bean Burgers
    Amount Per Serving (1 burger patty)
    Calories 264 Calories from Fat 63
    % Daily Value*
    Fat 7g11%
    Saturated Fat 3g19%
    Cholesterol 81mg27%
    Sodium 886mg39%
    Potassium 584mg17%
    Carbohydrates 35g12%
    Fiber 10g42%
    Sugar 4g4%
    Protein 14g28%
    Vitamin A 390IU8%
    Vitamin C 21.5mg26%
    Calcium 153mg15%
    Iron 4mg22%
    * Percent Daily Values are based on a 2000 calorie diet.

    Here’s one more to pin on your Pinterest boards!Looking for a recipe for fantastic tasting black bean burgers, that vegetarians and meat lovers both will LOVE? Look no further - here it is!

    Eggplant Parmesan

    Eggplant Parmesan is a classic Italian meatless dish, with breaded eggplant slices baked with marinara sauce, mozzarella and Parmesan cheeses.
    Eggplant Parmesan is a classic Italian meatless dish, with breaded eggplant slices baked with marinara sauce, mozzarella and Parmesan cheeses.

    Do you enjoy eggplant parmesan?  Lots of people love this classic Italian dish, and today I am going to show you how you can make it at home! You can read some interesting information about this dish’s origins here.

    I found the original recipe on Pinterest, and made this meatless dish for my husband and I several months ago. Every now and then I love to make meatless dishes, and thought this one sounded really good, so I bought a gorgeous eggplant at our local Farmer’s Market.

    Eggplant Parmesan has layers of lightly breaded eggplant slices, topped with marinara sauce, Parmesan and mozzarella cheeses. The eggplant slices are lightly browned, then layered in casserole dish with the sauce and the cheeses.

    Eggplant parmesan is baked until cooked through, and all that gooey cheese is melted throughout. Here’s how to make this dish:

    Scroll Down For A Printable Recipe Card At The Bottom Of The Page

    How To Make Eggplant Parmesan

    The first thing you will need to do is let excess water drain from the fresh eggplant. This step helps to reduce “sogginess” in the eggplant slices, by pulling out moisture before cooking.

    Cut a large eggplant into 1/2″ thick slices.  Salt BOTH sides of each slice. Put the salted eggplant slices in a large colander in the sink, or over a bowl.

    Let the eggplant slices sit and “drain” or “sweat out” the liquid for 45 minutes. Once done draining, lightly brush off the excess salt.

    Eggplant is sliced, then liquid is drained out of it before cooking Eggplant Parmesan.

    Preparing The Eggplant To Make Eggplant Parmesan

    Preheat your oven to 375°F, and place two (shallow) plates on the kitchen counter. Spread the Italian seasoned breadcrumbs out, on one plate. Place the 3 slightly beaten eggs and milk on the other plate. Lightly whisk the eggs and milk together, until blended.

    Dip each eggplant slice (one at a time) into the egg/milk mixture, making sure to cover both sides. Let excess liquid drip back onto plate. Dip the eggplant into the breadcrumbs, until both sides are covered, letting excess drop back onto plate.

    Continue this step until all eggplant slices are breaded. Place breaded eggplant onto a paper towel covered 9×13 baking sheet in a single layer.

    Eggplant slices are dipped in egg, then seasoned breadcrumbs, to make eggplant parmesan,

    Browning The Eggplant

    Put one Tablespoon of oil into a large skillet. Heat the skillet on medium high heat until hot, but not smoking.  Once the skillet and oil are hot, add a few slices of eggplant at a time to the skillet. I was able to cook 4 at a time.

    Cook eggplant on both sides, until they are lightly browned. Once browned, transfer them from the skillet to a paper towel lined baking sheet. Continue this step for all the slices, adding one Tablespoon oil for each group of eggplant slices that are browned.

    Eggplant slices are cooked on both sides to prepare them to make eggplant parmesan,

    Assembling The Eggplant Parmesan Casserole

    Now you are ready to assemble the eggplant parmesan! Spread 1 cup of marinara sauce on the bottom of a casserole dish. The first layer to go in is the eggplant slices. I used a 2.5 quart casserole dish, so I was able to get about 4 eggplant slices in each layer.

    Once you have a layer of eggplant slices, add a spoonful of marinara sauce to the top of each slice. Don’t drown the layers in sauce! Top the sauce with a layer of mozzarella and parmesan cheeses. This time I used shredded Parmesan cheese, and  slices of mozzarella cheese into my dish, but you can just as easily substitute grated mozzarella (instead of slices), if desired.

    Repeat this process for a couple more layers (or until you run out of eggplant!). Make sure to reserve some of the parmesan and mozzarella cheeses to top the entire dish of eggplant parmesan, before baking.

    Eggplant parmesan has layers of sauce, eggplant, and cheeses,

    Baking Eggplant Parmesan

    Bake the eggplant parmesan for approximately 20-25 minutes at 375°F.  When done, all that yummy cheese on top should be melted, golden brown and bubbly! Mine was done at 25 minutes.

    NOTE: If you want the cheese to be more golden brown in color, you can always put it under the oven broiler for a couple minutes, if desired. Remember to keep a close eye on it, if you do this step! Nobody wants burned cheese on top, right?

    Remove eggplant parmesan from oven, and let it sit for a couple minutes (to let the cheese solidify a bit). The only thing left to do is slice up a piece, serve it hot, and enjoy this classic Italian dish! You can also garnish the casserole with fresh, chopped basil, if desired.

    Eggplant parmesan, freshly baked, with gooey melted cheese on top.

    I hope you enjoy this dish! For me, it’s always fun to experiment in the kitchen, and try new recipes.  If you enjoy eggplant, be sure to check out my recipe for Baby Eggplant Mozzarella Bites! They’re delicious, too!

    Have a wonderful day, please come back again soon, and thanks for stopping by!

    Looking For More MEATLESS Meal Recipes?

    You can find all my recipes in the Recipe Index, located at the top of the page. A few meatless favorites include:

    Want More Recipes? Get My FREE Newsletter!

    I publish a newsletter 2 times per month (1st and 15th) with lots of recipes, tips, etc..
    Would you like to join our growing list of subscribers?

    There is a Newsletter subscription box on the top right (or bottom) of each blog post, depending on the device you use.
    You can submit your e-mail address there, to be added to my mailing list.

    Find Me On Social Media:

    Facebook page: The Grateful Girl Cooks!
    Pinterest:
    The Grateful Girl Cooks!
    Instagram:
    jbatthegratefulgirlcooks

    Author's signature

    Original recipe source: https://www.tablefortwoblog.com/eggplant-parmesan/

    ↓↓ PRINTABLE RECIPE BELOW ↓↓

    0 from 0 votes
    Eggplant Parmesan
    Prep Time
    1 hr 10 mins
    Cook Time
    20 mins
    Total Time
    1 hr 30 mins
     
    Eggplant Parmesan is a classic Italian meatless dish, with breaded eggplant slices layered and baked with marinara sauce, mozzarella and Parmesan cheeses.
    Category: Meatless Entree
    Cuisine: Italian
    Keyword: eggplant parmesan
    Servings: 4
    Calories Per Serving: 624 kcal
    Author: JB @ The Grateful Girl Cooks!
    Ingredients
    • 1 large eggplant , cut in 1/2" slices
    • 2 Tablespoons salt
    • cups Italian seasoned breadcrumbs
    • 3 large eggs , lightly beaten
    • 1/2 cup milk
    • 4 Tablespoons olive oil , or vegetable oil
    • 3 cups marinara sauce
    • 2 cups mozzarella , shredded or slices
    • 1 cup parmesan cheese , shredded
    Instructions
    1. Cut a large eggplant into 1/2" thick slices.  Salt BOTH sides of each slice. Put the salted slices in a large colander in the sink, or over a bowl. Let the eggplant sit and "drain" or "sweat out" the liquid for 45 minutes. Once done draining, lightly brush off excess salt.

    2. Preheat oven to 375°F.  Place two (shallow) plates on kitchen counter. Spread Italian breadcrumbs on one plate. Place eggs and milk on the other plate. Lightly whisk eggs and milk together. Dip each eggplant slice (one at a time) into egg/milk mixture, covering both sides. Let excess liquid drip back onto plate. Dip eggplant into breadcrumbs until both sides are covered, letting excess drop back onto plate. Continue this step until all eggplant slices are breaded. Place breaded eggplant onto a paper towel covered 9x13 baking sheet in a single layer.

    3. Put 1 Tablespoon oil into a large skillet. Heat the skillet on medium high heat until hot, but not smoking.  Once skillet and oil are hot, add a few slices of eggplant at a time to the skillet. Cook eggplant on both sides, until lightly browned. Once browned, transfer them from the skillet to a paper towel lined baking sheet. Repeat this step for all slices, adding one Tablespoon oil for each group of eggplant slices that are browned.

    4. Spread 1 cup of marinara sauce on bottom of casserole dish. The first layer is eggplant slices (I used a 2.5 quart casserole dish, and was able to get about 4 eggplant slices per layer). Onto that layer, add a little marinara sauce to the top of each piece (approx. 1/4 cup). Top the sauce with a layer of shredded mozzarella and parmesan cheeses. Repeat this process for two more layers (or until you run out of eggplant). Make sure to reserve some of the parmesan and mozzarella cheeses to top the dish off with, before baking.

    5. Bake, uncovered, for 20-25 minutes at 375°F.  When done, the cheese on top should be melted, golden brown and bubbly!  Note: If you want the cheese to be more golden brown in color, you can always put it under the oven broiler for a couple minutes, if desired. Remember to keep a close eye on it, if you do this step!  Remove eggplant parmesan from oven, and let it sit for a couple minutes (to let the cheese solidify a bit). The only thing left to do is slice up a piece, and serve it hot! Enjoy!

    Recipe Notes

    Note that 45 minutes of the prep time listed is INACTIVE time (while zucchini drains).

    You can also garnish the finished eggplant parmesan with chopped, fresh basil, if desired.

    Nutrition Facts
    Eggplant Parmesan
    Amount Per Serving (1 g)
    Calories 624 Calories from Fat 324
    % Daily Value*
    Fat 36g55%
    Saturated Fat 14g88%
    Cholesterol 64mg21%
    Sodium 5817mg253%
    Potassium 817mg23%
    Carbohydrates 44g15%
    Fiber 4g17%
    Sugar 12g13%
    Protein 31g62%
    Vitamin A 1505IU30%
    Vitamin C 14.1mg17%
    Calcium 719mg72%
    Iron 4.6mg26%
    * Percent Daily Values are based on a 2000 calorie diet.

    Here’s one more to pin on your Pinterest boards!Eggplant Parmesan is a classic Italian meatless dish, with breaded eggplant slices layered and baked with marinara sauce, mozzarella and Parmesan cheeses.

    Kung Pao Zoodles

    Kung Pao Zoodles is a low calorie (under 300), low carb dish using spiralized zucchini noodles, cooked in a sweet/spicy Asian sauce, and it can be made with or without chicken.
    Kung Pao Zoodles is a low calorie (under 300), low carb dish using spiralized zucchini noodles, cooked in a sweet/spicy Asian sauce, w/or without chicken.

    I’ve got to be honest here… this recipe totally surprised me! I purchased a spiralizer recently, to essentially make “noodles” out of a lot of different vegetables. I’d been wanting one for a while, and finally bought a fairly inexpensive one ($29).

    Scroll Down For A Printable Recipe Card At The Bottom Of The Page

    What If I Do Not Have A Spiralizer?

    If you do not have access to a Spiralizer, it IS possible to make zucchini noodles by hand. The best video I’ve seen to describe how to do this is on YouTube, which demonstrates three easy ways to make your own “zoodles” (with box grater, vegetable peeler, or mandoline). I recommend watching it! Here’s the link to the short video, from Kelly Senyei at “Just A Taste”: https://www.youtube.com/watch?v=ETgPaDQh9S4 This was the first recipe I made using it, and my expectations were fairly low for what Kung Pao Zoodles would taste like. Zoodles is a word commonly used to describe Zucchini Noodles!

    Whoa! I’m NOT KIDDING… I totally LOVED this dish!  This dish can also be a healthy/delicious meatless meal, by simply omitting the chicken breast.  It only took a couple minutes to turn two medium sized zucchini into gorgeous pasta like strands of veggie goodness!  Once cooked with the amazingly easy Asian inspired sauce, this dish made me GIDDY with excitement with my first bite!

    This recipe for Kung Pao Zoodles is very easy to prepare. If there is one tip I can give you, it is to HAVE EVERYTHING PREPPED AND READY TO GO BEFORE BEGINNING COOKING! The dish comes together very quickly once started, so be prepared!

    How Do I Make Kung Pao Zoodles?

    Cut ends off both zucchini, then spiralize them into spaghetti-like noodles, catching them as they come out into a medium sized bowl. If using a Spiralizer, cut the noodles with kitchen shears into 7 or 8 inch strips (cut long zoodles right in the bowl a couple of times- snip, snip!). Set aside.

    Zucchini being spiralized into noodles to make Kung Pao zoodles.

    Stir or whisk Asian sauce ingredients together in a small bowl (soy or tamari sauce, balsamic vinegar, hoisin sauce, water, sriracha, sugar and cornstarch). Set sauce aside.

    Asian sauce is mixed in bowl for Kung Pao Zoodles.

    If You Are Preparing Kung Pao Zoodles WITH Chicken:

    If adding chicken to this dish, season lightly with salt and black pepper. Heat vegetable oil over medium high heat. Place chicken cubes into large skillet; cook until lightly browned on all sides and cooked through. Remove chicken from skillet and set aside (or drain on paper towel).

    Chicken breast cubes are cooked for Kung Pao Zoodle dish.

    Prepare The Rest of This Dish

    Turn the heat down to medium and add sesame oil, minced garlic and grated fresh ginger to skillet. Stir and cook for 30-45 seconds, being careful to not let the garlic burn.

    Sesame oil, garlic and ginger cooking for kung pao zoodles.

    Add chopped red peppers, then stir in the Asian sauce. Bring sauce to a quick boil, then turn heat down to LOW, and cook for a minute or so until sauce is bubbling and has thickened.

    Asian sauce and red bell peppers are added to skillet for kung pao sauce.

    Add zucchini noodles (zoodles) to skillet.  Stir while cooking until the zoodles are coated with sauce.  Cook for two minutes, stirring often. As the zucchini noodles cook, they will release water, which will help to blend the sauce together with the noodles.

    Zucchini noodles (zoodles) are added to skillet.

    Zoodles (zucchini noodles) are cooked in the Kung Pao sauce.

    Time To Eat Some Kung Pao Zoodles!

    When done, add the cooked chicken pieces (if using) to the skillet, and stir to combine. I found using tongs worked great at getting everything mixed together. Divide Kung Pao zoodles between two serving bowls, and garnish each with chopped dry roasted peanuts and sliced green onions.

    Bowl of Kung Pao Zoodles garnished with chopped peanuts and green onions.

    Serve these delicious Kung Pao zoodles and enjoy! I absolutely LOVED this dish…there is so much yummy flavor! This meal is filling (as each serving is about 2 cups), it tastes amazing, and it so low in calories! Winner, winner… ZOODLE dinner!

    Kung Pao Zoodles with a pair of chopsticks... ready to serve!

    Chopsticks lifting up a bite of Kung Pao Zoodles!

    I really hope you will try making these Kung Pao Zoodles!  If you prefer the more traditional version of Kung Pao Chicken, I hope you will check out that recipe, as well.

    Looking For More SPIRALIZED FOOD Recipes?

    You can find ALL my recipes in the Recipe Index, located at the top of the page. I have a few delicious zoodle recipes, including:

    Interested In More Recipes?

    Thank you for visiting this website. I appreciate you using some of your valuable time to do soIf you’re interested, I publish a newsletter 2 times per month (1st and 15th) with all the latest recipes, and other fun info. I would be honored to have you join our growing list of subscribers, so you never miss a great recipe!
    There is a Newsletter subscription box on the top right side (or bottom) of each blog post, depending on the device you use, where you can easily submit your e-mail address (only) to be included in my mailing list.

    You Can Also Find Me On Social Media:

    Facebook page: The Grateful Girl Cooks!
    Pinterest:
    The Grateful Girl Cooks!
    Instagram:
    jbatthegratefulgirlcooks

    Author's signature

    Recipe Source: http://recipestotry.ca/kung-pao-chicken-with-zucchini/

    0 from 0 votes
    Kung Pao Zoodles
    Prep Time
    10 mins
    Cook Time
    10 mins
    Total Time
    20 mins
     
    Kung Pao Zoodles is a low calorie (under 300), low carb dish using spiralized zucchini noodles, cooked in a sweet/spicy Asian sauce, w/or without chicken.
    Category: Dinner
    Cuisine: Asian
    Keyword: kung pao zoodles
    Servings: 2 (approx. 2 cups per serving)
    Calories Per Serving: 281 kcal
    Author: JB @ The Grateful Girl Cooks!
    Ingredients
    For Zoodles:
    • 2 medium zucchini , ends trimmed
    • 1 teaspoon vegetable or canola oil **if adding chicken
    • 6 ounces boneless, skinless chicken breast **cut in 1/2 inch cubes (if adding chicken)
    • 1 pinch salt and pepper , to taste
    • 1/2 medium red bell pepper , cut into 1/2" pieces
    • 1 teaspoon sesame oil
    • 1 teaspoon freshly ground ginger
    • 2 cloves garlic , minced
    • 2 Tablespoons finely chopped dry roasted peanuts (for garnish)
    • 2 Tablespoons thinly sliced green onions (for garnish)
    For Asian Sauce:
    • Tablespoons reduced sodium soy sauce (tamari for gluten free)
    • 1 teaspoon hoisin sauce
    • 1 Tablespoon balsamic vinegar
    • Tablespoons water
    • 1/2 Tablespoon Sriracha sauce
    • 2 teaspoons granulated sugar
    • 2 teaspoons cornstarch
    Instructions
    1. Cut ends off both zucchini, then spiralize them into spaghetti-like noodles,. Cut noodles with kitchen shears into 8 inch strips. Set aside.

    2. Stir or whisk Asian sauce ingredients together in a small bowl (soy or tamari sauce, balsamic vinegar, hoisin sauce, water, sriracha, sugar and cornstarch). Set sauce aside.
    3. If adding chicken to this dish, season lightly with salt and black pepper. Heat vegetable oil over medium high heat. Place chicken cubes into large skillet; cook until lightly browned on all sides and cooked through. Remove chicken from skillet and set aside (drain on paper towel).

    4. Turn heat down to medium and add sesame oil, minced garlic and grated fresh ginger to skillet. Stir and cook for 30-45 seconds, being careful to not let garlic burn. Add chopped red peppers, then stir in Asian sauce. Bring sauce to a boil, then turn heat to LOW, and cook for a minute or so until sauce is bubbling and has thickened.  Add zucchini noodles to skillet.  Stir while cooking until zoodles are coated with sauce.  Cook for two minutes, stirring often. As the zucchini noodles cook, they will release water, which will help to blend the sauce together with the noodles. When done, add cooked chicken pieces (if using), and stir to combine. I found using tongs worked great at getting everything mixed together.

    5. To serve, divide Kung Pao zoodles between two serving bowls, and garnish with chopped peanuts and sliced green onions. Serve hot, and enjoy!

    Recipe Notes

    NOTE: Caloric calculation of 281 per serving includes chicken and vegetable oil to cook it in.  If preparing this recipe as a MEATLESS meal, the calorie count would be approximately 167 calories per (2 cup) serving.

    **Weight Watchers - Points+ = 7 points (with chicken).

    Nutrition Facts
    Kung Pao Zoodles
    Amount Per Serving (1 g)
    Calories 281 Calories from Fat 108
    % Daily Value*
    Fat 12g18%
    Saturated Fat 3g19%
    Cholesterol 54mg18%
    Sodium 724mg31%
    Potassium 976mg28%
    Carbohydrates 20g7%
    Fiber 3g13%
    Sugar 12g13%
    Protein 24g48%
    Vitamin A 1410IU28%
    Vitamin C 78.6mg95%
    Calcium 42mg4%
    Iron 1.6mg9%
    * Percent Daily Values are based on a 2000 calorie diet.

    Here’s one more to pin on your Pinterest boards!Kung Pao Zoodles is a low calorie (under 300), low carb dish using spiralized zucchini noodles, cooked in a sweet/spicy Asian sauce, w/or without chicken.