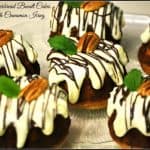
Miniature gingerbread bundt cakes with cinnamon icing are delicious, and make a wonderful gift to give friends and family during the holidays!
Do you enjoy gingerbread? I sure do. The warm flavors of the spices has always been a favorite of mine. There is quite a bit of history behind this beloved cake. You can read all about gingerbread here.
A few years ago I enjoyed making miniature Gingerbread Cakes With Cinnamon Icing to give to our neighbors and friends. Using a miniature bundt pan (preferably a 12 cup pan), I was able to make two dozen of these delicious food gifts to give away!
Scroll Down For A Printable Recipe Card At The Bottom Of The Page
How Many Gingerbread Bundt Cakes Will This Recipe Make?
The recipe is simple to prepare, and as written, makes approximately 24 cute, mini bundt cakes. Each individual sized gingerbread-flavored cake is covered with a delicious creamy Cinnamon icing (or glaze), then drizzled with chocolate to “fancy” them up.
The gingerbread bundt cakes are then garnished with a pecan and a mint sprig. When I made these, I doubled the amount of cinnamon icing. With double the amount of cinnamon icing, it covered more of the top of each cake.

Another Way To Serve These Gingerbread Bundt Cakes
Another option for serving these yummy treats is to leave the cinnamon icing off of the finished cakes. When ready to serve, cover the tops of each cake with whipped cream and a light dusting of cinnamon. The gingerbread bundt cakes are delicious served this way, as well.

Great For Gift-Giving!
It was fun to wrap up each individual mini cake (the ones with the cinnamon icing) and decorate them with pretty seasonal Fall leaves and ribbons. Gingerbread bundt cakes are also a wonderful Christmas gift for friends who enjoy food! They are a nice homemade gift to share (from our kitchen) with our friends and neighbors.
If you enjoy giving food gifts like gingerbread bundt cakes to family and friends, be sure to check out my recipes for Spiced Tea Mix, Old-Fashioned Fudge, and Chocolate Dipped Shortbread Cookies. These, along with other recipes for holiday goodies are available in my Recipe Index, at the top of each blog post.
The little gingerbread bundt cakes taste wonderful… they are LOADED with flavor! Sure hope you will consider making these little edible gifts for those you love! They would be a perfect food gift for the holidays!
Looking for More GINGERBREAD-INSPIRED Recipes?
You can find all of my recipes in the Recipe Index, located at the top of the page. I have several delicious, gingerbread-inspired recipes you might enjoy, including:
Interested In More Recipes?
Thank you for visiting this website. I appreciate you using some of your valuable time to do so. If you’re interested, I publish a newsletter 2 times per month (1st and 15th) with all the latest recipes, and other fun info. I would be honored to have you join our growing list of subscribers, so you never miss a great recipe!
There is a Newsletter subscription box on the top right side (or bottom) of each blog post, depending on the device you use, where you can easily submit your e-mail address (only) to be included in my mailing list.
You Can Also Find Me On Social Media:
Facebook page: The Grateful Girl Cooks!
Pinterest: The Grateful Girl Cooks!
Instagram: jbatthegratefulgirlcooks

Recipe Adapted From: http://thesepeasarehollow.blogspot.com/2010/10/gingerbread-bundts.html
Miniature gingerbread bundt cakes with cinnamon icing are delicious, and make a wonderful gift to give friends and family during the holidays!
- 2 ¼ cups all purpose flour
- ½ teaspoon baking soda
- ½ salt
- ½ teaspoon allspice
- ½ teaspoon ground cloves
- ½ teaspoon nutmeg
- 1 teaspoon cocoa powder
- 1 teaspoon ground cinnamon
- 2 teaspoons ground ginger
- 1 cube unsalted butter (melted, then brought to room temp.)
- ¾ cup dark molasses
- ¾ cup granulated sugar
- 1 egg (large)
- ½ cup buttermilk
- ½ cup milk
- 2 cups powdered sugar
- 6-8 Tablespoons milk (depends on how thick or thin you want icing!)
- ½ teaspoon ground cinnamon
- (OPTIONAL) Melted chocolate for drizzle, whole pecans and/or mint sprigs for garnish
- Preheat oven to 350 degrees F. Grease and flour the miniature bundt pan cups.
- Place flour, baking soda, salt, allspice, cloves, nutmeg, cocoa powder, cinnamon and ginger in a medium sized bowl. Whisk together until combined.
- Using an electric mixer or a stand mixer, combine molasses, granulated sugar and melted (but at room temperature) butter until blended well. Add the egg to this mixture, and continue beating until ingredients are completely combined.
- Slowly pour in the buttermilk, followed by the milk, beating slowly as you add, until ingredients are combined. Add the dry ingredients from the medium bowl (flour, spices, etc.) in small increments to the wet ingredients in mixing bowl, beating well after each addition. Be sure to scrape down the sides of bowl as you go. Stop mixing when ingredients have all been added and are just incorporated into batter.
- Pour or spoon batter into each prepared bundt pan cup, filling each to 3/4 of the way full. Smooth the top of the batter. Bake at 350 degrees, with the pan on the middle rack of oven, for approx. 30 minutes, OR until a toothpick that is inserted into the middle of the cake comes out clean. Remove pan to a wire rack. Let cakes cool for 15-20 minutes, then remove cakes from pan to wire rack.
- To prepare icing: Place the powdered sugar, cinnamon and milk in medium sized bowl. Mix well with a fork until smooth. Too thin? Add powdered sugar. Too thick? Add milk. Pour or spread icing over tops of each cooled cake. Let icing firm up before serving.
- If desired, drizzle melted chocolate over each cake. Garnish with a whole pecan or walnut, then add a sprig of mint for a festive garnish. Let chocolate firm up before serving or wrapping. Enjoy!
Here’s one more to pin on your Pinterest boards!


 are EASY to make at home, using this classic 2 step process that ensures a crisp exterior, but soft inside! / The Grateful Girl Cooks!")


 are EASY to make at home, using this classic 2 step process that ensures a crisp exterior, but soft inside! / The Grateful Girl Cooks!")