Month: September 2020

Banana Chocolate Chip Bars

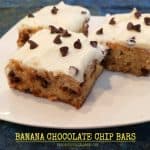
It’s easy to make Banana Chocolate Chip Bars (w/ cream cheese frosting) for those you love! They’re moist & delicious- you’re gonna love ’em!
It's easy to make Banana Chocolate Chip Bars (w/ cream cheese frosting) for those you love! They're moist & delicious- you're gonna love 'em!

Today I want to share with you a yummy recipe I use to make banana chocolate chip bars. I’ve made other recipes over the years, but this one is my “go to” now. I made a very slight “tweak” to a great banana bar recipe (CAN YOU SAY CHOCOLATE?), and have gotten rave reviews for these dessert treats ever since!

The addition of mini chocolate chips, plus using 4 ripe bananas and sour cream in the batter, adds to the flavor, and the “moistness” of these yummy bars. They are so good, so I wanted to share the recipe here on the blog. They don’t take too long at all to prepare (only about 20 minutes prep.) Here’s how to make them:

Scroll Down For A Printable Recipe Card At The Bottom Of The Page.

Prepare The Batter

Beat butter and granulated sugar together in medium sized mixing bowl (or in a stand mixer). Once it’s creamy and well-blended, add the eggs, ONE AT A TIME to the bowl, beating well after each egg is added. Now add vanilla extract and sour cream to the batter, and beat well, to fully incorporate these ingredients.

Butter, sugar, eggs, cream cheese and vanilla are mixed for the batter.

In a separate small bowl, whisk together all purpose flour, salt and baking soda. STIR the flour mixture into the batter, a little at a time, until all the flour has been added.

Dry ingredients are stirred into the batter for the banana bars.

Time To Add The Bananas!

Place four really ripe bananas into a mixing bowl. You know… the browned ones with lots of spots (the ones you forgot about!). They are nice and soft… and SWEET! Mash them up with a fork until fully “smooshed”, and then add them to the batter, along with mini chocolate chips. Give the batter a good stir, to ensure all ingredients are fully combined.

Ripe bananas are smashed then added with chocolate chips to batter.

Bake The Banana Chocolate Chip Bars

Now it’s time to bake ’em!  Pour the batter, spreading evenly into a greased (or sprayed) 13″ x 9″  baking pan (or 15″ x 10″ jelly roll pan). Bake the banana chocolate chip bars at 350°F. for 35-40 minutes (mine took 35), if using a 13″ x 9″ pan. NOTE: If you’re using a 15″ x 10″ jelly roll pan, bake the bars at 350°F. for 22-27 minutes.

When done, the bars will be golden brown on top, and a toothpick inserted into the top/middle of the bars should come out clean. Transfer the pan to a wire rack and let the banana chocolate chip bars cool completely. You can make the cream cheese frosting while they cool.

Batter is spread evenly in a 13"x 9" baking pan before baking.Banana chocolate chip bars cooling in pan on wire rack, after baking.

Frost The Banana Chocolate Chip Bars

While the bars cool, make the frosting. It’s easy! Place softened cream cheese, softened butter, and vanilla in a medium mixing bowl. Beat these three ingredients together until fully blended. Add the powdered sugar, a little at a time, and continue beating as you add it, until the frosting becomes creamy. This only takes a few minutes.

Spread the frosting over the top of the completely cooled banana chocolate chip bars, and then sprinkle with additional chocolate chips, if desired.  I can’t resist, so I sprinkle about 3 Tablespoons of mini chocolate chips over the top. It’s an optional step, but it sure looks yummy. Let the bars sit for a few minutes to let the frosting slightly firm up, then slice them up!

A cream cheese frosting is beaten together to frost the dessert bars.Frosting is spread on cooled banana bars, then garnished with chocolate chips.

Time To Eat!

If making these banana chocolate chip bars in a 13″ x 9″ pan (that’s how I make ’em), you can cut them into 24 small portions. If making in a jellyroll pan, you will get approx. 36 servings. The banana bars are moist, absolutely delicious, and filled with flavor. And that cream cheese frosting… whoa… it’s absolutely scrumptious!

I filled several plates with a few of these bars, and delivered them to four of our neighbors as a surprise treat. They got rave reviews! Trust me… I could have eaten the entire batch (they’re sooo good), but decided to share with others, rather than sharing with my hips (wink, wink)!

Banana chocolate chip bars are cut into portions and served!Plates full of banana chocolate chip bars, ready to deliver to our neighbors.

We love these yummy dessert bars, and I am confident you will, too. I hope you have the opportunity to make them for those you love. Thank you for stopping by, and I hope you will visit again soon. Have a great day!

Looking For More BAR COOKIE Recipes?

You can find all of my bar cookie recipes in the Recipe Index, located at the top of the page. I have quite a few you will enjoy, including:

Interested In More Recipes?

Thank you for visiting this website. I appreciate you using some of your valuable time to do soIf you’re interested, I publish a newsletter 2 times per month (1st and 15th) with all the latest recipes, and other fun info. I would be honored to have you join our growing list of subscribers, so you never miss a great recipe!
There is a Newsletter subscription box on the top right side (or bottom) of each blog post, depending on the device you use, where you can easily submit your e-mail address (only) to be included in my mailing list.

You Can Also Find Me On Social Media:

Facebook page: The Grateful Girl Cooks!
Pinterest:
The Grateful Girl Cooks!
Instagram:
jbatthegratefulgirlcooks

Author's signature

Recipe adapted from Terri, at: greatgrubdelicioustreats.com/banana-bars-with-cream-cheese-frosting/

0 from 0 votes
Banana Chocolate Chip Bars
Prep Time
20 mins
Cook Time
35 mins
Total Time
55 mins
 

It's easy to make Banana Chocolate Chip Bars (w/ cream cheese frosting) for those you love! They're moist and delicious- you're gonna love 'em!

Category: Dessert
Cuisine: American
Keyword: banana chocolate chip bars
Servings: 24
Calories Per Serving: 292 kcal
Author: JB @ The Grateful Girl Cooks!
Ingredients
  • ½ cup butter softened
  • 1⅓ cups granulated sugar
  • 2 large eggs
  • 1 teaspoon vanilla extract
  • 1 cup sour cream
  • 2 cups all purpose flour
  • 1 teaspoon baking soda
  • ¼ teaspoon salt
  • 4 medium RIPE bananas , mashed
  • ½ cup mini semi-sweet chocolate chips
For Frosting:
  • 8 ounces cream cheese softened
  • ½ cup butter softened
  • 1 teaspoon vanilla extract
  • 3 cups powdered sugar
Instructions
  1. Preheat oven to 350°F. Spray a 13 x 9 baking pan or 15 x 10 jelly roll pan with non-stick spray.

  2. Beat softened butter and sugar in medium bowl until creamy. Add eggs (one at a time), beating well after each addition. Add vanilla and sour cream; beat well.

  3. In a separate bowl, whisk together flour, salt and baking soda. STIR flour mixture into the batter, a little at a time, until combined. Next, add mashed bananas and chocolate chips to batter; stir until fully combined.

  4. Spread batter evenly into prepared 13" x 9" pan (or 15" x 10" jelly roll pan). Bake at 350°F. for 35-40 minutes (for a 13x9 pan) or for 22-27 minutes (in jelly roll pan). When done, the bars should be golden brown on top, and a toothpick inserted into the top of the bars should come out clean. Transfer pan to a wire rack; let bars cool completely before frosting.

Make Frosting:
  1. Place (softened) cream cheese, butter, and vanilla in a large bowl. Beat together until fully combined and smooth. Add powdered sugar, a little at a time, beating after each addition, until creamy.

  2. Spread frosting over cooled banana bars; sprinkle with additional chocolate chips (optional), if desired.  Let rest for a few minutes to let frosting slightly firm up, then cut into bars and serve! (24 servings for 9 x 13 pan, and 36 servings for 15 x 10 pan). Enjoy!

Recipe Notes

NOTES: Caloric calculation was made based on 24 servings (9 x 13 pan). If making 36 servings (in 15 x 10 jelly roll pan), the calorie calculation reduces to approx. 195 calories per serving. **Additional 3 Tbsp. mini chocolate chips (for garnish on top) are optional, and were not included in either caloric calculation.

Nutrition Facts
Banana Chocolate Chip Bars
Amount Per Serving (1 bar)
Calories 292 Calories from Fat 117
% Daily Value*
Fat 13g20%
Saturated Fat 8g50%
Cholesterol 45mg15%
Sodium 196mg9%
Potassium 159mg5%
Carbohydrates 43g14%
Fiber 1g4%
Sugar 31g34%
Protein 3g6%
Vitamin A 358IU7%
Vitamin C 2mg2%
Calcium 38mg4%
Iron 1mg6%
* Percent Daily Values are based on a 2000 calorie diet.

Here’s one more to pin on your Pinterest boards!It's easy to make Banana Chocolate Chip Bars (w/ cream cheese frosting) for those you love! They're moist & delicious- you're gonna love 'em!

Pumpkin Vinaigrette

It’s easy to make pumpkin vinaigrette in 5 minutes with a few ingredients! It’s a delicious salad dressing for mixed green or rice salads.
It's easy to make pumpkin vinaigrette in 5 minutes with a few ingredients! It's a delicious salad dressing for mixed green or rice salads.

Last year I made an absolutely delicious wild rice salad, with pumpkin vinaigrette for the dressing. It was fantastic, so today I want to share the recipe for the salad dressing. This vinaigrette is delicious on most mixed green salads, too, which is why it is good to have the recipe in my salad dressing “toolbox”.

You can use canned pumpkin puree (not pumpkin pie mix) OR your own homemade pumpkin puree, which is what I typically use to make this vinaigrette. Obviously the canned pumpkin puree is very convenient, but since I usually have several bags of homemade puree stored in our freezer, homemade is my “go to”.

The recipe is super easy to make in 5 minutes or less, with a few simple ingredients. Here’s how to make this delicious dressing:

Scroll down for a printable recipe card at the bottom of this page.

How To Make Pumpkin Vinaigrette

Measure 1/4 cup of pumpkin puree (canned or homemade) into a small bowl. NOTE: Remember to NOT use pumpkin pie filling, or you probably won’t like this dressing!

Homemade or canned pumpkin puree is used as the base for this vinaigrette.

To the pumpkin puree add white wine vinegar, honey, salt, pepper, and some dried thyme. (Exact measurements are found in the printable recipe card at the bottom of this post).

Spices, white wine vinegar and pumpkin puree are measured into a small bowl.

Whisk these ingredients together until they are fully blended, and the vinaigrette is creamy. The mixture will be fairly thick.

The ingredients for pumpkin vinaigrette are whisked together until blended.

Slowly drizzle olive oil into the pumpkin vinaigrette mixture. Be sure to whisk continuously as you slowly drizzle the olive oil in, because slow drizzling and whisking continuously helps the vinaigrette to emulsify. That basically means you mix the ingredients so well that ingredients that normally don’t combine well (like oil and water), can “come together” in a way that disperses them into a stabilized unit.

Most vinaigrettes are emulsified, to fully blend the various vinegars and oils. It’s a simple process, and you end up with a great dressing for your salads. Once the pumpkin vinaigrette is fully blended, then it is ready to serve on your favorite salad.

Olive oil is whisked into the pumpkin vinaigrette before serving.

Time To Dress A Salad With Pumpkin Vinaigrette

The photo below shows the pumpkin vinaigrette being added to my wild rice salad. This dressing is really delicious, full of unique flavors, and is a great addition to most salads.  I think you will really enjoy it.

Store any leftover salad dressing in a covered container in the refrigerator. After it has been refrigerated, bring it back to room temperature, because the oil will have slightly solidified. Shake or stir the vinaigrette vigorously before using again.

The finished pumpkin vinaigrette is poured over wild rice salad and then served.

Hope you enjoy this simple pumpkin vinaigrette. Thanks for stopping by, take care, and have a GREAT day!

Looking For More SALAD DRESSING Recipes?

You can find all of my salad dressing recipes in the Recipe Index, located at the top of the page. I have several, which include:

Interested In More Recipes?

Thank you for visiting this website. I appreciate you using some of your valuable time to do soIf you’re interested, I publish a newsletter 2 times per month (1st and 15th) with all the latest recipes, and other fun info. I would be honored to have you join our growing list of subscribers, so you never miss a great recipe!
There is a Newsletter subscription box on the top right side (or bottom) of each blog post, depending on the device you use, where you can easily submit your e-mail address (only) to be included in my mailing list.

You Can Also Find Me On Social Media:
Facebook page: The Grateful Girl Cooks!
Pinterest: The Grateful Girl Cooks!
Instagram: jbatthegratefulgirlcooks

Author's signature

Original recipe source: My “Southern Living 2009 Annual Recipes Cookbook”, published 1999 by Oxmoor House, Inc., page 195

0 from 0 votes
Pumpkin Vinaigrette
Prep Time
5 mins
Cook Time
0 mins
Total Time
5 mins
 

It's easy to make pumpkin vinaigrette in 5 minutes with a few ingredients! It's a delicious salad dressing for mixed green or rice salads.

Category: Salad Dressing
Cuisine: American
Keyword: pumpkin vinaigrette
Servings: 10 Tablespoons (approx. 2/3 cup total)
Calories Per Serving: 73 kcal
Author: JB @ The Grateful Girl Cooks!
Ingredients
  • ¼ cup canned pumpkin puree (or homemade) , NOT pumpkin pie filling
  • ¼ cup white wine vinegar
  • 1 Tablespoon honey
  • ½ teaspoon salt
  • ¼ teaspoon ground black pepper
  • ¼ teaspoon dried thyme
  • cup extra virgin olive oil
Instructions
  1. Measure pumpkin puree (canned or homemade) into a small bowl. Add white wine vinegar, honey, salt, pepper, and dried thyme. Whisk these ingredients together until fully blended and creamy.

  2. Slowly drizzle olive oil into vinaigrette. Whisk continuously as you drizzle the olive oil, because slow drizzling and whisking continuously helps the vinaigrette emulsify. Once pumpkin vinaigrette is fully blended, it is ready to serve on your favorite salad.

  3. Store leftover salad dressing in a covered container in refrigerator. After it's been refrigerated, bring it back to room temperature, because oil will have slightly solidified. Shake or stir vinaigrette vigorously before using again. Enjoy!

Nutrition Facts
Pumpkin Vinaigrette
Amount Per Serving (1 Tablespoon)
Calories 73 Calories from Fat 63
% Daily Value*
Fat 7g11%
Saturated Fat 1g6%
Sodium 117mg5%
Potassium 13mg0%
Carbohydrates 2g1%
Fiber 1g4%
Sugar 2g2%
Protein 1g2%
Vitamin A 953IU19%
Vitamin C 1mg1%
Calcium 2mg0%
Iron 1mg6%
* Percent Daily Values are based on a 2000 calorie diet.

Here’s one more to pin on your Pinterest boards!It's easy to make pumpkin vinaigrette in 5 minutes with a few ingredients! It's a delicious salad dressing for mixed green or rice salads.

Caramel Apple Cider

Fall and Winter are perfect seasons for easy-to-make delicious, hot Caramel Apple Cider, with whipped cream and caramel sauce!

Fall is here… and with it comes the gorgeous foliage (on the trees AND on the ground), crisp air, cooler temperatures, and in our area of the Pacific Northwest… RAIN. When Fall arrives, I love to wear sweatshirts, sweatpants, curl up by our fireplace each morning, AND drink a lot of HOT beverages, to keep me WARM!

Fall leaves and cooler temperatures encourage us to enjoy hot apple cider!

Fall and Winter are also the perfect seasons to enjoy Apple Cider Bundt Cake, Valencia Orange Hot Chocolate, Mom’s Apple Cake, and a big, hot bowl of Grandma’s Southern-Style Chicken n’ Dumplings! YUM! And now, here’s a wonderful hot beverage to enjoy, too!

The cider recipe I am sharing today is a delicious twist on “typical” apple cider. I discovered it in one of my old cookbooks from Southern Living (a Christmas edition). Tried it and loved it, so it’s now a lovely recipe to enjoy, especially during cool weather. With a few additional (simple) ingredients, you can transform a simple mug of apple cider into a delicious, glamorous looking, hot beverage treat!

This recipe for caramel apple cider is really easy to make, and is done in just under 15 minutes. The recipe yields four, one cup servings. Here’s how to make this yummy drink:

Scroll Down For A Printable Recipe Card At The Bottom Of The Page

How To Make Caramel Apple Cider

Place heavy whipping cream and light brown sugar in a large saucepan. Stir the two ingredients together, and cook, on medium heat, stirring constantly. Cook for  a total of two minutes (stirring constantly), until the liquid is very bubbly.

Whipping cream and brown sugar are cooked in saucepan.Brown sugar and heavy whipping cream cook until bubbly.

Pour in the apple cider and vanilla extract. Stir well, to fully combine the ingredients. Cook the caramel apple cider for ten minutes, or until the cider is fully heated through. Once it is really hot, remove the pan from the heat source. Now it’s time to garnish, and enjoy this yummy hot drink.

Apple cider and vanilla are added to the saucepan and heated through.

Serving Caramel Apple Cider

Ladle the steamin’ hot caramel apple cider into four mugs (approx. 8 ounces per mug). Top each mug of cider with aerosol whipped cream (really spray it on there!), and then drizzle the whipped cream with room temperature caramel sauce. You can also sprinkle each cider with ground cinnamon, if desired.

Serve the caramel apple cider immediately, and enjoy this tasty hot drink. The addition of the vanilla, cream and light brown sugar, give the cider a surprising, caramel-like twist, which I think you will enjoy! And the whipped cream and caramel sauce topping? YES, please!

A mug of caramel apple cider, topped with whipped cream and caramel sauce.

I hope you enjoy the sights, sounds, and experiences this Fall season. Make yourself (and those you love), a nice hot mug of caramel apple cider, sit back, and enjoy the changing of the seasons! If you enjoy this drink, be sure to check out my recipe for Hot Spiced Apple Cider!

Whipped cream and caramel sauce top a mug of hot caramel apple cider.

Thank you so much for stopping by today. I hope you have a wonderful day, and pray God provides you with encouragement, wisdom and grace for everything you encounter today. Come back soon, okay?

Looking For More FALL-INSPIRED Recipes?

You can more of my recipes in the Recipe Index, located in the MENU bar at the top of the page. I have quite a few recipes perfect for this season, including:

Interested In More Recipes?

Thank you for visiting this website. I appreciate you using some of your valuable time to do soIf you’re interested, I publish a newsletter 2 times per month (1st and 15th) with all the latest recipes, and other fun info. I would be honored to have you join our growing list of subscribers, so you never miss a great recipe!
There is a Newsletter subscription box on the top right side (or bottom) of each blog post, depending on the device you use, where you can easily submit your e-mail address (only) to be included in my mailing list.

You Can Also Find Me On Social Media:

Facebook page: The Grateful Girl Cooks!
Pinterest:
The Grateful Girl Cooks!
Instagram:
jbatthegratefulgirlcooks

Author's signature

Original recipe source: The cookbook “Christmas with Southern Living 2010”, published by Oxmoor House, page 145

0 from 0 votes
Caramel Apple Cider
Prep Time
3 mins
Cook Time
10 mins
Total Time
13 mins
 

Fall and Winter are perfect seasons for easy-to-make delicious, hot Caramel Apple Cider, with whipped cream and caramel sauce!

Category: Beverage
Cuisine: American
Keyword: caramel apple cider
Servings: 4 (8 oz. servings)
Calories Per Serving: 250 kcal
Author: JB @ The Grateful Girl Cooks!
Ingredients
For Caramel Apple Cider:
  • cup heavy whipping cream
  • cup light brown sugar
  • 4 cups apple cider
  • 1 teaspoon vanilla extract
For Topping (optional, but good!)
  • aerosol whipped cream, caramel sauce, cinnamon
Instructions
  1. Place whipping cream and light brown sugar in a large saucepan. Stir to combine ingredients. Cook on medium heat 2 minutes (stirring constantly), until very bubbly.

  2. Add apple cider and vanilla to pan. Stir well, to combine ingredients. Cook (stirring occasionally) for 10 minutes on medium-low heat, or until cider is fully heated through. Remove pan from heat source.

  3. Ladle hot cider into 4 mugs (approx. 8 ounces per mug). Top each cider with aerosol whipped cream (really spray it on there!), then drizzle with caramel sauce. Serve immediately, Enjoy.

Recipe Notes

NOTE: The optional toppings (aerosol whipped cream, caramel sauce & cinnamon) are not included in the caloric calculation, because amounts used may vary from person to person.

Nutrition Facts
Caramel Apple Cider
Amount Per Serving (1 cup (8 oz.)s)
Calories 250 Calories from Fat 72
% Daily Value*
Fat 8g12%
Saturated Fat 5g31%
Cholesterol 27mg9%
Sodium 22mg1%
Potassium 278mg8%
Carbohydrates 45g15%
Fiber 1g4%
Sugar 41g46%
Protein 1g2%
Vitamin A 292IU6%
Vitamin C 2mg2%
Calcium 47mg5%
Iron 1mg6%
* Percent Daily Values are based on a 2000 calorie diet.

Here’s one more to pin on your Pinterest boards!Fall and Winter are perfect seasons for easy-to-make delicious, hot Caramel Apple Cider, with whipped cream and caramel sauce!

Chicken Pasta Casserole

You’ll enjoy this Chicken Pasta Casserole, with rotini pasta, zucchini, onions, red bell peppers, Parmesan and mozzarella, in a creamy sauce!
You'll enjoy this Chicken Pasta Casserole, with rotini pasta, zucchini, onions, red bell peppers, Parmesan and mozzarella, in a creamy sauce!

I don’t know about you, but we enjoy a tasty casserole every now and then. Casseroles seem to have a little bit of everything in them, feed a crowd, and the leftovers are great the next day! THAT’S a win-win, in my book. This chicken pasta casserole (which is also easy to make) is no exception to that theory. Years ago I made a few changes to the original recipe, and have been happy with the results.

Filled with chicken breast, veggies, curly rotini pasta, spices and two kinds of cheese, it practically has all the food groups represented (except for fruit or dessert, wink wink!). I found my handwritten recipe on an index card in a very old recipe box.

I made this casserole several times many years ago (at least 15), and had written “GREAT” on the recipe, so I decided to cook it again, photograph the process, and share it here on my blog. Here’s how to make this delicious casserole:

Scroll Down For A Printable Recipe Card At The Bottom Of The Page

Prepare The Pasta

Cook rotini pasta (or rotelle) according to the package directions in boiling, salted water. Once the pasta is fully cooked, drain the pasta, and then set it aside. TIP: Make the sauce for the casserole while the pasta is cooking, to save time! 

Adding pasta to boiling water to cook.

Make The Sauce For The Chicken Pasta Casserole

To make the sauce, first melt butter in a large skillet on medium heat. Add chopped onions, red bell peppers, and sliced zucchini halves to the skillet. Sauté the veggies just until they become crisp/tender (approx. 3-4 minutes). Stir in flour until it’s combined with the veggies.

Bell peppers, zucchini, and onion are cooked in butter.Flour is stirred into the veggies to help thicken sauce later.

Cook The Sauce Until Thickened

Now add milk, chicken broth, tomato paste, salt, pepper, and basil to the skillet. Stir to combine all ingredients. Continue cooking, stirring often, on medium heat until the mixture has thickened and is bubbly. Once thickened, add 2 Tablespoons of grated Parmesan cheese, and stir again, to combine.

Milk, chicken broth, tomato paste and spices are added to make the sauce.The sauce for the chicken pasta casserole has thickened.

Stir in the cooked pasta and the chicken. Make sure to get everything covered with the sauce. Now you’re ready to put it all in a greased casserole dish, and bake!

Cooked pasta and chicken are added to the creamy sauce.Ingredients are stirred until fully incorporated.

Bake The Chicken Pasta Casserole

Spread the casserole mixture into a greased 3 quart casserole dish evenly. Sprinkle the top of the pasta with the remaining 2 Tablespoons of Parmesan cheese, followed by the grated mozzarella cheese.

Cover the pan with aluminum foil, and bake, in a preheated 400°F. oven for 10 minutes. After 10 minutes, remove the foil, and continue baking for 15 additional minutes. It’s done when the cheese has melted and the casserole is fully heated through.

Parmesan and mozzarella added to top of the chicken pasta casserole, before baking.Cheese has melted and casserole is bubbly when done.

That’s it! Once it comes out of the oven, the chicken pasta casserole is ready to serve, and eat! You can add additional Parmesan cheese to the top as a garnish (if desired), but it really isn’t necessary. This dish is really quite tasty, fresh from the old oven!

A bowl of chicken pasta casserole, ready to enjoy!

I truly hope you enjoy this delicious casserole. You can store leftovers covered in the refrigerator, for up to 3 days. Reheat in a microwave for a quick lunch the next day!

Thank you for stopping by, and I hope you come back soon for more family-friendly recipes! Have a wonderful day.

Looking For More CASSEROLE Recipes?

You can find all of my recipes in the Recipe Index, located at the top of the page. I have quite a few delicious casserole recipes, including:

Interested In More Recipes?

Thank you for visiting this website. I appreciate you using some of your valuable time to do soIf you’re interested, I publish a newsletter 2 times per month (1st and 15th) with all the latest recipes, and other fun info. I would be honored to have you join our growing list of subscribers, so you never miss a great recipe!
There is a Newsletter subscription box on the top right side (or bottom) of each blog post, depending on the device you use, where you can easily submit your e-mail address (only) to be included in my mailing list.

You Can Also Find Me On Social Media:

Facebook page: The Grateful Girl Cooks!
Pinterest:
The Grateful Girl Cooks!
Instagram:
jbatthegratefulgirlcooks

Author's signature

Original recipe source: unknown

5 from 1 vote
Chicken Pasta Casserole
Prep Time
15 mins
Cook Time
25 mins
Total Time
40 mins
 

You'll enjoy this Chicken Pasta Casserole, with rotini pasta, zucchini, onions, red bell peppers, Parmesan and mozzarella, in a creamy sauce!

Category: Entree - Casserole
Cuisine: American
Keyword: chicken pasta casserole
Servings: 5
Calories Per Serving: 428 kcal
Author: JB @ The Grateful Girl Cooks!
Ingredients
  • 8 ounces rotini pasta , cooked and drained
  • 1 cup yellow onion , chopped
  • 1 large zucchini , sliced, then slices cut in half
  • ½ cup red bell pepper , seeded and chopped
  • 3 Tablespoons butter
  • ¼ cup all purpose flour
  • cups chicken broth
  • ½ cup lowfat milk
  • 1 Tablespoon tomato paste *See note
  • ¾ teaspoon salt
  • ½ teaspoon basil
  • teaspoon ground black pepper
  • 4 Tablespoons grated Parmesan cheese , divided
  • 2 cups cooked chicken breasts ,cut in bite-sized pieces
  • cup grated mozzarella cheese
Instructions
  1. Preheat oven to 400°F. Cook pasta according to package directions. Once done, drain pasta; set aside. TIP: Make the sauce for the casserole while pasta cooks, to save time! 

  2. Melt butter in large skillet. Add onions, red peppers, and zucchini. Sauté veggies until crisp/tender (approx. 3-4 minutes). Stir in flour.

  3. Add milk, chicken broth, tomato paste, salt, pepper, and basil to skillet. Stir to combine. Continue cooking on medium heat, stirring often, until mixture thickens and is bubbly. Add half (2 Tbsp.) of grated Parmesan cheese, and stir again. Stir in cooked pasta and chicken until ingredients are coated with sauce.

  4. Grease a 3 qt. baking dish with non-stick baking spray. Spread casserole evenly in dish. Sprinkle pasta with remaining 2 Tbsp. of Parmesan cheese, followed by grated mozzarella. Cover dish with aluminum foil, and bake in a preheated 400°F. oven for 10 minutes. After 10 minutes, remove the foil, and continue baking for 15 additional minutes. When done, serve, and enjoy!

Recipe Notes

NOTE: You can substitute spaghetti sauce or tomato sauce if you do not have access to tomato paste, but increase amount needed to 1.5 Tablespoons.

Nutrition Facts
Chicken Pasta Casserole
Amount Per Serving (1 1/5 of total))
Calories 428 Calories from Fat 117
% Daily Value*
Fat 13g20%
Saturated Fat 7g44%
Cholesterol 74mg25%
Sodium 864mg38%
Potassium 623mg18%
Carbohydrates 47g16%
Fiber 3g13%
Sugar 7g8%
Protein 30g60%
Vitamin A 993IU20%
Vitamin C 39mg47%
Calcium 171mg17%
Iron 2mg11%
* Percent Daily Values are based on a 2000 calorie diet.

Here’s one more to pin on your Pinterest boards!You'll enjoy this Chicken Pasta Casserole, with rotini pasta, zucchini, onions, red bell peppers, Parmesan and mozzarella, in a creamy sauce!

Orange Chocolate Chip Cookies

Orange Chocolate Chip Cookies, topped with a creamy orange frosting, are a soft, delicious, and wonderfully decadent treat you will enjoy!

About 15 years ago, I received this recipe for orange chocolate chip cookies from a friend. She knew that I hosted a cookie exchange at Christmas time every year, and wanted to share this one with me to try. She wrote “I think you should bake these in the near future to see if they are something you would want for your exchange. I have a sister-in-law that thinks Christmas isn’t the same unless she has some of these.”   Well, I don’t know where my friend got her original recipe for these cookies, but it’s a KEEPER!

I have to tell you, these easy-to-make cookies taste WONDERFUL, and I am so glad my friend Annette sent me her recipe. Pillowy soft, filled with chocolate chips, flavored with orange juice and zest, and topped with a creamy orange icing, these cookies are absolutely delicious! Today I want to share the simple recipe with you. Here’s how to make them:

Scroll down for a printable recipe card at the bottom of this post.

Make The Cookie Dough

Before beginning, remember to preheat your oven to 350°F. The dough for the cookies is really easy to make, and it comes together quickly, so make sure the oven is preheated, so it’s ready to go once the cookie dough is done.

In a large bowl or stand mixer, cream shortening, granulated sugar and cream cheese together until well combined. Note:* I almost always use butter for my baking, but this recipe calls for vegetable shortening, so as not to “mess it up”, that is what I use).

Add two eggs, fresh orange juice, and orange zest to the batter. Continue to beat the ingredients together until the batter is fluffy, and fully combined.

Cream cheese, shortening, sugar, eggs, OJ, and zest are mixed for cookie batter.The wet ingredients for the cookie batter are mixed thoroughly.

Now add the flour, salt, and chocolate chips. STIR these ingredients into the batter. That’s it! This is the batter for your orange chocolate chip cookies! Now let’s bake them.

Flour, salt and chocolate chips are stirred into the cookie batter until combined.

Bake The Orange Chocolate Chip Cookies

Scoop or drop the batter by spoonfuls onto very lightly sprayed or greased cookie sheets, keeping about 2 inches between cookies. I usually get between 24-26 cookies out of the dough.

Bake at 350°F for 10-12 minutes, or only until the cookies are just barely golden brown around the bottom edges. You do NOT want the cookies to brown like a traditional chocolate chip cookie!

The dough for orange chocolate chip cookies are spooned onto baking sheets.

Once they’re done (see how they are barely brown around the edges?), remove the baking sheets from the oven, and let the cookies cool for a few minutes before transferring them to a wire rack to finish cooling.

The cookies are done when barely golden brown around the bottom edges.

Make The Orange Cream Cheese Frosting

While the orange chocolate chip cookies cool, you can make the orange cream cheese frosting. The frosting makes these delicious cookies perfect, so don’t leave this out!

In a medium bowl, use an electric mixer to beat together cream cheese, fresh orange juice, and orange zest (zest is the finely grated peel of the orange, and has lots of citrus flavor in it). Once they are creamed together, add powdered sugar, one cup at a time, until fully incorporated. You will end up with a fairly thick frosting for the cookies.

Cream cheese, powdered sugar, OJ & orange zest are combined to make frosting.

Frost The Orange Chocolate Chip Cookies

Once the cookies have COMPLETELY cooled, spread each one with the yummy orange frosting. There is enough frosting to generously cover the entire top of each cookie (I had 26 cookies). Let the cookies rest, which will firm up the frosting, before serving. In the second photo below, you can see that the bottoms of the cookies are barely browned. That is what they should look like.

Each of the orange chocolate chip cookies are topped with the citrus frosting.The bottoms of the cookies are only barely browned while baking.

Once the frosting has firmed up, the cookies are ready to enjoy! I’m confident you will like these soft, orange chocolate chip cookies. They are sooo good! The orange flavor, combined with chocolate chips is a favorite combination of mine, and I hope you like it, too.

Even though the cookies were so good that I could have eaten them ALL, I enjoyed taking small plates of these delicious cookies to several neighbors, so they could enjoy them, too!

A plate of frosted orange chocolate chip cookies, ready to enjoy!

I truly hope you have the opportunity to make these yummy cookies for yourself or for those you love. The recipe is so simple to prepare, and the results are wonderful! Have a great day, and thanks for stopping by.

Looking For More COOKIE Recipes?

You can find all of my cookie recipes in the Recipe Index, located at the top of the page. I have quite a few, delicious cookie recipes to explore, including:

Interested In More Recipes?

Thank you for visiting this website. I appreciate you using some of your valuable time to do soIf you’re interested, I publish a newsletter 2 times per month (1st and 15th) with all the latest recipes, and other fun info. I would be honored to have you join our growing list of subscribers, so you never miss a great recipe!
There is a Newsletter subscription box on the top right side (or bottom) of each blog post, depending on the device you use, where you can easily submit your e-mail address (only) to be included in my mailing list.

You Can Also Find Me On Social Media:

Facebook page: The Grateful Girl Cooks!
Pinterest:
The Grateful Girl Cooks!
Instagram:
jbatthegratefulgirlcooks

Author's signature

Original recipe source: Annette Goetz

0 from 0 votes
Orange Chocolate Chip Cookies
Prep Time
10 mins
Cook Time
11 mins
Total Time
21 mins
 

Orange Chocolate Chip Cookies, topped with a creamy orange frosting, are a soft, delicious, and wonderfully decadent treat you will enjoy!

Category: Dessert
Cuisine: American
Keyword: orange chocolate chip cookies
Servings: 26
Calories Per Serving: 230 kcal
Author: JB @ The Grateful Girl Cooks!
Ingredients
For Cookies:
  • 3 ounces light cream cheese
  • 1 cup granulated sugar
  • 1 cup vegetable shortening
  • 2 large eggs
  • 3 Tablespoons fresh orange juice
  • 1 Tablespoon orange zest
  • cups all purpose flour
  • ½ teaspoon salt
  • 1 cup chocolate chips I used mini-sized
For Orange Frosting:
  • 3 ounces light cream cheese
  • 1 Tablespoon fresh orange juice
  • 1 Tablespoon orange zest
  • 2 cups powdered sugar
Instructions
  1. Preheat oven to 350°F.

  2. In a large bowl or stand mixer, mix/cream shortening, granulated sugar and 3 ounces cream cheese until well combined. Add eggs, orange juice, and orange zest to batter. Continue to beat ingredients until batter is fluffy, and fully combined.

  3. STIR flour, salt, and chocolate chips into the batter. Drop dough by spoonfuls onto lightly greased baking sheets, leaving about 2 inches between cookies (approx. 24-26 cookies).

  4. Bake at 350°F for 10-12 minutes, or only until the cookies are barely golden brown around the bottom edges. You do NOT want cookies to brown like traditional chocolate chip cookies! When done, let cookies cool 2-3 minutes on baking sheets before transferring to a wire rack to finish cooling.

To Make Frosting:
  1. Use an electric or stand mixer to beat together cream cheese, orange juice and zest. When fully mixed, add powdered sugar, one cup at a time, beating until fully incorporated. Frosting will be slightly thick.

  2. Spread each cookie with frosting. There's enough to generously cover the entire top of each cookie. Let cookies rest to let frosting firm up, before serving. Enjoy!

Nutrition Facts
Orange Chocolate Chip Cookies
Amount Per Serving (1 cookie)
Calories 230 Calories from Fat 99
% Daily Value*
Fat 11g17%
Saturated Fat 4g25%
Cholesterol 19mg6%
Sodium 86mg4%
Potassium 37mg1%
Carbohydrates 31g10%
Fiber 1g4%
Sugar 22g24%
Protein 2g4%
Vitamin A 76IU2%
Vitamin C 2mg2%
Calcium 21mg2%
Iron 1mg6%
* Percent Daily Values are based on a 2000 calorie diet.

Here’s one more to pin on your Pinterest boards!Orange Chocolate Chip Cookies, topped with a creamy orange frosting, are a soft, delicious, and wonderfully decadent treat you will enjoy!

Ginger Sesame Salad Dressing

Ginger Sesame Salad Dressing is easy to make in a few minutes! Drizzle this tasty Asian-inspired dressing on a favorite mixed green or entree salad.

Today I want to share this incredibly easy homemade ginger sesame salad dressing. I love this dressing because it is full of flavor, goes well with practically any mixed green salad, is a cinch to make, and it tastes GREAT!

I found the recipe in an old Weight Watchers cookbook I have in my cookbook collection. Yes- I have collected hundreds of cookbooks and cooking magazines for over 40 years now, and to this day I still enjoy the “thrill of the hunt” for new recipes.

The recipe, as written, makes a fairly small batch of salad dressing. It will yield about 1/3 cup, or about 5 small servings of a Tablespoon each). However, the ingredients can be easily doubled or tripled to suit your needs. The printable recipe card is at the bottom of this post.

Scroll Down For A Printable Recipe Card At the Bottom Of The Page

What’s IN This Ginger Sesame Salad Dressing?

Well, I’m glad you asked. The ingredients you will need to make the salad dressing are soy sauce (regular or low-sodium), rice vinegar, Asian sesame oil, honey, dry mustard powder, fresh ginger, and crushed red pepper.

I prefer using low sodium soy sauce to reduce the amount of sodium in this dressing, but when I took the photo below (long after the fact), I used regular soy sauce in my quick ingredient picture.

All of these ingredients can typically be found in your local supermarket. A couple of them may be located in the Asian section. Fresh ginger is peeled, and then grated using a microplane zester, to finely shred it.

The ingredients are gathered to make the salad dressing.

How To Make The Salad Dressing

Making this ginger sesame salad dressing is very simple. First, measure all of the the ingredients into a medium saucepan.

The salad dressing ingredients are measured into a medium saucepan.

Whisk the ingredients to fully blend them together. Bring the salad dressing to a boil, using medium heat. As soon as it comes to a boil, remove the pan from the heat source. Let the salad dressing cool to room temperature before using.

IF PREPARING AHEAD OF TIME: Let the salad dressing cool naturally for a couple minutes, then cover and place in the refrigerator to chill until you are ready to serve. When ready to serve, take it out of the fridge and let it warm up, just enough to take the chill off.

Ginger sesame salad dressing is whisked, then brought to a boil on the stove.

Enjoy The Ginger Sesame Salad Dressing

Drizzle the salad dressing over your “green salad of choice”. The ginger sesame salad dressing lends a slightly Asian-inspired flavor to any mixed green salad. Store any leftovers, covered, in your refrigerator for up to a week.

Our favorite way to enjoy this dressing is drizzled on Sesame Chicken Salad, which is a really delicious lunch OR main course dinner!

A main dish chicken salad in a bowl, topped with ginger sesame salad dressing.

I hope you have the opportunity to try this salad dressing. It’s nice knowing what all the ingredients are, and it’s so simple to make in just a few minutes. Thank you for visiting , and I sincerely hope you will come back soon. Have a great day.

Looking For More Homemade SALAD DRESSING Recipes?

You can find all of my recipes for salad dressings in the Recipe Index, which is located at the top of the page. I have quite a few I think you will enjoy, including:

Interested In More Recipes?

Thank you for visiting this website. I appreciate you using some of your valuable time to do soIf you’re interested, I publish a newsletter 2 times per month (1st and 15th) with all the latest recipes, and other fun info. I would be honored to have you join our growing list of subscribers, so you never miss a great recipe!
There is a Newsletter subscription box on the top right side (or bottom) of each blog post, depending on the device you use, where you can easily submit your e-mail address (only) to be included in my mailing list.

You Can Also Find Me On Social Media:

Facebook page: The Grateful Girl Cooks!
Pinterest: The Grateful Girl Cooks!
Instagram: jbatthegratefulgirlcooks

Author's signature

Recipe source: The cookbook “Weight Watchers-Great Cooking Every Day”, published 2001 by Wt. Watchers International, Inc., page 45

0 from 0 votes
Ginger Sesame Salad Dressing
Prep Time
3 mins
Cook Time
3 mins
Total Time
6 mins
 

Ginger Sesame Salad Dressing is easy to make in a few minutes! Drizzle this tasty Asian-inspired dressing on a favorite mixed green or entree salad.

Category: Salad, Salad Dressing
Cuisine: Asian
Keyword: ginger sesame salad dressing
Servings: 5 Tablespoons (about 1/3 cup)
Calories Per Serving: 27 kcal
Author: JB @ The Grateful Girl Cooks!
Ingredients
  • 2 Tablespoons soy sauce , reduced sodium, if available
  • 2 Tablespoons rice vinegar
  • 2 teaspoons fresh ginger , peeled, finely minced
  • 1 Tablespoon honey
  • 1 teaspoon dry mustard powder
  • 1 teaspoon Asian sesame oil (dark)
  • ¼ teaspoon crushed red pepper
Instructions
  1. Measure all ingredients into a medium saucepan. Whisk ingredients, to fully blend together.

  2. Bring to a boil, on medium heat. As soon as it comes to a boil, remove pan from the heat. Let salad dressing cool to room temperature before using.

  3. IF PREPARING AHEAD OF TIME: Let salad dressing cool naturally for a couple minutes; cover and place in refrigerator to chill until ready to serve. When ready to serve, remove from fridge; let it warm up enough to take the chill off.

Recipe Notes

NOTES: The recipe caloric calculation was made using low sodium soy sauce. If using regular soy sauce the amount of sodium will be considerably higher.

Nutrition Facts
Ginger Sesame Salad Dressing
Amount Per Serving (1 Tablespoon)
Calories 27 Calories from Fat 9
% Daily Value*
Fat 1g2%
Saturated Fat 1g6%
Sodium 215mg9%
Potassium 12mg0%
Carbohydrates 4g1%
Fiber 1g4%
Sugar 4g4%
Protein 1g2%
Vitamin A 30IU1%
Iron 1mg6%
* Percent Daily Values are based on a 2000 calorie diet.

Here’s one more to pin on your Pinterest boards!Ginger Sesame Salad Dressing is easy to make in a few minutes! Drizzle this tasty Asian-inspired dressing on a favorite mixed green or entree salad.

Easy Chicken Jalapeño

Easy Chicken Jalapeño is a delicious entree, with seasoned pan-seared chicken breasts topped with a brown butter, sweet & mild sauce for serving.

If you’re looking for a simple, but delicious chicken dish with very few ingredients, may I suggest this recipe for easy chicken jalapeño? Seasoned, boneless chicken breasts are pan-seared in butter, then covered with an amazingly SIMPLE, but delicious slightly sweet, and mildly spicy sauce to serve. It can be made in under 20 minutes, too. Hooray!

I have used homegrown and store-bought jalapeños in several recipes over the years, including my Jalapeño Cheddar Bagels and Jalapeño Cheddar Cornbread. I like the little bit of spice and “oomph” they give a dish (remove the seeds for less spicy peppers).

When I saw the words jalapeno chicken in one of my old cookbooks, I was afraid it was going to be spicy. It is not! There is a wonderfully flavored, simple sauce that covers the cooked chicken, and it is FAMILY-FRIENDLY! I think you will enjoy it, like we do! Here’s how to make this yummy chicken dish:

Scroll Down For A Printable Recipe Card At The Bottom Of The Page.

Prepare The Chicken Breasts

NOTE: The recipe (as written) yields 4 chicken breast servings, but my photos will only reflect the two that I made just for my husband and myself. I also used a huge chicken breast (about 12 ounces), and sliced it horizontally in half, which gave me two cutlets, each about 6 ounces.

Pat the chicken breasts dry. Lightly season each chicken breast ON BOTH SIDES with salt, pepper, and garlic powder. Place each piece between two pieces of plastic wrap, sealing edges. Pound the chicken breasts with the flat side of a meat mallet (or heavy skillet) until about 1/2″ thick, but still hold their shape.

Chicken breasts on white plate, seasoned with salt, pepper, and garlic powderThe chicken breasts in plastic wrap are pounded thinner with a meat mallet.

Pan-Sear The Chicken Breasts

In a large skillet (I used cast iron), melt butter on medium-high heat. Once melted, add the chicken breasts in a single layer. Cook on medium-high heat for 4-5 minutes, without moving the chicken.

Carefully turn the chicken over, and cook the other side for 4-5 minutes, or until fully cooked through (internal temperature of 165°F.).  The thickness of the chicken will determine how long they take to cook through. Once done, transfer the chicken from the skillet to a plate, and cover with foil to keep it warm. **Do NOT clean the skillet out!

Pan-searing the chicken breasts in melted butter in a black cast iron skillet.The pan-seared chicken pieces are browned after cooking, and turning to other side.

Make The Sauce For Easy Chicken Jalapeño

To make the sauce for the easy chicken jalapeño, you will need all the leftover browned butter and little browned “bits” left in the skillet from the chicken.

Turn the heat to medium. Add the pepper jelly to the skillet, and whisk or stir to incorporate the jelly into the browned butter. Bring the sauce to a boil, continuing to stir until the jelly is fully incorporated, and the sauce is smooth. Remove the sauce from the heat. Now you’re ready to serve this dish!

Jalapeño pepper jelly is added to browned butter in the skillet after cooking chicken.

Serve Easy Chicken Jalapeño

Once the sauce is smooth and hot, it’s time to serve the easy chicken jalapeño! Place a piece of chicken onto each serving plate, and spoon the sauce over the top of each portion. If desired, you can garnish the chicken with jalapeño slices (seeds removed), and then add a spoonful of colorful salsa.

NOTE: You do NOT need jalapeño slices OR salsa for this dish to be perfect, but they DO add some color, and additional flavor. If you do not want to garnish… no worries! The chicken, served with only the yummy sauce on top tastes absolutely wonderful as is!

Easy chicken jalapeño, topped with sauce and sliced jalapenos, served with rice and peas..A spoonful of salsa adds color to the easy chicken jalapeño when served.

A Quick Note About Jalapeño Pepper Jelly

I used my own homemade jalapeño pepper jelly, which you can see in the photo below. However, many stores carry it (Walmart, Target, etc.), and it can also be ordered online (Amazon) or found at many farmer’s markets. It can also be used as a topping on cream cheese and crackers (yum!), so it’s a perfect idea for a way to use any leftover jelly!

Canned jalapeño jelly adds flavor to the sauce for this chicken dish.

I hope you enjoy this recipe for easy chicken jalapeño. It really is quite delicious, and is incredibly simple to prepare. Thanks for stopping by… have a great day!

Looking For More CHICKEN Recipes?

You can find all of my CHICKEN recipes in the Recipe Index, located at the top of the page. I have LOTS of them, including:

Interested In More Recipes?

Thank you for visiting this website. I appreciate you using some of your valuable time to do soIf you’re interested, I publish a newsletter 2 times per month (1st and 15th) with all the latest recipes, and other fun info. I would be honored to have you join our growing list of subscribers, so you never miss a great recipe!
There is a Newsletter subscription box on the top right side (or bottom) of each blog post, depending on the device you use, where you can easily submit your e-mail address (only) to be included in my mailing list.

You Can Also Find Me On Social Media:

Facebook page: The Grateful Girl Cooks!
Pinterest:
The Grateful Girl Cooks!
Instagram:
jbatthegratefulgirlcooks

Author's signature

Original recipe source: Juanita Alexander, in “Southern Living Cookbook 1992”, page 310, published by Oxmoor House, 1992.

0 from 0 votes
Easy Chicken Jalapeño
Prep Time
7 mins
Cook Time
10 mins
Total Time
17 mins
 

Easy Chicken Jalapeño is a delicious entree, with seasoned pan-seared chicken breasts topped with a brown butter, sweet & mild sauce for serving.

Category: Entree, Main Course
Cuisine: American, Southwest
Keyword: easy chicken jalapeño
Servings: 4
Calories Per Serving: 317 kcal
Author: JB @ The Grateful Girl Cooks!
Ingredients
For Chicken and Sauce:
  • 4 medium chicken breasts (boneless, skinless) (approx 6 ounces per breast)
  • salt, pepper, garlic powder to lightly season meat on both sides
  • 2 Tablespoons butter melted
  • ½ cup jalapeño jelly
Optional Garnish: (sliced jalapeños, salsa)
    Instructions
    1. Pat chicken breasts dry. Lightly season ON BOTH SIDES with salt, pepper, and garlic powder. Place each piece between two pieces of plastic wrap. Pound chicken breasts with the flat side of a meat mallet (or heavy skillet) until about 1/2" thick, but still hold their shape.

    2. In a large skillet, melt butter on medium-high heat. Add chicken breasts in a single layer. Cook on medium-high heat for 4-5 minutes, without moving chicken. Carefully turn the chicken over, and cook other side for 4-5 minutes, or until fully cooked through (internal temperature of 165°F.).  The thickness of the chicken will determine how long they take to cook through. Once done, transfer the chicken from the skillet to a plate, and cover with foil to keep it warm. **Do NOT clean the skillet out! The remaining browned butter and "browned bits will be used for the sauce.

    3. Make Sauce: Turn heat to medium. Add pepper jelly to skillet; whisk or stir jelly into browned butter. Bring to a boil, continuing to stir until the jelly is fully incorporated, and sauce is smooth. Remove sauce from the heat.

    4. TO SERVE: Place chicken breast onto individual serving plate; spoon sauce over the top. OPTIONAL: garnish with jalapeño slices (seeds removed), and colorful salsa. NOTE: You do NOT need jalapeño slices OR salsa for this dish, but they DO add color and additional flavor. ENJOY!

    Recipe Notes

    The caloric calculation was made based on using 4 chicken breasts (approx. 6 ounces each) AND a commercially prepared jalapeno pepper jelly with approx. 300 calories per 1/2 cup. Because pepper jellies widely vary in caloric counts, yours may differ, and will impact the total calorie count per portion.

    Nutrition Facts
    Easy Chicken Jalapeño
    Amount Per Serving (1 g)
    Calories 317 Calories from Fat 90
    % Daily Value*
    Fat 10g15%
    Saturated Fat 5g31%
    Cholesterol 124mg41%
    Sodium 839mg36%
    Potassium 629mg18%
    Carbohydrates 19g6%
    Sugar 17g19%
    Protein 36g72%
    Vitamin A 429IU9%
    Vitamin C 4mg5%
    Calcium 9mg1%
    Iron 1mg6%
    * Percent Daily Values are based on a 2000 calorie diet.

    Here’s one more to pin on your Pinterest boards!Easy Chicken Jalapeño is a delicious entree, with seasoned pan-seared chicken breasts topped with a brown butter, sweet & mild sauce for serving.

    Cheesy Skillet Potatoes

    Cheesy Skillet Potatoes are made with Yukon Gold or Butterball potatoes, seasoned with butter, spices & cheese, served with chives & sour cream.
    Cheesy Skillet Potatoes are made with Yukon Gold or Butterball potatoes, seasoned w/ butter, spices & cheese, served w/ chives & sour cream.

    If you’re on the hunt for a simple potato side dish for a meal, may I suggest these delicious, yet simple, cheesy skillet potatoes? Potatoes are par-boiled for several minutes to soften, then seared in butter in a skillet, seasoned, and topped with cheese, fresh chives, and a nice dollop of sour cream, to finish.

    This recipe is one I just kind of made up “on the fly”, while trying to figure out a NEW way to serve potatoes for one of our meals. It is fairly simple to prepare, and looks and tastes really good, too! Here’s how to make this side dish:

    Scroll Down for A Printable Recipe Card At The Bottom Of The Page

    What Potatoes Should I Use?

    We LOVE making this easy side dish using either Yukon gold or German butterball potatoes. They are fairly small, which works well for this dish. Both varieties have a naturally “buttery” flavor to them already, and a slightly yellow hue (especially butterballs). You could also use red potatoes if necessary, (but we prefer Butterballs or Yukons golds for their creamy color and flavor).

    I recently dug up over 7 pounds of German butterball potatoes in some half-barrels in our little backyard raised bed garden. I last planted potatoes 5 years ago, but several “volunteer” plants still pop up each summer, so we’ve harvested lots of butterballs every year since then. HOORAY! I used several of our harvested German butterball potatoes to photograph the “how-to’s” of this recipe.

    German butterball potatoes, harvested from our little backyard garden.

    Prepare The Potatoes

    The potatoes need to be par-boiled before “cooking” in the skillet. It’s easy. Par-boiling is simply a quick method used to partially cook food in boiling water to reduce the total cooking time (especially good for hard, dense potatoes).

    Par-boiling helps soften the food, but doesn’t allow it to get cooked all the way through. This process also helps remove a bit of the sugars found in potatoes naturally. Place the clean potatoes in a pot of boiling water (enough to cover potatoes) and gently boil for 8-9 minutes. You should be able to insert a knife into the potatoes easily when finished.

    Par-boiling the potatoes for 8-9 minutes in water.

    Drain, and rinse the potatoes in cold water to help stop the cooking process, once done. Once cool enough to handle, remove the peel from the potatoes (see how YELLOW the butterballs are?). Slice each potato into 1/4″ slices, and set aside.

    After being par-boiled, the potatoes are peeled.

    Cooking Cheesy Skillet Potatoes

    Melt 3 Tablespoons of butter on medium-low heat in a large skillet. Add the sliced potatoes, trying to keep them in a single layer, if possible. Cook for 3-4 minutes without turning (this allows them to get a bit crispy on the bottom). Season by sprinkling potatoes lightly with salt, black pepper, and garlic powder.

    Turn the potatoes to cook the other side. Cook for 3-4 more minutes. The potatoes are done once golden brown, and a bit crispy around the edges on both sides. The center of the potatoes should be soft.

    Seasoned, round potato slices are cooked in butter in a skillet.Skillet potatoes turn golden brown, and slightly crispy on the edges.

    As soon as the potatoes are “done”, remove the skillet from the heat source. Sprinkle the top of the potatoes with the grated cheddar cheese. Place a skillet lid or foil over the top of the skillet for about a minute.

    The cheese will melt quickly while the potatoes are hot. Once the cheese has melted, remove lid. Sprinkle cheesy skillet potatoes with chopped fresh chives. They will add color and flavor to the dish.

    Cheesy skillet potatoes are topped with grated cheese and chopped fresh chives.

    Serve Cheesy Skillet Potatoes

    To serve, place portions onto serving plates, and place a dollop of sour cream on top of each portion. Serve while potatoes are hot, and enjoy this simple, but yummy side dish.

    The final garnish for the cheesy skillet potatoes is a dollop of sour cream.

    I hope you enjoy this veggie side dish. It doesn’t take too long to prepare, and the cheesy skillet potatoes sure taste good! Thank you for stopping by, and I sincerely hope you will visit again soon. Have a great day.

    Looking For More Side Dishes Using Potatoes?

    You can find all of my side dish recipes in the Recipe Index, located at the top of the page. I have quite a few side dish recipes that feature potatoes, including:

    Interested In More Recipes?

    Thank you for visiting this website. I appreciate you using some of your valuable time to do soIf you’re interested, I publish a newsletter 2 times per month (1st and 15th) with all the latest recipes, and other fun info. I would be honored to have you join our growing list of subscribers, so you never miss a great recipe!
    There is a Newsletter subscription box on the top right side (or bottom) of each blog post, depending on the device you use, where you can easily submit your e-mail address (only) to be included in my mailing list.

    You Can Also Find Me On Social Media:

    Facebook page: The Grateful Girl Cooks!
    Pinterest:
    The Grateful Girl Cooks!
    Instagram:
    jbatthegratefulgirlcooks

    Author's signature

    Recipe Source: my brain. my hungry brain.

    0 from 0 votes
    Cheesy Skillet Potatoes
    Prep Time
    13 mins
    Cook Time
    7 mins
    Total Time
    20 mins
     

    Cheesy Skillet Potatoes are made with Yukon Gold or Butterball potatoes, seasoned with butter, spices & cheese, served with chives & sour cream.

    Category: Side Dish, Vegetable Dish
    Cuisine: American
    Keyword: cheesy skillet potatoes
    Servings: 4
    Calories Per Serving: 276 kcal
    Author: JB @ The Grateful Girl Cooks!
    Ingredients
    • 5 medium Yukon Gold or Butterball potatoes
    • 3 Tablespoons butter
    • ¼ teaspoon salt and black pepper (EACH) , to taste
    • teaspoon garlic powder
    • ¼ cup grated cheddar cheese , or more if preferred
    • 1 Tablespoon chopped fresh chives
    • 2 Tablespoons light sour cream , for garnish
    Instructions
    1. Place clean potatoes in a pot of boiling water (enough to cover potatoes). Gently boil for 8-9 minutes. You should be able to insert a knife into a potato easily when finished. Drain, and rinse potatoes in cold water, once done. Once cool enough to handle, peel potatoes. Slice potatoes into 1/4" rounds; set aside.

    2. Melt butter in a large skillet on medium-low heat. Add potatoes, keeping them in a single layer, if possible. Cook 3-4 minutes without turning. Season lightly with salt, black pepper, and garlic powder. Turn potatoes to cook the other side. Cook about 3-4 minutes. Potatoes are done when golden brown, and a bit crispy around the edges on both sides. The center of the potatoes should be soft.

    3. Immediately remove skillet from heat. Sprinkle potatoes with cheese. Place a skillet lid or foil over skillet for 1 minute. Once cheese has melted, remove lid. Transfer portions to plates. Sprinkle with chopped fresh chives, and a dollop of sour cream. Enjoy.

    Nutrition Facts
    Cheesy Skillet Potatoes
    Amount Per Serving (1 (1/4 of total))
    Calories 276 Calories from Fat 108
    % Daily Value*
    Fat 12g18%
    Saturated Fat 7g44%
    Cholesterol 32mg11%
    Sodium 281mg12%
    Potassium 907mg26%
    Carbohydrates 38g13%
    Fiber 5g21%
    Sugar 2g2%
    Protein 6g12%
    Vitamin A 385IU8%
    Vitamin C 42mg51%
    Calcium 87mg9%
    Iron 2mg11%
    * Percent Daily Values are based on a 2000 calorie diet.

    Here’s one more to pin on your Pinterest boards!Cheesy Skillet Potatoes are made with Yukon Gold or Butterball potatoes, seasoned w/ butter, spices & cheese, served w/ chives & sour cream.