Month: November 2022

Peppermint Mocha Coffee Creamer

Make delicious, homemade Peppermint Mocha Coffee Creamer to brighten the holidays (or ANY time)! Easy to make recipe only has 4 ingredients!Make delicious, homemade Peppermint Mocha Coffee Creamer to brighten the holidays (or ANY time)! Easy to make recipe only has 4 ingredients!

Do you like making your own homemade coffee creamers? If you do, I would love to share with you today how to make this delicious coffee creamer! Peppermint Mocha Coffee Creamer is the flavor of the day!

It is SO SIMPLE to make, and tastes wonderful  when added to a big ol’ mug of hot coffee. I scribbled the recipe on the bottom of a piece of paper many years ago, but don’t know where I got it from, so I’m not sure who to give credit to for this recipe. 

The creamer only has 4 ingredients and can be ready to pour into a cup of coffee in less than 5 minutes. It will yield almost 3 cups of creamer. How’s that for convenient?

If you enjoy the flavors of chocolate and mint, then I’ll bet you will enjoy this coffee creamer. Here’s how to make it!

Scroll Down For A Printable Recipe Card At The Bottom Of The Page

What Ingredients Will I Need?

You need peppermint extract, 2 cups half and half, several Tablespoons of chocolate syrup, and a can of sweetened condensed milk to make this coffee creamer. These ingredients are all you will need, and can be found in most grocery stores.

If you want to “fancy the coffee up” for serving, you will also want to have whipped cream and some crushed peppermint sticks. You can garnish each steaming hot mug of coffee with them, but that is completely optional!

Ingredients are half and half, peppermint extract, chocolate syrup and sweetened condensed milk.

Preparing The Creamer

Measure all of the creamer ingredients into a large bowl. The only thing you need to do to prepare the creamer is to thoroughly combine the ingredients.

You can use a wire whisk for this OR an electric mixer. I have used both, but because the sweetened condensed milk is very thick, I find that using an electric mixer works best.

NOTE: If using an electric mixer, blend, using the LOWEST setting, so the liquid doesn’t splatter everywhere, ok? Whisk or blend the creamer only until everything is completely blended.

Using a whisk to combine all the ingredients for the coffee creamer.Electric mixer can also be used (on LOW) to combine coffee creamer ingredients.

Storing The Peppermint Mocha Coffee Creamer

Once the peppermint mocha coffee creamer is fully combined, place a funnel into the neck of an airtight jar or bottle you’re using for the creamer. You can either POUR or LADLE the liquid creamer into the funnel in the jar.

I make a lot less mess when I use the funnel instead of just pouring the liquid in the bottle… just sayin’. Now the creamer is ready to enjoy! See how easy that was?

TIP: To store creamer, I remove the label from an old, empty creamer container. After washing and draining it well, I can re-use the container for homemade coffee creamers! The creamer should last approximately the same amount of time as the expiration date on the half and half carton, if stored in an airtight container.

Peppermint Mocha Coffee Creamer is ladled into a funnel on top of a storage bottle.A container of peppermint mocha coffee creamer and a cup of hot, black coffee, ready for creamer.

Enjoy Your Coffee With Peppermint Mocha Coffee Creamer!

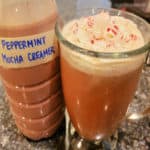
Most of the time, I simply add the peppermint mocha coffee creamer straight into my coffee, give it a stir and drink it up! But sometimes… I can’t help myself and try to make my coffee more fancy!

To do this, stir creamer into the coffee, then top with aerosol whipped cream, and sprinkle with crushed peppermint, right off of a candy cane!

This coffee creamer has a soothing, yet subtle peppermint and chocolate flavor, which I really enjoy in my strong, hot morning coffee! YUM! It’s a delicious coffee creamer any old time of the year, not just during the holidays!

Whipped cream and peppermint top a cup of coffee with peppermint mocha creamer.A mug of whipped cream topped coffee sweetened with peppermint mocha coffee creamer.

I hope you have the chance to make this simple, yet yummy coffee creamer, and trust you’ll enjoy it. I make it every year for Christmas, and love it a lot!

Thanks so much for taking time out of your day to visit my blog. I invite you to come back again soon, for more family-friendly recipes. Take care, and have a GREAT day!

Looking For More COFFEE CREAMER Recipes?

You can find ALL of my recipes in the Recipe Index, which is located at the top of the page. I have several delicious coffee creamer recipes to check out, including:

Want More Recipes? Get My FREE Newsletter!

I publish a newsletter 2 times per month (1st and 15th) with lots of recipes, tips, etc..
Would you like to join our growing list of subscribers?

There is a Newsletter subscription box on the top right (or bottom) of each blog post, depending on the device you use.
You can submit your e-mail address there, to be added to my mailing list.

Find Me On Social Media:

Facebook page: The Grateful Girl Cooks!
Pinterest:
The Grateful Girl Cooks!
Instagram:
jbatthegratefulgirlcooks

Author's signature

Original recipe source: unknown

↓↓ PRINTABLE RECIPE BELOW ↓↓

0 from 0 votes
Peppermint Mocha Coffee Creamer
Prep Time
4 mins
Cook Time
0 mins
Total Time
4 mins
 

Make delicious, homemade Peppermint Mocha Coffee Creamer to brighten the holidays (or ANY time)! Easy to make recipe only has 4 ingredients!

Category: Beverages, Condiments
Cuisine: American
Keyword: peppermint mocha coffee creamer
Servings: 48 (1 T. per serving)
Calories Per Serving: 46 kcal
Author: JB @ The Grateful Girl Cooks!
Ingredients
  • 2 cups half and half
  • 14 ounces sweetened condensed milk canned
  • 5 Tablespoons chocolate syrup
  • 1 teaspoon peppermint extract
Instructions
  1. Measure all ingredients into a large bowl. Use a wire whisk OR an electric mixer to fully combine ingredients. NOTE: I have used both, but because sweetened condensed milk is thick, using an electric mixer works best. If using an electric mixer, use on LOWEST setting, so liquid doesn't splatter.

  2. Pour creamer through funnel into an airtight jar or bottle for storage. Store in refrigerator for approx. as long as expiration date on the half and half carton. Enjoy!

Recipe Notes

Recipe will yield approximately 3 cups of liquid creamer. Caloric calculation is made based on using 1 Tablespoon per serving.

Nutrition Facts
Peppermint Mocha Coffee Creamer
Amount Per Serving (1 1 Tablespoon)
Calories 46 Calories from Fat 18
% Daily Value*
Fat 2g3%
Saturated Fat 1g6%
Polyunsaturated Fat 0.1g
Monounsaturated Fat 1g
Cholesterol 6mg2%
Sodium 18mg1%
Potassium 49mg1%
Carbohydrates 6g2%
Fiber 0.1g0%
Sugar 6g7%
Protein 1g2%
Vitamin A 58IU1%
Vitamin C 0.3mg0%
Calcium 35mg4%
Iron 0.1mg1%
* Percent Daily Values are based on a 2000 calorie diet.

Here’s one more to pin on your Pinterest boards!Make delicious, homemade Peppermint Mocha Coffee Creamer to brighten the holidays (or ANY time)! Easy to make recipe only has 4 ingredients!

Garlic Penne Pasta And Veggies

Garlic Penne Pasta And Veggies is a meatless pasta dish with garlic, spinach, tomatoes, chickpeas and Parmesan. It’s ready in 20 minutes!
Garlic Penne Pasta And Veggies is a meatless pasta dish with garlic, spinach, tomatoes, chickpeas and Parmesan. It's ready in 20 minutes!

If you’re looking for a meatless main dish that is full of flavor and takes practically no time at all to prepare, I think you’ll enjoy this tasty meal! Penne pasta is paired with a light garlic, Parmesan and veggie sauce.

This dish includes garbanzo beans (chickpeas) for added protein, fresh tomatoes, baby spinach and garlic, which bring color, texture, and flavor to the pasta.

It’s a cinch to make, and is ready in 20 minutes, because you make the sauce and veggies while the pasta cooks! How’s that for convenience? Let me show you how to make this meal:

Scroll Down For A Printable Recipe Card At The Bottom Of The Page

Cook The Penne Pasta

The first thing you’ll need to do is cook the penne pasta in boiling water, according to the directions found on the package.

While the pasta is cooking you prepare the rest of this dish, so it’s ready when the pasta is done! Once the penne is done cooking, drain the water off of the hot pasta.

Penne pasta is cooked in boiling water according to package instructions.

Prepare The Garlic Sauce And Veggies

While the pasta cooks, make the simple garlic sauce and veggies. Heat olive oil on medium heat in a large skillet. Add minced garlic and red pepper flakes to the hot oil.

Stir to combine, and sauté them, stirring often for 30-45 seconds. Be careful to not burn the garlic or it may become bitter in taste (and you do NOT want that!).

Add chopped fresh tomatoes and a can of garbanzo beans (chickpeas) that have been rinsed and drained to the skillet.

Stir to combine, and continue to cook and stir on medium heat for 2 more minutes.

Minced garlic and red pepper flakes cook in hot oil in a large skillet.Chopped fresh tomatoes and drained chickpeas (garbanzo beans) are added to skillet.

Place the fresh baby spinach and salt into the skillet, and cook, stirring often until the spinach leaves have wilted from the heat.

This is the garlic and veggie sauce you will add to the hot penne pasta, once it is done cooking. See how simple that was?

Baby spinach and salt are added to the garlic, tomato and chickpeas in skillet and cooked.Once the spinach leaves have wilted from the heat, the garlic and veggie sauce is done.

Serving The Garlic Penne Pasta And Veggies

Once the penne pasta has finished cooking, drain it and immediately add it to the skillet full of veggies. Add grated Parmesan cheese, and then toss the garlic penne pasta and veggies, to combine.

Because there is not a thick sauce coating everything, the pasta will cool fairly quickly, so serve the pasta immediately while hot. If desired, you can add additional Parmesan cheese to the top as a garnish for serving.

Cooked, drained penne pasta is added to the garlic and veggie sauce in skillet to combine.Grated Parmesan is added and combined with the Garlic Penne Pasta And Veggies, then served.

I hope you have the chance to make this delicious dish for those you love, and trust you’ll enjoy it as much as we do.

Thanks for stopping by, and I hope you’ll come back again soon for more family-friendly recipes. Take care, God bless you, and have a GREAT day!

Looking For More PASTA Recipes?

You can find ALL of my recipes in the Recipe Index, which is located at the top of the page. I have lots of wonderful pasta recipes for you to enjoy, including:

Want More Recipes? Get My FREE Newsletter!

I publish a newsletter 2 times per month (1st and 15th) with lots of recipes, tips, etc..
Would you like to join our growing list of subscribers?

There is a Newsletter subscription box on the top right (or bottom) of each blog post, depending on the device you use.
You can submit your e-mail address there, to be added to my mailing list.

Find Me On Social Media:

Facebook page: The Grateful Girl Cooks!
Pinterest:
The Grateful Girl Cooks!
Instagram:
jbatthegratefulgirlcooks

Author's signature

Original recipe source: Doris Heath, via “Taste of Home Magazine”, Oct./Nov. 2022 edition, page 26, published by Reiman Publications

↓↓ PRINTABLE RECIPE BELOW ↓↓

0 from 0 votes
Garlic Penne Pasta and Veggies
Prep Time
20 mins
Total Time
20 mins
 

Garlic Penne Pasta And Veggies is a meatless pasta dish with garlic, spinach, tomatoes, chickpeas and Parmesan. It's ready in 20 minutes!

Category: Main Dish
Cuisine: Italian
Keyword: garlic penne pasta and veggies
Servings: 6
Calories Per Serving: 353 kcal
Author: JB @ The Grateful Girl Cooks!
Ingredients
  • 12 ounces uncooked penne pasta
  • 2 Tablespoons extra virgin olive oil
  • 6 cloves garlic minced
  • ¼ teaspoon red pepper flakes or more if you like it spicy
  • 15 ounce can garbanzo beans (chickpeas) rinsed and drained
  • 2 medium tomatoes , seeded, cut in ½" pieces
  • 9 ounces fresh baby spinach
  • ¼ teaspoon salt
  • ¼ cup grated Parmesan cheese + more for garnish, if desired
Instructions
  1. Cook pasta in boiling water, according to directions on the package. Once pasta is done cooking, drain water off pasta.

  2. While pasta cooks, prepare sauce, so it's ready when pasta is done! Heat olive oil on medium heat in large skillet. Add garlic/red pepper flakes to hot oil. Stir to combine; cook stirring often for 30-45 seconds (don't let garlic burn or it becomes bitter).

  3. Add tomatoes and garbanzo beans (chickpeas). Stir to combine. Continue to cook and stir on medium heat for 2 minutes.

  4. Add spinach and salt to sauce; cook, stirring often until spinach has wilted from the heat. Sauce is now ready for hot, drained pasta.

  5. Once pasta is done, drain; immediately add it to skillet with veggies. Add grated Parmesan cheese; toss well, to combine ingredients. Serve immediately, sprinkled with additional Parmesan cheese, if desired.

Nutrition Facts
Garlic Penne Pasta and Veggies
Amount Per Serving (1 (1½ cups per serving))
Calories 353 Calories from Fat 72
% Daily Value*
Fat 8g12%
Saturated Fat 2g13%
Polyunsaturated Fat 2g
Monounsaturated Fat 4g
Cholesterol 4mg1%
Sodium 408mg18%
Potassium 584mg17%
Carbohydrates 57g19%
Fiber 6g25%
Sugar 3g3%
Protein 14g28%
Vitamin A 4401IU88%
Vitamin C 19mg23%
Calcium 126mg13%
Iron 3mg17%
* Percent Daily Values are based on a 2000 calorie diet.

Here’s one more to pin on your Pinterest boards!Garlic Penne Pasta And Veggies is a meatless pasta dish with garlic, spinach, tomatoes, chickpeas and Parmesan. It's ready in 20 minutes!

Cranberry Pineapple Jello Salad

Cranberry Pineapple Jello Salad is a delicious dish for the holidays or any time! Only 4 ingredients and minimum prep time are needed to make it!
Cranberry Pineapple Jello Salad is a delicious dish for the holidays or any time! Only 4 ingredients and minimum prep time needed to make it!

Looking for a fantastic tasting salad to serve for the holidays (or anytime)? This cranberry pineapple Jello salad can be made in advance with very little prep time, and is full of vibrant color and flavor! Best of all… it’s EASY to make, which is wonderful during such a busy time of year, right?

I found the recipe online several years ago, and added it to our holiday favorites rotation! You can make it up to a couple days ahead of time, then top it with whipped cream, mint and orange zest before serving time. You can even prepare it in a Jello salad mold, individual custard cups, or in a 9″ square dish, so you can make this salad your own! Here’s how to make it.

Scroll Down For A Printable Recipe Card At The Bottom Of The Page

Making This Salad Is EASY!

You only need 4 ingredients to make this cranberry pineapple Jello salad. They are 6 ounces raspberry gelatin mix, a large can of crushed pineapple, a can of whole berry cranberry sauce, and the grated zest of an orange. That’s all, and it only takes about 10 minutes or less to prepare! You can choose to garnish the finished salad, of course, but these 4 ingredients are all you will need to make this delicious salad.

Orange zest, whole cranberry sauce, crushed pineapple and raspberry gelatin are the ingredients needed.

Place the raspberry gelatin powder in a large mixing bowl. Add a cup of boiling water, and stir these two ingredients for 2 minutes, to allow time for the gelatin to fully dissolve. Once dissolved, pour in a half cup of very cold water, and stir to combine.

Add the canned pineapple (including juice), whole berry cranberry sauce, and the finely grated zest of an orange. Stir well, until all the jello salad ingredients have been well combined. Hot water is stirred into the raspberry gelatin powder and stirred to dissolve powder.Whole berry cranberry sauce, orange zest and crushed pineapple are added to jello mixture.The cranberry pineapple jello salad mixture is combined and ready to pour into serving dish.

Prepare The Gelatin Salad Mold Or Other Dishes

You have three options for dishes to use to hold the Jello. Lightly coat the bottom and sides of the dish(es) you use with non-stick baking spray before adding the Jello salad. For this recipe you can use either a 6 cup Jello mold, individual custard cups (4 ounce), or a 9″ square pan. NOTE: using small custard cups will yield aprox.16 servings, rather than 8 using the other options).

NOTE: I’ve also successfully used a 5 cup gelatin mold (as seen in the photo below). You will have extra jello left over, but can pour the extra into individual custard cups. I did this to show you another option for serving this salad in individual portions.

After spraying the dish you will be using, pour the Jello mixture into the dish. Lightly cover the dish(es) with plastic wrap, and refrigerate for at least 6 hours until well-chilled and firm. You can also make the salad a couple days ahead of serving time, if necessary, for convenience.

Jello salad mold (or other dishes) is coated with non-stick spray before adding jello.Jello mold and 2 custard cups, filled with cranberry pineapple jello salad, ready to refrigerate.

Releasing The Jello From The Salad Mold For Serving

If using a 9″ square pan or individual custard dishes, you can simple serve the cranberry pineapple Jello salad after it has been refrigerated for at least 6 hours. If you’re using a Jello mold, you will need to carefully unmold it before serving.

To unmold the salad, place very hot water in a large bowl. Holding the Jello mold with both hands, gently submerge it about 2/3 of the way into the hot water. Be careful to not let any water go over the top edge of the Jello mold. Hold the salad mold in the hot water for approximately 30 seconds, then remove it from the water.

Place your serving platter upside down on top of the open part. Hold the platter and Jello mold together with both hands, and carefully flip it over. The salad should release and invert onto the platter. If for some reason it doesn’t come out of the Jello mold immediately, repeat the hot water immersion and try again until it comes out.

Jello salad mold is submerged 2/3 of the way in hot water to help release jello from sides.

Serve The Cranberry Pineapple Jello Salad

The cranberry pineapple Jello salad should be served immediately after it’s been removed from the mold. Slice the salad into pie-shaped wedges, or if using a 9″ square pan, cut into squares for serving.

If you choose to serve this salad with a beautiful garnish, top the salad (or each portion) with whipped cream, a mint sprig and additional orange zest. The garnish will add extra color and flavor to the presentation of this tasty Jello salad!

Two custard cups of jello salad, topped with whipped cream, mint and orange zest.Cranberry Pineapple Jello Salad, out of plastic mold, topped with whipped cream, mint and orange zest.

I’m confident you’re going to enjoy this cranberry pineapple Jello salad for the holidays or any ol’ time of year! It’s so simple to make, and truly does taste wonderful! Thanks for taking the time to stop by, and I hope you’ll come back soon. Take care, may God bless you, and have a GREAT day!

Looking For More HOLIDAY SIDE DISH Recipes?

You can find ALL of my recipes in the Recipe Index, which is located at the top of the page. I have lots of delicious side dish recipes that are perfect holiday recipes (or any day, for that matter). They include:

Interested In More Recipes?

Thank you for visiting this website. I appreciate you using some of your valuable time to do soIf you’re interested, I publish a newsletter 2 times per month (1st and 15th) with all the latest recipes, and other fun info. I would be honored to have you join our growing list of subscribers, so you never miss a great recipe!
There is a Newsletter subscription box on the top right side (or bottom) of each blog post, depending on the device you use, where you can easily submit your e-mail address (only) to be included in my mailing list.

You Can Also Find Me On Social Media:

Facebook page: The Grateful Girl Cooks!
Pinterest:
The Grateful Girl Cooks!
Instagram:
jbatthegratefulgirlcooks

Author's signature

Original recipe source: Sara, at http://www.dinneratthezoo.com/cranberry-pineapple-gelatin-mold/

↓↓ PRINTABLE RECIPE BELOW ↓↓

0 from 0 votes
Cranberry Pineapple Jello Salad
Prep Time
10 mins
Cook Time
0 mins
Inactive Refrigeration Time
6 hrs
Total Time
6 hrs 10 mins
 

Cranberry Pineapple Jello Salad is a delicious dish for the holidays or any time! Only 4 ingredients and minimum prep time needed to make it!

Category: Salad/Side Dish
Cuisine: American
Keyword: cranberry pineapple jello salad
Servings: 8
Calories Per Serving: 204 kcal
Author: JB @ The Grateful Girl Cooks!
Ingredients
  • 6 ounces raspberry gelatin 1 large box or 2 small boxes
  • 20 ounce can crushed pineapple do not drain!
  • 14 ounce can whole berry cranberry sauce
  • 1 zest of one orange
OPTIONAL GARNISHES: whipped cream, orange zest, fresh mint sprig
    Instructions
    1. Place jello mix in large mixing bowl. Add 1 cup boiling water; stir for 2 minutes, to allow time for gelatin to fully dissolve. Pour in ½ cup cold water; stir to combine.

    2. Add pineapple (including juice), cranberry sauce, and grated orange zest. Stir well, until all ingredients have been well-combined.

    3. Lightly coat bottom and sides of the dish(es) you use with non-stick baking spray. Pour jello into prepared dish(es). Lightly cover with plastic wrap; refrigerate at least 6 hours until well-chilled and firm. TIP: You can make this salad a couple days in advance, if necessary.

    4. To unmold jello: Place hot water in a large bowl. Holding jello mold with both hands, gently submerge salad mold about ⅔ of the way in the water. Be careful to not let water go over top edge of salad mold. Hold salad mold in hot water for approx. 30 seconds, then remove. Place serving platter upside down on top of the open part of mold. Hold platter and jello mold tightly together with both hands; carefully flip it over. Salad should release and invert onto the platter. If it doesn't come out of salad mold right away, repeat hot water immersion and try again until it comes out.

    5. If desired, garnish salad with whipped cream, a mint sprig and additional orange zest. Cut into slices and serve. Cover/refrigerate leftovers.

    Recipe Notes

    Caloric calculation does NOT include optional garnishes and is based on eight total servings. If using only 4 ounce custard cups, you will have approx. 16 servings.

    Nutrition Facts
    Cranberry Pineapple Jello Salad
    Amount Per Serving (1 slice (1/8 of total))
    Calories 204 Calories from Fat 2
    % Daily Value*
    Fat 0.2g0%
    Saturated Fat 0.01g0%
    Polyunsaturated Fat 0.04g
    Monounsaturated Fat 0.01g
    Sodium 102mg4%
    Potassium 106mg3%
    Carbohydrates 51g17%
    Fiber 2g8%
    Sugar 44g49%
    Protein 2g4%
    Vitamin A 63IU1%
    Vitamin C 9mg11%
    Calcium 16mg2%
    Iron 0.4mg2%
    * Percent Daily Values are based on a 2000 calorie diet.

    Here’s one more to pin on your Pinterest boards!Cranberry Pineapple Jello Salad is a delicious dish for the holidays or any time! Only 4 ingredients and minimum prep time needed to make it!

    No-Knead Mini Loaves

    No-Knead Mini Loaves are crusty on the outside, soft on the inside and use only 4 ingredients! Makes enough for 5 small artisan bread loaves!
    No-Knead Mini Loaves are crusty on the outside, soft on the inside and use only 4 ingredients! Makes enough for 5 small artisan bread loaves!

    Today I want to share a fabulous recipe I found online a while back. The recipe is unique because you stir up dough in about 5 minutes, let it rise, and then refrigerate the dough until you want to bake a loaf or two of bread. The recipe (as written) will yield 4 large (1 pound) loaves OR if you make them a tiny bit smaller, you can make 5 no knead mini loaves from the dough. My husband and I enjoy the smaller loaves, since they’re the perfect size for the two of us.

    After the dough has risen, it can be kept (covered) in the refrigerator for up to 2 weeks. That means you can have hot baked bread often! Isn’t that awesome? Then, when you want to bake a small loaf for dinner, just pull some of the dough out of the fridge about 1½ hours before you want to eat it. Shape the dough, let it rise for a short time, and then bake it FRESH! We love having enough dough in the fridge to make 5 mini loaves, because it’s so convenient! This amazing dough can also be used to make small dinner rolls, pizza dough, etc. Here’s how to make no knead mini loaves.

    Scroll Down For A Printable Recipe Card At The Bottom Of The Page

    Make The Dough

    To make the dough for this bread, you need to heat water to 100° F. (or 37.7°C). The water needs to be at this temperature when you add the yeast in order to activate it. If the water is too hot,  it can kill the yeast, and we don’t want that to happen! You also want to ensure the yeast you are using is still fresh. If you’re not sure if it’s fresh or not, you can check its viability by doing this.

    Place the 100°F. water in a very large bowl or food-safe container (about 2 gallons), and whisk or stir in the active dry yeast until combined. Now add flour and salt to the liquid mixture and stir WELL to combine. This dough will be very thick and sticky, but just keep stirring until all the ingredients have been successfully combined.

    Dry active yeast is whisked into warm water in a large, 2 gallon bowl.Flour and salt are stirred into the water and yeast to form a sticky bread dough.Thick and sticky, the dough is combined in a large bowl for the no knead mini loaves.

    Let The Dough Rise

    Cover the bowl with plastic wrap, then top the bowl with a kitchen dish towel. Place the bowl on the counter, in a warm place in your kitchen. Let the dough sit at room temperature, undisturbed for 2 hours.

    After the dough has rested at room temperature for 2 hours, place the covered bowl into the refrigerator. Let the bread dough chill in the refrigerator overnight OR until 1½ hours before you want the baked bread to be ready! It should have doubled in size and be ready to go when you are!

    I usually mix up the dough the night BEFORE I want to bake the bread. Then I pull out just enough dough to make a loaf or two, re-cover the remaining dough and pop it back in the fridge until I’m ready to make another fresh loaf. This bread dough will keep (if covered) up to 2 weeks in the refrigerator, so it’s really convenient to have around.

    Bread dough is covered with plastic wrap and sits undisturbed at room temperature for 2 hours.

    Ready To Make No-Knead Mini Loaves!

    Okay… so now you’ve let the bread dough refrigerate overnight and it’s about 1½ hours before you want a nice hot, fresh loaf of bread. Here’s how to make the mini-loaves out of that beautifully risen dough! Remove the plastic wrap from the bowl.

    Flour a banneton proofing basket generously with flour for each loaf you will be making (rice flour or all purpose), then set it aside. NOTE: If you do not have access to a banneton proofing basket, place a large piece of parchment paper on the counter and lightly sprinkle it with flour.

    Pull out a grapefruit sized portion of dough from the refrigerator (return remaining dough to fridge). With floured hands, shape it into a ball, by stretching out the dough and tucking the edges under the bottom of the dough ball. You want it to be smooth on top, and the outer edges tucked under to form a tight, round dough ball. Pinch the dough together on the bottom to seal the edges together as much as possible. Place the dough ball, top-side DOWN, into the prepared banneton. NOTE: If using parchment paper (no banneton), place the dough ball, top side UP onto the parchment paper.

    Dough has risen to double its original size after being refrigerated overnight.Bread dough ball is transferred top side down into a floured banneton basket for rising.

    Time To Bake Some Bread!

    Cover the bread with a dish towel, set the banneton or parchment on the counter, and let it sit and rise at room temp. for 40 minutes. Halfway through this rising time (about 20 minutes), preheat your oven to 425°. At the same time, place a Dutch oven into the oven, so it will preheat, as well.

    Once the dough has risen for 40 minutes, if using a banneton, carefully turn the banneton over onto a large sheet of parchment paper. TIP: Place a large sheet of parchment on a baking sheet, then turn it over to cover the banneton (paper onto banneton with baking sheet on top). Securely hold the baking sheet and banneton with both hands and carefully flip it over to release and invert the dough ball from the banneton onto the parchment paper.

    Remove the hot Dutch oven from the preheated oven. Lift the parchment paper with the bread dough and lower the loaf carefully into the pan. Put the lid on the Dutch oven, place it back into the oven, and let it bake for 30 minutes. Take the lid off and continue baking uncovered for about 5 minutes or so, until the loaf is a light golden brown color on top.

    Bread dough ball, transferred from banneton basket onto parchment paper.When the no knead mini loaves are golden brown in color, they are removed from the oven.

    Who Wants A Warm Slice Of Homemade Bread?

    Remove the pan from the oven, and carefully (it’s HOT) transfer the bread to a wire rack to cool for about 5 minutes before attempting to slice it. Once the no knead mini loaves have cooled slightly, use a serrated knife to cut the warm bread into slices. We usually get between 6-8 thin slices per loaf. Grab some butter, spread it on thick, and enjoy a slice or two of these absolutely delicious no knead mini loaves!

    One of the no knead mini loaves of hot bread, ready to be sliced.Slices of the no knead mini loaves on a wire rack, ready to be buttered and eaten.

    I really hope you enjoy this delicious bread as much as we do! The first time I made an extra loaf for our son (who was sick), and took him some homemade hot soup and a fresh loaf of this bread. He said it was one of the best loaves of bread he has ever had! I really think you’ll enjoy it, too. It is so handy to have the dough already made up and in the fridge for when you want fresh hot bread for dinner! YUM!

    Thank you for stopping by today, and I invite you to come back again soon for more family-friendly recipes! Take care, may God bless you, and have a GREAT day!

    Looking For More BREAD Recipes?

    You can find ALL of my recipes in the Recipe Index, located at the top of the page. I have lots of delicious bread recipes, savory and sweet, including:

    Interested In More Recipes?

    Thank you for visiting this website. I appreciate you using some of your valuable time to do soIf you’re interested, I publish a newsletter 2 times per month (1st and 15th) with all the latest recipes, and other fun info. I would be honored to have you join our growing list of subscribers, so you never miss a great recipe!
    There is a Newsletter subscription box on the top right side (or bottom) of each blog post, depending on the device you use, where you can easily submit your e-mail address (only) to be included in my mailing list.

    You Can Also Find Me On Social Media:

    Facebook page: The Grateful Girl Cooks!
    Pinterest:
    The Grateful Girl Cooks!
    Instagram:
    jbatthegratefulgirlcooks

    Author's signature

    Original recipe source: With thanks to Carolyn Thomas, at: homesteadingfamily.com/no-knead-artisan-bread/

    ↓↓ PRINTABLE RECIPE BELOW ↓↓

    5 from 1 vote
    No-Knead Mini Loaves
    Prep Time
    10 mins
    Cook Time
    35 mins
    Resting Time
    2 hrs
    Total Time
    2 hrs 45 mins
     

    No-Knead Mini Loaves are crusty on the outside, soft on the inside and use only 4 ingredients! Makes enough for 5 small artisan bread loaves!

    Category: Bread
    Cuisine: All Cuisines
    Keyword: no-knead mini loaves
    Servings: 5 small loaves
    Calories Per Serving: 597 kcal
    Author: JB @ The Grateful Girl Cooks!
    Ingredients
    • 3 cups water at 100°F. temperature
    • 2 Tablespoons active dry yeast
    • cups all purpose flour or combo of whole wheat/all purpose
    • Tablespoons sea salt
    Instructions
    To Make Dough:
    1. Place the 100°F. water in a very large bowl or food-safe container (about 2 gallons), and whisk or stir in the active dry yeast until combined. Now add flour and salt to the liquid mixture and stir WELL to combine. This dough will be very thick and sticky, but just keep stirring until all the ingredients have been successfully combined.

    2. Cover the bowl with plastic wrap, then top the bowl with a kitchen dish towel. Place the bowl on the counter, in a warm place in your kitchen. Let the dough sit at room temperature, undisturbed for 2 hours.

      After the dough has rested at room temperature for 2 hours, place the covered bowl into the refrigerator. Let the bread dough chill in the refrigerator overnight OR until 1½ hours before you want the baked bread to be ready! It should have doubled in size.

    To Make Loaves: (Begin 1½ hours before you want a fresh loaf)
    1. Flour a banneton proofing basket (for each loaf) generously with flour; set aside. NOTE: If not using a banneton, place a large piece of parchment paper on the counter; sprinkle with flour.

      Pull out a grapefruit-sized amount of dough from bowl (return remaining dough to fridge). With floured hands, shape it into a ball, by stretching out dough and tucking edges under the bottom. You want it smooth on top, and outer edges tucked under, forming a tight, round dough ball. Pinch dough edges together on the bottom to seal edges as much as possible. Place dough ball, top-side DOWN, into prepared banneton. NOTE: If using parchment paper (no banneton), place dough ball, top side UP onto prepared parchment paper.

    2. Cover bread with a dish towel. Set banneton or parchment on counter; let it sit/rise at room temp. for 40 minutes. Halfway through rising time (20 minutes), preheat oven to 425°. Place Dutch oven into the oven, so it will preheat, as well.

    3. Once dough has sat for 40 minutes, if using a banneton, carefully turn the banneton over onto a large sheet of parchment paper. TIP: Place a large sheet of parchment paper on a baking sheet, then turn it over on top of the banneton (paper onto banneton with baking sheet on top). Securely hold baking sheet and banneton with both hands; carefully flip it over to release and invert the dough ball from banneton onto parchment.

    4. Remove Dutch oven from the preheated oven (it's HOT). Lift parchment paper with dough ball; lower loaf carefully into pan. Put the lid on Dutch oven; place back in oven; bake for 30 minutes. Remove lid; continue baking uncovered for about 5 minutes, until loaf is light golden brown in color.

    5. Remove pan from oven. Carefully lift paper/bread loaf out; transfer bread to wire rack to cool 4-5 minutes before slicing with a serrated knife. Enjoy!

    6. NOTE: Dough will keep, (covered in fridge) up to 2 weeks. Each time you want a fresh loaf, follow instructions above for making a new loaf!

    Nutrition Facts
    No-Knead Mini Loaves
    Amount Per Serving (1 loaf (1/5 of total))
    Calories 597 Calories from Fat 18
    % Daily Value*
    Fat 2g3%
    Saturated Fat 0.3g2%
    Polyunsaturated Fat 1g
    Monounsaturated Fat 0.2g
    Sodium 2104mg91%
    Potassium 190mg5%
    Carbohydrates 125g42%
    Fiber 5g21%
    Sugar 0.4g0%
    Protein 17g34%
    Vitamin C 0.004mg0%
    Calcium 30mg3%
    Iron 8mg44%
    * Percent Daily Values are based on a 2000 calorie diet.

    Here’s one more to pin on your Pinterest boards!No-Knead Mini Loaves are crusty on the outside, soft on the inside and use only 4 ingredients! Makes enough for 5 small artisan bread loaves!

    Banana Streusel Coffeecake

    Banana Streusel Coffeecake is a yummy breakfast treat, featuring a banana sour cream coffeecake with a brown sugar cinnamon crumb topping.
    Banana Streusel Coffeecake is a yummy breakfast treat, featuring a banana sour cream coffeecake with a brown sugar cinnamon crumb topping.

    We LOVE coffeecake! How about you? There’s just something about a slice of delicious coffeecake to go with my big old mug of hot coffee in the morning! Today I want to share this recipe for a delicious banana streusel coffeecake that is simple to make, and tastes wonderful!

    This coffeecake is truly not difficult to prepare, and yields 12 slices of yummy coffeecake, perfect for a breakfast or afternoon snack! Here’s how to make this treat.

    Scroll Down For A Printable Recipe Card At The Bottom Of The Page

    Prepare The Coffeecake Batter

    BEFORE YOU BEGIN: Preheat your oven to 350°F.  You will also need to line a 9″ cake pan with parchment paper (extending the paper to overhang the edges of the pan).

    Leave parchment paper hanging over the sides, because you will lift the finished coffeecake out of the pan later using the excess paper as “handles”. Lightly spray the parchment paper with non-stick baking spray.

    Okay… now it’s time to make the batter for this coffeecake. Place melted butter, granulated sugar, brown sugar, an egg plus an egg yolk, sour cream and coffee powder in a large mixing bowl. Mix these wet ingredients together until combined and the batter is smooth. Add mashed bananas to the bowl and stir until the mashed bananas have been fully incorporated into the batter.

    Batter ingredients for the coffeecake are combined in a large mixing bowl.Mashed bananas are added to the batter and mixed until the batter becomes smooth and thick.

    Combine And Add Dry Ingredients To Batter

    In a separate bowl, whisk together all purpose flour, baking soda and salt. These are the dry ingredients. Add the dry ingredients a little bit at a time to the wet ingredients (the batter), and stir only until all ingredients have been combined. Don’t overmix! You will be left with a fairly thick coffeecake batter. Set this aside while you make the streusel topping.

    Flour, baking soda and salt are whisked together until combined.The flour mixture is then added, a little at a time, to the wet banana batter.A very thick batter is now ready to pour into the baking pan.

    Make The Streusel Topping

    Place flour, brown sugar, salt, cinnamon, and small chunks of COLD butter in a medium bowl. Use a hand held pastry blender, two forks (or your fingers), and cut the butter into the other ingredients until the streusel crumbs become about the size of peas.

    Flour, salt, brown sugar, cinnamon and cold butter are placed in bowl to combine into topping.A pastry cutter is used to cut the cold butter into the streusel topping.

    Bake The Banana Streusel Coffeecake

    Spread the banana streusel coffeecake batter evenly in the parchment paper-lined cake pan. Sprinkle all of the streusel topping over the top of the batter, making sure to coat the entire surface.

    Coffeecake batter is spread into a parchment paper lined cake pan.Streusel topping is sprinkled over the entire top surface of the coffeecake.

    Bake the coffeecake at 350°F. for about 45 minutes OR until a toothpick inserted into the top middle of the coffeecake comes out clean. Your time may vary just a bit due to oven temperature variations. When done, remove the pan from the oven, and transfer it to a wire rack to cool.

    Let the banana streusel coffeecake cool for 10-15 minutes, then carefully lift it up and out of the pan by using the parchment paper “handles”. Place the coffeecake back onto the wire rack and let it cool completely before removing the parchment paper.

    After baking, the banana streusel coffeecake cools in the pan, on a wire rack.

    Who Wants A Slice Of Banana Streusel Coffeecake?

    When the banana streusel coffeecake has cooled completely (to room temperature), remove the parchment paper from the sides and bottom. Now this delicious coffeecake is ready to slice and serve! We feel this coffeecake tastes the absolute best when served at room temperature! Cut the coffeecake into 12 wedges and serve with a steaming cup of coffee, tea OR a big old glass of cold milk. YUM!

    The recipe will yield 12 nice sized pieces, and any leftovers will keep (covered, at room temp.) for several days. Any leftover coffeecake slices can also be frozen, if wrapped and stored in an airtight container or wrapped well in aluminum foil.

    The banana streusel coffeecake is cut into wedge shaped pieces before serving.One slice of the banana streusel coffeecake, on a white plate, ready to be eaten.

    I really hope you try this absolutely delicious banana streusel coffeecake. I’m confident you’re going to love it! Thank you for stopping by, and please come back again soon for more family-friendly recipes. Take care, may God bless you, and have a GREAT day!

    Looking For More COFFEECAKE Recipes?

    You can find ALL of my recipes in the Recipe Index, which is located at the top of the page. I have a nice variety of coffeecake recipes for you to check out, including:

    Interested In More Recipes?

    Thank you for visiting this website. I appreciate you using some of your valuable time to do soIf you’re interested, I publish a newsletter 2 times per month (1st and 15th) with all the latest recipes, and other fun info. I would be honored to have you join our growing list of subscribers, so you never miss a great recipe!
    There is a Newsletter subscription box on the top right side (or bottom) of each blog post, depending on the device you use, where you can easily submit your e-mail address (only) to be included in my mailing list.

    You Can Also Find Me On Social Media:

    Facebook page: The Grateful Girl Cooks!
    Pinterest:
    The Grateful Girl Cooks!
    Instagram:
    jbatthegratefulgirlcooks

    Author's signature

    Original recipe adapted from Lauren Miyashiro at: https://www.delish.com/cooking/recipe-ideas/recipes/a57269/banana-bread-coffee-cake-recipe/

    ↓↓ PRINTABLE RECIPE BELOW ↓↓

    0 from 0 votes
    Banana Streusel Coffeecake
    Prep Time
    15 mins
    Cook Time
    45 mins
    Total Time
    1 hr
     

    Banana Streusel Coffeecake is a yummy breakfast treat, featuring a banana sour cream coffeecake with a brown sugar cinnamon crumb topping.

    Category: Breakfast, Desssert, Snack
    Cuisine: American
    Keyword: banana streusel coffeecake
    Servings: 12 slices
    Calories Per Serving: 336 kcal
    Author: JB @ The Grateful Girl Cooks!
    Ingredients
    For Coffeecake Batter:
    • 2 cups all purpose flour
    • 1 teaspoon baking soda
    • ½ teaspoon salt
    • ½ cup butter melted (½ cup= 1 stick)
    • ¾ cup granulated sugar
    • ¼ cup brown sugar
    • 1 large egg + 1 egg YOLK
    • ¼ cup sour cream
    • 1 teaspoon vanilla extract
    • ¾ teaspoon instant coffee granules (finely ground) or espresso powder
    • 3 bananas (very ripe) mashed
    For Streusel Topping:
    • ½ cup all purpose flour
    • ½ cup brown sugar
    • ¼ teaspoon salt
    • ¼ teaspoon ground cinnamon
    • 4 Tablespoons cold butter cut in small cubes
    Instructions
    1. Preheat oven to 350°F.  Line a 9" cake pan with parchment paper, leaving some parchment paper hanging over the sides. You'll lift the coffeecake out of the pan later using excess paper as "handles". Lightly spray parchment paper with non-stick baking spray. Set pan aside.

    2. Make Batter: Place melted butter, sugar, brown sugar, an egg plus an egg yolk, sour cream and coffee powder in a large bowl. Mix together until combined and smooth. Add mashed bananas; stir until they're fully incorporated into the batter.

    3. In separate bowl, whisk together flour, baking soda and salt. Add this dry mix a little at a time to the wet batter. Stir only until ingredients have been combined. Don't overmix! Set bowl aside.

    4. Make streusel: Place flour, brown sugar, salt, cinnamon, and chunks of COLD butter in a medium bowl. Use a hand held pastry blender, two forks (or your fingers), to cut the butter in until the streusel crumbs are about the size of peas.

    5. Spread batter evenly in the parchment paper-lined cake pan. Sprinkle the streusel topping over the batter, coating the entire surface.

    6. Bake coffeecake at 350°F. for 45 minutes OR until a toothpick inserted into the top middle of the coffeecake comes out clean. Your time may vary a bit due to oven temperature variations. When done, remove pan from oven; transfer to a wire rack to cool in pan for 10-15 minutes, then carefully lift it out of the pan by using the parchment paper "handles". Place coffeecake back on wire rack; cool completely before removing parchment paper.

    7. Remove parchment paper from coffeecake sides and bottom. Cut the coffeecake into 12 wedges and serve. Enjoy!

    Nutrition Facts
    Banana Streusel Coffeecake
    Amount Per Serving (1 slice (1/12 of total))
    Calories 336 Calories from Fat 117
    % Daily Value*
    Fat 13g20%
    Saturated Fat 8g50%
    Trans Fat 0.5g
    Polyunsaturated Fat 1g
    Monounsaturated Fat 3g
    Cholesterol 48mg16%
    Sodium 342mg15%
    Potassium 174mg5%
    Carbohydrates 53g18%
    Fiber 1g4%
    Sugar 30g33%
    Protein 4g8%
    Vitamin A 410IU8%
    Vitamin C 3mg4%
    Calcium 30mg3%
    Iron 1mg6%
    * Percent Daily Values are based on a 2000 calorie diet.

    Here’s one more to pin on your Pinterest boards!Banana Streusel Coffeecake is a yummy breakfast treat, featuring a banana sour cream coffeecake with a brown sugar cinnamon crumb topping.

    Classic Turkey Croquettes

    Use leftover turkey to make Classic Turkey Croquettes! An old diner favorite, with turkey, potatoes and spices, baked and topped with gravy.
    Use leftover turkey to make Classic Turkey Croquettes! An old diner favorite, with turkey, potatoes and spices, baked and topped with gravy.

    After Thanksgiving has come and gone, and all the turkey sandwiches have been enjoyed, do you ever glance at the remaining turkey meat leftover and wonder what to do with the rest of it?

    Well, today I want to share with you a recipe for classic turkey croquettes, that are a perfect solution for that leftover turkey!

    What Is A CROQUETTE?

    First let’s talk about what a “croquette” is, ok? Many countries have their own version, but the word “croquette” has French origins, and comes from the word “croquer” which means “to crunch”. There are recipes for croquettes that date back to the 17th century!

    Croquettes typically contain meat, seafood or veggies, mixed with a thick “binder” to hold it all together, like potatoes, bread or sauces. They can be shaped into balls or oval disks, and are usually breaded and then deep fried. *Info source credit here.*

    Apparently, croquettes started becoming popular in the U.S. in the early 1900’s and were a common, but popular diner meal.

    I originally found this printed recipe taped onto an index card in an old recipe box. There was no mention on the card of the source, so I am grateful for whoever came up with this yummy recipe originally.

    These turkey croquettes are good old comfort food at its best! Here’s how to make classic turkey croquettes.

    Scroll Down For A Printable Recipe Card At The Bottom Of The Page

    Prepare Potatoes For The Filling

    The first thing I do when preparing this recipe is to preheat the oven to  350°F. and cook the potatoes. Now… if you just happen to have 2 cups of mashed potatoes lying around, by all means use them! I typically don’t, so I make them from scratch.

    You’ll need 2 cups of mashed potatoes for this recipe, which is the equivalent of about 3 medium-sized russet potatoes. Peel the potatoes, then cut them into small chunks. Place them in a large saucepan and cover them with water.

    Bring the water to a full boil on medium-high heat, and then cook the potatoes until they’re tender. This usually takes about 15 minutes, and you can check for tenderness by inserting a knife into a potato chunk. It should glide right into the potato, if tender.

    Drain the potatoes, then mash them, without adding any butter or milk. Mash by hand or by using an electric mixer until the potatoes are lump-free. Set aside.

    Peeled and cubed potatoes are boiled until tender.The cooked potatoes are mashed with an electric mixer until lump-free.

    Prepare The Croquette Ingredients

    Place the leftover pieces of turkey into a food processor and pulse about 6-8 times or until the meat become minced into very small pieces.

    If you do not have access to a food processor, finely mince the turkey meat by hand with a sharp knife. Place 2 cups of the minced turkey in a large mixing bowl. 

    Add chopped onions, Italian bread crumbs (reserving part for later), salt, pepper, tarragon, sage, Worcestershire sauce and an egg to the turkey.

    Stir these ingredients well, to fully combine them. Once combined, add the mashed potatoes to the mixture, and fold (or gently stir) them in, until fully incorporated.

    Pieces of leftover turkey are minced, using a food processor.Turkey, bread crumbs, egg, onions and spices are placed in large mixing bowl and combined.Mashed potatoes are added and folded in to the meat mixture for turkey croquettes.

    Final Step

    After folding in the mashed potatoes, the turkey croquette mixture will be mostly “bound together”, but might still be a bit crumbly. This is where you need to add a small amount of turkey or chicken stock, ONLY UNTIL THE MIXTURE BINDS TOGETHER.

    The recipe calls for 1/2 cup of stock, but it usually does not take all of it to bind the ingredients together.

    Add a little bit of the stock at a time, and stir after each addition. You need the meat mixture to easily be formed into a meatball shape, where the ingredients will hold together.

    Potatoes have been added to the turkey croquette mixture and combined.A small amount of turkey or chicken stock is added to help bind the turkey mixture together.

    Shape The Turkey Croquettes

    Form the turkey croquettes into a meatball shape, by scooping out a generous heaping Tablespoon of the meat mixture and shape it into a ball using your hands to roll and form it.

    Place each croquette onto wax paper, and continue until all the turkey mixture is used. The recipe, as written, will yield somewhere between 16-20 meatballs, but I usually get 19!

    Place the reserved bread crumbs on a small plate, and roll each of the turkey croquettes around in it, until all sides are coated with the bread crumbs. 

    Heaping Tablespoons of turkey mixture is shaped into round balls.Each of the classic turkey croquettes are rolled in Italian bread crumbs before baking.

    Ready To Bake

    Place the bread crumb-coated turkey croquettes onto an ungreased baking sheet, leaving a little space between each one.

    Bake the croquettes at 350°F. for 28-30 minutes (mine usually take 30 minutes!) Please note that the baked croquettes will not brown a lot, so don’t expect that!

    TIP: If you want to freeze some of the classic turkey croquettes for later use, do this BEFORE baking. Place the bread crumb-coated croquettes on a baking sheet and freeze for several hours until solidly frozen.

    Remove them from the baking sheet and place them in a freezer bag, label with oven temps, etc., and save for another day!

    Bread crumb-coated turkey croquettes are placed on baking sheet to cook in the oven.One of the baked classic turkey croquettes after coming out of the oven.

    Serving Classic Turkey Croquettes

    Classic turkey croquettes are always topped with hot chicken or turkey gravy to serve. Please note that I have not included a gravy recipe in the written recipe below.

    You can use your own homemade chicken or turkey gravy, OR you can use purchased bottled gravy or mix at the grocery store. The type of gravy you use is entirely YOUR CHOICE, but just know that you really will want that delicious, hot gravy on top!

    Place the hot croquettes on each plate, then spoon gravy over the top of each one, to serve. If you prefer store bought or making your own, by all means, use it! Whatever is the most convenient and the easiest for you, is the best plan! No judgement here.

    We enjoy eating classic turkey croquettes served with fresh green beans (from our garden!), and Cranberry Caramel Apple Yams on the side. This meal “felt” like Thanksgiving, with all those great colors and flavors. YUM YUM!

    Classic turkey croquettes are covered with gravy, and served with green beans and yams on the side.One of the classic turkey croquettes is cut in half to reveal the inside.

    I hope you will consider trying these classic turkey croquettes, and trust you will enjoy them like we do! They can easily be reheated in the microwave, which makes perfect for a quick lunch the next day or two!

    We eat part of them for dinner, have a few leftovers for lunch the next day or two, plus I freeze about half of them (before baking) to use for later meals. It’s really easy on the ol’ budget that way, too!

    Thank you so much for stopping by, and I hope you will come back soon for more family-friendly recipes. Take care, may God bless you with much to be thankful for, and have a GREAT day!

    Looking For More TURKEY Recipes?

    You can find ALL of my recipes in the Recipe Index, which is located at the top of the page. I have some truly delicious recipes using turkey, including:

    Want More Recipes? Get My FREE Newsletter!

    I publish a newsletter 2 times per month (1st and 15th) with lots of recipes, tips, etc..
    Would you like to join our growing list of subscribers?

    There is a Newsletter subscription box on the top right (or bottom) of each blog post, depending on the device you use.
    You can submit your e-mail address there, to be added to my mailing list.

    Find Me On Social Media:

    Facebook page: The Grateful Girl Cooks!
    Pinterest:
    The Grateful Girl Cooks!
    Instagram:
    jbatthegratefulgirlcooks

    Author's signature

    Original recipe source: unknown

    ↓↓ PRINTABLE RECIPE BELOW ↓↓

    0 from 0 votes
    Classic Turkey Croquettes
    Prep Time
    25 mins
    Cook Time
    30 mins
    Total Time
    55 mins
     

    Use leftover turkey to make Classic Turkey Croquettes! An old diner favorite, with turkey, potatoes and spices, baked and topped with gravy.

    Category: Main Course
    Cuisine: American
    Keyword: classic turkey croquettes
    Servings: 6 (3 per serving)
    Calories Per Serving: 277 kcal
    Author: JB @ The Grateful Girl Cooks!
    Ingredients
    • 2 cups cooked turkey meat minced
    • 1 cup yellow onions chopped
    • 2 cups Italian bread crumbs (or plain) DIVIDED USE!
    • 2 teaspoons Worcestershire sauce
    • ½ teaspoon poultry seasoning (or ground sage)
    • ½ teaspoon dried tarragon
    • 1 large egg lightly beaten
    • ¼ teaspoon salt and pepper (EACH)
    • 2 cups mashed russet potatoes approx. 3 medium
    • ½ cup turkey or chicken stock use only enough to bind meat
    Top croquettes with your choice of homemade or purchased turkey or chicken gravy (heated)
      Instructions
      1. Preheat oven to  350°F.

      2. Peel potatoes; cut into small chunks; place them in a large saucepan/cover with water. Bring to full boil on medium-high heat. Cook until they're tender (approx. 15 min.). Check tenderness by inserting knife into potato (should glide right into potato). Drain potatoes, then mash, by hand or mixer until lump-free. Set aside.

      3. Place cooked turkey into food processor; pulse 6-8 times or until turkey is minced into small pieces, OR mince turkey by hand with a sharp knife. Put turkey in large bowl. Add onions, 1½ cups bread crumbs (reserving ½ cup for later), salt, pepper, tarragon, sage, Worcestershire and egg to bowl. Stir well, to combine. Add mashed potatoes; fold (or gently stir) them in, until fully incorporated.

      4. Add turkey/chicken stock a little bit at a time, stirring it into turkey mixture ONLY until turkey mixture binds together (usually doesn't take all of it to bind the ingredients together.

      5. Scoop a generous heaping Tablespoon of turkey mixture and shape it into a ball using hands to roll/form it. Place croquette onto wax paper; continue until all turkey mixture is gone. **Recipe (as written) yields between 16-20 croquettes.

      6. Place reserved ½ cup bread crumbs on a small plate. Roll each turkey croquette in it, until coated on all sides with bread crumbs.

      7. Put croquettes on ungreased baking sheet, leaving space between each one. Bake at 350°F. for 28-30 minutes. Note that baked croquettes will not brown a lot. **TIP: If you want to freeze some croquettes for later use, do this BEFORE baking. Place bread crumb-coated croquettes on foil-lined baking sheet. Freeze several hours until solidly frozen. Remove croquettes from foil; place in a freezer bag, label with oven temps, etc., and save for another day!

      8. To serve: Classic turkey croquettes should be topped with turkey or chicken gravy to serve. Use your own homemade or purchased gravy for this. Place baked croquettes on serving plates. Spoon hot gravy over each croquette to serve.

      Recipe Notes

      Caloric calculation was made using 3 croquettes per serving. Gravy to top croquettes was not included in the Caloric calculation, as different varieties may be used.

      Nutrition Facts
      Classic Turkey Croquettes
      Amount Per Serving (1 (3 croquettes))
      Calories 277 Calories from Fat 36
      % Daily Value*
      Fat 4g6%
      Saturated Fat 1g6%
      Trans Fat 0.01g
      Polyunsaturated Fat 1g
      Monounsaturated Fat 1g
      Cholesterol 63mg21%
      Sodium 756mg33%
      Potassium 504mg14%
      Carbohydrates 40g13%
      Fiber 3g13%
      Sugar 4g4%
      Protein 19g38%
      Vitamin A 151IU3%
      Vitamin C 6mg7%
      Calcium 102mg10%
      Iron 3mg17%
      * Percent Daily Values are based on a 2000 calorie diet.

      Here’s one more to pin on your Pinterest boards!Use leftover turkey to make Classic Turkey Croquettes! An old diner favorite, with turkey, potatoes and spices, baked and topped with gravy.

      Pumpkin Cream Cheese Roll

      Make a delicious Pumpkin Cream Cheese Roll for the holidays (or any time)! This classic dessert has sweet cream cheese filling rolled inside!
      Make a delicious Pumpkin Cream Cheese Roll for the holidays (or any time)! This classic dessert has sweet cream cheese filling rolled inside!

      I don’t know about you, but I LOVE the classic Fall flavors of pumpkin, cinnamon, nutmeg and cloves! This dessert takes those flavors and imports them into a thin cake that is spread with sweet cream cheese filling and rolled into a long “log” of sorts. After chilling, the pumpkin roll is sliced, revealing the spiral shaped cream cheese filling.

      This pumpkin cream cheese roll not only LOOKS good, it tastes WONDERFUL! NOTE: Don’t be scared off by the amount of photos or the long recipe card instructions! I only want to give you explicit instructions so you, too, can be confident in making this recipe! Today I want to share all this so you see how simple it actually is to make this lip-smackin’ dessert!

      My youngest sister Joni recently visited us in Oregon from her home in Georgia. I asked her before she got here to email me the recipe she’s used for years to make pumpkin rolls, and told her we’d make it together (and photograph the steps), so I could share it here on my blog. We had fun making this pumpkin roll, and shared it with our extended family at a dessert night. So… here’s how to make a delicious pumpkin cream cheese roll for holidays, Fall, or any time of year!

      Scroll Down For A Printable Recipe Card At The Bottom Of The Page

      First Things First

      Preheat your oven to 350°F. while you prepare the pumpkin roll. Grease and flour a 10″ by 15″ cookie sheet or jelly roll pan GENEROUSLY. I can’t say this enough. You need to generously grease then generously flour the bottom and sides of the pan, so the cake will release easier when you flip it out of the pan later. This is the method I used in the photos below.

      Another option for preparing the baking sheet is to lightly grease the pan, then place a large sheet of parchment paper in the pan (to fit). Use softened butter to then generously “grease” the parchment paper (all of it) before adding the pumpkin batter to the pan.

      Make The Pumpkin Batter

      Beat eggs and granulated sugar using an electric mixer on High speed in a large bowl (or stand mixer bowl). Continue beating these two ingredients for about 1-2 minutes until well-combined and the sugar has dissolved.

      Mix in pumpkin puree and lemon juice on Low speed only until they have been incorporated into the egg mixture. In a separate medium bowl, whisk together flour, baking powder, salt, nutmeg, cinnamon and cloves. STIR the dry ingredients into the pumpkin batter until combined.

      Eggs and sugar are beaten with an electric mixer until sugar dissolves.Pumpkin puree and lemon juice are mixed into the egg mixture for the pumpkin roll batter.Flour, cinnamon, nutmeg, cloves and other ingredients are added to the pumpkin batter.

      Time To Bake!

      Pour the pumpkin batter into the prepared baking pan, and spread it out, evenly filling the pan. Place the pan into a preheated 350° oven. Bake for 12-15 minutes, or until a toothpick inserted into the top/middle comes out clean. Another way to test for doneness is by lightly touching the surface of the cake with a finger. If the “cake” springs back, it should be done.

      Pumpkin roll batter is spread in a large greased/floured cookie sheet.

      Prepare Damp Towel For Cake While It’s Baking

      A few minutes before the cake is done baking, wet a large kitchen dish towel with water and then wring the excess water out. Lay the very damp towel on the kitchen counter and GENEROUSLY sift powdered sugar over the surface. You want enough powdered sugar to be the same size/shape as the baking pan. The cake will be turned out onto the towel, and the powdered sugar will help the cake to not stick.

      Sifted powdered sugar is used to cover a damp kitchen towel where the baked cake will go.

      Remove Cake From Pan Immediately After Baking

      As soon as the cake is finished baking, check for doneness, and remove the pan from the oven. Use an offset spatula (or regular long one) to loosen all the edges (sides and under) the cake. You may find you need to really get the spatula under that pumpkin roll to loosen it from the pan. Carefully slide the spatula around under the cake, trying not to cut up the cake with the spatula as much as possible. NOTE: If using the alternative parchment paper method, simply go around the edges of the cake to loosen from the sides.

      Using oven mitts, hold the pan on both of the short sides of the pan, and immediately invert (flip over) the pan of “loosened” cake onto the powdered sugar on the damp towel. It may not look perfect, but remember that this “top surface” will be covered with the cream cheese filling later! NOTE: Remove the parchment paper carefully (if you used that method). NOW it’s time to roll the cake up while it is still hot.

      The pumpkin cake is removed from the oven after baking, and edges are loosened from pan.Pumpkin cake is inverted onto the powdered sugar lined damp dish towel while still hot.

      Rolling Up The Cake With The Towel Inside

      Beginning with the LONG side of the pumpkin roll, fold the still damp towel over the bottom edge of the cake (about 2″ or so). Carefully and tightly roll the towel INTO the cake as you go. Roll until it is completely rolled up and the “seam” side is on the bottom.

      Once rolled (with the towel inside), let the pumpkin roll sit and rest/cool on the counter for 30 minutes, before proceeding to the next step.

      The damp dish towel is rolled up into the pumpkin cake to form a long roll.Finishing rolling up the damp dish towel and pumpkin cake into a log shape, before it rests.

      Fill the Pumpkin Roll And Roll Again

      Okay… once the cake is rolled in the towel and “resting”, it’s time to make the simple cream cheese filling! Place cream cheese, butter, a cup of powdered sugar and vanilla extract in a medium bowl. Use an electric mixer to beat these ingredients until smooth, fully combined and lump-free.

      After the pumpkin roll has cooled (rolled in the towel) for 30 minutes, carefully unroll the cake. Evenly spread the cream cheese filling over the surface of the cake, all the way to the edges.

      Now you need to re-roll the cake, but this time only use the towel to help guide the rolling. You will now roll the cream cheese covered cake up tightly, starting again on the long side, but rolling the cake by itself (no towel IN the cake). The towel is simply used to help roll the cake as one long unit (see 3rd photo of my sister rolling it below). Your pumpkin roll should now be fully rolled up only as cake and filling.

      Cream cheese, butter, powdered sugar and vanilla are combined for pumpkin roll filling.The cream cheese filling is spread on the unrolled pumpkin cake after it has rested.Now the pumpkin cream cheese roll is re-rolled without the dish towel rolled up inside.

      Wrap And Chill for Best Results

      Carefully transfer the finished pumpkin roll to a large sheet of parchment paper and carefully seal the cake. Place the parchment paper-wrapped roll onto a large sheet of aluminum foil, and wrap and seal the package. At this point, you can either freeze the pumpkin roll to be thawed later OR refrigerate it to serve it chilled that same day.

      This pumpkin cream cheese roll freezes well, and only needs to thaw for 15-25 minutes before slicing and serving it.  This makes it very convenient to make this dessert ahead of time if that works best for you! When you want to enjoy the pumpkin roll, just pull it out of the freezer, unwrap, and let it thaw slightly! The pumpkin roll tastes best when served slightly chilled.

      The pumpkin cream cheese roll will now be well-wrapped and refrigerated or frozen before serving.

      Serve The Pumpkin Cream Cheese Roll

      Transfer the pumpkin cream cheese roll to a large serving platter, and give it a good dusting of sifted powdered sugar right before slicing. The cake may absorb some of the powdered sugar, so if you see that, simply sift a bit more on top for a light dusting! It’s so pretty to decorate the platter with some Autumn colors or garnishes of your choice to add to the Fall theme!

      Cut the pumpkin roll with a sharp knife into 10 slices, then serve, sliced side up! Once sliced, you will be able to see the spiraled cream cheese filling inside the pumpkin roll. The combination of the pumpkin flavored cake (seasoned with cinnamon, nutmeg and cloves) screams “Fall”, and the cream cheese filling sends it over the top! It’s so yummy, and we think it’s a perfect Fall or Thanksgiving dessert! Be sure to store any leftovers (wrapped well) in the refrigerator.

      The pumpkin cream cheese roll is sprinkled with powdered sugar before slicing to serve.A slice of the pumpkin cream cheese roll reveals the spiraled cream cheese filling inside.

      I hope you have the opportunity to make this fabulous pumpkin cream cheese roll for those you love, and trust you enjoy it’s great flavor! Thanks for taking time out of your busy day to stop by! I invite you to come back again soon for more family-friendly recipes. Take care, may God bless you, and have a GREAT day!

      Looking for More PUMPKIN Recipes?

      You can find ALL of my recipes in the Recipe Index, which is located at the top of the page. I have some delicious recipes featuring pumpkin to enjoy, including:

      Interested In More Recipes?

      Thank you for visiting this website. I appreciate you using some of your valuable time to do soIf you’re interested, I publish a newsletter 2 times per month (1st and 15th) with all the latest recipes, and other fun info. I would be honored to have you join our growing list of subscribers, so you never miss a great recipe!
      There is a Newsletter subscription box on the top right side (or bottom) of each blog post, depending on the device you use, where you can easily submit your e-mail address (only) to be included in my mailing list.

      You Can Also Find Me On Social Media:

      Facebook page: The Grateful Girl Cooks!
      Pinterest:
      The Grateful Girl Cooks!
      Instagram:
      jbatthegratefulgirlcooks

      Author's signature

      Original recipe source: my sister Joni (she does not remember where she got the recipe from, many years ago)

      ↓↓ PRINTABLE RECIPE BELOW ↓↓

      0 from 0 votes
      Pumpkin Cream Cheese Roll
      Prep Time
      10 mins
      Cook Time
      14 mins
      Resting Time (cooling)
      30 mins
      Total Time
      54 mins
       

      Make a delicious Pumpkin Cream Cheese Roll for the holidays (or any time)! This classic dessert has sweet cream cheese filling rolled inside!

      Category: Dessert, Holidays
      Cuisine: American
      Keyword: pumpkin cream cheese roll
      Servings: 10 slices
      Calories Per Serving: 272 kcal
      Author: JB @ The Grateful Girl Cooks!
      Ingredients
      For Pumpkin Roll:
      • 3 large eggs
      • 1 cup granulated sugar
      • cup pumpkin puree NOT pie filling!
      • 1 teaspoon lemon juice
      • ¾ cup all purpose flour
      • 1 teaspoon baking powder
      • ½ teaspoon salt
      • 1 teaspoon ground cloves
      • 1 teaspoon ground cinnamon
      • 1 teaspoon ground nutmeg
      • **damp dish towel and powdered sugar for dusting
      For Filling:
      • 8 ounces cream cheese softened
      • 4 Tablespoons butter softened
      • 1 cup powdered sugar
      • 1 teaspoon vanilla extract
      • powdered sugar for dusting
      Instructions
      1. Preheat oven to 350°F. Option #1: Generously grease/flour a 10" x 15" cookie sheet or jelly roll pan. Option#2: Lightly grease pan; place parchment paper in pan (to fit). Use butter to generously "grease" parchment paper (all of it).

      2. Beat eggs and sugar in large bowl with electric mixer on High. Continue beating for 1-2 minutes until well-combined/sugar dissolves. Add pumpkin and lemon juice. Beat on Low only until incorporated into egg mixture. In a separate bowl, whisk together flour, baking powder, salt, nutmeg, cinnamon and cloves. STIR this into pumpkin mixture until combined.

      3. Pour batter into prepared pan; spread it evenly in pan. Place in oven. Bake at 350°F for 12-15 minutes, or until a toothpick inserted into the top/middle comes out clean, OR lightly touching the cake surface with a finger. If cake springs back, it should be done.

      4. 3-4 minutes before cake is done, soak a kitchen dish towel with water; wring excess water out. Lay damp towel on counter; GENEROUSLY sift powdered sugar over towel in same size/shape as the baking pan. Cake will be turned out onto the towel; powdered sugar will help it to not stick.

      5. When cake is done, remove from oven and immediately use an offset or regular metal spatula to loosen all edges (sides and under) the cake. Carefully slide spatula around under cake, to loosen it as much as possible. NOTE: If using alternative parchment paper method, simply run spatula around edges of cake to loosen. Using oven mitts, hold pan on both short sides; immediately invert (flip over) pan of "loosened" cake onto powdered sugar on towel. It may not look perfect, but this will be covered with cream cheese filling later! NOTE: Peel parchment paper carefully off cake (if you used that method).

      6. Roll the cake while it's still hot. Beginning with the LONG side, fold damp towel over bottom edge of the cake (about 2"). Carefully and tightly roll towel INTO the cake, forming a log-shaped roll. Continue until fully rolled and "seam" side is on the bottom. Once rolled (with towel inside), let it cool for 30 minutes.

      7. While cake cools, place cream cheese, butter, a powdered sugar and vanilla in a medium bowl. Beat with electric mixer until combined/lump-free. After pumpkin roll has cooled for 30 minutes, carefully unroll cake. Evenly spread cream cheese filling over the top of the cake, all the way to the edges.

      8. Re-roll the cake, but this time only use the towel to help guide the rolling. Starting rolling again on the long side, but roll cake into itself (no towel IN the cake). Use the towel to help roll cake as one long unit, with seam on bottom.

      9. Carefully transfer pumpkin roll to parchment paper and wrap it, then cover with aluminum foil and seal. You can freeze the pumpkin roll at this point OR refrigerate it to serve later the same day. Note; If freezing, frozen roll needs to be thawed for 15-20 minutes before slicing.

      10. To serve: Place unwrapped chilled pumpkin roll on serving platter. Sift powdered sugar on top just before slicing. Cut pumpkin roll into 10 slices, then serve, with the sliced side up! Wrap any leftovers well, and store in refrigerator. Enjoy!

      Recipe Notes

      NOTE: Caloric calculation does not include additional powdered sugar used to sprinkle on the damp dish towel or dust the finished cake, as the amounts may vary per cook.

      Nutrition Facts
      Pumpkin Cream Cheese Roll
      Amount Per Serving (1 slice (1/10 of total))
      Calories 272 Calories from Fat 90
      % Daily Value*
      Fat 10g15%
      Saturated Fat 6g38%
      Trans Fat 0.2g
      Polyunsaturated Fat 1g
      Monounsaturated Fat 3g
      Cholesterol 80mg27%
      Sodium 257mg11%
      Potassium 154mg4%
      Carbohydrates 42g14%
      Fiber 1g4%
      Sugar 34g38%
      Protein 5g10%
      Vitamin A 1872IU37%
      Vitamin C 1mg1%
      Calcium 69mg7%
      Iron 1mg6%
      * Percent Daily Values are based on a 2000 calorie diet.

      Here’s one more to pin on your Pinterest boards!Make a delicious Pumpkin Cream Cheese Roll for the holidays (or any time)! This classic dessert has sweet cream cheese filling rolled inside!


      Cranberry Caramel Apple Yams

      Baked Cranberry Caramel Apple Yams are amazing! Canned yams are mashed, topped with cranberries, apples & pecans, then drizzled with caramel.Baked Cranberry Caramel Apple Yams are amazing! Canned yams are mashed, topped with cranberries, apples & pecans, then drizzled with caramel.

      Looking for an amazing side dish that is delicious enough to serve for the holidays? Or are you looking for a side dish recipe that goes well with a chicken, beef or pork dinner, any time of year?

      Guess what? I think you will LOVE this recipe for cranberry caramel apple yams! This recipe will make 8 small servings or 6 slightly larger servings.

      This is an easy to prepare layered side dish that tastes wonderful! The bottom layer is creamy mashed yams (with brown sugar), the middle layer is cranberries, apples, walnuts or pecans, and the top is drizzled with caramel sauce!

      This recipe uses canned yams, which makes it convenient, practically effortless to make, and saves a lot of preparation time, too!

      Put those layers of goodness together and you have a colorful, lip-smackin’ delicious side dish! The recipe for cranberry caramel apple yams originated in an old cookbook I had, and now I can’t wait to share it with you. Here’s how to make this dish.

      Scroll Down For A Printable Recipe Card At The Bottom Of The Page

      Prepare The Yams (Layer #1)

      Before beginning, preheat your oven to 350°F., and lightly spray or grease the bottom and sides of a 2 quart baking dish.

      Drain the liquid from a large can of yams, then place them in a mixing bowl, along with packed brown sugar and salt. Use an electric mixer to combine these ingredients until thoroughly “mashed” and smooth in texture.

      Spread the mashed yam mixture evenly in the prepared baking dish. Set the dish aside while you prepare the cranberry apple layer.

      Drained canned yams, salt and brown sugar are combined in a medium bowl.An electric mixer is used to mash the yams until smooth in texture.Mashed brown sugar yams are spread in a greased 2 quart baking dish.

      Cook The Cranberry Apple Mixture (Layer #2)

      Place fresh or frozen (unthawed) cranberries, chopped apple, granulated sugar and water in a medium saucepan.

      Cook the fruit mixture on Medium heat for about 7-10 minutes, stirring often, until most of the cranberries have popped and burst open. As the cranberries “pop”, this fruit mixture will thicken slightly.

      Cranberries, chopped apple, granulated sugar and water are placed in a medium saucepan.Cranberry/apple mixture is cooked 7-10 minutes or until cranberries pop or burst open.

      Remove the saucepan from the heat source and stir in chopped walnuts or pecans (whichever you prefer or have available).

      Spoon the cranberry/apple mixture over the top of the yams in the baking dish, covering as much of the surface as possible.

      Chopped nuts (walnuts or pecans) are stirred into cranberry/apple mixture in pan.The cranberry/apple/nut mixture is spread on top of the mashed yams in baking dish.

      Make The Simple Caramel Topping (Layer #3)

      Now it’s time to make a simple caramel sauce to drizzle over the top of this dish! It’s EASY! Stir brown sugar, butter and 1 Tablespoon water together in a small saucepan. Bring this mixture to a boil on medium-low heat.

      Continue to let the sauce boil for 2 minutes, stirring constantly while it cooks. After it has boiled for two minutes, remove the pan from the heat. IMMEDIATELY drizzle the caramel sauce evenly over the top of the cranberry/apple layer. Now the cranberry caramel apple yams are ready to bake!

      Butter, brown sugar and a Tablespoon of water are placed in pan to make caramel sauce.Caramel sauce is boiled for two minutes before being removed from heat.Hot caramel sauce is drizzled over the top of the cranberry/apple/nut layer.

      Time To Enjoy The Cranberry Caramel Apple Yams

      Bake the yams (uncovered) at 350°F. for 15-17 minutes. They are done when fully heated through! Serve the cranberry caramel apple yams while hot, and enjoy the creamy yams, tangy and sweet fruit, crunchy nuts, and sweet caramel sauce on top.

      This dish goes GREAT with chicken, beef and pork, and would be a great addition to any holiday feast! The recipe can easily be doubled or tripled, and is truly a delicious yet simple dish to prepare.

      YUM! I even enjoy grabbing a spoonful of the leftovers at room temperature. This dish is so good I can’t help myself. We enjoyed the yams this time, served alongside Classic Turkey Croquettes!

      The cranberry caramel apple yams are baked for 15 minutes to fully heat them through.A fork, holding a bite of the cranberry caramel apple yams, ready to be eaten.

      I really hope you’ll give these cranberry caramel apple yams a try, and am confident you’ll enjoy them as much we do! We love the colors, flavors, and textures of this wonderful side dish!

      Thanks so much for stopping by, and please come back soon for more family-friendly recipes. Take care, and have a GREAT day!

      Looking For More YAM OR SWEET POTATO Recipes?

      You can find ALL of my recipes in the Recipe Index, which is located at the top of the page. I have some wonderful yam and sweet potato recipes for you to choose from, including:

      Want More Recipes? Get My FREE Newsletter!

      I publish a newsletter 2 times per month (1st and 15th) with lots of recipes, tips, etc..
      Would you like to join our growing list of subscribers?

      There is a Newsletter subscription box on the top right (or bottom) of each blog post, depending on the device you use.
      You can submit your e-mail address there, to be added to my mailing list.

      Find Me On Social Media:

      Facebook page: The Grateful Girl Cooks!
      Pinterest:
      The Grateful Girl Cooks!
      Instagram:
      jbatthegratefulgirlcooks

      Author's signature

      Original recipe source:  Gooseberry Patch “Big Book Of Holiday Cooking”, page 245, published in 2012 by Time Home Entertainment, Inc.

      ↓↓ PRINTABLE RECIPE BELOW ↓↓

      0 from 0 votes
      Cranberry Caramel Apple Yams
      Prep Time
      15 mins
      Cook Time
      15 mins
      Total Time
      30 mins
       

      Baked Cranberry Caramel Apple Yams are amazing! Canned yams are mashed, topped with cranberries, apples & pecans, then drizzled with caramel.

      Category: Side Dish, Vegetable Dish
      Cuisine: American
      Keyword: cranberry caramel apple yams
      Servings: 8 small servings
      Calories Per Serving: 273 kcal
      Author: JB @ The Grateful Girl Cooks!
      Ingredients
      • 29 ounces canned yams drained
      • cup brown sugar packed
      • teaspoon salt
      For Fruit Layer:
      • 1 cup fresh or frozen cranberries
      • ½ large apple (any variety) cored/peeled/chopped
      • 3 Tablespoons granulated sugar
      • cup water
      For Caramel Drizzle:
      • ½ cup chopped walnuts or pecans
      • ¼ cup brown sugar packed
      • 1 Tablespoon butter
      • 1 Tablespoon water
      Instructions
      1. Preheat oven to 350°F. Lightly spray/grease bottom/sides of a 2 qt. baking dish.

      2. Drain liquid from canned yams, then place yams in a large bowl, with packed brown sugar and salt. Use electric mixer to combine, until mashed/smooth in texture. Spread yams evenly in baking dish. Set aside.

      3. Place cranberries, apple, granulated sugar and water in a medium saucepan. Cook on Medium heat 7-10 minutes, stirring often, until most cranberries have popped/burst open. As it cooks, fruit mixture will thicken slightly. Remove pan from heat; stir in chopped walnuts or pecans. Spoon cranberry/apple mixture evenly over yams in baking dish. Set aside.

      4. Combine brown sugar, butter and 1 T. water in a small saucepan. Bring to a boil on medium-low heat. Continue to let sauce boil for 2 minutes, stirring constantly. Remove pan from the heat. IMMEDIATELY drizzle caramel evenly over cranberry/apple layer.

      5. Bake (uncovered) at 350°F. for 15-17 minutes. The yams are done when fully heated through. Serve hot, and enjoy!

      Nutrition Facts
      Cranberry Caramel Apple Yams
      Amount Per Serving (1 (1/8 of total))
      Calories 273 Calories from Fat 54
      % Daily Value*
      Fat 6g9%
      Saturated Fat 1g6%
      Trans Fat 0.1g
      Polyunsaturated Fat 4g
      Monounsaturated Fat 1g
      Cholesterol 4mg1%
      Sodium 62mg3%
      Potassium 918mg26%
      Carbohydrates 53g18%
      Fiber 5g21%
      Sugar 23g26%
      Protein 3g6%
      Vitamin A 202IU4%
      Vitamin C 20mg24%
      Calcium 40mg4%
      Iron 1mg6%
      * Percent Daily Values are based on a 2000 calorie diet.

      Here’s one more to pin on your Pinterest boards!Baked Cranberry Caramel Apple Yams are amazing! Canned yams are mashed, topped with cranberries, apples & pecans, then drizzled with caramel.