Creamy Coconut Rice is prepared with coconut oil, coconut milk and shredded coconut, and is a wonderfully flavored side dish you’ll enjoy!
I don’t know about you, but we eat lots of rice in our home. Usually, it is steamed long grain white rice, but occasionally we mix it up and have creamy coconut rice with our meals.
If you’ve never made coconut rice before, I think you will enjoy it! I found the original recipe in a cookbook I checked out from our local library a while ago.
The coconut flavor is subtle and NOT too overbearing, and is a nice change from regular, bland tasting white rice.
Canned coconut milk (light or full fat) is used to create a creamy texture and light coconut flavor in jasmine rice. Canned coconut milk can usually be found in the Asian section of most supermarkets. I always have 3-4 cans available in our pantry for dishes like this!
Let me show you how to make creamy coconut rice:
Scroll Down For A Printable Recipe Card At The Bottom Of The Page
Making The Coconut Rice
Melt coconut oil (solid form) in a medium or large saucepan on medium heat. Add shredded coconut and stir to combine. Cook the coconut for 1-2 minutes, stirring often until it becomes lightly “toasted”.
Stir in jasmine rice and cook about 2 minutes or until it begins to kind of “pop” in the pan from the heat.


Cooking The Rice With Coconut Milk
Quickly stir the canned coconut milk and remove 2 Tablespoons into a separate bowl. Add water, salt and the remaining can of coconut milk to the rice.
Bring this mixture to a simmer and then reduce the heat to LOW. Continue to cook the creamy coconut rice on low heat, stirring often so the rice doesn’t stick to the bottom of the pan.


Let it cook for 17-20 minutes on LOW heat. As it cooks LOW and SLOW, the rice will absorb the coconut milk. Don’t turn up the heat, because it needs the time to fully cook and create tender rice.

Final Steps
When the coconut milk has been absorbed, and the rice is tender to the bite, remove the pan from the heat. This usually takes about 18-20 minutes.
If the rice is not tender enough, simply add a tiny bit more liquid and continue cooking until tender. Once the creamy coconut rice is tender, remove the pan from the heat and immediately cover with a lid.


Let the rice sit (covered) for 5 minutes, then add the reserved 2 Tablespoons of coconut milk back into the rice. Stir the milk in and fluff the rice with a fork before serving.

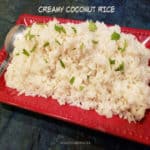
Serve The Creamy Coconut Rice
Serve the creamy coconut rice while hot. If desired, garnish the dish with chopped fresh parsley (this is optional, but adds a pop of color).
The rice is now ready to be served with a variety of main dishes and will be a wonderful addition to your meal!


I hope you enjoy this tasty side dish, and trust those you make it for will enjoy it, too. I am confident you will like it and all of its coconut creaminess.
Thank you for stopping by today and hope you will come back again soon for more family-friendly recipes. Take care, may God bless you, and have a wonderful day!
Looking More Recipes Featuring RICE?
You can find ALL of my recipes in the Recipe Index, which is located at the top of the page. I have some delicious recipes featuring rice to choose from, including:
- Instant Pot Rice Pudding
- Easy Homemade Rice Pilaf
- Southwestern Rice Salad
- Rainbow Rice
- Coconut Lime Rice
Want More Recipes? Get My FREE Newsletter!
I publish a newsletter 2 times per month (1st and 15th) with lots of recipes, tips, etc.
Would you like to join our growing list of subscribers?
There is a Newsletter subscription box on the top right (or bottom) of each blog post, depending on the device you use.
You can submit your e-mail address there, to be added to my mailing list.
Find Me On Social Media:
Facebook page: The Grateful Girl Cooks!
Pinterest: The Grateful Girl Cooks!
Instagram: jbatthegratefulgirlcooks

Original Recipe source: “The Milk Street Cookbook”, with Christopher Kendall (page 170). Published by Little Brown And Company, 2020.
↓↓ PRINTABLE RECIPE BELOW ↓↓
Creamy Coconut Rice is prepared with coconut oil, coconut milk and shredded coconut, and is a wonderfully flavored side dish you'll enjoy!
- 2 Tablespoons coconut oil
- ½ cup unsweetened shredded coconut
- 1½ cups jasmine rice uncooked/rinsed
- ¾ cup water
- 14 ounces canned coconut milk (light or full fat) stirred or shaken, divided use
- 1 teaspoon kosher salt
- chopped parsley for garnish (OPTIONAL)
Melt coconut oil in medium or large saucepan on Medium heat. Add coconut; stir to combine. Cook and stir coconut 1-2 minutes, until it is lightly toasted. Add rice; stir/cook 2 minutes or until it begins to "pop" in the pan from heat.
Stir canned coconut milk; remove 2 Tablespoons into separate bowl; set aside.
Add water, salt and remaining can of coconut milk to rice. Bring to a simmer, and then reduce heat to LOW. Continue to cook rice on low heat, stirring often so rice doesn't stick to bottom of pan. Cook 17-20 minutes on LOW heat. As it cooks LOW and SLOW, the rice will absorb coconut milk. Don't turn up heat, because it needs time to fully cook rice until tender.
When coconut milk is absorbed, and rice is tender (about 18-20 min.), remove pan from heat. TIP: If rice is not tender enough, simply add a bit more water; continue cooking until tender. Remove pan from heat; immediately cover with lid. Let rice sit (covered) for 5 minutes, then add reserved 2 T. coconut milk back into rice. Stir milk in, and fluff rice with a fork.
Transfer rice to serving platter or bowl. Garnish with chopped parsley, if desired (optional). Serve rice hot, and enjoy!
NOTE: Lite coconut milk was used for the nutritional calculation.
Here’s one more to pin on your Pinterest boards!