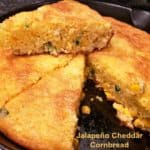
Category: Side Dishes

Easy Grilled Corn On The Cob

Grilled corn on the cob (on the BBQ) is easy to make, delicious, and a great way to keep a kitchen cool on hot days, by cooking outside!Grilled corn on the cob (on the BBQ) is super easy to make, delicious, and is a great way to keep your kitchen cool during hot summer days, by cooking outside!
Do you enjoy corn on the cob?  We LOVE corn on the cob!  Each summer, I try to pick up fresh corn at the grocery store or farmer’s market whenever I can. 

For most of our married life I simply boiled the corn with a teensy tiny bit of sugar in the water. That’s the way I used to cook corn on the cob most of the time.

But in the past couple years I’ve realized just how absolutely delicious grilled corn on the cob can be.

Scroll Down For A Printable Recipe Card At The Bottom Of The Page

How To Make Easy Grilled Corn On The Cob

Getting our BBQ heated up for grilled corn on the cob

There are several methods for grilling corn… we’ve grilled it with the husks still on, after soaking it in water (to prevent burning). That is delicious, and “steams” the corn inside the husk.

Another way to grill corn is the method I’m sharing today. This method is perfect if you just want to get corn on the grill, then onto the table, but don’t want to soak the corn in water.

Here’s The Method We Use For Grilled Corn On The Cob

Soooo… always start with FRESH corn. Corn on the cob is the best when it is at its peak locally during the Summer months.

Whether you get fresh corn from your own garden, a grocery store, farmer’s market, or a friend who is feeling generous with their harvest, it doesn’t matter. Just get yourself some fresh yummy ears of corn!

Fresh picked corn, ready to cook!
For this method used for grilled corn on the cob, you will need to completely remove the corn husks and as much of the corn “silk” as possible before starting. Rinse, then dry off corn.

Cleaning corn silk and husk off corn in order to grill

Lightly brush each ear of corn you are using with a very mild tasting cooking oil (I used vegetable oil). Make sure to brush the oil on all sides.

Corn is lightly brushed with oil before grilling

Time To Grill The Corn On The Cob!

Preheat your charcoal BBQ grill until the coals are ready (hot, hot, hot) or a gas grill has reached a high temperature. 

We grilled the corn this time on our beloved Weber charcoal grill with some yummy looking baby back ribs. Now THAT’S gonna be a good dinner!

Corn is placed on hot BBQ grill to cook

Cook the corn for 2-3 minutes on the hot grill, then rotate each ear of corn a quarter turn. It should be “barely charred” or have light brown grill marks on it.

See how the ears of corn are starting to have a slight “char” on the kernels? That is GOOD.

Corn is rotated on grill a quarter turn every 2-3 minutes

Keep rotating the ears of corn a quarter turn every 2-3 minutes.  If the coals are hot enough, the total time to cook the grilled corn on the cob is usually about 10 minutes.

Be careful to not let the kernels burn too much, but a good char on each piece of corn is wonderful!

Grilled corn on the cob is almost done!

When Is The Corn Done?

Once the corn has been grilled on all sides (after about 10-11 minutes), the corn should be done! 

Transfer the grilled corn on the cob to a serving plate, add butter, season to taste with salt and pepper, and dig in!

Go ahead and chomp away on this summertime treat – it’s really delicious! We love the slight smoky taste the corn has after being grilled.

How Else Can I Use Grilled Corn?

Another way to use grilled corn on the cob is to let it cool, then slice off the kernels from the cob.

The grilled corn kernels taste wonderful when added to a Southwestern-style salad like Black Bean Corn & Tomato Salad w/ Avocado Cilantro Dressing, soup or a taco salad. A great smoky grilled corn flavor will be instantly added to that dish!

Grilled corn on the cob is done and slathered with butter

There are so many different ways to cook corn on the cob… this is one simple method that we enjoy using. It’s nice to cook a piece of meat AND the corn on the grill at the same time!

Sure hope you will consider trying it this EASY way! If you enjoy dishes with fresh corn, may I also suggest my recipes for Grilled Unshucked Corn On the Cob and Fresh Corn Sauté with Red Peppers and Onions?

Thanks for stopping by today. I invite you to come back again soon for more family friendly recipes. Take care, and have a GREAT day!

Want More Recipes? Get My FREE Newsletter!

I publish a newsletter 2 times per month (1st and 15th) with lots of recipes, tips, etc..
Would you like to join our growing list of subscribers?

There is a Newsletter subscription box on the top right (or bottom) of each blog post, depending on the device you use.
You can submit your e-mail address there, to be added to my mailing list.

Find Me On Social Media:

Facebook page: The Grateful Girl Cooks!
Pinterest:
The Grateful Girl Cooks!
Instagram:
jbatthegratefulgirlcooks

Author's signature

↓↓ PRINTABLE RECIPE BELOW ↓↓

0 from 0 votes
Easy Grilled Corn On The Cob
Prep Time
5 mins
Cook Time
10 mins
Total Time
15 mins
 
Grilled corn on the cob (on the BBQ) is super easy to make, delicious, and is a great way to keep your kitchen cool during hot summer days, by cooking outside!
Category: Side Dishes, Vegetables
Cuisine: American
Keyword: grilled corn on the cob
Servings: 2 servings
Calories Per Serving: 155 kcal
Author: JB @ The Grateful Girl Cooks!
Ingredients
  • 2 ears fresh corn on the cob
  • 1 Tablespoon vegetable oil (or light tasting oil)
  • 1 teaspoon butter (or more, to taste)
  • 1 pinch salt (or more, to taste)
  • 1 pinch black pepper (or more, to taste)
Instructions
  1. Completely remove the corn husks and as much of the corn "silk" as possible before starting. Rinse, and dry off corn.

  2. Lightly brush each ear of corn you are using with a very mild tasting cooking oil (I used vegetable oil). Make sure to brush the oil on all sides.
  3. Preheat your BBQ grill until you have very hot coals or a high temperature reading. When hot, place corn ears on grill. After 2-3 minutes cooking the corn on the hot grill, rotate each ear a quarter turn. Keep rotating the ears of corn a quarter turn every 2-3 minutes. If the coals are hot enough, the total time to cook the ears of corn is usually about 10-11 minutes. Be careful to not let the kernels burn too much, but a good char is wonderful!

  4. When corn is grilled on all sides (after about 10-11 minutes), the corn should be done!  Transfer the grilled corn on the cob to a serving plate, add butter, season to taste with salt and pepper, and dig in! Enjoy!

Nutrition Facts
Easy Grilled Corn On The Cob
Amount Per Serving (1 ear of corn)
Calories 155 Calories from Fat 90
% Daily Value*
Fat 10g15%
Saturated Fat 7g44%
Cholesterol 5mg2%
Sodium 31mg1%
Potassium 243mg7%
Carbohydrates 16g5%
Fiber 1g4%
Sugar 5g6%
Protein 2g4%
Vitamin A 230IU5%
Vitamin C 6.1mg7%
Iron 0.5mg3%
* Percent Daily Values are based on a 2000 calorie diet.

Here’s one more to pin on your Pinterest boards!Grilled corn on the cob (on the BBQ) is super easy to make, delicious, and is a great way to keep your kitchen cool during hot summer days, by cooking outside!


Cajun Tater Tots with Dipping Sauce

Spicy Cajun tater tots (fried OR baked), served with a seasoned Ranch/Sour Cream dipping sauce and BBQ sauce on the side, are the perfect appetizer to munch on at any dinner, get together or party!
Spicy Cajun tater tots (fried OR baked), served with a seasoned Ranch/Sour Cream dipping sauce and BBQ sauce, are the perfect appetizer to munch on at any dinner, get together or party!

My husband and I enjoy eating out at a Pacific Northwest well known restaurant called McMenamins. They have over 55 casual restaurant / brewhouses located in Oregon and Washington (including one about a mile from our home), and are a very popular hangout.

Our favorite appetizer to get (each time we go) is a basket of their Cajun Tater Tots! I love the dipping sauce they’re served with, and my husband loves his tots with BBQ sauce, so we each get our own little cup of sauce to dip the tots into! Perfect!

The deep fried tater tots, seasoned with Cajun-style spices are the perfect little treat to munch on while we wait for our order to be cooked! These little tots are so addictive… once you eat one, it is hard to stay out of them (trust me…I know what I’m talking about here)!

Scroll Down For A Printable Recipe Card At The Bottom Of The Page

Time To Try Making My Own Cajun Tater Tots!

I decided to try and make something similar at home, just for fun, and found a copycat recipe (for the tots only) online.  That particular recipe baked the tater tots, so I adapted the recipe a bit, changed the recipe from baking to deep frying, then created my own sauce, and made them!

The Cajun tater tots turned out really good!  NOTEI am posting pictures of the “deep fried” version, but am including directions for baking them, for your convenience, in the printable recipe below.

Okay… So How Do I Make Them?

The first thing you need to do is make the dipping sauce.  I made a sauce similar to what they serve at the restaurant. A small amount of Cajun spices are added to a simple mixture of Ranch dressing and sour cream.

Ingredients are mixed until smooth, covered, then refrigerated until ready to use. This cooling sauce is a great balance to the slightly spicy tots! It’s easy to make the sauce up early in the day for later use!

Dipping sauce for tater tots, in white bowl

After you’ve made the dipping sauce, it’s time to make the seasoning for the tots. This is done by simply mixing up the dry ingredients in a small bowl, then setting it aside.

Bowl of cajun spice ingredients for cooked tater tots

To Deep Fry Cajun Tater Tots:

Frozen tater tots are carefully deep fried in a basket in a pan half full of hot oil (375 degrees). They cook for 3-4 minutes until they become crispy and the color has changed to golden brown.

Tater tots deep frying in oil in large saucepan with fry basket

Once they are cooked to a golden brown color, the fryer basket and tots are removed from oil, drained slightly (over the pan), then tots are transferred to a large bowl.

Golden brown tater tots are removed from cooking oil

Sprinkle Cajun spice mixture is immediately over hot tater tots, then toss them until the tots are covered with seasoning. The spices will stick to the oil remaining on the drained tots. I serve them hot in a parchment paper lined basket.

Cajun tater tots, served in basket

Serve The Cajun Tater Tots

Serve the hot spiced tater tots with two bowls of dipping sauces. Sauces are the perfect way to enjoy your tots! Dip away! Pictured on the left is the Ranch/Sour cream dipping sauce, and the dish on the right contains bottled BBQ sauce (my hubby’s preferred sauce, straight out of the bottle).

Dipping sauces, served to accompany Cajun tater tots

That’s it! It’s not too hard to make these delicious Cajun tots at home, if you can’t get to a McMenamins to taste the original! They are so good!

You can find ALL of my recipes in the Recipe Index, located at the top of the page. If you’re looking for more appetizers like this one, you might also enjoy Crunchy Homemade Onion Rings , Baked Parmesan Zucchini Fries or Crispy Homemade French Fries.  Each of them is a wonderful, yummy appetizer or side dish!

Interested In More Recipes?

Thank you for visiting this website. I appreciate you using some of your valuable time to do soIf you’re interested, I publish a newsletter 2 times per month (1st and 15th) with all the latest recipes, and other fun info. I would be honored to have you join our growing list of subscribers, so you never miss a great recipe!
There is a Newsletter subscription box on the top right side (or bottom) of each blog post, depending on the device you use, where you can easily submit your e-mail address (only) to be included in my mailing list.

You Can Also Find Me On Social Media:

Facebook page: The Grateful Girl Cooks!
Pinterest:
The Grateful Girl Cooks!
Instagram:
jbatthegratefulgirlcooks

Author's signature

Tot recipe adapted from Sandy, at: http://www.everydaysouthwest.com/recipes/cajun-spiced-tater-tots/

0 from 0 votes
Cajun Tater Tots with Dipping Sauce
Prep Time
10 mins
Cook Time
4 mins
Total Time
14 mins
 
Spicy Cajun tater tots (fried OR baked), served with a seasoned Ranch/Sour Cream dipping sauce and BBQ sauce, are the perfect appetizer to munch on at any dinner, get together or party!
Category: Appetizer
Cuisine: Cajun
Keyword: Cajun tater tots
Servings: 4 servings
Calories Per Serving: 342 kcal
Author: JB @ The Grateful Girl Cooks!
Ingredients
For Tots:
  • 2 teaspoons Cajun seasoning
  • 1/2 teaspoon ground black pepper
  • 1/8 teaspoon cayenne pepper , or more if you like 'em spicy!
  • 1/2 teaspoon dried rosemary
  • 1/4 teaspoon salt , + more to season at finish
  • 1/2 teaspoon garlic powder
  • 1/4 teaspoon onion powder
  • 16 ounces Ore Ida Tater Tots
  • Enough oil to deep fry tater tots (Fill pan HALF full only)
For Dipping Sauces:
  • 1/3 cup bottled Ranch Dressing
  • 2 Tablespoons sour cream
  • 1/8 teaspoon (EACH) Cajun seasoning, cayenne, dried rosemary, salt, garlic and onion powder
  • 1/2 cup bottled BBQ sauce
Instructions
  1. Make dipping sauce by mixing Ranch dressing with sour cream, Cajun seasoning, cayenne pepper, rosemary, salt, garlic powder and onion powder. Stir until fully combined. Cover, then refrigerate until ready to use. 

  2. Make the seasoning for the Cajun tater tots, by simply mixing up the dry ingredients in a small bowl, and set aside.
OPTION #1 - Deep Fried (this is the method I used):
  1. Fill a cooking pot half full of vegetable oil (no more than half full!).  Preheat oil to 375° F. (uncovered). Carefully add frozen tater tots to fryer basket (only fill basket HALF full), and lower into hot oil. IMPORTANT: Be very careful-ice crystals on the frozen tots may splatter when they hit the hot oil.  If this happens, immediately put a lid on pan and reduce heat till splattering stops, then uncover and return oil to cooking temp.  Cook tater tots for 3-4 minutes at temperature, until they turn golden brown. Turn off heat, and carefully lift fryer basket out of oil, letting oil drain out of basket back into the pot.  Once fairly well drained, pour 1/2 of hot tots into a medium mixing bowl.  Immediately sprinkle with 1/2 of the Cajun seasoning mixture and lightly mix or toss to season. Repeat with other half until all tots are seasoned.  Lightly season with additional salt (to taste), if desired, and serve while hot.

OPTION #2 - Baked
  1. Preheat your oven to 425° F.  Melt 3 Tablespoons butter with 1 Tablespoon vegetable oil.  Combine the Cajun season mixture with the butter/oil mixture. Stir until combined.  Pour 1/2 of the sauce into medium mixing bowl; swirl it around to coat sides of bowl. Add 1/2 of the tots. Place plastic wrap over the bowl, seal tightly, then toss the tater tots carefully (keeping bowl tightly sealed) until they are fairly well covered by the spice/butter mixture.  Transfer the seasoned tots onto a 13x9 inch rimmed baking sheet, in a single layer. Repeat process until all tots are coated.  Bake tots at 425° F. for 20-25 minutes, or until crispy and light golden brown. (Note: If doubling recipe, baking time will increase to between 25 and 35 minutes). When done, remove from oven. Lightly season with additional salt (to taste), if desired,  and serve while hot.

  2. To Serve: Place hot, seasoned tots in a parchment paper lined basket or bowl and serve, with little cups of dipping sauce(s) on the side. Enjoy!

Recipe Notes

Note: IF baking (Option #2), you will also need 3 Tablespoons butter, and 1 Tablespoon vegetable oil added to ingredient list.

Nutrition Facts
Cajun Tater Tots with Dipping Sauce
Amount Per Serving (1 serving + Ranch dipping sauce (1/4 of total))
Calories 342 Calories from Fat 216
% Daily Value*
Fat 24g37%
Saturated Fat 4g25%
Cholesterol 8mg3%
Sodium 854mg37%
Potassium 348mg10%
Carbohydrates 31g10%
Fiber 2g8%
Protein 2g4%
Vitamin A 540IU11%
Vitamin C 9.2mg11%
Calcium 29mg3%
Iron 0.9mg5%
* Percent Daily Values are based on a 2000 calorie diet.

Here’s one more to pin on your Pinterest boards!Spicy Cajun tater tots (fried OR baked), served with a seasoned Ranch/Sour Cream dipping sauce and BBQ sauce, are the perfect appetizer to munch on at any dinner, get together or party!

Garlic Focaccia Bread

Garlic Focaccia Bread, with olive oil and fresh herbs, is a great side dish for a variety of meats and salads, can be served as an appetizer with dipping oil and herbs, or simply used to make sandwiches!Garlic Focaccia Bread, with olive oil and fresh herbs, is a great side dish for a variety of meats and salads, can be served as an appetizer with dipping oil and herbs, or simply used to make sandwiches!

Garlic Focaccia Bread is a versatile side dish for a variety of meats or salads, can be served as an appetizer (served with dipping oil and herbs), or simply used to make a great sandwich! The crispy “dimpled” crust of this delicious bread (with olive oil, garlic and fresh thyme topping), is it’s trademark feature!

My friends and I used to frequent a local restaurant that brought baskets of sliced warm focaccia bread and a small bowl of dipping oil (with herbs) to the table before dinner. Oh. My. Goodness. I think that place is where I really fell in love with focaccia bread!

Talk about GOOD!!! I knew I wanted to make something similar at home, so I decided to try an old recipe I had stored in my trusty (and practically dilapidated) file box.

Scroll Down For A Printable Recipe Card At The Bottom Of The Page

Where I Discovered The Original Recipe

Many years ago I found a recipe in a newspaper, cut it out, and taped it to a 3×5 index card. Didn’t even write down what newspaper it was from. It’s now old and yellowed, but I had NEVER tried that particular recipe until recently.  WOW- it was DELICIOUS!

The original recipe was titled “Nona’s Courtyard Cafe Focaccia”, and I THINK (not sure) it might have originated from a restaurant in Ventura, California (which is now closed). I tried to find the recipe online, but no luck… oh well. At least I had this old recipe on file to try. It’s very easy to make… here’s how!

How To Make Garlic Focaccia Bread

Mix yeast with warm water (100 degrees) in a large bowl. Stir, then set the bowl aside for 5 minutes to let yeast fully dissolve. Bubbles will begin to appear on the surface, which tells you the yeast is active, alive, and working.

Yeast is dissolved in warm water to make bread dough.

Add flour, 1 Tablespoon olive oil, Parmesan cheese, honey, salt and cold water to bowl. Mix the ingredients well. I started mixing it with a spoon, then switched to using my (clean) hands to mix it up, because it was easier that way, as it is a thick dough.

Form the dough into a ball, then put it on a lightly floured work surface. Roll the dough out with a rolling pin, smoothing and shaping it into a circle of dough about 10 inches wide.

Focaccia dough is mixed, formed into ball and rolled into 10" circle

In a separate small bowl or measuring cup, mix together 1/3 cup olive oil and crushed garlic.  Set aside to let the flavors “mingle”, while you get the dough ready for it!

Olive oil and minced garlic for bread, in measuring cup

Poking Holes In the Garlic Focaccia Bread Dough

Transfer the dough circle to a large baking sheet with edges (I used a ratty old pizza pan with edges).  Poke holes in the top of the dough using your finger. Make deep holes all over the top of the dough, but don’t go all the way through dough to the bottom.

Holes poked into top of focaccia bread dough with finger

Cover the top and sides of dough with the olive oil/ garlic mixture.  I started off spooning it on top, then used a pastry brush to fully coat top and sides of dough, and to spread the garlic around.

What Should I Do With The Excess Olive Oil?

There is a lot of “excess” oil that will run off the edges of dough onto pan. Just scoop it up with a spoon and fill up all the holes with it. Sprinkle top of dough with chopped fresh thyme (or fresh rosemary, if substituting). There will STILL be excess oil around bottom of dough, as you can see in the photo below. Leave it there! It will absorb into the bread while it bakes, and help to make a nice crispy crust!

Set the pan aside, and let the dough rise a bit (uncovered) for about 30 minutes in a warm place, free from drafts. Preheat oven to 400º F. while dough is rising.

Focaccia dough, covered with olive oil, garlic and thyme before baking

Bake The Garlic Focaccia Bread

After dough has risen, bake it in a 400º F. oven for 23-25 minutes, or until the bread is evenly browned all over.  Remove from oven, transfer the garlic focaccia bread to a wire rack, and let it cool for 20-25 minutes before you serve it.

Doesn’t it look GOOD? See the little pieces of garlic in the “dimples”?  ALL the oil has been absorbed into crust. The 2 photos below show the top and bottom of the bread… nice and crispy on the outside, but soft on the inside!

Top crust of garlic focaccia bread after baking

Bottom crust of baked focaccia bread

If you want to make the garlic focaccia bread ahead of time, you can easily reheat it by covering it tightly with aluminum foil and reheat on low heat (250º F.) in oven for 10-15 minutes. To serve, slice bread in half left to right, then cut into 2″ wide strips from top to bottom.

You can serve it with a (2 to 1) mixture of olive oil and balsamic vinegar or olive oil and fresh herbs (like garlic, thyme and rosemary, etc.) in a little bowl for dipping, if you wish.

Baked garlic focaccia bread, cooling on wire rack

Here’s a close up of a slice of the garlic focaccia bread so you can see what the inside looks like! YUM.

Close up photo of sliced focaccia bread

My husband, oldest son and I enjoyed this bread served with Orange and Rosemary Glazed Salmon, steamed broccoli and rice. It was delicious.  We ended up with a few pieces of focaccia bread left over, so I will serve it on the side with spaghetti, made with Easy Spaghetti Sauce with Italian Sausage for tonight’s dinner!

Hope you will consider making this garlic focaccia bread! It’s a great side dish to compliment a variety of main courses or salads.

It can also be used as an appetizer BEFORE the meal, when served with a mixture of olive oil and fresh herbs (or olive oil/balsamic vinegar). You can also use it to make a delicious sandwich!  Lots of possibilities. Hope you enjoy it… and have a wonderful day!

Looking For More BREAD Recipes?

You can find all of my recipes in the Recipe Index, located at the top of the page. I have lots of delicious bread recipes, including:

Interested In More Recipes?

Thank you for visiting this website. I appreciate you using some of your valuable time to do soIf you’re interested, I publish a newsletter 2 times per month (1st and 15th) with all the latest recipes, and other fun info. I would be honored to have you join our growing list of subscribers, so you never miss a great recipe!
There is a Newsletter subscription box on the top right side (or bottom) of each blog post, depending on the device you use, where you can easily submit your e-mail address (only) to be included in my mailing list.

You Can Also Find Me On Social Media:

Facebook page: The Grateful Girl Cooks!
Pinterest:
The Grateful Girl Cooks!
Instagram:
jbatthegratefulgirlcooks

Author's signature

Adapted from Recipe Source: old newspaper article (original source/newspaper/author unknown)

0 from 0 votes
Garlic Focaccia Bread
Prep Time
15 mins
Cook Time
25 mins
Rising Time
30 mins
Total Time
40 mins
 
Garlic Focaccia Bread, with olive oil and fresh herbs, is a great side dish for a variety of meats and salads, can be used to make sandwiches, or served as an appetizer with dipping oil!
Category: Appetizer, Bread, Side Dish
Cuisine: Italian
Keyword: garlic focaccia bread
Servings: 10 slices
Calories Per Serving: 229 kcal
Author: JB @ The Grateful Girl Cooks!
Ingredients
  • 1/2 ounce dry active yeast
  • 1 cup water heated to 100 degrees
  • 3 cups flour (all purpose)
  • 1 Tablespoon olive oil
  • 1/4 cup cold water
  • 1 teaspoon honey
  • 3/4 teaspoon salt
  • 1/4 cup Parmesan cheese ,freshly grated
  • 1/3 cup olive oil
  • 1 teaspoon garlic (crushed)
  • 1/2 teaspoon fresh thyme (or rosemary) , finely chopped
Instructions
  1. Mix yeast with warm water (100 degrees) in a large bowl. Stir, then set bowl aside for 5 minutes to let yeast fully dissolve. Bubbles will begin appearing on the surface, which tells you the yeast is active and working.

  2. Add flour, 1 Tablespoon olive oil, Parmesan cheese, honey, salt and cold water to bowl. Mix ingredients well. NOTE: I started mixing it with a spoon, then switched to using my (clean) hands to mix it up, because it's easier (it's a thick dough). Form dough into a ball, then place on a lightly floured surface. Roll dough out with a rolling pin, smoothing and shaping it into a circle 10" wide.

  3. In a separate small bowl or measuring cup, mix together 1/3 cup olive oil and crushed garlic.  Set aside to let flavors "mingle" while you get dough ready.

  4. Transfer the dough circle to a large baking sheet or pizza pan (with edges) .  Poke holes in top of the dough using your fingertips. Make deep holes all over the top of the dough, but don't go all the way through to the bottom.

  5. Cover top/sides of dough with olive oil/ garlic mixture using spoon and/or pastry brush.  There will be oil that runs off edges onto pan. Scoop it up with a spoon and fill the holes with it. Sprinkle top with chopped fresh thyme (or rosemary, if using). There will STILL be excess oil on pan around bottom of dough. Leave it there! It will absorb into the bread when it bakes, and help to make a nice crust!  Set bread aside, and let dough rise a bit (uncovered) for 30-40 minutes in a warm place, free from drafts. Preheat oven to 400º F. while dough rises.

  6. After dough has risen, bake in 400º F. oven for 23-25 minutes, or until bread is evenly browned.  Remove from oven, transfer bread to a wire rack, and let cool 20-25 minutes before serving. To serve, slice in half from left to right, then cut into 2" thick slices from top to bottom.  If desired, serve with dipping sauce of (2 to 1 mix) olive oil and balsamic vinegar OR olive oil and fresh herbs, like thyme, garlic, rosemary. ENJOY!

Recipe Notes

NOTE: Yeast used is equivalent of 2 (¼ ounce) packages OR 4½ teaspoons of bulk dry active yeast. 

Nutrition Facts
Garlic Focaccia Bread
Amount Per Serving (1 slice)
Calories 229 Calories from Fat 81
% Daily Value*
Fat 9g14%
Saturated Fat 1g6%
Cholesterol 1mg0%
Sodium 216mg9%
Potassium 53mg2%
Carbohydrates 29g10%
Fiber 1g4%
Protein 5g10%
Vitamin A 20IU0%
Vitamin C 0.1mg0%
Calcium 35mg4%
Iron 1.8mg10%
* Percent Daily Values are based on a 2000 calorie diet.

Here’s one more to pin on your Pinterest boards!Garlic Focaccia Bread, with olive oil and fresh herbs, is a great side dish for a variety of meats and salads, can be served as an appetizer with dipping oil and herbs, or simply used to make sandwiches!

Pistachio Pineapple Fluff Salad

This sweet, creamy and delicious pistachio pineapple fluff salad is incredibly easy to make in 5 minutes or less, serves 8, and is a great side dish or dessert your family will LOVE!This sweet, creamy pistachio pineapple fluff salad is incredibly easy to make (5 minutes), serves 8, and is a great side dish or dessert your family will LOVE!

We LOVE this simple salad, too!  The best part is that it’s so EASY to make, in 5 minutes or less… and tastes so yummy!  It’s so easy – if you can stir, you can make this!  Last Fall, I made a scrumptious Piña Colada Fluff Salad (which we devoured, by the way!), so the thought of making a different recipe that had pistachio pudding in it sounded wonderful!

Seriously, if you need a quick, last minute item to add to your table as a side dish, or even a simple dessert, you can literally have this one in the fridge in 5 minutes or less!

Scroll Down For A Printable Recipe Card At The Bottom Of The Page

True Story

True story – the day I made this salad I was headed out to the doctor for my annual physical.  For certain I knew I wanted to make it, and decided to do so exactly 5 minutes before leaving my home. I glanced at the clock, then decided it would be great to have this salad made up already when I returned home and fixed dinner. So I quickly grabbed the ingredients from our pantry, “dumped” it all together, gave it a good sir… and boom! Made a salad, took photos of it, AND made it to my appointment on time!  Yee Haw!

Okay… So HOW Do I Make Pistachio Pineapple Fluff Salad?

Here’s how easy it is to make:  Place pistachio pudding mix, mini marshmallows, chopped walnuts or pecans, and a can of crushed pineapple (including the juice!) into a large bowl. I made this up in the same bowl I was gonna serve it in later!

Pineapple, pecans, mini marshmallows and pistachio pudding mix in bowl

Stir all ingredients well, until thoroughly blended. At this point, it looks like something The Grinch would like, right? This would also be a fun GREEN colored salad to whip up for St. Patrick’s Day! And what an EASY potluck dish this would be to make… in no time at all!

Ingredients stirred together for fluff salad in glass bowl

The last thing to do is add a thawed (8 ounce) container of whipped topping. I used Light Cool Whip, in order to cut out a few calories from this salad.  Blend the whipped topping into the pistachio pineapple fluff salad until fully combined.

Whipped topping is stirred into fluff salad ingredients

Refrigerate The Pistachio Pineapple Fluff Salad Before Serving

This is what it will look like once fully blended (see photo below).  Cover the dish, and refrigerate the pistachio pineapple fluff salad salad until you are ready to serve it.  I prefer it really cold and thick, so when possible, I prepare this at least a couple hours before serving.

Fluff salad with pineapple and pistachio pudding is ready to refrigerate!

When ready to serve, you can add chopped pistachios or mini marshmallows to the top as a garnish, grab a big spoon, and enjoy this creamy, fluffy DELICIOUS pistachio pineapple fluff salad!  It’s so good, I’ll bet once you take one bite, you will want another… and another. YUM!

A big spoonful of pistachio pineapple fluff salad, ready to eat!

Sure hope you will give this pistachio pineapple fluff salad a try!  I like to think of it as a QUICK way to add another great tasting dish to any meal!  It would be a perfect side dish to take to a potluck, or holiday gathering, and the recipe can be easily doubled or tripled for large crowds. Your friends and family will enjoy it, and they don’t have to know that it ONLY TOOK YOU 5 MINUTES TO MAKE! We’ll keep that our little secret, okay? (wink, wink).

Thank you for visiting- I appreciate you taking time out of your busy day to stop by. Be sure to check out all the recipes I’ve posted (with direct links) using the Recipe Index at the top of this page!  I sincerely trust you will find some delicious recipes to make and serve, with love, to those you cherish! Have a wonderful day!

Looking For More SALAD Recipes?

I have lots of great salad recipes on the blog you might be interested in, including:

Interested In More Recipes?

Thank you for visiting this website. I appreciate you using some of your valuable time to do soIf you’re interested, I publish a newsletter 2 times per month (1st and 15th) with all the latest recipes, and other fun info. I would be honored to have you join our growing list of subscribers, so you never miss a great recipe!
There is a Newsletter subscription box on the top right side (or bottom) of each blog post, depending on the device you use, where you can easily submit your e-mail address (only) to be included in my mailing list.

You Can Also Find Me On Social Media:

Facebook page: The Grateful Girl Cooks!
Pinterest:
The Grateful Girl Cooks!
Instagram:
jbatthegratefulgirlcooks

Author's signature

Original recipe source: Trish, at https://www.momontimeout.com/pistachio-dessert-salad-pistachio-fluff-recipe/

0 from 0 votes
Pistachio Pineapple Fluff Salad
Prep Time
5 mins
Cook Time
0 mins
Total Time
5 mins
 

This sweet, creamy and delicious pistachio pineapple fluff salad is incredibly easy to make (in 5 minutes), and is a great side dish or dessert your family will LOVE!

Category: Dessert, Salad
Cuisine: American
Keyword: pistachio pineapple fluff salad
Servings: 8 servings
Calories Per Serving: 197 kcal
Author: JB @ The Grateful Girl Cooks!
Ingredients
  • 3.4 ounces pistachio instant pudding mix (1 small box)
  • 1 cup miniature marshmallows
  • 20 ounce can crushed pineapple
  • 1/2 cup walnuts or pecans , chopped
  • 8 ounces lite whipped topping (Cool Whip), thawed
Instructions
  1. Place pudding mix, mini-marshmallows, crushed pineapple (including juice), and chopped walnuts or pecans in a large bowl. Stir these ingredients very well, to fully combine.

  2. Fold in container of thawed whipped topping until fully blended into salad.  Cover bowl, and refrigerate until you are ready to serve (I recommend at least an hour or two, if possible).

  3. When ready to serve, grab a spoon and dig into this salad (or dessert). It's scrumptious!

Nutrition Facts
Pistachio Pineapple Fluff Salad
Amount Per Serving (1 serving)
Calories 197 Calories from Fat 54
% Daily Value*
Fat 6g9%
Saturated Fat 1g6%
Cholesterol 4mg1%
Sodium 199mg9%
Potassium 150mg4%
Carbohydrates 35g12%
Fiber 1g4%
Sugar 29g32%
Protein 2g4%
Vitamin A 85IU2%
Vitamin C 6.7mg8%
Calcium 51mg5%
Iron 0.4mg2%
* Percent Daily Values are based on a 2000 calorie diet.

Here’s one more to pin on your Pinterest boards!This sweet, creamy and delicious pistachio pineapple fluff salad is incredibly easy to make (in 5 minutes), serves 8, and is a great side dish or dessert your family will LOVE!

Broccoli Au Gratin Rice Pilaf

You’ll love this easy, delicious, homemade broccoli au gratin rice pilaf side dish (a Rice a Roni copycat), with rice, orzo pasta, broccoli and cheese! It’s a wonderful accompaniment for beef, chicken, pork OR seafood!
You'll love this easy, delicious Broccoli Au Gratin Rice Pilaf (a Rice a Roni copycat), with rice, orzo pasta, broccoli and cheese!

I prepared this simple recipe for broccoli au gratin rice pilaf recently as a side dish for our salmon dinner.  What a delicious treat!  This filling recipe is basically a copycat version of the popular Rice-a Roni boxed Broccoli au Gratin mix, but guess what?

This pilaf is just as easy to make from scratch, and is full of homemade flavors and fresh ingredients!  It doesn’t take much time or effort at all to make, and really tastes GOOD! Here’s how to make broccoli au gratin rice pilaf (4 generous servings):

Scroll Down For A Printable Recipe Card At The Bottom OF The Page

Brown The Rice And Orzo Pasta

Start by heating olive oil on medium heat in large skillet. Add the orzo pasta and white rice to skillet. Stir mixture often (to prevent burning) and cook until the orzo turns a nice golden brown, as you can see in the photo below. This will only take a few minutes.

Rice and orzo for pilaf cooking in skillet

Cook The Broccoli Au Gratin Rice Pilaf

The next simple step is to add vegetable broth to the pilaf mixture in skillet. Bring the liquid to a rolling boil, then reduce heat to Low.

Cover the skillet (or pan), and cook for about 10-15 minutes, until almost all of the broth has been absorbed.  At that point, add finely chopped broccoli. (I used frozen broccoli, which I thawed and chopped finely, before beginning).

Vegetable broth and broccoli added to rice pilaf in skillet

Stir broccoli into the pilaf; cook mixture for another 3 minutes. Remove the skillet (or pan) from direct heat; add in the shredded cheddar cheese, butter, and season with salt and pepper (to taste). Stir until cheese and butter have melted and blended in completely. Put a lid on the pan, keep covered, and let the pilaf rest for 4-5 minutes.

Pilaf with broccoli, cheese and butter in skillet

Serve The Broccoli Au Gratin Rice Pilaf!

When ready, remove lid from pan, fluff the broccoli rice pilaf with a fork, and dish this yummy food up straight from the pan, OR place it in a pretty serving bowl to dress it up a bit!

Your family will really enjoy this tasty side dish, and you can smile, knowing you were able to get a yummy, healthy veggie into them!

Broccoli au gratin rice pilaf in white bowl

Broccoli and rice pilaf in close up photo

Here is the finished broccoli rice pilaf on my husband’s plate, with Orange and Rosemary Glazed Salmon on the side.  Seafood, broccoli rice pilaf, all present and accounted for on the ol’ dinner plate, for the win!

Broccoli au gratin rice pilaf on plate with salmon fillet

Thank you for visiting my blog today. I appreciate it, and really hope you will consider trying this recipe for Broccoli Au Gratin Rice Pilaf. It’s truly easy to make, and tastes wonderful! You might also enjoy my recipe for Easy Homemade Rice Pilaf (a delicious, “plain” version). Have a great day, and may the work of your hands bring great joy to God, others, and YOU!

Looking For More SIDE DISH Recipes?

Interested In More Recipes?

Thank you for visiting this website. I appreciate you using some of your valuable time to do soIf you’re interested, I publish a newsletter 2 times per month (1st and 15th) with all the latest recipes, and other fun info. I would be honored to have you join our growing list of subscribers, so you never miss a great recipe!
There is a Newsletter subscription box on the top right side (or bottom) of each blog post, depending on the device you use, where you can easily submit your e-mail address (only) to be included in my mailing list.

You Can Also Find Me On Social Media:

Facebook page: The Grateful Girl Cooks!
Pinterest:
The Grateful Girl Cooks!
Instagram:
jbatthegratefulgirlcooks

Author's signature

Recipe Source: Debi, at  https://lifecurrentsblog.com/homemade-rice-a-roni/

0 from 0 votes
Broccoli Au Gratin Rice Pilaf
Prep Time
5 mins
Cook Time
12 mins
Resting Time
5 mins
Total Time
17 mins
 
You'll love this easy, delicious Broccoli Au Gratin Rice Pilaf (a Rice a Roni copycat), with rice, orzo pasta, broccoli and cheese!
Category: Side Dish
Cuisine: American
Keyword: broccoli au gratin rice pilaf
Servings: 4 servings
Calories Per Serving: 305 kcal
Author: JB @ The Grateful Girl Cooks!
Ingredients
  • 1 Tablespoon olive oil
  • 1/2 cup orzo pasta
  • 1/2 cup white long grain rice
  • 2 cups vegetable broth
  • 1 cup broccoli , finely chopped
  • 2 Tablespoons butter
  • 1/2 cup sharp cheddar cheese , shredded
  • 1 pinch salt , to taste
  • 1/4 teaspoon ground black pepper
Instructions
  1. Begin by heating olive oil in large skillet or saucepan on medium heat. Add orzo and white rice to skillet;  stir, to cover orzo and rice well with the oil. Stir mixture often (to prevent burning) and cook until the orzo turns a nice golden brown. This will only take a few minutes.

  2. The next step is to add vegetable broth to the pilaf mixture in skillet. Bring the liquid to a rolling boil, then reduce heat to Low. Cover the skillet (or pan), and cook between 10-15 minutes, until ALMOST all of the broth has been absorbed (mine took 12 minutes, so keep an eye on it).  At that point, add chopped broccoli.  Stir broccoli into the pilaf; cook mixture for 3 more minutes.

  3. Remove skillet (or pan) from direct heat; add the shredded cheddar cheese, butter, salt and pepper.  Stir until cheese and butter have melted and blended in completely. Put a lid on the pan, keep covered, and let the pilaf rest for 4-5 minutes, then remove lid, and fluff pilaf with a fork. Transfer to a serving bowl, if desired, and serve. Enjoy!

Nutrition Facts
Broccoli Au Gratin Rice Pilaf
Amount Per Serving (1 serving)
Calories 305 Calories from Fat 126
% Daily Value*
Fat 14g22%
Saturated Fat 7g44%
Cholesterol 29mg10%
Sodium 627mg27%
Potassium 154mg4%
Carbohydrates 35g12%
Fiber 1g4%
Sugar 1g1%
Protein 8g16%
Vitamin A 710IU14%
Vitamin C 20.3mg25%
Calcium 123mg12%
Iron 0.7mg4%
* Percent Daily Values are based on a 2000 calorie diet.

Here’s one more to pin on your Pinterest boards!You'll love this easy, delicious Broccoli Au Gratin Rice Pilaf (a Rice a Roni copycat), with rice, orzo pasta, broccoli and cheese!

Easy Sautéed Mushrooms

Enjoy these easy to make, delicious sautéed mushrooms, with wine and butter, as a garnish for grilled steak or chicken, or as a simple side dish!Enjoy these easy to make, delicious sautèed mushrooms, with wine and butter, as a garnish for grilled steak or chicken, or as a simple side dish!

One of my favorite ways to top a grilled steak or piece of chicken is with this side dish recipe for EASY Sautéed Mushrooms! Made easily in a few minutes, they’re also wonderful served simply as an accompaniment to a variety of other dishes.

It only takes a few ingredients to make this tasty dish!  There are many varieties of mushrooms, but the personal favorites I use most often are baby portabellas or plain button mushrooms, both commonly found at most grocery stores.

Scroll Down For A Printable Recipe Card At The Bottom Of The Page

How To Make Sautéed Mushrooms

Here’s how to whip up a batch of these mushrooms, lickety-split (photos are for a total of 2 servings)!

In a medium sized skillet, melt 1 Tablespoon butter.  Add cleaned, thinly sliced mushrooms to skillet.  Sautè 3-4 minutes on medium heat, stirring often, until mushrooms begin to soften and turn light brown.

Raw mushrooms cooking in melted butter in silver skillet

Add 1/4 cup dry white wine to skillet, and continue cooking.

Mushrooms and wine cooking in metal skillet with a wooden spoon

Once liquid has cooked away and mushrooms are fully cooked, season lightly with garlic powder.  Stir. Season with salt and pepper, to suit your taste.

Cooked mushrooms in a metal skillet

Time to Enjoy Some Easy Sautéed Mushrooms

When ready to serve, place the cooked mushrooms onto serving plate, or directly onto cooked steak (or chicken).  Lightly garnish with parsley flakes, then serve.

Sautèed mushrooms on a white serving plate

That’s it!  See how EASY it is to add these delicious tasting sautéed mushrooms to your meal? Hope you will enjoy this simple side dish. The recipe can be easily doubled, etc. for larger quantities.  Have a wonderful day!

Looking For More VEGGIE SIDE DISH Recipes?

You can find all of my recipes in the Recipe Index, located at the top of the page. I have a good variety of veggie side dish recipes you will enjoy, including:

Interested In More Recipes?

Thank you for visiting this website. I appreciate you using some of your valuable time to do soIf you’re interested, I publish a newsletter 2 times per month (1st and 15th) with all the latest recipes, and other fun info. I would be honored to have you join our growing list of subscribers, so you never miss a great recipe!
There is a Newsletter subscription box on the top right side (or bottom) of each blog post, depending on the device you use, where you can easily submit your e-mail address (only) to be included in my mailing list.

You Can Also Find Me On Social Media:

Facebook page: The Grateful Girl Cooks!
Pinterest:
The Grateful Girl Cooks!
Instagram:
jbatthegratefulgirlcooks

Author's signature

0 from 0 votes
Easy Sautéed Mushrooms
Prep Time
3 mins
Cook Time
10 mins
Total Time
13 mins
 

Enjoy these easy to make, delicious sautéed mushrooms, as a garnish for grilled steak or chicken, or as a simple side dish!

Category: Side Dish
Cuisine: American
Keyword: sauteed mushrooms
Servings: 2 servings
Calories Per Serving: 101 kcal
Author: JB @ The Grateful Girl Cooks!
Ingredients
  • 12 button mushrooms , thinly sliced
  • 1 Tablespoon butter
  • 1/4 cup dry white wine
  • 1/8 teaspoon garlic powder
  • Pinch salt and pepper , to taste
  • 1/4 teaspoon dried parsley flakes , for garnish (optional)
Instructions
  1. In a medium skillet, melt 1 Tablespoon butter.  Add cleaned, thinly sliced mushrooms to skillet.  Cook 3-4 minutes on medium heat, stirring often, until mushrooms begin to soften and turn light brown.

  2. Add 1/4 cup dry white wine to skillet, and continue cooking. Once liquid has cooked away and mushrooms are fully cooked, season lightly with garlic powder.  Stir. Add salt and pepper, to taste.

  3. Place cooked mushrooms onto serving plate, or directly onto cooked steak (or chicken).  Lightly garnish with parsley flakes.
Nutrition Facts
Easy Sautéed Mushrooms
Amount Per Serving (1 serving)
Calories 101 Calories from Fat 54
% Daily Value*
Fat 6g9%
Saturated Fat 3g19%
Cholesterol 15mg5%
Sodium 57mg2%
Potassium 402mg11%
Carbohydrates 4g1%
Fiber 1g4%
Sugar 2g2%
Protein 3g6%
Vitamin A 175IU4%
Vitamin C 2.6mg3%
Iron 0.6mg3%
* Percent Daily Values are based on a 2000 calorie diet.

Here’s one more to pin on your Pinterest boards!Enjoy these easy to make, delicious sautéed mushrooms, with wine and butter, as a garnish for grilled steak or chicken, or as a simple side dish!

Mediterranean Quinoa Salad

You’ll enjoy Mediterranean Quinoa Salad, with traditional Greek flavors of kalamata olives, feta cheese, roasted red peppers, and a simple dressing!You'll enjoy this Mediterranean Quinoa Salad, with traditional Greek flavors of kalamata olives, feta cheese, roasted red peppers, and a simple dressing!

I’ve been enjoying cooking with quinoa recently. Did you know that quinoa is believed to have originated in the northwest part of South America?

Cooked quinoa provides healthy nutrients similar to what is typically found in rice and wheat, contains proteins and fiber, and is gluten-free. It is commonly referred to as a superfood, and is so easy to prepare!

If you enjoy quinoa, I’m confident you’ll like this delicious salad! By the way, if you’re interested in using quinoa for breakfast, be sure to check out my recipe for Apricot Almond Breakfast Quinoa! Anyways, here’s how to make this Mediterranean Quinoa Salad.

Scroll Down For A Printable Recipe Card At The Bottom Of The Page

Cook The Quinoa

To make this delicious dish, you will first need to cook the quinoa (according to package instructions) in lightly salted boiling water until done.

Fluff the cooked quinoa with a fork once done. Set it aside until it has cooled down to room temperature.

Cooked quinoa in metal saucepan

Make The Salad Dressing

While the quinoa is cooking, make the simple salad dressing for the Mediterranean quinoa salad. Add the ingredients (olive oil, red wine vinegar, oregano, salt and pepper) to a small bowl.

Mix these ingredients well using a fork, until fully combined. Set dressing aside until ready to top the salad.

Salad dressing for quinoa in small metal bowl

Assemble The Mediterranean Quinoa Salad

Place all the salad ingredients into a large mixing or serving bowl.  Isn’t it colorful? The salad has quinoa, roasted red peppers, corn, cilantro, red onion, feta cheese and kalamata olives.

Give the salad dressing a quick stir and pour over the salad ingredients.  Gently mix the Mediterranean quinoa salad together so the dressing coats everything well.

Quinoa, feta, olives, corn, etc. in salad bowl

Pouring salad dressing over veggies in salad bowl

Time To EAT!

Once the salad has been mixed, it’s ready to serve! See how easy that was? And it REALLY tastes great!

Mixing salad ingredients with a fork in a white bowl

Mediterranean Quinoa Salad is a fantastic side dish for a variety of meals. We enjoyed it with pan-seared creole salmon, and a small spinach salad, and it tasted wonderful! 

This would also be a tasty light lunch, as well, and just for the record, the leftovers were just as good the next day!

Spoonful of salad over bowl

If you enjoy quinoa, you might also enjoy my recipes for Southwest Quinoa Salad, Quinoa Enchilada Casserole (meatless), or a delicious Shrimp, Quinoa & Veggie Bowl.

Hope you will consider trying this recipe, and as always, I hope you will enjoy it! Don’t forget to check out ALL my recipes in the Recipe Index, located at the top of the page.

Take care, and may God bless you and surround you with His love today and always!

Want More Recipes? Get My FREE Newsletter!

I publish a newsletter 2 times per month (1st and 15th) with lots of recipes, tips, etc..
Would you like to join our growing list of subscribers?

There is a Newsletter subscription box on the top right (or bottom) of each blog post, depending on the device you use.
You can submit your e-mail address there, to be added to my mailing list.

Find Me On Social Media:

Facebook page: The Grateful Girl Cooks!
Pinterest:
The Grateful Girl Cooks!
Instagram:
jbatthegratefulgirlcooks

Author's signature

Recipe Source: https://cooktoria.com/recipe/mediterranean-quinoa-salad/

↓↓ PRINTABLE RECIPE BELOW ↓↓

0 from 0 votes
Mediterranean Quinoa Salad
Prep Time
10 mins
Cook Time
15 mins
Total Time
25 mins
 

This simple Quinoa Salad is filled with Mediterranean flavors! Easy to prepare, this is a fantastic tasting salad or side dish to serve for lunch or dinner!

Category: Salad/Side Dish
Cuisine: Mediterranean
Keyword: Mediterranean quinoa salad
Servings: 4 Servings
Calories Per Serving: 295 kcal
Author: JB @ The Grateful Girl Cooks!
Ingredients
For Salad:
  • 1/2 cup quinoa , uncooked
  • 1 cup kalamata olives , pitted, sliced
  • 1 cup corn kernels , fresh or canned
  • 1 cup roasted red peppers , sliced
  • 2/3 cup feta cheese , fat free
  • 1/2 cup red onion , diced
  • 1/2 cup cilantro , chopped
For Salad Dressing:
  • 2 Tablespoons olive oil , extra virgin
  • 2 teaspoons red wine vinegar
  • 1 teaspoon dried oregano
  • 1/4 teaspoon salt and pepper , to taste
Instructions
  1. Cook quinoa in lightly salted water according to package instructions (approx 12-15 minutes).  When done, drain, then set aside to let quinoa cool.

  2. Mix salad dressing ingredients together in a small bowl until fully blended.

  3. Place all salad ingredients in a large mixing bowl. Pour salad dressing over the top. Mix all ingredients gently until dressing has been incorporated into salad. Serve, and enjoy!

Nutrition Facts
Mediterranean Quinoa Salad
Amount Per Serving (1 g)
Calories 295 Calories from Fat 171
% Daily Value*
Fat 19g29%
Saturated Fat 5g31%
Cholesterol 22mg7%
Sodium 1507mg66%
Potassium 267mg8%
Carbohydrates 24g8%
Fiber 3g13%
Sugar 2g2%
Protein 8g16%
Vitamin A 575IU12%
Vitamin C 17.5mg21%
Calcium 165mg17%
Iron 1.8mg10%
* Percent Daily Values are based on a 2000 calorie diet.

Here’s one more for your Pinterest boardsYou'll enjoy Mediterranean Quinoa Salad, with traditional Greek flavors of kalamata olives, feta cheese, roasted red peppers, and a simple dressing!

Asian Style Stir Fry Veggies

Asian Style Stir Fry Veggies are bursting with color and flavor, and are a simple, delicious way to serve fresh vegetables with your meals.  Even kids will like this simple side dish!You'll love these colorful, delicious, quick and easy to make Asian style stir fry veggies. They're a perfect side dish for a variety of meals.

The recipe for Asian style stir fried veggies couldn’t be simpler, but the results are sure yummy! I came up with a simple sauce years and years ago, and enjoy using it occasionally to enhance mixed fresh stir-fried vegetables! Here’s how to make this dish:

Scroll Down For A Printable Recipe Card At The Bottom Of The Page

Prep The Stir Fry Veggies

Clean veggies, dry and then prep them, by cutting them into bite sized slices or chunks.  This time, I used broccoli, yellow squash, green zucchini, red and orange bell peppers, brown onion, baby carrots, and mushrooms.

Truthfully, any combination of vegetables you have available will work well (I’ve also added bok choy, green peppers, fresh asparagus or green beans, at times). Set aside.

Chopped Stir Fry Veggies on red cutting mat

Make The Asian Style Sauce

Mix Asian-style sauce in a small cup or bowl.  I simply used a fork to mix the ingredients (water, soy sauce, ground ginger and cornstarch) together. Set aside.

Stir Fry Veggie Sauce

Stir Fry The Veggies

In a large skillet, heat oil on medium-high heat until very hot (but not smoking).  Add the vegetables all at once (except for minced garlic).

Cook, stirring often, until vegetables are cooked (about 5-6 minutes). They should be crisp-tender when done. Add the minced garlic, and stir, to prevent burning. Cook an additional minute.

Chopped Vegetables in skillet cooking

Add Sauce To The Stir Fried Veggies

Give the sauce a final stir, then pour the Asian sauce into skillet, and stir to combine. The sauce will begin to thicken almost immediately. Continue to stir. If the sauce becomes too thick, add just a touch of water to skillet and stir until all veggies are coated with sauce, and are heated through.

Pouring Asian sauce into veggies in skillet

Once the Asian style stir fry veggies are heated through, and covered with sauce, they are ready to serve. For this meal, I served them as a side dish, along with a piece of pan-seared salmon and steamed rice. YUM!

Chopped veggies stir frying with sauce

That’s it! I really hope you will consider making these Asian Style Stir Fry Veggies.  They add a LOT of color and wonderful flavor to any meal!  It’s a great way to get more vegetables onto the plate, and they really do taste great (hint, hint).

Hope you have an absolutely WONDERFUL day, and remember… be KIND to those you encounter throughout your day.  You never know what others are going through… why not be their bright beacon of hope for that day! God Bless You!

Looking For More VEGETABLE Recipes?

You can find all of my recipes in the Recipe Index, located at the top of the page. I have lots of veggie recipes for you to enjoy, including:

Interested In More Recipes?

Thank you for visiting this website. I appreciate you using some of your valuable time to do soIf you’re interested, I publish a newsletter 2 times per month (1st and 15th) with all the latest recipes, and other fun info. I would be honored to have you join our growing list of subscribers, so you never miss a great recipe!
There is a Newsletter subscription box on the top right side (or bottom) of each blog post, depending on the device you use, where you can easily submit your e-mail address (only) to be included in my mailing list.

You Can Also Find Me On Social Media:

Facebook page: The Grateful Girl Cooks!
Pinterest:
The Grateful Girl Cooks!
Instagram:
jbatthegratefulgirlcooks

Asian Style Stir Fry Veggies / The Grateful Girl Cooks!

0 from 0 votes
Asian Style Stir Fry Veggies
Prep Time
10 mins
Cook Time
6 mins
Total Time
16 mins
 
You'll love these colorful, delicious, quick and easy to make Asian style stir fry veggies. They're a perfect side dish for a variety of meals.
Category: Side Dishes
Cuisine: Asian
Keyword: stir fry veggies
Servings: 2 large servings
Calories Per Serving: 221 kcal
Author: JB @ The Grateful Girl Cooks!
Ingredients
For Veggies (Use any combo or quantity you wish... this is what I used):
  • 2 Tbsp Vegetable oil
  • 1 Zucchini , I used 1/2 green and 1/2 yellow), sliced
  • 6-8 Mushrooms , sliced
  • 1/4 medium Brown onion , sliced
  • 1 cup Bell peppers , I used red and orange, sliced
  • 8 Baby Carrots , I used 8-10, sliced lengthwise
  • 1 cup Broccoli florets
  • 1 tsp Minced garlic
For Asian Style Sauce:
  • 3/4 cup water
  • 2 Tablespoons soy sauce
  • 1/8 teaspoon ground ginger
  • 1 teaspoon cornstarch , I used a heaping teaspoon
Instructions
  1. Clean veggies, dry them, then prep them, by cutting them into bite sized slices or chunks. Set aside.
  2. Mix Asian-style sauce in a small cup or bowl. I simply used a fork to mix the ingredients (water, soy sauce, ground ginger and cornstarch) together. Set aside.
  3. In a large skillet, heat oil on medium-high heat until very hot (but not smoking). Add the vegetables all at once (except for minced garlic). Cook, stirring often, until vegetables are cooked (about 5-6 minutes). They should be crisp-tender when done. Add the minced garlic, and stir to prevent burning. Cook an additional minute.
  4. Give the sauce a final stir, then pour it into skillet, and stir to combine. The sauce will begin to thicken almost immediately. Continue to stir. If sauce becomes too thick, add just a little bit more water to skillet and stir until all veggies are coated with sauce, and are heated through. Remove skillet from heat, serve, and enjoy!.
Nutrition Facts
Asian Style Stir Fry Veggies
Amount Per Serving (1 g)
Calories 221 Calories from Fat 126
% Daily Value*
Fat 14g22%
Saturated Fat 11g69%
Sodium 1071mg47%
Potassium 900mg26%
Carbohydrates 19g6%
Fiber 5g21%
Sugar 10g11%
Protein 7g14%
Vitamin A 8330IU167%
Vitamin C 157mg190%
Calcium 55mg6%
Iron 2.1mg12%
* Percent Daily Values are based on a 2000 calorie diet.

Here’s one more to pin on your Pinterest boards!You'll love these colorful, delicious, quick and easy to make Asian style stir fry veggies. They're a perfect side dish for a variety of meals.

Baked Parmesan Zucchini Fries

Baked Parmesan Zucchini Fries are a delicious side dish or appetizer! Baked until crispy, and served with dipping sauce, these “fries” will be a big hit!Baked Parmesan Zucchini Fries are a delicious side dish or appetizer! Baked until crispy, and served with dipping sauce, these "fries" will be a big hit!

Baked Parmesan Zucchini Fries are a delicious family-friendly way to get kids (and adults) to EAT THEIR VEGGIES!  Baked (not fried) to a crispy finish, and served with a cool, seasoned dipping sauce on the side, these “fries” won’t last long, as a side dish or an appetizer!

The zucchini are crispy on the outside, and have lots of flavor with the simple coating, and the PLUS is that they are BAKED, not FRIED. They are really very easy to prepare, and it’s a great way to get more veggies into the food rotation!

It’s easy to get these veggies into everyone, in a fun way (especially if the kids like French fries)!  Zucchini fries are delicious baked and eaten without any accompaniments, but I like to dip them in a tasty sauce (or ranch dressing).

Scroll Down For A Printable Recipe Card At the Bottom Of The Page

Making The Sauce/Dip For Baked Parmesan Zucchini Fries

This time I made up a quick and simple Mexican-spiced dip/sauce (with some of my favorite spices), to serve on the side. I made the sauce by combining non-fat plain Greek yogurt with a Tablespoon of mayonnaise. I then added cumin, garlic powder, chili powder, and paprika, and mixed until blended.

The dipping sauce has good Southwestern flavor, but is not too spicy, by the way! Make ahead, cover,  and refrigerate until ready to use.

Ingredients for dipping sauce for Baked Parmesan Zucchini Fries.

How To Cut Zucchini For Zucchini Fries

I used a green zucchini and a yellow zucchini to make the fries. After slicing the ends off, they were cut like this:

  • #1 Cut each in half in the middle.
  • #2 Cut each half in half lengthwise.
  • #3 Cut those pieces into 4 lengthwise slices each (so they are wedges about 1/2 an inch wide).

Zucchini is sliced into wedges to make Baked Parmesan zucchini fries.

In a small bowl, place two eggs. Lightly beat the eggs until they are fully combined. In a separate bowl, place Panko crumbs and Parmesan cheese. Add the garlic powder, salt, pepper, paprika and Italian seasoning, and stir until combined.

Beaten eggs, and panko bread crumbs are needed to coat zucchini fries before baking.

Prepping Zucchini Fries For Baking

Dip the zucchini wedges, one at a time into the egg mixture to coat. Shake off excess egg back into bowl, and then dip and roll in Panko mixture to coat all sides.

Zucchini fries are coated with panko breadcrumbs before baking.

Place each coated piece of zucchini on a baking sheet which has been lined with aluminum foil, covered with non-stick spray. Repeat until all “fries” have been coated.  Make sure to keep wedges separated on foil.

Parmesan zucchini fries are placed in single layer onto baking sheet to bake.

Cooking The Baked Parmesan Zucchini Fries

Spray the top of the zucchini with cooking spray or lightly drizzle with olive oil.  Bake in a preheated 425 degree oven for 22-25 minutes, flipping zucchini fries over,  half way through the cooking time. When done, the zucchini should be crisp on the outside and lightly browned.

Baked Parmesan Zucchini Fries are golden brown and crispy after baking.

Time To Eat!

Transfer zucchini fries to a platter, and serve with dipping sauce (if desired). They taste the very best when served hot, crispy, and fresh!

Baked Parmesan Zucchini Fries are served with dipping sauce.

Baked Parmesan Zucchini Fries on red platter, with dipping sauce.

Serve, and enjoy this yummy finger food side dish (or appetizer!).  Recipe is easily doubled for a larger crowd… as written, the recipe makes 32 “fries”. Hope you enjoy these zucchini fries – we sure did!

Looking For More APPETIZER Recipes?

You can find all of my recipes in the Recipe Index, located at the top of the page. I have some delicious appetizer recipes you might enjoy, including:

Interested In More Recipes?

Thank you for visiting this website. I appreciate you using some of your valuable time to do soIf you’re interested, I publish a newsletter 2 times per month (1st and 15th) with all the latest recipes, and other fun info. I would be honored to have you join our growing list of subscribers, so you never miss a great recipe!
There is a Newsletter subscription box on the top right side (or bottom) of each blog post, depending on the device you use, where you can easily submit your e-mail address (only) to be included in my mailing list.

You Can Also Find Me On Social Media:

Facebook page: The Grateful Girl Cooks!
Pinterest:
The Grateful Girl Cooks!
Instagram:
jbatthegratefulgirlcooks

Baked Parmesan Zucchini Fries / The Grateful Girl Cooks!

Zucchini Fries Recipe Source: Trish, at https://www.momontimeout.com/baked-parmesan-zucchini-fries-recipe/

0 from 0 votes
Baked Parmesan Zucchini Fries
Prep Time
10 mins
Cook Time
22 mins
Total Time
32 mins
 
Baked Parmesan Zucchini Fries are a delicious side dish or appetizer! Baked until crispy, and served with dipping sauce, these "fries" will be a big hit!
Category: Side Dish / Appetizer
Cuisine: American
Keyword: baked Parmesan zucchini fries
Servings: 32 fries
Calories Per Serving: 18 kcal
Author: JB @ The Grateful Girl Cooks!
Ingredients
  • 2 zucchini (medium sized- I used 1 green and 1 yellow)
  • 2 eggs , beaten lightly
  • 1/2 cup Panko bread crumbs
  • 1/4 cup grated Parmesan cheese
  • 1/4 teaspoon Italian seasoning
  • 1/4 teaspoon garlic powder
  • 1/4 teaspoon salt
  • 1/4 teaspoon black pepper
  • 1/4 teaspoon paprika
For Dipping Sauce:
  • 1/2 cup non-fat Greek yogurt (can substitute sour cream)
  • 1 Tablespoon Mayonnaise
  • 1/4 teaspoon EACH of spices (chili powder, ground cumin, garlic powder and paprika)
Instructions
To Make Dipping Sauce:
  1. Mix Greek yogurt, mayonnaise, cumin, garlic powder, chili powder, and paprika in small bowl until blended. Cover, and refrigerate until ready to use.
To Make Zucchini Fries:
  1. Cut both ends off each zucchini (discard). Cut each zucchini in half across the middle, then cut each half in half lengthwise, then cut those pieces into 4 lengthwise slices each (so they are wedges about 1/2 an inch wide). You should have 32 wedges.
  2. In a bowl, lightly beat eggs until combined. Set aside.
  3. In another bowl, mix Panko crumbs, Parmesan cheese, garlic powder, salt, pepper, paprika and Italian seasoning until combined.
  4. Dip zucchini wedges, one at a time into the egg mixture to coat. Shake excess egg back into bowl, then dip and roll zucchini slice in Panko mixture to coat all sides. Place each coated piece of zucchini on baking sheet lined with foil, and sprayed lightly with non-stick spray. Repeat until all "fries" have been coated. Keep wedges separated. Spray the top of the zucchini with cooking spray, or lightly drizzle with olive oil.
  5. Bake in preheated 425 degree oven for 22-25 minutes, turning zucchini slices over, half way through cooking time. When done, zucchini should be crisp on the outside and lightly browned. Transfer zucchini fries to a platter, and serve with dipping sauce (if desired).
Nutrition Facts
Baked Parmesan Zucchini Fries
Amount Per Serving (4 wedges)
Calories 18
% Daily Value*
Cholesterol 11mg4%
Sodium 45mg2%
Potassium 42mg1%
Carbohydrates 1g0%
Protein 1g2%
Vitamin A 55IU1%
Vitamin C 2.2mg3%
Calcium 17mg2%
Iron 0.1mg1%
* Percent Daily Values are based on a 2000 calorie diet.

Here’s one more to pin on your Pinterest boards!Baked Parmesan Zucchini Fries are a delicious side dish or appetizer! Baked until crispy, and served with dipping sauce, these "fries" will be a big hit!

Southwest Quinoa Salad

Southwest Quinoa Salad is a healthy side or vegetarian dish featuring quinoa, tomatoes, corn, beans, peppers, avocado, and a flavorful cilantro lime dressing!
Happy New Year! If you’re like many others, you’ve started the year with a determination to eat healthier or lose some weight! This Southwest Quinoa Salad is a delicious, healthy recipe solution for you! It features quinoa, black beans, tomatoes, corn, bell peppers, and avocado, topped with a scrumptious cilantro lime dressing! YUM!

This is my first official blog post of 2018, and I’m so grateful to be able to share this recipe with you from our newly remodeled kitchen.  I don’t know about you, but we managed to eat quite a bit of Christmas goodies and take-out over the holidays (due to my husband and I loving sweets AND having no kitchen to cook in for the past 2 months).

Now we have begun the year determined to make wiser choices.  Say hello to this quinoa salad. It’s a flavor-filled healthy “meatless” dish is perfect as a light side dish or a quick lunch!

Scroll Down For A Printable Recipe Cad At The Bottom Of The Page

Here’s How To Make Southwest Quinoa Salad

Put the uncooked quinoa in a fine mesh strainer and rinse with water (this helps clean the  quinoa). Place the rinsed quinoa, water and salt in a saucepan; bring the mixture to a boil over high heat.

When it comes to a boil, reduce heat to medium-low and put a lid on the pan. Cook quinoa for approximately 17-20 minutes (or until all liquid has been absorbed). Remove pan from heat, set aside, and let quinoa cool down to room temperature.

Southwest Quinoa Salad / The Grateful Girl Cooks!

Place cherry tomatoes, corn, black beans, bell peppers, avocado and room temperature quinoa into a large salad bowl. Set aside. TIP: An easy tip for cubing an avocado is to cut it in half, remove pit, then use a knife to slice grid lines into avocado lengthwise, then horizontally, without cutting through peel. Once cut, slide a large spoon around the inside of the peel, and the avocado cubes should fall out!

Southwest Quinoa Salad / The Grateful Girl Cooks!

Make The Cilantro Lime Salad Dressing

To make the simple cilantro lime dressing, whisk together olive oil, light sour cream, lime zest and juice, garlic powder, cumin, salt, pepper and cilantro in a small bowl . Be sure to mix well.

Southwest Quinoa Salad / The Grateful Girl Cooks!

Pour all of the dressing over salad, and stir well, to combine all ingredients thoroughly. The quinoa will absorb all the delicious Southwestern flavors from the dressing and will really make this dish shine!

Southwest Quinoa Salad / The Grateful Girl Cooks!

Southwest Quinoa Salad Is Ready To Enjoy!

Garnish the Southwest quinoa salad with a sprig of fresh cilantro, and serve it as a side dish. Since it is so filling, this salad (even without meat), would be a quick vegetarian meal or “take to work” packed lunch! The salad tastes good served at room temperature OR chilled!

Southwest Quinoa Salad / The Grateful Girl Cooks!

Here’s a close up of some Southwest Quinoa Salad goodness. Yum!  I love the fact that it not only tastes wonderful, but is quite colorful and good for you!

Southwest Quinoa Salad / The Grateful Girl Cooks!

New Beginnings

I served this Southwest Quinoa Salad with roasted turkey breast and steamed broccoli, for a healthy New Years Day dinner! My husband and I really enjoyed it, and it was FUN to prepare my first recipe for 2018 in our newly remodeled kitchen.

This was after 2 months of not being able to cook in there! Yay for our new, updated kitchen, appliances and counter tops! We still  have some work to do, but I’ve begun cooking in my kitchen once again. Yay!

Southwest Quinoa Salad / The Grateful Girl Cooks!

I want to wish you again a Happy New Year from our home to yours!  The arrival of a new year brings with it an infinite number of opportunities to encourage and serve others. Opportunities will also arise to grow as a person, create great memories, and cook delicious meals for yourself and those you love!

Hope you will join me in rising to the occasion, and as always, thank you for visiting The Grateful Girl Cooks. I appreciate each one of you. Have a great day!

Looking For More Recipes That Use QUINOA?

You can find ALL my recipes in the Recipe Index, located at the top of the page. I have some delicious recipes that feature quinoa you might enjoy, including:

Interested In More Recipes?

Thank you for visiting this website. I appreciate you using some of your valuable time to do soIf you’re interested, I publish a newsletter 2 times per month (1st and 15th) with all the latest recipes, and other fun info. I would be honored to have you join our growing list of subscribers, so you never miss a great recipe!
There is a Newsletter subscription box on the top right side (or bottom) of each blog post, depending on the device you use, where you can easily submit your e-mail address (only) to be included in my mailing list.

You Can Also Find Me On Social Media:

Facebook page: The Grateful Girl Cooks!
Pinterest:
The Grateful Girl Cooks!
Instagram:
jbatthegratefulgirlcooks

Southwest Quinoa Salad / The Grateful Girl Cooks!

Recipe Source: http://togetherasfamily.com/2017/05/fiesta-quinoa-salad/

0 from 0 votes
Southwest Quinoa Salad
Prep Time
8 mins
Cook Time
17 mins
Total Time
25 mins
 
Southwest Quinoa Salad is a healthy side or vegetarian dish featuring quinoa, tomatoes, corn, beans, peppers, avocado, and a flavorful cilantro lime dressing!
Category: Salad
Cuisine: Southwest
Keyword: Southwest quinoa salad
Servings: 8 side servings
Calories Per Serving: 218 kcal
Author: JB @ The Grateful Girl Cooks!
Ingredients
For Salad:
  • cups uncooked quinoa
  • cups water
  • 1/2 teaspoon salt
  • 1 cup halved cherry tomatoes
  • 1 can corn , drained (standard sized can)
  • 1 can black beans , drained and rinsed
  • 1 orange bell pepper , chopped (I used a combination of red, orange and green)
  • 1 avocado , peeled and cubed
For Cilantro Lime Dressing:
  • 1/4 cup olive oil
  • 1/4 cup reduced fat sour cream (can substitute plain non-fat yogurt)
  • Zest and juice from 1 lime
  • 1 teaspoon garlic powder
  • 1 teaspoon ground cumin
  • 1/2 teaspoon salt
  • 1/4 teaspoon black pepper
  • 1/3 cup chopped cilantro
Instructions
  1. Put the uncooked quinoa in a fine mesh strainer and rinse with water (this helps clean quinoa). Place the rinsed quinoa, water and salt in a saucepan; bring the mixture to a boil over high heat. When it comes to a boil, reduce heat to medium-low and put a lid on the pan. Cook quinoa for approximately 17-20 minutes (or until all liquid has been absorbed). Remove pan from heat, set aside, and let quinoa cool down to room temperature.
  2. Place cherry tomatoes, corn, black beans, bell peppers, avocado and cooled quinoa into a large salad bowl.
  3. To make cilantro lime dressing, in a small bowl whisk together olive oil, light sour cream, lime zest and juice, garlic powder, cumin, salt, pepper and cilantro. Be sure to mix well. Pour all of the dressing over salad, and stir well to combine all ingredients thoroughly. Serve as a side dish or as a healthy meatless meal, and enjoy! (Store leftovers in a covered container in refrigerator).
Nutrition Facts
Southwest Quinoa Salad
Amount Per Serving (1 serving)
Calories 218 Calories from Fat 108
% Daily Value*
Fat 12g18%
Saturated Fat 2g13%
Cholesterol 2mg1%
Sodium 307mg13%
Potassium 367mg10%
Carbohydrates 21g7%
Fiber 4g17%
Sugar 1g1%
Protein 4g8%
Vitamin A 660IU13%
Vitamin C 25.9mg31%
Calcium 32mg3%
Iron 1.7mg9%
* Percent Daily Values are based on a 2000 calorie diet.

Here’s one more to pin on your Pinterest boards!Southwest Quinoa Salad is a healthy side or vegetarian dish featuring quinoa, tomatoes, corn, beans, peppers, avocado, and a flavorful cilantro lime dressing!