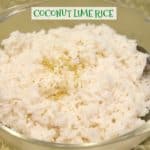
Category: Side Dishes

Whole Berry Cranberry Orange Sauce

This flavorful whole berry cranberry orange sauce is a wonderful side dish for Thanksgiving! It’s incredibly easy to make, with only a few ingredients!This flavorful whole berry cranberry orange sauce is a wonderful side dish for Thanksgiving! It's incredibly easy to make, with only a few ingredients!

It’s almost Thanksgiving, and I am looking forward to making one of my favorite dishes… Whole Berry Cranberry Orange Sauce! It’s sooo good, and simple to whip up!

Scroll Down For A Printable Recipe Card At The Bottom Of The Page

As a kid, I didn’t like cranberry sauce. I thought of it as the big red wiggly blob of funny tasting stuff from a can that my Mom put out on a plate at Thanksgiving.  Being the dutiful daughter that I am, I followed her example for many years in my own home. Funny thing, though… I never really liked it, because the gelatinous, wobbly texture made me cringe.

The OTHER Way I Make Cranberry Orange Sauce – My Mom’s Version

Years later my Mom began making a homemade cranberry-orange sauce, and I found I really enjoyed the fresh sweet and tartness.  It’s DELICIOUS!

Her recipe is almost more like a fresh “relish”, requires no cooking and has orange, apple and fresh cranberries in it (finely ground using a food processor).  I make her version often during the holidays. That  homemade cranberry sauce recipe is so good I can eat it right out of the bowl with a spoon! It tastes very similar to the kind sold at Trader Joes!

Whole fresh cranberries are used to make this recipe for cranberry orange sauce.

How To Make My Version Of Whole Berry Cranberry Orange Sauce

I also enjoy a whole berry cranberry orange sauce, which is cooked… with most of the cranberries “popped”, but left whole in the sauce. I slightly adapted my Mom’s original recipe to make this version, and am happy to share it with you.

This recipe does not include apples, requires a very short cooking time to enable the cranberries to “pop”, and is full of cranberry orange flavor! It tastes AMAZING! Whole berry cranberry orange sauce is so delicious, I usually have to grab a spoon and take multiple “samples”. It’s a hard job, but somebody has to do it!  I’m always happy to help!

Whole Berry Cranberry Orange Sauce is served in glass bowl with orange zest garnish.

The recipe for whole berry cranberry orange sauce is so easy to make from scratch. Basically the ingredients are placed into a large saucepan, and mixture is cooked. The ingredients are stirred frequently while the cranberries cook, until most of the cranberries have “popped”. This usually takes only 8-10 minutes.

Interesting Fact About Cooked Cranberries

Here’s an interesting side note – did you know when the cranberries are cooked at a high temperature and “pop” open, they release pectin? Yep, they do, and then the pectin turns around and slightly thickens the sauce naturally.  Who knew a sauce using these two main ingredients could be so delicious AND thicken itself?

Fresh cranberries and oranges are the two main ingredients to make whole berry cranberry orange sauce.

Anyways… I hope you will consider making your very own fresh whole berry cranberry orange sauce this Thanksgiving.  I think you will be amazed at how great it tastes! We had a guest over to share Thanksgiving with us, and he said it was the BEST cranberry sauce he had ever had!

The awesome thing is that it can be made a couple days before you serve it, so it can free up your precious time in the kitchen the day of the big feast (just keep it covered in the fridge!).

Whole Berry Cranberry Orange Sauce Is A Perfect Thanksgiving Side Dish!

Now that you know how to make your own whole berry cranberry orange sauce, you can serve it proudly with all your other delicious traditional Thanksgiving side dishes!

I love to serve Pecan Praline Yams and Brown Butter Green Beans with Toasted Almonds and Red Peppers with our Thanksgiving meal, along with Creamy Mashed Potatoes and Quick Easy Cornbread Stuffing.  YUM!

Whole berry cranberry orange sauce is served with other Thanksgiving side dishes.

From our family to yours… we wish you a memorable Thanksgiving with those family or friends dear to you. As our family gathers each Thanksgiving, we are mindful of the many blessings, large and small, that God has poured into our lives. We gladly acknowledge and thank Him for these gifts, with overflowing, grateful hearts!

We gather for Thanksgiving to give thanks to God for His many blessings.

My hope is that you, as well, would know the joy of a heart filled with gratitude this season! I also hope you will enjoy this recipe for whole berry cranberry orange sauce! Have a great day, and come back soon for more recipes.

Interested In More Recipes?

Thank you for visiting this website. I appreciate you using some of your valuable time to do soIf you’re interested, I publish a newsletter 2 times per month (1st and 15th) with all the latest recipes, and other fun info. I would be honored to have you join our growing list of subscribers, so you never miss a great recipe!
There is a Newsletter subscription box on the top right side (or bottom) of each blog post, depending on the device you use, where you can easily submit your e-mail address (only) to be included in my mailing list.

You Can Also Find Me On Social Media:

Facebook page: The Grateful Girl Cooks!
Pinterest:
The Grateful Girl Cooks!
Instagram:
jbatthegratefulgirlcooks

Author's signature

Adapted from my recipe for Homemade Cranberry-Orange Sauce

↓↓ PRINTABLE RECIPE BELOW ↓↓

0 from 0 votes
Whole Berry Cranberry Orange Sauce
Prep Time
5 mins
Cook Time
10 mins
Total Time
15 mins
 
This flavorful whole berry cranberry orange sauce is a wonderful side dish for Thanksgiving! It's incredibly easy to make, with only a few ingredients!
Category: Sauce
Cuisine: American
Keyword: whole berry cranberry orange sauce
Servings: 8 1/4 cup servings (approx. 2 cups)
Calories Per Serving: 103 kcal
Author: JB @ The Grateful Girl Cooks!
Ingredients
  • 1 bag fresh cranberries (12-16 ounces)
  • Zest from 1 large orange (reserve just a bit for garnish)
  • 1/2 cup fresh squeezed orange juice
  • 3/4 cup granulated sugar
  • 1/4 cup water
  • Extra orange zest for garnish
Instructions
  1. In a medium saucepan, mix together orange zest, fresh squeezed orange juice, water and granulated sugar. Stir and cook on medium heat for 2-3 minutes until the sugar has dissolved.
  2. Add fresh cranberries. Bring sauce to a boil. Once mixture is boiling, turn the heat down to a low simmer. Cook (uncovered), stirring often, for 7-8 minutes, until the cranberries have "popped" open and the sauce has thickened. Once this occurs, remove the cranberry sauce from heat, and set aside. Let cranberry sauce cool completely. When ready to serve, garnish with additional orange zest, if desired. Serve this delicious sauce at room temperature or refrigerated! May be made 2-3 days in advance. Store in refrigerator in covered container.
Nutrition Facts
Whole Berry Cranberry Orange Sauce
Amount Per Serving (1 serving (1/4 cup))
Calories 103
% Daily Value*
Sodium 1mg0%
Potassium 68mg2%
Carbohydrates 26g9%
Fiber 2g8%
Sugar 22g24%
Vitamin A 60IU1%
Vitamin C 13.5mg16%
Calcium 9mg1%
Iron 0.1mg1%
* Percent Daily Values are based on a 2000 calorie diet.

Here’s one more to pin on your Pinterest boards!This flavorful whole berry cranberry orange sauce is a wonderful side dish for Thanksgiving! It's incredibly easy to make, with only a few ingredients!


Save

Save

Save

Save

Save

Save

Save

Toasted Orzo with Lemon and Chives

Looking for a fabulous tasting side dish? Toasted Orzo with Lemon and Chives is simple to prepare and is an absolutely delicious side dish for chicken, pork, seafood or beef!Toasted Orzo with Lemon and Chives is simple to prepare and is an absolutely delicious side dish for chicken, pork, seafood or beef! / The Grateful Girl Cooks!
Recently I bought a couple of new cookbooks with some birthday gift cards I received this summer.  I carefully read through the entire cookbook, earmarking many recipes that caught my attention.  This recipe for TOASTED orzo was the very first recipe I made from the cookbook.  It did NOT disappoint! Seriously- it’s GOOD!

Using Orzo In Other Dishes

I have used orzo in other recipes before, such as Orzo with Parmesan, One Pan Greek Chicken and Orzo, Italian Orzo and Spinach Soup, and Spinach and Orzo Salad. In our home, we have come to love this little tiny pasta!  This recipe caught my eye because the orzo is TOASTED before cooking it. Here’s how to make it:

Scroll Down For A Printable Recipe Card At The Bottom Of The Page

How Do I Make Toasted Orzo?

The prep for this side dish is very simple.  It all begins with toasting the orzo.  Place the orzo in a 10 inch “dry” skillet. Turn the heat to medium-high, and cook/toast, stirring orzo occasionally, until pasta turns golden brown.

This will take about 5-7 minutes. Really keep an eye on the toasted orzo, especially toward the end of the cooking time, because it can go from really light brown to burnt very quickly.

Orzo is lightly toasted in a dry skillet until golden brown.

Toasted Orzo turns light golden brown as it cooks.

Once the orzo has been toasted, remove it from skillet and place in a bowl to cool.

Orzo is placed in bowl to cool down after being toasted.

Cooking The Orzo

Melt butter in the skillet using medium-high heat. Add the chopped onion; stir occasionally and cook for about 5 minutes until onion is translucent and has softened considerably. Add minced garlic; stir and cook an additional 30 seconds, being careful not to let the garlic burn.

Onion and butter is cooked for toasted orzo dish.

Add the toasted orzo back into the skillet, along with the chicken broth, wine, and water.  Bring this mixture to a low simmer, then turn the heat down to medium-low heat.

Continue to cook the mixture on medium-low, for about 15 minutes, giving it a good stir every 5 minutes.  When done, the liquid should have been absorbed, and the orzo should be nice and tender.

Chicken broth and wine are added to toasted orzo in pan.

Toasted orzo begins to absorb chicken broth and wine in skillet as it cooks.

Final Step

Now it’s time for the last step! Add the lemon zest, lemon juice, and chopped chives to the orzo. Stir until combined. Cook for about one more minute, to ensure orzo is heated through. Season the orzo with salt and pepper, to suit your taste.

Lemon zest, lemon juice and chopped chives added to toasted orzo.

Orzo is seasoned with salt and pepper while it cooks.

Serve The Toasted Orzo with Lemon and Chives

One you have seasoned with salt and pepper, to taste, the orzo is ready to serve!  Transfer it to a medium sized serving dish, or serve right out of the skillet onto individual plates! If desired, you can garnish dish with additional chopped chives, and thin strips of lemon peel. It really adds a nice, finishing touch to the dish, but it totally optional.

Toasted Orzo is served, garnished with chives and lemon peel strips.

Toasted Orzo is ready to EAT!

That’s it!  See how easy it was to make this delicious side dish!!!  I served the toasted orzo with a simple mixed green salad and Honey Garlic Pork Chops.

My husband and I loved it, and the leftovers were just as good the next day.  All we had to do was fluff the orzo a bit, microwave it, and we had a great accompaniment to another meal! Sure do hope you will try this delicious side dish.  Have a fantastic day, friends.

Looking For More SIDE DISH Recipes?

You can find ALL my recipes in the Recipe Index, located at the top of the page. I have quite a few delicious side dish recipes you might enjoy, including:

Interested In More Recipes?

Thank you for visiting this website. I appreciate you using some of your valuable time to do soIf you’re interested, I publish a newsletter 2 times per month (1st and 15th) with all the latest recipes, and other fun info. I would be honored to have you join our growing list of subscribers, so you never miss a great recipe!
There is a Newsletter subscription box on the top right side (or bottom) of each blog post, depending on the device you use, where you can easily submit your e-mail address (only) to be included in my mailing list.

You Can Also Find Me On Social Media:

Facebook page: The Grateful Girl Cooks!
Pinterest:
The Grateful Girl Cooks!
Instagram:
jbatthegratefulgirlcooks

Author's signature

Recipe Source: “America’s Test Kitchen-The Complete Cooking For Two Cookbook”, copyright 2014 by the Editors of America’s Test Kitchen, page 320

0 from 0 votes
Toasted Orzo with Lemon and Chives
Prep Time
12 mins
Cook Time
15 mins
Total Time
27 mins
 

Toasted Orzo with Lemon and Chives is simple to prepare and is an absolutely delicious side dish for chicken, pork, seafood or beef!

Category: Side Dish
Cuisine: American
Keyword: toasted orzo
Servings: 4 servings
Calories Per Serving: 142 kcal
Author: JB @ The Grateful Girl Cooks!
Ingredients
  • 2/3 cup orzo (dry)
  • 1 Tablespoon butter
  • 1 brown onion (small), finely chopped
  • 1 garlic clove , minced
  • 2 cups chicken broth
  • 1/2 cup water
  • 2 Tablespoons dry white wine
  • Tablespoons minced fresh chives
  • 1/2 teaspoon lemon zest
  • 1 teaspoon fresh squeezed lemon juice
  • Salt and Black pepper , to taste
Instructions
  1. Place orzo in a 10 inch "dry" skillet. Turn heat to medium-high, and cook/toast, stirring orzo occasionally, until pasta turns golden brown. This takes about 5-7 minutes. Keep an eye on the orzo, especially near end of the cooking time, because it can go from really light brown to burnt very quickly. Once orzo has been toasted, remove it from skillet; place in a bowl and set aside.
  2. Melt butter in skillet using medium-high heat. Add chopped onion; stir occasionally and cook for about 5 minutes until onion is translucent and has softened considerably. Add minced garlic; stir and cook an additional 30 seconds, being careful not to let the garlic burn.
  3. Pour the toasted orzo back into the skillet, along with the chicken broth, wine, and water. Bring this mixture to a low simmering boil, then turn heat down to medium-low. Continue to cook the mixture on medium-low, for about 15 minutes, giving it a good stir every 5 minutes. When done, the liquid should have been absorbed, and the orzo should be nice and tender.
  4. Add lemon zest, lemon juice, and chopped chives to orzo. Stir until combined. Cook for about one more minute, to ensure orzo is heated through. Season orzo with salt and pepper, to taste.
  5. Garnish with additional chopped chives and thin lemon peel slices, if desired. Serve, and enjoy!
Nutrition Facts
Toasted Orzo with Lemon and Chives
Amount Per Serving (1 g)
Calories 142 Calories from Fat 27
% Daily Value*
Fat 3g5%
Saturated Fat 1g6%
Cholesterol 7mg2%
Sodium 458mg20%
Potassium 189mg5%
Carbohydrates 22g7%
Fiber 1g4%
Sugar 1g1%
Protein 4g8%
Vitamin A 135IU3%
Vitamin C 12mg15%
Calcium 19mg2%
Iron 0.6mg3%
* Percent Daily Values are based on a 2000 calorie diet.

Here’s one more to pin on your Pinterest boards!Toasted Orzo with Lemon and Chives is simple to prepare and is an absolutely delicious side dish for chicken, pork, seafood or beef!

Save

Save

Save

Save

Save

Save

Save

Save

Save

Save

Piña Colada Fluff Salad

This EASY to make, sweet and delicious tropics inspired Piña Colada Fluff Salad, with pineapple and coconut, only takes 5 minutes to prepare and serves 8!This EASY to make, sweet and delicious tropics inspired Piña Colada Fluff Salad, with pineapple and coconut, only takes 5 minutes to prepare and serves 8!
I recently made a tropical inspired Piña Colada Fluff Salad, with crushed pineapple, shredded coconut, rum extract and miniature marshmallows as a side dish. My husband and I can’t stay out of it,  grabbing a spoonful here and there, because it is sooo incredibly good! Bonus? IT ONLY TAKES 5 MINUTES TO MAKE!

When I first showed this piña colada fluff salad to my husband, he didn’t seem too thrilled since he’s not much of a pineapple and coconut kind of guy.   But… after he took a taste, he took another bite, said it was “refreshing”, and another, and then another!

You get the picture!  He ended up absolutely LOVING this sweet taste of the tropics “dessert” salad, that is made in about 5 minutes!  How’s THAT for a real timesaver!? I can’t vouch for it’s “healthiness” (ha ha- who am I kidding?), but I can vouch for it’s “amazingness”!

Scroll Down For A Printable Recipe Card At the Bottom Of The Page

What Is IN This Piña Colada Fluff Salad?

Here’s the cast of characters for the piña colada fluff salad. The ingredients are crushed pineapple, miniature marshmallows, shredded coconut, whipped topping, rum extract, chopped nuts, and vanilla pudding mix.

These are the ingredients used to make this fluff salad.

Trust me, this salad is fantastic, and it’s SO EASY to make in 5 minutes. Here’s what you do:

How To Make Piña Colada Fluff Salad

Place the pudding mix and an entire can (juice included) of crushed pineapple into a large serving bowl.  Stir ingredients until they are completely mixed together.

Vanilla pudding and canned pineapple are combined to make fluff salad.

Add the marshmallows, shredded coconut, chopped nuts, and rum extract to mixture.

Marshmallows, pecans, coconut and rum extract added to fluff salad.

Top it off with the whipped topping.  Gently fold all the ingredients together until completely combined.

Whipped topping is added to Piña Colada Fluff Salad.

Refrigerate Before Serving

Once the piña colada fluff salad is thoroughly combined, cover the bowl and refrigerate until ready to serve! I recommend refrigerating it for a couple hours, at least!

Piña Colada Fluff Salad is refrigerated, then is ready to serve!

Time To EAT!

That’s it!  See how easy that was?  When ready to serve you will notice that the salad has thickened up a little bit. Scoop it up, serve, and enjoy the taste of the tropics with this simple, sweet piña colada fluff salad.

A spoonful of Piña Colada Fluff Salad, ready to eat!

I really hope you enjoy this salad.  If you like this, check out my recipe for Pistachio Pineapple Fluff Salad. YUM.  We had this with our dinner, but you could also serve this as dessert, if you wanted to.  This easy recipe is definitely going into my KEEP pile of recipes!  Enjoy!

Looking For More Tropics-Inspired Recipes?

You can find ALL my recipes in the Recipe Index, located at the top of the page. I have some delicious “tropics-inspired” recipes you might enjoy, including:

Interested In More Recipes?

Thank you for visiting this website. I appreciate you using some of your valuable time to do soIf you’re interested, I publish a newsletter 2 times per month (1st and 15th) with all the latest recipes, and other fun info. I would be honored to have you join our growing list of subscribers, so you never miss a great recipe!
There is a Newsletter subscription box on the top right side (or bottom) of each blog post, depending on the device you use, where you can easily submit your e-mail address (only) to be included in my mailing list.

You Can Also Find Me On Social Media:
Facebook page: The Grateful Girl Cooks!
Pinterest: The Grateful Girl Cooks!
Instagram: jbatthegratefulgirlcooks

Author's signature

Recipe Source:  http://www.momontimeout.com/2015/02/pina-colada-fluff/

0 from 0 votes
Piña Colada Fluff Salad
Prep Time
5 mins
Cook Time
0 mins
Total Time
5 mins
 

This EASY to make, sweet and delicious tropics inspired Piña Colada Fluff Salad, with pineapple and coconut, only takes 5 minutes to prepare and serves 8!

Category: Salad/Side Dish
Cuisine: American
Keyword: pina colada fluff salad
Servings: 8 servings
Calories Per Serving: 294 kcal
Author: JB @ The Grateful Girl Cooks!
Ingredients
  • 1 box vanilla instant pudding mix (3.4 ounces)
  • 1 can (20 ounces) crushed pineapple (do NOT drain!)
  • 1/2 cup chopped walnuts or pecans
  • 1 teaspoon rum extract
  • 2 cups miniature marshmallows
  • 1 cup shredded sweetened coconut
  • 1 tub Cool Whip (8 ounces), thawed
Instructions
  1. Place the entire can of crushed pineapple (undrained) and the pudding mix into a large serving bowl. Stir ingredients until they are fully mixed together.
  2. Add chopped nuts, rum extract, marshmallows and coconut to bowl. Top with entire tub of Cool Whip, and fold the ingredients in together until fully combined.
  3. Cover bowl with plastic wrap; refrigerate salad until completely chilled (recommend a couple hours) and you're ready to serve.
Nutrition Facts
Piña Colada Fluff Salad
Amount Per Serving (1 serving)
Calories 294 Calories from Fat 117
% Daily Value*
Fat 13g20%
Saturated Fat 7g44%
Cholesterol 4mg1%
Sodium 112mg5%
Potassium 213mg6%
Carbohydrates 43g14%
Fiber 3g13%
Sugar 32g36%
Protein 3g6%
Vitamin A 85IU2%
Vitamin C 6.8mg8%
Calcium 52mg5%
Iron 0.8mg4%
* Percent Daily Values are based on a 2000 calorie diet.

Here’s one more to pin on your Pinterest boards!This EASY to make, sweet and delicious tropics inspired Piña Colada Fluff Salad, with pineapple and coconut, only takes 5 minutes to prepare and serves 8!

Save

Save

Save

Save

Save

Save

Save

Save

Save

Save

Save

Easy Cheesy Garlic Crescent Rolls

Easy Cheesy Garlic Crescent Rolls with Italian seasoning are easy to make in about 20 minutes, and taste fantastic served with meats, soups and salads!Easy Cheesy Garlic Crescent Rolls with Italian seasoning are easy to make in about 20 minutes, and taste fantastic served with meats, soups and salads!
What’s NOT to love about Easy Cheesy Garlic Crescent Rolls?  They are super easy to prepare, are stuffed with cheese and Italian seasoning, and can be on the table in about 20 minutes!

You know what the best part is? These tasty little rolls are absolutely scrumptious! Here’s how to make them.

Scroll Down For A Printable Recipe Card At The Bottom Of The Page

How To Make Easy Cheesy Garlic Crescent Rolls

Preheat your oven to 375 degrees F. Line a 13×9 inch cookie sheet with parchment paper, and then set it aside.

Mix the melted butter, Italian seasoning, garlic, dried parsley and dried basil together, in a small bowl.  Unwrap the crescent rolls, and separate the dough at the perforations into triangles.

Using a pastry brush, brush the dough with the butter and seasoning mixture (but reserve a bit of the mixture to use later).

Crescent roll dough is unwrapped and brushed with seasonings.

Now Add The Cheese!

Place some of the grated mozzarella at the wide end of the dough (or place the string cheese half at the wide end).

Shredded mozzarella cheese is added to cheesy garlic crescent rolls before baking.

Carefully roll up the dough, and try to tuck the edges of dough in, to seal. Place dough onto parchment paper, with about 2 inches in between each one.

Brush the tops of the dough with the remaining butter/seasoning mixture. I even sprinkled just a bit more mozzarella cheese on top of the easy cheesy garlic crescent rolls!

Easy Cheesy Garlic Crescent Rolls are rolled up and are ready to bake.

Bake The Rolls

Bake the rolls at 375°F. for 10-12 minutes, until the rolls are golden brown on the outside. Remove the rolls from the oven.

If any of the cheese has leaked out, simply push it back onto the roll with a spatula while cheese is still warm!

Easy Cheesy Garlic Crescent Rolls are baked and cooling on parchment paper.

Serve The Cheesy Garlic Crescent Rolls

Serve these easy cheesy garlic crescent rolls while they are warm, and enjoy them!  They taste wonderful, and I’m willing to bet you can’t stay out of them.

Easy Cheesy Garlic Crescent Rolls, served warm, on a red platter.

We really enjoy these scrumptious cheesy garlic crescent rolls, and LOVE how EASY they are to make!  I hope you will give them a try. They really are quite delicious, and this recipe can easily be doubled to make more delicious rolls!

Thanks for stopping by, and please come back again soon for more family-friendly recipes. Take care, may God bless you, and have a GREAT day!

Looking For More BREAD Recipes?

You can find ALL of my recipes in the Recipe Index, which is located at the top of the page. I have lots of delicious bread recipes (sweet and savory) you might enjoy, including:


Want More Recipes? Get My FREE Newsletter!

I publish a newsletter 2 times per month (1st and 15th) with lots of recipes, tips, etc..
Would you like to join our growing list of subscribers?

There is a Newsletter subscription box on the top right (or bottom) of each blog post, depending on the device you use.
You can submit your e-mail address there, to be added to my mailing list.

Find Me On Social Media:

Facebook page: The Grateful Girl Cooks!
Pinterest:
The Grateful Girl Cooks!
Instagram:
jbatthegratefulgirlcooks

Author's signature

Recipe Source:  https://www.thechunkychef.com/cheesy-garlic-crescent-rolls/

↓↓ PRINTABLE RECIPE BELOW ↓↓

0 from 0 votes
Easy Cheesy Garlic Crescent Rolls
Prep Time
6 mins
Cook Time
11 mins
Total Time
17 mins
 
Easy Cheesy Garlic Crescent Rolls with Italian seasoning are easy to make in about 20 minutes, and taste fantastic served with meats, soups and salads!
Category: Bread, Side Dish
Cuisine: American
Keyword: cheesy garlic crescent rolls
Servings: 8 rolls
Calories Per Serving: 180 kcal
Author: JB @ The Grateful Girl Cooks!
Ingredients
  • 1 (8 ounce) can refrigerated crescent rolls
  • 1 cup freshly grated mozzarella cheese OR 4 pieces string cheese (cut in half to make 2 short pieces)
  • 3 Tablespoons butter , melted
  • 3 cloves garlic , minced
  • 1/2 teaspoon Italian seasoning
  • 1/2 teaspoon dried parsley
  • 1/4 teaspoon dried basil
Instructions
  1. Before beginning, be sure to preheat your oven to 375 degrees F. Line a cookie sheet with parchment paper, then set aside.
  2. Mix the melted butter, Italian seasoning, garlic, dried parsley and dried basil together, in a small bowl.
  3. Unwrap the crescent rolls. Separate dough into triangles. Using a pastry brush, brush the dough with the butter and seasoning mixture (but reserve a bit of the mixture to use later). Place some of the grated mozzarella at the wide end of the dough (or place the string cheese half at the wide end). Carefully roll up the dough, and try to tuck the edges of dough in, to seal. Place dough onto parchment paper, with about 2 inches in between each one.
  4. Brush the tops of the dough with the remaining butter/seasoning mixture. Bake rolls at 375 degrees for 10-12 minutes, until rolls are golden brown. Remove from oven. If any cheese has leaked out, simply push it back onto roll with a spatula while cheese is still warm! Serve, and enjoy!
Nutrition Facts
Easy Cheesy Garlic Crescent Rolls
Amount Per Serving (1 roll)
Calories 180 Calories from Fat 117
% Daily Value*
Fat 13g20%
Saturated Fat 7g44%
Cholesterol 22mg7%
Sodium 348mg15%
Potassium 15mg0%
Carbohydrates 12g4%
Sugar 2g2%
Protein 4g8%
Vitamin A 225IU5%
Vitamin C 0.3mg0%
Calcium 76mg8%
Iron 0.5mg3%
* Percent Daily Values are based on a 2000 calorie diet.

Here’s one more to pin on your Pinterest boards!Easy Cheesy Garlic Crescent Rolls with Italian seasoning are easy to make in about 20 minutes, and taste fantastic served with meats, soups and salads!

Save

Save

Save

Save

Save

Save

Save

Save

Save

Save

Potato Hash with Rosemary

Potato Hash with Rosemary is easy to prepare, seasoned with salt, pepper, onion, and fresh rosemary. A simple side dish for beef, pork, and poultry!Potato Hash with Rosemary is easy to prepare, seasoned with salt, pepper, onion, and fresh rosemary, and is a simple side dish for beef, pork, and poultry.
If you are looking for a simple vegetable side dish to serve with beef, poultry or pork, may I suggest this simple yet delicious Potato Hash With Rosemary? I found the recipe for a potato hash side dish in a Southern Living cookbook I bought while on vacation in Washington state earlier this summer.

The recipe couldn’t be simpler! A baking potato, sweet potato, onion, garlic, fresh rosemary, and light seasonings are cooked together until tender, and then served. The potato hash with rosemary was a wonderful side dish for a chicken dinner I fixed recently. I want to share this easy recipe with YOU, in the hope that you will want to try it, too!

Scroll Down For A Printable Recipe Card At The bottom Of The Page

How To Make Potato Hash

Here’s how to make the potato hash:  First, prep the ingredients (truly this is easy, and it’s the “hardest” part of the whole recipe).  Peel and cube potatoes, mince garlic, chop onion and fresh rosemary.

Russet and sweet potatoes on plate with herbs.

Time To Cook!

Heat the olive oil in a non-stick skillet on medium-low heat. Add the rest of the ingredients except for the garnish. This includes the potato, sweet potato, onion, garlic, a Tablespoon of fresh rosemary, salt, and pepper. Stir these ingredients together.

Cover the skillet and cook, on medium-low heat, for 20-25 minutes, stirring and turning occasionally, until the potatoes are tender.

Potatoes, rosemary, onions and spices are cooked in skillet.

Time To Serve The Potato Hash With Rosemary!

When done, transfer potato hash to serving dish and garnish with fresh sprigs of rosemary. Serve hot, and enjoy this simple veggie side dish!

The finished potato hash is served with a sprig of fresh rosemary as garnish.

I think this potato hash with rosemary looks pretty good… and guess what? It TASTES good, also! Win-Win!

Potato Hash with Rosemary is served on white plate

I enjoy finding and trying new recipes for side dishes, and glad I found this one for potato hash. Hope you have the opportunity to try making it, as well, and trust you enjoy it. Sure do hope you have a fantastic day, friends. I am grateful today for another GORGEOUS warm summer day here in Oregon.

Looking for More Recipes Featuring POTATOES?

You can find ALL my recipes in the Recipe Index, located at the top of the page. I have some wonderful recipes using potatoes you might enjoy, including:

Interested In More Recipes?

Thank you for visiting this website. I appreciate you using some of your valuable time to do soIf you’re interested, I publish a newsletter 2 times per month (1st and 15th) with all the latest recipes, and other fun info. I would be honored to have you join our growing list of subscribers, so you never miss a great recipe!
There is a Newsletter subscription box on the top right side (or bottom) of each blog post, depending on the device you use, where you can easily submit your e-mail address (only) to be included in my mailing list.

You Can Also Find Me On Social Media:

Facebook page: The Grateful Girl Cooks!
Pinterest:
The Grateful Girl Cooks!
Instagram:
jbatthegratefulgirlcooks

Author's signatureRecipe Source: The cookbook “Southern Living – 1998 Annual Recipes”, Published 1998, Oxmoor House, Inc., Book Division of Southern Progress Corporation, page 16.

0 from 0 votes
Potato Hash with Rosemary
Prep Time
5 mins
Cook Time
20 mins
Total Time
25 mins
 
Potato Hash with Rosemary is easy to prepare, seasoned with salt, pepper, onion, and fresh rosemary, and is a simple side dish for beef, pork, and poultry.
Category: Side Dish
Cuisine: American
Keyword: potato hash
Servings: 4 servings
Calories Per Serving: 139 kcal
Author: JB @ The Grateful Girl Cooks!
Ingredients
  • 1 large baking potato , peeled and cubed
  • 1 large sweet potato , peeled and cubed
  • 1/4 cup chopped onion
  • 2 cloves garlic , minced
  • 2 Tablespoons olive oil
  • 1 Tablespoon chopped fresh rosemary
  • 1/2 teaspoon salt
  • 1/2 teaspoon ground black pepper
  • **Garnish (optional): fresh sprigs of rosemary
Instructions
  1. Heat olive oil in a non-stick skillet on medium-low heat. Add rest of ingredients except for garnish (potato, sweet potato, onion, garlic, Tablespoon of fresh rosemary, salt and pepper). Stir together.
  2. Cover skillet and cook (on medium-low) for 20-25 minutes, stirring occasionally, until potatoes are tender.
  3. When done, transfer potato hash to serving dish and garnish with fresh sprigs of rosemary.
  4. Serve hot, and enjoy this simple side dish!
Nutrition Facts
Potato Hash with Rosemary
Amount Per Serving (1 g)
Calories 139 Calories from Fat 63
% Daily Value*
Fat 7g11%
Saturated Fat 1g6%
Sodium 312mg14%
Potassium 346mg10%
Carbohydrates 17g6%
Fiber 1g4%
Sugar 2g2%
Protein 1g2%
Vitamin A 4625IU93%
Vitamin C 5mg6%
Calcium 19mg2%
Iron 0.6mg3%
* Percent Daily Values are based on a 2000 calorie diet.

Here’s one more to pin to your Pinterest boards!Potato Hash with Rosemary is easy to prepare, seasoned with salt, pepper, onion, and fresh rosemary, and is a simple side dish for beef, pork, and poultry.

Save

Save

Save

Save

Save

Save

Save

Save

Save

Save

Save

P.F. Chang’s Spicy Green Beans (copycat)

P.F. Chang’s spicy green beans are fresh green beans cooked in a flavorful Asian sauce, in this delicious restaurant copycat recipe!P.F. Chang's spicy green beans are fresh green beans cooked in a flavorful Asian sauce, in this delicious restaurant copycat recipe!

Looking for a tasty new way to serve those yummy summer green beans you get from the grocery store, Farmer’s Market or your own garden?  How about this delicious, quick and easy recipe for P.F. Chang’s Spicy Green Beans (copycat)?

I’ve grown my own green beans for years now, so I’m always on the lookout for new ways to cook and serve them.  I found this “copycat” recipe for spicy green beans on Pinterest, and decided to give it a try. You will be surprised how GOOD these green beans are!  The addition of an Asian pan sauce makes them “practically perfect in every way” (to coin a phrase from Mary Poppins).

Scroll Down For A Printable Recipe Card At The Bottom Of The Page

Are These Spicy Green Beans Difficult To Make?

Are these spicy green beans difficult to make? Absolutely NOT! All in all, the beans take only 5-6 minutes to cook… really!  The “hardest” thing you will have to do is snip the ends off the beans… ha ha! Here’s how to make delicious P.F. Chang’s Spicy Green Beans from the comfort of your own home:

Make The Asian Sauce

First make the Asian sauce by mixing the ingredients together in a small bowl, and then set aside until ready to put it in use. See how EASY that was?

An Asian inspired sauce is mixed in small bowl to add to green beans.
Pour the sesame oil into a large skillet or wok. NOTE: You can buy sesame oil in the Asian food section of most supermarkets. Turn the heat to medium high for about 30 seconds, and when the oil is hot, add the chopped green onions, minced garlic, and red pepper flakes.

Stir well, and cook for 30 seconds, stirring constantly. Be careful NOT to burn the garlic.

Sesame oil is used to add flavor to the cooked veggies in this dish.

Green onions, garlic and red pepper flakes are cooked in a skillet with sesame oil.
Time To Add The Fresh Green Beans!

Add the green beans to the skillet. Stir them constantly, and continue to cook them for 3-4 minutes, until they are almost fully cooked. The beans will turn a deeper green color as they cook.

Green beans are added to the skillet.

Add The Sauce To The Spicy Green Beans

When the green beans are done cooking, move them over to one side of the skillet. Give the Asian sauce a good stir, and then add it to the skillet. Stir well, and cook the sauce for 30 seconds (still on medium-high heat). Let the sauce come to a boil, then turn the heat to LOW. The sauce will thicken very slightly as it cooks.

Adding the Asian sauce to the spicy green beans in skillet.
Stir the sauce into the green beans to fully coat them.  Cook the spicy green beans and sauce for another 30 seconds, and then remove the skillet from the heat.

Spicy green beans finish cooking in the Asian sauce.

P.F. Chang’s Spicy Green Beans Are Ready To Serve!

Place the hot green beans and sauce onto serving plate or into a bowl, and garnish with sesame seeds (if using). Serve the spicy green beans while hot, and ENJOY!

The spicy green beans are sprinkled with sesame seeds and served.

Sesame seeds garnish the serving plate covered with P.F. Chang's Spicy Green Beans.

We enjoyed trying this recipe for spicy green beans. They are NOT too spicy at all, and have fantastic flavor!  I used only 1 pound of green beans, so if you are using 2 pounds of beans the quantity will be much larger than shown in my photos!

Hope you will consider trying this recipe. I trust you will find it just as delicious as we did! Have a great day, and please come back again soon!

Looking For More VEGETABLE SIDE DISHES?

You can find all of my vegetable dishes in the Recipe Index, located at the top of the page. A few recipes you might enjoy include:

Interested In More Recipes?

Thank you for visiting this website. I appreciate you using some of your valuable time to do soIf you’re interested, I publish a newsletter 2 times per month (1st and 15th) with all the latest recipes, and other fun info. I would be honored to have you join our growing list of subscribers, so you never miss a great recipe!
There is a Newsletter subscription box on the top right side (or bottom) of each blog post, depending on the device you use, where you can easily submit your e-mail address (only) to be included in my mailing list.

You Can Also Find Me On Social Media:
Facebook page: The Grateful Girl Cooks!
Pinterest: The Grateful Girl Cooks!
Instagram: jbatthegratefulgirlcooks

Author's signature

Recipe Source: http://domesticsuperhero.com/copycat-pf-changs-spicy-green-beans/

0 from 0 votes
P.F. Chang's Spicy Green Beans
Prep Time
10 mins
Cook Time
5 mins
Total Time
15 mins
 
P.F. Chang's spicy green beans are fresh green beans cooked in a flavorful Asian sauce, in this delicious restaurant copycat recipe!
Category: Side Dish, Vegetable Dish
Cuisine: Asian
Keyword: spicy green beans
Servings: 6 servings
Calories Per Serving: 75 kcal
Author: JB @ The Grateful Girl Cooks!
Ingredients
For Beans:
  • 1-2 pounds fresh green beans , ends trimmed and beans cut into 2 inch pieces
  • 2 green onions , chopped thin
  • 1 teaspoon red pepper flakes
  • 4 garlic cloves , minced
  • 2 Tablespoons sesame oil
For Asian Sauce:
  • 1/8 teaspoon salt
  • 1/8 teaspoon black pepper
  • 2 Tablespoons low sodium soy sauce
  • 1 Tablespoon rice vinegar
  • 1 teaspoon white granulated sugar
  • 1/4 cup water
  • Sesame Seeds , for garnish (optional)
Instructions
  1. Make the Asian sauce by mixing ingredients in a small bowl. Set the bowl aside until ready to use.
  2. Put sesame oil into a large skillet or wok. Turn heat to medium high for 30 seconds. To the hot oil add chopped green onions, minced garlic, and red pepper flakes. Stir well and cook for 30 seconds, stirring constantly and being careful NOT to burn the garlic.
  3. Add the green beans to the skillet. Stir constantly and cook for 3-4 minutes, until they are just about fully cooked. The beans will turn a deeper green color as they cook. When beans are done, move them over to one side of the skillet. Give the Asian sauce a good stir and add it to the skillet. Stir well, and cook the sauce for 30 seconds (still on medium-high heat); let the sauce come to a boil, then turn the heat to LOW. The sauce will thicken slightly. Stir the sauce into the green beans to coat. Cook beans and sauce for another 30 seconds, then remove skillet from heat.
  4. Place the hot green beans and sauce onto serving plate or in a bowl, and garnish with sesame seeds (if using). Serve the green beans while hot... and ENJOY!
Nutrition Facts
P.F. Chang's Spicy Green Beans
Amount Per Serving (1 serving)
Calories 75 Calories from Fat 36
% Daily Value*
Fat 4g6%
Sodium 237mg10%
Potassium 194mg6%
Carbohydrates 7g2%
Fiber 2g8%
Sugar 3g3%
Protein 1g2%
Vitamin A 660IU13%
Vitamin C 10.6mg13%
Calcium 34mg3%
Iron 1mg6%
* Percent Daily Values are based on a 2000 calorie diet.

Here’s one more to pin to your Pinterest boards!P.F. Chang's spicy green beans are fresh green beans cooked in a flavorful Asian sauce, in this delicious restaurant copycat recipe!

Save

Save

Save

Save

Save

Save

Save

Save

Save

Save

Save

Save

Save

Save

Swiss Chard with Bacon and Mushrooms

You’re going to enjoy Swiss Chard with Bacon and Mushrooms! This flavorful vegetable side dish also has onions and garlic, and is ready in under 20 minutes! You're going to enjoy Swiss Chard with Bacon and Mushrooms! This flavorful vegetable side dish also has onions and garlic, and is ready in under 20 minutes!
I started growing rainbow chard in my garden several years ago, so I enjoy trying new ways to prepare it.  Recently I cooked Swiss Chard with bacon and mushrooms, red onion, and garlic as a side dish for dinner, and was very pleased with the results. The addition of bacon, mushrooms, onion and garlic to Swiss chard made this quite a flavorful vegetable dish!

Scroll Down For A Printable Recipe Card At The Bottom Of The Page

What Is Swiss Chard?

Swiss chard is a leafy green vegetable that has been around for centuries. The chard develops large stalks, once mature. The leaves can be green or slightly red, and the stalks can vary in color, such as white, yellow or red. The leaves are very nutritious, and fresh young leaves can be eaten raw in salads.

For this recipe I used red chard, and did not use a published recipe. I used only my ideas for what might taste good paired with this veggie I grew in our backyard garden.

Growing Swiss chard in our garden.

Prepare The Bacon

Stack bacon pieces on top of each other. Using a sharp knife, slice bacon into thin strips. Place bacon pieces (sliced) into a large skillet. Cook on medium-high heat, stirring occasionally, until bacon pieces begin to brown (3-4 minutes).

Leave all bacon grease in the skillet (this photo is from another recipe, but shows how I slice the bacon for quick cooking).

Cooking bacon to add to Swiss chard and mushrooms.

Cook The Swiss Chard

Add chard stems, sliced mushrooms and chopped red onion to the bacon and bacon drippings in the skillet. Continue to cook until chard stems become slightly tender (3-4 mins). Now add the chopped chard leaves, and stir to combine. Continue to cook on medium heat, stirring occasionally, until leaves have wilted and are cooked through (2-3 minutes).

Swiss chard, bacon, red onion and mushrooms cooking in bacon drippings in skillet.

Add minced garlic and stir to combine. Cook for 1 minute, being careful to not burn the garlic. Add salt and pepper, to taste.

Minced garlic, salt and pepper added to cooked Swiss chard.

Time To Eat Swiss Chard With Bacon And Mushrooms

Serve this Swiss chard immediately, while hot. It is a simple side dish to prepare that will compliment a variety of main dishes.

Swiss Chard with Bacon and Mushrooms served in white bowl.

I cut the Swiss Chard stalks into fairly large slices as you can see from the photos, so if you prefer smaller bites, slice them to the thickness you prefer. Some folks prefer to leave the stalks out and only cook the leaves… whatever your preference is, GREAT!

Hope you will consider trying this recipe, and as always, I sincerely trust you will enjoy it! If you enjoy Swiss chard, be sure to check out my recipe for Swiss Chard with Onions and Garlic!

Looking For More Veggie Side Dish Recipes?

You can find all of my veggie side dish recipes in the Recipe Index, which is located at the top of the page. I have quite a few, including:

Interested In More Recipes?

Thank you for visiting this website. I appreciate you using some of your valuable time to do soIf you’re interested, I publish a newsletter 2 times per month (1st and 15th) with all the latest recipes, and other fun info. I would be honored to have you join our growing list of subscribers, so you never miss a great recipe!
There is a Newsletter subscription box on the top right side (or bottom) of each blog post, depending on the device you use, where you can easily submit your e-mail address (only) to be included in my mailing list.

You Can Also Find Me On Social Media:
Facebook page: The Grateful Girl Cooks!
Pinterest: The Grateful Girl Cooks!
Instagram: jbatthegratefulgirlcooks

Have a GREAT day!

Author's signature

↓↓ PRINTABLE RECIPE BELOW ↓↓

0 from 0 votes
Swiss Chard with Bacon and Mushrooms
Prep Time
5 mins
Cook Time
12 mins
Total Time
17 mins
 
You're going to enjoy Swiss Chard with Bacon and Mushrooms! This flavorful vegetable side dish also has onions and garlic, and is ready in under 20 minutes!
Category: Vegetable Dish
Cuisine: American
Keyword: swiss chard
Servings: 4 servings
Calories Per Serving: 210 kcal
Author: JB @ The Grateful Girl Cooks!
Ingredients
  • 4-5 slices bacon , (cut into thin pieces before cooking)
  • 8-10 mushrooms , sliced thin
  • 1/4 cup red onion , chopped
  • 3 Tablespoons bacon grease (approx. from cooked bacon)
  • 1 head Swiss chard (I used red chard), chopped and divided (stems separated from leaves)
  • 1 teaspoon minced garlic
  • Salt and Pepper to taste
Instructions
  1. Stack bacon pieces on top of each other. Using a sharp knife, slice into thin strips. Place bacon pieces (sliced) into a large skillet. Cook on medium-high heat, stirring occasionally, until bacon pieces begin to brown (3-4 minutes). Leave all bacon grease in the skillet.
  2. Add chard stems, sliced mushrooms and chopped red onion. Continue to cook until chard stems become slightly tender (3-4 mins).
  3. Add chopped chard leaves, and stir to combine. Continue to cook on medium heat, stirring occasionally, until leaves have wilted and are cooked through (2-3 minutes).
  4. Add minced garlic and stir to combine. Cook for 1 minute, being careful to not burn the garlic.
  5. Add salt and pepper to taste, then serve while hot.
Nutrition Facts
Swiss Chard with Bacon and Mushrooms
Amount Per Serving (1 serving)
Calories 210 Calories from Fat 171
% Daily Value*
Fat 19g29%
Saturated Fat 7g44%
Cholesterol 24mg8%
Sodium 332mg14%
Potassium 455mg13%
Carbohydrates 4g1%
Fiber 1g4%
Sugar 1g1%
Protein 5g10%
Vitamin A 4585IU92%
Vitamin C 23.6mg29%
Calcium 38mg4%
Iron 1.6mg9%
* Percent Daily Values are based on a 2000 calorie diet.

Here’s another to pin to your Pinterest boards!You're going to enjoy Swiss Chard with Bacon and Mushrooms! This flavorful vegetable side dish also has onions and garlic, and is ready in under 20 minutes!

Save

Save

Save

Save

Save

Save

Save

Save

Save

Save

Save

Save

Cauliflower Rice with Parmesan and Garlic

Cauliflower rice, (seasoned with Parmesan and garlic) is a trending, healthy substitute for people wanting to avoid the carbs/starches in white or brown rice! Cauliflower rice, (seasoned with Parmesan and garlic) is a healthy substitute for people wanting to avoid the carbs/starches in white or brown rice!
I recently found a recipe for Cauliflower Rice with Parmesan and Garlic, and decided to check it out. What a great way to get more veggies on the ol’ dinner plate!

How Cauliflower Rice Got It’s Name

The dish is called “rice” because a head of cauliflower is processed in a food processor (or by using a box grater) so that the florets become small enough that they LOOK like rice.  The cauliflower is then cooked and served.

This recipe for cauliflower rice adds a bit of flavor to the cooked “rice” by adding a bit of fresh grated Parmesan cheese, minced garlic and butter. The result? A tasty side dish, that still comes in under 100 calories! It’s very easy to make cauliflower rice. If you’ve been curious like I was as to HOW to make it, give this simple recipe a try, and see for yourself!

How To Make Cauliflower Rice

To “rice” the cauliflower, remove the outer leaves and core from a medium sized head of cauliflower. Cut the cauliflower into small florets.

Cauliflower Rice is made using fresh cauliflower, cut into florets.

Place the florets into a food processor (with blade attachment).  Pulse several times until the cauliflower florets are small like grains of rice.

Can I Still Make Cauliflower Rice If I Don’t Own A Food Processor?

The good news is… YES!!!  If you do not own a food processor, no problem… simply use a box cheese grater and grate into small rice sized pieces!

Cauliflower florets are processed in food processor until it resembles rice.

Melt butter in a large skillet or saucepan on medium-low heat. Add minced garlic and continue to cook, stirring constantly, for 2-3 minutes, so that the garlic flavor is infused into the melted butter.

It is important NOT to burn the garlic, so keep an eye on it!  Add the cauliflower rice to the skillet and stir. Turn the heat up to medium-high to finish cooking.

Garlic is cooked in butter, then cauliflower rice is added to pan.

Sprinkle grated Parmesan cheese on top and stir well, to combine. Cook for about 5 minutes, or until cauliflower is tender, stirring often.

Season the cauliflower rice with salt and pepper, to taste. I added some dried parsley at this point, as well. Stir to completely mix all ingredients, and reheat, if necessary to serving temperature.

Cauliflower Rice with Parmesan and Garlic is seasoned with Parmesan cheese, garlic and spices.

Pour the rice into a serving dish, and garnish with chopped fresh parsley and additional Parmesan cheese, if desired.  Serve this side dish hot.

Cauliflower Rice with Parmesan and Garlic in bowl, on a red placemat.

Hope you will consider trying this recipe for cauliflower rice.  It fools the eye because it LOOKS like rice on the plate, but has fewer calories, and tastes like cauliflower (with some seasonings)! What a great way to get more veggies onto the ol’ dinner plate, right?  You might also want to try my recipe for Lemon Garlic Cauliflower Rice. Have a great day!

Looking For Other RICE Recipes?

You can find ALL of my recipes in the Recipe Index, which is located at the top of the page. You might also enjoy a few other recipes for RICE that I have on this blog, including:

Interested In More Recipes?

Thank you for visiting this website. I appreciate you using some of your valuable time to do soIf you’re interested, I publish a newsletter 2 times per month (1st and 15th) with all the latest recipes, and other fun info. I would be honored to have you join our growing list of subscribers, so you never miss a great recipe!
There is a Newsletter subscription box on the top right side (or bottom) of each blog post, depending on the device you use, where you can easily submit your e-mail address (only) to be included in my mailing list.

You Can Also Find Me On Social Media:

Facebook page: The Grateful Girl Cooks!
Pinterest:
The Grateful Girl Cooks!
Instagram:
jbatthegratefulgirlcooks

Author's signature

Recipe Adapted From: http://kirbiecravings.com/2016/05/garlic-parmesan-cauliflower-rice.html

0 from 0 votes
Cauliflower Rice with Parmesan and Garlic
Prep Time
5 mins
Cook Time
7 mins
Total Time
12 mins
 

Cauliflower rice, (seasoned with Parmesan and garlic) is a trending, healthy substitute for people wanting to avoid the carbs/starches in white or brown rice!

Category: Side Dish, Vegetable Dish
Cuisine: American
Keyword: cauliflower rice
Servings: 8 (1/2 cup) servings
Calories Per Serving: 95 kcal
Author: JB @ The Grateful Girl Cooks!
Ingredients
  • 1 medium head of cauliflower (will yield approx. 4 cups of cauliflower "rice")
  • 4 Tablespoons butter
  • 4 garlic cloves , minced
  • 1/2 cup shredded Parmesan cheese
  • Dried parsley (just a shake or two)
  • Salt and pepper , to taste
  • Fresh chopped parsley for garnish (optional)
  • Parmesan cheese for garnish (optional)
Instructions
  1. To "rice" the cauliflower, remove outer leaves and core from a medium sized head of cauliflower. Cut the cauliflower into small florets. Place florets into a food processor (with blade attachment). Pulse several times until florets are small, like grains of rice. No food processor? Use a box cheese grater and grate into small rice sized pieces!
  2. Melt butter in a large skillet or saucepan on medium-low heat. Add minced garlic and continue to cook, stirring constantly, for 2-3 minutes, so the garlic flavor is infused into butter. It is important NOT to burn the garlic, so keep a good eye on it! Add "riced" cauliflower to skillet, stir, and turn heat to medium-high.
  3. Sprinkle grated Parmesan cheese on top and stir well, to combine. Cook cauliflower for about 5 minutes, stirring often, until cauliflower is tender. Season with salt and pepper (to taste) and dried parsley. Stir to combine all ingredients, and reheat if necessary, to serving temp.
  4. Transfer the rice to a serving dish, garnish with chopped fresh parsley and additional Parmesan cheese, if desired. Serve hot.
Nutrition Facts
Cauliflower Rice with Parmesan and Garlic
Amount Per Serving (1 serving)
Calories 95 Calories from Fat 63
% Daily Value*
Fat 7g11%
Saturated Fat 4g25%
Cholesterol 20mg7%
Sodium 171mg7%
Potassium 173mg5%
Carbohydrates 3g1%
Fiber 1g4%
Sugar 1g1%
Protein 3g6%
Vitamin A 230IU5%
Vitamin C 26.2mg32%
Calcium 93mg9%
Iron 0.3mg2%
* Percent Daily Values are based on a 2000 calorie diet.

Here’s one more to pin on your Pinterest boards!Cauliflower rice, (seasoned with Parmesan and garlic) is a trending, healthy substitute for people wanting to avoid the carbs/starches in white or brown rice!


Save

Save

Save

Save

Save

Save

Save

Save

Save

Save

Save

Save

Save

Save

Brussel Sprouts with Bacon and Mushrooms

Pan-seared Brussel sprouts with bacon, mushrooms, shallots, butter and garlic are a perfect side dish for your holiday dinner, or any other meal!Pan-seared Brussel sprouts with bacon, mushrooms, shallots, butter and garlic are a perfect side dish for your holiday dinner or any other meal!
If you like trying new vegetable dishes, I’m sure you will LOVE this simple side dish recipe for Brussel Sprouts with Bacon and Mushrooms! 

We enjoyed this delicious side dish with our dinner recently! This delicious veggie dish is a perfect one to be enjoyed for the holidays or other meals!

I grew up not liking Brussel sprouts at all, but as an adult, I’ve come to love them! We eat them pan-seared, roasted, steamed, and practically every way they can be prepared.

I decided to create a new recipe from scratch, to come up with a new way to enjoy them!

For this recipe I pan-seared Brussel sprouts with bacon, then added mushrooms, shallots, salt, pepper, minced garlic. I finished this dish off with a touch of butter. The results are DELICIOUS!

Scroll Down For A Printable Recipe Card At The Bottom Of The Page

How To Make Brussel Sprouts With Bacon and Mushrooms

Chop up the bacon and add it to a large skillet. I like to use kitchen scissors to cut the slices of bacon into tiny pieces before cooking. It makes the bacon cook a lot faster this way!

Cook the bacon on medium heat 2-3 minutes, until it is about half-way done.

Cooking the bacon pieces to add to pan-seared brussel sprouts.

Place brussel sprouts (that have been cut in half) into the same skillet.  Continue to pan-sear the vegetables in the bacon drippings for a couple minutes.

If necessary, you might want to add a little bit of olive oil to skillet, in order to keep from burning the veggies.  Lightly season the brussel sprouts with salt and pepper.

Brussel sprouts and bacon pieces are cooked in bacon drippings in skillet.

Continue cooking the brussel sprouts until they begin begin to soften (3-4 minutes). Make sure to turn them over to the other side, half way through cooking time.

Measure 3 Tablespoons of water into the pan, and cook until the water has dissipated.

Water is added to brussel sprouts and bacon and cooked until it is gone.

Add the sliced mushrooms and shallots to the skillet. Continue cooking until the mushrooms are done and cooked through (approx. 3-4 minutes).

Stir in the minced garlic, and cook for an additional minute, stirring often, so you won’t burn the garlic.

To Finish Cooking The Brussel Sprouts

At this point, the brussel sprouts and mushrooms should be cooked through. Toss a tiny pat of butter into the skillet, and stir until it melts and coats the veggies.

NOTE: **Butter is completely optional, but it does add more flavor… just sayin’.

Sliced mushrooms and shallots are added to brussel sprouts and bacon in skillet.

Serving The Brussel Sprouts

Remove pan from the heat, and season with additional salt and pepper to taste, and then serve the brussel sprouts. Transfer them to a serving plate, and dig in!

Brussel Sprouts with Bacon and Mushrooms are served on white platter.

The bacon will be fully cooked , the Brussel sprouts will be tender, and there will be a whole lot of flavor going on!

Cooked brussel sprouts on platter, with bacon and mushrooms.

Brussel sprouts with bacon and mushrooms is a very simple, yet tasty side dish to prepare.  I hope you will have the opportunity to make this easy recipe.

It’s one more way to get yummy veggies (including Brussel sprouts!) onto dinner plates. Plus… everything’s better with bacon, right? 

Thanks for stopping by, and please come back again soon for more family-friendly recipes. Take care, and have a great day!

Looking For More VEGETABLE Dishes?

You can find all of my vegetable dishes in the Recipe Index at the top of the page. A few favorite recipes are:

Want More Recipes? Get My FREE Newsletter!

I publish a newsletter 2 times per month (1st and 15th) with lots of recipes, tips, etc..
Would you like to join our growing list of subscribers?

There is a Newsletter subscription box on the top right (or bottom) of each blog post, depending on the device you use.
You can submit your e-mail address there, to be added to my mailing list.

Find Me On Social Media:

Facebook page: The Grateful Girl Cooks!
Pinterest:
The Grateful Girl Cooks!
Instagram:
jbatthegratefulgirlcooks

Instagram: jbatthegratefulgirlcooks

Author's signature

↓↓ PRINTABLE RECIPE BELOW ↓↓

0 from 0 votes
Brussel Sprouts with Bacon and Mushrooms
Prep Time
5 mins
Cook Time
15 mins
Total Time
20 mins
 
Pan-seared Brussel sprouts with bacon, mushrooms, shallots, butter and garlic are a perfect side dish for your holiday dinner or any other meal!
Category: Side Dish, Vegetables
Cuisine: American
Keyword: brussel sprouts
Servings: 2 servings
Calories Per Serving: 144 kcal
Author: JB @ The Grateful Girl Cooks!
Ingredients
  • 10 Brussel Sprouts (approx. 5 per person), cut in half (and stem removed)
  • 1-2 slices thick cut bacon , chopped into small pieces
  • Olive oil (only if necessary due to low bacon dripping residue in skillet)
  • salt & pepper , to taste
  • 3 Tablespoons water
  • 4-6 mushrooms , sliced
  • 1 teaspoon finely chopped shallots
  • 1/2 teaspoon minced garlic
  • 1 teaspoon butter
Instructions
  1. Add chopped bacon to medium skillet. Cook on medium heat until about 1/2 way done. (do not drain bacon drippings).
  2. Add brussel sprouts that have been cut in half (and de-stemmed). Continue to pan-sear brussel sprouts in bacon drippings for a couple minutes (add a tiny bit of olive oil to skillet only if necessary). Lightly season brussel sprouts with salt and pepper.
  3. Continue cooking until brussel sprouts begin to soften (3-4 minutes), flipping over half way through cooking. Add 3 Tablespoons water to skillet; cook until water has cooked away.
  4. Add sliced mushrooms and shallots to skillet. Continue cooking until mushrooms are done and cooked through (approx. 3-4 minutes). Add minced garlic; cook for additional minute. At this point, brussel sprouts and mushrooms should be cooked through. Add butter, and stir until butter has melted and coated veggies. (Note: Butter is completely optional, but adds good flavor)
  5. Remove pan from heat, season with additional salt and pepper (if needed), then serve.
Nutrition Facts
Brussel Sprouts with Bacon and Mushrooms
Amount Per Serving (1 serving)
Calories 144 Calories from Fat 81
% Daily Value*
Fat 9g14%
Saturated Fat 3g19%
Cholesterol 17mg6%
Sodium 164mg7%
Potassium 532mg15%
Carbohydrates 10g3%
Fiber 4g17%
Sugar 2g2%
Protein 6g12%
Vitamin A 780IU16%
Vitamin C 81.6mg99%
Calcium 40mg4%
Iron 1.5mg8%
* Percent Daily Values are based on a 2000 calorie diet.

Here’s one more to pin on your Pinterest boards!Pan-seared Brussel sprouts with bacon, mushrooms, shallots, butter and garlic are a perfect side dish for your holiday dinner or any other meal!

Save

Save

Save

Save

Save

Save

Save

Save

Save

Save

Save

Save

Save

Save

Save

Save

Save

How To Can Ranch Style Beans

Ranch style beans are a perfect “grab and go” side dish for chicken, hamburger, hot dogs, etc. Learn how to make and can them for long term storage!Ranch style beans are a perfect "grab and go" side dish for chicken, hamburger, hot dogs, etc. Learn how to make and can them for long term storage!
If you enjoy beans as a hearty side dish for chicken, burgers, hot dogs, etc. AND like canning, then you might be interested in learning how to can ranch style beans.

I learned how to can ranch-style beans from a website for canning enthusiasts (sbcanning.com). Canning some ranch style beans to have in my pantry to use as a side dish for some of our dinners sounded wonderful to me. The recipe was actually easy to prepare, and the beans are quite delicious!

This recipe to can ranch style beans as written makes 5 pints, but can be easily doubled. In the original recipe it calls for 4 Tablespoons chili powder, but I used only 3 Tablespoons, to lower the “spicy factor”. That was the only change I made to the original recipe. Here’s how to make them:

Scroll Down For A Printable Recipe Card At The Bottom Of The Page

Prepare Pressure Canner, Jars And Lids

Prepare your canning jars, lids, and pressure canner, according to recommended canning guidelines and the manufacturer instructions for your appliance. You must use a pressure canner to can ranch style beans!

A pressure canner must be used to can ranch style beans.

Cook The Pinto Beans

Place the dried pinto beans in a large saucepan (or Dutch oven). Add water to the pan, and make sure to cover the beans fully, by at least two inches. Bring the water to a full boil, and continue boiling for 2 minutes.  Take the pan off the heat, and cover the pan. Let the beans sit and soak for 1 hour, then drain the beans. **SEE NOTES SECTION IN PRINTABLE RECIPE FOR ALTERNATE METHOD**

Pinto beans soak in water before cooking them.

Prepare The Sauce For The Ranch Style Beans

In large skillet, heat the oil on medium heat. When the oil is hot, add the chopped onions, and cook them for 9-10 minutes. Stir in the minced garlic and cook (stirring constantly), for 1 minute (don’t let the garlic burn).

Onion and garlic are cooked to add to sauce for the ranch style beans.

Add the tomatoes, brown sugar, apple cider vinegar, water and spices (paprika, cumin, chili powder, and oregano) to the skillet. Stir, to fully combine the ingredients. Transfer this mixture to a blender or food processor (You may have to do this in batches). Process well, until the sauce mixture is smooth.

The sauce for the ranch beans is cooked in large skillet.

A blender is used to liquify the sauce for the beans.

Bring 3-4 cups of water (or beef broth) to a boil in separate pan. Once the liquid is boiling, remove the pan from the heat. Set this aside.

Add Prepared Beans To The Sauce

Add the prepared pinto beans to the hot, pureed tomato mixture. Stir well, to combine. It is important to make sure everything is very hot,  before adding it to the prepared canning jars.

Prepared pinto beans are added to the sauce.

Filling The Canning Jars

Fill the hot pint jars 3/4 of the way full.  Add salt and pepper to each jar.  Next, add boiling water (or beef broth) to each jar, being sure to leave a 1″ headspace in each jar.

Make sure to remove the air bubbles from each jar by inserting a plastic utensil into each one, and then adjust the headspace, if necessary. Wipe the rims clean with a damp paper towel, and then put on flat lids and screw bands. Tighten screw bands to fingertip tightness.

Sterilized, hot canning jars are ready for the beans to be added.

Time To Can Ranch Style Beans!

Process the jars in a prepared pressure canner. If you are using a weighted gauge canner, process pint jars at 10 pounds pressure for 75 minutes.  If you are using a dial gauge canner, process pint jars at 11 pounds pressure.  Quart sized jars should be processed for 85 minutes.

The gauge on the pressure canner is at 10 pounds pressure.

Once the ranch style beans are done, and have safely been removed from canner (following manufacturer instructions!), let the jars cool on a dish towel. When the jars of ranch style beans have completely cooled, wipe them clean and label the jars. Check to make sure each jar has sealed properly. Store the jars in your pantry (to use at a later date) as a quick “grab and go” side dish!

After the canning process is over, the jars of ranch style beans cool on a dish towel.

I love canning during the cold Winter months when I’m inside a lot, due to cold weather, snow or rain. It feels wonderful to have my pantry stocked and ready for the rest of the year. Hope you will consider trying this recipe for ranch style beans.

Looking For More CANNING Recipes?

You can find all of my canning recipes in the Recipe Index, located at the top of the page. Hope you will check them out! A few canning recipes you might enjoy include:

Interested In More Recipes?

Thank you for visiting this website. I appreciate you using some of your valuable time to do soIf you’re interested, I publish a newsletter 2 times per month (1st and 15th) with all the latest recipes, and other fun info. I would be honored to have you join our growing list of subscribers, so you never miss a great recipe!
There is a Newsletter subscription box on the top right side (or bottom) of each blog post, depending on the device you use, where you can easily submit your e-mail address (only) to be included in my mailing list.

You Can Also Find Me On Social Media:
Facebook page: The Grateful Girl Cooks!
Pinterest: The Grateful Girl Cooks!
Instagram: jbatthegratefulgirlcooks

Author's signature

Recipe Source: http://www.sbcanning.com/2013/10/canning-ranch-style-beans.html

5 from 2 votes
How To Can Ranch Style Beans
Prep Time
1 hr
Cook Time
1 hr 15 mins
Total Time
2 hrs 15 mins
 

Ranch style beans are a perfect "grab and go" side dish for chicken, hamburger, hot dogs, etc. Learn how to make and can them for long term storage!

Category: Canning
Cuisine: American
Keyword: ranch style beans
Servings: 5 pints
Calories Per Serving: 418 kcal
Author: JB @ The Grateful Girl Cooks!
Ingredients
  • 1 pound dried pinto beans (16 ounces)
  • 3-4 Tablespoons chili powder (I used 3)
  • 6 cloves garlic , finely minced
  • 1 brown onion , diced
  • 1 can (15 ounces) diced tomatoes (can substitute 2 medium, peeled/diced tomatoes)
  • 1 teaspoon brown sugar
  • 1 teaspoon apple cider vinegar
  • 1 teaspoon paprika
  • 1 teaspoon cumin
  • 1/2 teaspoon oregano
  • 1 cup water
To Add To Jars:
  • 1/2 teaspoon salt and 1/2 teaspoon black pepper
  • 3-4 cups boiling water (or beef broth)
Instructions
  1. Prepare jars, lids, pressure canner, according to manufacturer instructions. Put dried pinto beans in a large saucepan (or Dutch oven). Add water to pan, making sure to cover beans fully by two inches. Bring to a full boil; continue boiling for 2 minutes. Take pan off heat, cover, and let beans sit (and soak) for 1 hour, then drain beans.
  2. In large skillet, heat oil on medium. When oil is hot, add chopped onions; cook for 9-10 minutes. Add minced garlic and cook, stirring constantly for 1 minute (don't let garlic burn).
  3. Add tomatoes, brown sugar, apple cider vinegar, water, paprika, cumin, chili powder, and oregano. Transfer mixture to a blender or food processor (may have to do this in batches). Process until mixture is smooth.
  4. Bring 3-4 cups of water (or beef broth) to a boil in separate pan. Once boiling, remove from heat.
  5. Add prepared pinto beans to hot, pureed tomato mixture. Stir to combine. (Make sure mixture is hot before adding to prepared jars.
  6. Fill hot pint jars 3/4 of the way full. Add salt and pepper to each jar. Add boiling water (or beef broth) to each jar, being sure to leave 1" headspace. Remove air bubbles, then adjust headspace, if necessary. Wipe jar rims clean, then put on flat lids and rings, tightening to fingertip tight.
  7. Processing: If using weighted gauge canner, process pints at 10# pressure for 75 minutes. If using dial gauge canner, process at 11# pressure. Quart jars must be processed for 85 minutes.
  8. Once beans are done, and jars have been removed from canner (following manufacturer instructions), let jars cool on a dish towel. Once completely cooled, label jars; store in pantry.
Recipe Notes

Alternate Method For Beans: Sort and rinse beans. Soak in water overnight. Drain. Place beans in LARGE saucepan. Cover with cold water (water must be two inches above beans). Bring beans to a LOW BOIL and cook, stirring occasionally for 30 minutes. Drain. Proceed with remainder of recipe.

Nutrition Facts
How To Can Ranch Style Beans
Amount Per Serving (1 pint jar of beans)
Calories 418 Calories from Fat 18
% Daily Value*
Fat 2g3%
Sodium 996mg43%
Potassium 2282mg65%
Carbohydrates 79g26%
Fiber 19g79%
Sugar 14g16%
Protein 24g48%
Vitamin A 2915IU58%
Vitamin C 27.1mg33%
Calcium 167mg17%
Iron 8.5mg47%
* Percent Daily Values are based on a 2000 calorie diet.

Here’s one more to pin on your Pinterest boards!Ranch style beans are a perfect "grab and go" side dish for chicken, hamburger, hot dogs, etc. Learn how to make and can them for long term storage!


Save

Save

Save

Save

Save

Save

Save

Save

Save

Save

Save

Save

Save

Save