Learn how to make Homemade Beef Ravioli from scratch (pasta & filling). Top with marinara sauce and enjoy this delicious, Italian dish!

Craving ravioli? It seems nowadays most people tend to buy a bag of frozen ravioli at the store or order it at a restaurant. That’s awesome, but if you’re interested in learning how to make your own, I want to share this delicious recipe for homemade beef ravioli that can be made from scratch.
Every now and then I want to make HOMEMADE ravioli, and this is the recipe I use when I want to add a meat filling, for plump, tasty ravioli. Yes… it involves some time for the prep work, but if you’ve got the time, this is a great recipe I heartily recommend!
If you enjoy making homemade ravioli from scratch, be sure to also check out my recipes for Ravioli with Mushrooms and Snap Peas OR Butternut Squash Ravioli with Browned Butter Sage Sauce.
This recipe for homemade beef ravioli is wonderful! Here’s how to make this delicious, filling pasta dish from scratch.
Scroll Down For A Printable Recipe Card At The Bottom Of The Page
Make The Beef Filling For The Ravioli
Sauté olive oil and finely chopped carrot, onion and celery in a large skillet on Medium-High heat. Cook for 4-5 minutes until they begin to soften and the onions and celery become translucent.
Add 1 pound of ground beef and ½ pound of ground Italian sausage to the cooked veggies. Stir in minced garlic, dried oregano and Italian seasoning.
Break the meat down into small pieces and continue to cook on Medium heat (with the veggies) until the meat has been cooked through, is browned, and in small pieces.


Sit in red wine, a pinch of salt, and one bay leaf into the meat mixture in the skillet. Place a lid on the skillet, reduce the heat to LOW, and let this mixture simmer for 8-10 minutes, stirring occasionally.
Once it has finished cooking, transfer the skillet off the heat source and take off the lid. Remove the bay leaf (discard), then let the meat mixture cool COMPLETELY. This typically takes between 30-35 minutes.


Make The Pasta Dough While Meat Cools
While the meat filling is cooling, you can prepare the pasta dough, using your favorite recipe or the simple one I have provided below.
Using Your Own Pasta Dough Recipe? Use your own favorite recipe for homemade pasta dough, making enough to yield 1 pound of pasta dough.
Need A Simple Recipe For Pasta Dough? Place 3 eggs and 2½ cups of all purpose flour in a large mixing bowl (if making by hand) OR in the bowl of a stand mixer.
Combine the eggs and flour until they are blended well. Too wet? Add a tiny bit more flour. Too dry? Add a tiny bit more water. Place the dough on a lightly floured surface and firmly knead the dough.

Knead the dough firmly until it comes together and has a consistent texture and color throughout. Form it into a mound, then cover with a damp towel (or wrap tightly in plastic wrap), and let the dough REST for about 15 minutes.

Roll Out Pasta Dough By Hand Or Machine
Using a Pasta Rolling Machine Or Attachment?:
Unwrap the pasta dough, and divide it into 4 pieces. Roll 1 piece at a time, keeping the remaining pieces covered with a damp towel.
Use a pasta attachment OR a manual pasta machine to roll out the dough into 7″-8″ long sheets (approx. 3-4″ wide). Trim dough into rectangular sheets. Lay pasta on lightly floured surface and keep covered.**Follow manufacturer’s instructions for best results.**
Making Pasta Dough By Hand?:
If you will be rolling the dough by hand, use a rolling pin to roll each piece of dough into ¼” thick, 7-8″ long sheets. Place pasta sheets on a lightly floured surface as you finish each one and cover with a damp towel.

Final Step With The Cooled Ravioli Filling
When the meat mixture has cooled completely, add 2 eggs and Parmesan cheese. Stir very well, until they are fully incorporated and the mixture holds together enough to form a pliable, soft ball.
If you have a food processor, you can use that, as well for this step. Pulse the mixture a few times until it becomes pureed. It should still be able to form a ball (if not, add 1-2 more Tablespoons of Parmesan). Congrats… you just made the ravioli filling.


Stuffing And Cutting The Ravioli- 2 Ways
Method #1- When it is time to stuff and cut the ravioli, you have a couple choices as to “how” to do it. You can use a ravioli form (as shown in the first two pics below.
Using this method, you will lay a thin layer of a pasta dough sheet over the form, then scoop the meat filling into the “cups”. Place another thin pasta dough sheet on top to cover. Crimp edges tightly to seal both layers of pasta dough together, then turn the dough out and cut the individual raviolis.
Method #2- Lay a long pasta dough sheet on a lightly floured counter or cutting board. Scoop the meat filling in small mounds (about a generous teaspoon) onto the dough, leaving about an inch between each ravioli mound.
Lay a second sheet of pasta on top, then cut into individual raviolis. Press (or use a ravioli cutter) all the edges firmly to seal, removing as much air as possible before the final edge is sealed.


Cook The Ravioli
Once you’re made all the ravioli, it’s time to cook them. You may need to cook them in two batches, depending on the size saucepan you use. Photo shown below is only part of the batch, because I froze the remaining raviolis (before cooking) to make another time.
Heat a large saucepan full of water and a pinch of salt to a boil, using HIGH heat. Once the water is boiling, carefully add the ravioli into the water. Cook them for 6-8 minutes, then drain the water from the pan.


Serve And Enjoy Homemade Beef Ravioli
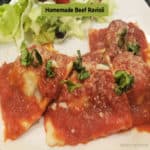
After draining the ravioli, transfer them to serving plates and serve immediately (while hot), topped with your favorite marinara or meat sauce (heated). If desired, sprinkle the ravioli with additional grated Parmesan cheese and add fresh chopped parsley.
The raviolis are plump, and as you can see (below), they’re packed with delicious meat filling! Dig in, and enjoy wonderful tasting homemade beef ravioli.


I hope you have the opportunity to make these delicious ravioli for your family or friends, and trust you’ll enjoy them as much as we do.
Thanks for stopping by, and I invite you to come back again soon for more family-friendly recipes. Take care, may God bless you, and have a wonderful day!
Looking For More ITALIAN Recipes?
You can find ALL of my recipes in the Recipe Index, located at the top of the page. I have lots of delicious Italian recipes for you to check out, including:
Want More Recipes? Get My FREE Newsletter!
I publish a newsletter 2 times per month (1st and 15th) with lots of recipes, tips, etc..
Would you like to join our growing list of subscribers?
There is a Newsletter subscription box on the top right (or bottom) of each blog post, depending on the device you use.
You can submit your e-mail address there, to be added to my mailing list.
Find Me On Social Media:
Facebook page: The Grateful Girl Cooks!
Pinterest: The Grateful Girl Cooks!
Instagram: jbatthegratefulgirlcooks

Ravioli filling recipe adapted from: recipesofitaly.com/authentic-italian/pasta-and-rice-recipes/meat-ravioli-recipe.html#.YN1262hKiUk
Pasta recipe source: Instruction manual for Roma Weston Traditional Style Pasta Machine, page 6
↓↓ PRINTABLE RECIPE BELOW ↓↓
Learn how to make Homemade Beef Ravioli from scratch (pasta & filling). Top with marinara sauce and enjoy this delicious, Italian dish!
Category: Main Dish
Cuisine: Italian
Keyword: beef ravioli, pasta
Servings: 6 (approx. 4 per serving)
Calories Per Serving: 726 kcal
Author: JB @ The Grateful Girl Cooks!
For Beef Filling:
- ½ pound ground Italian sausage (mild)
- ¼ cup extra virgin olive oil
- 1 stalk celery minced
- 1 medium carrot peeled, minced
- ¼ medium yellow onion minced
- 1 pound ground beef
- 1 teaspoon minced garlic
- ½ teaspoon dried oregano
- ½ teaspoon Italian seasoning
- 1 pinch salt
- 1 medium bay leaf
- ½ cup red wine
- ¾ cup Parmesan cheese finely grated
- 2 large eggs
Pasta Dough Ingredients (if using)- or use your favorite pasta dough recipe enough for 1 pound:
- 2½ cups all purpose flour
- 3 large eggs
Marinara or Meat Sauce For Topping Ravioli (use your favorite brand or recipe)
Make Beef Filling:
Sauté olive oil, carrot, onion and celery in large skillet on Medium-High heat. Cook 4-5 minutes until carrots soften and onions/celery become translucent. Add ground beef and Italian sausage to the skillet. Stir in garlic. Reduce heat to Medium; cook until meat is cooked through, browned, and in small pieces. Discard any grease.
Stir wine, salt, oregano, Italian seasoning and bay leaf into meat mixture. Cover skillet, reduce heat to LOW; simmer 8-10 minutes, stir occasionally. Remove skillet from heat; uncover. Remove/discard bay leaf; let meat filling cool COMPLETELY (approx. 30-35 minutes).
When mixture has cooled, add eggs and Parmesan. Stir well, until completely incorporated. Mixture should hold together enough to form a pliable ball. TIP: Have a food processor? Use it for this step. Pulse meat mixture a few times until pureed. It should still be able to form a ball (if not, add 1-2 T. more Parmesan).
Make The Pasta Dough:
Using Your Own Pasta Dough Recipe? Use a favorite recipe for homemade pasta dough, following instructions to yield 1 pound of pasta dough.
Need A Simple Recipe For Pasta Dough? While meat filling cools, you can prepare pasta following this recipe. Place 3 eggs and 2½ cups of all purpose flour in a large mixing bowl (if making by hand) OR in the bowl of a stand mixer. Combine eggs/flour until they're well-blended. Too wet? Add a bit more flour. Too dry? Add a bit more water. Place dough on a lightly floured surface and firmly knead until it comes together and has a consistent texture/color throughout. Form into a mound; cover with a damp towel (or wrap tightly in plastic wrap), and let dough REST for 15 minutes.
Roll Pasta:
Using a Pasta Rolling Machine Or Attachment?: Unwrap dough; divide into 4 pieces. Roll 1 piece at a time (keep remaining pieces covered with damp towel). Use a pasta attachment OR manual pasta machine to roll dough into ¼" thick, 7"-8" long sheets (approx. 3-4" wide). Lay pasta on lightly floured surface; keep covered. **Follow manufacturer instructions for best results.**
Making Pasta Dough By Hand?: If rolling the dough by hand, use a rolling pin. Roll each piece of dough into ¼" thick, 3-4" wide, 7-8" long sheets. Place pasta sheets on a lightly floured surface; cover with a damp towel.
Fill And Cut Ravioli (2 methods):
Method #1- Use a ravioli form. Using this method, you will lay a thin layer of a pasta dough sheet over the form, then scoop the meat filling into the "cups". Place another thin pasta dough sheet on top, to cover, then cut and firmly seal.** Use manufacturer's instructions for best results.**
Method #2- Lay a long pasta dough sheet on lightly floured work surface. Scoop small portions (1 rounded teaspoon) of meat filling onto the center of the dough, leaving 1"between each mound and leaving dough around all edges of the filling. Lay a second sheet of pasta on top. Press outside edges firmly to completely seal, then cut into individual raviolis, and seal each one firmly. removing as much air as possible before the final edge is sealed.
Cook Ravioli And Serve:
You may need to cook ravioli in two batches, depending on the size pan you use. Bring a large saucepan of water and a pinch of salt to a boil, on HIGH heat. Once fully boiling, carefully add ravioli. Cook for 6-8 minutes; drain water from pan.
After draining, transfer ravioli to plates; serve immediately, topped with marinara or meat sauce (heated). If desired, sprinkle ravioli with additional Parmesan cheese and/or fresh chopped parsley). Enjoy!
Note: Sauce is not included in the caloric calculation as varieties/brands used will vary. Caloric calculation was made using pasta ingredients indicated. Calories will vary if using different pasta dough ingredients.
Nutrition Facts
Homemade Beef Ravioli
Amount Per Serving (1 (about 4 per serving))
Calories 726 Calories from Fat 396
% Daily Value*
Fat 44g68%
Saturated Fat 15g94%
Trans Fat 1g
Polyunsaturated Fat 4g
Monounsaturated Fat 21g
Cholesterol 246mg82%
Sodium 608mg26%
Potassium 513mg15%
Carbohydrates 43g14%
Fiber 2g8%
Sugar 1g1%
Protein 34g68%
Vitamin A 2058IU41%
Vitamin C 2mg2%
Calcium 215mg22%
Iron 5mg28%
* Percent Daily Values are based on a 2000 calorie diet.
Here’s one more to pin on your Pinterest boards!


 - The Grateful Girl Cooks!")
 - The Grateful Girl Cooks!")
 - The Grateful Girl Cooks!")
 - The Grateful Girl Cooks!")
 - The Grateful Girl Cooks!")
 - The Grateful Girl Cooks!")
 - The Grateful Girl Cooks!")
 - The Grateful Girl Cooks!")
 - The Grateful Girl Cooks!")

 - The Grateful Girl Cooks!")
 - The Grateful Girl Cooks!")
 - The Grateful Girl Cooks!")
 - The Grateful Girl Cooks!")
 - The Grateful Girl Cooks!")
 - The Grateful Girl Cooks!")
 - The Grateful Girl Cooks!")
 - The Grateful Girl Cooks!")
 - The Grateful Girl Cooks!")
 - The Grateful Girl Cooks!")
 - The Grateful Girl Cooks!")
 - The Grateful Girl Cooks!")
 - The Grateful Girl Cooks!")

 - The Grateful Girl Cooks!")