Make a dozen delicious Oatmeal Molasses Dinner Rolls to serve with a favorite meal. Light, buttery and slightly sweet, they taste amazing!

Several years ago, I found a delicious recipe for dinner rolls in a cookbook and want to share this recipe with you today. If you enjoy homemade yeast rolls and don’t mind a bit of prep while you wait for the dough to rise, etc., then I think you will LOVE oatmeal molasses dinner rolls!
These absolutely amazing rolls are so delicious and with their lightly sweet molasses flavor, they’re hard to describe. The first time I made them, my husband and I both said “WOW!” and were blown away by how decadent they are.
Yes… as anyone who works with yeast breads or rolls know, they do take a bit more prep due to the time necessary for the rising of the dough. All that said, I’m not kidding when I say these rolls are worth your time!
I typically start the rolls early on the day we want to enjoy them with our dinner. Here’s how to make a dozen oatmeal molasses rolls.
Scroll Down For A Printable Recipe Card At The Bottom Of The Page
Prepare The Batter
Stir together active dry yeast, lukewarm water (110°F.) and a small pinch of brown sugar in a small bowl until combined. Set the bowl aside and let it rest until the mixture develops bubbles on top (about 5-10 minutes).
The bubbling on the surface indicates you have “good, active” yeast. If no bubbles form, the yeast is not working (too old, etc.), and you should discard and try again with new yeast!

Pour milk into a small saucepan and scald the milk. “Scalding” involves heating the milk on Medium-Low until you see it beginning to steam slightly and it starts bubbling around the edges.
Do not let the scalded milk come to a boil, so remove it from the heat once it has been scalded. Pour the heated milk into a large bowl and immediately add slices or cubes of butter. Stir to combine and let the butter melt.


Add Additional Dough Ingredients
Once the butter has fully melted, add the rest of the brown sugar, old-fashioned oats, molasses and salt. Stir these ingredients together and once fully combined, set the bowl aside.
Let this mixture cool down until it is only lukewarm. When the mixture has cooled down to be only lukewarm, add a large egg and stir well, to combine.
IMPORTANT: If you add the egg while the butter mixture is too hot, it might scramble the egg, so please don’t rush that step!
Once the egg has been mixed in, pour in the bubbling yeast mixture and stir it in until combined with the other ingredients.


Add The Flour
Stir in most of the flour (2½ cups) until it has been fully combined with the liquid mixture. Mix until the dough for the oatmeal molasses rolls loses its sheen. If necessary, add up to ½ cup more flour, to reach this point.
Let the dough rest in the mixing bowl for 10 minutes, then turn the dough out into a large, greased or sprayed bowl (greased on bottom and sides). Turn the dough ball over so all sides are coated with the grease.
Cover the bowl tightly with plastic wrap and put the bowl in the refrigerator for at least 2 hours. You can also refrigerate the dough overnight, if necessary, because it won’t rise too much.


Knead And Shape The Chilled Dough
Before shaping the rolls, grease or butter a 9″ cake pan very generously on the bottom and up the sides. Turn the dough out onto a well-floured work surface then knead the dough 4-5 times.
Cut the dough into 12 pieces, trying to keep them all approximately the same size, rolling each piece into a tight ball.

Shape the dough balls by place a piece on your palm and flatten the dough. Once flattened, roll the outer edges into the center and then pinch the edges together tightly to seal.
Put the rolls SEAM SIDE DOWN in the buttered cake pan in a single layer. The rolls will be touching each other.
Use a pastry brush to spread HALF of the melted butter (1 Tbsp.) all over the surface of each of the rolls, then sprinkle the tops with a small amount of old-fashioned oats.
Cover the pan with a towel and let the rolls rise in a warm place for 2 hours, OR until the rolls have doubled in size.

Time To Bake The Rolls
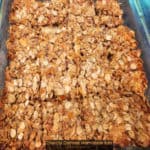
Preheat the oven to 350°F. during the last few minutes of the dough rising. You can see in the photo below how the rolls rise up in the pan, leaving hardly any space in between each one.
Bake the rolls for 35-40 minutes, until they are well-browned on top. If you have an instant-read thermometer you can test the internal temperature, if desired.
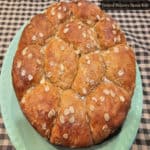
The oatmeal molasses dinner rolls should have an internal temp. of 190°F. once they’re done. Don’t they look AWESOME?


Serve The Oatmeal Molasses Dinner Rolls
Remove the rolls from the oven and let them sit for 1-2 minutes in the pan, then run a butter knife around the edges of the pan to loosen the rolls. Lightly brush the top of the rolls with the remaining HALF of the melted butter (1 Tbsp.).
Carefully turn the pan over so the rolls release from the pan and place them on a wire rack. The rolls should come out in a solid, cohesive unit (if the pan was well-greased beforehand).
Let the rolls cool slightly (still on the rack) for about 5-6 minutes before serving them.

Transfer the warm buttery rolls to a serving plate or platter, serve them and let your family or guests pull apart the individual rolls, as they wish.

The rolls are amazingly light, buttery, DELICIOUS and full of flavor! They are so GOOD I’ll bet you can’t stop with eating only one of them!
We love having the rolls served along with a hot bowl of soup or other main dish for our dinner and always enjoy EVERY SINGLE BITE!

I hope you have the opportunity to try these oatmeal molasses dinner rolls and anticipate that you and those you love will love them, too!
Yes, they take a while to make, but the end result is fabulous, delicious dinner rolls, worth every minute of time it takes to make them.
Thanks for stopping by today, and I invite you to come back again soon for more family-friendly recipes. Take care, may God bless you, and have a wonderful day.
Looking For More BREAD or ROLL Recipes?
You can find ALL of my recipes in the Recipe Index, which is located at the top of the page. I have lots of delicious bread and roll recipes to choose from, including:
Want More Recipes? Get My FREE Newsletter!
I publish a newsletter 2 times per month (1st and 15th) with lots of recipes, tips, etc.
Would you like to join our growing list of subscribers?
There is a Newsletter subscription box on the top right (or bottom) of each blog post, depending on the device you use.
You can submit your e-mail address there, to be added to my mailing list.
Find Me On Social Media:
Facebook page: The Grateful Girl Cooks!
Pinterest: The Grateful Girl Cooks!
Instagram: jbatthegratefulgirlcooks

Original recipe source: “The Food 52 Cookbook”, by Amanda Hesser and Merrill Stubbs, pages 89-91, published in 2012 by Harper Collins Publishers.
↓↓ PRINTABLE RECIPE BELOW ↓↓
Make a dozen delicious Oatmeal Molasses Dinner Rolls to serve with a favorite meal. Light, buttery and slightly sweet, they taste amazing!
Category: Bread, Side Dish
Cuisine: All Cuisines
Keyword: oatmeal molasses dinner rolls
Servings: 12 rolls
Calories Per Serving: 225 kcal
Author: JB @ The Grateful Girl Cooks!
- 2 teaspoons active dry yeast
- ¼ cup lukewarm water (110℉.)
- 1 pinch dark brown sugar (for yeast)
- ¾ cup milk low fat or whole
- 8 Tablespoons butter (=1 stick) cut into cubes or thin slices
- ¾ cup old-fashioned rolled oats + more for sprinkling on rolls
- 2 Tablespoons molasses
- 1 Tablespoon dark brown sugar (for dough)
- 2 teaspoons salt
- 1 large egg
- 2½ cups all-purpose flour + add'l. ½ cup, if necessary
- 2 Tablespoons butter (melted) *Divided Use* for brushing on rolls
Stir together yeast, lukewarm water (110°F.) and pinch of brown sugar in a small bowl. Set bowl aside until bubbles form on top (about 5 minutes). If no bubbles form, the yeast is too old. Discard/ try again with new yeast!
Scald milk in small saucepan, heating until you see it begins to steam and is bubbling around edges. Don't let milk boil; remove it from heat once scalded. Pour milk into a large bowl; immediately add butter, stir until butter melts.
Add remaining 1 Tbsp. brown sugar, oats, molasses and salt. Stir until combined; set bowl aside. Let mixture cool until it's lukewarm. Add egg; stir to combine. IMPORTANT: If you add egg while butter mixture is too hot, it can scramble the egg, so don't rush that step! Pour in yeast mixture; stir until combined.
Stir in 2½ cups flour until combined with liquid mixture. Mix until dough loses its shine. If necessary, add up to ½ cup more flour, to reach this point. Let dough rest in bowl 10 minutes, then transfer dough into a large, greased or sprayed bowl (bottom and sides). Turn dough over so all sides are coated with grease. Cover bowl with plastic wrap; refrigerate at least 2 hours. NOTE: You can also refrigerate dough overnight, if needed.
Grease or butter a 9" cake pan very well on bottom and sides; set aside. Turn chilled dough onto a well-floured surface and knead dough 4-5 times. Cut and divide dough into 12equal-sized pieces.
Shape dough into balls by placing a piece on your palm and flattening the dough. Roll outer edges into the center, pinch edges together to seal. Put rolls SEAM SIDE DOWN in greased pan in single layer. Use a pastry brush to spread 1 Tbsp. melted butter over the rolls, then sprinkle lightly with oats. Cover pan; let rolls rise in warm place for 2 hours, OR until rolls are doubled in size.
Bake in preheated 350℉. oven for 35-40 minutes, until well-browned on top and rolls have an internal temperature of 190°F. Remove rolls from oven; let them sit 1-2 minutes in the pan, then run a butter knife around edges of the pan. Lightly brush rolls with remaining 1 Tbsp. of melted butter.
Carefully turn pan over so rolls release from the pan. Place them right side up on a wire rack. Rolls should come out of pan in a solid unit if pan was well-greased). Let rolls cool slightly on rack for 5 minutes before serving. Enjoy!
Nutrition Facts
Oatmeal Molasses Dinner Rolls
Amount Per Serving (1 roll)
Calories 225 Calories from Fat 99
% Daily Value*
Fat 11g17%
Saturated Fat 6g38%
Trans Fat 0.4g
Polyunsaturated Fat 1g
Monounsaturated Fat 3g
Cholesterol 41mg14%
Sodium 477mg21%
Potassium 133mg4%
Carbohydrates 28g9%
Fiber 1g4%
Sugar 4g4%
Protein 5g10%
Vitamin A 343IU7%
Vitamin C 0.002mg0%
Calcium 39mg4%
Iron 2mg11%
* Percent Daily Values are based on a 2000 calorie diet.
Here’s one more to pin on your Pinterest boards!