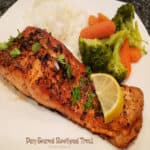
Pan-Seared Steelhead Trout is a delicious, easy to make dish! Trout fillets are cooked in a simple browned butter, shallot and garlic sauce!

Recently my husband bought some steelhead trout in the fish department at our local grocery store. He brought it home and told me he wanted to try it, because it looked good.
When I saw the fillets he bought, I thought he was mistaken! I was absolutely convinced he had accidentally bought salmon fillets.
Well, I was WRONG! It turns out that steelhead trout, which is common to the West coast (and Alaska), LOOKS a lot like salmon. It has the same orange-pink color as salmon, and is similar in taste and texture, but it’s actually TROUT. Who knew? Certainly not me!
My decision was made to pan-sear them, and I knew I wanted to use sauce to add flavor. I ended up making a simple sauce with browned butter, minced garlic, dried dill weed and chopped shallots.
Pan-seared steelhead trout turned out to be delicious, low in calories, and quite easy to prepare. The cooking technique I used is similar to how I make Pan Seared Creole Salmon. Here’s how to make this dish using one pound of steelhead trout (approx. 3 servings).
Scroll Down For A Printable Recipe Card At The Bottom Of The Page
Prepare The Trout For Cooking
Pat the trout fillets dry with paper towels to remove any excess moisture before seasoning. Lightly season the fish (flesh side only) with salt and black pepper.

Pan-Sear the Steelhead Trout
Melt 2 Tablespoons of butter in a large skillet on Medium heat. Once the butter melts, add chopped shallots, and let them cook for 2 minutes, stirring occasionally.
Place the steelhead trout in the hot skillet, with the skin side facing up. Cook the trout fillets on Medium heat for 3 minutes, without moving them in the skillet.
Stir minced garlic and dried dill weed into the butter sauce and cook the fish and sauce 1 more minute. Be sure to stir the sauce often, so the garlic doesn’t burn.


The butter sauce will begin to brown as it is cooked, and this gives it a wonderful, slightly nutty flavor! The fish is ready to flip over once the bottom side is nicely seared and browned.

Baste The Trout With Garlic Shallot Butter Sauce
Turn the steelhead trout fillets to the other side (flesh facing up). Use a spoon to scoop up the sauce and drizzle it over each piece. Continue to cook the fish for 4-5 more minutes until it is fully cooked through.
Spoon the sauce over the trout fillets continuously as they finish cooking. This basting sauce adds wonderful flavor to the fish, because of the browned butter, shallots, dill weed and garlic!

Time To Serve The Pan-Seared Steelhead Trout
Once the trout is fully cooked through and flakes easily, it is ready to serve. Use a large spatula and transfer the pan-seared steelhead trout onto individual plates.
To garnish the dish, squeeze lemon juice over each fillet, and top with fresh parsley and a lemon slice, if desired. This adds additional color and a pop of lemon flavor to the fish!


I hope you have a chance to try this delicious dish and trust you’ll enjoy it as much as we do. It is a simple dish to make, and yet it is a scrumptious seafood entree!
Thanks for stopping by, and I invite you to come back again soon for more delicious recipes! Take care, may God bless you, and have a wonderful day!
Looking For More TROUT Recipes?
You can find ALL of my recipes in the Recipe Index, which is located at the top of the page. I have several recipes for trout you might enjoy, including:
Want More Recipes? Get My FREE Newsletter!
I publish a newsletter 2 times per month (1st and 15th) with lots of recipes, tips, etc.
Would you like to join our growing list of subscribers?
There is a Newsletter subscription box on the top right (or bottom) of each blog post, depending on the device you use.
You can submit your e-mail address there, to be added to my mailing list.
Find Me On Social Media:
Facebook page: The Grateful Girl Cooks!
Pinterest: The Grateful Girl Cooks!
Instagram: jbatthegratefulgirlcooks

↓↓ PRINTABLE RECIPE BELOW ↓↓
Pan-Seared Steelhead Trout is a delicious, easy to make dish! Trout fillets are cooked in a simple browned butter, shallot and garlic sauce!
- 1 pound steelhead trout, skin on cut in approx. three 5 oz. pieces
- ¼ teaspoon salt
- ¼ teaspoon black pepper
- 2 Tablespoons butter
- 2 teaspoons shallots chopped
- 4 teaspoons minced garlic
- ¾ teaspoon dried dill weed
- 1 large lemon half for juice and half for garnish
- 2 Tablespoons chopped fresh parsley
Cut fish into three portions. Pat fish dry with paper towels to remove excess moisture. Lightly season fish (flesh side only) with salt and pepper.
Melt butter in large skillet on Medium heat. Add chopped shallots; cook for 2 minutes, stirring occasionally.
Place trout fillets in skillet (skin side facing up). Cook on Medium heat for 3 minutes, without moving them in the skillet. Stir garlic and dill weed into butter sauce. Cook fish/sauce 1 more minute until bottom of fish is browned. Stir sauce often, so garlic doesn't burn.
Turn fillets to the other side (flesh facing up). Use spoon to scoop up sauce; drizzle it on each piece. Cook fish 4-5 more minutes until cooked though, spooning sauce over fish often, as it finishes cooking.
When trout is cooked through and flakes easily, it's ready to serve. Transfer fillets to plates. To garnish, squeeze lemon juice over each fillet. Top with fresh parsley and a lemon slice, if desired. Enjoy!
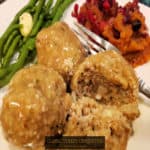
Here’s one more to pin on your Pinterest boards!


