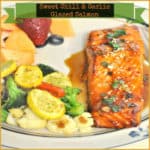
Category: Main Dishes

Mom’s Tuna Noodle Casserole

Nothing says “old school comfort food” like Mom’s Tuna Noodle Casserole! This classic dish has been around for years, is delicious, and easy on the budget!Nothing says "old school comfort food" like Mom's Tuna Noodle Casserole! This classic dish has been around for years, is delicious, and easy on the budget!
If my Mom’s Tuna Noodle Casserole isn’t “Old School”, I don’t know what is!  I’ve been sick for a few days, so “comfort food” and EASY were on the menu for one of our dinners. Mom made this for our family as I was growing up. That was back in the 60’s when we were footloose and fancy free kids, without a care in the world. You know- back in the day where we played outside for hours with our buddies, because we didn’t have computers or cell phones to stare at all day inside!

I think my Mom probably made this tuna noodle casserole for us because it was a very economical and tasty way to feed our family of 5, but it also tasted GOOD! Nothing fancy… just yummy food (and the leftovers taste great, also!)

When I made this the other night, my husband’s first words were “Wow… this brings back childhood memories. My Mom used to make tuna noodle casseroles, also!” I guess it must have been what Moms across America cooked back then. Here’s how to prepare this classic dish:

Scroll Down For A Printable Recipe Card At The Bottom Of The Page

How To Make Mom’s Tuna Noodle Casserole

In a large bowl, combine the cream of mushroom soup, sour cream, milk, salt, pepper, garlic powder, and grated Parmesan cheese. Stir to combine.

Mixing up the sauce for the tuna noodle casserole.
Add frozen peas (yes… still frozen!), sliced mushrooms, tuna, and grated cheddar cheese. Fold these in gently to the other ingredients in the bowl..

Tuna, mushrooms, cheddar cheese and peas are added to sauce for tuna noodle casserole.
This is what the tuna noodle casserole ingredients looks like once all ingredients except noodles are folded in. It’s not pretty, but that’s okay!

All ingredients except for noodles are mixed together for tuna noodle casserole.

Cook the Egg Noodles

Cook the egg noodles for 7 minutes in a large pot of boiling water.

Egg noodles for tuna noodle casserole are cooked for 7 minutes.
Drain the egg noodles well once done, then add the drained noodles to the rest of the ingredients. Stir to combine.

Cooked, drained pasta is added to tuna noodle casserole ingredients.
Pour ingredients into a 2 qt. baking dish that is coated with non-stick spray. Spread evenly in pan.

Tuna noodle casserole placed in baking dish, before going into the oven.
Crush some Ritz crackers in a baggie. I like to use a rolling pin to really break them down.

Buttery crackers are crushed to make a topping for tuna noodle casserole.
Bake Mom’s Tuna Noodle Casserole

Spread the crushed cracker crumbs evenly over the top of the casserole, then bake, uncovered at 350 degrees for 40 minutes.

Buttery cracker crumbs are spread on top of tuna noodle casserole before baking.
This is how it looks when it comes out of the oven. Let the casserole sit on a wire rack and cool for a few minutes before cutting into serving pieces.

Mom's Tuna Noodle Casserole after baking. Ready to cut and serve!
After casserole has “firmed” back up for a few minutes as it sits… slice with sharp knife into pieces, and use a spatula to place piece onto individual plates. Grab a fork, and enjoy this delicious, comfort food meal, just how good ol’ MOM used to make it!

Mom's Tuna Noodle Casserole cut into serving size on a plate.

This tuna noodle casserole is easy to prepare, feeds quite a few, is easy on the ol’ budget per serving, and it tastes great! Go figure! If you enjoy dishes that include tuna, you might also enjoy my recipes for Tuna Pasta Salad, “Old School” Tuna Cashew Casserole, or Quick and Easy Open-Faced Tuna Melts.

Hope you enjoy this simple blast from the past! Have a great day, and I hope you will come back again soon. Be sure to check out ALL my recipes in the Recipe Index, located at the top of the page. Have a great day, and come back soon.

Interested In More Recipes?

Thank you for visiting this website. I appreciate you using some of your valuable time to do soIf you’re interested, I publish a newsletter 2 times per month (1st and 15th) with all the latest recipes, and other fun info. I would be honored to have you join our growing list of subscribers, so you never miss a great recipe!
There is a Newsletter subscription box on the top right side (or bottom) of each blog post, depending on the device you use, where you can easily submit your e-mail address (only) to be included in my mailing list.

You Can Also Find Me On Social Media:

Facebook page: The Grateful Girl Cooks!
Pinterest:
The Grateful Girl Cooks!
Instagram:
jbatthegratefulgirlcooks

Author's signatureRecipe Source: My Mom

0 from 0 votes
Mom's Tuna Noodle Casserole
Prep Time
15 mins
Cook Time
40 mins
Total Time
55 mins
 
Nothing says "old school comfort food" like Mom's Tuna Noodle Casserole! This classic dish has been around for years, is delicious, and easy on the budget!
Category: Entree
Cuisine: American
Keyword: tuna noodle casserole
Servings: 8 servings
Calories Per Serving: 316 kcal
Author: JB @ The Grateful Girl Cooks!
Ingredients
  • 6 cups dry egg noodles (9 ounces)
  • 1 can cream of mushroom soup
  • 3/4 cup sour cream
  • 1/2 cup milk
  • 1/2 teaspoon salt
  • 1/4 teaspoon black pepper
  • 1/4 teaspoon garlic powder
  • 1/4 cup grated Parmesan cheese
  • 1 cup frozen peas (un-thawed)
  • 1 can sliced mushrooms (7 ounces)
  • 1 can albacore tuna , drained (6 ounces)
  • 1 cup grated cheddar cheese
  • 10-12 Ritz crackers (or Saltines, if you prefer)
Instructions
  1. Preheat oven to 350 degrees.
  2. In a large bowl, stir together the cream of mushroom soup, sour cream, milk, salt, pepper, garlic powder, and Parmesan cheese. Gently fold in the frozen peas, mushrooms, tuna, and cheddar cheese. Set aside.

  3. Cook egg noodles, according to pkg. instructions (add to boiling water, cook for 7 minutes). When done cooking, drain the noodles, and gently stir them into the rest of the ingredients until thoroughly combined.
  4. Spray a 2 quart baking dish with non-stick spray. Pour in the casserole ingredients; spread evenly. Finely crush Ritz crackers into small crumbs (put them in a baggie and use a rolling pin to crush them). Once crushed, sprinkle crumbs over the top of the casserole.

  5. Bake (uncovered) at 350 degrees for 40 minutes. Remove pan to a wire rack. Let it cool for a few minutes before slicing (letting it cool a bit will let you make better cuts, and make it easier to dish up!) Serve, and enjoy!

Nutrition Facts
Mom's Tuna Noodle Casserole
Amount Per Serving (1 (1/8th of total))
Calories 316 Calories from Fat 108
% Daily Value*
Fat 12g18%
Saturated Fat 6g38%
Cholesterol 64mg21%
Sodium 694mg30%
Potassium 312mg9%
Carbohydrates 32g11%
Fiber 2g8%
Sugar 2g2%
Protein 18g36%
Vitamin A 420IU8%
Vitamin C 7.4mg9%
Calcium 210mg21%
Iron 1.6mg9%
* Percent Daily Values are based on a 2000 calorie diet.

Here’s one more to pin on your Pinterest boards!Nothing says "old school comfort food" like Mom's Tuna Noodle Casserole! This classic dish has been around for years, is delicious, and easy on the budget!


Save

Save

BBQ Shredded Pork Hoagies with Spicy Slaw

Classic BBQ Shredded Pork Hoagies, topped with a slightly spicy and crunchy slaw. This is a great way to use leftover pork to make a new lunch or dinner!Classic BBQ Shredded Pork Hoagies, topped with a slightly spicy and crunchy slaw. This is a great way to use leftover pork to make a new lunch or dinner!
Do you like leftovers? We like them, but sometimes it can get “old” eating leftovers (even if original recipe was fantastic!). Such was the case a few weeks ago, so I “morphed” the leftovers from a pork roast into  BBQ Shredded Pork Hoagies with Spicy Slaw. YUM.

We had leftovers from a  Pork Tenderloin with Cranberry-Raspberry Sauce recently.  Since there was a bit of pork still waiting to be eaten (there’s only 2 of us), I decided to morph the leftover pork into a completely new meal!

That’s how we ended up with these delicious BBQ Shredded Pork Hoagies with Spicy Slaw. The spicy slaw recipe is from a previous recipe I posted for a Fried Chicken, Spicy Mayo and Slaw Sandwich.

Scroll Down For A Printable Recipe Card At the Bottom Of the Page

How I Made The BBQ Shredded Pork Hoagies

I took the leftover pork slices and added lots of BBQ sauce. Then I threw it all back into my slow cooker and let it cook all day (at least 5-6 hours).

Note: ANY leftover boneless pork chops or pork roast will work fine!  You can also BUY precooked BBQ pork if you want. This would allow you to skip this next part, but this is how I did it (to use up our leftovers).

The leftover pork had some of the sauce from the pork tenderloin left on it. You can also see some of the leftover cranberries, too. I threw the pork slices into the crock pot, along with the BBQ sauce and a tiny bit of water. You can see a few of the cranberries floating around in this photo.

Pieces of pork for BBQ shredded pork hoagies, cooking in crock pot.

After the meat and sauce had cooked for 5-6 hours I easily shredded the pork (with two forks) and added even more BBQ sauce.

Shredding meat and bbq sauce for BBQ shredded pork hoagies with two forks

Another Way To Make The Shredded Pork Without Using A Crock Pot

You can always shred leftover pieces of tender pork roast (without any sauce on it), THEN add the BBQ sauce. That way, you don’t have to use a crock pot.

All you need to do is mix the plain shredded pork with BBQ sauce and heat, before making the hoagies. The picture below shows this plain, unadorned shredded pork.

Shredded pieces of pork roast for BBQ shredded pork hoagies

Making The Spicy Slaw For Sandwich

Once pork is shredded, coated with BBQ sauce and reheated, all you need to do is prepare the spicy slaw mixture. Make the spicy slaw by mixing ingredients in a small bowl. There are only 5 simple ingredients, and it is EASY to make! Refrigerate slaw until you’re ready to put it on the hoagies!

Spicy coleslaw for BBQ shredded pork hoagies, in small metal bowl

To Make BBQ Shredded Pork Hoagies

Spread some hoagie rolls with butter, then lightly grill them until golden brown and slightly crisp.  This will help the bread to not get too soggy, once you add the BBQ shredded pork.

Grilling hoagie rolls in skillet, for BBQ shredded pork hoagies.

Top the toasted hoagie rolls with hot shredded BBQ pork, then add the cold, spicy slaw.

BBQ shredded pork hoagies with spicy slaw.

If desired, you can slice the BBQ shredded pork hoagies in half.  Serve this delicious sandwich hot, and enjoy!!!

BBQ shredded pork hoagies, cut in half on a plate

Hope you enjoy these BBQ shredded pork hoagies! It’s a great way to use leftover pork, without having to toss it or have it dry out in the refrigerator!

Looking For More SANDWICH Recipes?

You can find ALL of my recipes in the Recipe Index, located at the top of the page. I have some sandwich recipes that you’ll enjoy, including:

Interested In More Recipes?

Thank you for visiting this website. I appreciate you using some of your valuable time to do soIf you’re interested, I publish a newsletter 2 times per month (1st and 15th) with all the latest recipes, and other fun info. I would be honored to have you join our growing list of subscribers, so you never miss a great recipe!
There is a Newsletter subscription box on the top right side (or bottom) of each blog post, depending on the device you use, where you can easily submit your e-mail address (only) to be included in my mailing list.

You Can Also Find Me On Social Media:

Facebook page: The Grateful Girl Cooks!
Pinterest:
The Grateful Girl Cooks!
Instagram:
jbatthegratefulgirlcooks

Author's signature

0 from 0 votes
BBQ Shredded Pork Hoagies with Spicy Slaw
Prep Time
20 mins
Cook Time
15 mins
Total Time
35 mins
 
Classic BBQ Shredded Pork Hoagies, topped with a slightly spicy and crunchy slaw. This is a great way to use leftover pork to make a new lunch or dinner!
Category: Sandwich
Cuisine: American
Keyword: BBQ shredded pork hoagies
Servings: 4 sandwiches
Calories Per Serving: 615 kcal
Author: JB @ The Grateful Girl Cooks!
Ingredients
  • Shredded pork (quantity-as much or as little as you wish)
  • BBQ sauce (enough to fully saturate the amount of shredded pork you will use)
  • 4 Hoagie rolls (one per sandwich)
  • 4 Tablespoons Butter (to spread on rolls before grilling)
For spicy slaw:
  • 1 garlic clove , finely chopped
  • 1/2 small red onion , thinly sliced, chopped
  • 1 jalapeno , finely chopped
  • 4 cups thinly sliced green cabbage
  • 1/2 cup Bread and Butter pickle slices , plus 1/4 cup pickle juice from jar
Instructions
  1. Cook pork or leftover pork in slow cooker for several hours until completely tender. Using two forks, shred the pork. Put back into slow cooker and add sufficient BBQ sauce to completely coat meat. Heat thoroughly (can also heat the shredded BBQ pork in microwave, if desired).
  2. Make spicy slaw while pork is heating: Mix all slaw ingredients in a small bowl; toss to combine, then cover and refrigerate until ready to build the sandwiches.
  3. Spread each half of the hoagie rolls with butter. Grill until they are golden brown.
  4. Place grilled roll on serving dish. Spread hot BBQ shredded pork on top of one half of the roll. Spoon some cold spicy slaw evenly over the pork. Place top bun on the hoagie, and serve!
  5. Enjoy!
Recipe Notes

Cook time varies. Cooking time shown is based on having pre-cooked pork available when you start this recipe. Once you have the precooked, shredded pork coated with BBQ sauce and hot, you can have the sandwiches finished in about 10 minutes.
My other advice is to try and make the spicy slaw several hours before serving. The flavors really develop well, the longer it is refrigerated!

Nutrition Facts
BBQ Shredded Pork Hoagies with Spicy Slaw
Amount Per Serving (1 sandwich)
Calories 615
* Percent Daily Values are based on a 2000 calorie diet.

Here’s one more to pin on your Pinterest boards!Classic BBQ Shredded Pork Hoagies, topped with a slightly spicy and crunchy slaw. This is a great way to use leftover pork to make a new lunch or dinner!


Save

Salmon in Lemon-Butter Herb Sauce

Grilled or pan-seared salmon in lemon-butter herb sauce is a delicious, simple and elegant looking dinner entree.Grilled or pan-seared salmon in a lemon-butter herb sauce is a delicious, simple and elegant looking dinner entree.
My husband and I love salmon. I’ve been preparing salmon the same way for quite a while (creatures of habit, but we like it), but finally decided to branch out, and start trying some new salmon recipes this year. Enter this delicious entree. Seriously delicious.

If I’m telling the truth I would tell you that I had to be on my best behavior not to “sample” the sauce multiple times until it was gone (somebody has to do Quality Control, right?). Yeah. The sauce is pretty amazing… not gonna lie! An extra benefit to making this at home versus ordering something like this at a restaurant is the cost factor. It’s so much less expensive to create this easy, but elegant seafood dish at home! I really like that!

I found the recipe on Pinterest, and decided to give it a try! I slightly modified the recipe as far as cooking the seafood goes… original recipe calls for grilling the salmon fillets. Since it was cold and damp outside (February in the Northwest), I pan-seared the fillets, then topped them with the sauce. Fantastic!

The sauce (with butter, white wine, lemon juice, and herbs) only takes about 10 minutes to pull together, and the fish only takes about 4-5 minutes per side to cook, so all in all, this was a very quick and elegant dish to prepare. I will absolutely make this again. I’m anxious to fire up the ol’ Weber grill and try this recipe with grilled salmon.

Scroll Down For A Printable Recipe Card At The Bottom Of The Page 

Make The Lemon Butter Herb Sauce

Cook white wine, lemon juice and green onions until the liquid has reduced down considerably…

Wine, lemon juice and green onions are cooked for sauce

Add COLD butter, a little at a time, and blend it into the sauce.

Cold butter is blended into sauce in pan

Now add dill, fresh chopped chives, and black pepper to the lemon-butter sauce, and whisk to combine..

Dill, chives and pepper are added to lemon butter sauce

The lemon-butter herb sauce is done! Boy, does it taste amazing!

Lemon butter herb sauce is finished cooking

Prepare The Salmon

Brush boneless skinless fillets on all sides with a lemon juice/olive oil mixture before cooking..

Fish is brushed with lemon juice/olive oil mixture

Place fillets into a hot skillet that has been sprayed with non-stick spray AND has olive oil in it to prevent sticking. Cook the fish on both sides (approx. 4-5 minutes per side), until done, and can be easily flaked with a fork.

Salmon fillets are pan-seared in skillet

Serve The Salmon In Lemon Butter Herb Sauce

Once the fillets are done, carefully put the fillets onto individual serving plates. Spoon the lemon-butter herb sauce over the top of each piece of fish. Serve while hot, and enjoy!

Finished salmon fillet, with lemon herb butter sauce on top

Sure hope you will give this recipe a try. It tastes amazing, and I think you will LOVE it! Thank you for stopping by, and I hope you will come back soon.

Looking for More SALMON Recipes?

You can find ALL my recipes in the Recipe Index, located at the top of the page. I have some wonderful salmon recipes you’ll enjoy, including:

Interested In More Recipes?

Thank you for visiting this website. I appreciate you using some of your valuable time to do soIf you’re interested, I publish a newsletter 2 times per month (1st and 15th) with all the latest recipes, and other fun info. I would be honored to have you join our growing list of subscribers, so you never miss a great recipe!
There is a Newsletter subscription box on the top right side (or bottom) of each blog post, depending on the device you use, where you can easily submit your e-mail address (only) to be included in my mailing list.

You Can Also Find Me On Social Media:

Facebook page: The Grateful Girl Cooks!
Pinterest:
The Grateful Girl Cooks!
Instagram:
jbatthegratefulgirlcooks

Have a great day!

Author's signatureRecipe slightly adapted from: http://www.tablespoon.com/recipes/grilled-salmon-with-lemon-herb-butter-sauce/8a8b4611-8bb4-430b-bf23-6aaddcce21a5?_szp=100295&_szi=23

↓↓ PRINTABLE RECIPE BELOW ↓↓

0 from 0 votes
Salmon in a Lemon-Butter Herb Sauce
Prep Time
15 mins
Cook Time
10 mins
Total Time
25 mins
 

Grilled or pan-seared salmon in a lemon-butter herb sauce is a delicious, simple and elegant looking dinner entree.

Category: Entree
Cuisine: American
Keyword: salmon
Servings: 4 servings
Calories Per Serving: 527 kcal
Author: JB @ The Grateful Girl Cooks!
Ingredients
For Lemon-Butter Herb Sauce:
  • 2 Tablespoons finely chopped green onions (shallots)
  • 1/4 cup dry white wine
  • 3 Tablespoons fresh lemon juice
  • 6 Tablespoons COLD butter
  • 1 Tablespoon dill (dried or fresh), chopped
  • 1 Tablespoon finely chopped chives
  • 1/8 teaspoon pepper
For salmon:
  • 3 Tablespoons olive oil
  • 1 Tablespoons fresh lemon juice
  • salmon (4 boneless, skinless fillets)
  • 1/4 teaspoon salt
  • 1/4 teaspoon pepper
  • 1 Tablespoon butter
Instructions
  1. Prepare the sauce: Place the finely chopped green onions, lemon juice and wine in a small saucepan. Bring to a boil on high heat, then reduce heat to medium and cook for 7-8 minutes, or until liquid has reduced to about 2-3 Tablespoons. Remove from heat. Add butter, 1 Tablespoon at a time, stirring continuously, until all butter has been melted and incorporated into sauce. Add dill, chopped chives and black pepper. Mix to combine. Set sauce aside while you cook the salmon.
  2. To cook salmon:
  3. In a small dish, combine 1 (ONE) Tablespoon of olive oil and 1 Tablespoon of lemon juice. Using a pastry brush, coat all sides of the salmon with this mixture.
  4. Spray a skillet with non-stick spray, then place the other 2 Tablespoons of olive oil into pan. Heat until VERY hot (but not smoking). When skillet is very hot, add the salmon fillets. It should sizzle when you add them to skillet. Cook salmon for about 4 minutes without moving them. After 4 minutes, carefully turn the salmon to the other side and continue cooking. Add 1 Tablespoon butter. As the butter melts, continuously spoon the melted butter onto the salmon as it cooks. Salt and pepper the salmon lightly. In about 3-4 minutes, the salmon should be done. Make sure the salmon is done, and flakes easily (due to differing thicknesses of salmon, you need to keep an eye on the salmon for done-ness).
  5. Reheat lemon-butter sauce if necessary right before the salmon is done.
  6. To serve, place salmon fillet on individual plate, then spoon some of the warm sauce over the top. Enjoy!
Recipe Notes

Salmon can also be grilled outside on a BBQ. Remember to coat it with olive oil and lemon juice mixture before adding it to the grill.

Nutrition Facts
Salmon in a Lemon-Butter Herb Sauce
Amount Per Serving (1 (6 oz. plus sauce))
Calories 527 Calories from Fat 369
% Daily Value*
Fat 41g63%
Saturated Fat 15g94%
Cholesterol 146mg49%
Sodium 396mg17%
Potassium 855mg24%
Carbohydrates 1g0%
Protein 34g68%
Vitamin A 745IU15%
Vitamin C 6.8mg8%
Calcium 25mg3%
Iron 1.4mg8%
* Percent Daily Values are based on a 2000 calorie diet.

Here’s one more to pin on your Pinterest boards!Grilled or pan-seared salmon in a lemon-butter herb sauce is a delicious, simple and elegant looking dinner entree.


Save

Save

Ham ‘n Cheese Breakfast Soufflé

Ham ‘n Cheese Breakfast Soufflé is a light, fluffy, scrumptious “all in one” breakfast or brunch baked dish containing eggs, milk, ham, cheese and sourdough bread.Ham 'n Cheese Breakfast Soufflé is a light, fluffy, scrumptious "all in one" breakfast or brunch baked dish containing eggs, milk, ham, cheese and sourdough bread.What do you get when you morph the best of two breakfast casseroles into one dish? This delicious “all-in-one” ham ‘n cheese breakfast soufflé that will get your morning started out just right.

A few days ago, one of my friends asked me if I had a good “breakfast casserole” that would feed quite a few people. She needed a recipe for a brunch she was going to be attending this coming weekend. I told her I did, and immediately thought of this recipe! It serves 12, is super easy to make, plus it is always a hit at a brunch or potluck. So here ya go, Sherry. This one is for YOU!

Scroll Down For A Printable Recipe Card At The Bottom Of The Page

How I Came Up With This Recipe

When I got married, I was given a recipe for a Cheese Soufflé from two friends. I’ve made that recipe many times over the past 37 years. I ended up blending that original recipe with parts of another recipe (source unknown), and came up with this delicious breakfast dish years ago. It really is an all-in-one breakfast dish, because it contains eggs, bread, milk, cheese, and ham.

Plan Ahead!

This dish takes only a few minutes of prep to get ready;  but PLAN AHEAD! It chills in the fridge overnight, then is baked for one hour. That’s it! Easy… and delicious! The mixture puffs up during the cooking process, which is why it is has the word “soufflé” in the title.  And there you have it! Here’s a few photos taken while preparing this ham cheese breakfast soufflé.

Making The Ham ‘n Cheese Breakfast Soufflé

First things first… cut the crusts off the bread. Discard crust. Cut bread into small cubes.

Crusts cut off bread for breakfast soufflê.

Place a layer of bread cubes into the pan first, followed by the ham cubes.

Bread cubes are topped with ham cubes for breakfast souffle.

The next layer to be added is the grated cheddar cheese. YUM.

Grated cheddar cheese is added to breakfast souffle.

Whisk the egg mixture together, then pour it over the bread, ham, and cheese mixture.

Eggs, half n' half, and spices are blended for breakfast souffle

Let It Soak In Overnight

Pour the egg mixture into the baking dish. Cover the baking dish with plastic wrap, and let it sit and soak overnight in the refrigerator. This allows enough time for the liquid to be absorbed into the bread. in the filling. In the oven, let it come to room temp, then bake!

Egg mixture is poured on top of breakfast souffle and casserole is refrigerated overnight.

Time To Eat The Ham ‘n Cheese Breakfast Soufflé

When finished baking, the ham ‘n cheese breakfast soufflé will be puffed up, and will be light golden brown on the top. The photo below shows what it looks like right out of the oven. See how this breakfast soufflé puffs up? Pretty!

Let it cool a bit before slicing. As it cools, you will notice the top deflates a bit, as the hot air escapes. That is absolutely normal! Let the casserole cool just a little bit before slicing.

Ham 'n Cheese Breakfast Soufflé , hot out of the oven... all puffed up!

Here’s what a piece looks like after being cut and served… time to dig in! That one piece of ham ‘n cheese breakfast soufflé has bread, eggs, ham, and cheese in it! Add some fruit on the side, and you’ve got a great breakfast!

A piece of ham 'n cheese breakfast souffle on a plate, with orange slices.

Hope you will give this breakfast soufflé recipe a try. The leftovers are easily reheated, so this one can go the distance. I think you will enjoy it! I hope you have a great day, and trust you will come back soon for more recipes.

Looking For More EGG Dishes?

You can find all of my recipes in the Recipe Index, located at the top of the page. I have quite a few breakfast dishes featuring eggs I think you’ll enjoy, including:

Interested In More Recipes?

Thank you for visiting this website. I appreciate you using some of your valuable time to do soIf you’re interested, I publish a newsletter 2 times per month (1st and 15th) with all the latest recipes, and other fun info. I would be honored to have you join our growing list of subscribers, so you never miss a great recipe!
There is a Newsletter subscription box on the top right side (or bottom) of each blog post, depending on the device you use, where you can easily submit your e-mail address (only) to be included in my mailing list.

You Can Also Find Me On Social Media:

Facebook page: The Grateful Girl Cooks!
Pinterest:
The Grateful Girl Cooks!
Instagram:
jbatthegratefulgirlcooks

Author's signatureOriginal Recipe adapted from: Dee Gustafson and Faye Johnson

↓↓ PRINTABLE RECIPE BELOW ↓↓

0 from 0 votes
Ham 'n Cheese Breakfast Soufflé
Prep Time
20 mins
Cook Time
1 hr
Total Time
1 hr 20 mins
 

Ham 'n Cheese Breakfast Soufflé is a light, fluffy, scrumptious "all in one" breakfast or brunch baked dish containing eggs, milk, ham, cheese and sourdough bread.

Category: Breakfast
Cuisine: American
Keyword: breakfast souffle
Servings: 12 servings
Calories Per Serving: 234 kcal
Author: JB @ The Grateful Girl Cooks!
Ingredients
  • 10 slices white bread , crusts removed (I used 5 really large slices sourdough bread)
  • 2 cups chopped ham
  • 2 cups grated Cheddar cheese
  • 6 eggs , slightly beaten
  • 2 cups milk
  • 1 cup half n' half
  • 1 teaspoon salt
  • ¾ teaspoon dry mustard powder
  • 2 Tablespoons dried parsley
Instructions
  1. Spray a 9x13 pan with non-stick spray.
  2. Remove the crusts from the bread and discard. Cut the remaining bread into cubes. Spread in baking dish.
  3. Cut the ham into cubes. Layer on top of the bread cubes.
  4. Layer the grated cheese on top of the ham.
  5. In a medium bowl, whisk together the eggs, milk, half n' half, salt, mustard powder, and dried parsley, until fully combined. Pour this evenly over the top of the cheese in baking pan. Cover pan with plastic wrap, and refrigerate overnight.
  6. On the day you are going to bake it, remove the pan from refrigerator and let it sit for about 30-40 minutes, to take the chill off the pan. Preheat your oven to 350 degrees.
  7. When ready, remove plastic wrap, and place in oven.
  8. Bake for 1 hour at 350 degrees (or until it is eggs are "set" in the middle of pan). **If you forget, and end up taking the dish straight from the refrigerator to the oven, remember to add another 25-30 minutes of baking time!
  9. When done baking, remove pan to wire rack. Let it cool for about 10 minutes, then cut it into pieces. This dish is at it's very best once it has cooled down a bit. Enjoy!
Recipe Notes

Prep time does NOT include overnight refrigeration time.
Any white bread will work in this recipe. this time I used 5 LARGE slices sourdough bread. Usually I just use regular old, cheap white bread.
If you would like a bit more flavor, try adding a small can of diced green chiles to this dish. Just mix the drained chiles in with the eggs, Really good!

Nutrition Facts
Ham 'n Cheese Breakfast Soufflé
Amount Per Serving (1 (1/12th of total))
Calories 234 Calories from Fat 117
% Daily Value*
Fat 13g20%
Saturated Fat 7g44%
Cholesterol 123mg41%
Sodium 719mg31%
Potassium 161mg5%
Carbohydrates 13g4%
Sugar 3g3%
Protein 14g28%
Vitamin A 450IU9%
Vitamin C 0.6mg1%
Calcium 273mg27%
Iron 1.5mg8%
* Percent Daily Values are based on a 2000 calorie diet.

Here’s one more to pin on your Pinterest boards!Ham 'n Cheese Breakfast Soufflé is a light, fluffy, scrumptious "all in one" breakfast or brunch baked dish containing eggs, milk, ham, cheese and sourdough bread.


Save

Save

Save

Save

Chili & Cheese Stuffed Spud

Need a quick, filling lunch or dinner that is REALLY easy? Why not make a chili cheese stuffed spud, with sour cream, cheddar cheese and green onions!Need a quick, filling lunch or dinner that is REALLY easy? Why not make a chili cheese stuffed spud, with sour cream, cheddar cheese and green onions!
Ever have those moments when you just don’t want to cook dinner? What? You do, too??? Shocking! I had one of those moments recently (several times, actually). I ended up making a Chili Cheese Stuffed Spud for my husband and I.

I was too tired to “want” to fix anything, so I  heated up some leftover chili I had in the fridge (Mom’s Old-Fashioned Chili). Use any kind of chili you like! Then I stuffed a big beast-like “baker” potato with the chili.  You know – the BIG potatoes!

That humongous potato was filled with the chili, then topped with cheese, sour cream and green onions, and POOF! Dinner was served! Or as I like to say: “Dinner is served. I am offering two choices tonight for your dining pleasure. 1) Take It, or 2) Leave It.”

A Chili Cheese Stuffed Spud Is A Filling Meal!

This was a delicious, filling, “all-in-one” dinner.  “Ya got your potato, ya got your chili with meat and beans, ya got your cheese, ya got your sour cream, and ya got your green onions” (said with a deep New York accent, of course!). Geepers, if you threw some chocolate on there, you would have almost ALL the food groups represented… but I digress.

I threw (translation: gently and lovingly placed) the potatoes in the oven and baked them, but if you’re pressed for time, just microwave them… easy peasy, either way! Did you know that potatoes are the world’s 4th largest field crop? Yep. It’s true. (Random factoid for the day).

This is such an easy dish to prepare… and it really did fill up our hungry tummies! It’s so versatile… you can take away, or add anything you want (like veggies) to “make it yours”. Just thought I’d share it with you on the ol’ blog today. We sure don’t eat these too often at our house, but every now and then, it’s a quick, economical, and filling meal.

Chili cheese stuffed spud, topped with sour cream, grated cheese & scallions.

The Basics of Making A Chili Cheese Stuffed Spud

I’m not even going to post a recipe for this, because it’s so very basic… Bake (or microwave) a large potato, slice open, generously fill it with hot chili, then top with grated cheddar cheese, a generous dollop of sour cream, and some sliced green onions.

Seriously… how easy is that? Hope you will consider making these Chili & Cheese Stuffed Spuds, especially for those moments when your private chef, caterer, or entire kitchen staff get horribly sick and can’t prepare your evening meal. (*cough, cough*).  But we ALL know this situation would NEVER happen on Downton Abbey, would it now?

Have a wonderful day. Be sure and check out ALL of my recipes in the Recipe Index, which is located at the top of the page. I have a LOT of family-friends recipes I am confident you will enjoy.

Interested In More Recipes?

Thank you for visiting this website. I appreciate you using some of your valuable time to do soIf you’re interested, I publish a newsletter 2 times per month (1st and 15th) with all the latest recipes, and other fun info. I would be honored to have you join our growing list of subscribers, so you never miss a great recipe! 

There is a Newsletter subscription box on the top right side (or bottom) of each blog post, depending on the device you use, where you can easily submit your e-mail address (only) to be included in my mailing list.

You Can Also Find Me On Social Media:

Facebook page: The Grateful Girl Cooks!
Pinterest:
The Grateful Girl Cooks!
Instagram:
jbatthegratefulgirlcooks

Author's signature

Here’s one more to pin on your Pinterest boards!Need a quick, filling lunch or dinner that is REALLY easy? Why not make a chili cheese stuffed spud, with sour cream, cheddar cheese and green onions!

Save

Save

Shrimp and Noodles in Spicy Garlic Sauce

Why order take-out when you can make this delicious Asian shrimp and noodles in spicy garlic sauce in under 20 minutes from start to finish?Why order take-out when you can make this delicious Asian shrimp and noodles in spicy garlic sauce in under 20 minutes from start to finish?
Well… it’s been quite a week. I made Shrimp and Noodles in Spicy Garlic Sauce to cap it off.  This delicious shrimp really hit the spot after such a wild week! Work for my husband and myself was CRAZY busy, a family member is facing very serious medical issues, our phone account was breached (someone fraudulently bought an IPhone using our account and shipped it to YEMEN, of all places!). To top it all off, day before yesterday I got a flat tire AND had the keys to our other car with me (oops), so my husband couldn’t come help me.  Some weeks are like that, right?

Oh well.  I am extremely grateful for the nice gentleman named Mark (a kind stranger) who, in absolutely POURING rain (we were sopping wet) helped me get enough air into the tire to enable me to drive a few miles to a tire store, where a lovely an evil bolt was removed and the tire was patched. There really are wonderful people in this big, old world, who still will go out of their way to help others in need.

At least my husband and I were able to end this crazy week with a great dinner last night… Shrimp and Noodles in a Spicy Garlic Sauce really hit the spot… we were tired and hungry by the time Friday night rolled around. My husband had been up working since 3 AM (remember… crazy busy), so in reality, I could have made cereal for dinner and he probably wouldn’t have noticed as he nodded off into the bowl.

We LOVED This Simple Dish!

BUT I made this great recipe instead! EASY, EASY, EASY, quick, and incredibly delicious. Absolutely perfect is the best way I can describe this dish. The shrimp was so flavorful due to a fantastic Asian-inspired garlic sauce, and the ramen noodles helped make the dish very filling!

I found the recipe for the shrimp and sauce on Pinterest,  and decided to cook some ramen noodles to add to it. YUM! Seriously, I think the entire meal took under 20 minutes to make, from start to finish! I sure hope you’ll give this recipe a try. I know you will really LOVE it! Here’s how to make it:

Scroll Down For A Printable Recipe Card At The Bottom Of The Page

For this recipe, you will need some large shrimp that have been rinsed and deveined, but with the tail left on. Set the cleaned shrimp aside until they are needed later.

Rinsed and de-veined shrimp are left with their tails on for this dish.

Make The Spicy Garlic Sauce

The spicy garlic sauce takes just a minute to make. It’s as simple as stirring the ingredients together… really!

A spicy garlic sauce is quickly made by stirring ingredients together in a bowl.

The noodles required for this dish are very easy to find. Yep… you guessed it! You will need one package of good old cheap Ramen noodles, with the sauce packet removed.

A package of Ramen noodles are needed for this recipe, minus the seasoning packet.

Cook the noodles in boiling water for 3 minutes, then drain off all the water.

Ramen noodles are cooked in boiling water for 3 minutes, then drained.

Stir and quickly cook the garlic in olive oil, until fragrant. Be careful NOT to let it burn, or it will become bitter.

Minced garlic is quickly cooked in hot oil before adding other ingredients.

Add The Shrimp

Add the shrimp to the skillet, and cook for just a few minutes, until slightly pink in color and cooked through.

Shrimp is added to the skillet with the cooked garlic and oil.

Now add the garlic sauce and cooked noodles into the skillet with the shrimp. Mix together and cook, until all ingredients are heated through.

Ramen noodles are added to the cooked shrimp in the skillet.

Sprinkle with sliced green onions and sesame seeds. When hot, divide into portions and serve.

The shrimp and noodles in spicy garlic sauce is heated through in the skillet.

Time To Enjoy Some Shrimp And Noodles In Spicy Garlic Sauce

Garnish each serving with a few more sesame seeds and green onion slices. Serve, and enjoy! This shrimp is DELICIOUS!

A serving of shrimp and noodles in spicy garlic sauce on a plate, ready to be enjoyed.

I really hope you will consider trying this recipe for shrimp and noodles in spicy garlic sauce! I’m confident you and those you love will enjoy it. Have a great day!

Looking For More SHRIMP Recipes?

You can find ALL of my recipes in the Recipe Index, located at the top of the page. I have some delicious shrimp recipes for you to enjoy, which include:

Interested In More Recipes?

Thank you for visiting this website. I appreciate you using some of your valuable time to do soIf you’re interested, I publish a newsletter 2 times per month (1st and 15th) with all the latest recipes, and other fun info. I would be honored to have you join our growing list of subscribers, so you never miss a great recipe!

There is a Newsletter subscription box on the top right side (or bottom) of each blog post, depending on the device you use, where you can easily submit your e-mail address (only) to be included in my mailing list.

You Can Also Find Me On Social Media:
Facebook page: The Grateful Girl Cooks!
Pinterest: The Grateful Girl Cooks!
Instagram: jbatthegratefulgirlcooks

Author's signature

Recipe Adapted From: http://appetiteforchina.com/recipes/shrimp-garlic-sauce

↓↓ PRINTABLE RECIPE BELOW ↓↓

0 from 0 votes
Shrimp and Noodles in Spicy Garlic Sauce
Prep Time
15 mins
Cook Time
5 mins
Total Time
20 mins
 

Why order take-out when you can make this delicious Asian shrimp and noodles in spicy garlic sauce in under 20 minutes from start to finish?

Category: Entree
Cuisine: Asian
Keyword: shrimp and noodles
Servings: 2 servings
Calories Per Serving: 565 kcal
Author: JB @ The Grateful Girl Cooks!
Ingredients
  • 3/4 pound uncooked large shrimp , deveined
  • 3 Tablespoons soy sauce
  • 2 Tablespoons chili sauce (I used Mae Ploy)
  • 2 teaspoons sesame oil
  • 2 teaspoons cooking sherry (can also use Chinese rice wine-I used cooking sherry)
  • 1 teaspoon granulated sugar
  • 1 3 ounce package dry ramen noodles (sauce packet removed-don't need it)
  • 2 Tablespoons olive oil
  • 4 cloves garlic , crushed or finely chopped (equals 2 Tablespoons minced garlic)
  • 1 green onion (green and white parts), thinly sliced (for garnish)
  • Sesame seeds (for garnish)
Instructions
  1. Peel the shrimp, but leave the tail intact. (Devein shrimp, if not already done).
  2. Make the sauce: In a little bowl, mix together the soy sauce, chili sauce, sesame oil, cooking sherry (or Chinese rice wine), and granulated sugar until well combined. Set sauce aside.
  3. Bring a small pan of water to a boil on high heat. Add ramen noodles; cook noodles for 3 minutes. Drain noodles. Set aside.
  4. Heat the olive oil on medium-high heat in a large skillet. Add the minced garlic to the hot pan; stir and cook for about 30 seconds (be careful NOT to burn it!).
  5. Add shrimp to skillet. Cook shrimp for about 2 minutes per side, until both sides are pink. Add the sauce mixture and the noodles to the skillet. Mix gently to combine. Cook until heated through (a minute or so). Sprinkle with a bit of the green onions and sesame seeds.
  6. Place shrimp and noodles on individual serving plates. Garnish with additional green onions and sesame seeds. Enjoy!
Recipe Notes

You can also make the shrimp (without the noodles). The original recipe serves 4 (shrimp and sauce only- no noodles). Use 1 1/2 pounds of shrimp, and keep all other ingredient amounts the same.

Nutrition Facts
Shrimp and Noodles in Spicy Garlic Sauce
Amount Per Serving (1 serving)
Calories 565 Calories from Fat 243
% Daily Value*
Fat 27g42%
Saturated Fat 6g38%
Cholesterol 428mg143%
Sodium 3190mg139%
Potassium 334mg10%
Carbohydrates 36g12%
Fiber 2g8%
Sugar 4g4%
Protein 41g82%
Vitamin A 160IU3%
Vitamin C 12.4mg15%
Calcium 270mg27%
Iron 6mg33%
* Percent Daily Values are based on a 2000 calorie diet.

Here’s one more to pin on your Pinterest boards!Why order take-out when you can make this delicious Asian shrimp and noodles in spicy garlic sauce in under 20 minutes from start to finish?


Save

Save

Beer Battered Fish and Chips

Can’t get to England? Why not make your own crunchy beer battered fish and homemade “chips” (french fries) for dinner, in the comfort of your home!Can't get to England? Why not make your own crunchy beer battered fish and homemade "chips" (french fries) for dinner, in the comfort of your own home!
I don’t fry food too much these days as a rule… every couple of months I will make fried chicken to honor our family’s Southern roots, BUT THEN I SAW IT… a recipe on Pinterest for Beer Battered Fish and Chips.

Against all my common sense, I think I heard the recipe calling to me, bringing back memories of a summer I spent in England years ago.

Fish and chips seemed to be available everywhere, and were served wrapped up in paper, and piping hot! I loved buying fish and chips from local vendors in several of the towns I visited. Such a great memory.

Occasionally my husband or I will now order this meal in a restaurant; but the thought of making my own seemed daunting. However, I love to learn and challenge myself to try new things.

But Could I Make Beer Battered Fish And Chips At Home?

I decided to try and make my own replica of British fish and chips. GULP. I crossed my fingers, toes, eyes, and anything else I could cross, and plunged in!

Well- I used thick pieces of frozen cod for this recipe and found it, as well as the batter, to be wonderful! Plus… “chips”? How can ya go wrong with some good “chips”… FRIES???

I enjoyed every single bite of my crispy coated pieces of fish (with Malt Vinegar on them), and loved the delicious “chips” dipped in ketchup. The chips (fries) are cooked twice to get them nice and crispy, and let me tell you… they were tasty!

So there you have it, and I’m really glad I made this recipe that very first time. Yum! The only thing missing was having this meal served, wrapped up in a big piece of greasy paper… but I can live without that! Here’s a peek at the “process” for making this dish:

Scroll Down For A Printable Recipe Card At The Bottom Of The Page

Prepare The Potatoes For Frying

Peel the potatoes, then cut them into sticks for the “chips” (fries). Pat them very dry with paper towels, trying to absorb as much moisture as possible.

Potatoes are peeled, then sliced to make British style "chips"

Cook the fries in HOT oil (350°F.) for about 8 minutes.

Potatoes cook in hot oil for 8 minutes

After cooking the “chips” for about 8 minutes, remove them from the oil with a slotted spoon or spatula. Let these semi-cooked “chips” drain on paper towels while you cook the fish.

Fries are drained after first cooking

Prep The Fish for Frying

Lightly coat all the pieces of fish in a flour/salt/pepper mixture and then set them aside to rest, while you mix the batter.

Fish pieces are coated in seasoned flour

Once the beer batter has been made, dip the flour coated fish pieces in it, one at a time. Fully coat the fish pieces with the batter before frying.

Beer batter is made for the fish

Cook The Beer Battered Fish

Cook the battered fish pieces in HOT oil (350°F) for 7-8 minutes until golden brown and crispy on all sides. It is very important for the oil to be at the temperature before adding the fish.

Cook the beer battered fish for approximately 7-8 minutes, turning the pieces over halfway though the cooking time.

Once done, the batter coating should be golden brown and crispy on all sides. The fish should be fully cooked through.

Beer battered fish pieces are cooked in hot oil

Drain the hot, cooked pieces of fish on layers of paper towels to absorb any excess oil. Reheat the oil back to 350°F. so you can fry the “chips” you set aside earlier a second time.

Beer battered fish drains on paper towel after cooking

Cook The “Chips” (Fries) A Second Time

Put the half-cooked “chips” (fries) back into the 350°F. hot oil (after removing the fish). Cook them for an additional 3-4 minutes, until they’re golden brown and crispy.

The "chips" (french fries) go back into hot oil for 2nd cooking

Time To Eat Some Beer Battered Fish And Chips!

Okay… now the beer battered fish and chips are hot, and ready to gobble up! Grab some Malt Vinegar or tartar sauce to serve with the fish.

Serve this delicious beer battered fish and chips, and enjoy! The fish has a crisp outer coating and is flaky inside, and the “chips” taste amazing, too. They’re so good!

Beer battered fish and chips are now served!

I love experimenting with food in our kitchen. I enjoy getting out of my comfort zone, learning about and trying new recipes for the first time!

Maybe if you’re feeling adventurous too, you will give this fish and chips recipe a try. I highly recommend it!

Thank you for stopping by today, and I invite you to come back soon for more delicious recipes. Take care, and have a great day.

Looking For More FISH Recipes?

You can find ALL of my recipes in the Recipe Index, which is located at the top of the page. I have LOTS of absolutely delicious fish recipes you can check out, including:

Want More Recipes? Get My FREE Newsletter!

I publish a newsletter 2 times per month (1st and 15th) with lots of recipes, tips, etc..
Would you like to join our growing list of subscribers?

There is a Newsletter subscription box on the top right (or bottom) of each blog post, depending on the device you use.
You can submit your e-mail address there, to be added to my mailing list.

Find Me On Social Media:

Facebook page: The Grateful Girl Cooks!
Pinterest:
The Grateful Girl Cooks!
Instagram:
jbatthegratefulgirlcooks

Author's signature

Recipe Source: http://www.lovefoodies.com/british-beer-battered-fish–chips.html

↓↓ PRINTABLE RECIPE BELOW ↓↓

0 from 0 votes
Fish and Chips
Prep Time
20 mins
Cook Time
20 mins
Total Time
40 mins
 
Can't get to England? Why not make your own crunchy beer battered fish and homemade "chips" (french fries) for dinner, in the comfort of your own home!
Category: Entree
Cuisine: British
Keyword: fish and chips
Servings: 2 servings
Calories Per Serving: 901 kcal
Author: JB @ The Grateful Girl Cooks!
Ingredients
For fish:
  • 4 pieces cod (thick pieces-about 1 1/2 inches thick- I used frozen cod pieces)
  • 1 cup all purpose flour
  • Salt and pepper , to season fish
For batter:
  • 1 cup all purpose flour
  • 1 1/2 teaspoons baking powder
  • 7 Tablespoons milk
  • 1/2 Tablespoon olive oil
  • 1 Tablespoon water
  • 6-7 Tablespoons beer (light beer is best). Club soda may be substituted.
For Chips:
  • 2 small to medium potatoes per person (peeled , cut into "finger thickness"
Serve With:
  • Malt Vinegar and/or Tartar Sauce
Instructions
  1. Pat fish filets dry with a paper towel. In a medium sized bowl, whisk together the flour, salt and pepper. Gently dredge the fish in the flour, turning to coat completely. Shake off excess flour; set flour covered filets aside.
  2. Make the batter for the fish: Add all batter ingredients to a medium bowl, except for the beer (or club soda). Whisk to combine. There will be some lumps. That's okay. Set batter aside.
  3. Make the chips: Peel, then cut potatoes into finger thickness. Slice potatoes lengthwise, then into strips. Dry the potatoes as much as you can by patting them dry with paper towels.
  4. Heat oil in large skillet or stock pot until it reaches 350 degrees. (No thermometer? Try dropping a tiny bit of batter into oil... it should really sizzle, and come to the surface!). Carefully put cut potatoes into hot oil. Let them cook for about 8 minutes. Remove potatoes from hot oil (I used a spatula to help remove them). Place hot potatoes onto a baking pan or a wire rack with paper towels underneath, to drain, while you cook the fish. (You will cook the potatoes a 2nd time AFTER the fish has cooked).
  5. Add the beer or club soda to the batter, and gently mix to combine. The batter should have the consistency of slightly thinned yogurt. If it is too thick, add just a touch more beer, and stir.
  6. Heat the oil back up to 350 degrees. While it is heating back up, place parchment paper on baking sheet (to hold the fish after you remove it from the hot oil). If you are cooking for more than two people, see notes section for tip). Place flour covered fish pieces, one at a time, into the batter and fully cover with batter. Let excess batter run off fish back into bowl. Gently put battered fish into 350 degree (HOT) oil. Cook a few pieces at a time. Cook fish for 7-8 minutes, turning once, until golden brown and crispy on both sides. Remove cooked fish to parchment paper lined baking sheet to keep warm while you cook additional fish, then re-cook the "chips".
  7. When done cooking the fish, heat the oil back to 350 degrees. Carefully add the chips. Cook for 3-4 additional minutes, until crispy and hot! Remove chips, drain.
  8. Serve hot pieces of fish, a serving of "chips" on the side, along with some Malt Vinegar and/or tartar sauce. Enjoy!
Recipe Notes

I only cooked enough fish for two people. If you're cooking for more than 2, cook the fish in batches. Keep your oven heated to 300 degrees. As you remove cooked fish from oil, place it on paper-lined baking sheets; keep fish warm in oven until ready to serve.
Calculate about 5 ounces fish per person. Malt vinegar and tartar sauce not included in caloric calculation.

Nutrition Facts
Fish and Chips
Amount Per Serving (2 pieces fish+ fries)
Calories 901 Calories from Fat 63
% Daily Value*
Fat 7g11%
Saturated Fat 1g6%
Cholesterol 148mg49%
Sodium 231mg10%
Potassium 2621mg75%
Carbohydrates 121g40%
Fiber 7g29%
Sugar 3g3%
Protein 79g158%
Vitamin A 240IU5%
Vitamin C 22.8mg28%
Calcium 320mg32%
Iron 12.9mg72%
* Percent Daily Values are based on a 2000 calorie diet.

Here’s one more to pin on your Pinterest boards!Can't get to England? Why not make your own crunchy beer battered fish and homemade "chips" (french fries) for dinner, in the comfort of your own home!


Save

Save

Save

Save

Save

Baked Pork Chops with Stuffing

Baked pork chops with stuffing, topped with a creamy mushroom sauce is comfort food at it’s best! They’re easy to make, and the chops are tender and delicious!Baked pork chops with stuffing, topped with a creamy mushroom sauce is comfort food at it's best! They're easy to make, and the chops are tender and delicious!
Ever have a dinner recipe you’ve made for years, have no clue where you got the recipe from, but it’s ALWAYS good? THIS recipe for Baked Pork Chops with Stuffing is one of them! I know  I’ve been making this recipe for over 20 years. Originally I copied it onto a 3×5 index card way back in the day, but don’t remember where I got the recipe from.

I made these baked pork chops for our dinner last night, and decided to share it on the ol’ blog today. They taste REALLY GOOD!

Baked pork chops with stuffing are “comfort food” at it’s easiest and best, folks. It only takes about 15 minutes of prep time to get them ready.  The pork chops are then baked for an hour.  While they are baking, you can paint your home, finish your thesis, jog 2-3 miles… whatever.

Scroll Down For A Printable Recipe Card At The Bottom Of The Page

Busy? Want To Make These Pork Chops Ahead Of Time?

Baked pork chops with stuffing are easy to make AND delicious! You can easily prep them ahead of time, too! The pork chops were prepped early in the day, then put into the refrigerator BEFORE baking.

About 1/2 hour before baking I took the pork chops out of the fridge, to take the chill off the meat. When ready to bake, I popped the dish into the oven. This would be a great dish for busy people to make. Prepare it early in the day, and have it ready to throw in the oven later.

It’s EASY To Make Baked Pork Chops With Stuffing

The pork chops are browned in a skillet, then topped with a simple “stuffing” (heh heh… the “stuffing” goes on TOP of the chops). I’m not sure why it is called “stuffing”. One of life’s great mysteries, I suppose.

It’s extremely easy to make the sauce, and pour it over the stuffing and chops. Once that is done, into the oven the dish goes. See? EASY! Now you can sit back and relax!

Making Baked Pork Chops With Stuffing

The “stuffing” is easy. Soft bread cubes are mixed with onion, butter, and spices. I use sourdough bread… crust and all. It’s very basic, but trust me… it will be delicious!

Stuffing for baked pork chops, made with soft bread cubes, butter and onions in small metal bowl

Pan-Sear The Pork Chops

Into a hot skillet the chops go, for a quick sear (to brown them). I prefer to use boneless pork chops, but bone-in chops will do just fine in this recipe, as well.

Pork chops are seared in skillet until lightly browned before baking.

Pork chops are quickly browned on both sides, then removed to a baking dish.

Pork chops are browned on both sides in skillet before being baked.

The “stuffing” is then piled on top of each pork chop.

Stuffing is placed on top of browned pork chops before baking.

Making The Sauce For The Baked Pork Chops With Stuffing

The sauce is heated through on the stove, on medium low heat. Best part? The sauce only has a few ingredients. EASY. The sauce is then poured over the stuffing and pork chops, then into the oven it goes for 1 hour!

Creamy mushroom sauce heating on stove top in skillet before toppng pork chops.

This is what it looks like when the chops with stuffing first come out of the oven. The top of the sauce and stuffing is golden brown and bubbly. Now all that’s left is to serve it up! The baked pork chops smell so good!

Bubbly sauce and stuffing on top of baked pork chops, right out of the oven.

Serving The Baked Pork Chops With Stuffing

Use a spatula to lift each pork chop out of the baking pan and onto individual plates. This helps to keep the stuffing intact on the baked pork chops. Now you are ready to eat! Yum. The chops were served with green beans and rice on the side.

Baked pork chops with stuffing on plate with green beans and rice on the side.

Sure hope you’ll give this recipe a try… I’m confident you will love it!  The pork chops come out of the oven very tender, and coated with a luscious stuffing and sauce. Trust me – make these pork chops! Congratulations! You’ve just made a fantastic, fairly inexpensive, and not too labor intensive meal!

Looking For More PORK Recipes?

You can find all of my recipes in the Recipe Index, located at the top of the page. I have lots of recipes that use pork, including:

Interested In More Recipes?

Thank you for visiting this website. I appreciate you using some of your valuable time to do soIf you’re interested, I publish a newsletter 2 times per month (1st and 15th) with all the latest recipes, and other fun info. I would be honored to have you join our growing list of subscribers, so you never miss a great recipe!
There is a Newsletter subscription box on the top right side (or bottom) of each blog post, depending on the device you use, where you can easily submit your e-mail address (only) to be included in my mailing list.

You Can Also Find Me On Social Media:

Facebook page: The Grateful Girl Cooks!
Pinterest:
The Grateful Girl Cooks!
Instagram:
jbatthegratefulgirlcooks

Author's signature

↓↓ PRINTABLE RECIPE BELOW ↓↓

0 from 0 votes
Baked Pork Chops with Stuffing
Prep Time
15 mins
Cook Time
1 hr
Total Time
1 hr 15 mins
 
Baked pork chops with stuffing, topped with a creamy mushroom sauce is comfort food at it's best! They're easy to make, and the chops are tender and delicious!
Category: Entree
Cuisine: American
Keyword: baked pork chops
Servings: 4 servings
Calories Per Serving: 345 kcal
Author: JB @ The Grateful Girl Cooks!
Ingredients
  • 4 boneless pork chops (or bone-in)
  • 2 Tablespoons olive oil
For stuffing:
  • 2 cups soft sourdough bread cubes (cut into small cubes-any bread will do...)
  • 2 Tablespoons brown onion , finely chopped
  • 2 Tablespoons butter , melted
  • 2 Tablespoons water
  • 1/2 teaspoon poultry seasoning (can substitute thyme, if desired)
For sauce:
  • 1 can cream of mushroom soup (undiluted)
  • 3-4 white button mushrooms , chopped
  • 1/3 cup cooking sherry (can substitute water, if desired)
Instructions
  1. Preheat oven to 350 degrees. Spray a 13x9 baking pan with non-stick spray.
  2. Heat the olive oil in a large skillet until very hot. Add the pork chops. Brown the chops on medium heat until browned on both sides. Remove chops from skillet; place in a single layer in prepared baking pan. Set aside.
  3. In a small bowl, mix the bread cubes, onion, melted butter, water, and poultry seasoning. Mix well to combine.
  4. Using the same skillet that you cooked the pork chops in, combine the can of soup, sherry (or water), and the chopped mushrooms. Heat through. Remove from heat.
  5. Place 1/4 of the stuffing mix on top of each chop. Pour (or ladle) the sauce mixture over the top of the stuffing and chops, to cover. Bake pork chops, uncovered, for 1 hour at 350 degrees. Serve, and enjoy!
Nutrition Facts
Baked Pork Chops with Stuffing
Amount Per Serving (1 pork chop)
Calories 345 Calories from Fat 153
% Daily Value*
Fat 17g26%
Saturated Fat 6g38%
Cholesterol 103mg34%
Sodium 191mg8%
Potassium 598mg17%
Carbohydrates 9g3%
Sugar 1g1%
Protein 32g64%
Vitamin A 175IU4%
Vitamin C 0.7mg1%
Calcium 13mg1%
Iron 1.4mg8%
* Percent Daily Values are based on a 2000 calorie diet.

Here’s one more to pin on your Pinterest boards!Baked pork chops with stuffing, topped with a creamy mushroom sauce is comfort food at it's best! They're easy to make, and the chops are tender and delicious!


Save

Baked Parmesan Chicken

Baked Parmesan Chicken – You’ll enjoy these easy to make, seasoned, baked chicken breasts with a creamy Parmesan cheese coating! Delicious, and 5 minute prep!Baked Parmesan Chicken - You'll enjoy these easy to make, seasoned, baked chicken breasts with a creamy Parmesan cheese coating! Delicious, and 5 minute prep!

A couple of nights ago I made Baked Parmesan Chicken for dinner.  I didn’t use a recipe, but just made it up as I went along.  Sometimes experimenting is the way I find a recipe to keep. The chicken took only 5 minutes to prep, then it baked in the oven while I didn’t even give it another thought (how rude of me…). How easy is that?  It was DELICIOUS.

It was one of those nights where we seriously considered “just having a bowl of cereal for dinner”. Earlier that day I thawed chicken breasts, but both my husband and I were so exhausted at dinner time after a long work day, we wanted something “simple”.

I ended up deciding to just throw the chicken breasts in the oven and let them bake… figured we needed the protein more than we needed a bowl of cereal… haha!

Anyways, the chicken turned out wonderful! I based the “recipe” (if you can call it that!) on an old recipe I have that uses mayonnaise as one of the ingredients in a wonderful dinner bread. Sounds weird, huh? But wait – it’s amazing! (Here’s the original recipe: Italian Biscuit Flat Bread).

So for this dish I went with what I thought would taste good on chicken, and poof… dinner was served, and we really liked it! Hope you will give it a try! Here’s how to make this dish:

Scroll Down For A Printable Recipe Card At The Bottom Of The Page 

How To Make Baked Parmesan Chicken 

Boneless, skinless chicken breasts are lightly seasoned with salt, pepper, Italian seasoning, garlic powder, and thyme.

Four raw seasoned chicken breasts on plate

Believe it or not, mayonnaise is spread over the entire top surface of the chicken. this helps the Parmesan to adhere to the chicken AND keeps the chicken moist (trust me… it works!)

Four chicken breasts with mayonnaise on top

Bake The Parmesan Chicken

Cover the top of the chicken with grated Parmesan cheese, then sprinkle with paprika and parsley. Throw it in the ol’ oven at this point!  SEE HOW EASY THE PREP WAS?

Chicken, covered with Parmesan cheese and spices

Baked Parmesan chicken is cooked, uncovered, at 350 degrees for 45 minutes.  This is how it looks when it comes out of the oven. The chicken breasts should be lightly browned on top.

Chicken is baked and out of oven

And that’s it!!! One of the easiest recipes I know of!  The best part? It tastes GOOD… AND you can make the other side dishes while the chicken is baking. EASY PEASY!

We always enjoy this simple dish, especially when served with mashed potatoes and a small green salad on the side.

Baked poultry on beige plate with potatoes and salad

Hope you will give this recipe a try. It’s so easy and will save you LOTS of time fixing a yummy dinner your family will enjoy! Have a great day!

Looking For More CHICKEN Recipes?

You can find all of my recipes in the Recipe Index, which is located at the top of the page. I have LOTS of chicken recipes you’re gonna enjoy, including:

Interested In More Recipes?

Thank you for visiting this website. I appreciate you using some of your valuable time to do soIf you’re interested, I publish a newsletter 2 times per month (1st and 15th) with all the latest recipes, and other fun info. I would be honored to have you join our growing list of subscribers, so you never miss a great recipe!
There is a Newsletter subscription box on the top right side (or bottom) of each blog post, depending on the device you use, where you can easily submit your e-mail address (only) to be included in my mailing list.

You Can Also Find Me On Social Media:

Facebook page: The Grateful Girl Cooks!
Pinterest:
The Grateful Girl Cooks!
Instagram:
jbatthegratefulgirlcooks

Author's signature

↓↓ PRINTABLE RECIPE BELOW ↓↓

0 from 0 votes
Baked Parmesan Chicken
Prep Time
5 mins
Cook Time
45 mins
Total Time
50 mins
 
You'll enjoy these easy to make, seasoned, baked chicken breasts with a creamy Parmesan cheese coating for dinner! Delicious, and prep time is only 5 minutes!
Category: Entree
Cuisine: American
Keyword: parmesan chicken
Servings: 4 servings
Calories Per Serving: 211 kcal
Author: JB @ The Grateful Girl Cooks!
Ingredients
  • 4 chicken breasts , boneless, skinless
  • 1 dash Salt and pepper (to season chicken)
  • 1 dash Italian seasoning (to season chicken)
  • 1 dash Garlic powder (to season chicken)
  • 1 dash Thyme (dried - to season chicken)
  • 4 teaspoons mayonnaise
  • 1/2 cup Grated Parmesan cheese
  • 1 dash Paprika (for garnish)
  • 1 dash Dried Parsley (for garnish)
Instructions
  1. Preheat oven to 350 degrees. Spray a baking pan with non-stick spray.
  2. Sprinkle the chicken breasts with salt, pepper, Italian seasoning, and dried thyme. (Don't need to measure, just season the meat with a good sprinkling of each of the spices.)
  3. Spread 1 teaspoon mayonnaise over the entire top surface of each chicken breast, to cover.
  4. Sprinkle the top of each chicken breast with the Parmesan cheese shreds (to cover the mayonnaise). Press down the cheese if necessary, to adhere it to the mayo.
  5. Place chicken breasts into a baking pan. Bake chicken, uncovered, at 350 degrees for 45 minutes. Remove from oven. Sprinkle top of each chicken breast with paprika and dried parsley. Serve, and enjoy!
Nutrition Facts
Baked Parmesan Chicken
Amount Per Serving (1 piece)
Calories 211 Calories from Fat 81
% Daily Value*
Fat 9g14%
Saturated Fat 3g19%
Cholesterol 85mg28%
Sodium 358mg16%
Potassium 433mg12%
Protein 28g56%
Vitamin A 140IU3%
Vitamin C 2.1mg3%
Calcium 151mg15%
Iron 0.7mg4%
* Percent Daily Values are based on a 2000 calorie diet.

Here’s one more to pin on your Pinterest boards!Baked Parmesan Chicken - You'll enjoy these easy to make, seasoned, baked chicken breasts with a creamy Parmesan cheese coating! Delicious, and 5 minute prep!

Save

Homemade Amaretto

Make homemade amaretto, a sweet Italian almond flavored liqueur, inexpensively at home! It’s easy, and can be used for cocktails or in other recipes.Make homemade amaretto, a sweet Italian almond flavored liqueur inexpensively at home! It's easy, and can be used for cocktails or in other recipes.
I recently whipped up some homemade Amaretto. It was so easy to make, and it only took a few minutes. I wanted to have it on hand, to use in a few recipes, but didn’t want to go to the store to buy an entire bottle just for a small amount needed.

Really… why pay some serious bucks for an entire bottle, when all you need might be 1/4 cup for a recipe? So I decided to make my own! If you are familiar with Amaretto, you know that it is a sweet, almond-flavored Italian liqueur.

A lot of people use it in cocktails, but it can also be used in numerous recipes.  I adapted a recipe I’ve had for years, and ended up making a small bottle of amaretto (approx. 13-14 ounces) that will be more than enough for several recipes, plus a few more.

Scroll Down For A Printable Recipe Card At The Bottom Of The Page

Is Homemade Amaretto Easy To Make?

Homemade Amaretto is totally easy to make.  You do need to have a bottle of cheap vodka in order to make this amaretto (you need 1 cup).

I happened to have a bottle stuck away because I make my own vanilla extract, and use that as the base (but that’s a completely different recipe, right?)

So How Do You Make Homemade Amaretto?

Making the amaretto is very easy! Water, granulated sugar and brown sugar are cooked in a saucepan, on medium heat, until the sugars are dissolved.

Bring this mixture to a boil, then remove the pan from the heat. Let it cool completely.

Water, sugar and brown sugar are cooked until sugar dissolves.

Add Extracts

After the homemade amaretto has cooled completely, add the vodka, pure almond extract and vanilla extract, and stir to combine.

Vodka, almond and vanilla extracts are added to the homemade amaretto mixture in pan.

Have a clean jar ready for the homemade amaretto. Use a funnel to pour the cooled homemade amaretto liqueur into the bottle.

The homemade amaretto is transferred into a bottle by using a funnel.

Into the bottle goes the homemade amaretto. It sure smells good! In fact, even a year or two later, I occasionally open the bottle just to smell this liqueur… it smells heavenly!

Pouring the homemade amaretto into a funnel, then into the bottle.

Put a label on the bottle, add a cork or screw top to seal it, and store your homemade amaretto in a cool, dark place.

Homemade Amaretto is ready to store in cool, dark place.

If you are interested in making this recipe, you will discover you can make your own homemade amaretto for a fraction of the cost of buying it at a store. Hope you will consider giving this recipe a try.

Thanks for stopping by. Don’t forget to check out ALL my recipes in the Recipe Index, which is located at the top of the page. Have a great day!

Interested In More Recipes?

Thank you for visiting this website. I appreciate you using some of your valuable time to do soIf you’re interested, I publish a newsletter 2 times per month (1st and 15th) with all the latest recipes, and other fun info. I would be honored to have you join our growing list of subscribers, so you never miss a great recipe!
There is a Newsletter subscription box on the top right side (or bottom) of each blog post, depending on the device you use, where you can easily submit your e-mail address (only) to be included in my mailing list.

You Can Also Find Me On Social Media:
Facebook page: The Grateful Girl Cooks!
Pinterest: The Grateful Girl Cooks!
Instagram: jbatthegratefulgirlcooks

Author's signatureRecipe inspired by: Todd Wilbur’s Top Secret Recipe’s version of DiSaronno Amaretto

↓↓ PRINTABLE RECIPE BELOW ↓↓

4.5 from 2 votes
Homemade Amaretto
Prep Time
10 mins
Cook Time
5 mins
Total Time
15 mins
 

Make homemade amaretto, a sweet Italian almond flavored liqueur inexpensively at home! It's easy, and can be used for cocktails or in other recipes.

Category: Liqueur
Cuisine: Italian
Keyword: amaretto
Servings: 14 ounces ( 1 oz. per serving)
Calories Per Serving: 85 kcal
Author: JB @ The Grateful Girl Cooks!
Ingredients
  • 1/2 cup water
  • 1/2 cup granulated sugar
  • 1/4 cup dark brown sugar + 1 Tablespoon
  • 1 cup vodka
  • 1 Tablespoon almond extract (extract with no added oils)
  • 1 1/4 teaspoons vanilla extract
Instructions
  1. In a medium pan, add the water, granulated sugar and brown sugar. Mix to combine. Cook over medium heat, stirring to dissolve sugars.
  2. Bring the mixture to a boil; if all the sugar has dissolved, remove the pan from the heat. Set aside and let the hot syrup cool for 10-15 minutes.
  3. To the cooled mixture, add the vodka, almond extract, and vanilla extract. Mix well, to combine.
  4. Pour amaretto into a clean bottle using a funnel. Place cork or a top on the bottle to seal it. Store in pantry or cool, dark place.
  5. Enjoy!
Recipe Notes

Note: Recipe inspired by: Todd Wilbur's Top Secret Recipe's version of DiSaronno Amaretto

Nutrition Facts
Homemade Amaretto
Amount Per Serving (1 ounce)
Calories 85
% Daily Value*
Sodium 1mg0%
Potassium 5mg0%
Carbohydrates 11g4%
Sugar 11g12%
Calcium 3mg0%
* Percent Daily Values are based on a 2000 calorie diet.

Here’s one more to pin on your Pinterest boards!Make homemade amaretto, a sweet Italian almond flavored liqueur inexpensively at home! It's easy, and can be used for cocktails or in other recipes.


Save

Save