Mom’s Swiss Steak is comfort food at its very BEST! Sliced round steak with a flavorful onion gravy is baked until tender. Economical and delicious! 
My family didn’t have a lot of money as I was growing up. Truth is, things were fairly tight most of the time, but my mom sure knew how to stretch a dollar and feed her family well.
This delicious “comfort food” recipe for Mom’s Swiss Steak is one she fixed often for our family. We ALL loved it when she made this yummy dinner.
Mom’s Swiss steak really is quite simple to make and only has a few ingredients: round steak, an onion, some flour, water, a bit of oil, salt and pepper. Not too expensive to make, either!
Scroll Down For A Printable Recipe Card At The Bottom Of The Page
How Do You Make Mom’s Swiss Steak?
To begin, you need to cut a 1 1/2 – 2-pound round steak into serving pieces (the pieces don’t have to be too big, because they will “get bigger” once flattened by pounding out thinner).
Place one piece at a time between two pieces of plastic wrap. This helps to prevent splatters- put one piece plastic wrap on bottom and one on top of meat.
Pound the meat flat with the flat side of a meat mallet, one at a time, until each piece is flattened out and much thinner. Think of this as cheap therapy. Remove the meat from the plastic.
Repeat with the remaining pieces until all the meat pieces have been “tenderized”.

Season each piece generously with salt and pepper, then dredge each piece in flour, to cover all sides of the meat.


Prepare The Meat
Heat the oil in a large skillet. Once the oil is hot (medium-high), add the pieces of meat. Sear the meat, turning over once, until browned on both sides but not fully cooked.
Do this in batches, if necessary, because you want to avoid overcrowding the skillet for best results.

Lay the browned pieces of meat in a single layer in a large casserole dish. Top each piece with a round slice of onion.
Once one layer is done, add more meat and onion slices to make another layer, until all the pieces of browned meat are layered in the baking pan.
Leave ¼ cup of the meat and oil/drippings in the skillet and discard the rest.

Make The Thin “Gravy”
Make a very thin flour/water gravy and add to skillet. I add 4 cups water to the previously used skillet, then whisk the flour into the remaining one cup of water.

Add this flour and water liquid mixture to the skillet, then whisk or stir, to combine. Salt and pepper the “gravy” quite liberally, to season the “gravy” to taste.
Bring the mixture to a boil (and slightly thickens), then carefully pour the thin “gravy” over the meat in the baking pan.


Ready To Bake
Once the thin “gravy” is poured over the meat and onions in the baking dish, cover the casserole dish with a lid or seal tightly with aluminum foil.
Bake at 350°F. for 1½ hours. I know it doesn’t look too appealing before going into the oven, but trust me, it will come out fabulous!

Serve Mom’s Swiss Steak
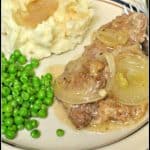
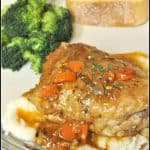
When done, the meat will be very tender, and the gravy will taste wonderful, due to the onions infusing flavor while baking. Serve the meat, topped with the onions onto serving plates.
Spoon some of the gravy over the top and serve! We LOVE having Mom’s Swiss Steak with mashed potatoes, and use some of the gravy for the potatoes, as well.
This is a definite “comfort food” meal because the smell and taste of the very tender Swiss steak is wonderful!


I hope you will consider giving this family recipe for Mom’s Swiss Steak a try. It’s a fairly simple way to stretch your hard-earned money.
This recipe makes enough to feed a hungry family or provide ample leftovers for a couple (like us)!
Thanks for stopping by, and I invite you to come back soon for more family-friendly recipes. Take care, may God bless you, and have a wonderful day.
Looking For More BEEF Recipes?
You can find ALL my recipes in the Recipe Index, which is located at the top of the page. I have a variety of recipes featuring beef you can choose from, including:
- Salisbury Steak
- Southwest Steak Salad with Avocado & Cilantro Dressing
- Grilled Patty Melts
- Easy Stuffed Beef Rolls
- Hawaiian Meatballs and Rice
Want More Recipes? Get My FREE Newsletter!
I publish a newsletter 2 times per month (1st and 15th) with lots of recipes, tips, etc.
Would you like to join our growing list of subscribers?
There is a Newsletter subscription box on the top right (or bottom) of each blog post, depending on the device you use.
You can submit your e-mail address there, to be added to my mailing list.
Find Me On Social Media:
Facebook page: The Grateful Girl Cooks!
Pinterest: The Grateful Girl Cooks!
Instagram: jbatthegratefulgirlcooks

Recipe Source: My Mom Fredia, who has been making this for over 50 years!
↓↓ PRINTABLE RECIPE BELOW ↓↓
Mom's Swiss Steak is comfort food at its very BEST! Sliced round steak with a flavorful onion gravy is baked until tender. Economical and delicious!
- 2 pounds round steak
- 1 teaspoon Salt and Pepper
- 1/2 cup Vegetable oil (approx. 1/2 cup) Enough to fully cover bottom of large skillet
- 1 large large brown onion , cut into thin round slices
- 1/2 cup Flour (enough to dredge meat in - approx. 4 heaping Tablespoons)
- 4 cups water
- 3 Tablespoons flour
- Preheat oven to 350 degrees.
- Cut round steak into serving pieces (approx 10- remember each piece will become slightly "larger" after being flattened out by pounding). One at a time, lay each piece of meat between plastic wrap. Pound with flat side of meat mallet until flattened and thinned down and tenderized. Repeat process for each piece of meat. Salt and Pepper each piece of meat, then dredge/fully cover each piece (all sides) in flour (put flour on a dinner plate to do this).
- Heat oil on medium high heat. Once hot, brown meat (turning once) until browned on both sides. (You may need to cook the meat in batches, depending on quantity and size of skillet). When done, reserve 1/4 cup of the oil and drippings in skillet ; discard the rest of oil.
- Place browned meat pieces in a single layer in casserole dish. Top each piece of meat with a slice of onion. Add another layer of meat, then onion, until all pieces are in dish.
- Make a really thin gravy by adding 4 cups water to 1/4 cup of oil/pan drippings remaining in skillet. Mix 1 cup water with 3 HEAPING Tablespoons flour. Mix well, then add to skillet and whisk to combine. Season this thin gravy to taste with additional salt and pepper. Bring "gravy" to a boil. It will slightly thicken. Remove "gravy" from heat, and carefully pour it over meat.
- Cover dish with lid or tightly cover with aluminum foil. Bake at 350 degrees for 1 1/2 hours.
- Remove from oven when done. Serve meat, topped with onions and gravy... and enjoy!
Note- Active prep time is 25 minutes. Rest of the total time for this recipe is inactive time, while meat is baking!
Here’s one more to pin on your Pinterest boards! 


 at home, with chicken breast, bell peppers and pineapple in a sweet Thai chili sauce. / The Grateful Girl Cooks!")
 / The Grateful Girl Cooks!")
 / The Grateful Girl Cooks!")
 / The Grateful Girl Cooks!")
 / The Grateful Girl Cooks!")
 / The Grateful Girl Cooks!")
 / The Grateful Girl Cooks!")
 / The Grateful Girl Cooks!")
 / The Grateful Girl Cooks!")
 / The Grateful Girl Cooks!")
 / The Grateful Girl Cooks!")
 / The Grateful Girl Cooks!")

 at home, with chicken breast, bell peppers and pineapple in a sweet Thai chili sauce. / The Grateful Girl Cooks!")


