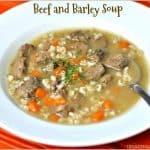
Category: Main Dishes

Easy Spaghetti Sauce With Italian Sausage

Spaghetti Sauce with Italian Sausage is a delicious, quick and easy meal to make, with tomatoes, sausage, mushrooms, green peppers, onions, and Italian spices. Spaghetti Sauce with Italian Sausage is a delicious, quick and easy meal to make, with tomatoes, sausage, mushrooms, green peppers, onions, and Italian spices.

When I make spaghetti sauce, I typically cook the sauce for several hours. However, sometimes I don’t have time to spare, so I make this EASY and quick spaghetti sauce. The sauce is is flavored with Italian sausage, mushrooms, green peppers, onions, and lots of spices. It’s delicious and filling, especially on a “cool weather” kind of day, like today in the Pacific Northwest.

I grew up eating my Mom’s spaghetti sauce, which she cooked with ground beef in the sauce. While that is good, my husband and I prefer the taste of Italian sausage in our sauce. I’ve been making it this way for YEARS! If you’ve never made sauce with Italian sausage, I hope you will consider it. The spaghetti sauce only takes about 10 minutes of prep work, then the rest of the time (30 minutes) is inactive “simmering” time. Not too much time to invest, and the results are wonderful!

I like to make extra spaghetti sauce to freeze for another day! The recipe serves 4-6 depending on serving size. Even if you can’t use that many servings in a single meal, it’s nice to have extra sauce available, for other meals).

Scroll Down For A Printable Recipe Card At The Bottom Of The Page

How To Make Spaghetti Sauce With Italian Sausage

Start the party off by sautéing Italian sausage (which has been removed from the casing) with chopped onion. The meat and onions are cooked on medium heat in a large skillet.

Cooking Italian sausage and onions in skillet for spaghetti sauce.

Add chopped green pepper, and continue cooking until the Italian sausage is fully cooked.

Chopped green peppers are added to sausage, and onions for spaghetti sauce.

Drain the grease from the skillet, then add tomato paste, a large can of diced tomatoes, and water. Sometimes I add in 1/2 cup red wine, if I have an open bottle (optional, though).

Tomato paste, diced tomatoes and water are added to skillet with spaghetti sauce.
Next add the spices (oregano, basil, Italian seasoning, garlic powder, red pepper flakes, salt & pepper). Stir the spaghetti sauce well, to combine.

Dried Italian spices are added to skillet to season spaghetti sauce.

Add mushrooms. I used some of my dehydrated mushrooms (they ARE kind of handy to have around and re-hydrate wonderfully in the sauce).

Of course, you can use the same amount of fresh, sliced mushrooms. If you don’t like mushrooms, just leave ’em out!

Mushrooms (dehydrated or fresh) are added to spaghetti sauce.
Cook the Spaghetti Sauce

Bring the spaghetti sauce to a boil, then reduce heat to a low simmer. Cook for about 30 minutes or so. The sauce will reduce a bit, and all those yummy flavors will permeate the sauce.

While the sauce is cooking, cook the spaghetti noodles (or any other pasta). Drain the cooked pasta, then place the spaghetti noodles onto individual serving plates. Top pasta with a ladle of this yummy spaghetti sauce, then garnish with grated Parmesan cheese.

Easy Spaghetti Sauce With Italian Sausage is served on top of pasta!
That’s it! It’s such an inexpensive and delicious hearty meal, with an amazing tasting Italian spaghetti sauce! Thanks for stopping by, and I hope you will come back again soon. Have a GREAT day!

Looking For More PASTA Recipes?

You can find all of my pasta recipes in the Recipe Index, located at the top of the page. I have lots of them, including:

You can find many other pasta recipes in my Recipe Index at the top of each post. Have a great day, and Buon Appetito (Italian, for “enjoy your meal!)!

Interested In More Recipes?

Thank you for visiting this website. I appreciate you using some of your valuable time to do soIf you’re interested, I publish a newsletter 2 times per month (1st and 15th) with all the latest recipes, and other fun info. I would be honored to have you join our growing list of subscribers, so you never miss a great recipe!
There is a Newsletter subscription box on the top right side (or bottom) of each blog post, depending on the device you use, where you can easily submit your e-mail address (only) to be included in my mailing list.

You Can Also Find Me On Social Media:

Facebook page: The Grateful Girl Cooks!
Pinterest:
The Grateful Girl Cooks!
Instagram:
jbatthegratefulgirlcooks

Author's signatureRecipe source: My brain, in Italian mode.

0 from 0 votes
Easy Spaghetti Sauce With Italian Sausage
Prep Time
10 mins
Cook Time
30 mins
Total Time
40 mins
 
Spaghetti Sauce with Italian Sausage is a delicious, quick and easy meal to make, with tomatoes, sausage, mushrooms, green peppers, onions, and Italian spices.
Category: Entree
Cuisine: Italian
Keyword: spaghetti sauce
Servings: 6
Calories Per Serving: 278 kcal
Author: JB @ The Grateful Girl Cooks!
Ingredients
  • 3 Italian sausage links (mild or hot), casings removed.
  • 3/4 cup chopped brown onion
  • 1/3 cup chopped green pepper
  • 1 can (6 oz.) tomato paste
  • 1 large can (28 oz.) diced tomatoes
  • 1 cup water (or substitute 1/2 cup water and 1/2 cup red wine, if desired)
  • 1 1/2 teaspoons oregano (dried)
  • 1 teaspoon Italian seasoning
  • 1/2 teaspoon basil (dried)
  • 1 1/4 teaspoons garlic powder
  • 1 teaspoon salt
  • 1/4 teaspoon black pepper
  • 1/4 teaspoon red pepper flakes (dried)
  • 1 1/2 cups sliced mushrooms
  • Grated Parmesan cheese , for garnish (if desired)
Instructions
  1. Remove casing from sausage links by cutting with a knife down the length of the link, and removing the sausage. Discard the casing. Crumble the sausage into a large skillet.
  2. Sauté the sausage and chopped onion on medium heat. Add the green pepper; cook until sausage is fully cooked. Drain the grease out of the pan (discard), and return skillet to stovetop.
  3. Add tomato paste, can of diced tomatoes (including juice), and water to skillet. Add oregano, Italian seasoning, basil, garlic powder, salt, pepper and red pepper flakes. Add sliced mushrooms. Stir all ingredients well, to combine.

  4. Bring sauce to a boil, then reduce heat to low and continue to cook for about 30 minutes. The sauce will reduce down a bit, and the flavors will permeate the sauce. Taste test the sauce and add additional salt or spices as desired.
  5. While sauce is cooking, prepare the pasta of your choice according to package directions. Drain pasta, then serve with spaghetti sauce ladled over the top. Garnish with Parmesan cheese, if desired, and serve HOT!

Recipe Notes

Caloric calculation does not include pasta of your choice. It also does not include optional Parmesan cheese topping (optional).

Nutrition Facts
Easy Spaghetti Sauce With Italian Sausage
Amount Per Serving (1 g)
Calories 278 Calories from Fat 162
% Daily Value*
Fat 18g28%
Saturated Fat 6g38%
Cholesterol 42mg14%
Sodium 1199mg52%
Potassium 950mg27%
Carbohydrates 19g6%
Fiber 4g17%
Sugar 10g11%
Protein 12g24%
Vitamin A 780IU16%
Vitamin C 28.1mg34%
Calcium 83mg8%
Iron 3.7mg21%
* Percent Daily Values are based on a 2000 calorie diet.

Here’s one more to pin on your Pinterest boards!Spaghetti Sauce with Italian Sausage is a delicious, quick and easy meal to make, with tomatoes, sausage, mushrooms, green peppers, onions, and Italian spices.


Save

Save

Chili Mac With Summer Squash

Chili Mac with Summer Squash is a budget friendly, easy, delicious meal, with ground beef, pasta, fresh veggies and great Southwest flavor!Chili Mac with Summer Squash is a budget friendly, easy, delicious comfort food meal, with ground beef, pasta, fresh summer veggies and great Southwest flavor!
Well, if you’re looking for an inexpensive, easy to prepare “Comfort Food” kind of meal… this “Chili Mac With Summer Squash” is it!!  I made this Southwestern flavored recipe up as I went along (really), but it is loosely based on the goulash recipe (Italian-flavored) my Mom used to make for us kids when we were growing up.

I fixed this EASY PEASY yummy dish for my husband and I for dinner recently, and it filled us up!  It’s pretty amazing what you can do with a pound of hamburger meat, some fresh veggies from the garden (or store), elbow macaroni, and some tasty Southwestern spices! The recipe serves 4-6 depending on serving size, so all in all, it’s a lot of bang for your hard earned money! Here’s how to make this:

Scroll Down For A Printable Recipe Card At The Bottom Of The Page

Cook The Meat 

First, brown one pound of ground beef with chopped onions and a bit of diced jalapeno. When it is nearly done, add minced garlic.

Ground beef, onions, garlic and jalapeno are cooked for chili mac
Drain off the grease (discard), then add one small can of diced tomatoes, a little water, some taco seasoning, salt, and pepper to the beef. (I used 3 large Tablespoons of my homemade taco seasoning mix:  “Make Your Own Taco Seasoning Mix”).

Canned tomatoes and chili spices are added to ground beef mixture
Time To Add The Summer Squash!

Stir well, then add zucchini and yellow squash (cut in quarters). I used my homegrown veggies (yay for my garden). Stir again to combine, then cover the skillet and let it all cook for 9-10 minutes. Only cook long enough to cook the squash, but not let it get “smooshy”.

Sliced summer squash is added to chili beef mixture

Summer squash is cooked with ground beef, tomatoes and spices
To Save Time: While the meat and veggies are cooking, cook the elbow macaroni separately in a large saucepan. Once the meat and veggies were done cooking, I uncovered the skillet to take a photo to show what it will look like.

Summer squash is finished cooking with chili beef
Finish Making The Chili Mac with Summer Squash

Once the pasta noodles have finished cooking, drain the water from them. Put the drained macaroni noodles back into the large pot they were cooked in.

Macaroni noodles are cooked, then drained.
Immediately pour the entire skillet of hot meat and veggies into the pan of cooked/drained macaroni.

Summer squash, chili beef and tomatoes are poured over cooked macaroni
Stir it all together, then heat it another minute or two to make sure it is hot… then taste-test it to make sure it is seasoned with enough salt.

Pasta, beef and summer squash are stirred to combine.
Time to EAT!

Ladle the Chili Mac into serving bowls while it is piping hot!

Chili mac with summer squash is placed into bowls for serving
Sprinkle each bowl with a small amount of grated cheddar cheese, then serve it! There ya have it… a tasty one-dish meal that has meat, pasta, AND yummy veggies!

Chili mac is sprinkled with grated cheddar cheese to serve.
All that’s left to do is grab a fork and dig in! Chili Mac with summer squash is quick, easy, totally inexpensive to make, and really good. How good, you ask? The kind of good where you want to “put on stretchy pants and hang out on the couch watching a great movie while you eat this on a rainy day good”.

Sure hope you will give this recipe a try! The leftovers are amazingly yummy, as well- (speaking with first-hand knowledge!)  I think you’ll like this comforting dish as much as we do, and will LOVE how easy it is to prepare!

Looking For More PASTA Recipes?

You can find all of my recipes in the Recipe Index, which is located at the top of the page. I have LOTS of delicious featuring pasta, including:

Interested In More Recipes?

Thank you for visiting this website. I appreciate you using some of your valuable time to do soIf you’re interested, I publish a newsletter 2 times per month (1st and 15th) with all the latest recipes, and other fun info. I would be honored to have you join our growing list of subscribers, so you never miss a great recipe!
There is a Newsletter subscription box on the top right side (or bottom) of each blog post, depending on the device you use, where you can easily submit your e-mail address (only) to be included in my mailing list.

You Can Also Find Me On Social Media:
Facebook page: The Grateful Girl Cooks!
Pinterest: The Grateful Girl Cooks!
Instagram: jbatthegratefulgirlcooks

Have a GREAT day!

Author's signature

0 from 0 votes
Chili Mac With Summer Squash
Prep Time
15 mins
Cook Time
9 mins
Total Time
24 mins
 
Chili Mac with Summer Squash is a budget friendly, easy, delicious comfort food meal, with ground beef, pasta, fresh summer veggies and great Southwest flavor!
Category: Entree
Cuisine: Southwestern
Keyword: chili mac
Servings: 5 servings
Calories Per Serving: 562 kcal
Author: JB @ The Grateful Girl Cooks!
Ingredients
  • 1 pound hamburger meat
  • 1/3 cup chopped onion
  • 1/2 small jalapeno pepper , (de-stemmed and seeded), chopped finely
  • 1 1/2 teaspoons minced garlic
  • 1 teaspoon salt
  • 1/4 teaspoon black pepper
  • 1 envelope taco seasoning or 3 Tablespoons homemade taco seasoning
  • 1 can diced tomatoes (14.5 ounces)
  • 1/2 cup water
  • 1 green zucchini , sliced, then cut into quarters
  • 1 yellow squash , sliced, then cut into quarters
  • 2 cups elbow macaroni (cooked per package directions)
  • 1 cup grated cheddar cheese
  • Additional salt (to taste)
Instructions
  1. Before cooking the hamburger meat, bring a large saucepan full of water to a boil (to cook the macaroni in)
  2. In large skillet, brown the hamburger meat, chopped onion and jalapeno. Right before meat is fully cooked, add the minced garlic. Drain grease off meat when fully cooked. Return skillet to stove.
  3. Add tomatoes, taco seasoning, water, salt and pepper, zucchini, and yellow squash. Stir to combine. Cover skillet, then continue to cook on medium-low for approximately 9 minutes. Do not let squash get smooshy!
  4. While meat mixture is cooking, prepare macaroni noodles in a large saucepan, according to package directions. When done, drain macaroni, then return noodles to large saucepan.
  5. Add in the hot meat/squash mixture. Stir to combine. Heat quickly (uncovered) on medium-high for a minute or two, stirring constantly, to heat dish thoroughly. Taste test. If it needs more salt, add it now.
  6. Spoon mixture into individual serving bowls. Top with grated cheddar cheese, and serve hot!
Nutrition Facts
Chili Mac With Summer Squash
Amount Per Serving (1 serving (1/5 of total))
Calories 562 Calories from Fat 234
% Daily Value*
Fat 26g40%
Saturated Fat 11g69%
Cholesterol 88mg29%
Sodium 809mg35%
Potassium 767mg22%
Carbohydrates 49g16%
Fiber 3g13%
Sugar 5g6%
Protein 30g60%
Vitamin A 515IU10%
Vitamin C 24.1mg29%
Calcium 231mg23%
Iron 3.7mg21%
* Percent Daily Values are based on a 2000 calorie diet.

Here’s one more to pin on your Pinterest boards!Chili Mac with Summer Squash is a budget friendly, easy, delicious comfort food meal, with ground beef, pasta, fresh summer veggies and great Southwest flavor!


Save

Save

Mahi Mahi with Corn & Avocado Salsa

Easy to prepare, healthy AND delicious, baked Mahi Mahi seafood dish, served on a bed of Corn and Avocado Salsa is sure to please your taste buds!Easy to prepare, healthy AND delicious, baked Mahi Mahi seafood dish, served on a bed of Corn and Avocado Salsa is sure to please your taste buds!
Want to try a fantastic, delicious, healthy and EASY seafood meal? Then look no further. This Mahi Mahi with Corn & Avocado Salsa is the dinner for YOU. Seriously wonderful.

I made this delicious dish for my husband and I the other night for dinner. We both LOVED it! I used frozen mahi mahi fillets that we purchased in a large bag at Costco, then thawed the pieces we needed to make the recipe.

The fish is lightly spiced, and the corn and avocado salsa (that you place the fish on top of when done) is crunchy, creamy and amazing! So quick and easy to prepare, as well!! Winner, winner! This is a perfect meal to serve that’s ready in a flash!

Scroll Down For A Printable Recipe Card At The Bottom Of The Page

Make The Seasoning For The Mahi Mahi

The first thing I did was mix up the seasoning for the fish. Took all of about 1 minute. Whew. I know it was hard to not work up a real sweat, but you did it!

Seasoning for mahi mahi, in metal bowl
Brush all sides of the uncooked Mahi Mahi with the seasoning sauce. I lined a baking sheet with aluminum foil (to catch drips), then sprayed a wire oven-safe rack with non-stick spray.

Bake The Mahi Mahi

Place the fish on the wire rack, then put the rack on top of the foil-covered baking sheet and place it in the oven. You will need to bake the mahi mahi at 375° F for 18-20 minutes.

Sauce brushed onto mahi mahi fillets, on blue matTwo pieces of mahi mahi on wire rack
Make The Corn And Avocado Salsa While Mahi Mahi Bakes

While the fish is baking, it is easy to make the corn and avocado salsa in no time at all. Again… this step is very EASY.

Corn and avocado salsa in bowl
Serve The Mahi Mahi with Corn And Avocado Salsa

When the Mahi Mahi was done baking, I spooned a bed of the salsa onto our individual dinner plates, then placed the baked Mahi Mahi on top. Voila! Quick AND healthy!  The mahi mahi and the fresh, delicious salsa looks good and tastes even better!

Mahi Mahi on corn and avocado salsa, with watermelon wedge on side
Sure hope you will give this healthy entree a try… I will most DEFINITELY be preparing this mahi mahi with corn and avocado salsa again!  Have a fantastic day, friends.

Looking For More SEAFOOD Recipes?

You can find all of my seafood recipes (there’s a lot!) in the Recipe Index, located at the top of the page. A few family favorites include:

Interested In More Recipes?

Thank you for visiting this website. I appreciate you using some of your valuable time to do soIf you’re interested, I publish a newsletter 2 times per month (1st and 15th) with all the latest recipes, and other fun info. I would be honored to have you join our growing list of subscribers, so you never miss a great recipe!
There is a Newsletter subscription box on the top right side (or bottom) of each blog post, depending on the device you use, where you can easily submit your e-mail address (only) to be included in my mailing list.

You Can Also Find Me On Social Media:

Facebook page: The Grateful Girl Cooks!
Pinterest:
The Grateful Girl Cooks!
Instagram:
jbatthegratefulgirlcooks

Author's signatureRecipe Source: http://laughingspatula.com/easy-grilled-mahi-with-avocado-and-corn-salsa/

0 from 0 votes
Mahi Mahi with Corn & Avocado Salsa
Prep Time
10 mins
Cook Time
18 mins
Total Time
28 mins
 

Easy to prepare, healthy AND delicious, this baked Mahi Mahi seafood dish, served on a bed of Corn and Avocado Salsa is sure to please your taste buds!

Category: Entree
Cuisine: American
Keyword: mahi mahi
Servings: 4 servings
Calories Per Serving: 333 kcal
Author: JB @ The Grateful Girl Cooks!
Ingredients
For the Mahi Mahi:
  • 4 mahi mahi fillets - thawed
  • 2 Tablespoons olive oil
  • 2 teaspoons ground cumin
  • 2 teaspoons chili powder
  • 1/2 teaspoon salt
  • 1/4 teaspoon black pepper
For the Salsa:
  • 2 fresh ears of corn , (approx. 2 cups-cut from cob)
  • 1 small jalapeno pepper , seeded and finely chopped
  • 1 firm and ripe avocado , cut into cubes
  • 1/3 cup red onion , finely chopped
  • 1 Tablespoon sugar
  • 1 Tablespoon white vinegar
  • 1/2 teaspoon salt
  • 1/4 teaspoon pepper
Instructions
  1. Preheat oven to 375 degrees.
  2. Place aluminum foil onto a cookie sheet. Spray a wire rack with a non-stick spray. Place the fish fillets onto the wire rack over the foil (this will make cleanup a snap!). Place cookie sheet with wire rack and fish into oven. Bake for approximately 18-20 minutes or until fish is done.
  3. While fish is baking, prepare the salsa:
  4. Mix all the salsa ingredients together in a medium sized bowl.
  5. When the fish is done baking, create a "bed" of salsa on the serving plate, then top with a piece of the hot fish. Serve and enjoy!
Recipe Notes

FYI --Original recipe serves 4. When I made this I only cooked TWO Mahi Mahi fillets, but kept all other ingredients the same... We liked having a large amount of the fresh salsa under the fish.

Nutrition Facts
Mahi Mahi with Corn & Avocado Salsa
Amount Per Serving (1 serving (w/ corn salsa)
Calories 333 Calories from Fat 144
% Daily Value*
Fat 16g25%
Saturated Fat 2g13%
Cholesterol 82mg27%
Sodium 703mg31%
Potassium 920mg26%
Carbohydrates 24g8%
Fiber 5g21%
Sugar 7g8%
Protein 24g48%
Vitamin A 825IU17%
Vitamin C 13.4mg16%
Calcium 36mg4%
Iron 2.7mg15%
* Percent Daily Values are based on a 2000 calorie diet.

Here’s one more to pin on your Pinterest boards!Easy to prepare, healthy AND delicious, baked Mahi Mahi seafood dish, served on a bed of Corn and Avocado Salsa is sure to please your taste buds!

Save

Save

Grilled Summer Veggies

Grilled Summer Veggies, with zucchini, yellow squash, carrots, onion, green and red peppers and green beans are cooked on BBQ, then topped w/ Parmesan cheese!Grilled Summer Veggies, with zucchini, yellow squash, carrots, onion, green and red peppers and green beans are cooked on BBQ, then topped w/ Parmesan cheese!

The HOT summer continues here in the great Pacific Northwest! We are still using our BBQ grill a lot, as we try to keep our kitchen (and home) cool! Today I want to share a recipe I make quite frequently in the summertime- Grilled Summer Veggies!

Scroll Down For A Printable Recipe Card At The Bottom Of The Page

Making Grilled Summer Veggies Is EASY

This recipe is really, really easy.  All that is involved in the prep work for this delicious side dish is slicing and cutting up the veggies. I even was able to use some homegrown veggies from our garden as part of this dish (yee haw!)


Summer veggies are sliced, and ready to be grilled.Once the veggies are sliced and chopped, put them into a large bowl. I used zucchini, yellow squash, red onion, green and red pepper, green beans (even a few yellow fillet beans from the garden), and baby carrots.

You can certainly add in additional veggies to make this dish “your own”. That’s the best way, right? You’ve got to like what you’re cooking!

Cut veggies are placed in large bowl to mix with seasonings.Time To Season The Veggies

Season the veggies with olive oil, salt, pepper, Parmesan cheese, garlic powder, and Italian seasoning. Give them a good toss, to fully coat the veggies with the seasoning.

Summe veggies are seasoned with olive oil, Parmesan cheese and Italian spices before grilling.

Use A BBQ Grill Safe Basket

After the veggies and seasonings are combined, put them into a BBQ-safe grill pan (we got one for about $8 at a home improvement warehouse). NOTE: If you don’t have access to a grill pan, use a cast iron skillet on your BBQ to cook these, but watch out… the skillet will get REALLY hot!).

The grill pan we used has a handle to carry it that detaches once you get it on the BBQ grill, then reattaches to lift pan off the grill once done. Pretty handy to use!

Veggies are placed into a BBQ-grill pan for cooking.Cook the veggies on a medium-hot grill for about 15 minutes or so, stirring often. My husband was the “Grill-Meister and Stirrer-Extraordinaire” for this dish!

Grilled Summer Veggies on the BBQ, being stirred while they cook.Some of the veggies will get a nice char on them or get slightly golden brown… that’s great! Just remember to stir them occasionally so they don’t burn! We love cooking veggies on our Weber grill, cause the smoky smell permeates the vegetables, and gives them such a wonderful flavor!

Summer veggies grilling on the BBQ.Serve The Grilled Summer Veggies

Once the veggies are done (fork-tender), we bring them inside and top them with grated Parmesan cheese, and serve them up, straight out of the grill pan! YUM!

Grilled Summer Veggies are sprinkled with grated Parmesan cheese before serving.Sure hope you will give this EASY recipe a try. These grilled summer veggies are a wonderful accompaniment to most meat dishes. I think you and your family will love them! You might also like to see how to grill corn on the cob on the BBQ! That’s another easy way to cook veggies!

Have a great day!  Thanks for stopping by today, and come back soon. May you find beauty all around you today. Hope you’re looking for it!

Looking For More VEGGIE Recipes?

You can find all my recipes in the Recipe Index, located at the top of the page. I have a great variety of vegetable dishes, including:

Interested In More Recipes?

Thank you for visiting this website. I appreciate you using some of your valuable time to do soIf you’re interested, I publish a newsletter 2 times per month (1st and 15th) with all the latest recipes, and other fun info. I would be honored to have you join our growing list of subscribers, so you never miss a great recipe!
There is a Newsletter subscription box on the top right side (or bottom) of each blog post, depending on the device you use, where you can easily submit your e-mail address (only) to be included in my mailing list.

You Can Also Find Me On Social Media:

Facebook page: The Grateful Girl Cooks!
Pinterest:
The Grateful Girl Cooks!
Instagram:
jbatthegratefulgirlcooks

Author's signature

5 from 1 vote
Grilled Summer Veggies
Prep Time
10 mins
Cook Time
15 mins
Total Time
25 mins
 
Grilled Summer Veggies, with zucchini, yellow squash, carrots, onion, green and red peppers and green beans are cooked on BBQ, then topped w/ Parmesan cheese!
Category: Side Dish, Vegetable Dish
Cuisine: American
Keyword: grilled summer veggies
Servings: 4 servings
Calories Per Serving: 163 kcal
Author: JB @ The Grateful Girl Cooks!
Ingredients
  • 1 zucchini , sliced
  • 1 yellow squash , sliced
  • 3 slices red onion (then quartered
  • 1/2 green bell pepper , cut into chunks
  • 1/2 red bell pepper , cut into chunks
  • green beans (I used about 10), ends trimmed and beans cut in half
  • 6-8 baby carrots , cut in half lengthwise
  • 1/4 cup Parmesan cheese
  • Salt and Pepper to taste
  • 3 Tablespoons olive oil
  • 1/2 teaspoon garlic powder
  • 1/2 teaspoon Italian seasoning
  • 2 teaspoons Grated Parmesan cheese (for garnish once veggies are cooked)
Instructions
  1. Prepare all veggies. Place into a large bowl.  Add seasoning ingredients: Parmesan cheese (shaker can kind), salt, pepper, olive oil, garlic powder, and Italian seasoning, Mix well to combine.

  2. Place veggies into a sprayed BBQ grill saute pan or into a cast iron skillet. Place pan onto a medium high BBQ grill. Cook for 15-18 minutes, stirring occasionally so the veggies don't burn.  When done, remove from heat (if using cast iron skillet it will be HOT... be careful!).

  3. Sprinkle grated Parmesan cheese over the top of the hot vegetables, and serve.  Enjoy!

Nutrition Facts
Grilled Summer Veggies
Amount Per Serving (1 (1/4 of total))
Calories 163 Calories from Fat 117
% Daily Value*
Fat 13g20%
Saturated Fat 2g13%
Cholesterol 6mg2%
Sodium 156mg7%
Potassium 364mg10%
Carbohydrates 7g2%
Fiber 2g8%
Sugar 4g4%
Protein 4g8%
Vitamin A 2855IU57%
Vitamin C 49.3mg60%
Calcium 125mg13%
Iron 0.8mg4%
* Percent Daily Values are based on a 2000 calorie diet.

Here’s one more to pin on your Pinterest boards!Grilled Summer Veggies, with zucchini, yellow squash, carrots, onion, green and red peppers and green beans are cooked on BBQ, then topped w/ Parmesan cheese!


Save

Save

Cobb Salad

Cobb Salad is a delicious “all in one” meal, with chicken breast, chilled salad greens, bacon, avocado, bleu cheese crumbles, and crunchy veggies!Cobb Salad is a delicious "all in one" meal, featuring chicken breast, chilled salad greens, bacon, avocado, bleu cheese crumbles, and crunchy veggies!
This past week I made a Cobb Salad for my husband and I for dinner. Cobb Salads are one of my favorite meals, because of all the chopped veggies, chicken, bacon, etc. that go into it. It’s an entire meal… we are always full when done eating, that’s for sure!

Scroll Down For A Printable Recipe Cad At The Bottom Of the Page

Making A Cobb Salad

The majority of work involved in making this chopped Cobb Salad is simply that… chopping! Chopping up cooked, crisp bacon, grilled chicken breasts, tomatoes, hard boiled eggs, tomatoes, cucumber and avocados.

The prep work is not so bad… it’s easy!  Once you have THAT done, all that is involved is layering the ingredients onto the cold crisp salad greens, adding your favorite dressing and enjoying this great salad!

Cobb salad, with chicken, bleu cheese, bacon and avocado!
If you have already have cooked chicken (I used leftover grilled chicken breasts!) and hard-boiled eggs, then this salad comes together very quickly!

The recipe makes enough for two meal sized salads. It could easily be adapted to make 4 smaller salads as a side dish.  You know what else I like about this yummy salad?  It not only TASTES good, it LOOKS good!

Chunks of chicken, avaocado, cucumber and bacon on cobb salad
Once you’ve “assembled” this cobb salad, all that is left to do is add your favorite salad dressing, grab a fork, and dig in!!! Sure hope you will give this salad a try. I really think you will LOVE it!

Salad dressing is drizzled over cobb salad, ready to serve!

I hope you have the chance to make and enjoy this delicious Cobb Salad. Have a fantastic week, friends. May God bless the work of your hands as you journey through each day you are given!

Looking For More SALAD Recipes?

You can find all of my recipes in the Recipe Index, located at the top of the page. I have some wonderful salad recipes that include:

Interested In More Recipes?

Thank you for visiting this website. I appreciate you using some of your valuable time to do soIf you’re interested, I publish a newsletter 2 times per month (1st and 15th) with all the latest recipes, and other fun info. I would be honored to have you join our growing list of subscribers, so you never miss a great recipe!
There is a Newsletter subscription box on the top right side (or bottom) of each blog post, depending on the device you use, where you can easily submit your e-mail address (only) to be included in my mailing list.

You Can Also Find Me On Social Media:

Facebook page: The Grateful Girl Cooks!
Pinterest:
The Grateful Girl Cooks!
Instagram:
jbatthegratefulgirlcooks

Have a GREAT day!

Author's signature

0 from 0 votes
Cobb Salad
Prep Time
15 mins
Cook Time
0 mins
Total Time
15 mins
 

Cobb Salad is a delicious "all in one" meal, featuring chicken breast, chilled salad greens, bacon, avocado, bleu cheese crumbles, and crunchy veggies!

Category: Entree Salad
Cuisine: American
Keyword: cobb salad
Servings: 2 entree salads
Calories Per Serving: 701 kcal
Author: JB @ The Grateful Girl Cooks!
Ingredients
  • Iceberg Lettuce and assorted Spring Greens
  • 4 slices bacon , cooked until crispy, then crumbled
  • 2 grilled or cooked skinless , boneless chicken breasts, cut into 1 inch cubes
  • 1/2 cup bleu cheese crumbles
  • 1 medium tomato , chopped
  • 2 hard boiled eggs , chopped
  • 1 medium cucumber , peeled and cubed
  • 1 avocado , cubed
  • Salt and pepper to taste
Instructions
  1. Place mixed chilled salad greens on serving plate.
  2. Place layers (lines) of remaining ingredients on top of salad greens in any order you wish, remembering to divide all ingredients in half (half for each salad).
  3. Top with your favorite salad dressing; serve and enjoy!
Recipe Notes

FYI-The prep time does not include time for boiling the eggs or cooking the chicken. It's really quick and easy to throw this salad together when those are already pre-cooked.

Caloric calculation is based on TWO salads. If recipe is divided into 4 servings, the calorie count will be cut in half.

Nutrition Facts
Cobb Salad
Amount Per Serving (1 main course salad)
Calories 701 Calories from Fat 450
% Daily Value*
Fat 50g77%
Saturated Fat 16g100%
Cholesterol 313mg104%
Sodium 969mg42%
Potassium 1514mg43%
Carbohydrates 16g5%
Fiber 8g33%
Sugar 5g6%
Protein 46g92%
Vitamin A 1400IU28%
Vitamin C 25.1mg30%
Calcium 248mg25%
Iron 2.3mg13%
* Percent Daily Values are based on a 2000 calorie diet.

Here’s one more to pin on your Pinterest boards!Cobb Salad is a delicious "all in one" meal, featuring chicken breast, chilled salad greens, bacon, avocado, bleu cheese crumbles, and crunchy veggies!


Save

Save

Grilled Lime-Cilantro Shrimp Kabobs

Delicious marinated and grilled lime cilantro shrimp kabobs, with peppers and onions are an easy, healthy and flavorful dish you’ll enjoy!Delicious marinated and grilled lime cilantro shrimp kabobs, with peppers and onions are an easy, healthy and flavorful dish you'll enjoy!
We’ve been grilling a lot of our evening meals outside this summer, because of the “above average” heat we’re having here in the Pacific Northwest. Who wants to bake and heat up the house at the end of a long day when it’s this hot? NOT THIS GIRL! That’s why I made these Grilled Lime-Cilantro Shrimp Kabobs for dinner this week.

I found the recipe for the marinade on Pinterest, then decided to add onions, plus red and green pepper slices, threaded them all onto skewers and threw ’em onto our trusty Weber BBQ grill. In practically no time at all we were enjoying these tasty shrimp kabobs and veggies! Who doesn’t like a good kabob? All in all, a QUICK, EASY, HEALTHY and DELICIOUS dinner on a very HOT evening!

Here’s how easy they are to make… honestly, the most time these took was the 30 minute marinating time. Other than that, they were a cinch!

Scroll Down For A Printable Recipe Card At The Bottom Of The Page

Prepare The Shrimp

Clean, shell and de-vein all of the shrimp, and place them in a bowl. Discard the shells and veins, etc.

Shrimp are cleaned, shelled and de-veined before making kabobs.

Use a microplane or a fine grater to add the zest of one lime to the shrimp in the bowl.

Lime zest is added to the raw shrimp in bowl.

Now add the juice from the entire lime to the shrimp. The lime juice should be about the equivalent of about 1/4 cup liquid.

Fresh lime juice is added to the shrimp.

Marinate The Shrimp For The Kabobs

Add oil, chopped cilantro, finely chopped jalapeno, minced garlic, salt, and pepper to the shrimp. Stir, to fully cover the shrimp with the marinade ingredients. Cover the bowl with plastic wrap and let the shrimp marinate in the refrigerator for about 30 minutes.

The shrimp is marinated in the lime and cilantro sauce.

While the shrimp is marinating, cut up the red and green bell peppers and onion. When the shrimp is finished marinating, add sliced veggies to the bowl. Give them a quick stir, to coat with the marinade.

Make The Lime Cilantro Shrimp Kabobs

Thread the veggies and shrimp onto 4 skewers for grilling. Make sure to alternate colors and veggies with the shrimp. Note: I used metal skewers; if you are using wood skewers, be sure to soak them in water for about 30 minutes prior to using, so they won’t burn on the grill.

Red and green peppers and onions are mixed with the marinated shrimp.Shrimp kabobs are placed onto skewers before grilling.

Time To Grill The Shrimp Kabobs

Cook the shrimp kabobs on a hot BBQ grill (medium-high heat). We grilled them about 3 minutes per side (maybe just a tad more, to ensure the veggies got some heat, too). Turn the shrimp kabobs at least once during the grilling time, to ensure all sides cook evenly.

Grilling lime cilantro shrimp kabobs on the BBQ.

Serve And Enjoy

When done, remove the shrimp kabobs from the grill, and serve them right away while they’re hot! Each serving is 2 skewers of shrimp kabobs.

Grilled shrimp kabobs on a plate with rice on the side.I served the kabobs with my Fresh Corn Sauté with Red Pepper and Onions, some rice, and a couple slices of fresh tomatoes from our garden on the side. YUM!

The shrimp is removed from the skewers and served with some corn on the side.These grilled shrimp kabobs sure were good! Hope you’ll give these a try, too! I’m sure they would be just as good grilled on your indoor stovetop grill OR under a broiler (if you don’t have a BBQ grill).

This would also be a great recipe to take on a family camping trip. Just make everything up ahead of time (chopping veggies, marinating shrimp), then skewer them and cook over a campfire grill! The recipe I made (and am posting) serves two people, but can EASILY be doubled!!! Have a great day!

Looking For More KABOB Recipes?

You can find all of my recipes in the Recipe Index, located at the top of the page. A few kabob recipes you might enjoy include:

Interested In More Recipes?

Thank you for visiting this website. I appreciate you using some of your valuable time to do soIf you’re interested, I publish a newsletter 2 times per month (1st and 15th) with all the latest recipes, and other fun info. I would be honored to have you join our growing list of subscribers, so you never miss a great recipe!
There is a Newsletter subscription box on the top right side (or bottom) of each blog post, depending on the device you use, where you can easily submit your e-mail address (only) to be included in my mailing list.

You Can Also Find Me On Social Media:

Facebook page: The Grateful Girl Cooks!
Pinterest:
The Grateful Girl Cooks!
Instagram:
jbatthegratefulgirlcooks

Author's signatureShrimp Marinade Adapted From: http://www.closetcooking.com/2014/07/cilantro-lime-grilled-shrimp.html

0 from 0 votes
Grilled Lime-Cilantro Shrimp Kabobs
Prep Time
10 mins
Cook Time
6 mins
Marinating
30 mins
Total Time
46 mins
 

Delicious marinated and grilled lime cilantro shrimp kabobs, with peppers and onions are an easy, healthy and flavorful dish you'll enjoy!

Category: Entree
Cuisine: American
Keyword: shrimp kabobs
Servings: 4 kabobs
Calories Per Serving: 87 kcal
Author: JB @ The Grateful Girl Cooks!
Ingredients
  • 1/2 pound shrimp , cleaned, shelled, and deveined
  • 1 lime (zest AND juice)
  • 1/2 Tablespoon vegetable oil
  • 1 Tablespoon cilantro , chopped
  • 1/4 medium jalapeno , finely chopped
  • 1/2 clove minced garlic
  • salt and pepper (to taste)
  • 1/2 medium red bell pepper , cut into wedges (about the same size as the shrimp)
  • 1/2 medium green pepper , cut into wedges (about the same size as the shrimp)
  • 1/4 medium brown onion , cut into wedge slices (about the same size as the shrimp)
Instructions
  1. In a medium sized bowl, marinate the cleaned, shelled and deveined shrimp in the lime zest, lime juice, vegetable oil, cilantro, garlic, jalapeno, salt and pepper. Stir well, to combine and cover the shrimp with the marinade. Cover bowl with plastic wrap; refrigerate shrimp and marinade for 30 minutes
  2. While shrimp is marinating, cut up the red and green bell peppers, and the brown onion. Cut them into wedges about the same size as the shrimp.
  3. When shrimp has marinated for 30 minutes, add the peppers and onions to the bowl. Toss to coat. Thread the shrimp, peppers and onions onto 4 skewers, alternating items on the skewers.

  4. Grill on a medium-high heated BBQ grill (or under broiler, or on a stovetop grill). Cook shrimp about 3 minutes on each side, or until done. Serve while hot, and enjoy this simple dish! Each serving is 2 kabobs.

Recipe Notes

This recipe is EASILY doubled to serve 4!

Nutrition Facts
Grilled Lime-Cilantro Shrimp Kabobs
Amount Per Serving (2 kabobs)
Calories 87 Calories from Fat 18
% Daily Value*
Fat 2g3%
Saturated Fat 1g6%
Cholesterol 142mg47%
Sodium 442mg19%
Potassium 129mg4%
Carbohydrates 4g1%
Fiber 1g4%
Sugar 1g1%
Protein 12g24%
Vitamin A 520IU10%
Vitamin C 39.7mg48%
Calcium 88mg9%
Iron 1.4mg8%
* Percent Daily Values are based on a 2000 calorie diet.

Here’s one more to pin on your Pinterest boards!Delicious marinated and grilled lime cilantro shrimp kabobs, with peppers and onions are an easy, healthy and flavorful dish you'll enjoy!


Save

Save

Meatballs Stroganoff

Easy, budget friendly, and absolutely delicious, meatballs stroganoff, in a creamy mushroom sauce served on top of egg noodles, is comfort food at it’s best!Easy, budget friendly, and absolutely delicious, meatballs stroganoff, in a creamy mushroom sauce served on top of egg noodles, is comfort food at it's best!

Does it seem like Summer is rushing madly by? It does to me! We’ve had family members visiting for a large part of the month of July, and I am stunned that it’s already August and almost time for FALL. You know what that means, right? IT’S time for “MEATBALLS STROGANOFF”!!! (ok, totally lame transition, but work with me here, folks!)

Here’s the backstory. I thawed out some hamburger meat, fully intending to grill burgers. However, it was so hot outside I didn’t want myself or my hubby to have to grill and sweat at the same time.

I decided to cook something on the old stove top. THAT’S why I made these scrumptious meatballs. Now we can all sleep better tonight, knowing all the intricate details, right? Guess what? This dish is inexpensive to make, and the recipe makes 4-6 servings (depending on just how many meatballs one can eat in a serving)!

Scroll Down For A Printable Recipe Card At The Bottom Of The Page

How To Make Meatballs Stroganoff

First thing you will need to do is mix up the ground beef, milk, dry bread crumbs, salt and pepper in a large bowl. Easy, right? Right!

Ground beef, bread crumbs and spices in mixing bowl to make meatballs for meatballs stroganoff.
Shape this mixture into meatballs. Brown them in a small amount of butter in a large skillet.

Meatballs browning in oil in large skillet
Brown the meatballs on all sides. Once they are brown all over transfer them out of the skillet to a plate while the stroganoff sauce is being made. Drain the grease out of the skillet, and give it a quick wash (the skillet, NOT the grease!).

Browned meatballs for meatballs stroganoff are cooking in silver skillet.
Make The Stroganoff Sauce

To prepare the stroganoff sauce, cook the chopped onions, mushrooms, and paprika in a skillet with a bit of butter until tender.

Cooking mushrooms, onions and spices for stroganoff sauce for meatballs
Once the onions are tender, sprinkle the mixture with flour and stir to blend. Add the beef bouillon, salt and pepper to the skillet. Whisk it together to form a sauce.

Flour is added to mushrooms and onions in skilletBeef broth is added to stroganoff sauce in skilletStroganoff sauce (with whisk) thickens as it is cooked in pan
Add The Meatballs to the Sauce

Return the meatballs to the sauce, and cover the skillet.  Cook the meatballs stroganoff for 10-12 minutes on medium/low heat, until they’re completely heated through. Spoon the stroganoff sauce over the meatballs several times during this cooking process. The sauce will thicken slightly as it cooks.

While the meatballs stroganoff are cooking, combine the sour cream and Worcestershire sauce in a small bowl, and set aside.

Cooked meatballs stroganoff with sauce in skillet.Cook the Egg Noodles

Cook the egg noodles in a separate pan, according to the manufacturer’s directions. When egg noodles are fully cooked, drain them. Add a little butter and some chopped fresh dill to the noodles if you want (optional).

Egg noodles are cooked to serve with meatballs stroganoff.
Add the blended sour cream/Worcestershire sauce to the meatballs stroganoff and stir, to fully combine. Continue to heat the meatballs stroganoff for a couple of minutes, so they are heated through. Be careful to not let the sauce come to a boil.

Sour cream is added to meatballs stroganoff and sauce at end of cooking time.
Serve the Meatballs Stroganoff

To serve, place the cooked and drained hot egg noodles onto individual plates. Top the noodles with the meatballs stroganoff. A serving size is anywhere from 2-4 meatballs, depending on how hungry you are!

Spoon the extra mushroom sauce over the top of the meatballs and noodles, then sprinkle the top of the meatballs with a bit of fresh or dried parsley.

Meatballs stroganoff is served on top of cooked egg noodles
We really love these “comfort food” meatballs stroganoff! Hope you will give ’em a try! I think you will like them, too. Have a great day!

Looking For More MEATBALL Recipes?

You can find ALL my recipes in the Recipe Index, located at the top of the page. I have several recipes that feature meatballs, including:

Interested In More Recipes?

Thank you for visiting this website. I appreciate you using some of your valuable time to do soIf you’re interested, I publish a newsletter 2 times per month (1st and 15th) with all the latest recipes, and other fun info. I would be honored to have you join our growing list of subscribers, so you never miss a great recipe! 

There is a Newsletter subscription box on the top right side (or bottom) of each blog post, depending on the device you use, where you can easily submit your e-mail address (only) to be included in my mailing list.

You Can Also Find Me On Social Media:

Facebook page: The Grateful Girl Cooks!
Pinterest:
The Grateful Girl Cooks!
Instagram:
jbatthegratefulgirlcooks

Author's signatureRecipe Source: Unknown. I wrote it on a 3×5 card many, many YEARS ago, and neglected to add the original source. Sorry, whoever you are, dear recipe provider!

0 from 0 votes
Meatballs Stroganoff
Prep Time
30 mins
Cook Time
10 mins
Total Time
40 mins
 

Easy, budget friendly, and absolutely delicious, meatballs stroganoff, in a creamy mushroom sauce served on top of egg noodles, is comfort food at it's best!

Category: Entree
Cuisine: American
Keyword: meatballs stroganoff
Servings: 6 servings (3 meatballs each)
Calories Per Serving: 563 kcal
Author: JB @ The Grateful Girl Cooks!
Ingredients
  • 1 1/2 pounds ground beef
  • 3/4 cup milk
  • 3/4 cup dried bread crumbs
  • 3 Tablespoons chopped parsley
  • 1 1/2 teaspoons salt
  • 1/4 teaspoon black pepper
  • 4 Tablespoons butter , divided
  • 3/4 cup chopped brown onions
  • 1/2 pound mushrooms , sliced
  • 3/4 teaspoon paprika
  • 2 Tablespoons flour
  • 1 can beef bouillon/broth
  • 1/2 teaspoon Worcestershire sauce
  • 1/2 cup sour cream
  • 2 cups (cooked) Hot egg noodles , prepared according to manufacturer's directions
  • Chopped fresh dill (optional, for garnishing egg noodles)
  • Chopped parsley (optional, for garnishing meatballs when serving)
Instructions
  1. Mix the ground beef, milk, dried bread crumbs, salt and pepper in a medium bowl. Shape meat mixture into 1/1/4 inch balls.
  2. Add 2 Tablespoons butter to a large skillet. Heat on medium to melt butter. Add meatballs to melted butter and brown meatballs completely on all sides. When done, remove meatballs to a plate. Cover plate with aluminum foil to keep meatballs warm.
  3. In a clean skillet, melt 2 Tablespoons butter over medium heat. Add onions, mushrooms, and paprika. Cook this until onions are tender (3-4 minutes).
  4. Sprinkle flour over onion/mushrooms. Stir to combine. While stirring, add the beef bouillon, salt and pepper, and stir until fully combined.
  5. Begin cooking egg noodles in separate saucepan while you finish making the sauce.
  6. Combine the sour cream and Worcestershire sauce in a small bowl. Set aside.
  7. Return the meatballs to the sauce in skillet, cover, and simmer on low for 10-12 minutes, spooning the sauce over the meatballs to coat, occasionally.
  8. Stir the sour cream/Worcestershire sauce into the meatballs. Stir to combine. Heat through, but do not let sauce boil once you've added the sour cream.
  9. Drain egg noodles, toss with a small amount of butter (if desired), and add some chopped fresh dill (if desired). Place egg noodles onto serving plate, then top with 2-4 meatballs and sauce (quantity of meatballs depending on how hungry you are). Garnish with chopped parsley, if desired. Enjoy!
Nutrition Facts
Meatballs Stroganoff
Amount Per Serving (3 meatballs + noodles)
Calories 563 Calories from Fat 324
% Daily Value*
Fat 36g55%
Saturated Fat 16g100%
Cholesterol 127mg42%
Sodium 1117mg49%
Potassium 621mg18%
Carbohydrates 30g10%
Fiber 2g8%
Sugar 4g4%
Protein 27g54%
Vitamin A 715IU14%
Vitamin C 5.1mg6%
Calcium 123mg12%
Iron 3.9mg22%
* Percent Daily Values are based on a 2000 calorie diet.

Here’s one more to pin on your Pinterest boards!Easy, budget friendly, and absolutely delicious, meatballs stroganoff, in a creamy mushroom sauce served on top of egg noodles, is comfort food at it's best!

Save

Save

Quick n’ Easy Chef’s Salad

Summertime. Heat. Hot. UGH. What better time to make a Quick n’ Easy Chef’s Salad for dinner? This is a great idea for those HOT, HOT, summer days when you don’t really want to heat up the kitchen or cook a lot. Quick n' Easy Chef's Salad / The Grateful Girl Cooks!
My husband and I love to have lighter meals at times when it is so hot outside that all you want to do is fill your tummy or feed your family, without exerting too much energy. Ever have days like that? I do, occasionally. Well, why not throw together a healthy, delicious entree salad, filled with lots of veggies AND protein and make THAT your meal? The bonus is that it’s quick, easy, and delicious!

Chef Salads are kind of like that. You just “build” them as you like them. Usually I start with a bed of mixed greens. I slice up some hard-boiled eggs (see my cute little egg picture below?), slice cheese into stick-like portion sizes (I’ve used cheddar in these photos, but have also used cheddar and pepper jack combo before), chop a few tomatoes and/or other veggies like green/red peppers, cucumber chunks, red onions, etc, and slice up some deli-bought ham and turkey slices.

Then I assemble it all (as decoratively as my little old hands can), on a dinner plate, and top it with my favorite salad dressing. **In case you’re wondering, my favorite salad dressing is bleu cheese. (I posted that in case you want to send me a case of bleu cheese dressing for my birthday).

Really the “hardest” thing about making this salad  is just hard-boiling the eggs ahead of time. No biggie.

By the way, speaking of eggs… I love my handy-dandy little ol’ egg slicer I’ve had for over 30 years. Still works like a charm to make even slices of hard boiled egg to garnish this salad or potato salad with. Just sayin’. From the looks of this picture, it looks like it needs a good cleaning!

Quick n' Easy Chef's Salad / The Grateful Girl Cooks!Quick n' Easy Chef's Salad / The Grateful Girl Cooks!
Anyways… just build the salad the way you or your family likes it. This is just the way I do it. Nothing too fancy… just GOOD. You really can’t go wrong with hard-boiled eggs, ham/turkey, cheese, and whatever veggies you want.

Just try to make it look good. Remember… we eat with our eyes, right? (something like that… I do tend to use a fork for this meal).

Quick n' Easy Chef's Salad / The Grateful Girl Cooks!
It’s as simple as that! You really can make a quick, healthy, entree Chef’s Salad for much less than you would spend to buy one in a restaurant. Hope you will consider making a Chef’s Salad for you and your significant others sometime this summer.

Quick n' Easy Chef's Salad / The Grateful Girl Cooks!
Hope you will be inspired to make a Chef’s Salad this summer, and make it your OWN way. Have a great summer. Enjoy the beauty all around (look closely- you can find it everywhere); practice thankfulness, and try to make the most out of each day you are given.

God Bless You!

Interested In More Recipes?

Thank you for visiting this website. I appreciate you using some of your valuable time to do soIf you’re interested, I publish a newsletter 2 times per month (1st and 15th) with all the latest recipes, and other fun info. I would be honored to have you join our growing list of subscribers, so you never miss a great recipe! 

There is a Newsletter subscription box on the top right side (or bottom) of each blog post, depending on the device you use, where you can easily submit your e-mail address (only) to be included in my mailing list.

You Can Also Find Me On Social Media:

Facebook page: The Grateful Girl Cooks!
Pinterest:
The Grateful Girl Cooks!
Instagram:
jbatthegratefulgirlcooks

Quick n' Easy Chef's Salad / The Grateful Girl Cooks!


Here’s one more to pin on your Pinterest boards!Quick n' Easy Chef's Salad / The Grateful Girl Cooks!

Save

Save

Easy Grilled Chicken with Jerk Seasoning

I found a new recipe for seasoning grilled chicken. It’s called EASY Grilled Chicken With Jerk Seasoning, and the jerk seasoning is made from scratch!  The recipe is really, really simple… and there are layers of flavors to the jerk spiced chicken that completely surprised me. EASY Grilled Chicken With Jerk Seasoning / The Grateful Girl Cooks!
Wanna know a little secret? Until I made this easy recipe, I had NEVER used Jerk seasoning before on anything. ANYTHING. I’d heard of chicken with jerk seasoning, but never had madeany meals that included this spice mix. Hmmm. What about you? Have you ever tried Jerk Seasoning? Well, here’s a simple recipe to give it a try!

All I had heard before trying this spice was that it is filled with layers of amazing flavors, was a dry rub for pork or chicken, and that it is thought to be native to Jamaica. So I decided to give it a try with this super easy recipe for mixing up the Jerk seasoning, and then grilling chicken with the spices on it. How hard can THAT be, right? NOT. This is ridiculously EASY.

To make the Jerk spice rub, here’s what ya do… First you mix the spices  in a small bowl. (Easy, right?)

EASY Grilled Chicken With Jerk Seasoning / The Grateful Girl Cooks!
Add a tablespoon of oil to the spices.

EASY Grilled Chicken With Jerk Seasoning / The Grateful Girl Cooks!
Give it a good stir to fully blend it all together. It will look like this (and it only took a second to make!)

EASY Grilled Chicken With Jerk Seasoning / The Grateful Girl Cooks!
Now use your hands and rub the spices onto both sides of the chicken. Coat it as thin or as thick as you like. I did a fairly thin layer, and the flavors were wonderful!

EASY Grilled Chicken With Jerk Seasoning / The Grateful Girl Cooks!Time To Cook The Chicken With Jerk Seasoning!

Put the chicken onto your hot BBQ grill (or you can also make this in a hot skillet in the kitchen). Note: Recipe makes enough spice for 4 chicken breasts; I only cooked 3 (FYI).

EASY Grilled Chicken With Jerk Seasoning / The Grateful Girl Cooks!
Cook the chicken (time will vary depending on size of pieces) until done, turning to cook both sides. (We cooked ours for about 10 minutes per side).

When the chicken is done, the outside will be a very deep brown color, and the insides will not be pink.

EASY Grilled Chicken With Jerk Seasoning / The Grateful Girl Cooks!
I served the chicken with a side of white rice (nice and bland went well with the flavorful and full of taste chicken, and a green salad. That’s it!  See how easy that was?

EASY Grilled Chicken With Jerk Seasoning / The Grateful Girl Cooks!
The chicken with jerk seasoning was delicious. It’s hard to describe, but each bite had many levels of flavor… at times a tiny bit spicy, other bites I got the sweet flavor of the brown sugar, and various spices that complimented the chicken well. I would definitely make this recipe again!

Hope you will give this recipe a try. Next time I’ll try this seasoning rub on pork, and see how that tastes, as well! Have a great day!

Interested In More Recipes?

Thank you for visiting this website. I appreciate you using some of your valuable time to do soIf you’re interested, I publish a newsletter 2 times per month (1st and 15th) with all the latest recipes, and other fun info. I would be honored to have you join our growing list of subscribers, so you never miss a great recipe!
There is a Newsletter subscription box on the top right side (or bottom) of each blog post, depending on the device you use, where you can easily submit your e-mail address (only) to be included in my mailing list.

You Can Also Find Me On Social Media:
Facebook page: The Grateful Girl Cooks!
Pinterest: The Grateful Girl Cooks!
Instagram: jbatthegratefulgirlcooks

EASY Grilled Chicken With Jerk Seasoning / The Grateful Girl Cooks!Recipe Source: http://pinchofyum.com/super-simple-jerk-chicken

0 from 0 votes
Easy Grilled Chicken with Jerk Seasoning
Prep Time
5 mins
Cook Time
20 mins
Total Time
25 mins
 
Enjoy the many levels of flavor of Jamaican Jerk Seasoning in this easy grilled chicken dish.
Category: Entree
Cuisine: Jamaican
Keyword: chicken with jerk seasoning
Servings: 4 servings
Calories Per Serving: 187 kcal
Author: JB @ The Grateful Girl Cooks!
Ingredients
For Jerk Seasoning:
  • 2 teaspoons allspice
  • 2 Tablespoons brown sugar
  • 1/2 teaspoon cumin
  • 1/4 teaspoon cloves
  • 1/4 teaspoon cinnamon
  • 1 teaspoon salt
  • 1/2 teaspoon ground black pepper
  • 1/8 teaspoon cayenne pepper
  • 1 Tablespoon canola oil (or vegetable oil)
  • 4 boneless, skinless chicken breasts , (4 oz. each)
Instructions
  1. Mix all the spices and oil in a small bowl.
  2. Using your hands, rub the spice mixture over both sides of each chicken breast to fully coat (spread spices thin or thick-your choice!).
  3. Preheat your BBQ grill or a skillet. You want both of them to be really hot when you add the chicken.
  4. Cook chicken on both sides until done (dark brown on outside, not pink on inside). Our chicken breasts which were fairly large, cooked for about 8-10 minutes on each side. Yours may take less time or more time, depending on how large or small the pieces of chicken are.
  5. Once chicken is done, remove it from heat, cover with foil and let it "rest" for about 5 minutes before serving. This will help the juices to stay in and soak in to the meat.
  6. Serve, and enjoy!
Nutrition Facts
Easy Grilled Chicken with Jerk Seasoning
Amount Per Serving (1 breast)
Calories 187 Calories from Fat 54
% Daily Value*
Fat 6g9%
Cholesterol 72mg24%
Sodium 716mg31%
Potassium 430mg12%
Carbohydrates 7g2%
Sugar 5g6%
Protein 24g48%
Vitamin A 60IU1%
Vitamin C 1.7mg2%
Calcium 17mg2%
Iron 0.6mg3%
* Percent Daily Values are based on a 2000 calorie diet.

Here’s one more to pin on your Pinterest boards!EASY Grilled Chicken With Jerk Seasoning / The Grateful Girl Cooks!


Save

Save

Save

Cedar Plank Grilled Salmon

Cedar Plank Grilled Salmon with butter, lemon and spices is a simple, easy way to BBQ outside on hot, summer days! Cedar Plank Grilled Salmon with butter, lemon and spices is a simple, easy way to BBQ outside on hot, summer days!
We’ve been enjoying much warmer than normal temperatures (can you say HOT???) in the Pacific Northwest this summer. Hot temps (in the high 90’s) have meant that I don’t use my oven as much to fix meals, so I don’t add to the heat in our home, PLUS it has meant more time outside on the deck, bonding with our Weber BBQ at dinner time. This Cedar Plank Grilled Salmon was our dinner last night.

Scroll Down For A Printable Recipe Card At The Bottom Of The Page

Last night my hubby (the “Grill-Meister”) grilled a salmon fillet on a cedar plank on our BBQ, and man oh man, it was so good! I typically pan-sear or bake salmon inside, in my kitchen, but there’s just something about grilled salmon in the summer, with the smokey smell from the BBQ and the cedar plank that you cook it on, that makes everything right with the world.

I had to remind my husband to put the lighter fluid on the charcoal briquets and NOT in his glass of wine, but after we got that sorted out, he took over the grilling duties! We cooked the salmon on our Weber BBQ on medium heat (lid closed, top vent open);  if you are using a gas grill, be sure the flames don’t reach the cedar plank or you might catch it on fire!

Cook, getting ready to grill salmon on cedar plank on BBQ
Have you ever grilled salmon fillets on cedar planks on your BBQ? Yum. It’s SO easy. First you buy a package of cedar planks at the grocery store (most stores carry them by the fish counter). They look like this, and usually a package contains 3-4 planks.

How To Prepare Cedar Plank So It Won’t Burn

You will need to soak the plank you are going to use in water for at least 30-40 minutes before putting on the grill. (I weigh mine down with filled pans of water in the sink, then cover board completely with water).

The wood plank needs to be soaked this long, so it doesn’t catch fire on the grill. As the fish cooks, the cedar board smokes and infuses flavor into the seafood. Makes sense, right?

Cedar plank used to grill salmon on BBQTime To Cook the Salmon

Once it is done “soaking”, you place a fresh salmon fillet on it  SKIN SIDE DOWN (we used one of two wild sockeye salmon fillets we bought at good old Costco).

Use a pastry brush to spread melted butter all over the top of the salmon. Sprinkle with salt, pepper, and garlic powder. Squeeze a bit of lemon juice over the top, also. I like to “garnish” the salmon fillet with thin slices of lemon while it cooks.

Once you have that done, you simply put the entire plank on the hot BBQ grill (with the top little vent open). Put the lid on the BBQ, and let it cook covered for about 35 minutes, until salmon is done (flaky). That’s it! No need to mess with it at all.

Cedar plank with salmon and lemon slices on grill
This is what it should look like when it is done. See? The soaked cedar plank didn’t burn up!

Grilled salmon is done cooking on cedar plank
Serving Cedar Plank Grilled Salmon

Remove the entire plank from the BBQ, take it inside, and cut salmon (not the cutting board!) into serving pieces (4-5 out of this piece of salmon). See how easy that is? When you realize how much 4-5 servings of cedar plank grilled salmon would cost in a restaurant, it REALLY is an inexpensive and easy way to make it yourself!!! Why not?

I served the salmon with some grilled mixed veggies (including yellow squash and peas from our garden), and we had a wonderful, healthy dinner that was incredibly delicious! AND we have a couple extra pieces of salmon for leftovers, too!

We really enjoy cedar plank grilled salmon; I have several other delicious recipes for this fish on my blog! You might want to check out the recipes for Salmon in a Lemon Butter Herb Sauce, Orange and Rosemary Glazed Salmon, or Pan-Seared Salmon with Cilantro Lime Sauce, to name a few. There are additional salmon recipes which you can find in the Recipe Index at the top of the page. YUM!

Grilled salmon served with mixed vegetables
Hope you will give this easy cedar plank grilled salmon a try this summer! Throw it on the grill, sit back and relax with a refreshing beverage, and let your BBQ do almost all the work for you!  Don’t forget to check out my Recipe Index, to see ALL my recipes. It’s located at the top of the page. Have a great week!

Interested In More Recipes?

Thank you for visiting this website. I appreciate you using some of your valuable time to do soIf you’re interested, I publish a newsletter 2 times per month (1st and 15th) with all the latest recipes, and other fun info. I would be honored to have you join our growing list of subscribers, so you never miss a great recipe!
There is a Newsletter subscription box on the top right side (or bottom) of each blog post, depending on the device you use, where you can easily submit your e-mail address (only) to be included in my mailing list.

You Can Also Find Me On Social Media:

Facebook page: The Grateful Girl Cooks!
Pinterest:
The Grateful Girl Cooks!
Instagram:
jbatthegratefulgirlcooks

Author's signature

↓↓ PRINTABLE RECIPE BELOW ↓↓

0 from 0 votes
Cedar Plank Grilled Salmon
Prep Time
30 mins
Cook Time
35 mins
Total Time
1 hr 5 mins
 
Cedar Plank Grilled Salmon with butter, lemon and spices is a simple, easy way to BBQ outside on hot, summer days! The smell from the cedar on the grill infuses smoky flavor into the fish for an amazing meal!
Category: Dinner
Cuisine: American
Keyword: cedar plank grilled salmon
Servings: 5 servings
Calories Per Serving: 301 kcal
Author: JB @ The Grateful Girl Cooks!
Ingredients
  • 2 pounds fresh salmon fillet (with skin on bottom)
  • 2 Tablespoons butter (melted)
  • 1/4 teaspoon salt
  • 1/4 teaspoon black pepper
  • 1/4 teaspoon garlic powder
  • 1/2 lemon (juice of)
  • 5 slices lemon (thinly sliced)
Instructions
  1. Soak the cedar plank you are going to use in water for at least 30-40 minutes before putting on the grill. (I weigh mine down with filled pans of water in the sink, then cover board completely with water). The wood plank needs to be soaked this long, so it doesn't catch fire on the grill. As the fish cooks, the cedar board smokes and infuses flavor into the seafood.

  2. Once it is done "soaking", remove from water. Place a fresh salmon fillet on it  SKIN SIDE DOWN.  Use a pastry brush to spread melted butter all over the top of the salmon. Sprinkle with salt, pepper, and garlic powder. Squeeze some lemon juice over the top, also. Garnish the salmon fillet with thin slices of lemon.

  3. Once BBQ is hot and ready, place wood plank directly onto BBQ rack. Cook salmon on medium heat (on our Weber grill we cooked it with lid closed, top vent open);  if you are using a gas grill, be sure the flames are set low enough to not reach the cedar plank directly or you might catch it on fire! Cook salmon (with lid on BBQ) for about 35 minutes, until done and fish flakes easily.

  4. Remove the entire plank from the BBQ, take it inside, and cut salmon (not the cutting board!) into serving pieces... serve, and enjoy! 

Nutrition Facts
Cedar Plank Grilled Salmon
Amount Per Serving (1 piece)
Calories 301 Calories from Fat 144
% Daily Value*
Fat 16g25%
Saturated Fat 4g25%
Cholesterol 111mg37%
Sodium 236mg10%
Potassium 898mg26%
Carbohydrates 1g0%
Protein 36g72%
Vitamin A 215IU4%
Vitamin C 4.9mg6%
Calcium 22mg2%
Iron 1.5mg8%
* Percent Daily Values are based on a 2000 calorie diet.

Here’s one more to pin on your Pinterest boards!Cedar Plank Grilled Salmon with butter, lemon and spices is a simple, easy way to BBQ outside on hot, summer days!

Save