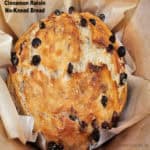
Asian-Inspired Couscous

 Asian-Inspired Couscous is a simple, flavor-filled side dish to make, with green onions, soy sauce, and a few spices (ginger, garlic, etc.).
Asian-Inspired Couscous is a simple, flavor-filled side dish to make, with green onions, soy sauce, and a few spices (ginger, garlic, etc.).

If you’re like me, you’re probably constantly on the lookout for a new recipe or two that are easy to make and taste great. Simple, right?

Well, this recipe for Asian-Inspired Couscous fits that bill. It is VERY simple to make, and has wonderful flavor. Green onions, soy sauce, garlic, ginger, and a smidge of cayenne pepper give this versatile couscous side dish it’s great taste.

Couscous is a fairly bland variety of pasta made with semolina flour, but it absorbs flavors very well. It is low in fat, but also contains more protein, minerals and vitamins than white rice.

Because couscous absorbs flavors well, it’s perfect used in this recipe, because it takes on Asian-inspired flavors from the spices, soy sauce and green onions. Here’s how to make this side dish.

Scroll Down For A Printable Recipe Card At The Bottom Of The Page

Prepare The Asian-Inspired Sauce

Spray a large skillet with non-stick baking spray. Heat the skillet on Medium-High heat until it is very hot. Add chopped green onions to the skillet and cook, stirring often, until they become tender (2-3 minutes).

Now add water, soy sauce, sugar, garlic powder, ground ginger, and cayenne pepper to the skillet. Stir until the ingredients are well-combined, then bring the liquid to a full boil.

Chopped green onions are cooked in a lightly sprayed skillet on Medium-High heat.Water, soy sauce, and spices are added to the cooked green onions in the skillet.

Cook The Couscous

Pour uncooked couscous into the boiling liquid in the skillet. Stir well, to fully combine the liquid and the couscous.

A cup of uncooked couscous is added to the boiling liquid in the skillet.Couscous, ready to be stirred into the Asian-inspired sauce and cooked.

Put a lid on the skillet, and turn the heat down to Low. Simmer the Asian-inspired couscous COVERED on low heat for 10-12 minutes, or until the liquid has been absorbed. Stir occasionally.

Asian-inspired couscous cooks in a covered skillet on low heat in sauce until liquid is absorbed.

Fluff And Serve Asian-Inspired Couscous

When all the liquid has been absorbed into the couscous, it should be ready to serve. The couscous should be tender to the bite. Use a fork to “fluff” up the couscous before serving.

Asian-inspired couscous is fluffed with a fork before serving, once liquid has been absorbed.

Serve the Asian-inspired couscous right out of the skillet, or transfer to a serving bowl. Serve this dish immediately while the couscous is still hot!

This recipe for Asian-inspired couscous will yield enough for six small side dish servings. It pairs well with beef, chicken, pork or lamb, and I’m confident you’ll like it.

A white bowl filled with hot Asian-inspired couscous, ready to be served.,

I hope you have the opportunity to make this versatile side dish, and trust you’ll enjoy it as much as we do. It is a very handy recipe to have because it’s so yummy, and is a cinch to make!

Thanks for stopping by, and I invite you to come back again soon for more family-friendly recipes. Take care, God bless, and have a GREAT day!

Looking For More SIDE DISH Recipes?

You can find ALL of my recipes in the Recipe Index, which is located at the top of the page. I have lots of delicious side dishes for you to choose from, including:

Want More Recipes? Get My FREE Newsletter!

I publish a newsletter 2 times per month (1st and 15th) with lots of recipes, tips, etc..
Would you like to join our growing list of subscribers?

There is a Newsletter subscription box on the top right (or bottom) of each blog post, depending on the device you use.
You can submit your e-mail address there, to be added to my mailing list.

Find Me On Social Media:

Facebook page: The Grateful Girl Cooks!
Pinterest:
The Grateful Girl Cooks!
Instagram:
jbatthegratefulgirlcooks

Author's signature

Original recipe source: ” Cooking Light” Cookbook 1994, pages 132-133, published in 1993 by Oxmoor House

↓↓ PRINTABLE RECIPE BELOW ↓↓

0 from 0 votes
Asian-Inspired Couscous
Prep Time
10 mins
Cook Time
12 mins
Total Time
22 mins
 

Asian-Inspired Couscous is a simple, flavor-filled side dish to make, with green onions, soy sauce, and a few spices (ginger, garlic, etc.).

Category: Side Dish
Cuisine: Asian
Keyword: Asian-inspired couscous
Servings: 6
Calories Per Serving: 116 kcal
Author: JB @ The Grateful Girl Cooks!
Ingredients
  • cooking spray (enough for skillet)
  • ½ cup sliced green onions (use green and white parts)
  • cups water
  • 2 Tablespoons low sodium soy sauce
  • ½ teaspoon granulated sugar
  • ¼ teaspoon garlic powder
  • ¼ teaspoon ground ginger
  • ¼ teaspoon ground cayenne pepper OR ⅛ teaspoon for less heat
  • 1 cup couscous uncooked
Instructions
  1. Spray large skillet with non-stick baking spray. Heat skillet on Medium-High heat until very hot. Add chopped green onions; cook, stirring often until they become tender (2-3 minutes).

  2. Add water, soy sauce, sugar, garlic, ginger, and cayenne pepper to skillet. Stir until well-combined. Bring liquid to a full boil.

  3. Pour uncooked couscous into boiling liquid in skillet. Stir well.

  4. Put a lid on the skillet; turn heat down to Low. Simmer couscous COVERED on low heat for 10-12 minutes, or until liquid has been absorbed. Stir occasionally.

  5. When liquid has been fully absorbed into couscous, it should be ready to serve. Couscous should be tender to the bite. Use a fork to "fluff" up couscous before serving hot. Enjoy!

Nutrition Facts
Asian-Inspired Couscous
Amount Per Serving (1 (1/6 of total))
Calories 116 Calories from Fat 2
% Daily Value*
Fat 0.2g0%
Saturated Fat 0.04g0%
Polyunsaturated Fat 0.1g
Monounsaturated Fat 0.03g
Sodium 196mg9%
Potassium 94mg3%
Carbohydrates 24g8%
Fiber 2g8%
Sugar 1g1%
Protein 4g8%
Vitamin A 118IU2%
Vitamin C 2mg2%
Calcium 15mg2%
Iron 1mg6%
* Percent Daily Values are based on a 2000 calorie diet.

Here’s one more to pin on your Pinterest boards!

Asian-Inspired Couscous is a simple, flavor-filled side dish to make, with green onions, soy sauce, and a few spices (ginger, garlic, etc.).

Southwest Veggie Skillet

Southwest Veggie Skillet is a yummy side dish, with corn, zucchini, bell peppers, onion and tomatoes! Add black beans to make it a meatless meal!
Southwest Veggie Skillet is a yummy side dish, with corn, zucchini, bell peppers, onion and tomatoes! Add black beans to make a meatless meal!

If you’re on the lookout for a great tasting, easy to make side dish, may I suggest this Southwest Veggie Skillet? This dish features a lot of yummy vegetables and a few Southwest-inspired spices that combine to make a fantastic side dish!

The vegetables are low in calories, but have a lot of flavor! Guess what? If you add a rinsed, drained can of black beans to this recipe, you can also enjoy this as a MEATLESS main dish! How’s that for versatile?

 I’m confident you’ll enjoy this simple dish, whether eaten as a side dish or as a vegetarian main course. Here’s how to make it, in about 25 minutes!

Scroll Down for A Printable Recipe Card At The Bottom Of The Page

How To Make The Southwest Veggie Skillet

Heat olive oil over Medium-high heat in a large skillet (I use cast iron). Once the oil is very hot, but not smoking, add chopped onions and a chopped jalapeño pepper to the skillet.

Cook these ingredients for approximately 4 minutes, and then add minced garlic to the skillet. Continue to cook, stirring the veggies often for 1 more minute (don’t burn the garlic!). The veggies should be tender at this point.

Chopped onion and jalapeño pepper are cooked in hot oil in a cast iron skillet.Minced garlic is added to the onions and jalapeños in skillet.

Add More Veggies!

Now add frozen corn (or fresh, if available), chopped bell pepper and zucchini to the skillet. NOTE: I use a combination of red, orange and green bell peppers for added color, but that is optional.

TIP: If you are adding black beans to make this a meatless main dish, this is when to add them!

Sprinkle the veggies with ground cumin and chili powder, then stir until the spices have been mixed in. Cook the veggies, stirring often, for 7-8 minutes, until the veggies have softened and are heated through.

Frozen corn, bell peppers, zucchini and spices are added to the hot skillet.The Southwest flavored veggies cook in the skillet for 7-8 minutes, until tender.

Last Steps Before Serving

Stir cherry tomato halves (I use red and yellow) into the skillet, and cook ONLY until they are barely heated through. This will only take a minute or less! Remove the skillet from the heat source.

Once the skillet is off the heat, add chopped cilantro, fresh lime juice, salt and black pepper to the veggies. Stir to combine, and then the Southwest Veggie Skillet is ready to be served.

Halved cherry tomatoes (red and yellow) are added to the Southwest Veggie Skillet.Skillet is removed from heat, and lime juice, salt/pepper, and chopped cilantro are added.

Serve The Southwest Veggie Skillet

The Southwest Veggie Skillet is now ready to be enjoyed! Transfer the dish to a serving bowl OR serve it hot, right from the skillet.

This is a very tasty side dish that pairs well with chicken, pork, beef or fish! Serve it next to the meat, or place the meat on top of the veggies, serve and enjoy!

After stirring to combine ingredients, the Southwest Veggie Skillet is ready to serve.Southwest Veggie Skillet side dish is served with a cooked chicken breast, on a white plate.

I hope you enjoy this delicious vegetable side dish as much as we do! The veggies have great flavor, and it really is a simple dish to prepare in a short amount of time.

Thanks for stopping by, and I invite you to come back soon for more family-friendly recipes. Take care, may God bless you, and have a wonderful day.

Looking For More VEGGIE Recipes?

You can find ALL of my recipes in the Recipe index, which is located at the top of the page. I have LOTS of delicious vegetable dishes for you to check out, including:

Want More Recipes? Get My FREE Newsletter!

I publish a newsletter 2 times per month (1st and 15th) with lots of recipes, tips, etc..
Would you like to join our growing list of subscribers?

There is a Newsletter subscription box on the top right (or bottom) of each blog post, depending on the device you use.
You can submit your e-mail address there, to be added to my mailing list.

Find Me On Social Media:

Facebook page: The Grateful Girl Cooks!
Pinterest:
The Grateful Girl Cooks!
Instagram:
jbatthegratefulgirlcooks

Author's signature

Recipe adapted from a recipe found in : “The Essential WW Freestyle Cookbook”, page 196, published in 2018 by Weight Watchers International, Inc.

↓↓ PRINTABLE RECIPE BELOW ↓↓

0 from 0 votes
Southwest Veggie Skillet
Prep Time
10 mins
Cook Time
15 mins
Total Time
25 mins
 

Southwest Veggie Skillet is a yummy side dish, with corn, zucchini, bell peppers, onion and tomatoes! Add black beans to make a meatless meal!

Category: Side Dish, Vegetables
Cuisine: Southwest
Keyword: Southwest veggie skillet
Servings: 4 (1 cup per serving)
Calories Per Serving: 142 kcal
Author: JB @ The Grateful Girl Cooks!
Ingredients
  • 1 Tablespoon olive oil
  • 1 medium yellow onion chopped
  • large garlic cloves finely minced
  • 1 medium jalapeño pepper seeds removed, finely minced
  • 10 ounces frozen corn kernels OR 1¾ cup fresh
  • 1 medium zucchini chopped
  • 1 medium red bell pepper (or color combo) chopped (I use red/orange/green)
  • teaspoons ground cumin
  • ¼ teaspoon chili powder
  • 1 cup cherry tomatoes cut in half (I use red/yellow)
  • 2 Tablespoons chopped cilantro
  • Tablespoons fresh lime juice
  • ¾ teaspoon salt
  • ½ teaspoon ground black pepper
Instructions
  1. Heat olive oil on Medium-high heat in a large skillet. Once oil is very hot, but not smoking, add onions and jalapeño pepper. Cook approx. 4 minutes; add garlic. Continue to cook, stirring often for 1 minute (don't burn the garlic!).

  2. Add frozen corn (or fresh, if using), red bell pepper and zucchini to skillet. NOTE: I use a combo of red, orange and green bell peppers for color, but that is optional. TIP: If adding a can of black beans to make this a meatless main dish, this is when to add them!

  3. Sprinkle veggies with cumin and chili powder; stir until combined. Cook, stirring often, for 7-8 minutes, until veggies have softened and are heated through.

  4. Gently stir cherry tomato halves into veggies; cook ONLY until heated through. This will only take a minute or less! Remove skillet from heat source.

  5. Off heat, add cilantro, lime juice, salt and pepper to the veggies; stir to combine. Serve immediately. Enjoy!

Recipe Notes

NOTE: If you wish to make this a MEATLESS main dish, add 1 can of rinsed/drained black beans.

Nutrition Facts
Southwest Veggie Skillet
Amount Per Serving (1 cup)
Calories 142 Calories from Fat 45
% Daily Value*
Fat 5g8%
Saturated Fat 1g6%
Polyunsaturated Fat 1g
Monounsaturated Fat 3g
Sodium 454mg20%
Potassium 558mg16%
Carbohydrates 26g9%
Fiber 4g17%
Sugar 5g6%
Protein 4g8%
Vitamin A 1316IU26%
Vitamin C 69mg84%
Calcium 34mg3%
Iron 2mg11%
* Percent Daily Values are based on a 2000 calorie diet.

Here’s one more to pin on your Pinterest boards!Southwest Veggie Skillet is a yummy side dish, with corn, zucchini, bell peppers, onion and tomatoes! Add black beans to make a meatless meal!

Pan-Seared Steelhead Trout

Pan-Seared Steelhead Trout is a delicious, easy to make dish! Trout fillets are cooked in a simple browned butter, shallot and garlic sauce!

Recently my husband bought some steelhead trout in the fish department at our local grocery store. He brought it home and told me he wanted to try it, because it looked good. When I saw the fillets he bought, I thought he was mistaken! I was absolutely convinced he had accidentally bought salmon fillets.

Well, I was WRONG! It turns out that steelhead trout, which is common to the West coast (and Alaska), LOOKS a lot like salmon. It has the same orange-pink color as salmon, and is similar in taste and texture, but it’s actually TROUT. Who knew? Certainly not me!

My decision was made to pan-sear them, and I knew I wanted to use sauce to add flavor. I ended up making a simple sauce with browned butter, minced garlic, dried dill weed and chopped shallots.

Pan-seared steelhead trout turned out to be delicious, low in calories, and quite easy to prepare. The cooking technique I used is similar to how I make Pan Seared Creole Salmon. Here’s how to make this dish using one pound of steelhead trout (approx. 3 servings).

Scroll Down For A Printable Recipe Card At The Bottom Of The Page

Prepare The Trout For Cooking

Pat the trout fillets dry with paper towels to remove any excess moisture before seasoning. Lightly season the fish (flesh side only) with salt and black pepper.

Three steelhead trout fillets are seasoned with salt and pepper before cooking.

Pan-Sear the Steelhead Trout

Melt 2 Tablespoons of butter in a large skillet on Medium heat. Once the butter melts, add chopped shallots, and cook for 2 minutes, stirring occasionally.

Place the steelhead trout in the hot skillet, with the skin side facing up. Cook the trout fillets on Medium heat for 3 minutes, without moving them in the skillet.

Stir minced garlic and dried dill weed into the butter sauce, and cook the fish and sauce 1 more minute. Be sure to stir the sauce often, so the garlic doesn’t burn. 

Chopped shallots are cooked in melted butter in a large skillet.Steelhead fillets are cooked, skin side up, in a skillet with melted butter and shallots.

The butter sauce will begin to brown as it is cooked, which gives it a wonderful, slightly nutty flavor! The fish is ready to flip over once the bottom side is nicely seared and browned.

Browned butter with shallots, garlic and herbs are cooked in skillet with 3 steelhead trout fillets.

Baste The Trout With Garlic Shallot Butter Sauce

Turn the steelhead trout fillets to the other side (flesh facing up). Use a spoon to scoop up the sauce, and drizzle it over each piece. Continue to cook the fish for 4-5 more minutes until cooked though. 

Spoon the sauce over the trout fillets continuously as they finish cooking. This basting adds wonderful flavor to the fish, because of the browned butter, shallots, dill weed and garlic!

Pan-seared steelhead trout fillets are browned and drizzled with brown butter sauce in skillet.

Time To Serve The Pan-Seared Steelhead Trout

Once the trout is fully cooked through and flakes easily, it is ready to serve. Use a large spatula to transfer the pan-seared steelhead trout onto individual plates.

To garnish the dish, squeeze lemon juice over each fillet, and top with fresh parsley and a lemon slice, if desired. This adds additional color and a pop of lemon flavor to the fish!

A white plate with pan-seared steelhead trout, broccoli and rice on it.A piece of steelhead trout, garnished with lemon slice and chopped fresh parsley to serve.

I hope you have a chance to try this delicious dish, and trust you’ll enjoy it as much as we do. It is a simple to make, yet scrumptious seafood entree!

Thanks for stopping by, and I invite you to come back again soon for more delicious recipes! Take care, God bless you, and have a wonderful day!

Looking For More TROUT Recipes?

You can find ALL of my recipes in the Recipe Index, which is located at the top of the page. I have several recipes for trout you might enjoy, including:

Interested In More Recipes? Get My FREE Newsletter!

I publish a newsletter 2 times per month (1st and 15th) with recipes, tips, etc..
 I would be honored to have you join our growing list of subscribers!

There is a Newsletter subscription box on the top right (or bottom) of each blog post, depending on the device you use, where you can submit your e-mail address to be added to my mailing list.

Find Me On Social Media:

Facebook page: The Grateful Girl Cooks!
Pinterest:
The Grateful Girl Cooks!
Instagram:
jbatthegratefulgirlcooks

Author's signature

↓↓ PRINTABLE RECIPE BELOW ↓↓

5 from 4 votes
Pan-Seared Steelhead Trout
Prep Time
7 mins
Cook Time
10 mins
Total Time
17 mins
 

Pan-Seared Steelhead Trout is a delicious, easy to make dish! Trout fillets are cooked in a simple browned butter, shallot and garlic sauce!

Category: Main Course
Cuisine: All Cuisines
Keyword: Pan-Seared Steelhead Trout
Servings: 3
Calories Per Serving: 266 kcal
Author: JB @ The Grateful Girl Cooks!
Ingredients
  • 1 pound steelhead trout, skin on cut in approx. three 5 oz. pieces
  • ¼ teaspoon salt
  • ¼ teaspoon black pepper
  • 2 Tablespoons butter
  • 2 teaspoons shallots chopped
  • 4 teaspoons minced garlic
  • ¾ teaspoon dried dill weed
  • 1 large lemon half for juice and half for garnish
  • 2 Tablespoons chopped fresh parsley
Instructions
  1. Cut fish into three portions. Pat fish dry with paper towels to remove excess moisture. Lightly season fish (flesh side only) with salt and pepper.

  2. Melt butter in large skillet on Medium heat. Add chopped shallots; cook for 2 minutes, stirring occasionally.

  3. Place trout fillets in skillet (skin side facing up). Cook on Medium heat for 3 minutes, without moving them in the skillet. Stir garlic and dill weed into butter sauce. Cook fish/sauce 1 more minute until bottom of fish is browned. Stir sauce often, so garlic doesn't burn. 

  4. Turn fillets to the other side (flesh facing up). Use spoon to scoop up sauce; drizzle it on each piece. Cook fish 4-5 more minutes until cooked though, spooning sauce over fish often, as it finishes cooking.

  5. When trout is cooked through and flakes easily, it's ready to serve. Transfer fillets to plates. To garnish, squeeze lemon juice over each fillet. Top with fresh parsley and a lemon slice, if desired. Enjoy!

Nutrition Facts
Pan-Seared Steelhead Trout
Amount Per Serving (1 portion (approx. 5 oz.))
Calories 266 Calories from Fat 117
% Daily Value*
Fat 13g20%
Saturated Fat 6g38%
Trans Fat 0.3g
Polyunsaturated Fat 2g
Monounsaturated Fat 4g
Cholesterol 109mg36%
Sodium 304mg13%
Potassium 822mg23%
Carbohydrates 5g2%
Fiber 1g4%
Sugar 1g1%
Protein 32g64%
Vitamin A 571IU11%
Vitamin C 28mg34%
Calcium 128mg13%
Iron 2mg11%
* Percent Daily Values are based on a 2000 calorie diet.

Here’s one more to pin on your Pinterest boards!Pan-Seared Steelhead Trout is a delicious, easy to make dish! Trout fillets are cooked in a simple browned butter, shallot and garlic sauce!

Cranberry Apple Scones

Cranberry Apple Scones with vanilla glaze can be enjoyed for breakfast or a light snack! They’re yummy and ready to eat in under 30 minutes!
Cranberry Apple Scones with vanilla glaze can be enjoyed for breakfast or a light snack! They're yummy and ready to eat in under 30 minutes!

I don’t know about you, but I LOVE scones! They are wonderful to have for a quick breakfast, afternoon snack or treat, and I’ve been making them for years in multiple flavors!

Cranberry apple scones have great flavor and texture, and are actually quite simple to make. Fresh or frozen cranberries and your choice of apple can be used, which makes it a convenient recipe, too!

If you’ve never made scones before, there’s no need to worry about it! These are easy to make, and you’ll be a “scone master” before you know it! Here’s how to make cranberry apple scones.

Scroll Down For A Printable Recipe Card At The Bottom Of The Page

Making The Dough For Cranberry Apple Scones

Mix flour, baking powder and baking soda in a large bowl until combined. Add slices of COLD butter to the flour mixture. Use a pastry blender or two forks to cut the butter in, until it becomes the size of peas.

Add the chopped fresh cranberries and peeled apples, and stir until they are combined with the flour mixture. NOTE: Frozen cranberries may be used, if thawed before chopping and adding.

Cold butter slices are cut into a flour mixture until butter is the size of peas.Chopped cranberries and peeled apples are added to the flour and butter mixture in bowl.

Add the buttermilk to the scone mixture. Stir in the buttermilk ONLY until the ingredients have been combined.

Buttermilk is added to the scone dough, and stirred only until incorporated.

Rolling Out The Dough For The Scones

Shape the dough into a ball, and place it on a lightly floured surface. Sprinkle the dough with a tiny bit of flour. Roll the dough into an 8″ circle (¾” thick). Use your palms to shape the outer edge.

TIP: I’ve been known to use a tape measure to tell me how much more I need to roll the dough out. Hey… it works! Don’t knock it until you’ve tried it!

Cut the dough evenly into 8 pie-shaped wedges using a large knife (or pizza cutter!). Carefully transfer the scones onto an ungreased baking sheet.

Scone dough is shaped in a ball, and placed on floured surface for rolling.A measuring tape is used to measure dough into an 8" circle.

Ready… Set… Bake!

When you put the scones onto the baking sheet, keep them in a circular shape. Leave a small amount of space (not too much!) between each of the slices.

Bake the scones at 400°F. for 12-15 minutes. Oven temperatures can vary, so check them, beginning at the 12 minute mark! When done, the scones should be lightly browned on top. A toothpick inserted into the thickest part of one should come out clean.

Transfer the pan to a wire rack and let the scones cool to room temperature before adding the glaze.

Cranberry apple scones dough is cut into 8 wedges and put on a baking sheet to cook.The baked cranberry apple scones cool on a baking sheet after coming out of the oven.

Glazing The Cranberry Apple Scones

While the cranberry apple scones cool, make the vanilla glaze to drizzle on top. Measure powdered sugar, vanilla extract and warm water into a small bowl.

Stir well, until the glaze fully mixed and lump-free. Add a drop or two more water, if needed, to make the glaze a consistency that’s easy to drizzle.

Once the scones are at room temperature, drizzle the glaze over the top. I use a honey spreader or a fork to do this. Try to evenly distribute the glaze over the surface of the scones.

Powdered sugar, vanilla and water are mixed in a bowl to make a sweet glaze for the scones.Sweet glaze is drizzled over the baked scones, using a honey spreader.

Time To Enjoy A Scone

Let the cranberry apple scones rest until the glaze has hardened. This usually only takes a few minutes, and then the scones are ready to be enjoyed. Slice through the scones to separate them from each other before serving.

Grab a hot cup of coffee or tea and one of the scones, then sit back and enjoy these delicious treats. I really think you’re going to like them!

Once glaze hardens, cranberry apple scones are cut into wedges, then are ready to be enjoyed.

I really hope you like this recipe for cranberry apple scones! They have great flavor, thanks to the cranberries and apples spread throughout the scones, and the sweet glaze on top.

Thanks for stopping by, and I invite you to come back again soon for more family-friendly recipes. Take care, God bless, and have a GREAT day!

Looking For More SCONE Recipes?

You can find ALL of my recipes in the Recipe Index, which is located at the top of the page. I have some fantastic tasting scone recipes for you to check out, including:

Interested In More Recipes? Get My FREE Newsletter!

I publish a newsletter 2 times per month (1st and 15th) with recipes, tips, etc..
 I would be honored to have you join our growing list of subscribers!

There is a Newsletter subscription box on the top right (or bottom) of each blog post, depending on the device you use You can submit your e-mail address to be added to my mailing list.

Find Me On Social Media:

Facebook page: The Grateful Girl Cooks!
Pinterest:
The Grateful Girl Cooks!
Instagram:
jbatthegratefulgirlcooks

Author's signature

Recipe adapted from: “Gooseberry Patch- Have Yourself A Homemade Christmas”, Cranberry Scones, pg. 151, published 2014 by Gooseberry Patch/Time Home Entertainment, Inc.

↓↓ PRINTABLE RECIPE BELOW ↓↓

0 from 0 votes
Cranberry Apple Scones
Prep Time
13 mins
Cook Time
14 mins
Total Time
27 mins
 

Cranberry Apple Scones with vanilla glaze can be enjoyed for breakfast or a light snack! They're yummy and ready to eat in under 30 minutes!

Category: Breakfast, Snack
Cuisine: American
Keyword: cranberry apple scones
Servings: 8 scones
Calories Per Serving: 222 kcal
Author: JB @ The Grateful Girl Cooks!
Ingredients
  • cups all purpose flour
  • teaspoons baking powder
  • ¼ teaspoon baking soda
  • 6 Tablespoons butter COLD, sliced
  • ½ cup cranberries (fresh or frozen/thawed) chopped
  • ½ cup chopped apple peeled, chopped
  • cup granulated sugar
  • 6 Tablespoons buttermilk
For Glaze:
  • ½ cup powdered sugar
  • teaspoon vanilla extract
  • teaspoons warm water
Instructions
  1. Preheat oven to 400°F.

  2. Stir flour, baking powder and baking soda in large bowl to combine. Add COLD butter slices. Use pastry blender or 2 forks to cut butter in, until it becomes the size of peas. Add cranberries and apples; stir to combine. Add buttermilk. Stir buttermilk in ONLY until ingredients are combined.

  3. Shape dough into a ball; place on lightly floured surface. Sprinkle dough with tiny bit of flour. Roll ball into an 8" circle (¾" thick). Use hands to shape outer edge. Cut into 8 pie-shaped wedges. Transfer scones onto ungreased baking sheet, keeping them in a circular shape. Leave a small space between slices.

  4. Bake at 400°F. for 12-15 minutes. When done, scones should be lightly browned on top. A toothpick inserted into thickest part should come out clean. Transfer pan to a wire rack; let scones cool to room temp before adding glaze.

  5. Measure powdered sugar, vanilla and warm water into bowl. Stir well, until lump-free. Add 2-3 more drops of water, if needed, to make glaze a consistency that's easy to drizzle. Drizzle glaze over surface of scones.

  6. Let scones rest until glaze hardens (2-3 minutes). Slice scones to separate them from each other before serving. Enjoy!

Recipe Notes

NOTE: Frozen cranberries may be used, if thawed before chopping and adding.

Nutrition Facts
Cranberry Apple Scones
Amount Per Serving (1 scone)
Calories 222 Calories from Fat 81
% Daily Value*
Fat 9g14%
Saturated Fat 6g38%
Trans Fat 0.3g
Polyunsaturated Fat 0.4g
Monounsaturated Fat 2g
Cholesterol 24mg8%
Sodium 115mg5%
Potassium 128mg4%
Carbohydrates 33g11%
Fiber 1g4%
Sugar 17g19%
Protein 3g6%
Vitamin A 289IU6%
Vitamin C 1mg1%
Calcium 52mg5%
Iron 1mg6%
* Percent Daily Values are based on a 2000 calorie diet.

Here’s one more to pin on your Pinterest boards!

Cranberry Apple Scones with vanilla glaze can be enjoyed for breakfast or a light snack! They're yummy and ready to eat in under 30 minutes!

Brussel Sprout Casserole For Two

Brussel Sprout Casserole For Two is a tasty side dish! Sliced Brussel sprouts, cheddar and bacon are baked, topped with cheese and breadcrumbs.

If you’re on the lookout for a new veggie side dish OR a new way to prepare Brussel sprouts, check out this recipe! As written, this delicious side dish will serve two people, but it can easily be adapted to double or triple the quantity.

Cheddar cheese, bacon and crispy Panko breadcrumbs compliment the tender Brussel sprouts wonderfully in this dish! My personal feeling is that everything is better with bacon, right? YEP!

This recipe is quite simple to make, and is a tasty way to enjoy Brussel sprouts, even if you’re not usually a fan. The Brussel sprouts are par-boiled first (to tenderize them), then the casserole is quickly assembled and baked. 

Here’s how to make this scrumptious vegetable side dish!

Scroll Down for A Printable Recipe Card At The Bottom Of The Page

Preparing The Brussel Sprouts

To make this dish for two, you will need about 10 fresh Brussel sprouts. Trim the end stem off of the Brussel sprouts, then slice them in half length-wise.

Fill a Medium sized saucepan with water, and bring it to a boil. Add the Brussel sprout halves, and boil them for 7-8 minutes or until the Brussel sprouts have become slightly tender.

Remove the pan from the stove, and drain off the water. Let the Brussel sprouts cool.

Brussels sprout ends are trimmed, then the sprouts are sliced in half.Halved brussel sprouts are boiled in water for 7 minutes, or until tender.

Preparing The Bacon

You will need crisp, cooked bacon for this casserole. I find it’s best to cook it at the same time the Brussel sprouts are cooking, to save time.

Cut the bacon into small pieces, then cook, stirring often until browned, cooked through, and crispy. Use a slotted spoon to transfer the cooked bacon to paper towels to absorb any excess grease.

Two slices of bacon are cut in small pieces, then cooked until crispy in skillet.Crisp, browned bacon slices drain on paper towels after being removed from skillet.

Assembling The Brussel Sprout Casserole For Two

Once the Brussel sprouts have cooled enough to handle, cut them into thin slices with a sharp knife. Place the slices into a medium-sized bowl.

Add grated cheddar cheese (half the total amount), bacon, half and half, salt and black pepper to the bowl. Gently toss these ingredients together until they’re fully combined.

Tender-cooked brussel sprouts are cut into thin slices for the casserole.Sliced brussel sprouts, cheese, bacon, salt, pepper and half and half are mixed in bowl.

Place the combined Brussel sprout mixture into a lightly greased small baking dish. Now the casserole is ready for the final step before baking!

The combined brussel sprout mixture is placed in small, greased baking dish.

Topping And Then Baking The Casserole 

Sprinkle the top of the Brussel sprout casserole with the remaining grated cheddar cheese. Top this with the crispy Panko breadcrumbs.

Place the Brussel sprout casserole for two into a preheated 400°F. oven, and bake for 14-16 minutes. When done, the top should be lightly browned and crusted, and the casserole will be fully heated through.

Grated cheddar and Panko breadcrumbs top the Brussel Sprout Casserole For Two.After baking, the brussel sprout casserole for two is lightly browned on top.

Serving The Brussel Sprout Casserole For Two

Transfer the baking dish from the oven to a wire rack. Let the casserole cool 1-2 minutes before serving. Scoop out a portion (recipe yields 2 servings), transfer to plates… serve and enjoy!

We enjoyed the Brussel sprout casserole for two, served with chicken cutlets in pan sauce, and steamed rice on the side. It tastes fantastic!

This veggie side dish is absolutely delicious, and has wonderful flavor! I’m confident you will enjoy this lovely Brussel sprout side dish served with a favorite main dish.

Brussel Sprout Casserole For Two cools on a wire rack after being removed from oven.A serving of the brussel sprout casserole for two, served on a white plate.

I hope you will have the opportunity to make this Brussel sprout recipe, and trust you’ll enjoy it like we do! It really is a delicious veggie side dish.

Thanks for stopping by, and please come back soon for more family-friendly recipes. Take care, and have a great day!

Looking For More VEGETABLE Side Dish Recipes?

You can find ALL of my recipes in the Recipe Index, which is located at the top of the page. I have a large variety of delicious vegetable recipes for you to check out, including:

Want More Recipes? Get My FREE Newsletter!

I publish a newsletter 2 times per month (1st and 15th) with lots of recipes, tips, etc..
Would you like to join our growing list of subscribers?

There is a Newsletter subscription box on the top right (or bottom) of each blog post, depending on the device you use.
You can submit your e-mail address there, to be added to my mailing list.

Find Me On Social Media:

Facebook page: The Grateful Girl Cooks!
Pinterest:
The Grateful Girl Cooks!
Instagram:
jbatthegratefulgirlcooks

Author's signature

Recipe adapted from: mantitlement.com/the-best-brussels-sprouts-casserole

↓↓ PRINTABLE RECIPE BELOW ↓↓

0 from 0 votes
Brussel Sprout Casserole For Two
Prep Time
15 mins
Cook Time
15 mins
Total Time
30 mins
 

Brussel Sprout Casserole For Two is a tasty side dish! Sliced Brussel sprouts, cheddar and bacon are baked, topped with cheese and breadcrumbs.

Category: Side Dish, Vegetable
Cuisine: American
Keyword: brussel sprout casserole
Servings: 2
Calories Per Serving: 318 kcal
Author: JB @ The Grateful Girl Cooks!
Ingredients
  • ½ pound fresh brussel sprouts
  • 2 slices bacon cooked till crispy, crumbled
  • ½ cup cheddar cheese divided use, GRATED
  • 3 Tablespoons half and half (or heavy whipping cream)
  • 1 teaspoon butter melted
  • cup Panko breadcrumbs
  • ¼ teaspoon salt
  • teaspoon black pepper
Instructions
  1. Preheat oven to 400°F. Lightly grease/spray a small baking dish; set aside.

  2. Trim stem end off Brussel sprouts; slice Brussel sprouts in half length-wise. Fill medium saucepan with water; bring it to a boil. Add Brussel sprouts; boil them 7-8 minutes or until slightly tender. Drain water; let Brussel sprouts rest until cool enough to handle.

  3. Cut bacon into small pieces. Cook, stirring often until browned/crispy. Place bacon on paper towels to absorb grease.

  4. Cut Brussel sprouts into thin slices (lengthwise). Transfer slices to a medium bowl. Add ¼ cup cheddar cheese (reserve remaining ¼ C.), bacon, half and half, salt and pepper. Gently toss to combine. Place mixture in prepared baking dish. Sprinkle casserole with remaining ¼ C. cheese; top with Panko breadcrumbs.

  5. Bake casserole at 400°F. for 14-16 minutes. When done, casserole should be lightly browned/crusted on top, and heated through.

  6. Transfer baking dish to a wire rack. Let casserole cool 1-2 minutes before serving. Scoop out a portion, transfer to plates... serve and enjoy!

Nutrition Facts
Brussel Sprout Casserole For Two
Amount Per Serving (1 g)
Calories 318 Calories from Fat 207
% Daily Value*
Fat 23g35%
Saturated Fat 11g69%
Trans Fat 0.1g
Polyunsaturated Fat 2g
Monounsaturated Fat 7g
Cholesterol 56mg19%
Sodium 707mg31%
Potassium 546mg16%
Carbohydrates 15g5%
Fiber 5g21%
Sugar 4g4%
Protein 14g28%
Vitamin A 1289IU26%
Vitamin C 97mg118%
Calcium 281mg28%
Iron 2mg11%
* Percent Daily Values are based on a 2000 calorie diet.

Here’s one more to pin on your Pinterest boards!

Brussel Sprout Casserole For Two is a tasty side dish! Sliced Brussel sprouts, cheddar and bacon are baked, topped with cheese and breadcrumbs.

Chicken Cutlets in Pan Sauce

Chicken Cutlets In Pan Sauce is a simple, delicious meal! Pan-seared chicken breasts are topped with a wine, garlic, butter and herb sauce.

This recipe for chicken cutlets in pan sauce is a perfect recipe for busy days. Only 4-5 minutes of prep is needed before cooking this dish, and the final flavor is amazing!

We eat a lot of chicken at our house. I always keep chicken breasts in our freezer for quick meals. When a recipe calls for chicken cutlets, I slice a large chicken breast in half lengthwise to get 2 cutlets.

The star of this recipe is the pan sauce served on top of the pan-seared chicken. This sauce is quite simple to make and tastes wonderful. Here’s how to make chicken cutlets in pan sauce:

Scroll Down For A Printable Recipe Card At The Bottom Of The Page

Pan-Sear The Chicken Cutlets

Dry the chicken with paper towels to help absorb any excess moisture. Season the chicken on both sides with salt and black pepper. Heat olive oil in a large skillet on Medium-High heat until very hot, but not smoking.

Place the chicken cutlets in the skillet in a single layer and cook them 4-8 minutes without disturbing them. This allows time to develop a browned, seared texture on the bottom of each piece.

Chicken cutlets are seasoned with salt and pepper, then pan-seared in hot oil.

Turn Them Over!

After the chicken has cooked 4-8 minutes on the first side, it should be well browned on the bottom. Flip the chicken to the other side and continue cooking 4-8 more minutes.

The chicken is done when well-browned on both sides and cooked through to an internal temp. of 165°F. Remove the chicken from the pan, and cover tightly with foil, to keep the chicken warm. 

Chicken is turned over halfway through cooking, to brown both sides.Pan-seared chicken cutlets rest on a white plate and kept warm while sauce cooks.

Time To Make The Pan Sauce!

Use the same skillet (without cleaning it) to make the pan sauce. Pour additional olive oil into the skillet, and turn heat to Medium. Add chopped shallots and cook, stirring often, for 2 minutes.

Stir in minced garlic and cook for 30 seconds, stirring often so the garlic doesn’t burn. Pour white wine and chicken broth into the skillet.

This liquid helps deglaze the skillet, so scrape up the browned bits from the bottom as it cooks.

Bring the liquid to a gentle boil, then reduce the heat to Medium-Low. Let the sauce simmer (uncovered) 6-8 minutes, or until the liquid has been reduced by half.

Chopped shallots and minced garlic are cooked in hot oil in skillet.White wine and chicken broth are stirred into the skillet with garlic and shallots.

Final Step Before Serving

Turn the heat down to LOW once the liquid has been reduced in half. Add butter, fresh parsley and thyme to the sauce and stir to combine. Continue cooking ONLY until the butter has melted.

Sauce is reduced in volume, then fresh herbs and butter are added.Pan sauce is now ready to spoon on top of pan-seared chicken cutlets.

Serve The Chicken Cutlets in Pan Sauce

Transfer the chicken cutlets onto individual serving plates. Spoon 2-3 Tablespoons of pan sauce over the top of each piece of chicken, to cover. Serve the chicken cutlets in pan sauce immediately.

We typically serve this delicious chicken with mashed potatoes or steamed rice on the side. I also served the chicken with a Brussel sprout casserole for two. YUM!

Chicken cutlets in pan sauce, served with rice and Brussel sprout casserole on the side.A plate with one of the chicken cutlets in pan sauce, served with rice and a veggie.

I really hope you love this recipe for chicken cutlets in pan sauce! You can can easily double or triple the recipe to meet your needs by changing the amount of servings in the recipe card below!

Thank you for stopping by, and I invite you to come back soon for more family-friendly recipes. Take care, God bless, and have a great day!

Looking For More CHICKEN Recipes?

You can find ALL of my recipes in the Recipe Index, which is located at the top of the page. I have LOTS of delicious chicken recipes to check out, including:

Interested In More Recipes? Get My FREE Newsletter!

I publish a newsletter 2 times per month (1st and 15th) with recipes, tips, etc..
 I would be honored to have you join our growing list of subscribers!

There is a Newsletter subscription box on the top right (or bottom) of each blog post. You can submit your e-mail address there, to be added to my mailing list.

Find Me On Social Media:

Facebook page: The Grateful Girl Cooks!
Pinterest:
The Grateful Girl Cooks!
Instagram:
jbatthegratefulgirlcooks

Author's signature

Recipe Adapted From Maya Krampf at: https://www.wholesomeyum.com/pan-seared-chicken-breast/

↓↓ PRINTABLE RECIPE BELOW ↓↓

0 from 0 votes
Chicken Cutlets in Pan Sauce
Prep Time
5 mins
Cook Time
25 mins
Total Time
30 mins
 

Chicken Cutlets In Pan Sauce is a simple, delicious meal! Pan-seared chicken breasts are topped with a wine, garlic, butter and herb sauce.

Category: Main Course
Cuisine: All Cuisines
Keyword: chicken cutlets in pan sauce
Servings: 2
Calories Per Serving: 308 kcal
Author: JB @ The Grateful Girl Cooks!
Ingredients
For Chicken:
  • teaspoons olive oil
  • 2 chicken breast cutlets about 5 ounces each
  • ½ teaspoon salt
  • ¼ teaspoon black pepper
For Pan Sauce:
  • teaspoons olive oil
  • cloves garlic minced
  • ½ medium shallot finely chopped
  • ¼ cup dry white wine
  • ¼ cup low sodium chicken broth
  • 3 teaspoons unsalted butter
  • 2 teaspoons fresh parsley chopped
  • 2 teaspoons fresh thyme chopped
Instructions
  1. Dry chicken with paper towels to absorb excess moisture. Season chicken on both sides with salt and pepper.

  2. Heat olive oil in skillet on Medium-High heat until very hot, but not smoking. Put chicken in skillet in a single layer; cook cutlets 4-8 minutes without disturbing them.

  3. After chicken cooks 4-8 minutes, it should be well-browned on the bottom. Flip chicken over; cook 4-8 more minutes. Chicken is done when browned on both sides and cooked through to an internal temp. of 165°F. Remove chicken from pan; cover tightly with foil to keep chicken warm.

  4. Use same skillet (without cleaning it) to make pan sauce. Add olive oil to the skillet; turn heat to Medium. Add shallots; cook, stirring often, for 2 minutes. Stir in garlic; cook for 30 seconds, stirring so garlic doesn't burn. Add wine and chicken broth. Scrape browned bits up from bottom of pan as it cooks (more flavor). Bring liquid to a gentle boil. Reduce heat to Medium-Low. Let sauce simmer (uncovered) 6-8 minutes, or until liquid is reduced in half.

  5. Turn heat to LOW once liquid has been reduced. Add butter, parsley and thyme; stir to combine. Continue cooking ONLY until butter has melted.

  6. Transfer chicken to plates. Spoon 2-3 T. sauce over each piece to cover. Serve.

Nutrition Facts
Chicken Cutlets in Pan Sauce
Amount Per Serving (1 cutlet + 2-3 T. sauce)
Calories 308 Calories from Fat 144
% Daily Value*
Fat 16g25%
Saturated Fat 6g38%
Trans Fat 0.3g
Polyunsaturated Fat 1g
Monounsaturated Fat 7g
Cholesterol 107mg36%
Sodium 759mg33%
Potassium 619mg18%
Carbohydrates 4g1%
Fiber 1g4%
Sugar 1g1%
Protein 31g62%
Vitamin A 335IU7%
Vitamin C 6mg7%
Calcium 29mg3%
Iron 1mg6%
* Percent Daily Values are based on a 2000 calorie diet.

Here’s one more to pin on your Pinterest boards!Chicken Cutlets In Pan Sauce is a simple, delicious meal! Pan-seared chicken breasts are topped with a wine, garlic, butter and herb sauce.

Citrus Cannoli

Make about 15 (or more) delicious Citrus Cannoli, with sweetened orange ricotta filling, and decorated with chocolate and chopped pistachios!

Do you enjoy cannoli? My husband and I sure do! We have a coffee house very close to us that serves cannoli, and we have been known to drive there, just for the cannoli! A few years back while on a cruise up the eastern coast of the U.S., we spent a day in Boston.

We enjoyed doing the Freedom Trail walk, seeing historic sites, such as The Boston Commons, and Paul Revere’s home. We also saw the Old North Church and the “Cheers” bar from the old TV show. Our day also included tracking down a famous cannoli shop in the north end of Boston, to bring back some cannoli onto the ship. YUM!

A few years ago, a dear friend of ours who is a great Italian cook, posted a recipe she uses for homemade cannoli. After adapting the recipe slightly for our tastes and preferences, I made these delicious citrus cannoli. YUM!

The recipe, as written, will yield about 15-18 delicious cannoli. Cannoli are always best eaten the same day you make them, so share them!. I’ve shared them with quite a few of our neighbors!

Making citrus cannoli takes a bit of time and prep, but the finished treats are worth every minute! They’re DELICIOUS! Here’s how to make them:

Scroll Down For A Printable Recipe Card At The Bottom Of The Page

Make The Citrus Ricotta Filling For the Cannoli

Place ricotta cheese in a wire mesh strainer over a bowl, and let the excess liquid drain out. Discard liquid, then place the drained ricotta in a blender.

Cover and blend the ricotta until it becomes smooth. You can also use an electric mixer to mix the ricotta until smooth, if that is more convenient. Pour the smooth ricotta into a large bowl.

Gently FOLD in un-sifted powdered sugar, vanilla extract, and finely grated orange zest. Continue to gently fold these ingredients into the ricotta until completely incorporated.

Cover the bowl, and keep the citrus ricotta filling refrigerated and well chilled until you’re ready to fill the cannoli shells.

Powdered sugar, vanilla and orange zest is added to drained, blended ricotta cheese for cannoli filling.Citrus ricotta cannoli filling is refrigerated after being fully combined.

Make The Dough For The Cannoli Shells

While the ricotta mixture chills in the refrigerator, make the dough for the cannoli shells. Sift flour, salt and sugar together in a large mixing bowl. Use your fingers to create a “well” in the center of the mixture.

Add a slightly beaten egg and cold butter (cut in pieces) to the center well. Stir the egg and butter into the flour, from the outside in, to incorporate them into and moisten the flour mixture.

Add Marsala wine, one Tablespoonful at a time, stirring only until the dough mixture clings together.

Flour, salt, and granulated sugar are sifted into a bowl, and a "well" is created in the middle.An egg and cold pieces of butter are added to the flour mixture in a large bowl to make dough.Marsala wine is added, 1 Tablespoon at a time to the cannoli dough, until dough clings together.

Use your hands to shape the dough into a firm round ball, then wrap the dough tightly with plastic wrap. Let the dough rest at room temperature for 15 minutes before unwrapping.

Cannoli dough is formed into a firm dough ball, wrapped and rests for 15 minutes before shaping.

Cut Out And Shape the Cannoli Shells For Frying

Unwrap the dough, and place it on a lightly floured work surface. Using a rolling pin, roll the dough out until it is about ¼” thick. Use a  3½” round biscuit or cookie cutter to create circles out of the dough (each circle is 3½” wide).

Use the rolling pin to roll out each circle just a bit more into a slightly oval shape. You should end up with approx. 15-18 dough circles (and sometimes more).

Lay a metal cannoli tube (bought a set of 4 on Amazon for about $7) across the middle of a dough circle. Wrap the dough around the cannoli tube, and seal the edges together with a slightly beaten egg white (acts like glue), to hold the two seams together. Press the seam together, to ensure the cannoli shells seal properly and hold together when frying.

Use your fingers to slightly flare the edges (on both ends) of the dough out a little bit before frying the cannoli shells.

Dough for cannoli is rolled, then cut into circles before they are molded onto tubes and fried.One of the dough circles is wrapped around a metal cannoli tube.Four cannoli tubes are wrapped and seams are sealed with egg white before frying.

Cook The Cannoli Shells

Heat oil in a large skillet (or electric skillet) until it reaches 350°F.  Fry 3-4 cannoli shells at a time in the hot oil for ONE MINUTE, turning until they become golden in color on all sides.

NOTE: If using a smaller skillet, only cook 2-3 at a time so the cannoli don’t touch while cooking.

Use tongs to carefully remove the cannoli shells from the hot oil and transfer them to paper towels to drain. Allow the fried cannoli shells to cool for 5-8 seconds, then carefully slide them off the metal tubes onto paper towels.

Next Batch!

Wrap the next batch of cannoli shells back onto the metal forms, making sure to seal them well. Re-check the temperature of the oil to make sure it is 350°F. before adding the cannoli shells..

Repeat the cooking process until all the cannoli dough has been used. Let the cannoli shells cool completely after frying, before decorating and filling the shells.

NOTE: If you want to FREEZE some of the shells for later use, wrap the cooled shells carefully, then store them in the freezer in an airtight container. When you are ready to use them, thaw and then decorate shells and fill with cold ricotta mixture before serving.

3-4 cannoli at a time are fried for 1 minute in very hot oil until golden brown in color.Metal cannoli tubes are removed from fried shells, cooling and draining on paper towels.Some of the fried cannoli shells, cooling on paper towels before decorating and filling.

Decorating The Citrus Cannoli Shells

Decorating the cooled cannoli shells is optional, but it really gives them a wonderful look! Melt semi sweet chocolate chips in a double boiler (or in the microwave) until completely smooth.

Lightly dip the ends (both sides) of the cannoli shells into melted chocolate, then immediately sprinkle the chocolate with finely chopped pistachios. You can also sift powdered sugar onto the shells, if desired.

Place the shells on a wire rack after decorating, and let them cool completely at room temperature until the chocolate has hardened. TIP: I find it helpful to put wax paper, foil, or parchment paper UNDER the wire rack to catch any drips, etc..

Both ends of cannoli shells are dipped in melted chocolate and sprinkled with chopped pistachios.

Serve The Citrus Cannoli

Remove the chilled citrus ricotta filling from the refrigerator. Use a pastry bag to pipe the filling into each of the shells. I pipe it into both ends of the cannoli shell.

If you don’t have a pastry bag, you can add the citrus filling to a zip-loc bag. Snip a corner off a bottom edge to pipe it, OR you can carefully fill the shells using a small spoon.

NOTE: Citrus cannoli are at their very best when eaten on the same day they are made. The shells are much crisper that way, the way you want them to be.

Yes, you can refrigerate leftovers, but honestly, the shells will soften up when filled and refrigerated, so it’s not recommended.

Cold citrus ricotta filling is piped into the decorated cannoli shells before serving.A red serving platter holds seven citrus cannoli that are ready to be eaten!

I hope you have the chance to try making this recipe for yummy citrus cannoli. They’re really good! Thanks for stopping by, and I invite you to come back soon for more family-friendly recipes. Take care, may God bless you, and have a GREAT day.

Looking For More DESSERT Recipes?

You can find ALL of my recipes in the Recipe Index, which is located at the top of the page. I have lots of yummy dessert recipes for you to enjoy, including:

Want More Recipes? Get My FREE Newsletter!

I publish a newsletter 2 times per month (1st and 15th) with lots of recipes, tips, etc..
Would you like to join our growing list of subscribers?

There is a Newsletter subscription box on the top right (or bottom) of each blog post, depending on the device you use.
You can submit your e-mail address there, to be added to my mailing list.

Find Me On Social Media:

Facebook page: The Grateful Girl Cooks!
Pinterest:
The Grateful Girl Cooks!
Instagram:
jbatthegratefulgirlcooks

Author's signature

Recipe adapted from our friend, Diane Mueller

↓↓ PRINTABLE RECIPE BELOW ↓↓

0 from 0 votes
Citrus Cannoli
Prep Time
40 mins
Cook Time
5 mins
Total Time
45 mins
 

Make about 15 (or more) delicious Citrus Cannoli, with sweetened orange ricotta filling, and decorated with chocolate and chopped pistachios!

Category: Dessert
Cuisine: Italian
Keyword: citrus cannolis
Servings: 15
Calories Per Serving: 306 kcal
Author: JB @ The Grateful Girl Cooks!
Ingredients
For Citrus Ricotta Filling:
  • 4 cups ricotta cheese drained
  • cups un-sifted powdered sugar
  • 4 teaspoons vanilla extract
  • ½ cup finely grated orange zest orange peel, not the white pith
For Cannoli Shells:
  • cup all purpose flour
  • ½ teaspoon salt
  • 2 teaspoons granulated sugar
  • 1 large egg slightly beaten
  • 2 Tablespoons COLD butter cut in small pieces
  • ¼ cup Marsala wine
  • 1 large egg white slightly beaten
  • OIL, for frying 1" deep in skillet used
For Decorating Cannoli Shells (optional, but good):
  • ½ cup semi sweet chocolate chips
  • ½ cup chopped pistachios
Instructions
  1. Place ricotta in a wire mesh strainer over a bowl. Let liquid drain (and discard). Place ricotta in blender. Cover and blend until smooth (can use electric mixer). Put ricotta in a large bowl. Gently FOLD in powdered sugar (un-sifted), vanilla, and orange zest. Continue to fold in, until fully incorporated. Cover bowl; refrigerate ricotta filling until ready to fill cannoli shells.

  2. To make cannoli shell dough, sift flour, salt and sugar into large bowl. Create a "well" in the center. Add slightly beaten egg and cold butter (cut in pieces) to the "well". Stir egg/butter pieces into flour, from the outside in, to incorporate them into flour mixture. Add Marsala wine, one Tablespoonful at a time, stirring only until dough clings together. Use your hands to shape dough into a firm round ball. Wrap dough tightly with plastic wrap. Let dough rest at room temperature for 15 minutes before unwrapping.

  3. Unwrap dough; place it on lightly floured work surface. Roll dough out with rolling pin until about ¼" thick. Use a  3½" round biscuit or cookie cutter to cut out circles of dough. Roll each circle just a bit more into a slightly oval shape. You should have approx. 15-18 dough circles (sometimes more).

  4. Lay metal cannoli tube across middle of the dough circle. Wrap dough around metal tube; seal edges together well, brushing them with lightly beaten egg white, to hold seams together; pinch seam together. This is an important step, to ensure cannoli shells seal properly and hold together when frying. Use fingers to slightly flare edges (on both ends) of dough out a bit before frying.

  5. Heat oil (2" deep) in a large skillet (or electric skillet) until it reaches 350°F.  Fry 3-4 cannoli shells at a time for ONE MINUTE, turning as they cook until they become golden in color on all sides. NOTE: If using a smaller skillet, only cook 2-3 at a time so cannoli don't touch while cooking. Use tongs to carefully remove cooked shells from hot oil; transfer to paper towels to drain. Let shells cool for 5-8 seconds, then carefully slide them off (hot) tubes onto paper towels. Re-check oil temp. for each batch to make sure it is at 350°. Repeat cooking process until all dough has been used. Let shells cool completely before decorating and filling. NOTE: If you want to FREEZE some shells for later use, wrap cooled shells carefully; store in freezer in airtight container. When ready to use, thaw and decorate shells; fill with cold ricotta mixture before serving.

  6. To decorate cannoli shells, melt chocolate chips in double boiler (or microwave) until smooth. Lightly dip both ends of shells into melted chocolate; immediately sprinkle chocolate with chopped pistachios. Place shells on a wire rack after decorating; cool at room temp. until chocolate hardens. TIP: I find it helpful to put wax paper, foil, or parchment paper UNDER the wire rack to catch any drips, etc..

  7. Remove cold ricotta filling from refrigerator. Use a pastry bag to pipe filling into cannoli shells (both ends). TIP: No pastry bag? Add ricotta filling to a zip-loc bag. Snip a corner off bottom of bag to pipe it, OR fill shells using a small spoon. NOTE: Citrus cannoli are at their best, eaten the same day they're made. Cannoli shells are crisper that way. Yes, you can refrigerate leftovers, but the shells will soften when filled and refrigerated, so it's not recommended.

Recipe Notes

NOTE: Caloric calculation was based on 1 cannoli out of a total of 15 cannoli being made. It also includes the optional chocolate and pistachio decorations. If made WITHOUT the chocolate and pistachio, each of the 15 cannoli would have a caloric calculation of approx. 248 calories each.

Nutrition Facts
Citrus Cannoli
Amount Per Serving (1 cannoli (decorated))
Calories 306 Calories from Fat 135
% Daily Value*
Fat 15g23%
Saturated Fat 8g50%
Trans Fat 0.1g
Polyunsaturated Fat 1g
Monounsaturated Fat 5g
Cholesterol 50mg17%
Sodium 155mg7%
Potassium 181mg5%
Carbohydrates 31g10%
Fiber 2g8%
Sugar 15g17%
Protein 11g22%
Vitamin A 390IU8%
Vitamin C 5mg6%
Calcium 154mg15%
Iron 2mg11%
* Percent Daily Values are based on a 2000 calorie diet.

Here’s one more to pin on your Pinterest boards!Make about 15 (or more) delicious Citrus Cannoli, with sweetened orange ricotta filling, and decorated with chocolate and chopped pistachios!

Egg Salad For Sandwiches

It’s easy to make creamy Egg Salad For Sandwiches in about 30 minutes! This recipe yields enough egg salad to make 5 delicious sandwiches!
It's easy to make creamy Egg Salad For Sandwiches in about 30 minutes! This recipe yields enough egg salad to make 5 delicious sandwiches!

Do you enjoy egg salad sandwiches? I sure do! When I was 16 years old, working my first job, our store had a small made-to-go food counter where I ate on my lunch break. One of my favorite things to order was an egg salad sandwich!

Wow- did I ever LOVE that sandwich, served with potato chips and a pickle on the side. YUM! I remember asking the female cook how they made their egg salad. Our store’s cook only used mayo, mustard, salt and pepper to make their egg salad!

I’ve been making it that way ever since (and that’s a LONG time!). Pure and simple egg salad… just the way my husband and I like it! No onions or sweet pickle relish for us. Here’s how to make this creamy egg salad:

Scroll Down for A Printable Recipe Card At The Bottom Of The Page

Hard Boil the Eggs

The first thing you need to do is hard boil the eggs. Everyone does this step differently, and that’s okay with me! Boil them like you normally would, but if you’re curious, this is how I hard boil eggs. For this recipe you will need 10 large eggs to make enough for 5 sandwiches. PLEASE NOTE: The photos (directly below) are from another recipe of mine, to show you how I hard boil the eggs.

Place the eggs in a large saucepan, and cover with tap water. Place the pan on the stove and turn the heat to Medium-high. Cook the eggs (uncovered) on Medium-High for 22 minutes, then drain the boiling water out of the pan.

Fill the pan immediately with cold tap water, then crack the eggs on all sides by tapping them on the bottom of the pan.. Put each egg (cracked all over) back into the water to cool 2-3 minutes. The cool water will seep into the cracks in the shells, allowing for an easier removal later.

When cool enough to handle, roll one cracked egg at a time between your hands, to remove the shell in large pieces. Rinse each egg (once removed from the shell) to make sure no little pieces of eggshell remain on the egg.

Three photos showing how to boil eggs for the egg salad.

Time To Make Some Egg Salad!

Chop all the peeled eggs into fairly small pieces, with a sharp knife. Place the chopped eggs into a large mixing bowl. Okay… now let’s turn these chopped up eggs into egg salad for sandwiches

Eggs are hard boiled, peeled, then chopped into small pieces.

Add a half cup of mayonnaise (regular or light) and a half teaspoon of yellow mustard to the eggs. Stir until all the ingredients have been well combined, and the egg salad is fairly creamy.

Once combined, season to taste with salt and black pepper. I first season it lightly, take a small taste, then add more salt and pepper, as necessary.

Season To Taste

We all have different taste buds, right? So… if you want more mustard flavor, add it. If it needs more salt or pepper, to suit your taste… add a little bit more.

Once the egg salad suits your personal taste, cover the bowl with plastic wrap, or transfer it into a covered container. Refrigerate the egg salad until it is well chilled, then make some sandwiches!

Mayonnaise and a small amount of yellow mustard are added to the eggs in bowl.Egg salad is stirred well to combine, then seasoned to taste with salt and pepper.

Using The Egg Salad For Sandwiches

When ready to make an egg salad sandwich, simply spread the chilled egg salad onto a slice of bread you enjoy. We enjoy eating egg salad for sandwiches on white or multi-grain bread, but choose the type of bread you like for sandwiches.

A slice of bread is covered with a layer of cold egg salad.

Top the egg salad layer with some crisp, cold lettuce leaves (I prefer crunchy, cold iceberg lettuce for these sandwiches). Add another slice of bread on top of the lettuce, and your sandwich is done!

I like to slice the sandwich from corner to corner, because that’s the way I grew up eating them. It’s TRADITION, and that is how I roll!

Iceberg lettuce is added to the egg salad for sandwiches and topped with another bread slice.

And there you have it! Now you’ve made some wonderfully delicious egg salad for sandwiches! Be sure to add some fruit, chips, or maybe a pickle slice to your plate to serve on the side. YUM!

There you go- you’ve got enough egg salad for 5 yummy sandwiches! Any leftover egg salad can be stored (covered0, for up to 3-4 days in the refrigerator. ENJOY!

Egg salad sandwich is served, cut in half on a white plate, with tortilla chips on the side.

I hope you will try this simple recipe for egg salad for sandwiches, and trust you will enjoy it as much as we do. Any leftovers can be stored (covered) in the refrigerator for 3-4 days.

It’s always nice and handy to have the egg salad ready in the refrigerator. That way it’s super easy to make a quick sandwich for lunch or dinner!

Thank you for stopping by today, and I invite you to come back soon for more family-friendly recipes. Take care, may God bless you, and have a GREAT day.

Looking For More SANDWICH Recipes?

You can find ALL of my recipes in the Recipe Index, which is located at the top of the page. I have some delicious sandwich recipes for you to enjoy, including:

Want More Recipes? Get My FREE Newsletter!

I publish a newsletter 2 times per month (1st and 15th) with lots of recipes, tips, etc..
Would you like to join our growing list of subscribers?

There is a Newsletter subscription box on the top right (or bottom) of each blog post, depending on the device you use.
You can submit your e-mail address there, to be added to my mailing list.

Find Me On Social Media:

Facebook page: The Grateful Girl Cooks!
Pinterest:
The Grateful Girl Cooks!
Instagram:
jbatthegratefulgirlcooks

Author's signature

↓↓ PRINTABLE RECIPE BELOW ↓↓

0 from 0 votes
Egg Salad For Sandwiches
Prep Time
8 mins
Cook Time
22 mins
Total Time
30 mins
 

It's easy to make creamy Egg Salad For Sandwiches in about 30 minutes! This recipe yields enough egg salad to make 5 delicious sandwiches!

Category: Lunch
Cuisine: American
Keyword: egg salad for sandwiches
Servings: 5 (enough for 5 sandwiches)
Calories Per Serving: 296 kcal
Author: JB @ The Grateful Girl Cooks!
Ingredients
  • 10 large eggs
  • ½ cup mayonnaise can also use light mayo, if desired
  • ½ teaspoon yellow mustard
  • salt and black pepper, to taste season lightly, then add as needed
To make sandwiches: Bread of choice and lettuce (not included in caloric calculation)
    Instructions
    1. Hard boil the eggs (see NOTE below for how I do this). Remove shells from eggs.

    2. Chop peeled eggs into small pieces. Place the eggs into a large bowl.

    3. Add mayonnaise and mustard to the eggs. Stir until well combined, and egg salad is fairly creamy. Once combined, season to taste with salt and pepper.

    4. Cover bowl or transfer to a covered container; refrigerate egg salad until well chilled. Will keep in refrigerator for up to 3-4 days.

    To Make Egg Salad Sandwich:
    1. Spread egg salad on a slice of bread. Top egg salad with crisp, cold lettuce. Add another slice of bread on top of lettuce. If desired slice sandwich in half. Serve and enjoy!

    Recipe Notes

    HOW I BOIL EGGS: Place eggs in a large saucepan; cover with water. Place pan on stove; turn heat to Medium-high. Cook eggs (uncovered) on Medium-high for 22 minutes; drain water. Fill pan immediately with cold water, then crack eggs on all sides. Put each egg (cracked all over) back in water in pan; cool 2-3 minutes. When cool enough to handle, roll one egg at a time between hands, removing shell in large pieces. Rinse peeled eggs. 

    Nutrition Facts
    Egg Salad For Sandwiches
    Amount Per Serving (1 egg salad for 1 sandwich)
    Calories 296 Calories from Fat 234
    % Daily Value*
    Fat 26g40%
    Saturated Fat 6g38%
    Trans Fat 0.1g
    Polyunsaturated Fat 12g
    Monounsaturated Fat 7g
    Cholesterol 381mg127%
    Sodium 290mg13%
    Potassium 143mg4%
    Carbohydrates 1g0%
    Fiber 0.02g0%
    Sugar 1g1%
    Protein 13g26%
    Vitamin A 555IU11%
    Vitamin C 0.002mg0%
    Calcium 58mg6%
    Iron 2mg11%
    * Percent Daily Values are based on a 2000 calorie diet.

    Here’s one more to pin on your Pinterest boards!

    It's easy to make creamy Egg Salad For Sandwiches in about 30 minutes! This recipe yields enough egg salad to make 5 delicious sandwiches!

    Air Fryer Pork Chops For Two

    Make Air Fryer Pork Chops For Two! This quick, easy recipe yields delicious, spice-rubbed, bone-in pork chops for two people in 20 minutes.
    Make Air Fryer Pork Chops For Two! This quick, easy recipe yields delicious, spice-rubbed, bone-in pork chops for two people in 20 minutes.

    If you enjoy eating pork chops and have an air fryer, then I’m confident you will LOVE this recipe! The recipe makes two servings, which is convenient for my husband and I, since we’re the only ones left at home. Both of our grown sons live on their own, so it is a fun challenge to alter recipes at times to only make enough for the TWO of us.

    Air Fryer Pork Chops For Two is a recipe I originally found online. I cut the recipe in half for the two of us, and gave it a try in our air fryer a few months ago. My husband and I loved the flavor of the air-fried pork chops, thanks to a flavorful, homemade spice rub mixture!

    The pork chops were perfectly cooked and browned on the outside, juicy on the inside, and they tasted wonderful! We’ve enjoyed this dish several times since then!

    It only takes about 10 minutes to prepare the spice mix and season the meat, then into a preheated air fryer they go. The pork chops cook for about 8-10 minutes, or until they reach temp. All you need to do is flip them over halfway through the cooking time! How’s that for EASY? Here’s how to make them:

    Scroll Down For A Printable Recipe Card At The Bottom Of The Page

    Preheat Your Air Fryer

    Preheat your air fryer for five minutes at 400°F. If your machine doesn’t have a Preheat function, simply heat it for 5 minutes at that temperature (400°F). You want your air fryer hot when you add the seasoned pork chops, for best results.

    I usually mix up the spices, and season the pork chops while the air fryer preheats, because that saves time! Try it… you’ll see what I mean!

    An air fryer is preheated to 400°F. before cooking seasoned pork chops.

    Make The Seasoning Mix

    The spice mix is simple to make from scratch! You need brown sugar, salt, Italian seasoning, smoked paprika, garlic powder, onion powder, black pepper and sweet paprika.

    Mix these spices together in a small bowl, until they are fully combined.

    There are quite a few spices that make up the spice rub for the air fryer pork chops.A bowl with homemade spice mixture to rub onto the pork chops before they cook.

    Season The Pork Chops

    For this recipe you will need two bone-in pork chops, approx. 6-7 ounces each. Each pork chop should be about ¾ to 1″ thick, so they will cook evenly and for about the same amount of time.

    Pat the chops dry using paper towels to absorb extra moisture. Use a pastry brush to cover BOTH SIDES of each pork chop with melted butter.

    Cover BOTH SIDES of each pork chop with the spice mixture, rubbing it into the buttered pork chops so it adheres as much as possible. Use all of the spice mix, for the very best flavor on those chops!

    Once the pork chops are coated with the spices, they are ready to pop into a preheated air fryer!

    Two, six ounce bone-in pork chops, patted dry, and ready to be seasoned.Both sides of the pork chops are brushed with melted butter.Spice mixture is rubbed into both sides of the pork chops before cooking.

    Cooking The Pork Chops In the Air Fryer

    Place the seasoned chops in a single layer in the basket of the air fryer. Please note that if you are making more than two pork chops, you may have to work in batches to ensure they fit in the basket. This also allows the meat to “air fry” better as the hot air can circulate around the pork chops more efficiently!

    Cook the air fryer pork chops for two at 400°F. for about 6 minutes. Remove the basket, and flip the pork chops over to the other side.

    Re-insert basket into the air fryer and continue cooking for 2-4 more minutes OR until a meat thermometer inserted into the middle of a chop reaches 145°F. When done, the pork chops should be nicely browned on the surface, and cooked to 145°F.

    The thickness of the pork chops used will ultimately determine how long they take to air fry. Typically, it should take between 8-10 minutes TOTAL time to cook them to temperature.

    A couple of times, ours were fully cooked after 7 minutes total time. Keep an eye on them, so you do not overcook or undercook them!

    Well seasoned pork chops are placed in basket of air fryer in one layer.Air fryer pork chops for two have been flipped over to finish cooking.

    Serve The Air Fryer Pork Chops For Two

    Once done, remove the pork chops from the air fryer, and let them rest for 4-5 minutes before serving. This “resting” time lets the juices inside have time to redistribute inside the meat, so the pork chops remain juicy.

    Once they’ve rested, garnish the pork chops with fresh parsley, and serve! The pork chops are juicy, and have wonderful flavor, thanks to the homemade spice mix you used to season them.

    Serve immediately, while hot! We enjoy air fryer pork chops for two served with mashed potatoes and a green veggie on the side. YUM!

    The air fryer pork chops for two are served, garnished with fresh parsley.A close up of one of the air fryer pork chops, with parsley garnish, on a white plate.

    Thanks for stopping by today, and I hope you enjoy this delicious recipe for air fryer pork chops for two! Take care, please come back again soon, and have a GREAT day!

    Looking For More AIR FRYER Recipes?

    You can find ALL of my recipes in the Recipe Index, which is located at the top of the page. I have quite a few Air Fryer recipes for to you check out, including:

    Want More Recipes? Get My FREE Newsletter!

    I publish a newsletter 2 times per month (1st and 15th) with lots of recipes, tips, etc..
    Would you like to join our growing list of subscribers?

    There is a Newsletter subscription box on the top right (or bottom) of each blog post, depending on the device you use.
    You can submit your e-mail address there, to be added to my mailing list.

    Find Me On Social Media:

    Facebook page: The Grateful Girl Cooks!
    Pinterest:
    The Grateful Girl Cooks!
    Instagram:
    jbatthegratefulgirlcooks

    Author's signature

    Recipe adapted from (and with thanks to) Sara, at: dinneratthezoo.com/air-fryer-pork-chops/

    ↓↓ PRINTABLE RECIPE BELOW ↓↓

    0 from 0 votes
    Air Fryer Pork Chops For Two
    Prep Time
    5 mins
    Cook Time
    10 mins
    Total Time
    15 mins
     

    Make Air Fryer Pork Chops For Two! This quick, easy recipe yields delicious, spice-rubbed, bone-in pork chops for two people in 20 minutes.

    Category: Main Dish
    Cuisine: American
    Keyword: air fryer pork chops
    Servings: 2
    Calories Per Serving: 315 kcal
    Author: JB @ The Grateful Girl Cooks!
    Ingredients
    • 2 bone-in pork chops (6-7 oz. each) approx. ¾-1" thick
    • Tablespoons butter melted
    For Spice Mix:
    • ¾ Tablespoon brown sugar
    • ½ teaspoon salt
    • ½ teaspoon smoked paprika
    • ½ teaspoon Italian seasoning
    • ½ teaspoon sweet paprika
    • teaspoon onion powder
    • teaspoon garlic powder
    • teaspoon black pepper
    Garnish (optional):
    • 1 Tablespoon chopped fresh parsley
    Instructions
    1. Preheat air fryer for five minutes at 400°F.

    2. Mix brown sugar, salt, smoked paprika, Italian seasoning, sweet paprika, onion and garlic powders, and pepper in a small bowl, until well combined.

    3. Pat pork chops dry with paper towels to absorb moisture. Use a pastry brush to cover BOTH SIDES of each pork chop with melted butter.

    4. Cover BOTH SIDES of each pork chop with spice mix, rubbing it into the buttered pork chops so it adheres as much as possible.

    5. Place chops in a single layer in air fryer basket. Cook at 400°F. for about 6 minutes. Flip pork chops over. Continue cooking 2-4 minutes OR until a meat thermometer inserted into a chop reaches 145°F. and chops are nicely browned. NOTE: *If making more than two chops, work in batches. This allows meat to "air fry" better as hot air can circulate around pork chops more efficiently!

    6. Once done, remove pork chops from air fryer. Let them rest 4-5 minutes before serving. This lets juices have time to redistribute inside, so the pork chops remain juicy. Garnish chops with parsley (optional), and serve!

    Nutrition Facts
    Air Fryer Pork Chops For Two
    Amount Per Serving (1 pork chop)
    Calories 315 Calories from Fat 180
    % Daily Value*
    Fat 20g31%
    Saturated Fat 9g56%
    Trans Fat 0.5g
    Polyunsaturated Fat 2g
    Monounsaturated Fat 7g
    Cholesterol 111mg37%
    Sodium 722mg31%
    Potassium 492mg14%
    Carbohydrates 6g2%
    Fiber 1g4%
    Sugar 5g6%
    Protein 27g54%
    Vitamin A 940IU19%
    Vitamin C 3mg4%
    Calcium 45mg5%
    Iron 1mg6%
    * Percent Daily Values are based on a 2000 calorie diet.

    Here’s one more to pin on your Pinterest boards!Make Air Fryer Pork Chops For Two! This quick, easy recipe yields delicious, spice-rubbed, bone-in pork chops for two people in 20 minutes.

    Orange Spiced Coffee

    Orange Spiced Coffee is brewed with cinnamon, cloves, sugar, and orange marmalade! Top this delicious hot drink with whipped cream, to serve!
    Orange Spiced Coffee is brewed with cinnamon, cloves, sugar, and orange marmalade! Top this delicious hot drink with whipped cream, to serve!

    Are you a coffee drinker? My husband and I love our morning coffee! I drink two cups each morning, and my husband drinks it all day long as he works from home. He is my true “coffee hound”, in the truest sense of the word.

    It seems like there are definitely two schools of thought regarding coffee. For us coffee lovers, there’s just no getting around it. We like our coffee, and we know how we like it!

    COFFEE, COFFEE, COFFEE – The Great Debate!

    One school of thought is “I LIKE MY COFFEE BLACK- DON’T YOU DARE PUT ANYTHING ELSE IN IT”! The other school of thought (which is mine) is “I LOVE COFFEE, BUT PLEASE PUT CREAMER, SUGAR OR OTHER STUFF IN IT SO IT DOESN”T TASTE LIKE COFFEE”. Amen.

    Well… if you enjoy flavoring your coffee with creamers, etc. then today’s simple recipe for orange spiced coffee is just for you. I think it’s a great dessert-style coffee. A few easy additions to your coffee brewing routine, and you can enjoy a cup of this wonderful, citrus-flavored coffee! Here’s how to make 4 small servings!

    Scroll Down for A Printable Recipe Card At The Bottom Of The Page

    Prepare To Brew The Orange Spiced Coffee

    Place one third of a cup of ground coffee into a coffee filter. Add half a teaspoon of ground cinnamon and one eighth of a teaspoon of ground cloves to the coffee grounds.

    If it’s not already in its spot yet, place the filter into its designated position in your coffee maker. Pour 3 cups of water into the well of your coffee maker, but do not turn the machine on yet!

    Now it is time for the add-ins to go into the coffee pot BEFORE you brew the orange spiced coffee!

    Ground coffee, cinnamon and cloves are placed into a coffee filter before brewing.

    Add Mix Ins To The Coffee Pot Before Brewing

    Before brewing the coffee, add 1/4 cup of orange marmalade and a rounded teaspoon of granulated sugar to the empty coffee pot. I know it seems weird to put JAM into the coffee pot, but trust me on this.

    Once the coffee begins to brew, these two ingredients will dissolve and melt as the hot coffee covers them. This results in the rich orange flavor from the marmalade being infused into the coffee, which adds more flavor!

    Orange marmalade is used to help flavor the spiced coffee with a burst of citrus.Orange marmalade and sugar are placed in the coffee pot before brewing coffee.

    Brew The Coffee

    When you’ve added the marmalade and sugar to the empty pot and have the coffee filter in place, turn on your machine and brew the coffee.

    As the pot fills with hot spiced coffee, it will melt the marmalade and dissolve the granulated sugar, incorporating both into the brewed coffee.

    As the coffee brews, the hot liquid melts the sugar and marmalade jam in the coffee pot.

    Serving Orange Spiced Coffee

    When the orange spiced coffee is finished brewing, it is wonderfully citrus flavored, and ready to serve. Give it a quick stir, then pour about 3/4 cup of coffee into each of the four small  mugs. At this point, taste the coffee. If you prefer sweeter coffee, now is the time to stir in additional sugar, to suit your taste.

    My favorite way to enjoy this coffee is to add whipped cream and a little orange zest (finely grated peel) to top off each cup of coffee. It helps make the coffee look quite appetizing, and the dollop of whipped cream and orange zest make it even more delicious!

    If you enjoy drinking your coffee black, simply leave off the whipped cream and orange zest garnish, and enjoy the coffee, as is. It still has wonderful citrus and spice flavors.


    A mug of hot, orange spiced coffee, without additional garnishes for serving.

    We serve the orange spiced coffee with whipped cream and orange zest on top.

    This is such a simple way to serve some “fancy pants” coffee, for those days when you just want a delicious coffee “treat”. I really hope you enjoy this flavor filled hot beverage, and trust you will enjoy it as much as I do!

    Thanks for stopping by my blog today, and I would invite you to come back soon for more family-friendly recipes. Take care, may God bless you, and have a GREAT day!

    Looking For More Hot Drink Recipes?

    You can find all of my recipes in the Recipe Index, which is located at the top of the page. I have some delicious hot beverage recipes for you to enjoy, including:

    Author's signature

    Recipe adapted from Kay Marone, via “Gooseberry Patch- Have Yourself A Homemade Christmas”, page 281, published in 2014 by Gooseberry Patch and Time Home Entertainment, Inc.

    ↓↓ PRINTABLE RECIPE BELOW ↓↓

    5 from 1 vote
    Orange Spiced Coffee
    Prep Time
    5 mins
    Cook Time
    0 mins
    Total Time
    5 mins
     

    Orange Spiced Coffee is brewed with cinnamon, cloves, sugar, and orange marmalade! Top this delicious hot drink with whipped cream, to serve!

    Category: Beverage
    Cuisine: American
    Keyword: orange spiced coffee
    Servings: 4 (3/4 cup per serving)
    Calories Per Serving: 54 kcal
    Author: JB @ The Grateful Girl Cooks!
    Ingredients
    • cup ground coffee
    • ½ teaspoon ground cinnamon
    • teaspoon ground cloves
    • ¼ cup orange marmalade
    • 1 teaspoon granulated sugar
    • 3 cups water
    Optional Topping (but good!): whipped cream, orange zest
      Instructions
      1. Put ground coffee, cinnamon and cloves in a coffee filter. Pour 3 cups water into the well of the coffee maker, but do not turn the machine on yet!

      2. Add orange marmalade and sugar to the empty coffee pot.

      3. Turn coffee maker on and brew the coffee. As the pot fills with hot coffee, it will dissolve the marmalade and sugar, incorporating them into the brewed coffee.

      4. To serve, stir coffee, then pour ¾ cup of coffee into each of four small mugs. Taste the coffee. If you like sweeter coffee, stir in more sugar, to suit your taste. If desired, add whipped cream and orange zest to top each cup of coffee. If you enjoy your coffee black, leave off whipped cream and orange zest. Enjoy!

      Recipe Notes

      NOTE: Whipped cream garnish is NOT included in the caloric calculation as the amount you use may vary.

      Nutrition Facts
      Orange Spiced Coffee
      Amount Per Serving (1 serving (3/4 cup))
      Calories 54
      % Daily Value*
      Fat 0.01g0%
      Saturated Fat 0.003g0%
      Polyunsaturated Fat 0.01g
      Sodium 20mg1%
      Potassium 9mg0%
      Carbohydrates 14g5%
      Fiber 0.3g1%
      Sugar 13g14%
      Protein 0.1g0%
      Vitamin A 13IU0%
      Vitamin C 1mg1%
      Calcium 16mg2%
      Iron 0.1mg1%
      * Percent Daily Values are based on a 2000 calorie diet.

      Here’s one more to pin on your Pinterest boards!Orange Spiced Coffee is brewed with cinnamon, cloves, sugar, and orange marmalade! Top this delicious hot drink with whipped cream, to serve!