So, let’s just say this right off the bat… I don’t like “traditional” fruitcake. You know – the “door-stopper” kind, the unfortunate victim of many jokes. My Mom’s Refrigerator Fruitcake is not that kind of fruitcake. THIS fruitcake is chewy and tastes more like candy. Amen.
When I thought about what to name this post, I thought long and hard about calling it “fruitcake”, because many people despise fruitcake. My mom has been calling it fruitcake for as long as I can remember… BUT it tastes like candy!
Mom’s refrigerator fruitcake is chewy, and yes, it has bits of cherries, pineapple and raisins in it, but it also has marshmallows, butter, pecans and graham cracker crumbs. It is dense, chewy and AMAZING…and most importantly, is not baked, and tastes NOTHING like that other stuff. Oh yeah- it’s gorgeous, also (like stained glass)! If you can melt butter, chop things, and know how to stir, YOU can make this recipe!
Scroll Down For A Printable Recipe Card At the Bottom Of The Page
Here’s How To Make Mom’s Refrigerator Fruitcake
You will need candied cherries (red and green), plus some candied pineapple. These are sold in most grocery stores around the holidays. The containers look like this:

Chop up the red and green cherries, most of the pineapple and some pecans. Make sure to set aside a few red and green cherries (whole) to use for garnishing fruitcake later. Add the chopped fruit and pecans, along with raisins to a large bowl. Set it aside, and then admire it’s beauty!

Pulverize the graham crackers into very fine crumbs. I used a food processor, but you can put them in re-sealable bag and use a rolling pin to crush them, as well. Just think of it as cooking therapy! Set the graham cracker crumbs aside.


Get The Loaf Pans Prepared
Wrap 4 miniature loaf pans with aluminum foil. Note: My mom has always used empty juice cans to mold the fruitcake loaves (both ends removed, heavily buttered inside). I use aluminum foil covered mini-loaf pans.
Melt butter and really coat the inside surface of the foil (bottom AND sides). Cover it really well (to help prevent sticking). You will thank me. If using empty juice cans, no need to melt butter… just thoroughly coat entire inside of juice can with it. Set aside.

Making The Fruitcake
To make the fruitcake, melt 2 cubes (1 cup) of butter in a large, heavy bottomed stock pot.

Once butter has melted, add a 16 ounce bag of marshmallows, and cook on medium low, stirring frequently until melted.


Time To Add In All The GOOD Stuff!
When the marshmallows have fully melted, remove the pan from the heat. Add the candied fruit, nuts and raisins. Stir well to fully combine. This mixture WILL be thick. Just keep on stirring…


Now add the graham cracker crumbs, and stir well. Now it will be REALLY thick. Mix until totally combined!

It should look like this once your arms have gotten a great workout from stirring it up! All the ingredients should be combined, and Mom’s refrigerator fruitcake mixture will be THICK.

Divide The Fruitcake Mixture Into Prepared Loaf Pans
Divide the mixture evenly between containers while mixture is still warm. Pack it into the molds tightly to help shape the loaves. I find it really helpful to butter my fingers to help pack it in. Cover Mom’s refrigerator fruitcake with plastic wrap, and refrigerate at least 12 hours or overnight, to solidify the loaves.

Decorate And Serve Mom’s Refrigerator Fruitcake
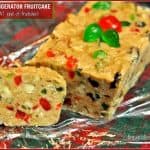
After refrigerating, carefully pull the fruitcake out of the pans and remove the foil. Mom’s refrigerator fruitcake should look like the fruitcake shown in the photo below. It will be a solid loaf.

Garnish each loaf with cherry halves like this, shown in the photo below. To serve, use a sharp knife to cut the fruitcake into thin slices. Yum! It is so good! Store Mom’s refrigerator fruitcake wrapped tightly in plastic wrap, in the refrigerator.

I really hope you will consider making this delicious Christmas “fruitcake”. I think you will be pleasantly surprised at just how GOOD it is and how much NOT LIKE FRUITCAKE it really is! Mom’s refrigerator fruitcake makes wonderful gifts for friends, as well. Merry Christmas!
Thank you for stopping by, and I hope you will come back again soon. Take care, and have a wonderful day!
Looking For More “Christmas Goodie” Recipes?
You can find all of my Christmas goodies in the Recipe Index, located at the top of the page. I have a LOT you will enjoy, including:
Interested In More Recipes?
Thank you for visiting this website. I appreciate you using some of your valuable time to do so. If you’re interested, I publish a newsletter 2 times per month (1st and 15th) with all the latest recipes, and other fun info. I would be honored to have you join our growing list of subscribers, so you never miss a great recipe!
There is a Newsletter subscription box on the top right side (or bottom) of each blog post, depending on the device you use, where you can easily submit your e-mail address (only) to be included in my mailing list.
You Can Also Find Me On Social Media:
Facebook page: The Grateful Girl Cooks!
Pinterest: The Grateful Girl Cooks!
Instagram: jbatthegratefulgirlcooks

Recipe Source: My Mom (she’s been making this for over 50 years… have NO IDEA where she got this recipe!)
Refrigerated, non-baked, non-traditional fruitcake, with pecans, cherries, pineapple, marshmallows, and graham crackers. This is more like CANDY!
Category: Dessert
Cuisine: American
Keyword: refrigerator fruitcake
Servings: 24 4 mini-loaves total
Calories Per Serving: 363 kcal
Author: JB @ The Grateful Girl Cooks!
- 1 (8 oz.) container red candied cherries (chopped-but save a few whole ones for garnish)
- 1 (8 oz.) container green candied cherries (chopped-but save a few whole ones for garnish)
- 1 (8 oz.) container candied pineapple, chopped
- 16 ounce bag mini marshmallows (or 48 large marshmallows)
- 1 cup raisins
- 1 1/2 cups chopped pecans (or walnuts)
- 2 cubes butter (one cup total)
- graham crackers (3 "sleeves" of graham crackers-1 pound)
- Additional butter for "greasing" loaf pans.
Have all ingredients chopped, crushed, etc. before beginning recipe. Line loaf pans with aluminum foil (completely cover bottom and sides). Butter the bottom and side of each foil covered loaf pan with butter. Do not skimp on this part. A well buttered loaf pan will help the foil to NOT stick to the fruitcake at the end when ready to remove it! Set aside pans and prepped ingredients.
Melt 2 cubes butter in a large heavy bottomed saucepan.
Add marshmallows; continue heating (and stirring) on medium low heat until marshmallows are fully melted. Remove from heat.
Add red and green cherries, pineapple, raisins, and nuts. Stir well.
Add graham cracker crumbs. Stir really well, until all ingredients are fully combined (mixture will be very thick).
Divide the mixture evenly (while still warm) into 4 prepared mini-loaf pans. Butter your fingers, press down and tightly compact the mixture into the loaf pan. When done (and mixture is tightly packed into pans), cover the pans with plastic wrap, and refrigerate for at least 12 hours. When done, remove each loaf from pan. Carefully remove aluminum foil. Garnish top of each fruitcake with half a red cherry and two halves green cherries.
Slice with sharp knife into thin slices, serve and enjoy! Store fruitcakes in plastic wrap (in the refrigerator).
Each mini loaf = 6 slices. Prep time does NOT include 12 hours refrigeration necessary to solidify and firm up the fruitcake!
If using juice cans as forms for fruitcake, butter insides very well with softened butter. No aluminum foil necessary!
Nutrition Facts
Mom's Refrigerator Fruitcake (it's not THAT kind of fruitcake!)
Amount Per Serving (1 slice)
Calories 363 Calories from Fat 126
% Daily Value*
Fat 14g22%
Saturated Fat 5g31%
Cholesterol 20mg7%
Sodium 208mg9%
Potassium 113mg3%
Carbohydrates 57g19%
Fiber 2g8%
Sugar 31g34%
Protein 2g4%
Vitamin A 240IU5%
Vitamin C 1.7mg2%
Calcium 29mg3%
Iron 1.3mg7%
* Percent Daily Values are based on a 2000 calorie diet.
Here’s one more to pin on your Pinterest boards!
Save
Save
Save


