Pecan Praline Yams are a yummy Thanksgiving tradition! Canned yams, baked with brown sugar, coconut, butter & pecans are an easy side dish for a family feast! 
Wow… Thanksgiving is just around the corner. Time to start thinking about turkey, dressing, potatoes and the other traditional side dishes that will be prepared, including these amazing Pecan Praline Yams, baked with brown sugar, coconut, butter and pecans!
Scroll Down For A Printable Recipe Card At The Bottom Of The Page
Family Holiday Traditions
I grew up having yams (or sweet potatoes) at every single Thanksgiving meal. My mom (a Texas girl) always made the yams the same way a lot of people from the South eat them. The yams (or sweet potatoes) were mashed, and served with marshmallows melted on the top. I thought they were okay, but they weren’t anything I couldn’t live without at Thanksgiving.
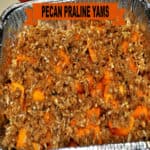
THESE Pecan Praline Yams are a far different story. They have become one of my favorite parts of our Thanksgiving meal since I began making them about 15 years ago! Now these absolutely delicious praline yams are a favorite family holiday tradition! Here they are, fresh pecan praline yams, straight out of the oven. It’s even a double batch!

How I Found The Original Recipe
I originally found the recipe many years ago on a large can of Princella Yams. This is a name brand with the big cans of yams you can find at most any grocery store. I decided to try the recipe printed on the can just to see if they were any good. Believe me, they are delicious!
Praline Yams are topped with chopped pecans, butter, brown sugar, and coconut! It all bakes together to form a sweet little crust on top of the yams. Oh My Goodness. These praline yams are so very good. See how the ingredients form a nice crumbly crust on top of the yams once baked? Yum.

We Serve Pecan Praline Yams At Thanksgiving!
This recipe is ridiculously quick to prepare, and I think that’s fantastic, especially with all the other traditional dishes I make for Thanksgiving. You can prepare this recipe and have it in the oven in practically no time.
We enjoy traditional dishes, like Whole Berry Cranberry Orange Sauce, Homemade Dinner Rolls, Toll House Pie, Rainbow Jello Salad and Mom’s Famous Cream Cheese Ball. You might also want to try my recipes for Candied Sweet Potatoes, Quick Easy Cornbread Stuffing, or Lemon Hazelnut Green Beans.

These pecan praline yams are always served alongside other family traditional Thanksgiving “must haves”. This particular year we also had a lime jello salad made with a twist from this recipe.

I sure hope you will give these pecan praline yams a try… we LOVE them! You’re gonna enjoy serving these at your holiday meal (or any meal), alongside YOUR favorite family recipes! Thanks for stopping by, and I hope you will come back soon.
Looking For More VEGGIE Recipes?
You can find ALL of my recipes in the Recipe Index, located at the top of the page. I have many delicious veggie recipes for you to enjoy, including:
Interested In More Recipes?
Thank you for visiting this website. I appreciate you using some of your valuable time to do so. If you’re interested, I publish a newsletter 2 times per month (1st and 15th) with all the latest recipes, and other fun info. I would be honored to have you join our growing list of subscribers, so you never miss a great recipe!
There is a Newsletter subscription box on the top right side (or bottom) of each blog post, depending on the device you use, where you can easily submit your e-mail address (only) to be included in my mailing list.
You Can Also Find Me On Social Media:
Facebook page: The Grateful Girl Cooks!
Pinterest: The Grateful Girl Cooks!
Instagram: jbatthegratefulgirlcooks
 Original recipe source: Printed on can of Princella Yams!
↓↓ PRINTABLE RECIPE BELOW ↓↓
- 29 oz. can of yams , drained (this is the large size can)
- 1/3 cup chopped pecans
- 1/3 cup coconut
- 1/3 cup packed brown sugar
- 3 Tablespoons all purpose flour
- 3 Tablespoons butter , melted
- Preheat oven to 350 degrees.
- Place drained yam pieces into an ungreased casserole dish in a single layer (8x8 - use 9x13 if doubling this recipe).
- In a small bowl, mix the remaining ingredients together. Sprinkle the crumbly mixture over the top of the yams, to cover.
Bake, uncovered, at 350°F. for 35 - 40 minutes. Serve while hot, and enjoy!
This recipe is EASILY doubled. It is also perfectly good to bake ahead of time, then cover with foil and reheat before serving. This sure helps on a busy day of food prep for a Thanksgiving meal.
Here’s one more to pin on your Pinterest boards!


 are creamy, rich and decadent. With only 5 ingredients, and so easy to make, what's not to love? / The Grateful Girl Cooks!")


 are creamy, rich and decadent. With only 5 ingredients, and so easy to make, what's not to love? / The Grateful Girl Cooks!")


