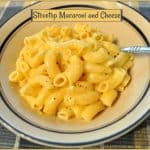
Category: Main Dishes

Southwest Steak Salad w/ Avocado & Cilantro Dressing

Southwest Steak Salad is a main course salad, with romaine lettuce, steak, tomatoes, avocadoes, beans & peppers in avocado cilantro dressing.Southwest Steak Salad is a main course salad, with romaine lettuce, steak, tomatoes, avocadoes, beans & peppers in avocado cilantro dressing.
As I write this post, I am still savoring the memory of the delicious Southwest Steak Salad with Avocado & Cilantro Dressing my husband and I enjoyed for dinner last evening! It was absolutely delicious! We had leftover grilled steak  and I decided to see what I could do with it. I found a recipe on Pinterest that sounded great, gave it a try, and it was a fantastic main course salad.

Romaine lettuce, thin slices of grilled steak, black beans, corn, sweet cherry tomatoes, and an absolutely amazing Avocado & Cilantro Salad Dressing that makes the salad PERFECT in Southwestern flavor!  THANK YOU to Krista, at Joyful Healthy Eats for this delicious recipe! I encourage you to check out her blog!

I used grilled steak this time, and next time I’m going to try it using grilled chicken breasts. Either would be fantastic in this salad! Whatever you use, steak or chicken, JUST MAKE SURE TO MAKE THE SALAD DRESSING. It is amazing  since it uses avocado as the main creamy ingredient. Let’s get those “healthy” fats in, okay?

Scroll Down For A Printable Recipe Card At The Bottom Of The Page

Grill The Steak And Make The Salad Dressing

Grill your steak or chicken either outdoors on a BBQ, or indoors on a grill. Let it rest a few minutes after it is finished cooking, then thinly slice it into strips. Set the steak aside.

Make the salad dressing by combining the dressing ingredients. They are avocado, cilantro, lime juice, red wine vinegar, olive oil, cumin and red pepper flakes.. Mix the salad dressing in a blender until smooth and creamy.

Ingredients gathered to make salad dressing for the Southwest steak salad.

This is what the lime cilantro salad dressing looked like right after removing it from my blender. It’s thick and creamy, and yummy! (I could eat it by the spoonful, but that’s an entirely different story!  Let’s NOT go there).

Creamy Avocado Cilantro Salad Dressing has been blended and is ready to use.

Put The Southwest Steak Salad Together And EAT!

Place the chopped romaine lettuce, orange bell peppers, corn, and black beans into two serving bowls or onto plates.

Romaine lettuce, corn, beans and orange bell peppers are the foundation for the salad.

Add warm, thin slices of steak (or chicken), cherry tomato halves, and the garnish the top of the Southwest steak salad with slices of avocado and cilantro leaves.

Avocado and steak slices are added to the top of the Southwest steak salad.

Spoon a big dollop of the salad dressing on top. Give it a big stir to combine, and dig in! You’re gonna LOVE this salad’s amazing Southwest flavors!

A dollop of avocado cilantro dressing tops the salad.

Really hope you will give this salad a try… we really enjoyed it, and were quite full afterwards!  Have a great day, and remember to be KIND. Everyone is facing a battle of some kind and YOU might be the one person to brighten their entire day!

Looking for More MAIN DISH SALAD Recipes?

You can find ALL my recipes in the Recipe Index, located at the top of the page. I have some wonderful main course salads you might enjoy, including:

Interested In More Recipes?

Thank you for visiting this website. I appreciate you using some of your valuable time to do soIf you’re interested, I publish a newsletter 2 times per month (1st and 15th) with all the latest recipes, and other fun info. I would be honored to have you join our growing list of subscribers, so you never miss a great recipe!
There is a Newsletter subscription box on the top right side (or bottom) of each blog post, depending on the device you use, where you can easily submit your e-mail address (only) to be included in my mailing list.

You Can Also Find Me On Social Media:
Facebook page: The Grateful Girl Cooks!
Pinterest: The Grateful Girl Cooks!
Instagram: jbatthegratefulgirlcooks

Author's signature

Recipe Source:  http://www.joyfulhealthyeats.com/southwestern-steak-salad-with-cilantro-avocado-dressing/

0 from 0 votes
Southwest Steak Salad w/ Avocado & Cilantro Dressing
Prep Time
15 mins
Cook Time
0 mins
Total Time
15 mins
 

Southwest Steak Salad is a main course salad, with romaine lettuce, steak, tomatoes, avocadoes, beans & peppers in avocado cilantro dressing.

Category: Main Course Salad
Cuisine: Southwest
Keyword: southwest steak salad, steak salad
Servings: 2 large servings
Calories Per Serving: 614 kcal
Author: JB @ The Grateful Girl Cooks!
Ingredients
For Salad Dressing:
  • 1 medium avocado
  • 1 cup fresh cilantro , chopped
  • 1/4 cup fresh lime juice
  • 1 Tablespoon red wine vinegar
  • 1 Tablespoon olive oil
  • 1/4 teaspoon red pepper flakes
  • 1/4 teaspoon cumin
  • 1/4 teaspoon Salt and Pepper , to taste
For Salad:
  • 6 ounces Ribeye steak , pre-grilled (with salt/pepper or Montreal seasoning), thinly sliced
  • 4 cups Romaine lettuce , chopped
  • 1/2 cup corn (canned, drained)
  • 1/2 cup black beans (canned, drained)
  • 1/2 cup orange bell pepper , diced
  • 1/2 medium avocado , peeled and thinly sliced (for garnish)
  • 1/4 cup cilantro leaves (chopped, for garnish)
Instructions
Prepare Salad Dressing:
  1. Prepare salad dressing by placing all ingredients except salt and pepper into a blender. Blend very well, until it is very smooth and creamy. Season with salt and pepper, to taste. (If it is too thick, you can thin it a bit by adding a tiny bit more olive oil and red wine vinegar). Set aside.
Prepare Salad:
  1. Place chopped lettuce onto serving plate. Top lettuce with corn and black beans; top this with orange bell peppers, thin slices of steak or chicken breast (quantity is your choice), cherry tomato halves. Garnish with chopped cilantro. Top with a large dollop of the salad dressing.
  2. Serve, and enjoy this great salad!
Recipe Notes

Note: Didn't add a cooking time, as it varies between steak or chicken. I used leftover grilled steak, so the prep time was minimal.

Nutrition Facts
Southwest Steak Salad w/ Avocado & Cilantro Dressing
Amount Per Serving (1 (1/2 of total))
Calories 614 Calories from Fat 378
% Daily Value*
Fat 42g65%
Saturated Fat 9g56%
Cholesterol 51mg17%
Sodium 365mg16%
Potassium 1583mg45%
Carbohydrates 39g13%
Fiber 17g71%
Sugar 6g7%
Protein 27g54%
Vitamin A 10425IU209%
Vitamin C 80.3mg97%
Calcium 72mg7%
Iron 4.8mg27%
* Percent Daily Values are based on a 2000 calorie diet.

Here’s one more to pin on your Pinterest boards!Southwest Steak Salad is a main course salad, with romaine lettuce, steak, tomatoes, avocadoes, beans & peppers in avocado cilantro dressing.


Save

Save

Santa Fe Chicken

You’ll love Santa Fe Chicken, with Tex-Mex seasoned baked chicken breasts and a crushed tortilla chip crust, salsa, avocados and Pepper Jack cheese!You'll love Santa Fe Chicken, with Tex-Mex seasoned baked chicken breasts and a crushed tortilla chip crust, salsa, avocados and Pepper Jack cheese!Anyone out there love a good Tex-Mex kick to their chicken? We sure do, which is why this Santa Fe Chicken tastes fantastic!

This easy to prepare dinner dish features baked, seasoned chicken breasts with a crushed tortilla chip coating. the chicken is covered with salsa, melted Pepper Jack cheese, and avocados! Can you say “YUM”???!

The recipe is very simple to prepare. I used two large chicken breasts and cut them horizontally in half, which gave me 4 thin chicken breasts, for 4 servings! My husband and I loved the flavor of the finished Santa Fe Chicken, and I hope you will, too!

Scroll Down for A Printable Recipe Card At The Bottom Of The Page

How To Make Santa Fe Chicken

First, preheat your oven to 400 degrees F.  Finely crush tortilla chips in your food processor (or crush in a sealable plastic storage bag, using a rolling pin or mallet to crumble). These crumbs will be the coating for the chicken, so you want them to be in small pieces.  Place the crumbs onto a dinner plate, and set it aside.

Crushed tortilla chips ready to coat Santa Fe chicken.


Prepare The Chicken

Season the boneless chicken breasts with salt, pepper, and a light sprinkling of cumin and garlic powder.

NOTE: If using whole chicken breasts, be sure to pound out the chicken with a mallet until it is about 1/4-1/2 inch thick. You can place the chicken breasts (one at a time) between two pieces of plastic wrap to do this, which will help minimize splatters. If you are using very large chicken breasts like I did, slice them horizontally in half (then no need to pound them).

Chicken breasts, lightly seasoned with salt, pepper and spices are used to make Santa Fe Chicken.
Coat each piece of chicken on both sides with mayonnaise – I know… weird, right? The mayonnaise helps keep the chicken very moist as it bakes. It also holds the tortilla chip crumbs onto the chicken! I was able to use my homemade mayonnaise to do this, which is why it has a slight yellow hue in the photo below.

Mayonnaise is brushed onto seasoned chicken breasts, to coat

Dredge each chicken breast in the tortilla chip crumbs on BOTH sides. You can use your fingers to help pack down the crumbs, if necessary.

Santa Fe chicken breasts are dredged in crushed tortilla chips, to coat.

Spray a casserole dish with non stick spray, then place the coated chicken breasts in the pan.

Chicken breasts with tortilla chip topping in white baking pan

Bake The Santa Fe Chicken

Bake Santa Fe chicken, uncovered, at 400 degrees for 20-25 minutes (or until chicken reaches internal temperature of 165 degrees). I baked mine for a total of 25 minutes. When done, remove the pan from the oven. Top each piece of chicken with salsa. I used the homemade salsa I canned last summer!

Baked Santa Fe chicken breasts are topped with salsa after baking.

Sprinkle the grated Pepper Jack cheese on top of the salsa. Place the Santa Fe chicken back into the oven and continue cooking for 5 more minutes (until the cheese has melted).

Grated Jack cheese is added to the salsa on top of Santa Fe chicken.

This is how it looked, right when it came out of the oven. Not sure if you’ll agree with me or not, but I think Santa Fe Chicken looks like a Tex-Mex version of Chicken Parmigiana!

Santa Fe Chicken with melted jack cheese out of oven.

Serving Santa Fe Chicken

To serve, garnish each piece of Santa Fe chicken with a couple slices of fresh avocado and some chopped cilantro. Garnishing the dish is optional, but it really adds additional flavor AND beautiful color to each serving! Flavor and color is a winning combo!

That’s it! See how easy it is to whip up this delicious Santa Fe Chicken dinner for 4? I really believe you will love the Tex-Mex flavor (and the tortilla chip crust) on these baked chicken breasts! Sure hope you will give them a try… I KNOW I will be making these again!

Santa Fe Chicken, garnished with avocado slices and cilantro and ready to eat!

Have a wonderful day, and may you KNOW today just how much you are loved by the One who created you! May God bless you in all you do today.

If you’re looking for additional chicken recipes with a Southwestern taste, you might want to check out my recipes for Chicken Enchilada Mole Casserole, Chili’s Chicken Enchilada Soup (a copycat recipe), or a delicious Layered Chicken Enchilada Casserole. I have LOTS of chicken recipes (of all kinds) on this blog. You can find them all, listed in the Recipe Index at the top of the page.

Interested In More Recipes?

Thank you for visiting this website. I appreciate you using some of your valuable time to do soIf you’re interested, I publish a newsletter 2 times per month (1st and 15th) with all the latest recipes, and other fun info. I would be honored to have you join our growing list of subscribers, so you never miss a great recipe!
There is a Newsletter subscription box on the top right side (or bottom) of each blog post, depending on the device you use, where you can easily submit your e-mail address (only) to be included in my mailing list.

You Can Also Find Me On Social Media:
Facebook page: The Grateful Girl Cooks!
Pinterest: The Grateful Girl Cooks!
Instagram: jbatthegratefulgirlcooks

Author's signature

Recipe Adapted From:  http://www.cinnamonspiceandeverythingnice.com/santa-fe-baked-chicken/

0 from 0 votes
Santa Fe Chicken
Prep Time
10 mins
Cook Time
25 mins
Total Time
35 mins
 

You'll love Santa Fe Chicken, with Tex-Mex seasoned baked chicken breasts and a crushed tortilla chip crust, salsa, avocados and Pepper Jack cheese!

Category: Entree
Cuisine: Southwest
Keyword: Santa Fe chicken
Servings: 4 servings
Calories Per Serving: 691 kcal
Author: JB @ The Grateful Girl Cooks!
Ingredients
  • 4 boneless skinless chicken breasts (or 2 large breasts, cut in half horizontally!)
  • Salt and black pepper
  • Cumin (to sprinkle on chicken breasts)
  • Garlic powder (to sprinkle on chicken breasts)
  • 1/2 cup mayonnaise (can substitute olive oil, if necessary)
  • 1 + 1/2 cups tortilla chip crumbs (chips processed in food processor or pounded in plastic sealable bag)
  • 1 + 1/3 cups salsa
  • 1 + 1/3 cups grated Pepper Jack Cheese (may substitute sharp cheddar)
  • 1/3 cup chopped fresh cilantro
  • 1 ripe avocado , peeled and thinly sliced
Instructions
  1. Preheat oven to 400 degrees F. Spray a casserole dish with non stick spray (or use parchment paper on bottom of pan).
  2. Finely crush tortilla chips by processing them in a food processor (or in large plastic sealable bag using a meat mallet or rolling pin) until they are small crumbs. Place crumbs onto a dinner plate. Set aside.

  3. If using 4 chicken breasts, pound them down to about 1/4-1/2 inch thickness by placing them between sheets of plastic wrap. Use a meat mallet to pound them out. If using 2 large breasts, cut them in half horizontally (no need to pound them down thinner). Lightly season each piece of chicken with salt, pepper, cumin, and garlic powder.

  4. Spread mayonnaise onto both sides of each piece of chicken (one at a time), then dredge mayonnaise coated chicken in tortilla chip crumbs, turning to coat both sides. Use your fingers to press on additional crumbs, if necessary.

  5. Bake chicken (uncovered) in 400 degree oven for 20-25 minutes. When done, chicken should have reached an internal temperature of 165 degrees.

  6. Remove pan from oven. Spoon salsa over top of each chicken breast, followed by grated Pepper Jack cheese. Place chicken back in oven for an additional 5 minutes, until cheese has melted. Remove from oven. Serve chicken with a garnish of avocado slices and chopped cilantro. Enjoy!

Recipe Notes

To thinly slice avocado... cut in half, remove seed. Run a large spoon under and around avocado half and remove entire half of avocado in one piece. Thinly slice. Caloric calculation does NOT include avocado garnish.

Nutrition Facts
Santa Fe Chicken
Amount Per Serving (1 piece)
Calories 691 Calories from Fat 405
% Daily Value*
Fat 45g69%
Saturated Fat 12g75%
Cholesterol 116mg39%
Sodium 1283mg56%
Potassium 781mg22%
Carbohydrates 34g11%
Fiber 3g13%
Sugar 4g4%
Protein 37g74%
Vitamin A 830IU17%
Vitamin C 3.3mg4%
Calcium 380mg38%
Iron 2.1mg12%
* Percent Daily Values are based on a 2000 calorie diet.

Here’s one more to pin on your Pinterest boards!You'll love Santa Fe Chicken, with Tex-Mex seasoned baked chicken breasts and a crushed tortilla chip crust, salsa, avocados and Pepper Jack cheese!

Save

Save

Spicy Fish Sandwich w/Chili Mayo

Spicy Fish Sandwich with Chili Mayo is a delicious meal, w/ pan-seared cod, peppery arugula and marinated cucumber strips, on a toasted roll!Spicy Fish Sandwich with Chili Mayo is an incredible meal, featuring pan-seared cod, peppery arugula and marinated cucumber strips, served on a toasted roll!
I made my hubby an amazing fish sandwich for dinner recently. It’s a Spicy Fish Sandwich with Chili Mayo recipe that I found on Pinterest. It was quite delicious, and I know this because I begged him for a couple bites! WOW- this fish sandwich tastes GREAT!

I found a piece of cod in our freezer that I wanted to use, so I fed the hubby AND tried a new recipe at the same time! It really DID taste good, and I will make it again (except this time I will make one for me, too!).  Here’s how you make this yummy fish sandwich (recipe is for 2 sandwiches):

Scroll Down For A Printable Recipe Card At The Bottom Of The Page

Prepare The Cucumber Topping

Thinly slice 1/2 of a cucumber lengthwise and add it to a bowl with some white wine vinegar and a small touch of sugar. I used a mandoline and julienned the cucumber into long thin strips, but you could also use a vegetable peeler and thinly slice the cucumber lengthwise to make wide “ribbons”. Once mixed, cover until ready to use on sandwich.

Cucumber is julienne sliced on a mandoline.

Thinly sliced cucumber for fish sandwich.

Make The Chili Mayo

Make the chili mayo by combining mayo and sweet chili sauce (I use Mae Ploy). Mix together and keep refrigerated until ready to use. Try to mix it up early in the day so flavors have time to mingle.

The chili mayo sauce does not have too much heat but just enough that I called this a spicy fish sandwich! If you like it hot, then by all means, simple add more chili sauce.

Making the chili mayo for the fish sandwich.

Chili mayo is ready for spicy fish sandwich!

Toast the Bread In A Skillet

Lightly toast a French bread roll in a skillet. (You can also broil it a bit, to toast the surface of the roll before adding the rest of the ingredients to it). A ciabatta roll would also be wonderful for the sandwich (per the original author). They have enough sturdiness to hold the ingredients without getting soggy.

Toasting french roll in skillet before making sandwich.

How To Cook The Fish

Mix up flour, smoked paprika, cumin, and dried thyme on a plate. Spread it out so you can dredge the piece of fish in it. This is enough spices for TWO pieces of fish. Dredge the fish in the spice/flour mixture, turning to coat it on both sides.

Flour and spices are mixed together for fish coating

Cod fillets are dredged in flour/spice mixture before cooking

Heat oil on medium high in non-stick skillet. Let it get hot, then place the piece (or pieces) of fish into the hot oil. DO NOT MOVE THE FISH after placing in the skillet initially (or it may stick). As it cooks for 2-3 minutes it will develop a “crust” on the bottom side and will be fine.

After 2-3 minutes, carefully turn the fish over and continue cooking for another 2-3 minutes, until done and golden brown.

Dredged fish is pan-seared in skillet for sandwich.

Pan-seared fish is cooked and ready to put on sandwich!

Putting The Spicy Fish Sandwich Together For Serving

To serve, slice the toasted rolls in half horizontally.  Spread a generous amount of the chili mayo sauce onto both sides of the toasted roll.

Chili mayo is spread on toasted french rolls for sandwich

Place some arugula leaves on top of the sauce on the bottom half of the roll, then place the cooked fish on top of the arugula.

Arugula and pan-seared fish are placed onto sandwich roll.

Add a generous helping of the sliced cucumbers (letting any juices drain off before adding). Top with the other half of the toasted roll, and serve!

Thinly sliced marinated cucumbers are added to spicy fish sandwich

Time To EAT!

Take a BIG bite! The seasoned, semi-crunchy fish, paired with peppery arugula, the crunch of marinated cucumbers, toasty roll, and the chili mayo combine to make this a WONDERFUL spicy fish sandwich!

Spicy Fish Sandwich w/Chili Mayo is served!

Sure hope you will give this spicy fish sandwich recipe a try! I know we will have this again in our home!  Have a wonderful day, friends. May you find moments of refreshment and encouragement throughout your day.

Looking for More SANDWICH Recipes?

You can find ALL my recipes in the Recipe Index, located at the top of the page. I have some delicious sandwich recipes, including:

Interested In More Recipes?

Thank you for visiting this website. I appreciate you using some of your valuable time to do soIf you’re interested, I publish a newsletter 2 times per month (1st and 15th) with all the latest recipes, and other fun info. I would be honored to have you join our growing list of subscribers, so you never miss a great recipe!
There is a Newsletter subscription box on the top right side (or bottom) of each blog post, depending on the device you use, where you can easily submit your e-mail address (only) to be included in my mailing list.

You Can Also Find Me On Social Media:
Facebook page: The Grateful Girl Cooks!
Pinterest: The Grateful Girl Cooks!
Instagram: jbatthegratefulgirlcooks

Author's signature

Recipe Source: http://www.olivemagazine.com/recipes/spicy-fish-burger-with-chilli-mayo/10084.html

0 from 0 votes
Spicy Fish Sandwich w/ Chili Mayo
Prep Time
10 mins
Cook Time
6 mins
Total Time
16 mins
 

Spicy Fish Sandwich with Chili Mayo is an incredible meal, featuring pan-seared cod, peppery arugula and marinated cucumber strips, served on a toasted roll!

Category: Sandwich
Cuisine: American
Keyword: spicy fish sandwich
Servings: 2 sandwiches
Calories Per Serving: 401 kcal
Author: JB @ The Grateful Girl Cooks!
Ingredients
For cucumbers and marinade:
  • 1/2 cucumber , sliced thinly lengthwise (using mandoline to julienne or veg. peeler to slice ribbons)
  • 1 teaspoon white wine vinegar
  • 1/3 teaspoon granulated sugar
For chili-mayo sauce:
  • 2 Tablespoons mayonnaise
  • 1 teaspoon sweet chili sauce (I used Mae Ploy), add more sauce to taste, if desired.
For fish:
  • 1 Tablespoon flour
  • 1/4 teaspoon smoky paprika
  • 1/4 teaspoon cumin
  • 1/4 teaspoon dried thyme
  • 2 Tablespoons oil
  • 2 pieces cod (bun sized)
  • 2 crusty French rolls or ciabatta rolls
  • Arugula (a small handful)
Instructions
  1. Prepare cucumbers, by thinly slicing or julienning into very thin strips lengthwise. Place in bowl with white wine vinegar and granulated sugar. Mix. Cover and set aside.
  2. Mix the mayonnaise and chili sauce together in a small container. Refrigerate until needed.
  3. Slice rolls in half. Lightly "toast" the cut sides of rolls in a dry skillet or under the broiler until slightly crispy. Set aside.
  4. Combine flour, paprika, cumin and thyme on a plate. Mix, then spread out on plate. Dredge the pieces of fish through the flour mixture, turning to coat both sides.
  5. Heat oil on medium-high in a non-stick skillet until hot. Carefully place the fish into the hot oil. Do not move the fish once in skillet or it might stick. It will form a crust as it cooks. Let fish cook for 2-3 minutes, then carefully turn fish over and continue cooking other side for 2-3 minutes, until done and golden brown.
  6. To assemble sandwich, slice rolls in half horizontally. Generously spread chili-mayo sauce on both sides of each sandwich roll. Place arugula on top of sauce on bottom of roll. Place fish on top of arugula. Place marinated cucumber slices (drain liquid first) on top of fish, then place top of roll on. Serve... and enjoy!
Nutrition Facts
Spicy Fish Sandwich w/ Chili Mayo
Amount Per Serving (1 sandwich)
Calories 401 Calories from Fat 180
% Daily Value*
Fat 20g31%
Saturated Fat 12g75%
Cholesterol 51mg17%
Sodium 442mg19%
Potassium 656mg19%
Carbohydrates 29g10%
Fiber 2g8%
Sugar 3g3%
Protein 25g50%
Vitamin A 460IU9%
Vitamin C 5mg6%
Calcium 84mg8%
Iron 2.4mg13%
* Percent Daily Values are based on a 2000 calorie diet.

Here’s one more to pin on your Pinterest boards!Spicy Fish Sandwich with Chili Mayo is an incredible meal, featuring pan-seared cod, peppery arugula and marinated cucumber strips, served on a toasted roll!


Save

Save

Save

Marinated Grilled Pork Chops

Marinated grilled pork chops feature thick boneless chops, seasoned in a light lemon juice, olive oil and herb marinade, then grilled to delicious perfection!Marinated grilled pork chops feature thick boneless chops, seasoned in a light lemon juice, olive oil and herb marinade, then grilled to delicious perfection!

I recently tried a new recipe for Marinated Grilled Pork Chops that I found online. Talk about EASY and tasty!!! Boneless pork chops are marinated in a simple sauce of lemon juice, olive oil and a few basic herbs, then are grilled and served to the “hungering mob”.  Easy!

I really think you will enjoy these easy to prepare pork chops. Here’s how to make them:

Scroll Down For A Printable Recipe Card At The Bottom Of The Page

Make The Marinade

The process couldn’t have been simpler! Here’s the ingredients for the simple marinade: Lemon juice, olive oil, garlic powder, basil, oregano, salt and pepper. (I was happy to be able to use dried basil and oregano from our garden as part of this marinade – note my “classy” labels on the jars! Ha Ha).

Spices are assembled to make marinade for pork chops

In a small bowl, add the ingredients for the marinade. (*Note: This recipe makes enough marinade for 6 servings. I only made 3 pork chops, since I was cooking only for my husband and myself, but still used the original amount of marinade as called for in the recipe).

Olive oil and herbs are used to make pork chop marinade.

Use a fork or whisk to completely blend these ingredients together. It will look like this.

Marinade is blended with a fork for pork chops.

Marinate The Pork Chops

Place the pork chops in a container (with a lid) or a large sealable freezer bag. I used a bag, then placed it in a bowl (to stabilize bag and to catch any leakage). Pour the marinade over the pork chops, squishing the bag around to coat all pieces with marinade.

Lemon marinade is poured over pork chops in resealable bag.

Let the chops marinade for several hours in the refrigerator. (I made mine up early in the morning and let them soak in the marinade all day). The olive oil will congeal after several hours refrigeration, but take the chops out of fridge about 30 minutes before grilling, and it will return to a liquid stage, as it warms up.

Pork chops marinade in sauce in refrigerator for a couple hours.

Cooking Marinated Grilled Pork Chops

When ready to cook, preheat your BBQ grill (or indoor grill) on medium-high heat.  Discard the extra marinade from the bag. Grill the pork chops for 5-7 minutes per side. Don’t overcook the chops (or they will be DRY).

Once done, the marinated grilled pork chops should have reached an internal temperature of 145 degrees (you can check with a meat thermometer if you have one). My husband grilled these outside on our Weber BBQ, and they were full of smoky flavor!

Remove the pork chops from the grill and let them sit for about 5 minutes to let the juices redistribute. After that, serve them to the ones you love, and enjoy this simple to prepare main dish. It’s a perfect recipe for summertime, when you don’t want to heat up the kitchen!

Marinated grilled pork chops are served with fruit, asparagus, and potatoes.

Have a wonderful day! Think of someone you might encourage with a kind word or deed today… they may need that boost of encouragement more than you thought!

Looking For More PORK CHOP Recipes?

You can find ALL my recipes in the Recipe Index, located at the top of the page. I have some really delicious pork chop recipes, including:

Interested In More Recipes?

Thank you for visiting this website. I appreciate you using some of your valuable time to do soIf you’re interested, I publish a newsletter 2 times per month (1st and 15th) with all the latest recipes, and other fun info. I would be honored to have you join our growing list of subscribers, so you never miss a great recipe!
There is a Newsletter subscription box on the top right side (or bottom) of each blog post, depending on the device you use, where you can easily submit your e-mail address (only) to be included in my mailing list.

You Can Also Find Me On Social Media:
Facebook page: The Grateful Girl Cooks!
Pinterest: The Grateful Girl Cooks!
Instagram: jbatthegratefulgirlcooks

Author's signature

Recipe Source: http://www.spendwithpennies.com/lemon-herb-grilled-pork-chops/

0 from 0 votes
Marinated Grilled Pork Chops
Prep Time
5 mins
Cook Time
15 mins
Total Time
20 mins
 
Marinated grilled pork chops feature thick boneless chops, seasoned in a light lemon juice, olive oil and herb marinade, then grilled to delicious perfection!
Category: Entree
Cuisine: American
Keyword: marinated grilled pork chops
Servings: 6 servings
Calories Per Serving: 256 kcal
Author: JB @ The Grateful Girl Cooks!
Ingredients
  • 1/2 lemon , juiced
  • 4 Tablespoons olive oil
  • 2 Tablespoons water
  • 1/2 teaspoon garlic powder
  • 1/4 teaspoon dried basil
  • 1/4 teaspoon dried oregano
  • Salt and pepper , to taste
  • 6 boneless pork chops (about 1 " thick)
Instructions
  1. Mix marinade ingredients in a small bowl until fully blended.
  2. Place pork chops in a large sealable freezer bag (or a large container with lid). Pour marinade over the chops. Squish bag around to fully cover the chops, then marinade in refrigerator for at least 2-3 hours.
  3. Remove bag with pork chops from fridge about 30 minutes prior to grilling. Preheat grill on medium-high heat. 

  4. Remove chops from bag (discard marinade) and place on pre-heated grill. Grill pork chops for 5-7 minutes per side, or until the pork reaches an internal temperature of 145 degrees. Do not overcook the chops or they will be DRY.
  5. When chops are done, remove them from heat, and let them sit for 5-6 minutes, to allow the juices time to redistribute inside the meat. Serve, and enjoy!

Recipe Notes

Please note that prep time does not include the minimum of 2-3 hours marinating time.

Nutrition Facts
Marinated Grilled Pork Chops
Amount Per Serving (1 pork chop)
Calories 256 Calories from Fat 117
% Daily Value*
Fat 13g20%
Saturated Fat 2g13%
Cholesterol 88mg29%
Sodium 66mg3%
Potassium 531mg15%
Carbohydrates 1g0%
Protein 30g60%
Vitamin C 4.8mg6%
Calcium 9mg1%
Iron 0.9mg5%
* Percent Daily Values are based on a 2000 calorie diet.

Here’s one more to pin on your Pinterest boards!Marinated grilled pork chops feature thick boneless chops, seasoned in a light lemon juice, olive oil and herb marinade, then grilled to delicious perfection!


Save

Save

Grilled Chicken & Spring Greens w/ Raspberry Balsamic Dressing

I had the best salad the other day for lunch! I was intent on making a healthy lunch, and I came up with this Grilled Chicken & Spring Greens with Raspberry Balsamic Dressing! And let me tell you… I loved every single bite (and crunch, thanks to the sunflower seeds)!Grilled Chicken & Spring Greens w Raspberry Balsamic Dressing / The Grateful Girl Cooks!

This was such an easy salad to put together! I pre-grilled the chicken early in the morning (on my handy-dandy indoor grill… Thanks, George Foreman!), so all that was involved at lunch time was to assemble the salad and whip up some dressing (under a minute).

I used some Raspberry Balsamic Vinegar that I had previously purchased at a specialty shop on the Oregon coast, but in case you don’t happen to have any just laying around waiting to be used, I have seen numerous “flavored” balsamic vinegars at local grocery stores.

Here’s a picture I took at a Flavored Olive Oil and Balsamic Vinegar tasting shop I visited with a friend, in downtown Seattle last summer (so fun to sample different flavors!). I left there with bottles of dark chocolate balsamic vinegar and blood orange olive oil- put the two together…oh my crazy goodness!

Grilled Chicken & Spring Greens w Raspberry Balsamic Dressing / The Grateful Girl Cooks!

It’s fun to experiment with different flavored balsamic vinegars…they are slightly thick and sweet! I have several flavors, including peach & cinnamon, dark chocolate, and my beloved raspberry! YUM.  If you don’t have access to “flavored” balsamic vinegar, rest assured…you can easily substitute regular aged balsamic vinegar in the dressing, and it will still taste great!

I like to make extra and keep grilled chicken on hand for last minute salads, quesadillas, tacos, etc., but if you don’t, here’s what you do. Slice a large chicken breast in half horizontally, then sprinkle it lightly on one side with garlic powder, coarse black pepper, celery salt, and seasoning salt.  Then grill it, bake it or broil it… whatever technique you prefer, and let the chicken cool down a bit (so it’s warm) before slicing it into thin strips and adding it to your salad.

Make The Salad Dressing

To make the salad dressing, mix equal parts balsamic vinegar and olive oil until completely blended, then add a tiny bit of salt and pepper, to taste. For one salad, I mixed 2 teaspoons olive oil and 2 teaspoons balsamic vinegar (& had some leftover!)

Grilled Chicken & Spring Greens w Raspberry Balsamic Dressing / The Grateful Girl Cooks!

I assembled chilled Spring Greens on a plate, added fresh raspberries, then sprinkled it with roasted sunflower seeds. I thinly sliced the warm grilled chicken breast, placed it on the top of the salad, then lightly drizzled the Raspberry Balsamic dressing over the top.

I am not posting an official “printable recipe”, because it’s really a simple salad to prepare, especially if you want to add other ingredients to make it “your own”.   I have highlighted the directions in blue (see above), for your convenience, however.

Be creative!  I’ve even used a Peach/Cinnamon balsamic to make this salad, as well. Just substitute fresh peach slices for the raspberries! Just arrange the salad, then drizzle with the dressing!

Grilled Chicken & Spring Greens w Raspberry Balsamic Dressing / The Grateful Girl Cooks!

I truly LOVE this salad (contemplating just how many times I can eat this before I ever get tired of it…), and hope you will consider making it. It’s a very healthy salad (protein, veggies, healthy oil, and fruit!)… and I trust you will LOVE it, too!

Have a fantastic day… may God bless you, and the work of your hands.

Here’s one more to pin on your Pinterest boards!Grilled Chicken & Spring Greens w Raspberry Balsamic Dressing / The Grateful Girl Cooks!

Interested In More Recipes?

Thank you for visiting this website. I appreciate you using some of your valuable time to do soIf you’re interested, I publish a newsletter 2 times per month (1st and 15th) with all the latest recipes, and other fun info. I would be honored to have you join our growing list of subscribers, so you never miss a great recipe!

There is a Newsletter subscription box on the top right side (or bottom) of each blog post, depending on the device you use, where you can easily submit your e-mail address (only) to be included in my mailing list.

You Can Also Find Me On Social Media:
Facebook page: The Grateful Girl Cooks!
Pinterest: The Grateful Girl Cooks!
Instagram: jbatthegratefulgirlcooks

Grilled Chicken & Spring Greens w/ Raspberry Balsamic Dressing

Save

Save

Chicken Marsala – “21 Day Fix” Recipe

I recently found this recipe for Chicken Marsala that is compliant with the “21 Day Fix” clean eating program. I found it to be full of flavor, easy to prepare, and a dish I would make again.Chicken Marsala - "21 Day Fix" Recipe / The Grateful Girl Cooks!
This recipe features sautéed baby portabella mushrooms, with shallots and garlic, served alongside pan browned chicken breast slices, in a light, slightly creamy sauce. Here’s how you make it:

Melt a small amount of coconut oil in a medium skillet on low to medium heat. Add sliced baby portabella mushrooms and sauté them for about 8 minutes, stirring occasionally.

Chicken Marsala - "21 Day Fix" Recipe / The Grateful Girl Cooks!

Once mushrooms are cooked, add Marsala wine, chopped shallots and minced garlic. Let this mixture simmer for about 15 minutes, until the wine reduces quite a bit. Stir the mixture occasionally.

Chicken Marsala - "21 Day Fix" Recipe / The Grateful Girl Cooks!

It will look like this when it’s just about done.

Chicken Marsala - "21 Day Fix" Recipe / The Grateful Girl Cooks!

While the mushrooms are cooking, prepare the chicken. Slice chicken breasts thinly, then place chicken strips in a large bowl or ziploc bag, along with wheat flour and spices. Mix well, to fully coat the pieces of chicken.

Chicken Marsala - "21 Day Fix" Recipe / The Grateful Girl Cooks!

This is what the chicken pieces will look like, once coated.

Chicken Marsala - "21 Day Fix" Recipe / The Grateful Girl Cooks!

Shake off excess flour. In a large skillet, melt coconut oil and heat on medium. Once skillet is hot, add chicken pieces, and cook for 2-3 minutes per side, until the chicken is lightly browned on both sides.

Chicken Marsala - "21 Day Fix" Recipe / The Grateful Girl Cooks!

Once the chicken is cooked through and lightly browned, add the mushrooms and sauce.  Sprinkle with 1 teaspoon wheat flour and stir (nominal amount added to thicken sauce).

Add chicken broth and almond milk. Stir again, to fully combine. Let this simmer until fully heated through.

Chicken Marsala - "21 Day Fix" Recipe / The Grateful Girl Cooks!

Once heated through, sprinkle with chopped fresh parsley or dried parsley flakes, and serve!

Chicken Marsala - "21 Day Fix" Recipe / The Grateful Girl Cooks!

If following the 21 Day Fix Plan, the counts for this chicken dish is 1 Red, 1 Green, and 1 tsp. (The count for the wheat flour divided between 4 servings is so nominal it is not included).

I served the chicken with sides of green salad and quinoa. If NOT following this eating plan, just go right ahead and enjoy this dish! It really is quite tasty.

Chicken Marsala - "21 Day Fix" Recipe / The Grateful Girl Cooks!

Enjoy this delicious chicken dish. I know my husband and I sure did!  Don’t ya just love it when a “lighter” version of a classic dish also tastes just as great? Have a great day… look around… “there is ALWAYS something to be thankful for”!

Interested In More Recipes?

Thank you for visiting this website. I appreciate you using some of your valuable time to do soIf you’re interested, I publish a newsletter 2 times per month (1st and 15th) with all the latest recipes, and other fun info. I would be honored to have you join our growing list of subscribers, so you never miss a great recipe!
There is a Newsletter subscription box on the top right side (or bottom) of each blog post, depending on the device you use, where you can easily submit your e-mail address (only) to be included in my mailing list.

You Can Also Find Me On Social Media:
Facebook page: The Grateful Girl Cooks!
Pinterest: The Grateful Girl Cooks!
Instagram: jbatthegratefulgirlcooks

Chicken Marsala - "21 Day Fix" Recipe / The Grateful Girl Cooks!Recipe Source:  http://www.fitmomangelad.com/21-day-fix-chicken-marsala/

0 from 0 votes
Chicken Marsala - "21 Day Fix" Recipe
Prep Time
15 mins
Cook Time
30 mins
Total Time
45 mins
 
Enjoy this "lighter" version of Chicken Marsala, featuring baby portabella mushrooms, chicken, shallots, garlic and Marsala wine.
Category: Entree
Cuisine: French
Keyword: chicken marsala 21 day fix
Servings: 4 servings
Calories Per Serving: 316 kcal
Author: JB @ The Grateful Girl Cooks!
Ingredients
Cook mushroom sauce:
  • 1 Tablespoon coconut oil
  • 8 ounces baby portabella mushrooms (Baby Bella), sliced
  • 1/4 cup shallots , diced
  • 3 cloves garlic , minced
  • 3/4 cup Marsala wine
For chicken:
  • 1 pound boneless , skinless chicken breast, thinly sliced
  • 1/4 cup wheat flour
  • 1 teaspoon onion powder
  • 1 teaspoon garlic powder
  • 1 teaspoon oregano
  • 1 Tablespoon coconut oil
  • 1 teaspoon wheat flour
  • 2 Tablespoons almond milk
  • 1/2 cup chicken broth
  • Salt and pepper , to taste
  • Fresh parsley , chopped OR dried parsley flakes
Instructions
  1. Melt coconut oil in a medium skillet. Add chopped mushrooms and sauté for about 8 minutes. Add minced garlic, chopped shallots and Marsala wine. Let this mixture simmer for about 15 minutes, or until the wine has reduced quite a bit, stirring occasionally.
  2. While the mushrooms are cooking, place the chicken slices, along with 1/4 cup wheat flour, onion powder, garlic powder, and oregano into a large bowl or ziploc bag. Stir or shake to fully coat the chicken pieces with spices.
  3. Heat 1 Tablespoons coconut oil in separate large skillet on medium heat. Shaking off excess flour, place chicken pieces into skillet. Cook for 2-3 minutes per side, until lightly browned and cooked through.
  4. Once chicken is cooked through, add the mushrooms and sauce. Sprinkle mixture with 1 teaspoon wheat flour. Stir to combine. Add almond milk and chicken broth; let this simmer for a few minutes until fully heated through.
  5. Garnish with fresh chopped parsley, or dried parsley flakes. Serve and enjoy!
Recipe Notes

21 Day Fix counts: 1 Red, 1 Green, 1 teaspoon (wheat flour is so nominal once divided into 4 servings, that is is not added to count).

Nutrition Facts
Chicken Marsala - "21 Day Fix" Recipe
Amount Per Serving (1 serving)
Calories 316 Calories from Fat 90
% Daily Value*
Fat 10g15%
Saturated Fat 6g38%
Cholesterol 72mg24%
Sodium 269mg12%
Potassium 708mg20%
Carbohydrates 16g5%
Fiber 1g4%
Sugar 5g6%
Protein 26g52%
Vitamin A 35IU1%
Vitamin C 4.1mg5%
Calcium 30mg3%
Iron 1.3mg7%
* Percent Daily Values are based on a 2000 calorie diet.

Here’s one more to pin on your Pinterest boards!Chicken Marsala - "21 Day Fix" Recipe / The Grateful Girl Cooks!


Save

Shrimp, Quinoa & Veggie Bowl

Make a delicious, filling shrimp quinoa veggie bowl, an all-in-one meal with cajun seasoned shrimp, fluffy quinoa, Swiss chard, onions, and colorful bell peppers. Make a delicious, filling shrimp quinoa veggie bowl, an all-in-one meal with cajun seasoned shrimp, fluffy quinoa, Swiss chard, onions, and peppers.
Looking for a healthy, yummy, complete meal? How about this Shrimp, Quinoa & Veggie Bowl?  Easy to prepare, and delicious… you’ll be eating a nutritious dinner in no time at all!

This really is a healthy all-in-one meal… pan seared shrimp and seasoning, super-food quinoa, and a few healthy (and colorful) veggies round off this easy dish. I simply put together a few ingredients I love, to create this one bowl meal.

If you can juggle cooking quinoa, and sautéing veggies and shrimp all at the same time, this dish will be ready in about 15-17 minutes… yay for multi-tasking! If not, no biggie- it will just take a few minutes longer to prepare.  Here’s how you make it:

Scroll Down For A Printable Recipe Card At The Bottom Of The Page

Cook The Quinoa

First, rinse quinoa and drain, then cook according to package instructions. (Optional- If you wish to add a bit more flavor to the quinoa, add a large chicken bouillon cube to the water before cooking- I did this!)

The quinoa is cooked according to package directions.

This is what the quinoa looks like, when done.

Fluffy cooked quinoa is ready to use in the shrimp quinoa veggie bowl.

Cook The Veggies

While the quinoa is cooking, cook the veggies. Heat 1 teaspoon olive oil in a skillet. Sauté the onion, Swiss chard STEMS (set the chopped leaves aside), and bell peppers (I used red, orange, and green for color) for 2-3 minutes.

Add the chopped Swiss chard leaves and cook for an additional minute. The reason to cook the Swiss chard stems and bell peppers first is to give them additional cooking time necessary to soften them before adding the chopped leaves (which wilt and cook quickly!).

Swiss chard, bell peppers and onions are cooked before adding to the dish.

Add sautéed veggies to the cooked quinoa; keep warm.

The cooked veggies are added on top of the cooked quinoa in a bowl.

Pan-Sear The Shrimp

While the quinoa was cooking, I also cooked the shrimp.  In a medium bowl, combine the shelled, cleaned and de-veined shrimp. Sprinkle with Cajun seasoning and a bit of dried parsley. Mix, to cover the shrimp with spices. Here they are before parsley was added.

Shrimp are peeled and de-veined, then lightly seasoned before cooking.

Heat 1 teaspoon olive oil in a skillet. Sauté the shrimp on medium heat for 2-3 minutes per side, or until pink and cooked through.

The seasoned shrimp are pan-seared in olive oil.

Time To Make The Shrimp Quinoa Veggie Bowl!

Mix the veggies and quinoa together. Reheat in microwave, if necessary. Place hot mixture into individual serving bowls.

Veggies and quinoa are mixed together in bowl.

Top the quinoa/veggie mixture with several of the pan-seared shrimp. Serve the shrimp quinoa veggie bowl while hot, and enjoy this healthy and filling meal!

The shrimp quinoa veggie bowl is ready to eat!

Hope you enjoy this shrimp quinoa veggie bowl. The recipe, as written, makes 2-3 main course servings, but can be easily doubled.  If you can multi-task like a champ, you can cook the veggies and shrimp while the quinoa is cooking, so you can easily assemble the finished bowl all at once!

If you don’t want to use Swiss chard, then substituting fresh spinach or cooked/chopped broccoli would be another option. You really can’t hurt this dish… just get creative in your kitchen, and make it your OWN!

Looking For More SHRIMP Recipes?

You can find all of my shrimp recipes in the Recipe Index, located at the top of the page. I have some really delicious recipes, including:

Interested In More Recipes?

Thank you for visiting this website. I appreciate you using some of your valuable time to do soIf you’re interested, I publish a newsletter 2 times per month (1st and 15th) with all the latest recipes, and other fun info. I would be honored to have you join our growing list of subscribers, so you never miss a great recipe!
There is a Newsletter subscription box on the top right side (or bottom) of each blog post, depending on the device you use, where you can easily submit your e-mail address (only) to be included in my mailing list.

You Can Also Find Me On Social Media:
Facebook page: The Grateful Girl Cooks!
Pinterest: The Grateful Girl Cooks!
Instagram: jbatthegratefulgirlcooks

Author's signature

0 from 0 votes
Shrimp, Quinoa & Veggie Bowl
Prep Time
5 mins
Cook Time
15 mins
Total Time
20 mins
 

Make a delicious, filling shrimp quinoa veggie bowl, an all-in-one meal with cajun seasoned shrimp, fluffy quinoa, Swiss chard, onions, and peppers.

Category: Entree
Cuisine: American
Keyword: shrimp quinoa veggie bowl
Servings: 3 servings
Calories Per Serving: 230 kcal
Author: JB @ The Grateful Girl Cooks!
Ingredients
For quinoa:
  • 1/2 cup quinoa , rinsed
  • 1 cup water
  • 1 large chicken bouillon cube (optional, but helps to add flavor to quinoa)
For veggies:
  • 1 teaspoon olive oil
  • 3/4 cup bell peppers , chopped (I used red, orange and green for COLOR!)
  • 1/4 cup chopped onion (brown onion)
  • 2 cups Swiss Chard , separated (chop stems & set aside) (chop leaves & set aside)
For shrimp:
  • 1 teaspoon olive oil
  • 1/2 pound medium shrimp (shelled and de-veined)
  • 1 teaspoon Cajun seasoning
  • 1/2 teaspoon dried parsley flakes
Instructions
  1. Rinse, then drain quinoa. Cook, according to package directions, adding chicken bouillon to the cooking water for flavor, if desired. When done, set aside and keep warm.
  2. Heat 1 teaspoon olive oil in skillet on medium heat. Add chopped onion, Swiss Chard STEMS, and bell peppers. Cook 2-3 minutes until stems have softened. Add chopped Swiss Chard LEAVES, and cook for an additional minute or until leaves have wilted and are cooked through (leaves will cook quickly). Add veggies to quinoa and keep warm.
  3. Sprinkle shrimp with Cajun spice and dried parsley flakes. Toss to coat shrimp with spices. Heat 1 teaspoon olive oil in skillet. When hot, add shrimp. Cook shrimp on medium heat for 2-3 minutes per side, or until pink and fully cooked through.
  4. Mix veggies and quinoa together. Reheat in microwave, if necessary. Place hot quinoa/veggie mixture into individual serving bowls. Top with shrimp. Serve hot... and enjoy!
Nutrition Facts
Shrimp, Quinoa & Veggie Bowl
Amount Per Serving (1 g)
Calories 230 Calories from Fat 45
% Daily Value*
Fat 5g8%
Cholesterol 190mg63%
Sodium 965mg42%
Potassium 424mg12%
Carbohydrates 23g8%
Fiber 3g13%
Sugar 2g2%
Protein 20g40%
Vitamin A 2965IU59%
Vitamin C 58.8mg71%
Calcium 135mg14%
Iron 3.6mg20%
* Percent Daily Values are based on a 2000 calorie diet.

Here’s one more to pin on your Pinterest boards!Make a delicious, filling shrimp quinoa veggie bowl, an all-in-one meal with cajun seasoned shrimp, fluffy quinoa, Swiss chard, onions, and peppers.


Save

Save

Macaroni and Cheese with Smoked Gouda and Spinach

Macaroni and cheese with smoked gouda, fresh spinach, and Parmesan cheese is a creamy, delicious comfort food meal!Macaroni and Cheese with Smoked Gouda and Spinach / The Grateful Girl Cooks!
My husband and I tried a new recipe a few weeks ago for “Macaroni and Cheese with Smoked Gouda and Spinach”. Let me tell you… it was a fantastic, flavorful, “meatless” dinner, and must be totally “HEALTHY” because it has spinach in it, right? (snicker, snicker)

It actually was very delicious and EASY to prepare! I found the recipe online and played around with it just a bit to suit our taste buds, and boom! Macaroni and Cheese with ATTITUDE! Here’s how easy it is to make:

Preheat your oven to 350 degrees. Cook and drain macaroni noodles, according to the package directions (then set aside).  Melt butter in a large skillet on medium heat. Add chopped green onion; cook & stir for a couple minutes, then add minced garlic and cook for one more minute.

Macaroni and Cheese with Smoked Gouda and Spinach / The Grateful Girl Cooks!

Stir (or whisk) in flour. Continue cooking for one minute.

Macaroni and Cheese with Smoked Gouda and Spinach / The Grateful Girl Cooks!

Add in half and half and milk, stirring continuously. Turn the heat on the stove up to medium-high. While stirring, bring the mixture to a boil. Continue stirring. This should take several minutes. The sauce will thicken and smooth out.

Macaroni and Cheese with Smoked Gouda and Spinach / The Grateful Girl Cooks!

Once the sauce for the macaroni and cheese has come to a boil and has thickened (see photo below), add salt and pepper, to taste.

Macaroni and Cheese with Smoked Gouda and Spinach / The Grateful Girl Cooks!

Turn heat down to medium-low. Stir in the smoked Gouda and freshly grated Parmesan cheeses. Mix well to melt cheeses.

Macaroni and Cheese with Smoked Gouda and Spinach / The Grateful Girl Cooks!

Once cheese has melted, add in the chopped spinach and the cooked and drained macaroni noodles. Stir to combine.

Macaroni and Cheese with Smoked Gouda and Spinach / The Grateful Girl Cooks!

Once the macaroni and cheese is fully mixed, taste the sauce. If necessary, add additional salt and pepper, to suit your taste.

Macaroni and Cheese with Smoked Gouda and Spinach / The Grateful Girl Cooks!

Spray a 2 quart baking dish with nonstick spray, then pour macaroni mixture in. Sprinkle the top with dried bread crumbs. Cover the dish with aluminum foil and bake it for 10 minutes in a 350 degree oven.

After 15 minutes, remove the foil , and continue baking for approximately 6-7 additional minutes, until the cheese sauce is nice and bubbly!

Macaroni and Cheese with Smoked Gouda and Spinach / The Grateful Girl Cooks!

Here’s what the macaroni and cheese looked like straight out of the oven. Can you see the bubbling sauce on the edges of the pan?

Macaroni and Cheese with Smoked Gouda and Spinach / The Grateful Girl Cooks!

We let it cool down just a touch, then dished up our servings! It was really delicious! The combination of flavor from Smoked Gouda Cheese and Parmesan really give this comfort food dish a LOT of flavor!

I sure hope you will give this macaroni and cheese recipe a try. It’s that kind of recipe that makes you want to curl up on the couch (in sweatpants) with a big bowl of this comfort food after a long day. No matter HOW you eat this, I think you’ll LOVE it!

Interested In More Recipes?

Thank you for visiting this website. I appreciate you using some of your valuable time to do soIf you’re interested, I publish a newsletter 2 times per month (1st and 15th) with all the latest recipes, and other fun info. I would be honored to have you join our growing list of subscribers, so you never miss a great recipe!
There is a Newsletter subscription box on the top right side (or bottom) of each blog post, depending on the device you use, where you can easily submit your e-mail address (only) to be included in my mailing list.

You Can Also Find Me On Social Media:
Facebook page: The Grateful Girl Cooks!
Pinterest: The Grateful Girl Cooks!
Instagram: jbatthegratefulgirlcooks

Macaroni and Cheese with Smoked Gouda and Spinach / The Grateful Girl Cooks!

Recipe Adapted From:  http://www.recipegirl.com/2011/03/21/spinach-macaroni-and-cheese/

0 from 0 votes
Macaroni and Cheese with Smoked Gouda and Spinach
Prep Time
15 mins
Cook Time
22 mins
Total Time
37 mins
 

Macaroni and cheese with smoked gouda, fresh spinach, and Parmesan cheese is a creamy, delicious comfort food meal!

Category: Meatless Entree
Cuisine: American
Keyword: macaroni and cheese
Servings: 6 servings
Calories Per Serving: 686 kcal
Author: JB @ The Grateful Girl Cooks!
Ingredients
  • 3 Tablespoons butter
  • 1/2 cup chopped green onion , thinly sliced (stem and bulb)
  • 1 teaspoon minced garlic
  • 1/3 cup all purpose flour
  • 2 cups Half and Half
  • 2 cups low-fat milk (I used 1%)
  • Salt and Pepper , to taste
  • 1 1/2 cups Smoked Gouda cheese , grated
  • 1/2 cup fresh Parmesan cheese , grated
  • 4 cups fresh spinach leaves , cut into 1/2 inch strips
  • 3/4 pound elbow macaroni , cooked and drained (use pkg. directions)
  • 1/2 cup dried bread crumbs
Instructions
  1. Preheat oven to 350 degrees. Cook macaroni, according to package directions. Drain and set aside.
  2. Melt the butter over medium heat, in a large skillet or saucepan. Add chopped green onion. Cook for 3-4 minutes, then add minced garlic and cook for additional minute. (do not burn garlic!)
  3. Stir or whisk in flour. Cook for additional minute.
  4. Add half and half and milk. Stir or whisk in to the flour mixture in pan to fully combine. Turn heat up to medium high. Continue cooking, stirring often until mixture comes to a boil. This will take several minutes. The sauce will thicken quite a bit. Once thickened, season to taste with a little bit of salt and black pepper. Turn heat down to medium-low.
  5. Stir in Smoked Gouda and Parmesan cheeses. Stir to combine. Add chopped spinach and cooked & drained macaroni noodles. Stir well to fully mix ingredients together. Once mixed, taste it again. Add additional salt and pepper, if desired.
  6. Spray a 1 quart baking dish with non stick spray. Pour macaroni mixture into dish. Sprinkle the dried bread crumbs evenly over the top of macaroni. Cover pan with foil.
  7. Place covered dish in 350 degree oven and bake for 15 minutes. Remove foil from dish, then continue baking for 6-7 minutes. When done, the sauce is hot and bubbly around the edges of the pan.
  8. Remove from oven, let it rest for about a minute, then serve it up! YUM. Enjoy!
Recipe Notes

Any combo of cheeses would probably work in this dish... Just be sure that the total amount of cheese added is 2 cups! Have fun creating your OWN version!

Nutrition Facts
Macaroni and Cheese with Smoked Gouda and Spinach
Amount Per Serving (1 (1/6 of total))
Calories 686 Calories from Fat 297
% Daily Value*
Fat 33g51%
Saturated Fat 20g125%
Cholesterol 114mg38%
Sodium 739mg32%
Potassium 571mg16%
Carbohydrates 64g21%
Fiber 3g13%
Sugar 7g8%
Protein 30g60%
Vitamin A 2850IU57%
Vitamin C 8.3mg10%
Calcium 674mg67%
Iron 2.4mg13%
* Percent Daily Values are based on a 2000 calorie diet.

Here’s one more to pin on your Pinterest boards!Macaroni and Cheese with Smoked Gouda and Spinach / The Grateful Girl Cooks!


Save

Save

Fried Shrimp

 You’re going to love these crunchy, classic fried shrimp… they taste delicious, and are SO EASY to prepare, for a fraction of the cost of eating out!You're going to love these crunchy, classic fried shrimp... they taste delicious, and are SO EASY to prepare, for a fraction of the cost of eating out!

The other night I went “old school” for dinner… crunchy Fried Shrimp, with a seafood cocktail sauce on the side. I had a half of a pound of shrimp begging to be used, and decided to just “fry ’em up”. I usually grill or pan sear shrimp, but these bad boys were destined for hot oil.

Guess what? They were GOOD and CRUNCHY. They are also ridiculously EASY to make. Pass the seafood cocktail sauce, please! Crunchy and delicious… just the way they’re SUPPOSED to be!

Since I bought a pound of shrimp on sale, and only used 1/2 pound, the cost for my husband and I was only $3 total for some mighty delicious crunchy fried shrimp (cheaper than fast food!)!  Best part – the shrimp were on our plates in under 20 minutes total.  Such a deal!

Scroll Down For A Printable Recipe Card At The Bottom Of The Page

Prepare The Shrimp

Here’s what you do to make these “old school” crunchy fried shrimp:  First clean, remove shells and de-vein (if necessary) the shrimp. 

Let the shrimp soak for a couple minutes in a bowl filled with an egg and some milk that have been beaten together. Make sure to coat all sides with egg mixture (so the flour coating will adhere).

Shrimp rest in a bowl in a milk/egg mixture before coating in flour

Combine self-rising flour (see recipe for an easy substitution tip) and spices. Place flour mixture on a dinner plate.

Dredge the shrimp in the flour mixture, one at a time, to completely coat all sides.

Shrimp are coated in flour mixture before frying.

Dredge The Shrimp TWO Times!

Place each shrimp onto baking sheet (or aluminum foil) and set aside.  This is what they looked like after the FIRST flour coating.

Once they have all been dredged in flour mixture… dredge them AGAIN (in flour mixture) for the second time. Shake off excess flour.  Let shrimp rest while oil is heating to temperature in pan.

Shrimp are dredged in flour mixture two times before frying.

Time To Make Some Fried Shrimp!

Add enough oil to pan to fill about 2 inches deep. I used my electric skillet, but you can also use a pan or regular skillet (but you WILL need a thermometer to get the oil heated to the necessary temperature for frying these successfully!). 

Heat the oil to 350 degrees. It must be this hot to fry these correctly and get a great outside crunch!

Once the temperature is 350 degrees, carefully add the shrimp one at a time (remember- oil is very HOT). They will need to fry for about 4 minutes, flipping them over halfway through the cooking time. 

If you are doubling recipe or cooking a large amount of fried shrimp, cook them in batches, BUT remember to bring oil back to 350 degrees after each batch!

Shrimp are fried at 350 degrees to ensure a crispy crunch!

Once done, the fried shrimp should be golden brown and crunchy on all sides. I placed the fried shrimp on a wire rack (with a paper towel underneath the rack to catch any drips).

By placing the paper towel UNDER the rack, the shrimp won’t stick to the paper towel. Great tip!

Fried shrimp drain on wire rack before serving.

Serve The Fried Shrimp

These fried shrimp taste wonderful when served with seafood cocktail sauce on the side for dipping. We also paired them with a green salad and fresh fruit… and we LOVED them! Crunch, Crunch, Crunch!

Fried shrimp, served with seafood sauce.

This was an easy way to make great tasting fried shrimp… like you would pay big bucks for at a nice restaurant. The only catch was that I had to do the dishes, but it was still worth it for this easy, quick, great tasting dinner at home!

I sure hope you will consider trying this great tasting recipe, and as always, I really do hope you and those you love will enjoy it! Thanks for stopping by, and come back soon! Have a GREAT day.

Looking for More SHRIMP Recipes?

You can find all of my recipes in the Recipe Index, located at the top of the page. I have quite a few recipes using shrimp you’ll enjoy, including:

Want More Recipes? Get My FREE Newsletter!

I publish a newsletter 2 times per month (1st and 15th) with lots of recipes, tips, etc..
Would you like to join our growing list of subscribers?

There is a Newsletter subscription box on the top right (or bottom) of each blog post, depending on the device you use.
You can submit your e-mail address there, to be added to my mailing list.

Find Me On Social Media:

Facebook page: The Grateful Girl Cooks!
Pinterest:
The Grateful Girl Cooks!
Instagram:
jbatthegratefulgirlcooks

Author's signature

↓↓ PRINTABLE RECIPE BELOW ↓↓

0 from 0 votes
Fried Shrimp
Prep Time
15 mins
Cook Time
4 mins
Total Time
19 mins
 
You're going to love these crunchy, classic fried shrimp... they taste delicious, and are SO EASY to prepare, for a fraction of the cost of eating out!
Category: Entree, Seafood
Cuisine: American
Keyword: fried shrimp
Servings: 2 servings
Calories Per Serving: 529 kcal
Author: JB @ The Grateful Girl Cooks!
Ingredients
  • 1/2 pound large (or medium) shrimp
  • 1 large egg
  • 1/2 cup milk
  • 1 cup self-rising flour (see Notes section for substitution tip)
  • 1/4 teaspoon Creole or Cajun seasoning (optional, but good)
  • Salt (approx. 1/4 teaspoon)
  • Black pepper (approx. 1/8 teaspoon)
  • Vegetable oil for frying (at least 2 inches deep in pan or skillet)
Instructions
  1. Clean, shell and de-vein shrimp before beginning.
  2. Whisk together egg and milk in a medium sized bowl. Add shrimp, stirring to coat all sides. Set aside.
  3. Place self-rising flour and seasonings onto a dinner sized plate. Stir with a fork to mix together. Dredge shrimp, one at a time, in flour mixture, coating all sides. Set shrimp on a baking sheet or foil. Repeat process until all shrimp have been dredged in flour. Once all have been coated in flour, DO IT AGAIN. Coat all shrimp in flour mixture for the second time. Set aside.
  4. Heat oil (at least 2 inches deep) until it reaches a temperature of 350 degrees. Once it reaches temperature, carefully add shrimp, one at a time (oil is HOT). Cook shrimp for about 4 minutes, turning over shrimp halfway through cooking time. When done, shrimp should be golden brown and crispy on the outside.
  5. Remove shrimp to a wire rack for just a second (with a paper towel underneath rack to catch drips).
  6. While hot, serve fried shrimp with a side of seafood cocktail sauce, and enjoy!
Recipe Notes

Substitute for self-rising flour: 1 cup all purpose flour, 1+ 1/2 teaspoons baking powder, 1/2 teaspoon salt. Directions: Measure 1 cup all purpose flour. Take OUT 2 teaspoons of that flour and discard. Add baking powder and salt, Stir to combine. This equals 1 cup total of self-rising flour!

Nutrition Facts
Fried Shrimp
Amount Per Serving (1 serving)
Calories 529 Calories from Fat 180
% Daily Value*
Fat 20g31%
Saturated Fat 13g81%
Cholesterol 373mg124%
Sodium 939mg41%
Potassium 264mg8%
Carbohydrates 48g16%
Fiber 1g4%
Sugar 3g3%
Protein 35g70%
Vitamin A 340IU7%
Vitamin C 4.6mg6%
Calcium 255mg26%
Iron 3.4mg19%
* Percent Daily Values are based on a 2000 calorie diet.

Here’s one more to pin on your Pinterest boards!You're going to love these crunchy, classic fried shrimp... they taste delicious, and are SO EASY to prepare, for a fraction of the cost of eating out!


Save

Save

Mixed Salad with Hoisin Vinaigrette and Crisp Panko Chicken

We’ve been having record-setting heat here in Portland this week. It was too hot for a heavy meal the other evening, so I made a Mixed Salad with Hoisin Vinaigrette and Crisp Panko Chicken for our dinner. It was easy, delicious, light but filling, and PERFECT on a hot day!Mixed Salad with Hoisin Vinaigrette and Crisp Panko Chicken / The Grateful Girl Cooks!
I found the recipe in one of my cookbooks… a Cooking Light cookbook (such good recipes)! This entree salad has it all! Crispy chunks of oven-baked chicken breast on a bed of chilled, mixed greens, and drizzled with a vinaigrette that is slightly tangy (but good) due to the addition of hoisin sauce, fresh ginger and Dijon mustard. I loved every bite (shocker, huh?)

Here’s how easy it is to make this yummy salad (start to finish took only about 25 minutes):

I first preheated my oven, then mixed up panko, salt, chili powder, and black pepper.

Mixed Salad with Hoisin Vinaigrette and Crisp Panko Chicken / The Grateful Girl Cooks!

I tossed the chicken pieces, a few at a time, in the panko mix to fully coat all sides.

Mixed Salad with Hoisin Vinaigrette and Crisp Panko Chicken / The Grateful Girl Cooks!

Place chicken in a single layer on a baking sheet coated with non-stick cooking spray.

Mixed Salad with Hoisin Vinaigrette and Crisp Panko Chicken / The Grateful Girl Cooks!

Bake chicken at 375 degrees for a total of 15 minutes. Turn the chicken pieces over halfway through the cooking time. When done, they will be golden brown and crispy on the outside.

MIxed Salad with Hoisin Vinaigrette and Crisp Panko Chicken / The Grateful Girl Cooks!

While chicken is baking, quickly blend together the vinaigrette, using a food processor or a blender. It will look like this once fully blended. Set aside.

Mixed Salad with Hoisin Vinaigrette and Crisp Panko Chicken / The Grateful Girl Cooks!

Arrange the chilled salad greens onto serving plate or into bowl. Add chopped green onions, blueberries, and tomatoes. (If it is easier, you can add the vinaigrette at this point, and mix greens, then top with chicken. OR you can add chicken, then top with vinaigrette (my plan).

Mixed Salad with Hoisin Vinaigrette and Crisp Panko Chicken / The Grateful Girl Cooks!

I chose to add chicken to top of salad, THEN drizzle with vinaigrette, cause I think it looks better for serving. Whatever is easiest for you works for me. Once that’s done, all that is left for you to do is EAT!

Mixed Salad with Hoisin Vinaigrette and Crisp Panko Chicken / The Grateful Girl Cooks!

See how easy that was? Sure hope you enjoy this fantastic main dish salad. It truly was perfect for a hot April night! Glad I stumbled upon the recipe in one of my cookbooks (and adapted it just a smidge). Can’t wait to make this again. Have a great day!

Interested In More Recipes?

Thank you for visiting this website. I appreciate you using some of your valuable time to do soIf you’re interested, I publish a newsletter 2 times per month (1st and 15th) with all the latest recipes, and other fun info. I would be honored to have you join our growing list of subscribers, so you never miss a great recipe!
There is a Newsletter subscription box on the top right side (or bottom) of each blog post, depending on the device you use, where you can easily submit your e-mail address (only) to be included in my mailing list.

You Can Also Find Me On Social Media:
Facebook page: The Grateful Girl Cooks!
Pinterest: The Grateful Girl Cooks!
Instagram: jbatthegratefulgirlcooks

Mixed Salad with Hoisin Vinaigrette and Crisp Panko Chicken / The Grateful Girl Cooks!

Recipe Adapted From: The Cookbook “Cooking Light-Annual Recipes 2007, page 103, published 2006 by Oxmoor House, Inc.

0 from 0 votes
Mixed Salad with Hoisin Vinaigrette and Crisp Panko Chicken
Prep Time
10 mins
Cook Time
15 mins
Total Time
25 mins
 
You'll love this entree salad...Spring greens, topped with crisp chicken breast chunks, tomatoes, green onions, and drizzled with a delicious Hoisin Vinaigrette.
Category: Main Dish Salad
Cuisine: American
Keyword: salad with hoisin vinaigrette
Servings: 2 servings
Calories Per Serving: 463 kcal
Author: JB @ The Grateful Girl Cooks!
Ingredients
For chicken:
  • 1/2 cup panko (Japanese breadcrumbs)
  • 1/2 teaspoon salt
  • 1/4 teaspoon chili powder
  • 1/4 teaspoon black pepper
  • 1 lb. chicken breast , cut in 1 inch pieces (I used one large chicken breast, cut horizontally then cubed)
  • Cooking spray
For Vinaigrette:
  • 2 Tablespoons white wine vinegar
  • 1 1/2 Tablespoons hoisin sauce (found in Asian section of grocery store)
  • 1 Tablespoon finely grated fresh ginger (peeled)
  • 1 Tablespoon Dijon mustard
  • 2 teaspoons canola or vegetable oil
  • 1 1/2 teaspoons soy sauce (low-sodium if you have it)
  • 1 teaspoon toasted sesame oil
  • 1 large clove garlic , minced
For Salad:
  • 1 8 oz. package mixed greens (or use a combo: I used mesculin, romaine, spinach)
  • 1 cup chopped tomatoes , seeded (or use cherry tomatoes, cut in half)
  • 1/2 cup fresh blueberries
  • 1/2 cup chopped green onions
Instructions
  1. Preheat your oven to 375 degrees.
  2. Mix panko, salt, chili powder and black pepper in small bowl. Add chicken pieces, a few at a time, tossing to fully coat with seasoned breadcrumbs. Set each piece in a single layer on lightly sprayed baking sheet; continue until all chicken pieces are coated. Bake chicken at 375 degrees for approx. 15 minutes (or until done and golden brown), turning chicken to other side halfway through cooking time.
  3. Blend the vinaigrette ingredients together, using a blender or food processor; blend until smooth.
  4. Place chilled salad greens, tomatoes, blueberries, and chopped green onions onto individual serving dishes. Top with a portion of the crisp panko chicken pieces, then drizzle with vinaigrette.
  5. Serve, and enjoy!
Recipe Notes

This makes enough for 2 main course servings. If smaller portions are desired (for side salad), it should serve 4.

Nutrition Facts
Mixed Salad with Hoisin Vinaigrette and Crisp Panko Chicken
Amount Per Serving (1 g)
Calories 463 Calories from Fat 117
% Daily Value*
Fat 13g20%
Saturated Fat 2g13%
Cholesterol 145mg48%
Sodium 1540mg67%
Potassium 1191mg34%
Carbohydrates 30g10%
Fiber 4g17%
Sugar 11g12%
Protein 52g104%
Vitamin A 530IU11%
Vitamin C 22.6mg27%
Calcium 94mg9%
Iron 3.4mg19%
* Percent Daily Values are based on a 2000 calorie diet.

Here’s one more to pin on your Pinterest boards!Mixed Salad with Hoisin Vinaigrette and Crisp Panko Chicken / The Grateful Girl Cooks!


Save

Save