Make EASY Thai peanut sauce in under 5 minutes! This is a perfect sauce to add to cooked pasta, noodles or quinoa for delicious Thai-inspired flavor!

Do you enjoy peanut sauce? I sure do! After trying this sauce on pasta quite a few years ago, I decided to learn to make it myself at home!
The bold flavors in peanut sauce help to compliment a number of pasta, noodle or quinoa dishes. This delicious peanut sauce can also be served with grilled chicken skewers (commonly called chicken satay).
Guess what? This amazing sauce is TOTALLY EASY to make, so if you can measure and stir, you can make it, too! Here’s how to make this ridiculously easy (but scrumptious) Thai peanut sauce in about 5 minutes:
Scroll Down For A Printable Recipe Card At The Bottom Of The Page
Make The Thai Peanut Sauce
The ingredients for Thai peanut sauce are creamy peanut butter, soy sauce, Sriracha, brown sugar, lime juice, garlic, rice wine vinegar, ground ginger, sesame oil, and hot water.
To make the sauce, place all ingredients EXCEPT for the hot water into a medium sized bowl. Set aside the water to add at the end (you will need it hot but not boiling).

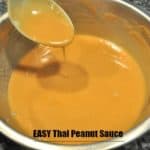
Stir these ingredients together until they are well blended. The sauce will be fairly thick at this point (sorry about the slightly blurry photo!).

Add 1/2 cup of very hot water to the peanut sauce. Stir or whisk the sauce well, until all the ingredients are fully blended.
Adding hot water helps to thin out the thick peanut butter, because that makes the sauce easier to pour or drizzle. Thai peanut sauce is ready to use once the water is fully incorporated.
Whoo Hoo! You just made Thai peanut sauce! If you take a little taste, you can see just how yummy it tastes. Go on, because you know you want to try it, right?

How Can You Use Thai Peanut Sauce?
Adding peanut sauce is often used to bring bold flavors to a variety of dishes. We’ve enjoyed using peanut sauce for a Thai Quinoa Salad (shown in photo below).
Sometimes I alter the sauce recipe a bit depending on a few other factors, but 99% of the time, this is my “go to” Thai-inspired peanut sauce.

My absolute FAVORITE way to enjoy Thai peanut sauce is mixed with pasta! In the past I have made Vegetarian Spicy Noodles in Peanut Sauce.
I’ve also used a slight variation of peanut sauce in my yummy Thai Chicken Linguini. Both recipes are coated with creamy peanut sauce and taste delicious!


I truly hope you find an opportunity to make this delicious Thai peanut sauce for use in a favorite recipe or two. After mixing it up, it’s all I can do to keep from eating it by the spoonful, because it’s THAT good!
Thanks for stopping by, and I invite you to come back again soon for more family friendly recipes. Take care, may God bless you, and have a great day.
Looking For More SAUCE Recipes?
You can find ALL of my recipes in the Recipe Index, which is located at the top of the page. I have some delicious recipes for sauces (savory and sweet) to choose from, including:
- Asian-Style BBQ Sauce
- Homemade Tartar Sauce
- Peanut Butter Ice Cream Sauce
- Greek Tzatziki Sauce
- Easy Homemade Enchilada Sauce
Want More Recipes? Get My FREE Newsletter!
I publish a newsletter 2 times per month (1st and 15th) with lots of recipes, tips, etc.
Would you like to join our growing list of subscribers?
There is a Newsletter subscription box on the top right (or bottom) of each blog post, depending on the device you use.
You can submit your e-mail address there, to be added to my mailing list.
Find Me On Social Media:
Facebook page: The Grateful Girl Cooks!
Pinterest: The Grateful Girl Cooks!
Instagram: jbatthegratefulgirlcooks

Original recipe source for sauce: http://www.singforyoursupperblog.com/pasta/thai-chicken-pasta/
↓↓ PRINTABLE RECIPE BELOW ↓↓
Make EASY Thai peanut sauce in under 5 minutes! This is a perfect sauce to add to cooked pasta, noodles or quinoa for delicious Thai-inspired flavor!
- 1 cup smooth peanut butter
- ¼ cup soy sauce , regular or low-sodium
- 2 teaspoons Sriracha sauce , or 3 teaspoons chili paste
- 2 Tablespoons brown sugar
- 2 medium limes (juice of)
- 1 clove garlic , minced
- 1 teaspoon rice wine vinegar
- 1 teaspoon ground ginger
- ½ teaspoon Asian sesame oil
- ½ cup water (very hot)
Place all ingredients for the Thai peanut sauce EXCEPT for the hot water into a medium sized bowl. Stir ingredients together until well blended. The sauce will be fairly thick at this point.
Add 1/2 cup of very hot water to the peanut sauce, and stir or whisk well, until all ingredients are fully blended. The hot water helps to thin out the thick peanut butter, which makes the sauce easier to pour or drizzle. Once the water is fully incorporated into the Thai peanut sauce, it is ready to use in your favorite dishes. Enjoy!
Here’s one more to pin on your Pinterest boards!


