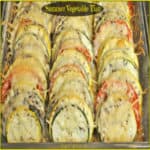
There are a lot of fantastic Summer veggies coming into season right now. This Summer Vegetable Tian is a GREAT way to simply & creatively serve fresh veggies to those you love!
The recipe serves 6, and is very inexpensive to make (especially if you have a backyard garden like me, and are bursting with harvested zucchini, onions, yellow squash and tomatoes about this time of year)!
If you have ONE onion, ONE zucchini, ONE yellow squash, ONE potato, and ONE tomato, then you have almost everything you will need to make this great side dish!
Scroll Down For A Printable Recipe Card At The Bottom Of The Page
How To Make A Summer Vegetable Tian
Here’s how you make this beautiful, delicious summer vegetable tian: Start by sautéing the diced onions and minced garlic in olive oil for a few minutes. Note: I added garlic during the last minute of cooking, so it wouldn’t burn or become bitter.

Spread softened butter on the bottom and sides of a baking dish (again… playing with your food).

Spread the cooked onions and garlic on the bottom of the dish.

Now It’s Time To Arrange The Veggies!
Alternating veggies, stack the sliced vegetables in the dish vertically until it is filled. (You will notice there won’t be as many tomato slices as everything else- no worries, just add them in. Have fun playing with your food! Season the veggies generously with salt and pepper, then add dried thyme.

Cover the baking dish with aluminum foil, and place the pan in a preheated 400 degree oven. Bake veggies for 30 minutes, then take the foil off the dish, cover the top of the veggies with the shredded Parmesan cheese, then continue baking for another 15-20 minutes.
This is what they looked like when I removed the foil. (oops-forgot to take a picture after adding shredded cheese to the top after this!)

Time To Eat The Summer Vegetable Tian!
When done, the Parmesan cheese will be melted and light brown in color, and the veggies will be cooked through. Remove baking dish from oven, and serve while hot! I found it easiest to remove a “serving sized section” of veggies using a spatula to keep them together in a compact, colorful line.

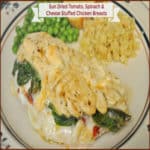
On the plate, and ready to eat! I served this summer vegetable tian dish with Baked Dover Sole Rollatini, but it would be a great side dish for a variety of main courses!

I don’t think you can EVER go wrong with fresh vegetables on the table! The alternating colors displayed so beautifully made it a very appetizing looking dish. The vegetables tasted wonderful, too, so I will definitely be making this again! Have a blessed day!
Looking For More VEGGIE Recipes?
You can find all of my veggie dishes in the Recipe Index, located at the top of the page. I have lots of vegetable dishes I think you will enjoy, including:
Interested In More Recipes?
Thank you for visiting this website. I appreciate you using some of your valuable time to do so. If you’re interested, I publish a newsletter 2 times per month (1st and 15th) with all the latest recipes, and other fun info. I would be honored to have you join our growing list of subscribers, so you never miss a great recipe!
There is a Newsletter subscription box on the top right side (or bottom) of each blog post, depending on the device you use, where you can easily submit your e-mail address (only) to be included in my mailing list.
You Can Also Find Me On Social Media:
Facebook page: The Grateful Girl Cooks!
Pinterest: The Grateful Girl Cooks!
Instagram: jbatthegratefulgirlcooks

Recipe Source: http://www.budgetbytes.com/2011/08/summer-vegetable-tian/
↓↓ PRINTABLE RECIPE BELOW ↓↓
- 1 medium sized brown onion , diced
- 2 cloves garlic , minced
- 1 Tablespoon olive oil
- 1 medium sized zucchini , thinly sliced
- 1 medium sized yellow squash , thinly sliced
- 1 medium potato , thinly sliced
- 1 medium tomato , thinly sliced
- 1 teaspoon dried thyme
- Salt and Pepper (to taste)
- 1 cup shredded Italian Cheese (I used shredded Parmesan)
- Non-stick spray (or softened butter), for pan. I used butter!
- Preheat your oven to 400º F. While oven is preheating, dice the onion (finely) and mince the 2 cloves of garlic. Heat olive oil in skillet on medium heat. Add onions; sauté them for 4-5 minutes, or until soft and translucent. Add garlic the last minute of cooking, so as not to burn it. Set aside.
- THINLY slice zucchini, yellow squash, potato and tomato. It is best if these vegetables are all about the same circumference around, for uniformity.
- Spray an 8x8 baking dish with non-stick spray or coat bottom and sides of pan with softened butter (I used butter!). Place the cooked onions and garlic on the bottom of pan, spreading evenly.
- Evenly stack the thinly sliced vegetables vertically in dish (alternating veggies) to form a long line of colorful veggies in the pan. When one row is done, start another row, until all veggies have been distributed. (Think of this as playing with your food!)
- Once vegetables are arranged in dish, season them liberally with salt and pepper, then add thyme.
- Cover baking dish with aluminum foil; Bake at 400 degrees for 30 minutes. Take the foil off the dish, cover the tops of the veggies with shredded Parmesan cheese, then continue cooking (uncovered) for an additional 15-20 minutes (until the cheese turns light brown).
- Remove pan from oven, and serve! Enjoy!
I found it is easiest to serve the veggies by lifting a "section" out of the baking dish with a long spatula. That keeps the veggies together in a compact, colorful line.
Here’s one more to pin on your Pinterest boards!


