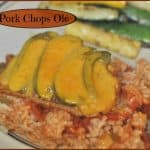
Strawberry Pie

Nothing beats this classic dessert recipe for delicious homemade Strawberry Pie, with strawberry glaze! It’s SO QUICK AND EASY to make, you won’t believe it!Nothing beats this classic dessert recipe for delicious homemade Strawberry Pie, with strawberry glaze! It's SO QUICK AND EASY to make, you won't believe it!

A couple days ago I was scrolling through my Facebook news feed, and found a recipe for an easy, fresh Strawberry Pie from “Taste of Home”, a website/magazine I have loved for years!

I recently bought 2 large containers of strawberries at the grocery store (got a screamin’ good deal on them), and had been looking for a “new” recipe for strawberry pie to make using them.

The next morning I got up and made this delicious strawberry pie, and I’m sure glad I did. Totally delicious, classic fruit pie!!!!  I’m reminded of a quote I saw: “The best thing to put into a homemade pie is your teeth!” (author unknown). Honestly, this pie is super easy to make.

I made my own pie crust (here’s my recipe that I’ve used for years:  (DIY-moms-pie-crust/), but if you want quick and easy, just buy a pre-made pie crust, and save yourself some time.

Once you’ve got your pie crust taken care of, making the pie is as simple as slicing strawberries, mixing the glaze up in a saucepan, and pouring the glaze on top. Seriously EASY.

How To Make This Classic Strawberry Pie

Start with a pie crust. Make your own pie crust or buy one. Either way, it’s all good. Make sure to flute the edges to form a pretty edge.

Empty pie crust and rolling pin used to make a strawberry pie.

Pre-Bake The Strawberry Pie Crust

You will need to cook the pie crust before filling it. Put a layer of heavy duty aluminum foil over the crust, then fill it with dry beans to weigh it down.

Doing this simple step will help keep the pie crust from “puffing” up too much while cooking.

Dry beans on foil in empty pie crust help to keep air bubbles out of pie crust.

Bake the pie crust for 8 minutes, then lift out the foil and beans, and pop the crust back into the oven for 5-6 more minutes. When done, it will look something like this, shown below.

Baked pie crust cooling on wire rack, ready to make strawberry pie.
Make The Glaze For The Pie

Let the pie crust cool completely. While it is cooling, mix up the sugar, cornstarch and water in a saucepan over medium heat, until thickened. This mixture will be part of your glaze for the strawberry pie.

Sugar, cornstarch and water in saucepan with a whisk, making glaze for strawberry pie

Once the liquid has thickened, add a small box of strawberry gelatin, and stir well to combine. This is the glaze for your strawberry pie!

Let the strawberry glaze cool for 15-20 minutes in the refrigerator before using it to fill the pie. 

Strawberry gelatin added to glaze mixture for strawberry pieStrawberry pie filling in saucepan with metal whisk.Fill the Pie With Strawberries

While the glaze is cooling in the refrigerator, go ahead and slice up 4½ cups of ripe, sweet, fresh strawberries.

Fresh strawberries, sliced in bowl with blue rim, ready to go into a pie crust.
When the pie crust has cooled, arrange the strawberries in the crust. Now it’s starting to LOOK LIKE a REAL strawberry pie!

Strawberries arranged in baked pie crust, for strawberry pie!Time To Glaze This Strawberry Pie!

Once the glaze has cooled, give it a stir, then carefully pour it all over the top of the strawberry pie.

Pour the glaze all around, to completely cover the strawberries on top, AND to fill any little spaces. Try not to drizzle it onto the crimped pie crust.

Strawberry glaze is poured over strawberry pie in crust.
Once all the glaze is on the strawberry pie, place the pie in a refrigerator for several hours, so the glaze will firm up.

When ready to serve the strawberry pie, garnish the pie with a sprig of mint, and/or some whipped cream, slice and serve!

Strawberry Pie with fresh sprig of mint garnish on top.Time To EAT!

Because the glaze has firmed up, this is not a messy pie to cut and serve. Just sayin’. See how “clean” the cuts in the strawberry pie are?

Strawberry pie, with one slice removed.
That’s it! Slice yourself a good sized piece, grab a fork, a can of whipped cream to decorate the slice with, and a good cup of coffee!

Hope you enjoy this delicious, fresh-tasting Strawberry Pie!

One slice of strawberry pie on a plate with a fork.
Thanks for stopping by, and try this pie! It’s awesome. Hope you have a great day, and trust you will come back soon!

Looking For Other PIE Recipes?

All of my recipes can be found in the Recipe Index at the top of the page. A few of our family favorite pie recipes include:

Want More Recipes? Get My FREE Newsletter!

I publish a newsletter 2 times per month (1st and 15th) with lots of recipes, tips, etc..
Would you like to join our growing list of subscribers?

There is a Newsletter subscription box on the top right (or bottom) of each blog post, depending on the device you use.
You can submit your e-mail address there, to be added to my mailing list.

Find Me On Social Media:

Facebook page: The Grateful Girl Cooks!
Pinterest:
The Grateful Girl Cooks!
Instagram:
jbatthegratefulgirlcooks

Author's signatureRecipe Source: http://www.tasteofhome.com/recipes/easy-fresh-strawberry-pie

↓↓ PRINTABLE RECIPE BELOW ↓↓

0 from 0 votes
Strawberry Pie
Prep Time
35 mins
Cook Time
0 mins
Refrigeration Time
2 hrs
Total Time
2 hrs 35 mins
 
Nothing beats this classic dessert recipe for delicious homemade Strawberry Pie, with strawberry glaze! It's SO QUICK AND EASY to make, you won't believe it!
Category: Dessert
Cuisine: American
Keyword: strawberry pie
Servings: 8 slices
Calories Per Serving: 278 kcal
Author: JB @ The Grateful Girl Cooks!
Ingredients
  • 1 unbaked pastry (pie) shell (9 inches)
  • * a couple cups of dry beans (ONLY TO WEIGH DOWN THE CRUST DURING PRE-BAKE)
  • 3/4 cup granulated sugar
  • 2 Tablespoons cornstarch
  • 1 cup water
  • 1 package (3 ounces) strawberry gelatin
  • 4 1/2 cups sliced fresh strawberries
  • Fresh sprig of mint (optional)
  • Whipping cream for garnish (optional)
Instructions
To make pie shell:
  1. Line an unpricked and uncooked pie shell with heavy duty aluminum foil. Fill with dried beans to weigh down the shell (this helps keep the crust from puffing up full of air). Bake crust at 425 degrees for 8 minutes. Carefully lift out the aluminum foil and beans (**beans can be put back in the container you got them from and can still be used**). After beans and foil are out of the shell, put it back into the oven for an additional 5-6 minutes longer, then remove to a wire rack to cool.
To make strawberry glaze:
  1. In a medium saucepan, whisk together the granulated sugar, cornstarch and water until it is fully combined and smooth. Bring mixture to a boil; stir and cook it for 2 minutes, until thickened. Remove the pan from the heat. Stir in the strawberry gelatin powder, until dissolved. Refrigerate the glaze mixture for 15-20 minutes, or until it has cooled down some.
To assemble the pie:
  1. Slice the strawberries. Carefully place/arrange them into the baked pie crust. Pour the cooled strawberry glaze over the entire surface of the pie, even filling in the little nooks and crannies. Use all of the glaze mixture. When done, place pie in refrigerator for 2-3 hours, or until it is completely "set up" (the glaze will congeal and firm up).
  2. Garnish pie with mint and/or whipped cream, if desired.
  3. Cut into 8 pieces, serve... and enjoy!
Recipe Notes

Note: Prep time of 3 hours INCLUDES inactive prep time of 2 1/2 hours for refrigeration of pie. If using a pre-made crust, this recipe can be made in about 30 minutes.

Nutrition Facts
Strawberry Pie
Amount Per Serving (1 slice)
Calories 278 Calories from Fat 72
% Daily Value*
Fat 8g12%
Saturated Fat 2g13%
Sodium 150mg7%
Potassium 149mg4%
Carbohydrates 49g16%
Fiber 2g8%
Sugar 31g34%
Protein 2g4%
Vitamin A 10IU0%
Vitamin C 47.6mg58%
Calcium 19mg2%
Iron 1mg6%
* Percent Daily Values are based on a 2000 calorie diet.

Here’s one more to pin on your Pinterest boards!Nothing beats this classic dessert recipe for delicious homemade Strawberry Pie, with strawberry glaze! It's SO QUICK AND EASY to make, you won't believe it!

Save

Save

Save

Save

Cedar Plank Grilled Salmon

Cedar Plank Grilled Salmon with butter, lemon and spices is a simple, easy way to BBQ outside on hot, summer days! Cedar Plank Grilled Salmon with butter, lemon and spices is a simple, easy way to BBQ outside on hot, summer days!
We’ve been enjoying much warmer than normal temperatures (can you say HOT???) in the Pacific Northwest this summer. Hot temps (in the high 90’s) have meant that I don’t use my oven as much to fix meals, so I don’t add to the heat in our home, PLUS it has meant more time outside on the deck, bonding with our Weber BBQ at dinner time. This Cedar Plank Grilled Salmon was our dinner last night.

Scroll Down For A Printable Recipe Card At The Bottom Of The Page

Last night my hubby (the “Grill-Meister”) grilled a salmon fillet on a cedar plank on our BBQ, and man oh man, it was so good! I typically pan-sear or bake salmon inside, in my kitchen, but there’s just something about grilled salmon in the summer, with the smokey smell from the BBQ and the cedar plank that you cook it on, that makes everything right with the world.

I had to remind my husband to put the lighter fluid on the charcoal briquets and NOT in his glass of wine, but after we got that sorted out, he took over the grilling duties! We cooked the salmon on our Weber BBQ on medium heat (lid closed, top vent open);  if you are using a gas grill, be sure the flames don’t reach the cedar plank or you might catch it on fire!

Cook, getting ready to grill salmon on cedar plank on BBQ
Have you ever grilled salmon fillets on cedar planks on your BBQ? Yum. It’s SO easy. First you buy a package of cedar planks at the grocery store (most stores carry them by the fish counter). They look like this, and usually a package contains 3-4 planks.

How To Prepare Cedar Plank So It Won’t Burn

You will need to soak the plank you are going to use in water for at least 30-40 minutes before putting on the grill. (I weigh mine down with filled pans of water in the sink, then cover board completely with water).

The wood plank needs to be soaked this long, so it doesn’t catch fire on the grill. As the fish cooks, the cedar board smokes and infuses flavor into the seafood. Makes sense, right?

Cedar plank used to grill salmon on BBQTime To Cook the Salmon

Once it is done “soaking”, you place a fresh salmon fillet on it  SKIN SIDE DOWN (we used one of two wild sockeye salmon fillets we bought at good old Costco).

Use a pastry brush to spread melted butter all over the top of the salmon. Sprinkle with salt, pepper, and garlic powder. Squeeze a bit of lemon juice over the top, also. I like to “garnish” the salmon fillet with thin slices of lemon while it cooks.

Once you have that done, you simply put the entire plank on the hot BBQ grill (with the top little vent open). Put the lid on the BBQ, and let it cook covered for about 35 minutes, until salmon is done (flaky). That’s it! No need to mess with it at all.

Cedar plank with salmon and lemon slices on grill
This is what it should look like when it is done. See? The soaked cedar plank didn’t burn up!

Grilled salmon is done cooking on cedar plank
Serving Cedar Plank Grilled Salmon

Remove the entire plank from the BBQ, take it inside, and cut salmon (not the cutting board!) into serving pieces (4-5 out of this piece of salmon). See how easy that is? When you realize how much 4-5 servings of cedar plank grilled salmon would cost in a restaurant, it REALLY is an inexpensive and easy way to make it yourself!!! Why not?

I served the salmon with some grilled mixed veggies (including yellow squash and peas from our garden), and we had a wonderful, healthy dinner that was incredibly delicious! AND we have a couple extra pieces of salmon for leftovers, too!

We really enjoy cedar plank grilled salmon; I have several other delicious recipes for this fish on my blog! You might want to check out the recipes for Salmon in a Lemon Butter Herb Sauce, Orange and Rosemary Glazed Salmon, or Pan-Seared Salmon with Cilantro Lime Sauce, to name a few. There are additional salmon recipes which you can find in the Recipe Index at the top of the page. YUM!

Grilled salmon served with mixed vegetables
Hope you will give this easy cedar plank grilled salmon a try this summer! Throw it on the grill, sit back and relax with a refreshing beverage, and let your BBQ do almost all the work for you!  Don’t forget to check out my Recipe Index, to see ALL my recipes. It’s located at the top of the page. Have a great week!

Interested In More Recipes?

Thank you for visiting this website. I appreciate you using some of your valuable time to do soIf you’re interested, I publish a newsletter 2 times per month (1st and 15th) with all the latest recipes, and other fun info. I would be honored to have you join our growing list of subscribers, so you never miss a great recipe!
There is a Newsletter subscription box on the top right side (or bottom) of each blog post, depending on the device you use, where you can easily submit your e-mail address (only) to be included in my mailing list.

You Can Also Find Me On Social Media:

Facebook page: The Grateful Girl Cooks!
Pinterest:
The Grateful Girl Cooks!
Instagram:
jbatthegratefulgirlcooks

Author's signature

↓↓ PRINTABLE RECIPE BELOW ↓↓

0 from 0 votes
Cedar Plank Grilled Salmon
Prep Time
30 mins
Cook Time
35 mins
Total Time
1 hr 5 mins
 
Cedar Plank Grilled Salmon with butter, lemon and spices is a simple, easy way to BBQ outside on hot, summer days! The smell from the cedar on the grill infuses smoky flavor into the fish for an amazing meal!
Category: Dinner
Cuisine: American
Keyword: cedar plank grilled salmon
Servings: 5 servings
Calories Per Serving: 301 kcal
Author: JB @ The Grateful Girl Cooks!
Ingredients
  • 2 pounds fresh salmon fillet (with skin on bottom)
  • 2 Tablespoons butter (melted)
  • 1/4 teaspoon salt
  • 1/4 teaspoon black pepper
  • 1/4 teaspoon garlic powder
  • 1/2 lemon (juice of)
  • 5 slices lemon (thinly sliced)
Instructions
  1. Soak the cedar plank you are going to use in water for at least 30-40 minutes before putting on the grill. (I weigh mine down with filled pans of water in the sink, then cover board completely with water). The wood plank needs to be soaked this long, so it doesn't catch fire on the grill. As the fish cooks, the cedar board smokes and infuses flavor into the seafood.

  2. Once it is done "soaking", remove from water. Place a fresh salmon fillet on it  SKIN SIDE DOWN.  Use a pastry brush to spread melted butter all over the top of the salmon. Sprinkle with salt, pepper, and garlic powder. Squeeze some lemon juice over the top, also. Garnish the salmon fillet with thin slices of lemon.

  3. Once BBQ is hot and ready, place wood plank directly onto BBQ rack. Cook salmon on medium heat (on our Weber grill we cooked it with lid closed, top vent open);  if you are using a gas grill, be sure the flames are set low enough to not reach the cedar plank directly or you might catch it on fire! Cook salmon (with lid on BBQ) for about 35 minutes, until done and fish flakes easily.

  4. Remove the entire plank from the BBQ, take it inside, and cut salmon (not the cutting board!) into serving pieces... serve, and enjoy! 

Nutrition Facts
Cedar Plank Grilled Salmon
Amount Per Serving (1 piece)
Calories 301 Calories from Fat 144
% Daily Value*
Fat 16g25%
Saturated Fat 4g25%
Cholesterol 111mg37%
Sodium 236mg10%
Potassium 898mg26%
Carbohydrates 1g0%
Protein 36g72%
Vitamin A 215IU4%
Vitamin C 4.9mg6%
Calcium 22mg2%
Iron 1.5mg8%
* Percent Daily Values are based on a 2000 calorie diet.

Here’s one more to pin on your Pinterest boards!Cedar Plank Grilled Salmon with butter, lemon and spices is a simple, easy way to BBQ outside on hot, summer days!

Save

Pecan Sticky Rolls

If you like Cinnamon Rolls, then you’ll love these scrumptious homemade Pecan Sticky Rolls! Raised yeast rolls, dripping with a caramel-pecan topping.If you like Cinnamon Rolls, then you'll love these scrumptious homemade Pecan Sticky Rolls! Raised yeast rolls, dripping with a caramel-pecan topping.
Oh my goodness… these pecan sticky rolls are so delicious! They are a wonderful treat to enjoy (occasionally) over a cup of morning coffee or tea! I found this easy recipe in the user manual for my bread machine years ago. After making them ONCE, I decided this was a “keeper” recipe, and have enjoyed making these rolls many times since then.

The method used for making pecan sticky rolls is very similar to making cinnamon rolls (with only a couple changes). Here’s how to make them:

Scroll Down For A Printable Recipe Card At The Bottom Of The Page

Make The Dough In A Bread Machine OR By Hand

I made the dough in my bread machine. It’s possible to make these even without a machine , and I’ve included directions in the printable recipe at the bottom of this post. Make the dough on the DOUGH cycle of your bread machine, or follow instructions to make by hand. When the dough is done, roll it out to a 15×10 inch rectangle on a lightly floured surface.

The dough is rolled out into a large rectangle.
Spray a 9 x 13 x 2 inch pan with non-stick spray. In a small bowl, mix the topping ingredients (melted butter, brown sugar, corn syrup, and pecan halves). Spread this mixture all over the bottom of the baking pan. The rolls are baked on top of this sticky butter pecan mixture, and then flipped over, which lets all the gooey topping drip down and coat the sweet rolls.

Prepare The Pecan Sticky Rolls

Combine granulated sugar and cinnamon in a small bowl. Spread 2 teaspoons of softened butter over the surface of the dough, then sprinkle with the cinnamon-sugar mixture. Roll up the dough tightly (starting at the LONG side), and seal the edges when done. Cut the pecan sticky rolls into 1 inch slices, then arrange them in the baking pan on top of the caramel-pecan mixture.

Let The Dough For The Pecan Sticky Rolls Rise

Cover the pan with a dish towel and let the dough rise in a warm place until the dough has doubled in size. Shhh- here’s a secret! I actually put them outside on top of our jacuzzi to rise, because it was a really hot day!

Pecan sticky rolls in pan rising in a warm place!The dough for the sweet rolls has risen, and is now ready to bake.

Bake, Then Invert The Pecan Sticky Rolls!

Once the rolls have risen, bake them (uncovered) in a 375 degree oven for about 25 minutes, until golden brown. As soon as they are done, remove the pan from the oven and immediately INVERT the pan onto a heat proof serving platter. Let the pan stay inverted (upside down) for a minute, so that yummy caramel-pecan topping can drizzle all over the hot rolls. Now you can see why they are called pecan sticky rolls!

Remove the pan from the inverted rolls, and spoon any excess topping onto the tops of the rolls. Let the pecan sticky rolls cool just a bit before serving them! The recipe makes 14-15 rolls… and they are wonderful. Sweet, full of cinnamon, and sticky… just the way we like ’em.

Sure hope you will give this recipe a try! If you enjoy this, be sure to check out my recipes for homemade cinnamon rolls or cinnamon roll crescents. Yum! You can also find ALL of my recipes in the Recipe Index, located at the top of the page. Have a great day.

Interested In More Recipes?

Thank you for visiting this website. I appreciate you using some of your valuable time to do soIf you’re interested, I publish a newsletter 2 times per month (1st and 15th) with all the latest recipes, and other fun info. I would be honored to have you join our growing list of subscribers, so you never miss a great recipe!
There is a Newsletter subscription box on the top right side (or bottom) of each blog post, depending on the device you use, where you can easily submit your e-mail address (only) to be included in my mailing list.

You Can Also Find Me On Social Media:

Facebook page: The Grateful Girl Cooks!
Pinterest:
The Grateful Girl Cooks!
Instagram:
jbatthegratefulgirlcooks

Author's signatureRecipe Source: Oster Deluxe Bread & Dough Maker User Handbook, published 1994, Sunbeam-Oster Household Products, page 55

0 from 0 votes
Pecan Sticky Rolls
Prep Time
2 hrs 30 mins
Cook Time
25 mins
Total Time
2 hrs 55 mins
 

If you like Cinnamon Rolls, then you'll love these scrumptious homemade Pecan Sticky Rolls! Raised yeast rolls, dripping with a caramel-pecan topping.

Category: Breakfast
Cuisine: American
Keyword: pecan sticky rolls
Servings: 14
Calories Per Serving: 294 kcal
Author: JB @ The Grateful Girl Cooks!
Ingredients
For Dough:
  • 1 cup water
  • 1 egg
  • 2 Tablespoons butter , softened
  • 3 1/4 cups all-purpose flour
  • 1/4 cup granulated sugar
  • 1 teaspoon salt
  • 3 teaspoons reg. active dry yeast OR 3 teaspoons bread machine yeast OR quick acting yeast
For Spreadable Filling (to spread on rolled out dough)
  • 2 Tablespoons butter , softened (to spread on rolled out dough)
  • 1/2 cup granulated sugar (to spread on rolled dough)
  • 2 teaspoons ground cinnamon (to spread on rolled out dough)
For Caramel-Pecan Topping:
  • 1/3 cup butter , melted
  • 1/2 cup packed brown sugar
  • 1 Tablespoon corn syrup
  • 2/3 cup pecan halves
Instructions
  1. Place all dough ingredients ( into bread machine and select DOUGH cycle. (If making by hand, see NOTES section for directions).
  2. Spray a 13x9x2 inch baking pan with non-stick spray
  3. In a medium bowl, combine 1/3 cup melted butter, brown sugar, corn syrup, and pecan halves. Mix well. Spread this in the bottom of the baking pan.
  4. In a small bowl, mix together the spreadable filling (1/2 cup sugar and 2 teaspoons cinnamon). Set aside.
  5. When dough is ready, roll it out to a 15x10 inch rectangle on a lightly floured surface. Spread the 2 Tablespoons of softened butter over the surface of the dough, all the way to the edges. Sprinkle the buttered dough with the cinnamon-sugar mixture, all the way to the edges.
  6. Roll up the dough very tightly, beginning at the long (15 inch) side of the dough. Tuck in the ends and pinch the dough into the roll to seal. Using a sharp knife, cut the dough roll into 14-15 one inch slices. Arrange the cut slices on top of the pecan mixture in baking pan. Cover with a dish towel, and let rise in a warm place for about an hour (or until dough has doubled in size).
  7. Once dough has risen, place the uncovered pan in a preheated 375 degree oven. Bake rolls for 22-27 minutes (mine took 25), or until they turn golden brown. Remove the pan from the oven and immediately invert (flip over) the entire pan onto a heat proof serving platter (or tray). Don't remove the pan for about a minute or so, because you want all that sticky caramel-pecan topping to drip onto the rolls. Remove the pan after a minute or so, and spoon any remaining topping over the top of the rolls. Let cool slightly, then serve!
Recipe Notes

If you are NOT using a bread machine: In a LARGE mixing bowl, dissolve the yeast into 1 cup warm water (not hot). Let sit for about 5 minutes to make sure it bubbles (meaning the yeast is good). Add/mix in the egg, and the softened butter. Stir in the flour, sugar and salt. Mix ingredients very well. Knead dough on a lightly floured surface (for about 10 minutes) into a large ball, using lightly flour-dusted hands. Spray a LARGE bowl with non-stick spray. Place dough ball in bowl. Flip the dough over, to coat it with the spray from the bowl. Cover dough with dish towel. Let rise in a warm place for about an hour (or until doubled in size). Once dough has doubled in size, continue with recipe, as directed.

Nutrition Facts
Pecan Sticky Rolls
Amount Per Serving (1 roll)
Calories 294 Calories from Fat 99
% Daily Value*
Fat 11g17%
Saturated Fat 5g31%
Cholesterol 31mg10%
Sodium 242mg11%
Potassium 89mg3%
Carbohydrates 43g14%
Fiber 2g8%
Sugar 19g21%
Protein 4g8%
Vitamin A 250IU5%
Calcium 21mg2%
Iron 1.7mg9%
* Percent Daily Values are based on a 2000 calorie diet.

Here’s one more to pin on your Pinterest boards!If you like Cinnamon Rolls, then you'll love these scrumptious homemade Pecan Sticky Rolls! Raised yeast rolls, dripping with a caramel-pecan topping.


Save

Save

Florentine Manicotti

Florentine manicotti, filled with ricotta, Parmesan and mozzarella cheeses, and covered with marinara sauce is a meatless, easy to make Italian dish.Florentine manicotti, filled with ricotta, Parmesan and mozzarella cheeses, and covered with marinara sauce is a meatless, easy to make Italian dish.

My husband and I love Italian food! One of the dishes we enjoy occasionally is this “meatless” recipe for Florentine Manicotti. Pasta shells filled with three cheeses (creamy ricotta, mozzarella and Parmesan), spinach, and covered in spaghetti sauce. Yum. I like to think of manicotti as the Italian version of Mexican enchiladas!

For anyone unfamiliar with manicotti, it is a large, tube shaped type of pasta that is typically filled with meat or cheese and is baked in spaghetti sauce. This particular recipe is meatless; it’s delicious, and is a fairly easy dish to prepare. I use a recipe I found years ago on a box of pasta, and tweaked it a bit by adding cooked spinach and a couple additional spices to the cheesy filling, to give it a true “Florentine” touch!

Scroll Down For A Printable Recipe Card At The bottom Of The Page

Make The Filling For Florentine Manicotti

Cook a small box of frozen spinach, according to the package directions. Drain it very well, and let the spinach cool. When it has cooled off, mix up the cheese filling, and then add the spinach.

Preparing the filling for the florentine manicotti.

Prepare The Manicotti For Filling

Here’s what manicotti pasta shells look like BEFORE they are cooked. They’re each about 5 inches long. The tubes of pasta are fragile, so be very careful not to break them.

Manicotti pasta shells BEFORE cooking. Carefully add the pasta to a large pot of boiling, salted water, and cook it for 7 minutes.

The pasta shells are cooked for 7 minutes in boiling, salted water.Once done cooking, carefully remove the manicotti shells to a colander and drain them well.

After cooking, the manicotti pasta shells are drained in a colander.

Before you begin filling the Florentine manicotti put a layer of spaghetti sauce on the bottom of a baking pan.

Marinara sauce is spread on the bottom of casserole dish before adding stuffed manicotti.

Make The Florentine Manicotti

Gently fill each of the pasta tubes with the cheese and spinach filling. I hold the shell in my hand and fill one side with the cheese/spinach filling (using a spoon and sometimes a butter knife) clear to the middle. Switch to the other end of the shell and fill the other side. Try to get as much filling into the shell as possible without splitting it.

Stuffing the florentine manicotti shells before baking.Once the Florentine manicotti shells are filled, lay them on top of the spaghetti sauce.

Stuffed florentine manicotti are laid on top of sauce in baking dish.Cover the manicotti with the rest of the spaghetti sauce. I cover the entire pasta shell with sauce, then sprinkle the top with Parmesan cheese (or grated mozzarella cheese).

The manicotti are covered with sauce and Parmesan cheese, to bake.

Time To Bake!

Cover the baking pan with aluminum foil. Bake at 350 degrees for 40 minutes, then remove the foil and bake an additional 15 minutes longer. when done, the Florentine manicotti is heated through, and the cheese filling is bubbly.

Let cool for a minute or two (easier to serve up) , then remove the manicotti to serving plates using a spatula. The only thing left to do is grab a fork, dig in, and enjoy this tasty dish!

Florentine manicotti are done baking and ready to eat!Hope you will give this recipe a try!  I may not have the most mouthwatering “professional” photos to share, but trust me. Florentine manicotti are delicious, and I really think you will enjoy them! Have a great day, and please come back soon.

Looking for More ITALIAN Recipes?

You can find all of my recipes in the Recipe Index, located at the top of the page. I have lots of delicious Italian dishes you might want to check out, including:

Interested In More Recipes?

Thank you for visiting this website. I appreciate you using some of your valuable time to do soIf you’re interested, I publish a newsletter 2 times per month (1st and 15th) with all the latest recipes, and other fun info. I would be honored to have you join our growing list of subscribers, so you never miss a great recipe!
There is a Newsletter subscription box on the top right side (or bottom) of each blog post, depending on the device you use, where you can easily submit your e-mail address (only) to be included in my mailing list.

You Can Also Find Me On Social Media:

Facebook page: The Grateful Girl Cooks!
Pinterest:
The Grateful Girl Cooks!
Instagram:
jbatthegratefulgirlcooks

Author's signatureRecipe adapted from: Box of American Beauty Manicotti Pasta Shells.

0 from 0 votes
Florentine Manicotti
Prep Time
25 mins
Cook Time
1 hr
Total Time
1 hr 25 mins
 
Florentine manicotti, filled with ricotta, Parmesan and mozzarella cheeses, and covered with marinara sauce is a meatless, easy to make Italian dish.
Category: Entree
Cuisine: Italian
Keyword: florentine manicotti
Servings: 6 servings
Calories Per Serving: 332 kcal
Author: JB @ The Grateful Girl Cooks!
Ingredients
  • 6-8 uncooked manicotti pasta shells
  • 15 ounces part-skim ricotta cheese (1 3/4 cups)
  • 2 cups (8 ounces) grated mozzarella cheese
  • 10 ounces frozen chopped spinach (cooked per package directions, and drained well)
  • 1/4 cup grated Parmesan cheese
  • 2 Tablespoons fresh parsley , chopped
  • 1/2 teaspoon salt
  • 1/4 teaspoon ground black pepper
  • 1/8 teaspoon garlic powder
  • 1/8 teaspoon ground oregano
  • 3 cups (or one 28 ounce jar) prepared spaghetti sauce
  • Additional Parmesan or mozzarella cheese (for garnish, optional)
Instructions
  1. Preheat oven to 350 degrees F.
  2. Cook frozen chopped spinach per package instructions. Remove from heat; drain WELL. Let spinach cool.
  3. In a medium sized mixing bowl, combine the ricotta cheese, grated mozzarella, Parmesan cheese, parsley, salt, pepper, garlic powder and ground oregano. Stir well until fully combined.
  4. Add spinach to the cheese mixture. Stir well, to combine.
  5. Cook manicotti shells according to package instructions (add to boiling water-7 minutes cook time is typical). When done, remove from heat, drain gently, and let dry.
  6. Fill each shell using a spoon until full of filling.
  7. Spread some of the spaghetti sauce over the bottom of 13x9 baking pan (enough to fully cover); put the filled pasta in a single layer on top of sauce.
  8. Spoon the rest of the spaghetti sauce over the top of the manicotti. Sprinkle with additional grated Parmesan cheese (or mozzarella), if desired. Cover pan with aluminum foil.
  9. Bake at 350 degrees for 40 minutes; remove foil, then cook an additional 15 minutes. Manicotti should be hot and cheese bubbly when done. Remove pan from oven. Let sit for a minute or two, then gently remove manicotti to individual serving plates using a spatula.
  10. Serve with a green salad and a slice of crusty french bread, and enjoy!
Nutrition Facts
Florentine Manicotti
Amount Per Serving (1 manicotti)
Calories 332 Calories from Fat 135
% Daily Value*
Fat 15g23%
Saturated Fat 8g50%
Cholesterol 45mg15%
Sodium 1270mg55%
Potassium 736mg21%
Carbohydrates 25g8%
Fiber 3g13%
Sugar 6g7%
Protein 24g48%
Vitamin A 6720IU134%
Vitamin C 13mg16%
Calcium 596mg60%
Iron 2.9mg16%
* Percent Daily Values are based on a 2000 calorie diet.

Here’s one more to pin on your Pinterest boards!Florentine manicotti, filled with ricotta, Parmesan and mozzarella cheeses, and covered with marinara sauce is a meatless, easy to make Italian dish.

Save

Save

Save

Red, White and Blue Ice Cream Sundaes

Homemade red, white and blue ice cream sundaes, with strawberries, blueberries, chocolate syrup and whipped cream make patriotic celebrations special!Red, White and Blue Ice Cream Sundaes / The Grateful Girl Cooks!
This past weekend another celebration of Independence Day occurred in the United States. It’s such a special day!

We are so very grateful to live in this country, and thankful for all who have stood boldly and sacrificed their lives to provide us with the freedoms we are blessed to have here in the U.S.A.

We celebrated with Red, White and Blue Ice Cream Sundaes! They are so easy to make… here’s how!

Scroll Down For A Printable Recipe Card At The Bottom Of The Page

Making Red, White and Blue Ice Cream Sundaes Is A Cinch!

Homemade vanilla ice cream is topped with whipped cream, chocolate syrup, blueberries, blue sprinkles, and fresh sliced strawberries.

You really don’t need a recipe for that, but I am including my basic homemade vanilla ice cream recipe below, for anyone who enjoys making homemade ice cream, and might want it.

Making homemade vanilla ice cream is what I enjoy doing! The ice cream part is easy. Mix up heavy whipping cream, milk, sugar and vanilla, then pour it into an ice cream maker.

Pouring ice cream mixture into machine for freezing.
After about 20 minutes, the vanilla ice cream has frozen to soft serve consistency. We LOVE making ice cream in our little Cuisinart ice cream machine, which I received as a gift!

Homemade vanilla ice cream is ready to make into ice cream sundaes!
Remove the ice cream from the machine, and put it into a sealed container in the freezer to firm up some more (an hour or two).

Time To Serve The Red, White and Blue Ice Cream Sundaes!

When ready to serve, scoop vanilla ice cream into serving dishes. Spray some whipped cream on top (along with some colored decorating sugar, if desired).

Drizzle ice cream with chocolate syrup, then surround ice cream with blueberries and sliced strawberries, and serve! Red, White, and Blue Ice Cream Sundaes, for the win!

Red, White and Blue Ice Cream Sundaes are decorated and ready to eat!
These simple ice cream sundaes are colorful, easy and delicious, and they are perfect for any patriotic celebration!

By the way, if you enjoy ice cream sundaes, check out the recipe for making a Strawberry Almond Romanoff Sundae. YUM!

It doesn’t have to be complicated, just fun! Happy Independence Day, from our home to yours!

Sparklers lit, and wishing you a Happy 4th of July!
Have a great week! Let’s be grateful for the freedoms we celebrate in this great country. We are blessed.

Thanks for stopping by, and please come back soon for more family-friendly recipes. Take care, and may God bless you.

Looking For More HOMEMADE ICE CREAM Recipes?

You can find all of my recipes in the Recipe Index, located at the top of the page. A few homemade ice cream recipes I think you will really enjoy include:

Want More Recipes? Get My FREE Newsletter!

I publish a newsletter 2 times per month (1st and 15th) with lots of recipes, tips, etc..
Would you like to join our growing list of subscribers?

There is a Newsletter subscription box on the top right (or bottom) of each blog post, depending on the device you use.
You can submit your e-mail address there, to be added to my mailing list.

Find Me On Social Media:

Facebook page: The Grateful Girl Cooks!
Pinterest:
The Grateful Girl Cooks!
Instagram:
jbatthegratefulgirlcooks

Author's signature

↓↓ PRINTABLE RECIPE BELOW ↓↓

0 from 0 votes
Red, White and Blue Ice Cream Sundaes
Prep Time
25 mins
Cook Time
0 mins
Total Time
25 mins
 

Homemade red, white and blue ice cream sundaes, with strawberries, blueberries, chocolate syrup and whipped cream make patriotic celebrations special!

Category: Dessert
Cuisine: American
Keyword: ice cream sundaes
Servings: 6 (1 cup each) 1.5 qts. total
Calories Per Serving: 439 kcal
Author: JB @ The Grateful Girl Cooks!
Ingredients
For ice cream:
  • 2 cups heavy whipping cream
  • 1 cup milk
  • 3/4 cup granulated sugar
  • 2 teaspoons vanilla extract
For sundae:
  • Chocolate syrup
  • Prepared whipping cream (spray can or fresh)
  • Blue or red colored decorating sugar (optional)
  • Sliced strawberries (Fresh)
  • Blueberries (Fresh)
Instructions
  1. In large mixing bowl, combine the ice cream ingredients. Whisk well, to combine and dissolve the sugar. Pour into freezer canister, and freeze, according to manufacturer's instructions.

  2. When ice cream is "done", remove to a freezeable container, seal and place in freezer for at least 2 hours to firm up ice cream.
  3. When ready to serve, scoop ice cream into serving dishes, and garnish with sliced strawberries, blueberries, whipped cream, chocolate syrup, and colored decorating sugar. Serve and enjoy!
Recipe Notes

Prep time indicated is for making the ice cream. It does not include additional time in the freezer where the ice cream firms up. Caloric calculation is for 1 cup ice cream, plus all toppings (evenly divided between 6 servings)

Nutrition Facts
Red, White and Blue Ice Cream Sundaes
Amount Per Serving (1 (1 cup per, plus toppings))
Calories 439 Calories from Fat 279
% Daily Value*
Fat 31g48%
Saturated Fat 19g119%
Cholesterol 116mg39%
Sodium 48mg2%
Potassium 156mg4%
Carbohydrates 34g11%
Sugar 31g34%
Protein 3g6%
Vitamin A 1265IU25%
Vitamin C 14.6mg18%
Calcium 106mg11%
Iron 0.1mg1%
* Percent Daily Values are based on a 2000 calorie diet.

Here’s one more to pin on your Pinterest boards!Homemade red, white and blue ice cream sundaes, with strawberries, blueberries, chocolate syrup and whipped cream make patriotic celebrations special!


Save

Save

Melba Pie!

You’ll love Melba Pie for your next dessert… a classic, double-crusted pie, featuring the wonderful, sweet flavors of fresh raspberries and peaches!You'll love Melba Pie for your next dessert... a classic, double-crusted pie, featuring the wonderful, sweet flavors of fresh raspberries and peaches!
Do you know what Melba Pie is? I sure didn’t… until I stumbled upon this recipe in an old cookbook of mine. I’d heard of Peach Melba (a classic dessert) in the past, but didn’t know there was even such a thing as a Melba PIE. Melba Pie is a delicious pie which features raspberries AND peaches! Go figure!

This recipe is for a two crusted pie. One crust on the bottom, the other (you guessed it!) on the top. The filling is a snap to make, so whether you like to make your own pie crust (here’s my recipe for “Mom’s Pie Crust“), or you prefer to buy pre-made pie crust dough, it’s a rather simple and tasty pie to make with the summer bounty of peaches and raspberries available.

Scroll Down For A Printable Recipe Card At The Bottom Of The Page

How To Make A Melba Pie

First thing you need to do is prepare a DOUBLE crust pastry shell. Once you have the pie dough ready, you need to make the filling. Of course, you can also purchase commercially prepared pie crust (you will need two crusts), if that’s more convenient!

In a medium sized saucepan, mix together the granulated sugar, cornstarch, and the cinnamon. Stir in the raspberries (if using FROZEN raspberries, do NOT drain them… add it all in).

Fresh raspberries mixed with sugar, cinnamon and cornstarch for pie filling.
Cook  and stir the raspberry mixture until it thickens and the mixture comes to a boil.

Raspberries, sugar, cinnamon and cornstarch are cooked until pie filling thickens.
Once it begins to boil and is thickened, add the peaches and lemon juice, then remove from heat.

Fresh peach slices and lemon juice added to melba pie filling.Melba pie filling is cooked until thickened.
Fill The Pie

Line a pie pan with the bottom pastry. Prick the dough in several spots with the tines of a fork. Carefully add the pie filling on top of the pie crust.

Raspberry-peach melba pie filling added into to pie crust.
Top the Melba pie filling with the other pie crust. Seal, and decoratively flute the edges of the pie crust dough. Cut a couple of slits into the top of the pie, to allow steam to escape while baking.

A top crust is placed on top of melba pie filling, and edges of crust are crimped.Time To Bake The Melba Pie!

Bake the pie for about 30-35 minutes (or until light golden brown on top). Some of the juices may be bubbling around the slits you cut in the top crust. Remove the pie from the oven, and transfer carefully to a wire rack to cool. When the pie has cooled, it’s ready to serve.

Slice of pie is removed to show raspberry-peach melba pie filling.
Time To EAT!

Slice a nice piece of pie, and serve it with some vanilla ice cream on top or on the side! Yum! Take a few bites, and enjoy your homemade raspberry and peach Melba Pie!

Slice of melba pie with a scoop of vanilla ice cream is always a big hit!

I hope you will find time to make this delicious pie, and as always, I really trust you will enjoy it! Don’t forget you can check out ALL my recipes in the Recipe Index, located at the top of the page.

If you enjoy baking (and EATING) pies, you might also be interested in some of my other pie recipes, including Boysenberry, Dutch Crumb Apple, Strawberry-Rhubarb, Old-Fashioned Banana Cream, Peach, Strawberry, or Toll House. You can find the rest in the Recipe Index, at the top of the page.

Interested In More Recipes?

Thank you for visiting this website. I appreciate you using some of your valuable time to do soIf you’re interested, I publish a newsletter 2 times per month (1st and 15th) with all the latest recipes, and other fun info. I would be honored to have you join our growing list of subscribers, so you never miss a great recipe!
There is a Newsletter subscription box on the top right side (or bottom) of each blog post, depending on the device you use, where you can easily submit your e-mail address (only) to be included in my mailing list.

You Can Also Find Me On Social Media:

Facebook page: The Grateful Girl Cooks!
Pinterest:
The Grateful Girl Cooks!
Instagram:
jbatthegratefulgirlcooks

Have a GREAT day, friends.

Author's signature

Recipe Source: “The New Pillsbury Family Cookbook”, copyright 1973, The Pillsbury Company, page151.

0 from 0 votes
Melba Pie!
Prep Time
20 mins
Cook Time
30 mins
Total Time
50 mins
 

You'll love Melba Pie for your next dessert... a classic, double-crusted pie, featuring the wonderful, sweet flavors of fresh raspberries and peaches!

Category: Dessert
Cuisine: American
Keyword: melba pie
Servings: 8 servings
Calories Per Serving: 263 kcal
Author: JB @ The Grateful Girl Cooks!
Ingredients
  • Double crust pastry (homemade or store-bought)
  • 1/3 cup granulated sugar
  • 3 Tablespoons cornstarch
  • 1/4 teaspoon cinnamon
  • 1 1/4 cups (10 oz. package) raspberries (fresh or frozen-if frozen, thawed but UNDRAINED)
  • 2 cups fresh peach slices (can also use a 1 lb.,13 oz. can of peaches, DRAINED)
  • 1 Tablespoon lemon juice
Instructions
  1. While making the pie filling, preheat your oven to 425 degrees.
  2. Prepare a double crust pastry shell. Place one of the crusts into a 9" pie pan. Prick the bottom of the crust with the tines of a fork.
  3. Place the granulated sugar, cornstarch and cinnamon into a medium sized pan. Gently stir in the (undrained) raspberries. Cook this, (while stirring constantly so it won't stick) on medium heat until it begins to thicken, and comes to a boil.
  4. Stir in the sliced (drained) peaches, and the lemon juice. Once ingredients are all combined, pour the pie filling into the pie pastry shell.
  5. Put the other pie crust on top of the filling; seal the two crusts together around edges, then decoratively flute the edges.
  6. Using a sharp knife, make a couple small slits in the center of the top crust.
  7. Bake pie in preheated 425 degree oven for approximately 30 minutes, or until the crust has begun to turn golden brown.
  8. Remove pie to a wire rack to cool.
  9. Serve with a scoop of vanilla ice cream... and enjoy!
Nutrition Facts
Melba Pie!
Amount Per Serving (1 slice)
Calories 263 Calories from Fat 99
% Daily Value*
Fat 11g17%
Saturated Fat 3g19%
Sodium 174mg8%
Potassium 142mg4%
Carbohydrates 37g12%
Fiber 2g8%
Sugar 12g13%
Protein 3g6%
Vitamin A 125IU3%
Vitamin C 8.2mg10%
Calcium 15mg2%
Iron 1.3mg7%
* Percent Daily Values are based on a 2000 calorie diet.

Here’s one more to pin on your Pinterest pages!You'll love Melba Pie for your next dessert... a classic, double-crusted pie, featuring the wonderful, sweet flavors of fresh raspberries and peaches!


Save

Save

Purple Coleslaw

Purple coleslaw, with homemade poppyseed dressing, is a quick, easy salad that’s perfect for BBQ’s! Slaw turns deep purple the longer it refrigerates.Purple coleslaw, with homemade poppyseed dressing, is a quick, easy salad that's perfect for BBQ's! Slaw turns deep purple the longer it refrigerates.
I happen to love coleslaw, and the crunch of the cabbage, and the creamy, slightly sweet dressing. Coleslaw is so easy to make, and I like the way this Purple Coleslaw deepens in it’s purple color the longer it is mixed together. More color on my plate!

It’s easy to go to the produce section and buy pre-shredded coleslaw mixes. Also it is easy to go to the salad dressing section and buy a pre-made coleslaw dressing. Mix them together and poof! Coleslaw. Well, I totally “get” the convenience of it, but I think it’s fun being able to make a great coleslaw using fresh produce. I also enjoy making my own “not out of the bottle” coleslaw dressing.

Scroll Down For A Printable Recipe Card At The Bottom Of The Page

Why Does It Turn Purple?

Store bought coleslaw mixes usually have lots of shredded green cabbage, shredded carrots and a teensy,tiny bit of purple cabbage. I like to make my own coleslaw THAT way, but I also love this recipe which adds a much larger amount of purple cabbage.

This larger amount of purple cabbage ultimately colors the dressing purple the longer the coleslaw is mixed together. It’s kinda fun to serve a purple coleslaw, and it’s a breeze to make my own!

How To Make Purple Coleslaw

First you shred two cups of purple cabbage into a large mixing bowl. I use a mandolin, but you can also do this with a cheese grater.

The purple cabbage is shredded on a mandoline or box grater.Shredded purple cabbage in bowl.
Now shred the green cabbage and some carrots into the same bowl.

Green cabbage is shredded on a mandoline or box grater.
Now you will have all the coleslaw veggies in the large mixing bowl. See how EASY that is?

Grated purple and green cabbage, plus carrots in bowl.
Mix these colorful purple coleslaw ingredients together. See how pretty it is already?

Green and purple cabbage, plus carrot shreds are mixed together in large bowl.
Make The Dressing For The Purple Coleslaw

The coleslaw dressing has light mayonnaise, apple cider vinegar, poppyseeds, and a little salt, pepper and sugar. Mix these ingredients together in a small bowl. That’s IT!

The poppyseed salad dressing is easy to make for this slaw.
Add the dressing to the bowl with the purple coleslaw, and stir well, to combine.

A poppyseed dressing is added to the purple coleslaw, and mixed in.
Refrigerate The Purple Coleslaw For Best Flavor (And Color)

Cover the coleslaw with plastic wrap and refrigerate for at least an hour (the longer the better), so the flavors can come together. When you are ready to serve, give it a good stir, and dig in. Refrigerate leftovers.

NOTE: The longer you keep the purple coleslaw refrigerated (and stirred), the more purple the dressing will become, as the deep purple color from the cabbage mixes with the dressing. It’s kind of a unique touch for a delicious homemade coleslaw.

The longer the purple coleslaw is refrigerated, the deeper the color becomes.
This is a perfect side dish for summer BBQ’s. We really enjoy this great purple coleslaw. Sure hope you will give it a try. Have a great week!

Looking For More COLESLAW Recipes?

You can find ALL my recipes in the Recipe Index, located at the top of the page. I have lots of great salads you’ll enjoy, including these other coleslaw recipes:

Interested In More Recipes?

Thank you for visiting this website. I appreciate you using some of your valuable time to do soIf you’re interested, I publish a newsletter 2 times per month (1st and 15th) with all the latest recipes, and other fun info. I would be honored to have you join our growing list of subscribers, so you never miss a great recipe!
There is a Newsletter subscription box on the top right side (or bottom) of each blog post, depending on the device you use, where you can easily submit your e-mail address (only) to be included in my mailing list.

You Can Also Find Me On Social Media:

Facebook page: The Grateful Girl Cooks!
Pinterest:
The Grateful Girl Cooks!
Instagram:
jbatthegratefulgirlcooks

Recipe source: My brain and lots of experimenting…

Author's signature

0 from 0 votes
Purple Coleslaw
Prep Time
15 mins
Cook Time
0 mins
Total Time
15 mins
 

Purple coleslaw, with homemade poppyseed dressing, is a quick, easy salad that's perfect for BBQ's! Slaw turns deep purple the longer it refrigerates.

Category: Side Dish
Cuisine: American
Keyword: purple coleslaw
Servings: 6 (1/2 cup) servings
Calories Per Serving: 288 kcal
Author: JB @ The Grateful Girl Cooks!
Ingredients
For Coleslaw:
  • 2 cups shredded green cabbage
  • 1 cup shredded purple cabbage
  • 1/2 cup shredded carrots
For Coleslaw Dressing:
  • 1 cup mayonnaise
  • 2 Tablespoons apple cider vinegar
  • 1/4 teaspoon salt
  • 1/4 teaspoon pepper
  • 1 teaspoon poppyseeds
  • 2 Tablespoons granulated sugar
Instructions
  1. Shred green cabbage, purple cabbage, and carrots. Place into a large mixing bowl. Mix well, to combine.
  2. In a small mixing bowl, combine the mayonnaise, apple cider vinegar, salt, pepper, poppyseeds, and granulated sugar. Mix well, to thoroughly combine.
  3. Add the dressing to the slaw mixture. Stir well until all veggies are coated with dressing. Cover coleslaw with plastic wrap; place in refrigerator for a minimum of 1 hour (preferably longer), so that flavors come together and the slaw is very cold.
  4. Serve, and enjoy!
Recipe Notes

Prep time does not include inactive refrigeration time. The longer the cole slaw is refrigerated, the better it is, and the more PURPLE it becomes!

Nutrition Facts
Purple Coleslaw
Amount Per Serving (1 g)
Calories 288 Calories from Fat 252
% Daily Value*
Fat 28g43%
Saturated Fat 4g25%
Cholesterol 15mg5%
Sodium 349mg15%
Potassium 117mg3%
Carbohydrates 7g2%
Fiber 1g4%
Sugar 6g7%
Protein 1g2%
Vitamin A 1995IU40%
Vitamin C 17.7mg21%
Calcium 30mg3%
Iron 0.4mg2%
* Percent Daily Values are based on a 2000 calorie diet.

Here’s one more to pin on your Pinterest boards!Purple coleslaw, with homemade poppyseed dressing, is a quick, easy salad that's perfect for BBQ's! Slaw turns deep purple the longer it refrigerates.


Save

Save

Make Grilled Pizzas On Your BBQ!

Learn how easy it is to make grilled pizzas on your BBQ grill, which helps keep your kitchen cool in the Summer!Learn how easy it is to make grilled pizzas on your BBQ grill, which helps keep your kitchen cool this Summer!
Want to beat the heat in the kitchen this summer? Why not make grilled pizzas on your BBQ grill? That way you can kill two birds with one stone… keep the ol’ kitchen cool, AND enjoy a great homemade pizza!

I heard someone say they loved grilled pizzas right off the BBQ grill. Wait… What? It sounded like a great cooking experiment so I decided to give it a try. Result? Completely awesome!  It’s really much easier than I thought it would be! Get your hands on some pizza dough. Purchase it at the grocery store or make your own.

Scroll Down For A Printable Recipe Card At The Bottom Of The Page

Make Or Purchase Pizza Dough

I like to make my own grilled pizza dough. If you want to see the recipe for the dough I use, you can find it on my blog post for “Make It Yourself! Pepperoni Pizza”. The most important tip about this way of making pizza is to have all the pizza toppings ready to go (chopped, diced, etc.) before you put the dough on the grill!

Make the pizza dough (or open the package of pre-made dough – whatever). When done, divide dough into 6-8 little balls (if wanting small individual sized pizzas) OR (as in my pictures), divide dough into 2 medium sized dough balls. Roll or stretch dough out into a round shape (don’t worry if they’re not perfectly round shaped… no biggie).

Pizza dough rising for grilled pizzas

Time To Make Grilled Pizzas On Your BBQ!

Heat your BBQ grill on medium high heat. Brush olive oil (important-don’t forget this step – this will keep dough from sticking to grill, and will crisp the dough up a bit!!!) on both sides of the circle-shaped pizza dough. Carefully slide the pizza dough onto the grill rack.

Cook dough for 3-4 minutes on the first side. The bottom should be lightly browned and have grill marks. The top of the dough will look done. Carefully remove dough and turn it upside down (*GRILLED SIDE UP) onto a cutting board.

Quickly add the sauce and toppings to your pizza. If you’re feeling brave, just flip the pizza over and add the sauce and toppings while it is on the grill. (that was too hot for me…I just had a wood cutting board outside and transferred it back and forth. Worked like a charm.

Pizza dough is removed from BBQ and toppings are added, then back onto BBQ grill
Carefully slide pizzas back onto grill and continue to cook for 3-4 minutes. We put the lid on the BBQ, which helped the cheese melt. The bottom of the dough should be lightly browned.

Grilled pizzas made on the BBQ are ready to slice and eat!

Remove pizzas from grill, slice and serve, with any last minute garnishes. Serve immediately… enjoy!

Grilled pizza sliced and served... straight off the BBQ grill!
We loved the taste of the grilled pizzas… and I personally loved the fact that our kitchen stayed cool! We loved our grilled BBQ chicken pizza, and our veggie delight pizza, and look forward to making this easy dinner again this summer. It sure helps to keep our kitchen cool!

I am not posting a printable recipe because everyone likes different kinds of pizza, toppings, sauces, AND pizza dough. I simply wanted to describe the “how-to’s” of grilling fresh pizzas on a BBQ so anyone could do it themselves! Hope you will give it a try!

Looking for More PIZZA Recipes?

You can find ALL my recipes in the Recipe Index, located at the top of the page. I have a variety of pizza recipes, which include:

Interested In More Recipes?

Thank you for visiting this website. I appreciate you using some of your valuable time to do soIf you’re interested, I publish a newsletter 2 times per month (1st and 15th) with all the latest recipes, and other fun info. I would be honored to have you join our growing list of subscribers, so you never miss a great recipe! 

There is a Newsletter subscription box on the top right side (or bottom) of each blog post, depending on the device you use, where you can easily submit your e-mail address (only) to be included in my mailing list.

You Can Also Find Me On Social Media:

Facebook page: The Grateful Girl Cooks!
Pinterest:
The Grateful Girl Cooks!
Instagram:
jbatthegratefulgirlcooks

Have a great day.

Author's signature

Here’s one more to pin on your Pinterest boards!Learn how easy it is to make grilled pizzas on your BBQ grill, which helps keep your kitchen cool this Summer!

Save

Save

Quick and Easy Open Faced Tuna Melts

It’s been unusually HOT in the Pacific Northwest for the past several weeks. Temps are supposed to hover near 100 degrees this coming weekend, which is “not the norm” for late June in Oregon. We want quick  and easy meals (don’t want to heat up the kitchen cooking). Enter our “go-to” standby… Quick and Easy Open Faced Tuna Melts!!!!Quick and Easy Open Faced Tuna Melts / The Grateful Girl Cooks!
These open faced tuna melts are ridiculously easy… so easy in fact, that I’m not even gonna post the “recipe”. They actually are delicious, and are very quick to prepare!

First you toast some English muffins. I used sourdough (delicious!). Allow for one half or two halves per serving. Once toasted, place some cheese (gruyere, smoky gouda, or cheddar) on top of the muffin. (I have used all of these cheeses in the past. Pictures are with Smoky Gouda.

Quick and Easy Open Faced Tuna Melts / The Grateful Girl Cooks!
Put some tuna on top to cover the muffin. (Use the tuna you prefer, mixed up with whatever you like in your tuna salad). All I used for mine was one can (one can is enough for 4 half muffins) of albacore tuna, mixed with mayonnaise. That’s it!  But for goodness sake, make your tuna the way you like it!

Quick and Easy Open Faced Tuna Melts / The Grateful Girl Cooks!
Slice some really good ripe tomatoes and put a slice on top of each muffin. Sprinkle with a pinch of salt, pepper, dried parsley and dried basil. Just a touch.

Quick and Easy Open Faced Tuna Melts / The Grateful Girl Cooks!
Put the english muffins on a wire rack and place under a broiler. DO NOT put them directly under the broiler. Put them on the middle rack of your oven.

It will take a few minutes to broil them, but by putting them on the middle rack, instead of directly under the broiler, all the ingredients will have a chance to get hot, and that cheese on the bottom will melt.

Remove from broiler when cheese is bubbly and the tuna has just started to lightly turn golden.

Quick and Easy Open Faced Tuna Melts / The Grateful Girl Cooks!
Remove tuna melts from wire rack with a spatula. Place on serving plates. I like to put some red leaf lettuce leaves under the tuna melts just for some added color, to make it look good, but that is totally optional.

You can either pick them up and eat them or cut them with knife and fork… whatever suits you! They’re really delicious! Sure hope you’ll give ’em a try. Good for a quick, filling lunch, or dinner on a really HOT evening! Been making these for years and years, and have never been disappointed!

Quick and Easy Open Faced Tuna Melts / The Grateful Girl Cooks!Have a wonderful week… may you feel gratitude for all you experience this week, and above all else…may you deeply know just how much God loves you!

Interested In More Recipes?

Thank you for visiting this website. I appreciate you using some of your valuable time to do soIf you’re interested, I publish a newsletter 2 times per month (1st and 15th) with all the latest recipes, and other fun info. I would be honored to have you join our growing list of subscribers, so you never miss a great recipe!

There is a Newsletter subscription box on the top right side (or bottom) of each blog post, depending on the device you use, where you can easily submit your e-mail address (only) to be included in my mailing list.

You Can Also Find Me On Social Media:
Facebook page: The Grateful Girl Cooks!
Pinterest: The Grateful Girl Cooks!
Instagram: jbatthegratefulgirlcooks

Quick and Easy Open Faced Tuna Melts / The Grateful Girl Cooks!


Here’s one more to pin on your Pinterest boards!Quick and Easy Open Faced Tuna Melts / The Grateful Girl Cooks!

Save

Save

Homemade Peach Ice Cream

Fresh peaches and peach nectar bring flavor to delicious homemade peach ice cream (a Food Network recipe), easily made in an ice cream machine!Fresh peaches and peach nectar bring flavor to delicious homemade peach ice cream (a Food Network recipe), easily made in an ice cream machine!
It’s officially SUMMER!!! Time for BBQ’s with friends, lots of sunshine, starlit evenings hanging out on our back deck, ping pong tournaments, and Homemade Peach Ice Cream!  What could be better than a big old bowl of frozen peachy goodness on a hot summer day?

I found this recipe from Patrick and Gina Neely on The Food Network’s website a couple years ago, and thought I would give it a try! I love experimenting with new recipes for homemade ice cream, and this one sounded like a winner!

Scroll Down For A Printable Recipe Card At The Bottom Of The Page

Top Homemade Peach Ice Cream With Pecan Praline Sauce!

Their recipe for homemade peach ice cream also included instructions for a wonderful pecan and praline topping. This praline topping is the perfect accompaniment to the ice cream! It is called Southern Praline Sauce and it tastes fantastic, served warm over this homemade peach ice cream!

A praline sauce is made to add to the top of each scoop of homemade peach ice cream!

Preparing The Homemade Peach Ice Cream

The peaches are peeled, pitted, sliced and then chopped, which is about the only “difficult” thing about this recipe… ha ha! After that, cook the peaches with other ingredients, then blend and let it cool. When that is done, freeze the homemade peach ice cream to creamy perfection in an ice cream maker!

Fresh peaches are peeled, pitted, sliced and then chopped to add to ice cream base.

Time To Freeze The Ice Cream!

Add the ice cream mixture to an ice cream machine and process, according to manufacturer instructions. The recipe will yield approximately 1.5 quarts, for about 6 servings. Once finished, I put the semi-firm ice cream into a covered container, and place it back into my refrigerator’s freezer. This helps it freeze and firm up a little bit more (1-2 hours), for best texture!

I use a Cuisinart ice cream machine to make homemade peach ice cream.

Time To Eat!

When you are ready to serve, just scoop it right up. The homemade peach ice cream tastes really good, especially when topped with the praline sauce, which is a yummy addition of flavor!

Homemade Peach Ice Cream topped with a praline sauce, in a glass dish.
Whether you make the praline sauce or not, this peach ice cream is fabulous! The recipe uses fresh peaches, peach nectar, and sour cream, etc., so you KNOW it has to be yummy! I was fortunate to use some of the fresh juicy peaches I picked at a local farm to make this ice cream!

Fresh peaches were picked and used to make homemade peach ice cream!
Anyways… this is a great recipe, all you ice cream lovers out there. If you’re looking for a good recipe for Homemade Peach Ice Cream to add to your summer enjoyment, this is one I recommend, as well as my recipe for Perfectly Peachy Ice Cream. Hope you’ll give it a try. It’s amazing!

Looking For More ICE CREAM Recipes?

You can find all of my recipes in the Recipe Index, located at the top of the page. I have quite a few recipes for homemade ice cream, including:

Interested In More Recipes?

Thank you for visiting this website. I appreciate you using some of your valuable time to do soIf you’re interested, I publish a newsletter 2 times per month (1st and 15th) with all the latest recipes, and other fun info. I would be honored to have you join our growing list of subscribers, so you never miss a great recipe!
There is a Newsletter subscription box on the top right side (or bottom) of each blog post, depending on the device you use, where you can easily submit your e-mail address (only) to be included in my mailing list.

You Can Also Find Me On Social Media:

Facebook page: The Grateful Girl Cooks!
Pinterest:
The Grateful Girl Cooks!
Instagram:
jbatthegratefulgirlcooks

Author's signaturePeach Ice Cream Recipe Source: http://www.foodnetwork.com/recipes/patrick-and-gina-neely/neelys-homemade-peach-ice-cream-recipe.html

0 from 0 votes
Homemade Peach Ice Cream
Prep Time
30 mins
Cook Time
10 mins
Total Time
40 mins
 

Fresh peaches and peach nectar bring flavor to delicious homemade peach ice cream (a Food Network recipe), easily made in an ice cream machine!

Category: Dessert
Cuisine: American
Keyword: peach ice cream
Servings: 6 servings (1.5 qts.)
Calories Per Serving: 487 kcal
Author: JB @ The Grateful Girl Cooks!
Ingredients
  • 5 large ripe peaches , peeled, pitted, chopped
  • ¼ cup water
  • 12 ounces peach nectar (I used Kerns brand- found in juice aisle)
  • 1 cup granulated sugar
  • ½ cup sour cream
  • 1 pint heavy whipping cream
  • 1/4 teaspoon vanilla extract
  • 2 teaspoons lemon juice
Instructions
  1. Put the chopped peaches into a medium saucepan. Add water and canned peach nectar to the peaches. Stir to combine. Cook on medium heat until peaches have softened and cooked (about 10 minutes). Remove pan from heat. Drain off the peach juice (you can discard the leftover juice). Pour the peaches into a large mixing bowl. Stir in the granulated sugar, then let the peaches sit for awhile, so they cool back down to room temperature.

  2. Once peaches have cooled to room temp., add in sour cream, whipping cream, vanilla extract, and lemon juice. Blend well, using an immersion blender, food processor, or a blender (might have to do in batches).

  3. Pour peach mixture into the canister of your ice cream freezer and freeze, according to your particular manufacturer's instructions. When done, put the ice cream in a covered container and freeze for a couple hours to firm it up a bit.
  4. OPTIONAL: If desired, serve with warm Southern Praline Sauce over the top of the ice cream (see link in post for recipe). Serve, and enjoy!

Nutrition Facts
Homemade Peach Ice Cream
Amount Per Serving (1 (1/6th of total))
Calories 487 Calories from Fat 297
% Daily Value*
Fat 33g51%
Saturated Fat 20g125%
Cholesterol 117mg39%
Sodium 45mg2%
Potassium 323mg9%
Carbohydrates 48g16%
Fiber 1g4%
Sugar 44g49%
Protein 3g6%
Vitamin A 1685IU34%
Vitamin C 9.6mg12%
Calcium 80mg8%
Iron 0.3mg2%
* Percent Daily Values are based on a 2000 calorie diet.

Here’s one more to pin on your Pinterest boards!Fresh peaches and peach nectar bring flavor to delicious homemade peach ice cream (a Food Network recipe), easily made in an ice cream machine!


Save

Save