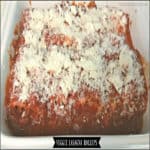
Boysenberry Pie

Enjoy the flavor of summer berries with homemade Boysenberry Pie! Serve a slice topped with vanilla ice cream for a classic, delicious dessert!Enjoy the flavor of summer berries with homemade Boysenberry Pie! Serve a slice topped with vanilla ice cream for a classic, delicious dessert!

When I was growing up in Southern California, I LOVED to visit my Great-Aunt’s home in the summer, because she grew boysenberries in her backyard. We could pick them right out of her garden and eat them.

Sometimes we would get lucky and she would bake a Boysenberry Pie for us! This is one of my all-time FAVORITE pies… and talk about delicious!!!! Oh My!

Scroll Down For A Printable Recipe Card At The Bottom Of The Page

I Grew Up Enjoying Boysenberry Pie At Knott’s Berry Farm

Another reason I love homemade boysenberry pie is due to family trips to Knott’s Berry Farm in Southern CA as I was growing up. Our family always stopped into their restaurant for their famous Fried Chicken Dinner and, of course, their FAMOUS Boysenberry Pie for dessert. YUMMO!!! What a delicious treat!

This is a fresh picked boysenberry... my FAVORITE!

I  LOVE to go to a local U-Pick Farm each summer and pick boysenberries while ripe, and store them away so I can make a Boysenberry Shortbread Tart, a cobbler, or this Boysenberry Pie any time I want to during the year.

The recipe I am posting is for a 9-inch boysenberry pie, but I’ve included quantity instructions for an 8 inch pie in the Notes section of the printable recipe.

This Boysenberry Pie Recipe Is An Oldie, But A Goodie!

The recipe I use for my Boysenberry Pie is one I have been using for nearly 40 years. It is straight from the pages of a cookbook I received as a wedding present YEARS AND YEARS AGO. The recipe is as easy as making (or buying) a double pie crust, mixing up the pie ingredients, adding it to the pie crust, then baking.

I use this recipe from my blog to make pie crusts: DIY – Mom’s Pie Crust.  Always makes a flaky, great crust.  I either make a double crust pie or I make a lattice-weaved crust pie.

Preparing the pie crust to make a boysenberry pie.

Whether you make your own crust OR buy it, this pie is delicious! Here are picture of both ways I make my crusts for this pie. The first photo is a traditional double crust boysenberry pie.

Boysenberry Pie, with a traditional double crust.

This boysenberry pie was made with a lattice-weaved crust. We sure love this pie!

Boysenberry pie, with a lattice crust.

I hope you will consider making this classic dessert!  The recipe is also adaptable for using blackberries, too!!  I use fresh berries whenever they are available, but it is also fine to use unsweetened frozen berries (thawed before adding to pie).

Serve Boysenberry Pie A La Mode!

Homemade boysenberry pie is a delicious dessert… especially with a scoop of vanilla ice cream!), and for me, brings back sweet memories of childhood, spent in the company of my wonderful family!

Boysenberry Pie, served with a scoop of vanilla ice cream!
Hope you enjoy a wonderful day, full of sweet memories! Hope you make this delicious dessert!

Looking For More PIE Recipes?

You can find all of my pie recipes in the Recipe Index, located at the top of the page. A few family favorites include:

Interested In More Recipes?

Thank you for visiting this website. I appreciate you using some of your valuable time to do soIf you’re interested, I publish a newsletter 2 times per month (1st and 15th) with all the latest recipes, and other fun info. I would be honored to have you join our growing list of subscribers, so you never miss a great recipe!
There is a Newsletter subscription box on the top right side (or bottom) of each blog post, depending on the device you use, where you can easily submit your e-mail address (only) to be included in my mailing list.

You Can Also Find Me On Social Media:
Facebook page: The Grateful Girl Cooks!
Pinterest: The Grateful Girl Cooks!
Instagram: jbatthegratefulgirlcooks

Author's signaturePie Recipe Source: “The New Pillsbury Family Cookbook”, copyright 1973, the Pillsbury Company, page 149.

Pie Crust Recipe:  http://www.thegratefulgirlcooks.com/diy-moms-pie-crust/

0 from 0 votes
Boysenberry Pie
Prep Time
20 mins
Cook Time
40 mins
Total Time
1 hr
 
Enjoy the flavor of summer berries with homemade Boysenberry Pie! Serve a slice topped with vanilla ice cream for a classic, delicious dessert!
Category: Dessert
Cuisine: American
Keyword: boysenberry pie
Servings: 8 servings
Calories Per Serving: 368 kcal
Author: JB @ The Grateful Girl Cooks!
Ingredients
For the pie crusts:
  • 2 Two pastry pie crusts (one for top, one for bottom-homemade or store bought)
For the Pie Filling (a 9 inch pie):
  • 4 cups boysenberries (fresh)
  • 1 cup granulated sugar
  • 1/3 cup all purpose flour
  • 1/4 teaspoon cinnamon
  • 2 Tablespoons butter
Instructions
  1. Preheat oven to 425 degrees.
  2. In a large bowl, gently mix together the boysenberries, sugar, all purpose flour and cinnamon. Pour the fruit mixture into a pastry lined pie pan. Cut the butter into small pieces; dot the top of the fruit with the butter.

  3. Top the pie with the second crust; completely seal and flute the edges to make the crust. Make a slight cut with a knife in the middle of the top crust to vent the pie. If you wish to have a shiny/sugary top crust, brush the top crust with a tiny bit of milk (using a pastry brush), then sprinkle with granulated sugar).

  4. Bake for approximately 40-45 minutes, or until the juices are bubbly in the center and the crust is golden brown.
Recipe Notes

For an 8 inch pie, measurements are as follows: 3 cups fresh fruit, 3/4 cup sugar, 1/4 cup flour, 1/4 teaspoon cinnamon, and 1 Tablespoon butter. Same time for baking.

Nutrition Facts
Boysenberry Pie
Amount Per Serving (1 slice)
Calories 368 Calories from Fat 126
% Daily Value*
Fat 14g22%
Saturated Fat 5g31%
Cholesterol 7mg2%
Sodium 199mg9%
Potassium 138mg4%
Carbohydrates 57g19%
Fiber 4g17%
Sugar 29g32%
Protein 3g6%
Vitamin A 130IU3%
Vitamin C 2.1mg3%
Calcium 26mg3%
Iron 1.9mg11%
* Percent Daily Values are based on a 2000 calorie diet.

Here’s one more to pin on your Pinterest boards!Enjoy the flavor of summer berries with homemade Boysenberry Pie! Serve a slice topped with vanilla ice cream for a classic, delicious dessert!


Save

Mahi Mahi with Corn & Avocado Salsa

Easy to prepare, healthy AND delicious, baked Mahi Mahi seafood dish, served on a bed of Corn and Avocado Salsa is sure to please your taste buds!Easy to prepare, healthy AND delicious, baked Mahi Mahi seafood dish, served on a bed of Corn and Avocado Salsa is sure to please your taste buds!
Want to try a fantastic, delicious, healthy and EASY seafood meal? Then look no further. This Mahi Mahi with Corn & Avocado Salsa is the dinner for YOU. Seriously wonderful.

I made this delicious dish for my husband and I the other night for dinner. We both LOVED it! I used frozen mahi mahi fillets that we purchased in a large bag at Costco, then thawed the pieces we needed to make the recipe.

The fish is lightly spiced, and the corn and avocado salsa (that you place the fish on top of when done) is crunchy, creamy and amazing! So quick and easy to prepare, as well!! Winner, winner! This is a perfect meal to serve that’s ready in a flash!

Scroll Down For A Printable Recipe Card At The Bottom Of The Page

Make The Seasoning For The Mahi Mahi

The first thing I did was mix up the seasoning for the fish. Took all of about 1 minute. Whew. I know it was hard to not work up a real sweat, but you did it!

Seasoning for mahi mahi, in metal bowl
Brush all sides of the uncooked Mahi Mahi with the seasoning sauce. I lined a baking sheet with aluminum foil (to catch drips), then sprayed a wire oven-safe rack with non-stick spray.

Bake The Mahi Mahi

Place the fish on the wire rack, then put the rack on top of the foil-covered baking sheet and place it in the oven. You will need to bake the mahi mahi at 375° F for 18-20 minutes.

Sauce brushed onto mahi mahi fillets, on blue matTwo pieces of mahi mahi on wire rack
Make The Corn And Avocado Salsa While Mahi Mahi Bakes

While the fish is baking, it is easy to make the corn and avocado salsa in no time at all. Again… this step is very EASY.

Corn and avocado salsa in bowl
Serve The Mahi Mahi with Corn And Avocado Salsa

When the Mahi Mahi was done baking, I spooned a bed of the salsa onto our individual dinner plates, then placed the baked Mahi Mahi on top. Voila! Quick AND healthy!  The mahi mahi and the fresh, delicious salsa looks good and tastes even better!

Mahi Mahi on corn and avocado salsa, with watermelon wedge on side
Sure hope you will give this healthy entree a try… I will most DEFINITELY be preparing this mahi mahi with corn and avocado salsa again!  Have a fantastic day, friends.

Looking For More SEAFOOD Recipes?

You can find all of my seafood recipes (there’s a lot!) in the Recipe Index, located at the top of the page. A few family favorites include:

Interested In More Recipes?

Thank you for visiting this website. I appreciate you using some of your valuable time to do soIf you’re interested, I publish a newsletter 2 times per month (1st and 15th) with all the latest recipes, and other fun info. I would be honored to have you join our growing list of subscribers, so you never miss a great recipe!
There is a Newsletter subscription box on the top right side (or bottom) of each blog post, depending on the device you use, where you can easily submit your e-mail address (only) to be included in my mailing list.

You Can Also Find Me On Social Media:

Facebook page: The Grateful Girl Cooks!
Pinterest:
The Grateful Girl Cooks!
Instagram:
jbatthegratefulgirlcooks

Author's signatureRecipe Source: http://laughingspatula.com/easy-grilled-mahi-with-avocado-and-corn-salsa/

0 from 0 votes
Mahi Mahi with Corn & Avocado Salsa
Prep Time
10 mins
Cook Time
18 mins
Total Time
28 mins
 

Easy to prepare, healthy AND delicious, this baked Mahi Mahi seafood dish, served on a bed of Corn and Avocado Salsa is sure to please your taste buds!

Category: Entree
Cuisine: American
Keyword: mahi mahi
Servings: 4 servings
Calories Per Serving: 333 kcal
Author: JB @ The Grateful Girl Cooks!
Ingredients
For the Mahi Mahi:
  • 4 mahi mahi fillets - thawed
  • 2 Tablespoons olive oil
  • 2 teaspoons ground cumin
  • 2 teaspoons chili powder
  • 1/2 teaspoon salt
  • 1/4 teaspoon black pepper
For the Salsa:
  • 2 fresh ears of corn , (approx. 2 cups-cut from cob)
  • 1 small jalapeno pepper , seeded and finely chopped
  • 1 firm and ripe avocado , cut into cubes
  • 1/3 cup red onion , finely chopped
  • 1 Tablespoon sugar
  • 1 Tablespoon white vinegar
  • 1/2 teaspoon salt
  • 1/4 teaspoon pepper
Instructions
  1. Preheat oven to 375 degrees.
  2. Place aluminum foil onto a cookie sheet. Spray a wire rack with a non-stick spray. Place the fish fillets onto the wire rack over the foil (this will make cleanup a snap!). Place cookie sheet with wire rack and fish into oven. Bake for approximately 18-20 minutes or until fish is done.
  3. While fish is baking, prepare the salsa:
  4. Mix all the salsa ingredients together in a medium sized bowl.
  5. When the fish is done baking, create a "bed" of salsa on the serving plate, then top with a piece of the hot fish. Serve and enjoy!
Recipe Notes

FYI --Original recipe serves 4. When I made this I only cooked TWO Mahi Mahi fillets, but kept all other ingredients the same... We liked having a large amount of the fresh salsa under the fish.

Nutrition Facts
Mahi Mahi with Corn & Avocado Salsa
Amount Per Serving (1 serving (w/ corn salsa)
Calories 333 Calories from Fat 144
% Daily Value*
Fat 16g25%
Saturated Fat 2g13%
Cholesterol 82mg27%
Sodium 703mg31%
Potassium 920mg26%
Carbohydrates 24g8%
Fiber 5g21%
Sugar 7g8%
Protein 24g48%
Vitamin A 825IU17%
Vitamin C 13.4mg16%
Calcium 36mg4%
Iron 2.7mg15%
* Percent Daily Values are based on a 2000 calorie diet.

Here’s one more to pin on your Pinterest boards!Easy to prepare, healthy AND delicious, baked Mahi Mahi seafood dish, served on a bed of Corn and Avocado Salsa is sure to please your taste buds!

Save

Save

Grilled Summer Veggies

Grilled Summer Veggies, with zucchini, yellow squash, carrots, onion, green and red peppers and green beans are cooked on BBQ, then topped w/ Parmesan cheese!Grilled Summer Veggies, with zucchini, yellow squash, carrots, onion, green and red peppers and green beans are cooked on BBQ, then topped w/ Parmesan cheese!

The HOT summer continues here in the great Pacific Northwest! We are still using our BBQ grill a lot, as we try to keep our kitchen (and home) cool! Today I want to share a recipe I make quite frequently in the summertime- Grilled Summer Veggies!

Scroll Down For A Printable Recipe Card At The Bottom Of The Page

Making Grilled Summer Veggies Is EASY

This recipe is really, really easy.  All that is involved in the prep work for this delicious side dish is slicing and cutting up the veggies. I even was able to use some homegrown veggies from our garden as part of this dish (yee haw!)


Summer veggies are sliced, and ready to be grilled.Once the veggies are sliced and chopped, put them into a large bowl. I used zucchini, yellow squash, red onion, green and red pepper, green beans (even a few yellow fillet beans from the garden), and baby carrots.

You can certainly add in additional veggies to make this dish “your own”. That’s the best way, right? You’ve got to like what you’re cooking!

Cut veggies are placed in large bowl to mix with seasonings.Time To Season The Veggies

Season the veggies with olive oil, salt, pepper, Parmesan cheese, garlic powder, and Italian seasoning. Give them a good toss, to fully coat the veggies with the seasoning.

Summe veggies are seasoned with olive oil, Parmesan cheese and Italian spices before grilling.

Use A BBQ Grill Safe Basket

After the veggies and seasonings are combined, put them into a BBQ-safe grill pan (we got one for about $8 at a home improvement warehouse). NOTE: If you don’t have access to a grill pan, use a cast iron skillet on your BBQ to cook these, but watch out… the skillet will get REALLY hot!).

The grill pan we used has a handle to carry it that detaches once you get it on the BBQ grill, then reattaches to lift pan off the grill once done. Pretty handy to use!

Veggies are placed into a BBQ-grill pan for cooking.Cook the veggies on a medium-hot grill for about 15 minutes or so, stirring often. My husband was the “Grill-Meister and Stirrer-Extraordinaire” for this dish!

Grilled Summer Veggies on the BBQ, being stirred while they cook.Some of the veggies will get a nice char on them or get slightly golden brown… that’s great! Just remember to stir them occasionally so they don’t burn! We love cooking veggies on our Weber grill, cause the smoky smell permeates the vegetables, and gives them such a wonderful flavor!

Summer veggies grilling on the BBQ.Serve The Grilled Summer Veggies

Once the veggies are done (fork-tender), we bring them inside and top them with grated Parmesan cheese, and serve them up, straight out of the grill pan! YUM!

Grilled Summer Veggies are sprinkled with grated Parmesan cheese before serving.Sure hope you will give this EASY recipe a try. These grilled summer veggies are a wonderful accompaniment to most meat dishes. I think you and your family will love them! You might also like to see how to grill corn on the cob on the BBQ! That’s another easy way to cook veggies!

Have a great day!  Thanks for stopping by today, and come back soon. May you find beauty all around you today. Hope you’re looking for it!

Looking For More VEGGIE Recipes?

You can find all my recipes in the Recipe Index, located at the top of the page. I have a great variety of vegetable dishes, including:

Interested In More Recipes?

Thank you for visiting this website. I appreciate you using some of your valuable time to do soIf you’re interested, I publish a newsletter 2 times per month (1st and 15th) with all the latest recipes, and other fun info. I would be honored to have you join our growing list of subscribers, so you never miss a great recipe!
There is a Newsletter subscription box on the top right side (or bottom) of each blog post, depending on the device you use, where you can easily submit your e-mail address (only) to be included in my mailing list.

You Can Also Find Me On Social Media:

Facebook page: The Grateful Girl Cooks!
Pinterest:
The Grateful Girl Cooks!
Instagram:
jbatthegratefulgirlcooks

Author's signature

5 from 1 vote
Grilled Summer Veggies
Prep Time
10 mins
Cook Time
15 mins
Total Time
25 mins
 
Grilled Summer Veggies, with zucchini, yellow squash, carrots, onion, green and red peppers and green beans are cooked on BBQ, then topped w/ Parmesan cheese!
Category: Side Dish, Vegetable Dish
Cuisine: American
Keyword: grilled summer veggies
Servings: 4 servings
Calories Per Serving: 163 kcal
Author: JB @ The Grateful Girl Cooks!
Ingredients
  • 1 zucchini , sliced
  • 1 yellow squash , sliced
  • 3 slices red onion (then quartered
  • 1/2 green bell pepper , cut into chunks
  • 1/2 red bell pepper , cut into chunks
  • green beans (I used about 10), ends trimmed and beans cut in half
  • 6-8 baby carrots , cut in half lengthwise
  • 1/4 cup Parmesan cheese
  • Salt and Pepper to taste
  • 3 Tablespoons olive oil
  • 1/2 teaspoon garlic powder
  • 1/2 teaspoon Italian seasoning
  • 2 teaspoons Grated Parmesan cheese (for garnish once veggies are cooked)
Instructions
  1. Prepare all veggies. Place into a large bowl.  Add seasoning ingredients: Parmesan cheese (shaker can kind), salt, pepper, olive oil, garlic powder, and Italian seasoning, Mix well to combine.

  2. Place veggies into a sprayed BBQ grill saute pan or into a cast iron skillet. Place pan onto a medium high BBQ grill. Cook for 15-18 minutes, stirring occasionally so the veggies don't burn.  When done, remove from heat (if using cast iron skillet it will be HOT... be careful!).

  3. Sprinkle grated Parmesan cheese over the top of the hot vegetables, and serve.  Enjoy!

Nutrition Facts
Grilled Summer Veggies
Amount Per Serving (1 (1/4 of total))
Calories 163 Calories from Fat 117
% Daily Value*
Fat 13g20%
Saturated Fat 2g13%
Cholesterol 6mg2%
Sodium 156mg7%
Potassium 364mg10%
Carbohydrates 7g2%
Fiber 2g8%
Sugar 4g4%
Protein 4g8%
Vitamin A 2855IU57%
Vitamin C 49.3mg60%
Calcium 125mg13%
Iron 0.8mg4%
* Percent Daily Values are based on a 2000 calorie diet.

Here’s one more to pin on your Pinterest boards!Grilled Summer Veggies, with zucchini, yellow squash, carrots, onion, green and red peppers and green beans are cooked on BBQ, then topped w/ Parmesan cheese!


Save

Save

Cobb Salad

Cobb Salad is a delicious “all in one” meal, with chicken breast, chilled salad greens, bacon, avocado, bleu cheese crumbles, and crunchy veggies!Cobb Salad is a delicious "all in one" meal, featuring chicken breast, chilled salad greens, bacon, avocado, bleu cheese crumbles, and crunchy veggies!
This past week I made a Cobb Salad for my husband and I for dinner. Cobb Salads are one of my favorite meals, because of all the chopped veggies, chicken, bacon, etc. that go into it. It’s an entire meal… we are always full when done eating, that’s for sure!

Scroll Down For A Printable Recipe Cad At The Bottom Of the Page

Making A Cobb Salad

The majority of work involved in making this chopped Cobb Salad is simply that… chopping! Chopping up cooked, crisp bacon, grilled chicken breasts, tomatoes, hard boiled eggs, tomatoes, cucumber and avocados.

The prep work is not so bad… it’s easy!  Once you have THAT done, all that is involved is layering the ingredients onto the cold crisp salad greens, adding your favorite dressing and enjoying this great salad!

Cobb salad, with chicken, bleu cheese, bacon and avocado!
If you have already have cooked chicken (I used leftover grilled chicken breasts!) and hard-boiled eggs, then this salad comes together very quickly!

The recipe makes enough for two meal sized salads. It could easily be adapted to make 4 smaller salads as a side dish.  You know what else I like about this yummy salad?  It not only TASTES good, it LOOKS good!

Chunks of chicken, avaocado, cucumber and bacon on cobb salad
Once you’ve “assembled” this cobb salad, all that is left to do is add your favorite salad dressing, grab a fork, and dig in!!! Sure hope you will give this salad a try. I really think you will LOVE it!

Salad dressing is drizzled over cobb salad, ready to serve!

I hope you have the chance to make and enjoy this delicious Cobb Salad. Have a fantastic week, friends. May God bless the work of your hands as you journey through each day you are given!

Looking For More SALAD Recipes?

You can find all of my recipes in the Recipe Index, located at the top of the page. I have some wonderful salad recipes that include:

Interested In More Recipes?

Thank you for visiting this website. I appreciate you using some of your valuable time to do soIf you’re interested, I publish a newsletter 2 times per month (1st and 15th) with all the latest recipes, and other fun info. I would be honored to have you join our growing list of subscribers, so you never miss a great recipe!
There is a Newsletter subscription box on the top right side (or bottom) of each blog post, depending on the device you use, where you can easily submit your e-mail address (only) to be included in my mailing list.

You Can Also Find Me On Social Media:

Facebook page: The Grateful Girl Cooks!
Pinterest:
The Grateful Girl Cooks!
Instagram:
jbatthegratefulgirlcooks

Have a GREAT day!

Author's signature

0 from 0 votes
Cobb Salad
Prep Time
15 mins
Cook Time
0 mins
Total Time
15 mins
 

Cobb Salad is a delicious "all in one" meal, featuring chicken breast, chilled salad greens, bacon, avocado, bleu cheese crumbles, and crunchy veggies!

Category: Entree Salad
Cuisine: American
Keyword: cobb salad
Servings: 2 entree salads
Calories Per Serving: 701 kcal
Author: JB @ The Grateful Girl Cooks!
Ingredients
  • Iceberg Lettuce and assorted Spring Greens
  • 4 slices bacon , cooked until crispy, then crumbled
  • 2 grilled or cooked skinless , boneless chicken breasts, cut into 1 inch cubes
  • 1/2 cup bleu cheese crumbles
  • 1 medium tomato , chopped
  • 2 hard boiled eggs , chopped
  • 1 medium cucumber , peeled and cubed
  • 1 avocado , cubed
  • Salt and pepper to taste
Instructions
  1. Place mixed chilled salad greens on serving plate.
  2. Place layers (lines) of remaining ingredients on top of salad greens in any order you wish, remembering to divide all ingredients in half (half for each salad).
  3. Top with your favorite salad dressing; serve and enjoy!
Recipe Notes

FYI-The prep time does not include time for boiling the eggs or cooking the chicken. It's really quick and easy to throw this salad together when those are already pre-cooked.

Caloric calculation is based on TWO salads. If recipe is divided into 4 servings, the calorie count will be cut in half.

Nutrition Facts
Cobb Salad
Amount Per Serving (1 main course salad)
Calories 701 Calories from Fat 450
% Daily Value*
Fat 50g77%
Saturated Fat 16g100%
Cholesterol 313mg104%
Sodium 969mg42%
Potassium 1514mg43%
Carbohydrates 16g5%
Fiber 8g33%
Sugar 5g6%
Protein 46g92%
Vitamin A 1400IU28%
Vitamin C 25.1mg30%
Calcium 248mg25%
Iron 2.3mg13%
* Percent Daily Values are based on a 2000 calorie diet.

Here’s one more to pin on your Pinterest boards!Cobb Salad is a delicious "all in one" meal, featuring chicken breast, chilled salad greens, bacon, avocado, bleu cheese crumbles, and crunchy veggies!


Save

Save

Chocolate-Covered Bacon

Chocolate-covered bacon is both sweet and salty, incredibly easy to make, and is a very unique, but DELICIOUS crispy treat you will LOVE!Chocolate-covered bacon is both sweet and salty, incredibly easy to make, and is a very unique, but DELICIOUS crispy treat you will LOVE!!
A couple years ago, my husband tried a piece of Chocolate-Covered Bacon at a little bakery, while out of our area on business. He said it was fantastic (I had my doubts). Now, don’t get me wrong… I love bacon, but chocolate covered bacon seemed a bit wonky to me. That is, UNTIL I MADE MY OWN! Wowzers! It’s fantastic, and EASY to make!

Scroll Down For A Printable Recipe Card At The Bottom Of The Page

My husband and I recently attended a THEMED dinner party with dear friends. The theme this time was BACON. All parts of the meal had to include some form of bacon. Everything. Beverages, appetizers, entrees (3), and desserts. All bacon inspired. Here’s our menu for the bacon-themed dinner:

Menu for bacon-themed dinner

Here’s a collage of some of the bacon dishes we enjoyed… everything from prosciutto risotto to candied bacon ice cream!

Collage of bacon themed dishes from our bacon themed dinner

I was in charge of the desserts, (as I typically am). One of the desserts I made was chocolate covered bacon strips. YUM! Even after being coated in semi-sweet chocolate, the bacon was crispy inside. The chocolate actually is a perfect counter balance to the saltiness of the bacon.  You can also see my Bacon Pecan Pralines, Maple Bacon Pecan Truffles, and Candied Bacon Ice Cream in the collage photo above.

It really was easy to make this chocolate-covered bacon. I didn’t have a “recipe”; I just used the technique I use for dipping truffles in chocolate. My fingers got a bit messy, but that’s no big deal. Here’s what I did.

How To Make Chocolate-Covered Bacon

First I fried the number of bacon strips I wanted. This recipe is for 8, but you can easily alter recipe to accommodate the number of strips you want to make.  I cooked the bacon strips until they were very crispy, then drained them on a paper towel to absorb the grease.

Bacon is fried until crisp.
I let the bacon cool completely. Then I melted semi-sweet chocolate chips with a heaping Tablespoon of vegetable shortening in my microwave. (30 seconds, stir. 30 seconds stir).

Chocolate chips and shortening are melted together to coat baconDipping the Bacon

The next thing I did was carefully (the bacon is crisp, remember?) dip one piece of bacon at a time in the chocolate.  I used a spoon to help cover about 3/4 of the piece on both sides with chocolate, then carefully flipped it over and did the remaining bit on both sides.

I used a spoon to spoon the chocolate into nooks and crannies that needed help to be covered. I let the excess chocolate drip back into the bowl.

Crisp bacon is dipped in melted chocolate until fully covered.
After each piece was completely covered in chocolate, it was carefully placed on a piece of aluminum foil to let the chocolate firm up.

Chocolate dipped bacon is left to dry until chocolate firms up
Once the chocolate had firmed up, I melted some white chocolate chips (about 1/2 cup) with a small amount of shortening (1 teaspoon), then decoratively drizzled it over the bacon slices. I even had some green colored chocolate chips from a bag of Christmas colored ones, so I also drizzled that over, for contrast (optional).

Ready For Some Chocolate-Covered Bacon!

At our bacon dinner that evening, one of my friends wondered if I had put mint flavored drizzle (the GREEN chips) on the bacon. No way… just used a different colored semi-sweet chocolate chip!

Chocolate covered bacon is drizzled with white and green chocolate
When I was done being “creative” (ha ha), I let the chocolate-covered bacon slices firm up completely before attempting to remove them from the aluminum foil. I then placed them in a single layer in a sealed plastic container, and kept them in the refrigerator until ready to serve later that evening.

The truffles you see in the picture (with the bacon strips) are another creation I made for bacon night. Here’s the recipe for these Maple Bacon Pecan Truffles. (they were yummy, too!)

Close up photo of chocolate-covered bacon strips
That’s it! It’s really not hard to make chocolate-covered bacon, at all! Hope you will give it a try. Bacon just seems to make everything better… even chocolate! Thanks for stopping by, and come back soon. Don’t forget to check out ALL of my recipes in the Recipe Index, located at the top of the page.

Interested In More Recipes?

Thank you for visiting this website. I appreciate you using some of your valuable time to do soIf you’re interested, I publish a newsletter 2 times per month (1st and 15th) with all the latest recipes, and other fun info. I would be honored to have you join our growing list of subscribers, so you never miss a great recipe!
There is a Newsletter subscription box on the top right side (or bottom) of each blog post, depending on the device you use, where you can easily submit your e-mail address (only) to be included in my mailing list.

You Can Also Find Me On Social Media:

Facebook page: The Grateful Girl Cooks!
Pinterest:
The Grateful Girl Cooks!
Instagram:
jbatthegratefulgirlcooks

Have a GREAT day!

Chocolate Covered Bacon / The Grateful Girl Cooks!

0 from 0 votes
Chocolate-Covered Bacon
Prep Time
25 mins
Cook Time
0 mins
Total Time
25 mins
 
Chocolate-covered bacon is both sweet and salty, incredibly easy to make, and is a very unique, but DELICIOUS crispy treat you will LOVE!!
Category: Candy
Cuisine: American
Keyword: chocolate covered bacon
Servings: 8 servings
Calories Per Serving: 301 kcal
Author: JB @ The Grateful Girl Cooks!
Ingredients
  • Bacon (I used 8 strips)
  • 1 1/2 cups semi-sweet chocolate chips
  • 1 HEAPING tablespoon vegetable shortening
  • 1/2 cup white chocolate chips + 1 teaspoon vegetable shortening (for drizzle)
  • 1/2 cup colored chocolate chips + 1 teaspoon vegetable shortening (for drizzle... totally optional!)
Instructions
  1. Cook bacon until very crisp. Remove from skillet to paper towels to absorb extra grease. Let cool completely.
  2. Place 1 1/2 cups chocolate chips in a microwave safe bowl. Add the shortening. Cook on high power for 30 seconds. Remove. Stir. Place bowl back in microwave. Cook on high power for 30 seconds. Stir well, to fully combine. If mixture is not fully smooth, place it back in microwave on medium high power for 15 seconds (I usually don't have to do this, but you might, depending on the wattage of your microwave). DO NOT BURN THE CHOCOLATE!
  3. Carefully coat all sides of the bacon strips with melted chocolate. Using a spoon to help get the chocolate onto the bacon works great! Place coated bacon strips onto aluminum foil, and let sit, undisturbed until chocolate has set.
  4. Melt white chocolate chips and shortening in the exact same way as described above. Decoratively drizzle the mixture over the chocolate covered strips. Let sit until chocolate is completely firmed up, then place bacon strips in a covered container and refrigerate until ready to serve. Enjoy!
Nutrition Facts
Chocolate-Covered Bacon
Amount Per Serving (1 slice)
Calories 301 Calories from Fat 207
% Daily Value*
Fat 23g35%
Saturated Fat 10g63%
Cholesterol 16mg5%
Sodium 149mg6%
Potassium 234mg7%
Carbohydrates 17g6%
Fiber 2g8%
Sugar 12g13%
Protein 4g8%
Vitamin A 25IU1%
Calcium 21mg2%
Iron 2.2mg12%
* Percent Daily Values are based on a 2000 calorie diet.

Here’s one more to pin on your Pinterest boards!Chocolate-covered bacon is both sweet and salty, incredibly easy to make, and is a very unique, but DELICIOUS crispy treat you will LOVE!!


Save

Save

Grilled Lime-Cilantro Shrimp Kabobs

Delicious marinated and grilled lime cilantro shrimp kabobs, with peppers and onions are an easy, healthy and flavorful dish you’ll enjoy!Delicious marinated and grilled lime cilantro shrimp kabobs, with peppers and onions are an easy, healthy and flavorful dish you'll enjoy!
We’ve been grilling a lot of our evening meals outside this summer, because of the “above average” heat we’re having here in the Pacific Northwest. Who wants to bake and heat up the house at the end of a long day when it’s this hot? NOT THIS GIRL! That’s why I made these Grilled Lime-Cilantro Shrimp Kabobs for dinner this week.

I found the recipe for the marinade on Pinterest, then decided to add onions, plus red and green pepper slices, threaded them all onto skewers and threw ’em onto our trusty Weber BBQ grill. In practically no time at all we were enjoying these tasty shrimp kabobs and veggies! Who doesn’t like a good kabob? All in all, a QUICK, EASY, HEALTHY and DELICIOUS dinner on a very HOT evening!

Here’s how easy they are to make… honestly, the most time these took was the 30 minute marinating time. Other than that, they were a cinch!

Scroll Down For A Printable Recipe Card At The Bottom Of The Page

Prepare The Shrimp

Clean, shell and de-vein all of the shrimp, and place them in a bowl. Discard the shells and veins, etc.

Shrimp are cleaned, shelled and de-veined before making kabobs.

Use a microplane or a fine grater to add the zest of one lime to the shrimp in the bowl.

Lime zest is added to the raw shrimp in bowl.

Now add the juice from the entire lime to the shrimp. The lime juice should be about the equivalent of about 1/4 cup liquid.

Fresh lime juice is added to the shrimp.

Marinate The Shrimp For The Kabobs

Add oil, chopped cilantro, finely chopped jalapeno, minced garlic, salt, and pepper to the shrimp. Stir, to fully cover the shrimp with the marinade ingredients. Cover the bowl with plastic wrap and let the shrimp marinate in the refrigerator for about 30 minutes.

The shrimp is marinated in the lime and cilantro sauce.

While the shrimp is marinating, cut up the red and green bell peppers and onion. When the shrimp is finished marinating, add sliced veggies to the bowl. Give them a quick stir, to coat with the marinade.

Make The Lime Cilantro Shrimp Kabobs

Thread the veggies and shrimp onto 4 skewers for grilling. Make sure to alternate colors and veggies with the shrimp. Note: I used metal skewers; if you are using wood skewers, be sure to soak them in water for about 30 minutes prior to using, so they won’t burn on the grill.

Red and green peppers and onions are mixed with the marinated shrimp.Shrimp kabobs are placed onto skewers before grilling.

Time To Grill The Shrimp Kabobs

Cook the shrimp kabobs on a hot BBQ grill (medium-high heat). We grilled them about 3 minutes per side (maybe just a tad more, to ensure the veggies got some heat, too). Turn the shrimp kabobs at least once during the grilling time, to ensure all sides cook evenly.

Grilling lime cilantro shrimp kabobs on the BBQ.

Serve And Enjoy

When done, remove the shrimp kabobs from the grill, and serve them right away while they’re hot! Each serving is 2 skewers of shrimp kabobs.

Grilled shrimp kabobs on a plate with rice on the side.I served the kabobs with my Fresh Corn Sauté with Red Pepper and Onions, some rice, and a couple slices of fresh tomatoes from our garden on the side. YUM!

The shrimp is removed from the skewers and served with some corn on the side.These grilled shrimp kabobs sure were good! Hope you’ll give these a try, too! I’m sure they would be just as good grilled on your indoor stovetop grill OR under a broiler (if you don’t have a BBQ grill).

This would also be a great recipe to take on a family camping trip. Just make everything up ahead of time (chopping veggies, marinating shrimp), then skewer them and cook over a campfire grill! The recipe I made (and am posting) serves two people, but can EASILY be doubled!!! Have a great day!

Looking For More KABOB Recipes?

You can find all of my recipes in the Recipe Index, located at the top of the page. A few kabob recipes you might enjoy include:

Interested In More Recipes?

Thank you for visiting this website. I appreciate you using some of your valuable time to do soIf you’re interested, I publish a newsletter 2 times per month (1st and 15th) with all the latest recipes, and other fun info. I would be honored to have you join our growing list of subscribers, so you never miss a great recipe!
There is a Newsletter subscription box on the top right side (or bottom) of each blog post, depending on the device you use, where you can easily submit your e-mail address (only) to be included in my mailing list.

You Can Also Find Me On Social Media:

Facebook page: The Grateful Girl Cooks!
Pinterest:
The Grateful Girl Cooks!
Instagram:
jbatthegratefulgirlcooks

Author's signatureShrimp Marinade Adapted From: http://www.closetcooking.com/2014/07/cilantro-lime-grilled-shrimp.html

0 from 0 votes
Grilled Lime-Cilantro Shrimp Kabobs
Prep Time
10 mins
Cook Time
6 mins
Marinating
30 mins
Total Time
46 mins
 

Delicious marinated and grilled lime cilantro shrimp kabobs, with peppers and onions are an easy, healthy and flavorful dish you'll enjoy!

Category: Entree
Cuisine: American
Keyword: shrimp kabobs
Servings: 4 kabobs
Calories Per Serving: 87 kcal
Author: JB @ The Grateful Girl Cooks!
Ingredients
  • 1/2 pound shrimp , cleaned, shelled, and deveined
  • 1 lime (zest AND juice)
  • 1/2 Tablespoon vegetable oil
  • 1 Tablespoon cilantro , chopped
  • 1/4 medium jalapeno , finely chopped
  • 1/2 clove minced garlic
  • salt and pepper (to taste)
  • 1/2 medium red bell pepper , cut into wedges (about the same size as the shrimp)
  • 1/2 medium green pepper , cut into wedges (about the same size as the shrimp)
  • 1/4 medium brown onion , cut into wedge slices (about the same size as the shrimp)
Instructions
  1. In a medium sized bowl, marinate the cleaned, shelled and deveined shrimp in the lime zest, lime juice, vegetable oil, cilantro, garlic, jalapeno, salt and pepper. Stir well, to combine and cover the shrimp with the marinade. Cover bowl with plastic wrap; refrigerate shrimp and marinade for 30 minutes
  2. While shrimp is marinating, cut up the red and green bell peppers, and the brown onion. Cut them into wedges about the same size as the shrimp.
  3. When shrimp has marinated for 30 minutes, add the peppers and onions to the bowl. Toss to coat. Thread the shrimp, peppers and onions onto 4 skewers, alternating items on the skewers.

  4. Grill on a medium-high heated BBQ grill (or under broiler, or on a stovetop grill). Cook shrimp about 3 minutes on each side, or until done. Serve while hot, and enjoy this simple dish! Each serving is 2 kabobs.

Recipe Notes

This recipe is EASILY doubled to serve 4!

Nutrition Facts
Grilled Lime-Cilantro Shrimp Kabobs
Amount Per Serving (2 kabobs)
Calories 87 Calories from Fat 18
% Daily Value*
Fat 2g3%
Saturated Fat 1g6%
Cholesterol 142mg47%
Sodium 442mg19%
Potassium 129mg4%
Carbohydrates 4g1%
Fiber 1g4%
Sugar 1g1%
Protein 12g24%
Vitamin A 520IU10%
Vitamin C 39.7mg48%
Calcium 88mg9%
Iron 1.4mg8%
* Percent Daily Values are based on a 2000 calorie diet.

Here’s one more to pin on your Pinterest boards!Delicious marinated and grilled lime cilantro shrimp kabobs, with peppers and onions are an easy, healthy and flavorful dish you'll enjoy!


Save

Save

Fresh Corn Sauté with Red Pepper and Onions

Fresh corn sauté, with red peppers, butter and onions is a quick, delicious and low calorie side dish, sure to be a big hit at your Summer BBQ!Fresh corn sauté, with red peppers, butter and onions is a quick, delicious and low calorie side dish, sure to be a big hit at your Summer BBQ!

I love summertime… and I LOVE fresh corn on the cob! A giant piece of fresh corn is one of my favorite foods of summer. This recipe for Fresh Corn Sauté with Red Pepper and Onions is absolutely, lip-smackin’ delicious. Did I also mention how SIMPLE this is to make? And how LOW IN CALORIES  and DELICIOUS it is, also? (ding, ding… we have a WINNER!)

This fresh corn sauté is a fantastic summer side dish! It only took me about ten minutes to prepare, from start to finish! I found the recipe in this month’s issue of Cooking Light Magazine, and knew I wanted to try it! Sure glad I did. This Fresh Corn Sauté only takes a few (fresh) ingredients, serves 4, and takes about 10 minutes to prepare. How awesome is that?

It’s kind of ironic that I am sharing so many photos of such a quick, easy dish, but hey… it’s a colorful dish, and I didn’t want to be selfish and NOT share… so here goes!

Scroll Down For A Printable Recipe Card At The Bottom Of The Page

Prepare The Corn

Cut the kernels off of 2 large ears of fresh corn, then chop green onions, and dice red peppers. Only takes a couple minutes. (see how easy so far?)

Corn, red pepper and green onions ready to cookFresh corn, cut from the cob and ready to cookHow To Make The Fresh Corn Sauté

Melt a bit of butter in a large skillet. That’s a no brainer, right?

Melting butter in large skillet, to saute cornAdd the fresh corn kernels to the skillet. Sauté the corn for 2 minutes, on medium-high heat.

Fresh corn kernels are cooked in large skillet with butter
Add the chopped green onions and the diced red peppers. Whew… so hard. Are you sweating yet?

Chopped red bell pepper and green onions are added to corn in skillet
Season The Corn

Now it’s time to add simple seasonings to this dish. Add salt and pepper to the corn and veggies in the skillet. You can add more or less to suit your own taste, if desired. Stir together, to combine all ingredients.

Salt and pepper are added to corn, peppers and green onions
Sauté for 2 more minutes, or until the fresh corn is crisp-tender. Hope you’re not too tired at this point (insert sarcastic grin).

Corn, peppers and green onions are sauteed for a couple minutes.
Serve The Fresh Corn Sauté

Remove the corn from skillet onto a serving plate. Look at how gorgeous those colors are!!!

Fresh corn saute with red pepper and onions is served on white platter
Serve this dish hot, and enjoy the work of your hands. The recipe makes 4 servings (1/2 cup per serving). This summer side dish is delicious, crispy, and full of summer goodness! YUM!

Corn, with red peppers and green onions on serving platter with spoon

Hope you enjoy this fresh corn sauté! We sure did! Have a GREAT day, and please come back again soon!

If you are a veggie lover, be sure and check out my recipes for Garlic Infused Roasted Asparagus, Summer Vegetable Tian, Summer Squash Bacon Saute, P.F. Chang’s Spicy Green Beans, or any of my recipes listed in the Recipe Index at the top of the page.

Interested In More Recipes?

Thank you for visiting this website. I appreciate you using some of your valuable time to do soIf you’re interested, I publish a newsletter 2 times per month (1st and 15th) with all the latest recipes, and other fun info. I would be honored to have you join our growing list of subscribers, so you never miss a great recipe!
There is a Newsletter subscription box on the top right side (or bottom) of each blog post, depending on the device you use, where you can easily submit your e-mail address (only) to be included in my mailing list.

You Can Also Find Me On Social Media:

Facebook page: The Grateful Girl Cooks!
Pinterest:
The Grateful Girl Cooks!
Instagram:
jbatthegratefulgirlcooks

Author's signatureRecipe source: Cooking Light Magazine, August 2015 issue, page 42.

0 from 0 votes
Fresh Corn Sauté with Red Pepper and Onions
Prep Time
5 mins
Cook Time
5 mins
Total Time
10 mins
 

Fresh corn sauté, with red peppers, butter and onions is a quick, delicious and low calorie side dish, sure to be a big hit at your Summer BBQ!

Category: Side Dish
Cuisine: American
Keyword: fresh corn saute
Servings: 4 servings
Calories Per Serving: 121 kcal
Author: JB @ The Grateful Girl Cooks!
Ingredients
  • 2 Tablespoons butter
  • 2 cups fresh corn kernels (I used 2 large ears of corn)
  • 1/4 cup chopped green onions (approx. 1 stalk-green and white parts)
  • 1/4 cup diced red bell pepper
  • 1/4 teaspoon salt
  • 1/4 teaspoon ground black pepper
Instructions
  1. With a sharp knife, cut the kernels off of ears of corn (shucked and de-silked)
  2. Melt butter in large skillet over medium to high heat.
  3. Add fresh corn kernels to the skillet. Cook them for 2 minutes on medium-high.
  4. Add the chopped green onions, diced red bell pepper, salt and pepper. Stir to combine.
  5. Cook for 2-3 more minutes, or until the corn is crisp, but tender.
  6. Serve while hot, and enjoy!
Nutrition Facts
Fresh Corn Sauté with Red Pepper and Onions
Amount Per Serving (1 g)
Calories 121 Calories from Fat 54
% Daily Value*
Fat 6g9%
Saturated Fat 3g19%
Cholesterol 15mg5%
Sodium 208mg9%
Potassium 244mg7%
Carbohydrates 15g5%
Fiber 1g4%
Sugar 5g6%
Protein 2g4%
Vitamin A 675IU14%
Vitamin C 18.3mg22%
Calcium 5mg1%
Iron 0.5mg3%
* Percent Daily Values are based on a 2000 calorie diet.

Here’s one more to pin on your Pinterest boards!Fresh corn sauté, with red peppers, butter and onions is a quick, delicious and low calorie side dish, sure to be a big hit at your Summer BBQ!

Save

Save

Save

Apple, Cranberries & Oats Skillet Breakfast

Comforting and delicious, this easy and healthy apple cranberries oats skillet breakfast will make you think you’re eating apple pie for breakfast!Comforting and delicious, this easy and healthy apple cranberries oats skillet breakfast will make you think you're eating apple pie for breakfast!

A few mornings ago, I was trying to decide what to eat for breakfast. I decided to eat a LARGE apple, but then thought it sounded rather boring. I wanted to eat a fairly healthy breakfast, but wanted it to taste fantastic and help fill me up.  So I made an Apple Cranberries Oats Skillet Breakfast and it was wonderful, delicious, and filling!

I decided to cook the apple slices in my trusty skillet, then added in additional flavor with some extra goodies (like cinnamon, dried cranberries, a smidge of brown sugar, etc.) and some “good for you” old-fashioned oats. What I ended up with was a healthy, satisfying meal… with a huge apple as the main ingredient!

Scroll Down For A Printable Recipe Card At The Bottom Of The Page

How to Make This Apple Cranberries Oats Skillet Breakfast

I love to cook oatmeal with fresh apples in it, but this time I reversed the process. I cooked an entire large apple, and added in only 1 Tablespoon of raw oats and dried cranberries while cooking (for extra texture and fiber).

I liberally sprinkled the mixture with cinnamon, lemon juice, a tiny pinch of brown sugar, and cooked the apples down until they were softened, but NOT mushy.

Apple slices, oats and cranberries cooking in skillet
I added a bit of water to my skillet while cooking to help the oats and apple soften up. That’s it!  Once the apples had softened (about 5 minutes later), I spooned the entire mixture into a bowl, let it cool just a bit, and ate the whole thing!

Truthfully it felt like I was eating apple crisp (kinda) for breakfast. It was delicious, and was a totally EASY and very satisfying start to my day! Another breakfast recipe (one of my faves) you might want to check out is my post for Apple Cinnamon Steel Cut Oats With Pecans! Yum.

Hope you will give this quick breakfast a try! Have a great day; my hope is that God blesses you with moments where you see evidence of HIS beauty, kindness, and love as you go through this day!

Interested In More Recipes?

Thank you for visiting this website. I appreciate you using some of your valuable time to do soIf you’re interested, I publish a newsletter 2 times per month (1st and 15th) with all the latest recipes, and other fun info. I would be honored to have you join our growing list of subscribers, so you never miss a great recipe!
There is a Newsletter subscription box on the top right side (or bottom) of each blog post, depending on the device you use, where you can easily submit your e-mail address (only) to be included in my mailing list.

You Can Also Find Me On Social Media:

Facebook page: The Grateful Girl Cooks!
Pinterest:
The Grateful Girl Cooks!
Instagram:
jbatthegratefulgirlcooks

Author's signatureRecipe source: My brain (and 2 cups of coffee)

0 from 0 votes
Apple, Cranberries & Oats Skillet Breakfast
Prep Time
5 mins
Cook Time
8 mins
Total Time
13 mins
 
Comforting and delicious, this easy and healthy apple cranberries oats skillet breakfast will make you think you're eating apple pie for breakfast!
Category: Breakfast
Cuisine: American
Keyword: apple cranberries oats skillet
Servings: 1 serving
Calories Per Serving: 181 kcal
Author: JB @ The Grateful Girl Cooks!
Ingredients
  • 1 apple , large, peeled, cored and sliced into thin slices
  • 1 Tablespoon fresh lemon juice
  • 3/4 teaspoon cinnamon
  • 3/4 teaspoon brown sugar
  • 1 Tablespoon dried cranberries
  • 1 Tablespoon old-fashioned oats (dry)
  • 1/4 cup water
Instructions
  1. Peel, core, and slice the apple into thin slices. Place in skillet. Stir in lemon juice. Cook apple slices on medium-low heat until apples begin to soften (2-3 minutes).

  2. Add cinnamon, brown sugar, dried cranberries, and oats. Stir together.
  3. Add water, stir to combine and continue cooking until apple mixture is hot, most of the water has cooked away, and the apples have softened (approx. 5 minutes). That's it! Serve while warm. Enjoy.
Nutrition Facts
Apple, Cranberries & Oats Skillet Breakfast
Amount Per Serving (1 serving)
Calories 181
% Daily Value*
Sodium 6mg0%
Potassium 194mg6%
Carbohydrates 46g15%
Fiber 6g25%
Sugar 32g36%
Protein 1g2%
Vitamin A 100IU2%
Vitamin C 14.2mg17%
Calcium 26mg3%
Iron 0.5mg3%
* Percent Daily Values are based on a 2000 calorie diet.

Here’s one more to pin on your Pinterest boards!Comforting and delicious, this easy and healthy apple cranberries oats skillet breakfast will make you think you're eating apple pie for breakfast!


Save

Save

Meatballs Stroganoff

Easy, budget friendly, and absolutely delicious, meatballs stroganoff, in a creamy mushroom sauce served on top of egg noodles, is comfort food at it’s best!Easy, budget friendly, and absolutely delicious, meatballs stroganoff, in a creamy mushroom sauce served on top of egg noodles, is comfort food at it's best!

Does it seem like Summer is rushing madly by? It does to me! We’ve had family members visiting for a large part of the month of July, and I am stunned that it’s already August and almost time for FALL. You know what that means, right? IT’S time for “MEATBALLS STROGANOFF”!!! (ok, totally lame transition, but work with me here, folks!)

Here’s the backstory. I thawed out some hamburger meat, fully intending to grill burgers. However, it was so hot outside I didn’t want myself or my hubby to have to grill and sweat at the same time.

I decided to cook something on the old stove top. THAT’S why I made these scrumptious meatballs. Now we can all sleep better tonight, knowing all the intricate details, right? Guess what? This dish is inexpensive to make, and the recipe makes 4-6 servings (depending on just how many meatballs one can eat in a serving)!

Scroll Down For A Printable Recipe Card At The Bottom Of The Page

How To Make Meatballs Stroganoff

First thing you will need to do is mix up the ground beef, milk, dry bread crumbs, salt and pepper in a large bowl. Easy, right? Right!

Ground beef, bread crumbs and spices in mixing bowl to make meatballs for meatballs stroganoff.
Shape this mixture into meatballs. Brown them in a small amount of butter in a large skillet.

Meatballs browning in oil in large skillet
Brown the meatballs on all sides. Once they are brown all over transfer them out of the skillet to a plate while the stroganoff sauce is being made. Drain the grease out of the skillet, and give it a quick wash (the skillet, NOT the grease!).

Browned meatballs for meatballs stroganoff are cooking in silver skillet.
Make The Stroganoff Sauce

To prepare the stroganoff sauce, cook the chopped onions, mushrooms, and paprika in a skillet with a bit of butter until tender.

Cooking mushrooms, onions and spices for stroganoff sauce for meatballs
Once the onions are tender, sprinkle the mixture with flour and stir to blend. Add the beef bouillon, salt and pepper to the skillet. Whisk it together to form a sauce.

Flour is added to mushrooms and onions in skilletBeef broth is added to stroganoff sauce in skilletStroganoff sauce (with whisk) thickens as it is cooked in pan
Add The Meatballs to the Sauce

Return the meatballs to the sauce, and cover the skillet.  Cook the meatballs stroganoff for 10-12 minutes on medium/low heat, until they’re completely heated through. Spoon the stroganoff sauce over the meatballs several times during this cooking process. The sauce will thicken slightly as it cooks.

While the meatballs stroganoff are cooking, combine the sour cream and Worcestershire sauce in a small bowl, and set aside.

Cooked meatballs stroganoff with sauce in skillet.Cook the Egg Noodles

Cook the egg noodles in a separate pan, according to the manufacturer’s directions. When egg noodles are fully cooked, drain them. Add a little butter and some chopped fresh dill to the noodles if you want (optional).

Egg noodles are cooked to serve with meatballs stroganoff.
Add the blended sour cream/Worcestershire sauce to the meatballs stroganoff and stir, to fully combine. Continue to heat the meatballs stroganoff for a couple of minutes, so they are heated through. Be careful to not let the sauce come to a boil.

Sour cream is added to meatballs stroganoff and sauce at end of cooking time.
Serve the Meatballs Stroganoff

To serve, place the cooked and drained hot egg noodles onto individual plates. Top the noodles with the meatballs stroganoff. A serving size is anywhere from 2-4 meatballs, depending on how hungry you are!

Spoon the extra mushroom sauce over the top of the meatballs and noodles, then sprinkle the top of the meatballs with a bit of fresh or dried parsley.

Meatballs stroganoff is served on top of cooked egg noodles
We really love these “comfort food” meatballs stroganoff! Hope you will give ’em a try! I think you will like them, too. Have a great day!

Looking For More MEATBALL Recipes?

You can find ALL my recipes in the Recipe Index, located at the top of the page. I have several recipes that feature meatballs, including:

Interested In More Recipes?

Thank you for visiting this website. I appreciate you using some of your valuable time to do soIf you’re interested, I publish a newsletter 2 times per month (1st and 15th) with all the latest recipes, and other fun info. I would be honored to have you join our growing list of subscribers, so you never miss a great recipe! 

There is a Newsletter subscription box on the top right side (or bottom) of each blog post, depending on the device you use, where you can easily submit your e-mail address (only) to be included in my mailing list.

You Can Also Find Me On Social Media:

Facebook page: The Grateful Girl Cooks!
Pinterest:
The Grateful Girl Cooks!
Instagram:
jbatthegratefulgirlcooks

Author's signatureRecipe Source: Unknown. I wrote it on a 3×5 card many, many YEARS ago, and neglected to add the original source. Sorry, whoever you are, dear recipe provider!

0 from 0 votes
Meatballs Stroganoff
Prep Time
30 mins
Cook Time
10 mins
Total Time
40 mins
 

Easy, budget friendly, and absolutely delicious, meatballs stroganoff, in a creamy mushroom sauce served on top of egg noodles, is comfort food at it's best!

Category: Entree
Cuisine: American
Keyword: meatballs stroganoff
Servings: 6 servings (3 meatballs each)
Calories Per Serving: 563 kcal
Author: JB @ The Grateful Girl Cooks!
Ingredients
  • 1 1/2 pounds ground beef
  • 3/4 cup milk
  • 3/4 cup dried bread crumbs
  • 3 Tablespoons chopped parsley
  • 1 1/2 teaspoons salt
  • 1/4 teaspoon black pepper
  • 4 Tablespoons butter , divided
  • 3/4 cup chopped brown onions
  • 1/2 pound mushrooms , sliced
  • 3/4 teaspoon paprika
  • 2 Tablespoons flour
  • 1 can beef bouillon/broth
  • 1/2 teaspoon Worcestershire sauce
  • 1/2 cup sour cream
  • 2 cups (cooked) Hot egg noodles , prepared according to manufacturer's directions
  • Chopped fresh dill (optional, for garnishing egg noodles)
  • Chopped parsley (optional, for garnishing meatballs when serving)
Instructions
  1. Mix the ground beef, milk, dried bread crumbs, salt and pepper in a medium bowl. Shape meat mixture into 1/1/4 inch balls.
  2. Add 2 Tablespoons butter to a large skillet. Heat on medium to melt butter. Add meatballs to melted butter and brown meatballs completely on all sides. When done, remove meatballs to a plate. Cover plate with aluminum foil to keep meatballs warm.
  3. In a clean skillet, melt 2 Tablespoons butter over medium heat. Add onions, mushrooms, and paprika. Cook this until onions are tender (3-4 minutes).
  4. Sprinkle flour over onion/mushrooms. Stir to combine. While stirring, add the beef bouillon, salt and pepper, and stir until fully combined.
  5. Begin cooking egg noodles in separate saucepan while you finish making the sauce.
  6. Combine the sour cream and Worcestershire sauce in a small bowl. Set aside.
  7. Return the meatballs to the sauce in skillet, cover, and simmer on low for 10-12 minutes, spooning the sauce over the meatballs to coat, occasionally.
  8. Stir the sour cream/Worcestershire sauce into the meatballs. Stir to combine. Heat through, but do not let sauce boil once you've added the sour cream.
  9. Drain egg noodles, toss with a small amount of butter (if desired), and add some chopped fresh dill (if desired). Place egg noodles onto serving plate, then top with 2-4 meatballs and sauce (quantity of meatballs depending on how hungry you are). Garnish with chopped parsley, if desired. Enjoy!
Nutrition Facts
Meatballs Stroganoff
Amount Per Serving (3 meatballs + noodles)
Calories 563 Calories from Fat 324
% Daily Value*
Fat 36g55%
Saturated Fat 16g100%
Cholesterol 127mg42%
Sodium 1117mg49%
Potassium 621mg18%
Carbohydrates 30g10%
Fiber 2g8%
Sugar 4g4%
Protein 27g54%
Vitamin A 715IU14%
Vitamin C 5.1mg6%
Calcium 123mg12%
Iron 3.9mg22%
* Percent Daily Values are based on a 2000 calorie diet.

Here’s one more to pin on your Pinterest boards!Easy, budget friendly, and absolutely delicious, meatballs stroganoff, in a creamy mushroom sauce served on top of egg noodles, is comfort food at it's best!

Save

Save

Peach Turnovers

Peach turnovers with vanilla glaze are delicious, and so quick and easy to make using peach pie filling and puff pastry sheets! Sure to be a family favorite!Peach turnovers with vanilla glaze are delicious, and so quick and easy to make using peach pie filling and puff pastry sheets! Sure to be a family favorite!

Well, I’m finally coming up for air again after having houseguests for nearly 3 of the past 5 weeks, AND having tweaked my back big-time. How about I just say that the month of JULY 2015 was a memorable one, and leave it at that! Seriously, it’s time to get back to the old blog , since I can now sit down at my desk without wincing (ouch!). Today I am sharing a quick recipe for peach turnovers!

Scroll Down For A Printable Recipe Card At The Bottom Of The Page

How I Came Up With the Recipe For Peach Turnovers

After I saw a doctor and was able to move again without as much pain, I canned 9 quarts of Peach Pie Filling after going out and picking peaches at a local U-Pick Farm. I had to make up for lost time! With just a little bit of pie filling left over, I tried to figure out what else I could make with it. 

I remembered I had one sheet of Puff Pastry left in my freezer, and decided to make some quick Peach Turnovers, and off to the kitchen I went! The recipe uses two pastry sheets to make 8 turnovers, but I only made half a recipe, which is why you only see 4 turnovers in my pictures. The printable recipe gives the amount necessary to make 8 turnovers.

Prepare The Puff Pastry

First I got out the frozen puff pastry and let it thaw on the counter for about half an hour. The thawing out time was the hardest/longest part of the whole recipe. Go figure!

Puff pastry sheets are used to make peach turnovers.
Once thawed, carefully unroll the entire pastry sheet, and seal the perforated fold lines in the pastry together (using fingers) to form one whole sheet of puff pastry. You can see the fold lines in the photo below.

Puff pastry is rolled out and perforated lines in dough are sealed.
Cut the pastry into 4 equal sized squares, using a knife.

Peach turnover dough is cut into 4 equal squares.
Add The Peach Pie Filling

Place a heaping Tablespoonful of peach pie filling into the middle of each square, trying not to put too much onto each square (if using canned pie filling, you will not use the entire can!). Brush all the edges of each square with a beaten egg white and water mixture, then fold one side of each square (over the pie filling) to the opposite side, to form a triangle.

Once each triangle is made, crimp the edges of each triangle using the tines of a fork to seal the two sides of the dough together. (sorry, forgot to take photo of the crimping part). You can also just pinch the two pieces of dough together to completely seal the edges of the peach turnovers.

Peach pie filling is added to puff pastry squares, then dough is folded over.
Bake The Peach Turnovers

Carefully place the peach turnovers onto a cookie sheet which has been sprayed with non-stick spray, and bake for 20-25 minutes until light golden brown. When I make them, it usually takes 23 minutes, but keep an eye on yours, as oven temps can vary quite a bit!

Peach Turnovers are baked, then cooled on wire rack.
Time To Glaze The Turnovers

Once done, remove the peach turnovers to a wire rack to cool slightly. I place aluminum foil under the rack to catch any drips that might occur while glazing the turnovers. Mix up a quick glaze while the hand pies are cooling, and drizzle each of them with it.

Peach Turnovers are drizzled with glaze once cooled.
The glaze firmed up in a few minutes, then these delicious Peach Turnovers were ready to eat.  The recipe makes 8 peach turnovers (using 2 sheets of puff pastry), and I think they would be fantastic hand pies with cherry or apple pie filling, as well.

Peach Turnovers / The Grateful Girl Cooks!

Sure hope you will give these delicious peach turnovers a try. Hope you have a great week! Make the most of every minute you are given… and go out and make a difference to all you happen to interact with today!

Looking For More Recipes For PEACH DESSERTS?

You can find ALL of my recipes in the Recipe Index, located at the top of the page. I have some wonderful peach desserts you might be interested in, including:

Interested In More Recipes?

Thank you for visiting this website. I appreciate you using some of your valuable time to do soIf you’re interested, I publish a newsletter 2 times per month (1st and 15th) with all the latest recipes, and other fun info. I would be honored to have you join our growing list of subscribers, so you never miss a great recipe!
There is a Newsletter subscription box on the top right side (or bottom) of each blog post, depending on the device you use, where you can easily submit your e-mail address (only) to be included in my mailing list.

You Can Also Find Me On Social Media:

Facebook page: The Grateful Girl Cooks!
Pinterest:
The Grateful Girl Cooks!
Instagram:
jbatthegratefulgirlcooks

Author's signatureRecipe Source: http://thedomesticrebel.com/2015/07/13/the-easiest-peach-turnovers/

0 from 0 votes
Peach Turnovers
Prep Time
15 mins
Cook Time
23 mins
Total Time
38 mins
 

Peach turnovers with vanilla glaze are delicious, and so quick and easy to make using peach pie filling and puff pastry sheets! Sure to be a family favorite!

Category: Dessert
Cuisine: American
Keyword: peach turnovers
Servings: 8 turnovers
Calories Per Serving: 514 kcal
Author: JB @ The Grateful Girl Cooks!
Ingredients
For the Turnovers:
  • 1 box puff pastry (2 sheets total), thawed
  • 21 ounces (1 can) peach pie filling (or use your own homemade peach pie filling)
  • 1 egg white , beaten with 1 teaspoon water
For the Glaze:
  • 2 cups powdered sugar
  • 2 Tablespoons milk
  • 1 teaspoon vanilla extract
Instructions
  1. Preheat your oven to 375 degrees F.
  2. Prepare 2 cookie sheets by spraying with non-stick spray (or line with parchment paper). Set prepared sheets aside. You will put 4 turnovers on each baking sheet.
  3. Thaw the puff pastry sheets per instructions on box (approx. 30 min). Carefully unroll the puff pastry sheets, then gently press any of the perfprated fold lines together so that they are completely sealed.
  4. Cut the pastry sheets into four equal square pieces, using a sharp knife.
  5. Place a large Tablespoonful of peach pie filling into the middle of each puff pastry square.
  6. In a small bowl, mix together the egg white and the water. Make one turnover at a time. Use a pastry brush to brush the edges of the pastry square with egg white mixture. After brushing edges with egg white mixture, gently take one corner of the puff pastry and bring it over the pie filling to the opposite corner. Use the tines of a fork to crimp the 2 edges shut, which will seal the dough.
  7. Brush the top of each turnover with the egg white/water mixture. Repeat this process with each of the turnovers.
  8. Gently place turnovers onto prepared baking sheets. Bake at 375 degrees for about. 20-25 minutes. The turnovers should be a light golden brown when done. Remove to a wire rack to cool.
  9. While the turnovers are cooling down, whisk the glaze ingredients together in a medium sized bowl. You want the glaze to be smooth, and pourable. Add a bit more milk if necessary to thin glaze out a bit. Drizzle the glaze decoratively over the tops of the turnovers. When glaze has firmed up a bit, the turnovers are ready to serve and enjoy!
  10. These turnovers are great warm... OR at room temperature, and are best eaten on the day you make them. Enjoy!
Recipe Notes

30 minutes needed to thaw out the frozen puff pastry is not included in the Prep Time. Perhaps thaw the pastry earlier in the day and keep refrigerated until ready to use. Once pastry is thawed, these can be put together and baked in no time at all!

Nutrition Facts
Peach Turnovers
Amount Per Serving (1 turnover)
Calories 514
* Percent Daily Values are based on a 2000 calorie diet.

Here’s one more to pin on your Pinterest boards!Peach turnovers with vanilla glaze are delicious, and so quick and easy to make using peach pie filling and puff pastry sheets! Sure to be a family favorite!


Save

Save