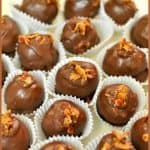
Raspberry Yogurt Smoothie

You’re gonna love this easy to make raspberry yogurt smoothie, with raspberries, banana, and Greek yogurt, sweetened with honey. It’s cold and delicious!You're gonna love this easy to make raspberry yogurt smoothie, with raspberries, banana, and Greek yogurt, sweetened with honey. Cold and delicious!
Well, it’s the New Year and it seems like everyone I know is on a new diet. Smoothies are all the talk this time of year. I happen to love smoothies. Here’s a great recipe for making a Raspberry Yogurt Smoothie.

Scroll Down For A Printable Recipe Card At The Bottom Of The Page

They are so easy to make. Basically you throw a bunch of “good for you” ingredients in a blender,  and blend until you have a nice cold, creamy, fruity beverage! Like this raspberry yogurt smoothie, for example!

I use Greek yogurt (for added protein) in a lot of the smoothies I make. I pick fresh raspberries each summer at a local U-Pick farm, so I always seem to have raspberries hanging out in my freezer, and bananas on our kitchen counter all year long. This is a GOOD thing when I want to make a cold fruit smoothie.

Fresh picked raspberries are perfect to use for jams and smoothies!

A lot of times I will double the amount of ingredients for any smoothie I make. Any leftover smoothies can be frozen and eaten later, when it will have firmed up, similar to ice cream, but better for you. Let it thaw a bit, then dish it up!

Turn A Raspberry Yogurt Smoothie Into A Popsicle!

You can also make popsicle-style treats with smoothies. Just pour the smoothie into a popsicle mold and freeze until later. It’s a wonderful, nutritious treat!

It's easy to turn a raspberry yogurt smoothie into a popsicle!

I’m pretty sure by now everyone has their way of making a fruit smoothie. That’s awesome! This is my way… hope you’ll give it a try and enjoy a cold and delicious raspberry smoothie.

Looking For More SMOOTHIE Recipes?

You can find all of my smoothie recipes in the Recipe Index, located at the top of the page. A few favorite smoothies include:

Interested In More Recipes?

Thank you for visiting this website. I appreciate you using some of your valuable time to do soIf you’re interested, I publish a newsletter 2 times per month (1st and 15th) with all the latest recipes, and other fun info. I would be honored to have you join our growing list of subscribers, so you never miss a great recipe!
There is a Newsletter subscription box on the top right side (or bottom) of each blog post, depending on the device you use, where you can easily submit your e-mail address (only) to be included in my mailing list.

You Can Also Find Me On Social Media:

Facebook page: The Grateful Girl Cooks!
Pinterest:
The Grateful Girl Cooks!
Instagram:
jbatthegratefulgirlcooks

Author's signature

↓↓ PRINTABLE RECIPE BELOW ↓↓

0 from 0 votes
Raspberry Yogurt Smoothie
Prep Time
5 mins
Cook Time
0 mins
Total Time
5 mins
 

You're gonna love this easy to make raspberry yogurt smoothie, with raspberries, banana, and Greek yogurt, sweetened with honey. Cold and delicious!

Category: Beverage
Cuisine: American
Keyword: raspberry yogurt smoothie
Servings: 1 large serving
Calories Per Serving: 383 kcal
Author: JB @ The Grateful Girl Cooks!
Ingredients
  • 1 cup raspberries (fresh or frozen)
  • 1/2 banana , sliced
  • 3/4 cup plain, fat free Greek yogurt
  • 1/4 cup low-fat milk
  • 2 Tablespoons honey
  • 1/2 teaspoon vanilla extract
  • 1/2 cup crushed ice
  • whipped cream (as garnish... optional!)
Instructions
  1. Put the raspberries, banana, yogurt, milk, honey and vanilla into a blender. Mix well until creamy. Add the ice and continue blending until thick and smooth. If necessary, add a bit more ice to make smoothie the thickness you desire.
  2. If desired, garnish with a spray of whipped cream! Grab a straw, drink it up, and enjoy!

Recipe Notes

If you want, you can drink a small portion and freeze the rest. After being frozen, it will firm up similar to ice cream. Let slightly thaw, and dish it up like ice cream. I've also poured extra smoothies into popsicle holders and frozen. It makes a great popsicle-style smoothie.

Nutrition Facts
Raspberry Yogurt Smoothie
Amount Per Serving (1 g)
Calories 383 Calories from Fat 27
% Daily Value*
Fat 3g5%
Saturated Fat 1g6%
Cholesterol 14mg5%
Sodium 95mg4%
Potassium 725mg21%
Carbohydrates 72g24%
Fiber 9g38%
Sugar 56g62%
Protein 22g44%
Vitamin A 60IU1%
Vitamin C 36.5mg44%
Calcium 296mg30%
Iron 0.8mg4%
* Percent Daily Values are based on a 2000 calorie diet.

Here’s one more to pin on your Pinterest boards!You're gonna love this easy to make raspberry yogurt smoothie, with raspberries, banana, and Greek yogurt, sweetened with honey. Cold and delicious!


Save

Save

Spanish Rice

It’s easy to make delicious Spanish Rice from scratch, with bell peppers, diced tomatoes, onion, and spices. Perfect side dish for most Mexican foods.Spanish Rice / The Grateful Girl Cooks!

Mexican cuisine is my favorite type of food to eat, if given the choice. I really enjoy making tacos, enchiladas, quesadillas, fajitas, tamales, refried beans and Spanish Rice. For years I bought and cooked a “name brand” version of Spanish Rice to serve with our Mexican dinners.

Why Not Make Spanish Rice From Scratch?

A few years ago, I decided to try to make my own version, so I could control what ingredients went into this dish. I don’t know what took me so long to make Spanish rice from scratch! Typically I have all the ingredients necessary, already in my pantry. I love that I don’t have to purchase a pre-boxed, shelf stable version (with some interesting ingredients) to prepare!

The best part is I can make it myself, with FRESH ingredients in just about the same time as the box mix! Spanish Rice is simple to make, and it’s delicious! Serve this delicious Spanish Rice as a side dish with a couple of tacos or enchiladas, and BOOM! You’ve got a great meal!

Spanish rice is a great side dish when serving tacos.

Sure hope you’ll give this recipe for Spanish rice a try! The rice is and easy to make, filling side dish. I think you will like it, especially served with some yummy tacos or enchiladas! Enjoy!

Looking For More MEXICAN FOOD Recipes?

You can find all my recipes in the Recipe Index, located at the top of the page. A few favorite Mexican or Southwest inspired recipes are:

Interested In More Recipes?

Thank you for visiting this website. I appreciate you using some of your valuable time to do soIf you’re interested, I publish a newsletter 2 times per month (1st and 15th) with all the latest recipes, and other fun info. I would be honored to have you join our growing list of subscribers, so you never miss a great recipe!
There is a Newsletter subscription box on the top right side (or bottom) of each blog post, depending on the device you use, where you can easily submit your e-mail address (only) to be included in my mailing list.

You Can Also Find Me On Social Media:

Facebook page: The Grateful Girl Cooks!
Pinterest:
The Grateful Girl Cooks!
Instagram:
jbatthegratefulgirlcooks

Author's signatureRecipe Source: My brain, and my Mexican food hunger pangs.

↓↓ PRINTABLE RECIPE BELOW ↓↓

0 from 0 votes
Spanish Rice
Prep Time
10 mins
Cook Time
25 mins
Total Time
35 mins
 
It's easy to make delicious Spanish Rice from scratch, with bell peppers, diced tomatoes, onion, and spices. Perfect side dish for most Mexican foods.
Category: Side Dish
Cuisine: Mexican
Keyword: spanish rice
Servings: 6 servings
Calories Per Serving: 176 kcal
Author: JB @ The Grateful Girl Cooks!
Ingredients
  • 1 cup uncooked rice
  • 2 Tablespoons olive or vegetable oil
  • 3/4 cup brown onion , finely chopped
  • 1/2 cup green pepper , chopped finely
  • 14 ounces diced tomatoes (canned-do not drain) (one 14 ounce can)
  • 1 cup water
  • 1 1/2 teaspoons salt
  • 1 teaspoon chili powder
  • 1/8 teaspoon garlic powder
  • 1/8 teaspoon cumin
  • cilantro for garnish , if desired
Instructions
  1. In a medium saucepan, heat the oil on medium-high heat. Add the onions and green pepper. Cook for 4-5 minutes, until onions are softened and translucent.
  2. Add the rest of the ingredients to the pan (except for cilantro). Stir until ingredients are thoroughly combined.
  3. Bring mixture to a quick boil, then reduce heat to low. Cover pan and cook rice on low simmer for 20-30 minutes, stirring once halfway through cooking time, until liquid has all been absorbed into the rice.
    Check on the rice at the 20 minute mark. If rice needs more cooking time to absorb more liquid, continue cooking. Keep an eye on it, so that you don't burn the rice. When rice is done, place it into serving dish and garnish with cilantro, if desired.  Serve and enjoy!

Nutrition Facts
Spanish Rice
Amount Per Serving (1 g)
Calories 176 Calories from Fat 45
% Daily Value*
Fat 5g8%
Sodium 684mg30%
Potassium 217mg6%
Carbohydrates 29g10%
Fiber 1g4%
Sugar 2g2%
Protein 3g6%
Vitamin A 220IU4%
Vitamin C 17.6mg21%
Calcium 34mg3%
Iron 1mg6%
* Percent Daily Values are based on a 2000 calorie diet.

Here’s one more to pin on your Pinterest boards!It's easy to make delicious Spanish Rice from scratch, with bell peppers, diced tomatoes, onion, and spices. Perfect side dish for most Mexican foods.


Save

Save

Smashed Potatoes with Mushrooms and Shallots

Smashed potatoes with mushrooms and shallots are a perfect side dish to serve with pork, beef or chicken.Smashed potatoes with mushrooms and shallots, are a perfect side dish to serve with pork, beef or chicken.
Last night I made Smashed Potatoes with Mushrooms and Shallots as a side dish with our dinner. Wow! Think I’ve found another delicious side dish! My husband and I enjoyed them very much! I knew I wanted to serve red potatoes on the side, and knew I didn’t want “regular” mashed potatoes.

They needed to be jazzed up a little bit, so I ended up making these smashed potatoes without a recipe by using ingredients I already had in my kitchen. I knew these ingredients would taste wonderful added to red potatoes! And they did taste great! Yum!

What Is IN These Smashed Potatoes?

Sauteed shallots, chopped mushrooms, butter, parsley, milk, salt, pepper, and a bit of garlic give these red potatoes an extra burst of flavor! The cooked red potatoes are lightly smashed, (rather than mashed until smooth and creamy) for extra texture.

These potatoes were a perfect side dish to our pork tenderloin dinner (Pork Tenderloin with Cranberry-Raspberry Sauce). Easy to prepare, and delicious!

Hope you will give these smashed potatoes a try. I really do think you will enjoy serving and eating them… they would be great as a side dish with pork, beef or chicken.

How To Make Smashed Potatoes

Potatoes are cut into chunks, then cooked with some minced garlic until tender… leave the peel on the potatoes!

Smashed Potatoes with Mushrooms and Shallots / The Grateful Girl Cooks!

Shallots, mushrooms, garlic powder, and parsley are cooked in a bit of butter until soft.

Smashed Potatoes with Mushrooms and Shallots / The Grateful Girl Cooks!

Cooked potatoes are combined with cooked mushrooms, shallots, butter, garlic powder, salt, pepper, and milk. Potatoes are lightly smashed, not creamed.

Smashed Potatoes with Mushrooms and Shallots / The Grateful Girl Cooks!

The smashed potatoes are garnished with a bit of parsley, and served. Easy… and delicious!

Smashed Potatoes with Mushrooms and Shallots / The Grateful Girl Cooks!

Hope you consider trying these smashed potatoes! Have a great day.

Interested In More Recipes?

Thank you for visiting this website. I appreciate you using some of your valuable time to do soIf you’re interested, I publish a newsletter 2 times per month (1st and 15th) with all the latest recipes, and other fun info. I would be honored to have you join our growing list of subscribers, so you never miss a great recipe!
There is a Newsletter subscription box on the top right side (or bottom) of each blog post, depending on the device you use, where you can easily submit your e-mail address (only) to be included in my mailing list.

You Can Also Find Me On Social Media:

Facebook page: The Grateful Girl Cooks!
Pinterest:
The Grateful Girl Cooks!
Instagram:
jbatthegratefulgirlcooks

Author's signature

↓↓ PRINTABLE RECIPE BELOW ↓↓

0 from 0 votes
Smashed Potatoes with Mushrooms and Shallots
Prep Time
10 mins
Cook Time
30 mins
Total Time
40 mins
 

Smashed red potatoes, with sauteed mushrooms and shallots, are a perfect side dish for pork, beef or chicken.

Category: Side Dish
Cuisine: American
Keyword: smashed potatoes
Servings: 5 servings
Calories Per Serving: 155 kcal
Author: JB @ The Grateful Girl Cooks!
Ingredients
  • 4 medium sized red potatoes
  • 1 teaspoon garlic , minced
  • 1 teaspoon butter
  • 1/3 cup shallots , finely chopped
  • 4-5 button mushrooms , chopped
  • 1/4 teaspoon garlic powder
  • 1/4 teaspoon dried parsley
  • 2 Tablespoons milk
  • 1 Tablespoon butter
  • Salt and Pepper , to taste
  • Additional dried parsley (for garnish, if desired)
Instructions
  1. Wash the potatoes. Do not peel. Cut the potatoes into medium sized chunks. Place potatoes into medium sauce pan and cover with water. Add minced garlic to pan. Cook on medium high heat for approximately 30 minutes, or until potatoes become tender (test by inserting knife point into potato).
  2. While potatoes are cooking, melt one teaspoon of butter in a skillet. Add the chopped shallots, chopped mushrooms, garlic powder, and dried parsley. Cook approximately 4-5 minutes, until mushrooms and shallots have cooked through and have softened.
  3. When potatoes have finished cooking, drain water. Add the sauteed shallot/mushroom mixture to the potatoes. Add milk and butter; lightly smash all ingredients together with a potato masher or a fork until ingredients are combined. Season to taste with salt and pepper. Add additional milk, if desired.
  4. Place smashed potatoes in a serving bowl, and garnish with additional parsley, if desired.
  5. Serve, and enjoy!
Nutrition Facts
Smashed Potatoes with Mushrooms and Shallots
Amount Per Serving (1 (1/5 of total))
Calories 155 Calories from Fat 27
% Daily Value*
Fat 3g5%
Saturated Fat 2g13%
Cholesterol 8mg3%
Sodium 61mg3%
Potassium 834mg24%
Carbohydrates 28g9%
Fiber 3g13%
Sugar 2g2%
Protein 4g8%
Vitamin A 105IU2%
Vitamin C 15.2mg18%
Calcium 24mg2%
Iron 1.3mg7%
* Percent Daily Values are based on a 2000 calorie diet.

Here is one more to pin on your Pinterest boards!Smashed potatoes with mushrooms and shallots, are a perfect side dish to serve with pork, beef or chicken.


Save

Save

Chocolate Crinkle Cookies

Chocolate Crinkle Cookies- How can you go wrong with easy to make chocolate, chocolate chip cookies that get all cute and “crinkly” when you bake ’em?Chocolate Crinkle Cookies- How can you go wrong with easy to make chocolate, chocolate chip cookies that get all cute and "crinkly" when you bake 'em?

I found a recipe for Chocolate Crinkle Cookies in a used cookbook I bought while on vacation last summer in Washington. I had to spend a whopping $2 dollars on it (great deal, right?), and found some great recipes in it, including this one for a simple, fudgy, chewy cookie.

If you like chocolate chip cookies, then you will enjoy this cookie! I love chocolate chip cookies AND finding great cookbooks at bargain basement prices to add to my ever increasing cookbook collection!

These cookies are very easy to make. Melted chocolate chips give the batter it’s dark brown color. The dough also contains whole chocolate chips, so basically it’s a 2 in 1 chocolate cookie. That’s why you will like these! Seriously…how can you go wrong with chocolate, chocolate chip cookies that get all cute and “crinkly” when you bake ’em?

Scroll Down for A Printable Recipe Card At The Bottom Of The Page

How To Make Chocolate Crinkle Cookies

These cookies are so easy to make. The first thing you will need to do is cream the butter and sugar, with an electric mixer.

Butter and granulated sugar are mixed to begin batter for chocolate crinkle cookies.

Next, melt the chocolate chips. I melted mine in the microwave. Cook on high for 30 seconds, stir well. If necessary, place back into microwave and cook and additional 30 seconds. Give them a good stir, and they should be fully melted.

Chocolate chips are melted to add to batter for chocolate crinkle cookies.

The next thing to do is mix in the melted chocolate with the batter. This is where the dough for these chocolate crinkle cookies starts to get GOOD!!!

Melted chocolate is added to batter for chocolate crinkle cookies.

The Batter For Chocolate Crinkle Cookies Is Starting To Come Together

The melted chocolate gives the batter a beautiful color. It is nice and brown in color. Now it’s time to add the remaining ingredients to the cookie batter.

After chocolate is added to cookie dough, the batter for chocolate crinkle cookies turns brown.

Now add the flour, a little at a time, to the batter. Mix the dough on slow, and continue adding flour until gone. Blend all the ingredients together.

Flour is added to chocolate crinkle cookies batter a little at a time, and mixed.

Now add the chocolate chips to the dough for chocolate crinkle cookies. The cookie dough batter is stirred, to combine.

Chocolate chips are added to the batter for the chocolate crinkle cookies.

Refrigerate the cookie dough for about 15 minutes. After you refrigerate the dough for a few minutes, the dough is much easier to roll into balls.

Shaping The Chocolate Crinkle Cookies

Shae the dough into 1½ inch balls, by rolling teaspoons of dough between your clean hands to shape into balls.. Place the balls of dough onto a large baking sheet, a couple inches apart, because they will spread out while cooking.

The dough for the chocolate crinkle cookies is rolled into small balls before baking.

Baking The Chocolate Crinkle Cookies

Bake the cookies for about 10-12 minutes at 350 degrees.  Here is one of the cookies straight out of the oven. Do you see how cute and crinkly they are? Let the cookies cool a bit before transferring them from the pan to a wire rack to finish cooling..

Chocolate crinkle cookies come out of the oven nice and wrinkly, and ready to eat!

To finish the chocolate crinkle cookies, sift a little bit of powdered sugar on top of each one!

Chocolate Crinkle Cookies are topped with sifted powdered sugar, to finish them off before eating.

Ready To Eat Some Chocolate Crinkle Cookies!

Once the cookies have a light dusting of sifted powdered sugar, they are ready to eat!  Pour yourself a cold glass of milk, and grab a couple delicious, chocolate crinkle cookies!

Chocolate Crinkle Cookies on a plate, ready to eat, with a cup of cold milk on the side.

Look at the inside of that cookie… YUM!!! I took one for the team and bit into one just so you could see the chocolate chips on the inside. You’re welcome!

The inside of the Chocolate Crinkle Cookies is chewy and fudgy!

I sure hope you will give this recipe for chocolate crinkle cookies a try. The recipe yields about 2 1/2 dozen cookies. They are scrumptious! Thank you for stopping by, and I hope you will come back soon for more recipes.

Looking For More Cookie Recipes?

If you enjoy these chocolate crinkle cookies, you might want to check out a few of my other cookies recipes. These include Butter Pecan Crisps, Flourless 3 Ingredient Peanut Butter, Butterscotch Chip, Oatmeal Raisin, Cinnamon Chip, Dipped Gingersnaps, Cranberry Orange Pinwheel, Chocolate Chip,Holiday Spritz, and many others. All of my cookie recipes can be found in the Recipe Index at the top of the page.

Interested In More Recipes?

Thank you for visiting this website. I appreciate you using some of your valuable time to do soIf you’re interested, I publish a newsletter 2 times per month (1st and 15th) with all the latest recipes, and other fun info. I would be honored to have you join our growing list of subscribers, so you never miss a great recipe! 

There is a Newsletter subscription box on the top right side (or bottom) of each blog post, depending on the device you use, where you can easily submit your e-mail address (only) to be included in my mailing list.

You Can Also Find Me On Social Media:

Facebook page: The Grateful Girl Cooks!
Pinterest:
The Grateful Girl Cooks!
Instagram:
jbatthegratefulgirlcooks

Author's signatureRecipe Source: The cookbook “Company’s Coming-Christmas Gifts From the Kitchen”, by Jean Paré, pg.31. Published by Company’s Coming Publishing Unlimited, 2006

↓↓ PRINTABLE RECIPE BELOW ↓↓

0 from 0 votes
Chocolate Crinkle Cookies
Prep Time
15 mins
Cook Time
12 mins
Total Time
27 mins
 
Chocolate Crinkle Cookies- How can you go wrong with easy to make chocolate, chocolate chip cookies that get all cute and "crinkly" when you bake 'em?
Category: Cookies
Cuisine: American
Keyword: chocolate crinkle cookies
Servings: 30 cookies (2.5 dzn)
Calories Per Serving: 145 kcal
Author: JB @ The Grateful Girl Cooks!
Ingredients
  • 6 Tablespoons butter , softened
  • 1 cup granulated sugar
  • 2 large eggs
  • 1 1/2 teaspoons vanilla extract
  • 1 cup semi-sweet chocolate chips
  • 1 1/2 cups all-purpose flour
  • 1 1/2 teaspoons baking powder
  • 1/4 teaspoon salt
  • 1 cup semi-sweet chocolate chips
  • 2 Tablespoons powdered sugar (for dusting finished cookies)
Instructions
  1. Preheat oven to 350 degrees.
  2. In a large bowl or base of a stand mixer, cream butter and granulated sugar until smooth. Add eggs, one at a time. Beat well after each egg. Add vanilla and beat until batter is smooth.

  3. In a microwave safe bowl, place 1 cup chocolate chips. Heat on high in microwave for 30 seconds. Stir well. Put back in microwave for another 30 seconds. Remove, and stir until chocolate is smooth. (You can also melt chocolate chips in saucepan over low heat). Add melted chocolate to batter mixture. Continue beating until smooth.

  4. In separate bowl, whisk together flour, baking powder and salt. Add this to batter, in small increments, until flour is fully incorporated. Stir in remaining 1 cup of chocolate chips. Mix dough well. Set dough in refrigerator for 10 minutes (to slightly firm up).

  5. Roll cookie dough into 1 1/2 inch balls. Place dough balls on a greased cookie sheet, about 1 inch apart. Bake at 350 degrees for 10-12 minutes, or until edges are firm. The centers may still be a bit soft, but that's okay. Remove cookies from oven. Let them stay on cookie sheets and cool for about 5 minutes before attempting to remove them. Place cookies on wire racks to cool completely. Using a sieve or sifter, sift powdered sugar over the top of cooled cookies. Serve, and enjoy!

Nutrition Facts
Chocolate Crinkle Cookies
Amount Per Serving (1 cookie)
Calories 145 Calories from Fat 63
% Daily Value*
Fat 7g11%
Saturated Fat 4g25%
Cholesterol 17mg6%
Sodium 45mg2%
Potassium 98mg3%
Carbohydrates 18g6%
Fiber 1g4%
Sugar 11g12%
Protein 1g2%
Vitamin A 90IU2%
Calcium 19mg2%
Iron 1.1mg6%
* Percent Daily Values are based on a 2000 calorie diet.

Here’s one more to pin on your Pinterest boards!Chocolate Crinkle Cookies- How can you go wrong with easy to make chocolate, chocolate chip cookies that get all cute and "crinkly" when you bake 'em?

Save

Save

Save

BBQ Glazed Cheese & Spinach Meatballs

You’ll enjoy yummy baked BBQ glazed cheese spinach meatballs, with cheddar and spinach, glazed with a homemade sweet, tangy sauce.
You'll enjoy yummy baked BBQ glazed cheese spinach meatballs, w/ cheddar and spinach, glazed with a homemade sweet, tangy sauce.
Almost 20 years ago my husband and I were served this recipe for BBQ Glazed Cheese & Spinach Meatballs at our friend Carla’s home in Central California. We thought they tasted incredible, and I’ve been making them ever since! True story! I don’t know where she got the original recipe. All I know is that my handwritten 3×5 recipe card is stained from nearly 20 years of making this dish.

The recipe is also fairly economical, because 1½ pounds of ground beef makes about 15 good-sized meatballs which can make several servings. Ground beef is mixed with spinach, grated cheddar cheese, onions, and spices, formed into individual portions, and browned in a skillet. They’re then baked in the oven with a homemade BBQ glaze coating them. 

They come out of the oven amazingly delicious! The meatballs are simple to make, and taste GREAT, served over steamed rice. Our sons are grown men and no longer living at home, so when I make this meal for myself and my hubby, I make extra rice, so we can enjoy another meal of leftovers! Here’s how to make these BBQ glazed cheese spinach meatballs:

Scroll Down For A Printable Recipe Card At The Bottom Of The Page

Make The Meatballs

Seasonings, ground beef, cheese, onions and spinach are place in a large bowl, and then you will need to mix them together. I use a fork to combine the ingredients.

Hamburger meat, cheese, onion and spinach in bowl

Okay… now that all of the ingredients are mixed, it’s time to shape the mixture into cute little meatballs!

Beef is mixed with other ingredients in bowl

Shape the meat mixture into a ball, rolling them between the palms of your clean hands! Each meatball should end up being about 2 inches in diameter.

Beef shaped into a meatball being held in a hand

Brown The Meatballs

You can make about 15 meatballs from the ground beef. Place them on aluminum foil as you make each one, before browning them in a skillet.

Meatballs formed on aluminum foil

Here are the meatballs, browning in the skillet. If you do not have a large enough skillet to hold all the meatballs, no problem! You will simply need to brown them in two batches.

Meatballs cooking in a skillet

Brown the meatballs on all sides, but be sure NOT to cook them all the way through. They will finish cooking all the way through in the oven.

Browned meatballs in skillet

Dip Browned Meatballs Into Flour

Once the meatballs have been browned, remove them from the skillet. Place them, a couple at a time, into a small bowl of flour. Turn the meatballs gently,  and cover them on all sides with flour.

Browned meatballs coated in flour in small bowl

When the meatballs are coated with flour, place them into the baking dish. Now they’re ready for the BBQ sauce!

Flour coated meatballs in glass baking dish

Make the sweet and tangy BBQ sauce, and then pour it over the tops of the meatballs. Now the BBQ glazed cheese spinach meatballs are ready to bake!

Sauce covering meatballs in dish

Bake The Glazed BBQ Cheese Spinach Meatballs

When the meatballs are finished baking, remove them from the oven. Here is what they look like hot, and right out of the oven. They smell so good right about now!

BBQ glaze covered meatballs out of oven

Time To Eat BBQ Glazed Cheese Spinach Meatballs!

Place a few meatballs on each individual plate. Drizzle the tops of the meatballs with some of the BBQ sauce. Garnish with a bit of parsley flakes, and serve the glazed BBQ cheese spinach meatballs on a bed of steamed rice. Grab a fork, and dig In!

Glazed meatballs on top of cooked rice

This dish is especially delicious served with a side of rice, and a yummy salad or veggie.  If you enjoy this dish, you might also enjoy my recipes for Meatballs Stroganoff, Mom’s Swedish Meatballs and Rice, Hawaiian Meatballs and Rice, or Easy Meatballs For Spaghetti! I sure hope you will give them a try… I think you’re gonna love ’em!

You can find ALL of my recipes in the Recipe Index, located at the top of the page. Thanks for stopping by, and I truly hope you will come back soon for more delicious dishes. Have a great day!

Interested In More Recipes?

Thank you for visiting this website. I appreciate you using some of your valuable time to do soIf you’re interested, I publish a newsletter 2 times per month (1st and 15th) with all the latest recipes, and other fun info. I would be honored to have you join our growing list of subscribers, so you never miss a great recipe!
There is a Newsletter subscription box on the top right side (or bottom) of each blog post, depending on the device you use, where you can easily submit your e-mail address (only) to be included in my mailing list.

You Can Also Find Me On Social Media:

Facebook page: The Grateful Girl Cooks!
Pinterest:
The Grateful Girl Cooks!
Instagram:
jbatthegratefulgirlcooks

Author's signatureRecipe Adapted from: My friend Carla Merrill

↓↓ PRINTABLE RECIPE BELOW ↓↓

0 from 0 votes
BBQ Glazed Cheese & Spinach Meatballs
Prep Time
20 mins
Cook Time
45 mins
Total Time
1 hr 5 mins
 

You'll enjoy yummy baked BBQ glazed cheese spinach meatballs, w/ cheddar and spinach, glazed with a homemade sweet, tangy sauce.

Category: Entree
Cuisine: American
Keyword: BBQ glazed meatballs
Servings: 15 meatballs
Calories Per Serving: 226 kcal
Author: JB @ The Grateful Girl Cooks!
Ingredients
For Meatballs:
  • 1 1/2 pounds ground beef
  • 1 package frozen chopped spinach , thawed completely and drained well
  • 1 small brown onion , finely chopped
  • 1 3/4 teaspoons salt
  • 1/4 teaspoon garlic powder
  • 1/2 teaspoon black pepper
  • 6 Tablespoons grated cheddar cheese
  • 3 Tablespoons flour
  • 2 Tablespoons oil
For sauce:
  • 2 Tablespoons white vinegar
  • 2 teaspoons prepared yellow mustard
  • 4 Tablespoons butter
  • 6 Tablespoons ketchup
  • 2/3 cup brown sugar
  • 1 Pinch dried parsley , for garnish (if desired)
Instructions
  1. Preheat oven to 325°F.

  2. In large bowl, combine ground beef, thawed and *drained spinach* (see note), onion, salt, garlic powder, pepper, and grated cheddar. (*Note: Make sure the spinach is drained very well. Press the spinach between paper towels to absorb a lot of water!) Completely combine ingredients.

  3. Using both hands, roll/shape meat into 2" balls (make approx. 15). Set meatballs onto non-stick paper or foil while making the rest.

  4. In a large non-stick skillet, heat oil on medium-high. When hot, add meatballs. Don't move them the first couple of minutes (so they won't break apart). Brown all sides (but do not cook all the way through). Remove them to paper towels to drain. Place flour in a small bowl. Gently roll each meatball in flour. Once covered on all sides with flour, place them in an 8x8 or 9x9 baking dish. Set aside. 

  5. Make The BBQ Sauce: In a medium saucepan, combine vinegar, mustard, butter, ketchup, and brown sugar. Simmer 2-3 minutes on low heat until butter melts and ingredients are combined. Pour sauce over the top of meatballs (spoon it up to cover them all).

  6. Bake uncovered, at 325°F for 45-50 minutes. When done, transfer pan to wire rack.  To serve, place meatballs on top of steamed rice (if using); spoon sauce from pan over top. Sprinkle with parsley, if desired.  Enjoy!

Recipe Notes

If you want to make more than 15 meatballs, use 2 pounds of hamburger meat. Everything else in the recipe remains the same. You should be able to get about 20 meatballs this way. A serving size is 3-4 meatballs.

Nutrition Facts
BBQ Glazed Cheese & Spinach Meatballs
Amount Per Serving (3 meatballs)
Calories 226 Calories from Fat 126
% Daily Value*
Fat 14g22%
Saturated Fat 6g38%
Cholesterol 46mg15%
Sodium 444mg19%
Potassium 241mg7%
Carbohydrates 14g5%
Sugar 11g12%
Protein 10g20%
Vitamin A 2400IU48%
Vitamin C 2.1mg3%
Calcium 88mg9%
Iron 1.5mg8%
* Percent Daily Values are based on a 2000 calorie diet.

Here’s one more to pin on your Pinterest boards!You'll enjoy yummy baked BBQ glazed cheese spinach meatballs, w/ cheddar and spinach, glazed with a homemade sweet, tangy sauce.


Save

Save

Save

Lime Sherbet

Who doesn’t like creamy, sweet and tangy lime sherbet? Enjoy this easy to make frozen treat in about 30 minutes, using an ice cream maker.Who doesn't like creamy, sweet and tangy lime sherbet? Enjoy this easy to make frozen treat in about 30 minutes, using an ice cream maker.
It’s the middle of winter and I’m posting a recipe for Lime Sherbet.  Eating freezing cold ice cream in the Winter!  Don’t ya just love it?

Brilliant, huh? Well, the way I figure it is that it is summer time in the Southern Hemisphere, so if you live there… this is for you!  Actually… even if you don’t live there, but love ice cream like me, I think you will like this recipe for lime sherbet. I mean, someone’s gotta eat ice cream year round, right?

Scroll Down For A Printable Recipe At The Bottom Of The Page

My Lime Sherbet And Ice Cream Memories Go Way Back

I remember as a young girl how excited my sisters and I would be when our Mom would go grocery shopping and buy a carton of ice cream or orange and lime sherbet. She would let us get a taste (1 little spoonful) of the ice cream straight out of the carton when she arrived home from the store.

The ice cream would have softened up a bit on the drive home, and boy was that first taste treat wonderful! Then into the freezer it would go, to firm up. Let me tell ya, the waiting until after dinner for a little scoop of ice cream OR lime sherbet took forever!

The Benefits To Having An INDOOR Ice Cream Maker

I personally can eat ice cream or sherbet any time of day, any season… Hmmm- this explains a lot. The cool part of having an indoor ice cream freezer that conveniently produces ice cream, or in this case, lime sherbet, in about 25 minutes.

It can be snowing or raining outside, and yet we can still quickly make ice cream without a trip to the store. Be very scared… Here’s a picture of the machine we use to wreak havoc on any diet we might be on!

This is my ice cream maker. We love it!

Why pay for a carton of lime sherbet at the grocery store (including all those funny sounding ingredients) when you can make it at home with only 3 main ingredients? I guess I’m just doing my part to save on gasoline expense, or the wear and tear on my tennis shoes. Yep… that’s it… it’s a self-less thing I do when I make homemade ice cream (ha ha).

Hope you’ll give this recipe a try. This lime sherbet has just the right amount of creamy, lime tartness and sweetness to make you love it!

A spoonful of freshly made lime sherbet.

Hope you will consider trying this delicious Lime Sherbet! Have a great day.

Looking For More ICE CREAM Recipes?

You can find ALL my recipes in the Recipe Index, located at the top of the page. I have LOTS of yummy ice cream recipes, including:

Interested In More Recipes?

Thank you for visiting this website. I appreciate you using some of your valuable time to do soIf you’re interested, I publish a newsletter 2 times per month (1st and 15th) with all the latest recipes, and other fun info. I would be honored to have you join our growing list of subscribers, so you never miss a great recipe!
There is a Newsletter subscription box on the top right side (or bottom) of each blog post, depending on the device you use, where you can easily submit your e-mail address (only) to be included in my mailing list.

You Can Also Find Me On Social Media:

Facebook page: The Grateful Girl Cooks!
Pinterest:
The Grateful Girl Cooks!
Instagram:
jbatthegratefulgirlcooks

Author's signature

Recipe Source: My Cuisinart Automatic Frozen Yogurt-Ice Cream & Sorbet Maker Recipe Booklet

↓↓ PRINTABLE RECIPE BELOW ↓↓

0 from 0 votes
Lime Sherbet
Prep Time
5 mins
Cook Time
0 mins
Freezing Time
25 mins
Total Time
30 mins
 
Who doesn't like creamy, sweet and tangy lime sherbet? Enjoy this easy to make frozen treat in about 30 minutes, using an ice cream maker.
Category: Ice Cream
Cuisine: American
Keyword: lime sherbet
Servings: 7 half cup servings
Calories Per Serving: 102 kcal
Author: JB @ The Grateful Girl Cooks!
Ingredients
  • 3 cups WHOLE milk (for best results)
  • 1 cup frozen limeade concentrate , thawed
  • 3 Tablespoons granulated sugar
  • several drops green food coloring (optional)
Instructions
  1. Mix the milk, limeade concentrate and granulated sugar in a food processor or blender. If desired, add green food coloring, as well. Mix until ingredients are thoroughly combined.
  2. Turn ice cream freezer on. Pour mixture into canister of ice cream freezer. Let the ingredients mix until thickened (about 25-30 minutes).

  3. Remove ice cream from canister, and place in covered container in freezer to "ripen" for an hour or two. Serve and enjoy!

Recipe Notes

This sherbet is at it's best if you place it in covered container and let it ripen in the freezer for an hour or two. It will firm up!

Nutrition Facts
Lime Sherbet
Amount Per Serving (1 (1/2 cup serving))
Calories 102 Calories from Fat 27
% Daily Value*
Fat 3g5%
Saturated Fat 1g6%
Cholesterol 10mg3%
Sodium 46mg2%
Potassium 138mg4%
Carbohydrates 15g5%
Sugar 15g17%
Protein 3g6%
Vitamin A 170IU3%
Vitamin C 1.1mg1%
Calcium 118mg12%
* Percent Daily Values are based on a 2000 calorie diet.

Here’s one more to pin on your Pinterest boards!Who doesn't like creamy, sweet and tangy lime sherbet? Enjoy this easy to make frozen treat in about 30 minutes, using an ice cream maker.


Save

Save

Butternut Squash Soup with Bacon

Butternut Squash Soup with Bacon is creamy, thick, and absolutely DELICIOUS! Satisfy even the pickiest of eaters with a bowl of this soup on a cold day!Butternut Squash Soup with Bacon is creamy, thick, and absolutely DELICIOUS! Satisfy even the pickiest of eaters with a bowl of this soup on a cold day!

Well, let’s just start this post by saying that those two butternut squash I bought at the Farmer’s Market never knew what hit ’em. The Butternut Squash Soup With Bacon I made with them was truly outstanding! I knew I wanted to try making butternut squash soup, and found a recipe from Food & Wine that called for using pancetta, but I went for something we always seems to have around the house… BACON.

So, let me first start by telling you I have NEVER, EVER cooked butternut squash before, in the 37 years I have been married. Now that I got that off my chest, let me tell you something… this will not be the last time, either! This soup was amazing… my husband and I even had leftovers for lunch today, and it’s still tastes just as good as it did a couple of nights ago when I first made it.

The butternut squash soup is filling, incredibly delicious (especially with the bacon crumbles on top!), and the soup itself is thick and creamy. Seriously orange colored (ha ha) and seriously GOOD.  I hope you will give this soup a try… I think you’re gonna love it!

Scroll Down For A Printable Recipe Card At The Bottom Of The Page

Prepare The Butternut Squash

Behold… the humble butternut squash… not too lovely in appearance, but boy, oh boy…it sure makes a GREAT tasting soup!

Butternut squash before baking them, to make soup.

Split the squash in half lengthwise, scoop out the seeds, add butter and salt/pepper, and into the oven they go to bake until tender

Butternut squash are halved, seeded, and butter, salt and pepper added before baking.

Here are the squash right out of the oven… that melted butter will also go into the soup. Yes, please!

Buttermilk squash are baked, and ready to use for soup!

Preparing The Butternut Squash Soup

Cook chopped onion in a bit of bacon grease in a heavy bottomed pan, then add thyme sprigs and a bay leaf. Building flavor into butternut squash soup is a GOOD thing!

Onion, thyme, and bay leaf are cooked to season butternut squash soup.

Scoop the cooked squash out of the peel and and add it to a large stockpot or Dutch oven. 

Baked butternut squash is scooped out of skin and added to soup pot.

Now you will add chicken stock to the pan. Bring this mixture to a boil, then reduce the heat and cook the butternut squash soup for 15 additional minutes.

Chicken stock is added to butternut squash soup in pot.

Time To Purée The Soup

Okay… now it’s time to blend the soup to make it nice, thick and creamy!  NOTE: My Mom gave me an immersion blender. You can use one of those OR blend the soup in batches (in blender or a food processor), till smooth and creamy. Don’t forget to remove the thyme and bay leaves before blending!

Butternut squash soup is blended with an immersion blender.

The butternut squash soup is all blended together. Stir in the whipping cream to the creamy soup. See how thick and smooth it is? Now it’s time to ladle it up into serving bowls.

Thick and creamy butternut squash soup.

Time To Serve The Butternut Squash Soup With Bacon

To serve, place bacon crumbles on top of each portion of soup. Drizzle with whipping cream, a bit of olive oil, and some extra thyme leaves (if desired). Grab a spoon, butter some warm bread, and enjoy this butternut squash soup with bacon! It is lip-smackin’ good!

Butternut Squash Soup with Bacon is served, with bread on the side!

I really hope you will try this delicious soup, and as always, my hope is you enjoy sharing this delicious meal with those you love!

Looking For More SOUP Recipes?

You can find ALL of my recipes in the Recipe Index, which is located at the top of the page. I have LOTS of yummy soup recipes you’re gonna enjoy, including:

Interested In More Recipes?

Thank you for visiting this website. I appreciate you using some of your valuable time to do soIf you’re interested, I publish a newsletter 2 times per month (1st and 15th) with all the latest recipes, and other fun info. I would be honored to have you join our growing list of subscribers, so you never miss a great recipe!
There is a Newsletter subscription box on the top right side (or bottom) of each blog post, depending on the device you use, where you can easily submit your e-mail address (only) to be included in my mailing list.

You Can Also Find Me On Social Media:
Facebook page: The Grateful Girl Cooks!
Pinterest: The Grateful Girl Cooks!
Instagram: jbatthegratefulgirlcooks

Author's signatureRecipe Adapted From: http://www.foodandwine.com/recipes/butternut-squash-soup-with-crisp-pancetta

↓↓ PRINTABLE RECIPE BELOW ↓↓

0 from 0 votes
Butternut Squash Soup with Bacon
Prep Time
1 hr 10 mins
Cook Time
15 mins
Total Time
1 hr 25 mins
 

Creamy, thick, and delicious, this butternut squash soup with bacon will satisfy even the pickiest of taste buds on a cold day!

Category: Soup
Cuisine: American
Keyword: butternut squash soup
Servings: 8 servings
Calories Per Serving: 269 kcal
Author: JB @ The Grateful Girl Cooks!
Ingredients
  • 2 medium butternut squash (about 3 pounds)
  • 3 Tablespoons butter , cut into 4 slices
  • Salt and Pepper (to season)
  • 4 slices bacon , cooked crisp, then crumbled (Reserve bacon drippings in pan)
  • 2 Tablespoons bacon drippings
  • 1/2 large brown onion , chopped finely
  • 6 fresh thyme sprigs , divided
  • 1 bay leaf (found in spice section, or Mexican food section in bags)
  • 5-6 cups chicken stock (or low-sodium broth)
  • 2 Tablespoons heavy whipping cream , divided
  • olive oil (for drizzling as garnish), optional
Instructions
  1. Preheat oven to 400 degrees. Carefully slice squash in half, lengthwise; scoop out the seeds. Put 4 squash halves cut side up, on a large cookie sheet (with edges). Put one slice of butter into each hole (where the seeds were). Season with salt and pepper. Roast butternut squash for 50-60 minutes at 400 degrees (or until tender). When tender, remove from oven. Let squash cool until it is cool enough to scoop all the squash out of the skins into a large bowl.

  2. Cook bacon in a medium skillet until very crisp. Remove bacon from pan; drain off bacon grease with the exception of 2 Tablespoons (and any little brown bits remaining in the skillet), which you leave in the skillet. Crumble bacon pieces, and set aside for garnishing soup before serving.

  3. Add chopped onion to bacon grease in skillet; cook until softened (about 5 minutes). Transfer onions and any remaining bacon grease from the skillet into a large, heavy stockpot. Stir in cooked squash, chicken stock (add 5 cups of chicken stock at first), 3 thyme sprigs (whole), and the bay leaf. Bring mixture to a boil over high heat; stir frequently. Once mixture comes to a boil, reduce heat and simmer for 15 minutes, stirring occasionally.

  4. After 15 minutes, remove thyme sprigs and bay leaf. Discard. Using an immersion blender, blend soup until thick and creamy. If not using immersion blender, transfer soup in batches to a food processor or blender, and blend until smooth (about a minute per batch), then return soup to stockpot. If you want soup to be thinner, add an additional cup of chicken stock and stir to combine. Stir 1 Tablespoon whipping cream into soup; season with salt and pepper, to taste.

  5. Reheat soup, if necessary. Ladle soup into serving bowls. To serve, place some of the crumbled bacon onto the top middle of the soup. Drizzle a tiny bit of whipping cream onto top, then drizzle with a tiny bit of olive oil. Garnish with thyme leaves. Serve, and enjoy!

Recipe Notes

The prep time includes the time for roasting the squash. Cook the bacon, onions, etc. while squash is in oven to reduce overall time.

Nutrition Facts
Butternut Squash Soup with Bacon
Amount Per Serving (1 serving)
Calories 269 Calories from Fat 135
% Daily Value*
Fat 15g23%
Saturated Fat 6g38%
Cholesterol 31mg10%
Sodium 578mg25%
Potassium 853mg24%
Carbohydrates 28g9%
Fiber 3g13%
Sugar 6g7%
Protein 7g14%
Vitamin A 20155IU403%
Vitamin C 41.4mg50%
Calcium 103mg10%
Iron 1.8mg10%
* Percent Daily Values are based on a 2000 calorie diet.

Here’s one more to pin on your Pinterest boards!Butternut Squash Soup with Bacon is creamy, thick, and absolutely DELICIOUS! Satisfy even the pickiest of eaters with a bowl of this soup on a cold day!


Save

Save

Save

Sweet Ginger Teriyaki Salmon

Teriyaki Salmon is marinated in a ginger, garlic, honey & brown sugar sauce, then baked for 15-30 minutes in this easy, delicious seafood dinner!Salmon is marinated in a teriyaki, ginger, garlic, honey & brown sugar sauce, then baked for 15-30 minutes in this easy to prepare delicious seafood dinner!
Do you enjoy salmon? My husband and I certainly do… and we really enjoyed our dinner a few night’s ago when I made Sweet Ginger Teriyaki Salmon. I found the recipe on Pinterest,  while searching out salmon recipes. I’ve been preparing Pan-Seared Creole Salmon for years and we absolutely LOVE it, but wanted to bust out of my “rut” and try a NEW recipe. Shocking, right?

Anyways, I found this recipe from Monique at Ambitious Kitchen, and gave it a try… I heartily recommend it! The flavor of the salmon was delicious! I served it with a side of garlic quinoa, and my recipe for Sugar Snap Pea Stir Fry, and I gotta be honest, this was an awesome meal. I will definitely be making this dish again!

Scroll Down For A Printable Recipe Card At The Bottom Of The Page

Sweet Ginger Teriyaki Salmon Is EASY To Prepare!

The teriyaki salmon is so easy to prepare. Salmon is marinated in a wonderful ginger teriyaki sauce, then baked (to perfection), garnished with cilantro and sesame seeds and served. I made the sauce early in the day and let the salmon marinade in it all day. In the evening, all I had to do was bake the salmon, sprinkle a garnish on it, and serve it!

Sure hope you will give this a try! I think you’re gonna enjoy some amazing tasting salmon! Here’s how it is prepared: The sauce is really easy (and quick) to make.

Preparing the marinade for the salmon.

Pouring that sweet ginger teriyaki sauce over the piece of salmon… see how easy the prep is so far???

Teriyaki marinade is poured over the salmon to cover.

Salmon has marinated… and now it’s ready to bake!

Now the marinated salmon is ready to bake in the oven.

Time To Bake The Sweet Ginger Teriyaki Salmon!

The teriyaki salmon is baked for 15-20 minutes, and then it is removed from oven. Garnish with sesame seeds and cilantro leaves, then serve. This fish tastes delicious!  See how easy that was?

Sweet Ginger Teriyaki Salmon is served with veggies and quinoa on the side.

I truly hope you enjoy this seafood dish. It truly IS easy to prepare, and is incredibly tasty! If you enjoy seafood, be sure to check out some of my other salmon recipes such as Salmon in a Lemon-Butter Herb Sauce, Orange and Rosemary Glazed Salmon, Cedar Plank Grilled Salmon, or Garlic and Herb Baked Salmon (to name a few).

Thanks for stopping by, and I hope you will come back again soon. Be sure to check out ALL my recipes in the Recipe Index, located at the top of the page. Have a wonderful day.

Interested In More Recipes?

Thank you for visiting this website. I appreciate you using some of your valuable time to do soIf you’re interested, I publish a newsletter 2 times per month (1st and 15th) with all the latest recipes, and other fun info. I would be honored to have you join our growing list of subscribers, so you never miss a great recipe!
There is a Newsletter subscription box on the top right side (or bottom) of each blog post, depending on the device you use, where you can easily submit your e-mail address (only) to be included in my mailing list.

You Can Also Find Me On Social Media:

Facebook page: The Grateful Girl Cooks!
Pinterest:
The Grateful Girl Cooks!
Instagram:
jbatthegratefulgirlcooks

Author's signatureRecipe Adapted From: http://www.ambitiouskitchen.com/2012/07/sesame-ginger-sweet-teriyaki-salmon-with-garlic-quinoa-stir-fry/

↓↓ PRINTABLE RECIPE BELOW ↓↓

0 from 0 votes
Sweet Ginger Teriyaki Salmon
Prep Time
10 mins
Cook Time
18 mins
Marinating Time
1 hr
Total Time
1 hr 28 mins
 

Teriyaki Salmon is marinated in a ginger, garlic, honey & brown sugar sauce, then baked for 15-30 minutes in this easy, delicious seafood dinner!

Category: Entree
Cuisine: Asian
Keyword: teriyaki salmon
Servings: 4 servings
Calories Per Serving: 347 kcal
Author: JB @ The Grateful Girl Cooks!
Ingredients
For The Marinade:
  • 1 cup teriyaki sauce
  • 1 teaspoon freshly grated ginger
  • 4 cloves garlic , minced
  • 3 Tablespoons dark brown sugar
  • 2 Tablespoons honey
  • 1/4 cup olive oil
  • 1 pound boneless , skinless salmon (or 4 salmon "steaks")
For Garnish:
  • 1 Tablespoons sesame seeds
  • 1/4 cup fresh cilantro , chopped
Instructions
  1. In a bowl, mix together the teriyaki sauce, grated ginger, garlic cloves, brown sugar, honey and olive oil, until sugar has dissolved and ingredients are well combined.
  2. Put the piece (or pieces) of salmon in a covered container or a large Ziploc bag. Add the marinade to the container, and coat the salmon on both sides. Refrigerate the salmon for at least 1 hour (I marinated mine all day). Turn the salmon over several times during refrigeration (if using a container).
  3. Preheat your oven to 400 degrees. Spray a baking pan with non-stick cooking spray. Remove the salmon from the marinade and place into cooking pan. (If you are using salmon with the skin ON, then place in baking pan, skin side down.
  4. Bake at 400 degrees for 15-20 minutes. Times will vary, due to different thicknesses of salmon. When done, the salmon should flake easily. (Our salmon took 20 minutes to reach that point) Serve, with a side of rice or quinoa, and a great veggie. Enjoy!
Nutrition Facts
Sweet Ginger Teriyaki Salmon
Amount Per Serving (1 fillet)
Calories 347 Calories from Fat 153
% Daily Value*
Fat 17g26%
Saturated Fat 2g13%
Cholesterol 72mg24%
Sodium 825mg36%
Potassium 493mg14%
Carbohydrates 21g7%
Sugar 19g21%
Protein 25g50%
Vitamin A 100IU2%
Vitamin C 2.6mg3%
Calcium 43mg4%
Iron 1.2mg7%
* Percent Daily Values are based on a 2000 calorie diet.

Here’s one more to pin on your Pinterest boards!Teriyaki Salmon is marinated in a ginger, garlic, honey & brown sugar sauce, then baked for 15-30 minutes in this easy, delicious seafood dinner!

Save

Save

Sugar Snap Pea Stir Fry

This Asian-inspired sugar snap pea stir fry, with mushrooms and colorful bell peppers cooked in teriyaki sauce, is a simple and delicious veggie side dish!This Asian-inspired sugar snap pea stir fry, with mushrooms and colorful bell peppers cooked in teriyaki sauce, is a simple and delicious veggie side dish!
Every year, I love to grow sugar snap peas in our backyard raised bed garden. We typically have a bumper crop, and freeze bags of them at their peak. If interested in learning about this type of pea, you can read more information here. I

t made perfect sense to me to come up with a good stir fry recipe to use these wonderful veggies. So here it is- my recipe for a delicious “Sugar Snap Pea Stir Fry”.

Try not to be too dazzled by the “oh so creative” name I gave this recipe (ha ha)! It’s the best I could come up with, so don’t judge.  All that said, if you are looking for a tasty way to make a sugar snap pea stir fry, look no further!

I believe you will enjoy the taste of stir fried sugar snap peas, cooked with red and orange peppers, mushrooms, garlic, teriyaki sauce, and topped with toasted almonds! The Asian inspired flavors will delight your taste buds!

Scroll Down For A Printable Recipe Card At The Bottom Of The Page

Frozen Or Fresh?

You can use either fresh or frozen sugar snap peas, because either type will work great in this recipe with very little difference in taste. I used some I had in the freezer from our little garden this past summer. 

Here is what a couple of sugar snap peas looked like growing in my garden this past summer. Isn’t it a gorgeous, cool-looking vegetable?

Sugar Snap Pea Stir Fry / The Grateful Girl Cooks!

Ready To Cook?

Sugar snap peas and peppers are cooked in the skillet first. The veggies are then pushed over to one side of the skillet, and mushrooms are added to the skillet.

Stir fry them for a couple minutes. Once cooked, they are combined with the other veggies in the sugar snap pea stir fry.

Sugar snap pea stir fry with mushrooms and bell peppers cooking in skillet.

Add minced garlic to the sugar snap pea stir fry. After that, grated fresh ginger and a bit of teriyaki sauce are added to the skillet.

Garlic is added to sugar snap pea stir fry for added flavor.

Lightly toast sliced raw almonds in a “dry” skillet, to add as a garnish to the dish at serving time.

Almonds are lightly toasted in skillet, to add as topping for sugar snap pea stir fry.

Time To Eat The Sugar Snap Pea Stir Fry!

Here is the finished sugar snap pea stir fry dish on a serving platter. Garnish the dish with the lightly toasted almond slices for added crunch!

This delicious sugar snap pea stir fry  is ready to eat, and enjoy! Grab a fork, and dig in!

Sugar snap pea stir fry, served on a white platter, is ready to enjoy!

I served this sugar snap pea stir fry with Sweet Ginger Teriyaki Salmon and it was a big hit! The teriyaki sauce the sugar snap peas are cooked in, paired extremely well with the sauce on the salmon.

Sure hope you will consider trying this recipe. It’s a great way to get some tasty veggies into your meals! If you enjoy sugar snap peas, be sure to check out my recipe for Parmesan Crumb Sugar Snap Peas, as well.

Thanks for stopping by, and I invite you to come back again son for more family-friendly recipes. Take care, may God bless you, and have a great day!

You Might Also Enjoy These Veggie Side Dish Recipes

These recipes, listed above, and many other vegetable side dishes can be found in the Recipe Index at the top of the page.  Enjoy!

Interested In More Recipes?

Thank you for visiting this website. I appreciate you using some of your valuable time to do soIf you’re interested, I publish a newsletter 2 times per month (1st and 15th) with all the latest recipes, and other fun info. I would be honored to have you join our growing list of subscribers, so you never miss a great recipe!
There is a Newsletter subscription box on the top right side (or bottom) of each blog post, depending on the device you use, where you can easily submit your e-mail address (only) to be included in my mailing list.

You Can Also Find Me On Social Media:

Facebook page: The Grateful Girl Cooks!
Pinterest:
The Grateful Girl Cooks!
Instagram:
jbatthegratefulgirlcooks

Author's signature

↓↓ PRINTABLE RECIPE BELOW ↓↓

0 from 0 votes
Sugar Snap Pea Stir Fry
Prep Time
10 mins
Cook Time
10 mins
Total Time
20 mins
 
This Asian-inspired sugar snap pea stir fry, with mushrooms and colorful bell peppers cooked in teriyaki sauce, is a simple and delicious veggie side dish!
Category: Side Dish, Vegetable Dish
Cuisine: Asian
Keyword: sugar snap pea stir fry
Servings: 4 servings
Calories Per Serving: 168 kcal
Author: JB @ The Grateful Girl Cooks!
Ingredients
For Stir Fry:
  • 2 Tablespoons olive oil
  • 2 cups sugar snap peas (fresh or frozen)
  • 1/2 cup red bell peppers , sliced
  • 1/2 cup orange bell peppers , sliced
  • 1 cup sliced mushrooms
  • 1 teaspoon minced garlic
  • 1/2 teaspoon grated ginger (I used a microplane, to grate the ginger very finely)
  • 1/4 cup teriyaki sauce
  • salt , to taste
For Garnish:
  • 1/4 cup sliced raw almonds , dry roasted (see notes section on "how to dry roast")
Instructions
  1. Heat the olive oil on medium-high in a non-stick skillet.
  2. When oil is hot, add the sugar snap peas and the red/orange peppers. Cook for 2-3 minutes. Push veggies over to one side of skillet; add the mushrooms.
  3. Cook mushrooms for 2-3 minutes, then combine veggies. Add the garlic and the grated ginger; cook for additional minute.
  4. Stir in the teriyaki sauce, and cook until all ingredients are heated through.
  5. Place veggies onto serving dish. Garnish with toasted almond slices.
  6. Serve, and enjoy!
Recipe Notes

How to dry roast almond slices: Heat a skillet (with no oil or butter) on medium-low. Add the sliced almond slices to the skillet. Heat 2-3 minutes until they begin to turn light brown. Keep the almonds stirred while they cook, so they won't burn. The End.

Nutrition Facts
Sugar Snap Pea Stir Fry
Amount Per Serving (1 serving)
Calories 168 Calories from Fat 99
% Daily Value*
Fat 11g17%
Saturated Fat 1g6%
Sodium 704mg31%
Potassium 356mg10%
Carbohydrates 11g4%
Fiber 3g13%
Sugar 6g7%
Protein 5g10%
Vitamin A 1700IU34%
Vitamin C 77.7mg94%
Calcium 49mg5%
Iron 1.9mg11%
* Percent Daily Values are based on a 2000 calorie diet.

Here’s one more to pin on your Pinterest boards!This Asian-inspired sugar snap pea stir fry, with mushrooms and colorful bell peppers cooked in teriyaki sauce, is a simple and delicious veggie side dish!


Save

Save

Lemon Bars

You will LOVE these classic Lemon Bars! Sweet and tangy lemon filling on a buttery crust, they are a perfect treat to serve for dessert, or any special occasion!

When life hands you lemons, or in this case, when a sweet friend MAILS you lemons… make LEMON BARS for dessert! I have made them so many times over the years, and they are always a favorite!

These luscious lemon bars are a sweet, tart, and amazingly awesome dessert treat! We absolutely LOVE them, and I’m confident you will too. Here’s how to make them.

Scroll Down For A Printable Recipe Card At The Bottom Of The Page

A Gift Of LEMONS!

A couple of months ago I mailed my life-long friend, Lenita, a box containing several jars of my homemade jams and jellies, as a gift. I had no idea that she would surprise me with a box of 6 of her prized Meyer lemons, picked from her very own tree in Southern California!

She mailed this box to me so it arrived just before Christmas.They were the most gorgeous lemons I have ever seen! Our son thought they were plastic, because they were so absolutely perfect!

This was for sure a Christmas MIRACLE! She also sent me the cool Homemade Jam Christmas ornament seen in the photo below.

I hung THAT on our tree and did not cook it in this recipe- (heh heh). Here’s my gift box… SEE-aren’t those lemons gorgeous?

Lemons in box for baking into some delicious lemon bars!

I Used The Lemons To Make LEMON BARS!

I was giddy with excitement (who DOESN’T like to receive wonderful surprises in the mail?)! My next task was to come up with different ways to use these beauties, so they would not go to waste.

This recipe for lemon bars is one of the ways I used a portion of those lemons. For this particular recipe you will use the entire lemon, except for the seeds (duh!). 

The lemon bars are absolutely fantastic! Here’s some pics I took while making this scrumptious dessert:

Making The Bottom Crust For The Lemon Bars

Before making the crust, preheat your oven to 350°F. This crust doesn’t take long to make, so to save time, you will want the oven preheated and ready to go!

Place the ingredients for the bottom crust layer in a food processor, and then process the ingredients until they are combined into a crumbly dough mixture.

Mixing dough for lemon bar crust in food processor

Form The Bottom Crust

Line an 8×8 pan with aluminum foil, leaving some to overhang on all 4 sides. You will be able to easily lift the entire pan of finished lemon bars out of the baking dish before serving.

Line 8x8 pan with aluminum foil for lemon bar filling

Now it’s time to form the bottom crust layer. Transfer the crumbly dough from the food processor into the foil wrapped 8×8 pan.

Bar cookie crust is added to foil-lined baking dish

Spread the dough firmly with your fingers until the crumbly dough has been compacted solidly together to form a bottom crust. Now it’s time to bake the crust!

Bake The Crust

Bake the crust in a preheated 350°F. oven for 20 minutes. When done, remove the baking dish from the oven and transfer it to a wire rack.

NOTE: After you bake the crust and remove the pan from the oven, reduce the oven heat to 300°F. This lower temperature is what you will need to bake the lemon bars.

Dough is pressed into bottom of dish to form base for lemon bars

Making The Filling for The Lemon Bars

While the bottom layer bakes, make the lemon filling for the lemon bars. Remove the lemon seeds, then place the cut up lemons in the food processor with granulated sugar.

Process the lemon and granulated sugar on high speed. The food processor does a great job of completely pulverizing the granulated sugar AND the entire lemon.

YES… you heard that right, friends! Use the WHOLE lemon (including the peel), because this provides maximum flavor for the lemon bars!

Once done with processing, be sure to check for any stray seeds that might have been stowaways and snuck into the mixture, and remove them.

Lemons and sugar in food processor to make filling

Finish Making The Lemon Filling

Add lemon juice, eggs, melted butter (cooled) and cornstarch to the lemon filling in the food processor. Pulse all these ingredients until the lemon filling becomes very smooth in texture.

Carefully pour the lemon filling over the hot, baked crust. Now the lemon bars are ready to be baked.

Lemon juice and eggs blended in food processor

Bake The Lemon Bars

 Bake the lemon bars at 300°F. for 25-30 minutes, or until the center is “set” and no longer “jiggly”. Once done, transfer the baking dish to a wire rack to cool.

Let the lemon bars cool completely to room temperature while still in the baking dish. 

Lemon filling is poured onto crust in baking dish and baked

Refrigerate Lemon Bars Before Serving

Place the baking dish in the refrigerator for 3-4 hours (or more) to allow the lemon bars to become firm before serving. Once refrigerated, remove the dish from the refrigerator.

Carefully lift the entire batch of lemon bars up and out of the baking dish using the aluminum foil overhanging the edges.

Peel back the foil and slice the lemon bars into 16 two inch squares. Okay…there’s only one final itty bitty step before serving these yummy bars.

Baked lemon bars, cut into slices to serve

Serve The Lemon Bars

Lightly sift some powdered sugar over the top of the lemon bars, immediately before they are served. Transfer the bars to a pretty platter, serve, and enjoy these mouth-watering dessert treats.

Powdered sugar sifted onto lemon bars

And just like that, these gorgeous lemon bars are ready to eat! Make sure any leftovers are kept refrigerated in a covered container, if you don’t eat them all in one sitting!

Close up of lemon bars on white plate

C’mon… you KNOW you want one of these lemon bars, right?  Go ahead… reach out and grab yourself one really delicious lemon bar. I don’t mind sharing! ENJOY!

Close up photo of lemon bars on a white plate.

Hope you will try these fabulous treats, and hope you will enjoy them as much as we do! They are amazing, and once you try them, you’ll want them again and again.

Thank you for stopping by today. I invite you to come back again soon for more family-friendly recipes. Take care, may God bless you, and have a GREAT day!

Looking For More BAR COOKIE Recipes?

You can find ALL of my recipes in the Recipe Index, which is located at the top of the page. I have a nice variety of yummy bar cookie recipes. All are delicious, and will pretty much satisfy your sweet tooth craving, including:

Chocolate Chip Swirl Bars
Sprinkle Bars
Blackberry Pie Bars
Strawberry-Rhubarb Dream Bars
Chocolate Pecan Pie Bars 

Want More Recipes? Get My FREE Newsletter!

I publish a newsletter 2 times per month (1st and 15th) with lots of recipes, tips, etc..
Would you like to join our growing list of subscribers?

There is a Newsletter subscription box on the top right (or bottom) of each blog post, depending on the device you use.
You can submit your e-mail address there, to be added to my mailing list.

Find Me On Social Media:

Facebook page: The Grateful Girl Cooks!
Pinterest:
The Grateful Girl Cooks!
Instagram:
jbatthegratefulgirlcooks

Author's signatureRecipe Source: http://www.fridaycakenight.com/2014/12/whole-meyer-lemon-bars/

↓↓ PRINTABLE RECIPE BELOW ↓↓

0 from 0 votes
Lemon Bars
Prep Time
30 mins
Cook Time
25 mins
Total Time
55 mins
 
You will LOVE these classic Lemon Bars! Sweet and tangy lemon filling on a buttery base, they are a perfect treat to serve for dessert, or any special occasion!
Category: Dessert
Cuisine: American
Keyword: Bar cookies, lemon bars
Servings: 16 servings
Calories Per Serving: 174 kcal
Author: JB @ The Grateful Girl Cooks!
Ingredients
For The Crust:
  • 1 cup all purpose flour
  • 1/4 cup granulated sugar
  • 1/2 cup butter , melted
  • 1 teaspoon vanilla extract
For The Filling:
  • 1 Meyer lemon (seeds removed) A regular lemon may be substituted.
  • 1 cup granulated sugar
  • 3 Tablespoons lemon juice (fresh or bottled- I used fresh)
  • 3 large eggs
  • 1 1/2 Tablespoons cornstarch
  • 3 Tablespoons butter , melted (then cooled to room temp.)
Instructions
  1. Preheat your oven to 350 degrees. Cover an 8x8 baking pan with aluminum foil, leaving extra hanging over the edges on each side (this foil and foil overhang will help you to easily remove the entire pan of lemon bars at one time, after baking)
  2. Place the crust ingredients into a food processor or the base of a stand mixer. Process the ingredients until well combined and crumbly dough is formed. Put the dough into the foil-lined baking pan and press down on crust until dough is compacted into a solid crust.
  3. Bake the crust at 350 degrees for 20 minutes. Remove to a wire rack.
  4. While the crust is baking, make the lemon filling. Place the seeded lemon (yep... the WHOLE thing!) and sugar into a food processor. Process the lemon and sugar on high speed until the lemon is completely "pulverized". Check the mixture for any remaining seeds that might have secretly snuck into the food processor. Remove them, if you find any. They are sneaky!
  5. Add the lemon juice, eggs, cornstarch, and the melted butter to the lemon/sugar mixture. Pulse until mixture is smooth.
  6. Once crust is done baking and is removed from oven, LOWER THE OVEN TEMP. to 300 degrees. Pour the lemon filling over the baked crust; continue baking for 25-30 minutes, or until center is set, and is no longer "jiggly" (mine took 28 minutes).

  7. Remove pan to wire rack. Let cool to room temp, then place entire pan into refrigerator. Let bars refrigerate for 3-4 hours (the longer the better!) before you serve them. After the bars have chilled, lift the entire batch out of the pan at one time, by lifting them out via the aluminum foil that is hanging over the edges.

  8. Cut the bars into sixteen 2" squares, then sift powdered sugar over the tops. Serve and enjoy. Keep remaining bars stored in refrigerator.

Nutrition Facts
Lemon Bars
Amount Per Serving (1 bar)
Calories 174 Calories from Fat 72
% Daily Value*
Fat 8g12%
Saturated Fat 5g31%
Cholesterol 51mg17%
Sodium 81mg4%
Potassium 22mg1%
Carbohydrates 22g7%
Sugar 15g17%
Protein 1g2%
Vitamin A 285IU6%
Vitamin C 1.1mg1%
Calcium 8mg1%
Iron 0.5mg3%
* Percent Daily Values are based on a 2000 calorie diet.

Here’s one more to pin on your Pinterest boards!You will LOVE these classic Lemon Bars! Sweet and tangy lemon filling on a buttery base, they are a perfect treat to serve for dessert, or any special occasion!

Save

Save

Save

Save