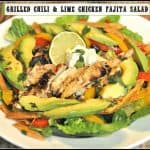
Grilled Chili Lime Chicken Fajita Salad is delicious, with marinated chicken, peppers, onions, black beans, avocado and lettuce, and a chili lime dressing!
Do you like fajitas? Well, I sure do, so I was excited to try a new recipe for Grilled Chili & Lime Chicken Fajita Salad! Wow… it tasted fantastic, and I can’t wait to share it with you today. This main dish salad is filled with marinated grilled chicken, romaine lettuce, black beans, grilled bell peppers and onion, and is topped with tortilla strips, cilantro, avocado and sour cream.
If that’s not enough, it is drizzled with an amazing chili and lime salad dressing (part of it serves as the marinade!). If you like Southwestern food, chances are you will LOVE this filling salad. We sure did! It is one of my new favorites… will DEFINITELY make this chicken fajita salad again and again.
Scroll Down For A Printable Recipe Card At The Bottom Of The Page
Plan Ahead
The chicken will need to marinate for a couple hours (at least), so plan ahead. This marinating time is not included in the prep time in the printable recipe. I like to get things ready ahead of time, so early in the afternoon I marinated the chicken, then grilled the chicken and at the same time, (in a separate skillet) I grilled the onion and peppers.
When it was dinner time, all I had to do was slice the pre-cooked chicken, arrange the salad ingredients in 2 serving bowls, drizzle with the dressing and serve! EASY!
How To Cook This Chicken Fajita Salad
The day I made this salad it was pouring rain, so I cooked the chicken on my indoor George Foreman grill. You can cook the marinated chicken on the BBQ, an indoor grill. You can also cook it in a skillet on your stovetop! The recipe calls for boneless chicken thighs, but boneless chicken breasts are a great substitution, too!
Marinating The Chicken
In a small bowl, whisk the ingredients for the marinade together until fully blended. Pour HALF (approx. 1/4 cup) of the marinade into a shallow dish.
Add the chicken, cover, and refrigerate/marinate chicken for at least 2 hours (turning occasionally to coat), for best taste results! Cover and set the remaining marinade (approx. 1/4 cup) aside until ready to serve (this is the salad dressing). There is no need to refrigerate.


Cooking the Chicken
After chicken has been marinated, grill the chicken until done and crispy on a BBQ or indoor grill. If using a skillet, heat a teaspoon of oil on medium-high heat until hot before adding meat. Once very hot (but not smoking), add chicken and cook until done. When cooked fully, remove chicken. Let rest for a few minutes, then cut chicken into thin slices.
TIP: When you cook the marinated chicken, discard and do NOT use the marinade that has been in contact with the chicken, to avoid cross contamination!


Cooking the Veggies
In a separate skillet, heat a teaspoon of oil on medium-high heat until hot. Add the sliced red and yellow bell peppers and onions to the skillet once it is hot (but not smoking).. Cook until tender (4-5 minutes), stirring occasionally. Remove the skillet from the heat and set it aside, to let the veggies cool.
 Time To Assemble The Salad
To assemble the salad, fill each serving dish with torn romaine leaves. Evenly distribute the black beans, peppers and onions over lettuce. Add some sliced avocado and crisp tortilla strips. TIP: I made my own tortilla strips. To see how to make them, check the notes section of printable recipe.
Sprinkle the salad with extra cilantro leaves. Place a dollop of sour cream on top, and add a lime wedge (for garnish). Finish it by drizzling reserved marinade over the top.
Enjoy This Delicious Chicken Fajita Salad
Serve… and ENJOY this amazing, flavor-filled chicken fajita salad! The recipe as written (below) makes two very generous sized main course salads.

I’m not kidding… this chili lime chicken fajita salad really is one delicious dinner! I hope you will give it a try. My husband loved it, too. One of his first comments after tasting it was, “wow, this has to be one of the best looking salads I’ve ever eaten”. Yes, it LOOKS good, but just wait until you TASTE it! Grab a fork and have a taste of this juicy chicken fajita salad! YUM!

Have a wonderful day! Thanks for stopping by. I hope you find some delicious recipes, (including this one for chicken fajita salad) to fix for those you love and cherish!
Looking For More ENTREE SALAD Recipes?
You can find ALL of my recipes in the Recipe Index, located at the top of the page. I have some delicious main course salad recipes you might enjoy, including:
- Cobb Salad
- Strawberry Avocado Spinach Salad with Grilled Chicken
- Grilled Ham Salad with Peaches and Goat Cheese
- Chicken Salad
Interested In More Recipes?
Thank you for visiting this website. I appreciate you using some of your valuable time to do so. If you’re interested, I publish a newsletter 2 times per month (1st and 15th) with all the latest recipes, and other fun info. I would be honored to have you join our growing list of subscribers, so you never miss a great recipe!
There is a Newsletter subscription box on the top right side (or bottom) of each blog post, depending on the device you use, where you can easily submit your e-mail address (only) to be included in my mailing list.
You Can Also Find Me On Social Media:
Facebook page: The Grateful Girl Cooks!
Pinterest: The Grateful Girl Cooks!
Instagram: jbatthegratefulgirlcooks

Recipe Adapted From: https://cafedelites.com/2015/08/09/grilled-chilli-lime-chicken-fajita-salad/
- 4 Tablespoons olive oil
- 1/3 cup (+ 1 Tablespoon more) fresh squeezed lime juice
- 2 Tablespoons fresh chopped cilantro
- 2 cloves minced garlic
- 1 teaspoon brown sugar
- 3/4 teaspoon red chili flakes
- 1/2 teaspoon ground Cumin
- 1 teaspoon salt
- 2 boneless , skinless chicken thighs (can substitute chicken breasts)
- 1/2 yellow bell pepper , sliced thin (seeds removed)
- 1/2 red bell pepper , sliced thin (seeds removed)
- 1/2 medium onion , thinly sliced
- 5 cups Romaine lettuce , roughly chopped
- 1 avocado , sliced (divided)
- 1/2 cup black beans (rinsed, drained)
- Sour cream and extra cilantro leaves
- Crisp tortilla strips (see Notes section for "how to make" these).
- In a small bowl, whisk ingredients for marinade together until fully blended. Pour HALF (approx. 1/4 cup) of the marinade into a shallow dish. Add chicken and let marinate in fridge for at least 2 hours, turning occasionally to coat. Cover remaining marinade and set aside until ready to serve (this is the salad dressing-you do not need to refrigerate).
- Heat a teaspoon of oil on medium-high heat in a skillet. Once oil is hot, add marinated chicken pieces; cook until done and crispy on outside (can also use indoor grill or outside BBQ). When fully cooked, remove chicken. Let rest for a few minutes, then cut into thin slices. Set aside. Discard and do NOT use the marinade that has been in contact with the chicken, to avoid cross contamination.
- In a separate skillet, heat a teaspoon of oil on medium-high heat. Add sliced onions and bell peppers. Cook until tender (4-5 minutes), stirring occasionally. Remove from heat; set aside.
Caloric calculation does not include sour cream or tortilla strip garnish. Prep Time does not include marinating time for chicken.
TO MAKE TORTILLA STRIPS: Cut 2 corn tortillas in half, then cut into thin strips. Coat strips with 1 Tablespoon of vegetable oil, then bake at 375 degrees for 5-6 minutes on each side (flipping midway through baking), until light brown and crispy.
Here’s one more to pin on your Pinterest boards!


 using safe pressure canning guidelines. Recipe yields 8 qts. of old-fashioned chili, for long term storage. / The Grateful Girl Cooks!")


 using safe pressure canning guidelines. Recipe yields 8 qts. of old-fashioned chili, for long term storage./ The Grateful Girl Cooks!")