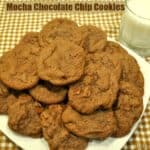
Category: Desserts

Fruit Smoothie Popsicles

It’s EASY and ECONOMICAL to make yummy homemade fruit smoothie popsicles! Enjoy a fresh fruit smoothie, popsicle style! You and your kids will love ’em!
It's EASY and ECONOMICAL to make yummy homemade fruit smoothie popsicles! Enjoy a fresh fruit smoothie, popsicle style! You and your kids will love 'em!

Summer was a hot one, here in good ol’ Oregon. We had less rain than usual, and many days were above 90 degrees.  One of the things we enjoyed having in our freezer were fruit smoothie popsicles! Best part? These are not summer only treats…you can make them ANY time of year!

I tend to drink a lot of fresh fruit smoothies in the summer, so it was only natural that I started making popsicles out of them. The beauty of making fruit smoothie popsicles is that you can tailor make them to your own preferences! How great is that?

Scroll Down For A Printable Recipe Card At The Bottom Of The Page

What Ingredients Are Used To Make Fruit Smoothie Popsicles?

The ingredients were quite simple… fresh fruit, milk (of choice – I used coconut milk for this batch), and Greek vanilla yogurt. The best part is that you can make YOUR favorite smoothie, any flavor, into a popsicle!

For this recipe for fruit smoothie popsicles I used bananas, and blueberries and strawberries! I even was able to use homegrown blueberries and strawberries from our garden in the backyard!

Ingredients for fruit smoothie popsicles (strawberries, banana, blueberries, coconut milk, Greek vanilla yogurt)

Several years ago I paid around $8 for these “GROOVY” pop molds, and I have gotten so much use out of them! They make popsicle creating so easy (and NO, I don’t receive compensation from them, just thought I’d show what I used to make these fruit smoothie popsicles!).

Popsicle molds used to make fruit smoothie popsicles.

Making fruit smoothie popsicles could NOT be any easier!  You simply add the ingredients (again… YOUR choice) to a blender, just like making your smoothie normally.  Blend together for a couple minutes until mixture is smooth.

Once fully blended, pour the liquid into your popsicle molds. Make sure the plastic popsicle holders are securely standing in the base unit to secure them.  Fill the popsicle molds about 3/4 of the way full.

What If I Don’t Own A Popsicle Mold To Make Fruit Smoothie Popsicles?

If you do not own a popsicle mold, you can also make the fruit smoothie popsicles this way. Pour the smoothie mixture 3/4 of the way into a small paper dixie cup. Place in freezer on baking sheet. After the smoothie has partly frozen (thickened up), insert a popsicle or wood craft stick into the cup.  Freeze popsicles overnight, then simply tear off the paper cup to reveal the popsicle.

Fruit smoothie is made with ingredients blended in blender.

Fruit smoothie is poured into popsicle molds.

Here you can see the holder that securely anchors the popsicle molds for filling.  Once molds are filled, snap on and firmly secure the lids (with handles) onto tops of containers.

Popsicle molds are filled with fruit smoothie mix.

Fruit Smoothie popsicles, with lids on, ready to freeze!

Freeze smoothies overnight, and BOOM!  You’ve just made fruit smoothie popsicles!  See how easy that was? When you are ready to enjoy one, simply hold the popsicle mold under some running warm water to loosen popsicle from sides of the container, then carefully slip popsicle out… and ENJOY!

If you used the “paper cup” method (mentioned above), simply tear off the paper cup, and enjoy your fruit smoothie popsicles! Now you have a fruit-filled and protein-enhanced (Greek yogurt) “snack” for the kids after school, or an after dinner creamy frozen fruit smoothie popsicle for YOU!

Frozen fruit smoothie popsicle, ready to eat!

Using Other Smoothie Recipes To Make Popsicles

There are so many choices of flavors for fruit smoothies, including Orange Julius, PeachBerry, Triple Berry Banana, Chocolate Peanut Butter, Blueberry Kale, Strawberry, etc. Have fun making your very own flavor combinations for fruit smoothie popsicles!

thanks for stopping by. Be sure to check out ALL of my recipes in the Recipe Index, located at the top of the page. Have a GREAT day!

Interested In More Recipes?

Thank you for visiting this website. I appreciate you using some of your valuable time to do soIf you’re interested, I publish a newsletter 2 times per month (1st and 15th) with all the latest recipes, and other fun info. I would be honored to have you join our growing list of subscribers, so you never miss a great recipe! 

There is a Newsletter subscription box on the top right side (or bottom) of each blog post, depending on the device you use, where you can easily submit your e-mail address (only) to be included in my mailing list.

You Can Also Find Me On Social Media:

Facebook page: The Grateful Girl Cooks!
Pinterest:
The Grateful Girl Cooks!
Instagram:
jbatthegratefulgirlcooks

Author's signature

0 from 0 votes
Fruit Smoothie Popsicles
Prep Time
5 mins
Cook Time
0 mins
Freezing Time (inactive)
6 hrs
Total Time
6 hrs 5 mins
 
It's EASY and ECONOMICAL to make yummy homemade fruit smoothie popsicles! Enjoy a fresh fruit smoothie, popsicle style! You and your kids will love 'em!
Category: Frozen, Snack
Cuisine: American
Keyword: fruit smoothie popsicles
Servings: 6 popsicles
Calories Per Serving: 59 kcal
Author: JB @ The Grateful Girl Cooks!
Ingredients
  • 1 cup coconut milk (dairy) , or milk of choice
  • 1/2 cup Greek vanilla yogurt
  • 1 large banana
  • 1/2 cup blueberries
  • 8-10 strawberries
Instructions
  1. Place all ingredients in a blender or food processor. Blend until ingredients become smooth, approximately 2-3 minutes.

  2. Pour smoothie into popsicle molds, securely attached to holder/stand. Fill each container about 3/4 of the way full.  Cover with lid securely, then move entire holder with popsicle molds (vertically standing) to freezer. Freeze overnight, of for 6-8 hours.

  3. When ready to serve, hold a popsicle mold (still sealed) under warm running water, turning, until it has loosened from sides, and can easily slip out of the plastic mold.  Serve, and enjoy!

Recipe Notes

No plastic popsicle molds? You can make these popsicles using small paper dixie cups. Pour smoothie into paper cups, place cups on baking sheet, and let firm up a bit in the freezer. Insert a wooden popsicle or craft stick into cup, and let the popsicles finish freezing overnight.

Nutrition Facts
Fruit Smoothie Popsicles
Amount Per Serving (1 g)
Calories 59 Calories from Fat 9
% Daily Value*
Fat 1g2%
Saturated Fat 1g6%
Cholesterol 1mg0%
Sodium 6mg0%
Potassium 132mg4%
Carbohydrates 12g4%
Fiber 1g4%
Sugar 8g9%
Protein 2g4%
Vitamin A 15IU0%
Vitamin C 12.5mg15%
Calcium 19mg2%
Iron 0.2mg1%
* Percent Daily Values are based on a 2000 calorie diet.

Here’s one more to pin on your Pinterest boards!It's EASY and ECONOMICAL to make yummy homemade fruit smoothie popsicles! Enjoy a fresh fruit smoothie, popsicle style! You and your kids will love 'em!

Triple Chip Bar Cookies

You’ll love these EASY to make Triple Chip Bar Cookies, loaded with semi-sweet, white, and cinnamon chips – it’s simple to have a dozen treats ready to eat in about 30 minutes!
You'll love these EASY to make Triple Chip Bar Cookies, loaded with semi-sweet, white, and cinnamon chips- have a dozen treats ready to eat in about 30 minutes!

If you’re looking for a ridiculously simple and DELICIOUS dessert that is a snap to make, then look no further. Have I got a recipe idea for YOU! Filled with assorted chips, these amazing tasting bar cookies are packed with flavor! AND… (drum roll, please!)… they only took 10 minutes to get into the oven!

Scroll Down For A Printable Recipe Card At The Bottom Of The Page

How To Make Triple Chip Bar Cookies

Before beginning to make batter, preheat oven to 350° F, and line an 8×8 baking dish with aluminum foil. Be sure to let the ends of the foil overlap and hang over the sides of the baking dish. This will help to lift the entire pan of bar cookies out of the dish after baking. Spray the foil (bottom and sides) with non-stick cooking spray.

In a medium sized bowl, mix together melted butter and brown sugar until blended.  I used a spoon- no need for a mixer.  Add egg and vanilla extract, stir until fully incorporated.Mixing batter for triple chip cookie bars.

Stir the flour, baking powder and salt into the batter.  Add assorted chocolate chips (I used white chocolate, cinnamon and semi-sweet chips… if you can’t find cinnamon chips at your store (sometimes they are seasonal), you can substitute butterscotch or peanut butter chips). Stir the batter until ingredients are fully combined.

Flour, mixture plus cinnamon, chocolate and white chips added to bar cookie batter.

Bake The Bar Cookies

Spread the batter into your prepared baking dish.  Bake triple chip bar cookies at 350° F. for 20-25 minutes, or until the top is golden brown and set. You can also test for doneness by inserting a toothpick into the middle top of the bar cookies. If it comes out clean with no dough on it, they are ready!

Since oven temperatures vary greatly, I recommend checking them at 20 minutes, then bake a few minutes longer, if necessary, to ensure they are baked through.

Foil lined and sprayed baking dish filled with triple chip bar cookie batter.

Once done, place the baking dish on a wire rack and let them cool for about 10 minutes.  Using the foil overhangs, carefully lift the entire pan of bar cookies out of the dish and place (still on the foil) onto a wire rack to finish cooling. Once cool, cut into 12 equal sized squares. I find that using a pizza slicer works great to cut the bars quickly and cleanly, but it’s not necessary to use one!

Triple chip bar cookies are cut into 12 pieces with pizza cutter.

Time To Serve These Triple Chip Bar Cookies

And just like that, in about 30 minutes from start to finish, you can have some really delicious triple chip bar cookies!  I personally think they taste best at room temperature!

Triple chip bar cookies are served on a light green plate.

Close up photo of triple chip bar cookies.

The triple chip bar cookies freeze well, too, so if you have any leftovers (notice I said “IF”), wrap them very well in aluminum foil and save a few for a rainy day! My husband poured a cold glass of milk and gobbled up two of these treats before I knew what happened!

Hand, holding one of the triple chip bar cookies.

Do You Enjoy Making Bar Cookies?

By the way, if you enjoy bar cookies, check out my recipes for Blackberry Pie Bars, Chocolate Pecan Pie Bars, JB’s Best Brownies, Lemon Bars, Pecan Chewies, Sprinkle Bars, Strawberry-Rhubarb Dream Bars, and Chocolate Peanut Butter Frosted Krispy Bars! You might also like Chocolate Chip Cheesecake-Swirl Brownie Bites. They’re not bars, but are equally wonderful!

If you’re looking for a quick and easy dessert to make for family or friends, I hope you will give THIS one a try!  And, as always, I really hope you enjoy them! Don’t forget- you can find ALL of my recipes in the Recipe Index, located at the top of the page.

Interested In More Recipes?

Thank you for visiting this website. I appreciate you using some of your valuable time to do soIf you’re interested, I publish a newsletter 2 times per month (1st and 15th) with all the latest recipes, and other fun info. I would be honored to have you join our growing list of subscribers, so you never miss a great recipe!
There is a Newsletter subscription box on the top right side (or bottom) of each blog post, depending on the device you use, where you can easily submit your e-mail address (only) to be included in my mailing list.

You Can Also Find Me On Social Media:

Facebook page: The Grateful Girl Cooks!
Pinterest:
The Grateful Girl Cooks!
Instagram:
jbatthegratefulgirlcooks

Have a WONDERFUL day!

Author's signature

Recipe Source: Fiona at https://www.justsotasty.com/triple-chip-cookie-bars/


↓↓ PRINTABLE RECIPE BELOW ↓↓

0 from 0 votes
Triple Chip Bar Cookies
Prep Time
10 mins
Cook Time
20 mins
Total Time
30 mins
 
You'll love these EASY to make Triple Chip Bar Cookies, loaded with semi-sweet, white, and cinnamon chips- have a dozen treats ready to eat in about 30 minutes!
Category: Dessert
Cuisine: American
Keyword: triple chip bar cookies
Servings: 12
Calories Per Serving: 280 kcal
Author: JB @ The Grateful Girl Cooks!
Ingredients
  • 1/2 cup butter melted
  • 1 cup brown sugar (light or dark) packed
  • 1 Tablespoon vanilla extract
  • 1 large egg
  • cups all purpose flour
  • 1/2 teaspoon baking powder
  • 1/4 teaspoon salt
  • 1 cup assorted chocolate chips (I used semi-sweet, white, and cinnamon)
Instructions
  1. Preheat oven to 350° F, and line an 8x8 baking dish with aluminum foil, being sure to let the ends of the foil hang over the sides of the baking dish (this will help lift the entire pan of bar cookies out of the dish after baking). Spray the foil (bottom and sides) with non-stick cooking spray.

  2. In a medium sized bowl, mix together melted butter and brown sugar with a spoon until blended. Add egg and vanilla extract; stir well, until combined.

  3. Add flour, baking powder and salt to the batter. Stir. Add assorted chocolate chips. Stir batter until ingredients are fully blended.

  4. Spread batter into prepared baking dish.  Bake at 350° F. for 20-25 minutes, or until top is golden brown and set. You can also test for doneness by inserting a toothpick into middle top of the bar cookies. If it comes out clean with no dough on it, they are ready! Since oven temperatures vary greatly, I recommend checking them at 20 minutes, then bake a few minutes longer, if necessary, to ensure they are baked through.

  5. Once done, remove dish from oven; place dish on wire rack and let bars cool for 10 minutes.  Using the foil overhang, carefully lift the entire pan of bar cookies out of dish and place (still on the foil) onto wire rack to finish cooling. Once cooled completely, cut into 12 equal sized squares. Serve, and enjoy!

Recipe Notes

If you can't find cinnamon chips at your store (sometimes they're seasonal), you can substitute butterscotch or peanut butter chips.

Nutrition Facts
Triple Chip Bar Cookies
Amount Per Serving (1 bar (1/12th of total))
Calories 280 Calories from Fat 117
% Daily Value*
Fat 13g20%
Saturated Fat 8g50%
Cholesterol 36mg12%
Sodium 129mg6%
Potassium 145mg4%
Carbohydrates 36g12%
Fiber 1g4%
Sugar 23g26%
Protein 2g4%
Vitamin A 265IU5%
Calcium 38mg4%
Iron 1.8mg10%
* Percent Daily Values are based on a 2000 calorie diet.

Here’s one more to pin on your Pinterest boards!You'll love these EASY to make Triple Chip Bar Cookies, loaded with semi-sweet, white, and cinnamon chips- have a dozen treats ready to eat in about 30 minutes!

Perfectly Peachy Ice Cream

Nothing says summer like homemade perfectly peachy ice cream, made with a few simple ingredients like fresh peaches, cream, sugar and spices! You will LOVE it!Nothing says summer like homemade perfectly peachy ice cream, made with a few simple ingredients like fresh peaches, cream, sugar and spices! You will LOVE it!

Made with only a few simple ingredients, this Perfectly Peachy Ice Cream is a scrumptious frozen treat to enjoy during those HOT summer days, or to make any other time of year!

Scroll Down For A Printable Recipe Card At The Bottom Of The Page

Fresh Ripe Peaches Are the Best!

Each summer I love to pick fresh peaches at a local U-Pick farm (usually in late July/early August).  This year my husband asked if we could have fresh peach ice cream as dessert for July 4th, but the local peaches here in Oregon weren’t fully ripe enough to pick.

He ended up going to Costco, and bought a small flat of gorgeous peaches and brought them home, just so we could have this homemade ice cream for Independence Day!

The peaches he bought at the store were absolutely delicious!  Still, there’s just something about picking those peaches right off the tree that screams “summer” to me.  Here are some of the peaches I’ve been able to pick in the past at my local U-Pick peach farm! Aren’t they gorgeous?

Fresh peaches on the tree... ready for me to pick them to make ice cream and pies!

Picked these fresh peaches YUM!

I don’t know about you… but we LOVE peach ice cream!  I have a recipe already on my blog from several years ago for homemade peach ice cream. It uses canned peach nectar and sour cream in it, and tastes wonderful.

This year I wanted to try a simpler peach ice cream recipe with only the basics: peaches, cream, sugar and spices! This delicious ice cream is the result! Boy… is it GOOD! Here’s how to make this wonderful homemade ice cream:

Here’s How To Make Perfectly Peachy Ice Cream

Peel and thinly slice fresh peaches. These were SO juicy! The juice was running down my hands while I sliced them…yum!

Fresh peaches are peeled, then sliced for perfectly peachy ice cream

Place sliced peaches into a large mixing bowl.  Add granulated sugar, juice of one lemon, vanilla and almond extracts and a bit of cinnamon.

Stir to combine, then let fruit sit for 15-20 minutes.  This resting time will allow the peaches to release some of that juicy goodness, AND let the sugar fully dissolve. Once done “resting”, mash the peaches into small pieces using a potato masher.

Fresh peach slices are crushed with a potato masher for ice cream

Once peaches are mashed, remove 2 cups of crushed peaches. Place them in a blender. Puree peaches until you have a smooth fruit mixture.

Part of the peaches are blended for ice cream

Pour the remaining crushed peaches (the ones left in the mixing bowl) into a container, cover, and keep refrigerated until ice cream is finished freezing.

Part of the peaches are set aside and chilled before adding to ice cream.

Getting Ready To FREEZE The Perfectly Peach Ice Cream

Add the heavy whipping cream to the 2 cups of peach puree in the blender. Give it a couple pulses to combine peach puree and whipping cream.  Cover blender (or pour into a container with a lid) and refrigerate this peach puree/cream mixture until very cold.

You can also pour the fruit/cream mixture into large bowl, cover with plastic wrap and refrigerate (but it’s one more bowl to clean- just sayin’!).

After peach/cream mixture is really cold, pour it into cannister of ice cream machine, and freeze ice cream according to the manufacturer’s instructions. I use a Cuisinart machine, and the ice cream is thick and soft serve consistency in about 20 minutes.

Peach ice cream mixture is added to ice cream machine.

Perfectly peach ice cream is done freezing.

Let The Ice Cream “Ripen” In the Freezer, Then ENJOY!

Transfer the ice cream to a bowl with a lid as soon as it is done churning in the freezer. Immediately add the reserved mashed and chilled peaches, and stir to combine. Place lid on container and put it in freezer to “ripen and firm up” for a few hours!

Cold reserved peaches are added to finished ice cream and stirred in.

Once ice cream has firmed up, it is ready to serve and gobble up!  The recipe makes approximately 1½ quarts, which means you will en up with about 12 (half-cup) servings of this delicious frozen “perfectly peachy ice cream”!

Big scoop of perfectly peachy ice cream is served with a mint sprig.

And that is how easy it is to make this delicious, perfectly peachy ice cream! It tasted soooo good, and we loved this easy to prepare, simple recipe! I hope you will consider making it for those you love.

If you love homemade ice cream like we do, be sure to check out the Recipe Index at the top of each blog post where you will find all the homemade ice cream recipes on this blog. They include Blueberry Cheesecake, Candied Bacon, Chocolate Peanut Butter, Coffee, Strawberry, and many others! Enjoy the, and have a great day. Come back soon.

Interested In More Recipes?

Thank you for visiting this website. I appreciate you using some of your valuable time to do soIf you’re interested, I publish a newsletter 2 times per month (1st and 15th) with all the latest recipes, and other fun info. I would be honored to have you join our growing list of subscribers, so you never miss a great recipe!
There is a Newsletter subscription box on the top right side (or bottom) of each blog post, depending on the device you use, where you can easily submit your e-mail address (only) to be included in my mailing list.

You Can Also Find Me On Social Media:

Facebook page: The Grateful Girl Cooks!
Pinterest:
The Grateful Girl Cooks!
Instagram:
jbatthegratefulgirlcooks

Have a wonderful day!

Author's signature

Recipe Source: https://www.makeandtakes.com/fresh-peach-ice-cream

0 from 0 votes
Perfectly Peachy Ice Cream
Prep Time
30 mins
Cook Time
0 mins
Freezer Firming Up Time
2 hrs
Total Time
2 hrs 30 mins
 
Nothing says summer like homemade perfectly peachy ice cream, made with a few simple ingredients like fresh peaches, cream, sugar and spices! You will LOVE it!
Category: Desserts- Ice Cream
Cuisine: American
Keyword: perfectly peachy ice cream
Servings: 12 (1/2 cup)-1½ quarts total
Calories Per Serving: 265 kcal
Author: JB @ The Grateful Girl Cooks!
Ingredients
  • 6 fresh peaches , peeled and sliced thin
  • cups granulated sugar
  • 1 large lemon (juice of)
  • 2 teaspoons vanilla extract
  • 1/8 teaspoon almond extract
  • 1/4 teaspoon ground cinnamon
  • 2 cups heavy whipping cream (no substitutions!)
Instructions
  1. Peel and thinly slice fresh peaches.  Place sliced peaches into a large mixing bowl.  Add granulated sugar, juice of one lemon, vanilla and almond extracts and cinnamon.  Stir to combine, then let fruit sit for 15-20 minutes.  This resting time will allow the peaches to release some of their juicy goodness, AND let the sugar fully dissolve. Once done "resting", smash the peaches into small pieces using a potato masher. 

  2. Once peaches are mashed, remove 2 cups of crushed peaches. Place them in a blender. Puree these two cups of peaches until you have a smooth fruit mixture.

  3. Pour the remaining crushed peaches (the ones left in the mixing bowl) into a container, cover, and keep refrigerated until ice cream is finished freezing.
  4. Add whipping cream to the 2 cups of peach puree in blender. Give it a few pulses to combine peach puree and whipping cream.  Cover blender (or pour into a container with a lid) and refrigerate this peach puree/cream mixture until very cold.  After peach/cream mixture is really cold, pour it into cannister of ice cream machine, and freeze according to the manufacturer's instructions.

  5. Transfer ice cream to a large bowl/container as soon as it is done churning in the freezer. Immediately add reserved mashed/chilled peaches; stir to combine.  Place lid on container and place in freezer to "firm up" for a few hours! When firmed up, serve, and enjoy!

Nutrition Facts
Perfectly Peachy Ice Cream
Amount Per Serving (0.5 cup)
Calories 265 Calories from Fat 126
% Daily Value*
Fat 14g22%
Saturated Fat 9g56%
Cholesterol 54mg18%
Sodium 15mg1%
Potassium 172mg5%
Carbohydrates 33g11%
Fiber 1g4%
Sugar 31g34%
Protein 1g2%
Vitamin A 830IU17%
Vitamin C 6.2mg8%
Calcium 30mg3%
Iron 0.2mg1%
* Percent Daily Values are based on a 2000 calorie diet.

Here’s one more to pin on your Pinterest boards!Nothing says summer like homemade perfectly peachy ice cream, made with a few simple ingredients like fresh peaches, cream, sugar and spices! You will LOVE it!

Berry Cobbler Traeger Grill Style

Make an incredibly delicious berry cobbler Traeger grill style, by cooking this dessert, with blackberries, blueberries and raspberries on a BBQ (or in oven)! Make an incredibly delicious berry cobbler Traeger grill style, by cooking this dessert, with blackberries, blueberries and raspberries on a BBQ (or in oven)!

Who wants a serving of berry cobbler, made Traeger grill style? That’s right! Did you know you can make a scrumptious fruit cobbler on a BBQ? Guess what? It tastes GREAT!

My husband recently received a new Traeger smoker grill for a combination birthday/Father’s Day present. I had been saving my money for a long time to buy him one as a special surprise (he’d wanted one for almost a year since he saw a demo), and boy, was he excited when he saw what I asked him to help me unload from the back of our truck!

Now that we had the grill, we had to figure out how to use it – DUH! (our first smoker). Certainly, we were used to using our Weber charcoal grill (direct heat). We also knew a Traeger grill could also double as an oven (due to using indirect heat), so we set about researching various recipes to try.

Scroll Down For A Printable Recipe Card At The Bottom Of The Page

Experimenting With Our New Traeger Grill

Our first attempt turned out wonderful as we smoked and grilled chicken Italian sausages, a rib eye steak, and several chicken breasts.  For our second go around with the Traeger, we smoked a pork loin roast (made some tasty BBQ pork sandwiches) and a whole chicken.

We then finished the day off by cooking a delicious triple berry cobbler for dessert ON THE GRILL. **Head implodes**. Who knew you could do that? We sure didn’t… until we bought this grill (see that big smile on my hubby’s face when I surprised him with it?).

My husband, with his new Traeger grill.

The berry cobbler we finished off the grilling session with is incredibly EASY to make… and delicious! I tweaked a rhubarb cobbler recipe I found on their app and adapted it for triple berries!

Berry Cobbler For The Traeger Grill OR In The Oven!

This recipe was specifically written for cooking the cobbler on a Traeger grill, BUT… it can just as easily be made in your oven… honest! Directions for baking it in the oven are included in the printable recipe below. I love the idea of being able to “bake” something on a hot summer’s day without heating up the kitchen, if I’m being honest. This has opened up new experimental cooking adventures for me, to be sure!

Here’s How To Make Berry Cobbler Traeger Style!

Combine frozen blackberries, blueberries and raspberries in a large mixing bowl. The recipe calls for mixed berries (I ended up using 3 full cups of frozen unsweetened mixed berries, straight out of a Richland frozen combo bag from Costco!). The frozen berries are then mixed with brown sugar, lemon juice, lemon zest, vanilla and a little pinch of salt.

Blackberries, blueberries and raspberries are mixed with brown sugar, etc. for cobbler

After the berries were coated well, I placed them in a 10″ cast iron skillet (you can also use an 8×8 aluminum pan for grilling) or an 8×8 baking dish (if baking in oven). I let them sit in the skillet and thaw while I was making the cobbler topping. Any accumulated juices from the thawing fruit stayed in the skillet.

Berries (for cobbler) are placed into cast iron skillet.

Make The Topping For The Cobbler

The berry cobbler topping is made by mixing flour, sugar, baking powder and salt in a medium bowl. COLD butter is cut into the flour with a pastry blender (or a couple forks) until the butter is the size of peas. Once mixed, sour cream is gently stirred into the mixture only until the dough begins to come together.

Dough is made for topping the berry cobbler.

The dough is then pinched into small pieces and placed all over the top of the fruit for the cobbler.

Dough is pinched off and covers the entire surface of the fruit for cobbler.

Granulated sugar is lightly sprinkled on top of the cobbler dough, then the berry cobbler is ready to be cooked on the smoker or in the oven..

Instructions For Baking In OVEN

If planning to bake in oven, preheat oven to 350°, then bake for 30-35 minutes or until topping is golden brown, and juices are bubbling around the edges. If you are using a Traeger grill, follow instructions below.

Instructions For Cooking On Traeger Grill Or Other Smoker

The Traeger grill is started on the “Smoke” setting with the lid open for 4-5 minutes, or until the fire has been established and grill is smoking. Turn temperature setting to 350° and preheat the grill for 10-15 minutes with the lid closed until temperature has been reached.

Place cast iron skillet (or aluminum pan) directly onto the grill grate. Close lid, and cook the cobbler for 35 minutes at 350° (may take just a few minutes longer if you want the topping to be more golden brown in color).  Cook until the dough topping is golden brown, and the juices are bubbling up all around the edges of the cobbler.

Once done, carefully remove skillet from grill (remember the pan is very HOT).  Let cobbler cool down for a few minutes, then scoop it up and serve. That’s how you make this scrumptious berry cobbler Traeger grill style!

Berry cobbler in cast iron skillet is cooked outside on a Traeger grill

Finished berry cobbler Traeger grill style!

See how good the inside of the cobbler looks? YUM. Only one thing can possibly make this triple berry cobbler taste even better. What on earth could THAT be?

An inside peek at the berry cobbler cooked on our Traeger grill!

Yep… a BIG scoop of homemade vanilla ice cream is the perfect finishing touch for this amazing tasting cobbler! If you like this cobbler, you might also want to take a look at my recipe for Strawberry Cobbler (baked). It’s yummy, too!

Berry Cobbler Trager grill style, served with a scoop of homemade vanilla ice cream!

We really LOVED this berry cobbler, cooked Traeger grill style! I am excited to try other desserts on the grill, as well, including chocolate chip cookies!  I hope you will consider making this recipe. I realize lots of people do not have Traeger grills, but this is a very good tasting cobbler, so I would encourage you to make it in your oven. It will taste DELICIOUS!

Looking For More “Traeger Smoked” Dessert Recipes?

You can find all of my recipes in the Recipe Index, located at the top of the page. You might enjoy some additional “smoked” dessert recipes we have cooked on our Traeger smoker, including:

Interested In More Recipes?

Thank you for visiting this website. I appreciate you using some of your valuable time to do soIf you’re interested, I publish a newsletter 2 times per month (1st and 15th) with all the latest recipes, and other fun info. I would be honored to have you join our growing list of subscribers, so you never miss a great recipe!
There is a Newsletter subscription box on the top right side (or bottom) of each blog post, depending on the device you use, where you can easily submit your e-mail address (only) to be included in my mailing list.

You Can Also Find Me On Social Media:

Facebook page: The Grateful Girl Cooks!
Pinterest:
The Grateful Girl Cooks!
Instagram:
jbatthegratefulgirlcooks

Have a fantastic day!

Author's signature

Recipe Adapted from: https://www.traegergrills.com/recipes/baked-goods/rhubarb-cobbler

0 from 0 votes
Berry Cobbler (Traeger Grill Style)
Prep Time
15 mins
Cook Time
35 mins
Total Time
50 mins
 
Make an incredibly delicious berry cobbler Traeger grill style, by cooking this dessert, with blackberries, blueberries and raspberries on a BBQ (or in oven)! 
Category: Dessert, Grill
Cuisine: American
Keyword: berry cobbler
Servings: 8 servings
Calories Per Serving: 371 kcal
Author: JB @ The Grateful Girl Cooks!
Ingredients
For Fruit Filling
  • 3 cups mixed berries (blackberries, blueberries, raspberries) ,frozen
  • 1 cup brown sugar
  • 1 pinch salt
  • 1 teaspoon lemon zest , finely grated
  • 1 lemon (juice of)
  • 1 teaspoon vanilla extract
For Cobbler Topping
  • cups all purpose flour
  • 3 Tablespoons granulated sugar
  • 1.5 teaspoons Baking powder
  • 1/2 teaspoon salt
  • 8 Tablespoons COLD butter , 1 cube= 1/2 cup
  • 1/2 cup sour cream
  • 2 Tablespoons raw sugar
Instructions
  1. Combine frozen blackberries, blueberries and raspberries in a large mixing bowl. Add brown sugar, lemon juice, lemon zest, vanilla and a little pinch of salt. Stir to fully coat fruit. Place fruit in a 10" cast iron skillet (or an 8x8 aluminum pan for grilling) or an 8x8 baking dish (if baking in oven). Let fruit sit in skillet and thaw while you make cobbler topping. Leave any accumulated juices from the thawing fruit in skillet. Set aside.

  2. Make cobbler topping by mixing flour, sugar, baking powder and salt in a medium bowl. COLD butter is cut into the flour with a pastry blender (or a couple forks) until the butter is the size of peas.  Once mixed, gently stir sour cream into the mixture (only until the dough begins to come together). Pinch dough into small pieces and place over the top of the fruit until covered. Sprinkle top of cobbler with raw sugar, if desired.

If Baking In Oven:
  1. If baking in oven, preheat oven to 350°, then bake for 30-35 minutes or until top of cobbler is golden brown and juices are bubbling around the edges.

If Using Traeger Grill:
  1. Start Traeger grill on the "Smoke" setting with the lid open for 4-5 minutes, or until the fire has been established and grill begins smoking. Turn temperature setting to 350° and preheat the grill for 10-15 minutes with the lid closed until temperature has been reached.  Place cast iron skillet (or aluminum pan) directly onto the grill grate. Close lid, and cook the cobbler for 35 minutes at 350° (may take just a few minutes longer if you want the topping to be more golden brown in color). Cook until the dough topping is golden brown, and the juices are bubbling up around the edges of the cobbler.

  2. Once cobbler is done, carefully remove skillet from grill or oven (remember the cast iron skillet will be very HOT). Let cobbler cool down for a few minutes, then scoop it up and serve warm, with a scoop of vanilla ice cream! ENJOY!

Recipe Notes

Traeger suggests using Apple or Pecan wood for this dessert. We ended up using Mesquite left over from cooking chicken and pork - no noticeable difference in taste!

Nutrition Facts
Berry Cobbler (Traeger Grill Style)
Amount Per Serving (1 serving)
Calories 371 Calories from Fat 117
% Daily Value*
Fat 13g20%
Saturated Fat 8g50%
Cholesterol 35mg12%
Sodium 269mg12%
Potassium 123mg4%
Carbohydrates 60g20%
Fiber 2g8%
Sugar 39g43%
Protein 3g6%
Vitamin A 425IU9%
Vitamin C 3.4mg4%
Calcium 55mg6%
Iron 1.4mg8%
* Percent Daily Values are based on a 2000 calorie diet.

Here’s one more to pin on your Pinterest boards!Make an incredibly delicious berry cobbler Traeger grill style, by cooking this dessert, with blackberries, blueberries and raspberries on a BBQ (or in oven)!

Raspberry Lemon Crumb Cake

You will LOVE this easy, delicious Raspberry Lemon Crumb Cake, which can be served as a dessert (yummy with a scoop of ice cream) OR a breakfast coffeecake.

This time of the year is the PERFECT time to find ripe raspberries at local farms or in the local produce section at the grocery store. Then you can make this absolutely yummy raspberry lemon crumb cake!

This past weekend I took my sister and brother-in-law raspberry picking at a local U-Pick farm. They were visiting Oregon from Southern CA for several days, and this is one of the activities my sister really enjoys when she comes up here to visit.

Scroll Down For A Printable Recipe Card At The Bottom Of The Page

Where I Go To Pick Fresh Berries Every Summer

Rowell Brothers Berry Farm has been around since 1853, is about 15 minutes from our home, and is one of the scenic places I LOVE to pick raspberries, blueberries, and boysenberries each summer (plus the fact that you can eat berries for free while you pick is always fun!).

We got to the farm early in the morning, picked raspberries for half an hour and then we were done! Over eight pounds of raspberries picked in half an hour, and we only paid a little over $10, which is a real deal, compared to what they sell for at the grocery store.

A couple days later I used the berries to make homemade raspberry jam , froze a lot of them to use another time, and then also made this delicious raspberry lemon crumb cake with the remaining berries!

Raspberries ready to pick at local U-Pick farm!Fresh picked raspberries are so delicious!

How I Got This Recipe For Raspberry Lemon Crumb Cake

I received this recipe from a friend from Southern California 3 years ago.  Diane and I grew up together in the youth group at church, and ran into each other once again at a music group reunion we both attended. I hadn’t seen her in over 40 years! It was fun catching up with her, and I learned she had attended culinary school in the past.  Ooh… how fun!

Once I returned home to Oregon, Diane sent me this recipe via e-mail and suggested I might enjoy trying it!  I saved the recipe in a basket which contains a HUGE pile of recipes I want to try (too many recipes, never enough TIME), and just this week finally hunted it down and pulled it out to use with these fresh picked raspberries! So glad I did – this is a delicious recipe!

The recipe is incredibly EASY, and the fruit-filled crumb cake tastes wonderful.  We enjoy a slice for breakfast, accompanied by a good, strong cup of coffee! My husband said his favorite way to eat this would be with a big ol’ scoop of vanilla ice cream on the side!  It’s that versatile – it can be either a breakfast coffeecake or a dessert cake!

Here’s How To Make Raspberry Lemon Crumb Cake

Very cold chunks of butter are cut into flour sugar and salt, using a pastry blender. The butter is worked into the dry ingredients until mixture is crumbly and butter is about the size of a pea. One half of a cup of the crumbly mixture is set aside to use for a crumb topping for the cake later on.

Butter is cut into flour and sugar for cake

The remaining flour mixture is combined with baking powder, baking soda, egg, buttermilk and fresh lemon juice, and blended until fully combined.

Egg, lemon juice and buttermilk are blended into dry ingredients for cake

Fresh raspberries are gently stirred into cake batter.  The batter is then placed into a cake pan that has been coated (bottom and sides) with non-stick cooking spray.

Raspberries are gently stirred into batter, then batter is placed in cake pan

Lemon zest and juice are then added to the reserved flour mixture that was set aside earlier. This crumb topping is mixed until combined, then sprinkled over the top of the cake batter in cake pan.

Lemon zest and juice added to crumb topping, then sprinkled onto cake batter

Time To Bake The Cake!

The raspberry lemon crumb cake is baked in a preheated 350°F oven for 25-30 minutes, or until the cake springs back when touched lightly in the center. This picture below shows how it looked straight out of the oven.

Raspberry lemon crumb cake, right out of the oven.

Once the cake cooled to room temperature, it was cut into 8 wedges. The top was garnished with a few raspberries and a sprig of fresh mint (from my garden!).

Raspberry lemon crumb cake cut in 8 wedges, garnished with raspberries and mint leaf.

The inside look at a slice of this raspberry cake in pan.

Time To EAT!

You can see what the raspberry lemon crumb cake looks like on the plate. It’s LOADED with raspberries! The cake is not dry at all, and the combination of raspberry and lemon flavors are absolutely perfect!

A slice of raspberry lemon crumb cake, served on a white plate

Slice of raspberry lemon crumb cake, with fresh raspberries and mint garnish.

We truly enjoyed this simple, yet delicious raspberry lemon crumb cake!  I really hope you will consider trying this cake for yourself… you will be surprised just how easy it is to make, and hope you will enjoy it, as well!

Looking For More CAKE Recipes?

You can find ALL my recipes in the Recipe Index, located at the top of the page. I have a nice variety of delicious cake recipes, including:

Interested In More Recipes?

Thank you for visiting this website. I appreciate you using some of your valuable time to do soIf you’re interested, I publish a newsletter 2 times per month (1st and 15th) with all the latest recipes, and other fun info. I would be honored to have you join our growing list of subscribers, so you never miss a great recipe!
There is a Newsletter subscription box on the top right side (or bottom) of each blog post, depending on the device you use, where you can easily submit your e-mail address (only) to be included in my mailing list.

You Can Also Find Me On Social Media:

Facebook page: The Grateful Girl Cooks!
Pinterest:
The Grateful Girl Cooks!
Instagram:
jbatthegratefulgirlcooks

Have a wonderful day!

Author's signature

Recipe Source: Diane Schultz O’Brien

0 from 0 votes
Raspberry Lemon Crumb Cake
Prep Time
10 mins
Cook Time
30 mins
Total Time
40 mins
 
You will LOVE this easy, delicious Raspberry Lemon Crumb Cake, which can be served as a dessert (yummy with a scoop of ice cream) OR a breakfast coffeecake. 
Category: Dessert or Coffeecake
Cuisine: American
Keyword: raspberry lemon crumb cake
Servings: 8 slices
Calories Per Serving: 207 kcal
Author: JB @ The Grateful Girl Cooks!
Ingredients
  • cups all purpose flour
  • 2/3 cup granulated sugar
  • 1/8 teaspoon salt
  • 1/4 cup butter (very cold)
  • 1/2 teaspoon baking powder
  • 1/4 teaspoon baking soda
  • 1/3 cup buttermilk (low-fat)
  • 2 Tablespoons lemon juice (fresh)
  • 1 egg
  • 1 cup fresh raspberries
  • 2 teaspoons lemon zest (finely grated lemon rind)
  • 3/4 teaspoon lemon juice (fresh)
Instructions
  1. Preheat oven to 350°F. Coat an 8" round cake pan with non-stick cooking spray (bottom and sides).

  2. Place flour, granulated sugar and salt in a large mixing bowl. Cut in chunks of COLD butter, using a pastry blender or 2 knives or forks, until the butter/crumbs are about the size of peas.  Measure out 1/2 cup of this crumb mixture and set aside to use as crumb topping later (set aside).

  3. To the mixing bowl with remaining flour mixture add the baking powder, baking soda, buttermilk, lemon juice, and egg. Beat on medium speed with a mixer until well blended. Gently STIR in fresh raspberries until fully combined with batter. Spoon batter into the prepared (sprayed) cake pan. Gently spread to cover bottom of pan.

  4. Take the reserved flour/crumb mixture and add lemon zest and juice to it. Combine these ingredients with a fork until crumbly.  Sprinkle this mixture over the top of the cake batter, until top of cake is covered.

  5. Bake cake on center rack of preheated 350°F oven for 25-30 minutes or until it is light golden brown on top and cake springs back with touched lightly in the center (mine took 30 minutes). Remove cake pan to a wire rack to cool to room temperature. Slice into 8 wedges, and garnish cake with fresh raspberries and a mint sprig, if desired. ENJOY!

Nutrition Facts
Raspberry Lemon Crumb Cake
Amount Per Serving (1 slice)
Calories 207 Calories from Fat 54
% Daily Value*
Fat 6g9%
Saturated Fat 3g19%
Cholesterol 36mg12%
Sodium 140mg6%
Potassium 91mg3%
Carbohydrates 34g11%
Fiber 1g4%
Sugar 17g19%
Protein 3g6%
Vitamin A 205IU4%
Vitamin C 6.2mg8%
Calcium 34mg3%
Iron 1.1mg6%
* Percent Daily Values are based on a 2000 calorie diet.

Here’s one more to pin on your Pinterest boards!You will LOVE this easy, delicious Raspberry Lemon Crumb Cake, which can be served as a dessert (yummy with a scoop of ice cream) OR a breakfast coffeecake.

Chocolate Peanut Butter Frosted Krispy Bars

The traditional snack or dessert treat of families everywhere gets an update in this delicious recipe for Chocolate Peanut Butter Krispy Bars!The traditional snack or dessert treat of families everywhere gets an update in this delicious recipe for Chocolate Peanut Butter Krispy Bars!

I made these dessert snack bars about a month ago, while trying to think of a way to make Krispy treats with a twist.  I slightly tweaked a recipe for the bars I found on a box of puffed rice cereal (a generic brand), then came up with a simple, quick and easy chocolate peanut butter topping for the bars, that would add another layer of flavor!

They turned out GREAT!  The addition of chocolate and peanut butter… really yummy! One of my favorite flavor combinations!!!  Even my hubby (who doesn’t typically like plain rice “krispy” treats) kept getting into these treats, once made!  They are really very simple to prepare… here’s how!

Scroll Down for A Printable Recipe Card At The Top Of the Page

How To Make Chocolate Peanut Butter Krispy Bars

Butter bottom and sides of a 9×13 rimmed pan, then set aside.  Measure and pour krispy cereal into large mixing bowl; set aside. Place butter, peanut butter, vanilla and marshmallows in a large saucepan. Cook on low until these ingredients have completely melted, stirring often to prevent sticking (sorry, no picture).

Once completely blended and smooth, remove from stove and pour immediately over krispy cereal. Stir very well, to fully coat cereal with marshmallow mixture.  Pour the mixture into the buttered 9×13 inch rimmed pan. Press down on the mixture with your fingers, spreading it out to cover the entire pan. Press hard to compress the layer. Let cool.

Krispy bars pressed into pan, ready for chocolate peanut butter frosting

While krispy bars are cooling, prepare the frosting. In a medium saucepan, melt together butter, peanut butter, and cocoa powder until completely smooth.

Remove the pan from the heat. Stir in vanilla extract, then add powdered sugar and enough milk (approx 2-3 Tablespoons plus) to make the frosting easily spreadable.

Chocolate peanut butter frosting cooking in saucepan

Pour the frosting over the surface of the krispy bars, then quickly spread to fully cover the entire top.

Chocolate peanut butter frosting poured over krispy treats

Ready To Cut Into Bars

This is how it looks once all the frosting is evenly spread over top surface. This will cover it all with a thin layer of frosting. NOTE: If you want a THICKER layer of frosting, simple double the ingredients! Use a knife to cut into 24 bars. Once cut, let the frosted bars sit for a while to let the frosting firm up a bit.

Chocolate frosted krispy bars in long metal pan

Krispy bars cut into 24 servings

Now We’re Ready To EAT!

All that’s left to do is grab one… and take a big bite! Want one? There’s plenty for everyone, and I enjoy sharing.

Holding krispy bar above platter of goodies

The bars are chewy, and have a wonderful chocolate peanut butter flavor… a perfect after school treat or after dinner dessert bar! Try not to eat them all at one time!

Platter of chocolate peanut butter krispy treats, on blue cloth

Hope you enjoy these simple, delicious treats!  Have a GREAT day… and thank God for each and every breath you have been given – it truly is a gift!

Looking For More BAR COOKIE Recipes?

You can find all of my recipes in the Recipe Index, located at the top of the page. I have quite a few ba cookie recipes, including:

Interested In More Recipes?

Thank you for visiting this website. I appreciate you using some of your valuable time to do soIf you’re interested, I publish a newsletter 2 times per month (1st and 15th) with all the latest recipes, and other fun info. I would be honored to have you join our growing list of subscribers, so you never miss a great recipe!
There is a Newsletter subscription box on the top right side (or bottom) of each blog post, depending on the device you use, where you can easily submit your e-mail address (only) to be included in my mailing list.

You Can Also Find Me On Social Media:

Facebook page: The Grateful Girl Cooks!
Pinterest:
The Grateful Girl Cooks!
Instagram:
jbatthegratefulgirlcooks

Author's signature

Recipe for bars (only) adapted from box of Kroger Crispy Rice Cereal

0 from 0 votes
Chocolate Peanut Butter Krispy Bars
Prep Time
10 mins
Cook Time
5 mins
Total Time
15 mins
 
The traditional snack or dessert treat of families everywhere gets an update in this delicious recipe for Chocolate Peanut Butter Krispy Bars!
Category: Dessert, Snack
Cuisine: American
Keyword: krispy bars
Servings: 24 bars
Calories Per Serving: 110 kcal
Author: JB @ The Grateful Girl Cooks!
Ingredients
For Krispy Bars
  • cups puffed rice cereal (like Rice Krispies)
  • 1/4 cup butter
  • 4 cups miniature marshmallows
  • 1 Tablespoon (heaping) peanut butter
  • 1 teaspoon vanilla extract
For Chocolate Peanut Butter Frosting
  • 2 Tablespoons butter
  • Tablespoons (heaping) unsweetened cocoa powder
  • 1 Tablespoon (heaping) peanut butter
  • 1/4 teaspoon vanilla extract
  • 1 cup powdered sugar
  • 2-3 (or more) Tablespoons milk (enough to make frosting spreadable)
Instructions
To Make Krispy Bars:
  1. Butter bottom and sides of a 9x13 rimmed pan; set aside.  Measure krispy cereal into large mixing bowl; set aside. Place butter, peanut butter, vanilla and marshmallows in a large saucepan. Cook on low until they have completely melted, stirring often to prevent sticking. Once completely blended/smooth, remove from stove; pour immediately over krispy cereal. Stir well, to fully coat cereal.  Pour mixture into buttered 9x13 pan.  Press mixture down with fingers to compress; spread to cover entire pan.  Let cool.

To Make Frosting:
  1. In a medium saucepan, melt butter, peanut butter, and cocoa powder until completely smooth, stirring often until smooth.  Remove from heat. Stir in vanilla extract, then add powdered sugar and enough milk (approx 2-3 Tablespoons +) to make the frosting easily spreadable. Pour frosting over surface of krispy bars, then quickly spread, to fully cover.

  2. Let frosted bars sit for a while to let frosting firm up slightly, then use a knife to cut into 24 equal sized bars. When ready, serve and ENJOY!

Nutrition Facts
Chocolate Peanut Butter Krispy Bars
Amount Per Serving (1 bar)
Calories 110 Calories from Fat 27
% Daily Value*
Fat 3g5%
Saturated Fat 2g13%
Cholesterol 7mg2%
Sodium 77mg3%
Potassium 31mg1%
Carbohydrates 19g6%
Sugar 10g11%
Protein 1g2%
Vitamin A 595IU12%
Vitamin C 4.8mg6%
Calcium 2mg0%
Iron 2.5mg14%
* Percent Daily Values are based on a 2000 calorie diet.

Here’s one more to pin on your Pinterest boards!The traditional snack or dessert treat of families everywhere gets an update in this delicious recipe for Chocolate Peanut Butter Krispy Bars!

Easy German Chocolate Cake with Homemade Frosting

It’s EASY to make an absolutely delicious German Chocolate Cake for dessert, thanks to a simple shortcut (using a box mix) and then topping it with yummy HOMEMADE coconut pecan frosting! SO GOOD!!!!
It's EASY to make a delicious German Chocolate Cake for dessert, thanks to a shortcut using a box mix and topping it with yummy HOMEMADE coconut pecan frosting!

Do you enjoy German chocolate cake? We sure do, but I think my Mom might be the biggest fan of all. She is the one who taught me this quick shortcut which I have used for years to make this delicious dessert!

Scroll Down For A Printable Recipe Card At The Bottom Of The Page

My Mom LOVES German Chocolate Cake

German Chocolate Cake is my Mom’s all-time favorite cake – (she used to make one for herself for her birthday whenever possible).  I recently flew down to see her in Southern California because she was very sick (and it was her birthday), and made her a German chocolate cake as a SURPRISE!

She loved it, and I even froze a few extra slices for her, which she was able to enjoy long after I had returned home to Oregon.

My mom, holding her birthday German Chocolate Cake

My mom has made LOTS of German chocolate cakes over the years. She told me how easy it has NOW become, thanks to using a boxed cake mix for the base.  Her cakes are always good; she cooks most of them from scratch, so I assumed she still made this particular cake from scratch. Nope. She switched because of the time it saved her to make this cake (a box mix can be made lickety split)!

So that’s how I make it now, too. She insists it’s the FROSTING that needs to be made from scratch for a PERFECT TASTING German chocolate cake! I gotta tell you – this frosting is the best – better than a tub of frosting from the store!

How To Make This EASY German Chocolate Cake

So here’s how to make this delicious cake, easily and quickly!  Prepare boxed cake mix using the ingredients and instructions on the box. I made a 9″ two layer cake, but it’s perfectly okay to make a 13×9 sheet cake with this recipe, as well (even EASIER).

When done baking, transfer the cake pans to a wire rack. Let the cake cool for about 10 minutes, then carefully invert cake layers onto wire rack, one at a time. You can do this by placing a wire rack on top of the cake pan. Quickly and carefully turn it over while holding both the wire rack and the cake pan tightly together. This will release the cake from the pan.  Let the cake layers cool to room temperature before frosting.

German chocolate cake mix batter in two pans, ready to bake

Two baked cake layers, cooling on wire rack

Time To Make The Easy German Chocolate Cake Frosting!

Once you put the cake in oven, make the homemade frosting: Cook butter, evaporated milk, sugar, egg yolks and vanilla in medium saucepan over medium-low heat. Cook for a full 12 minutes, stirring often, until mixture thickens. Remove the pan from the heat.

Butter, evaporated milk, eggs, cooking in pan for homemade German chocolate cake frosting

Thickened sauce for homemade cake frosting in saucepan

Stir in shredded coconut and chopped pecans until fully blended. Let this frosting cool to room temperature before frosting cake. You can speed up the cooling process by stirring the frosting often, if desired.

Shredded coconut and chopped pecans added to German chocolate cake frosting

Homemade coconut pecan frosting for German chocolate cake

Frost The Cake

To frost the cake, place one layer onto a serving platter. Spread a thin layer of frosting over the top of this layer.  Place another layer of cake on top of the frosted layer. Carefully spread frosting lightly over the top and sides of cake until fully covered.

Homemade coconut pecan frosting is spread onto and covers cake

Serve The German Chocolate Cake

Once the cake is frosted, all that is left for you to do is… slice cake, serve… and ENJOY! (Insert everyone’s happy face here!!!!!). The frosting is so incredibly good, and you made it from SCRATCH. You don’t have to tell your friends that you used a boxed cake mix for convenience… that will be OUR little secret (wink, wink).

Slice of German chocolate cake served on white plate with fork

Easy German chocolate cake with homemade frosting on white plate

This is a light, moist, absolutely delicious cake… one you will be proud to serve to family and friends, and the homemade frosting is outta this world good! The recipe makes enough frosting to lightly frost a two layer cake or a 13×9 inch cake (see NOTES section in printable recipe for larger quantity ingredient calculations), if additional cake layers or a thicker layer of frosting is desired.

Thank you for stopping by today!  I hope you will check out some of the other cake recipes here, like Apple Cake, Carrot Cake, Hummingbird Cake, Lemon Jello Cake, and several others. They are delicious, and can easily be found in the Recipe Index at the top of this page.  Have a fantastic day, friends.

Interested In More Recipes?

Thank you for visiting this website. I appreciate you using some of your valuable time to do soIf you’re interested, I publish a newsletter 2 times per month (1st and 15th) with all the latest recipes, and other fun info. I would be honored to have you join our growing list of subscribers, so you never miss a great recipe!
There is a Newsletter subscription box on the top right side (or bottom) of each blog post, depending on the device you use, where you can easily submit your e-mail address (only) to be included in my mailing list.

You Can Also Find Me On Social Media:

Facebook page: The Grateful Girl Cooks!
Pinterest:
The Grateful Girl Cooks!
Instagram:
jbatthegratefulgirlcooks

Author's signature

Frosting Recipe Source: My Mom

0 from 0 votes
Easy German Chocolate Cake with Homemade Frosting
Prep Time
10 mins
Cook Time
25 mins
Total Time
35 mins
 
It's EASY to make a delicious German Chocolate Cake for dessert, thanks to a shortcut using a box mix and topping it with yummy HOMEMADE coconut pecan frosting!
Category: Desssert
Cuisine: American
Keyword: German chocolate cake
Servings: 12 servings
Calories Per Serving: 449 kcal
Author: JB @ The Grateful Girl Cooks!
Ingredients
  • 1 German chocolate box cake mix
  • 1/2 cup butter
  • 1 cup evaporated milk
  • 1 cup granulated sugar
  • 3 egg yolks , beaten slightly
  • 1 teaspoon vanilla extract
  • cups shredded coconut
  • 1 cup chopped pecans
Instructions
  1. Prepare boxed cake mix using ingredients and instructions from box.  When done baking, transfer cake pans to wire rack. Let cool for about 10 minutes, then carefully invert cake onto wire rack (place wire rack on top of cake pan, then quickly and carefully turn over, to release cake from pan.  Let cake layers cool to room temperature before frosting.

  2. To make frosting (make while cake is baking): Cook butter, evaporated milk, sugar, egg yolks and vanilla in medium saucepan over medium-low heat. Cook for a full 12 minutes, stirring often, until mixture thickens. Remove pan from heat.

  3. Stir in shredded coconut and chopped pecans until fully blended. Let frosting cool to room temperature before frosting cake layers. (You can speed up the cooling process by stirring the frosting often, if desired).

  4. To frost cake, place one layer onto serving platter. Spread a thin layer of frosting over top of cake layer.  Place another layer of cake on top of frosting. Carefully spread frosting over top and sides of cake until covered. Slice cake, serve... and ENJOY!

Recipe Notes

NOTE: This makes enough frosting for a 13x9 or two layer cake.  If you want more frosting for your cake, use these ingredients: 1 can (12 oz.) evap. milk, 1½ cups sugar, 3/4 cup butter, 4 yolks, 1½ tsp. vanilla, 1 pkg (7 oz.) shredded coconut, and 1½ cups chopped pecans. (this will make 4½ cups total)

Nutrition Facts
Easy German Chocolate Cake with Homemade Frosting
Amount Per Serving (1 serving)
Calories 449 Calories from Fat 234
% Daily Value*
Fat 26g40%
Saturated Fat 11g69%
Cholesterol 75mg25%
Sodium 418mg18%
Potassium 263mg8%
Carbohydrates 51g17%
Fiber 2g8%
Sugar 37g41%
Protein 5g10%
Vitamin A 355IU7%
Vitamin C 0.6mg1%
Calcium 126mg13%
Iron 2.2mg12%
* Percent Daily Values are based on a 2000 calorie diet.

Here’s one more to pin on your Pinterest boards! It's EASY to make a delicious German Chocolate Cake for dessert, thanks to a shortcut using a box mix and topping it with yummy HOMEMADE coconut pecan frosting!

Chocolate Pots de Crème

If you’re looking for a quick and easy decadent dessert that can be made in under 10 minutes, you’ll love these thick and smooth, tiny Chocolate Pots de Crème, with deep rich chocolate flavor!Looking for a quick and easy decadent dessert you can make in under 10 minutes? You'll love these tiny Chocolate Pots de Crème with deep, rich chocolate flavor!

Last year I made Irish Chocolate Pots de Crème for a family gathering, and they were a huge hit!  The tiny ramekins of chocolate were flavored with Bailey’s Irish Cream and tasted amazing!

Because they were so good, I knew I wanted to go back and try the basic chocolate pot de crème recipe! Did you know this dessert can be traced back to France in the 17th century? If it’s been around that long, it MUST be good. It sure is!

If you are a chocolate lover like myself, you absolutely cannot go wrong with this simple recipe!  The recipe takes under 10 minutes to prepare and pop in the refrigerator, then all you need to do is let them fully chill before serving (at least an hour).  I usually mix them up and pop them in the fridge in the morning, to serve later in the evening. Here’s how easy they are to prepare:

Scroll Down For A Printable Recipe Card At The Bottom Of The Page

How To Make Chocolate Pots de Créme

Before beginning, place really small bowls or ramekins on a baking sheet (with rimmed edges).  The recipe will make about 9 (1/3 cup) servings, or about 7 (1/2) cup servings. With this dessert, small sized containers are a GOOD thing, as it is a really rich treat!

You can store the chocolate pots de créme, once made, for 2-3 days, so it’s easy to make a batch, then grab one when the craving for chocolate hits! Not that I’ve had this personal experience (*snicker, snicker*).

Blend The Chocolate Ingredients

Put chocolate chips, granulated sugar, vanilla, egg, salt in a blender. If using Grand Marnier (which is optional), add this, as well. I used a combination of 1/2 bittersweet (60% cacao) chocolate and 1/2 semi-sweet chocolate chips. Do NOT add the whipping cream.

Blend these on low for 1 minute, then increase to medium speed for an additional minute. Stop blender, and set aside.

Mixing chocolates and egg in blender

Heat The Whipping Cream

Pour the whipping cream into a large microwave safe bowl. Use a large bowl, because the cream will be microwaved, and will rise up some as it heats. (I used a glass bowl so I could see to make sure the whipping cream didn’t bubble up and over the top of the bowl).

Heat whipping cream in microwave on high power for 2 to 2½ minutes, until the cream is REALLY bubbling (needs to be super hot to cook the egg fully when added to blender).

Whipping cream in large bowl

Bubbles in whipping cream after microwaving

Place a funnel into the center hole in the top of your blender lid. Place the lid on the blender.

Funnel inserted in blender top

Time To Blend The Ingredients

Turn blender on LOW and blend ingredients already in there for 15 seconds. SLOWLY pour the hot whipping cream through the funnel into the chocolate mixture while mixing on low.

Once you’ve added all the cream, put your hand over the top of the funnel (to cover), and turn the speed up to HIGH. Let the mixture blend on high for two minutes. When done, carefully pour the chocolate pots de créme (dividing evenly) into the serving bowls. Refrigerate for at least 1 hour (preferably more) before serving.

Pouring blended chocolate into small serving pots

Pots of chocolate chilling in refrigerator

The chocolate pots de créme can be made 2-3 days in advance, but make sure to cover each dish with plastic if storing that long in refrigerator.

Ready To Serve!

When ready to serve, garnish with a dollop of whipped cream if you want, OR just grab a spoon a take a big old bite of chocolate goodness! It’s thick, it’s rich, it’s smooth, and it tastes decadently amazing!

Spoonful of thick fudgey dessert

Hope you enjoy these delicious little desserts with big flavor!  I told my husband “these chocolate pots de créme are so rich, it’s gonna put hair on my chest!!!”  Ha Ha!  We love ’em, and really hope you will, too! Have a great day.

Looking For Other DECADENT DESSERT Recipes?

You can find all of my dessert recipes in the Recipe Index, located at the top of the page. I have tons of yummy desserts you’ll enjoy, including:

Want More Recipes? Get My FREE Newsletter!

I publish a newsletter 2 times per month (1st and 15th) with lots of recipes, tips, etc..
Would you like to join our growing list of subscribers?

There is a Newsletter subscription box on the top right (or bottom) of each blog post, depending on the device you use.
You can submit your e-mail address there, to be added to my mailing list.

Find Me On Social Media:

Facebook page: The Grateful Girl Cooks!
Pinterest:
The Grateful Girl Cooks!
Instagram:
jbatthegratefulgirlcooks

Author's signature

Recipe Source: https://thecafesucrefarine.com/chocolate-pots-de-creme/

↓↓ PRINTABLE RECIPE BELOW ↓↓

0 from 0 votes
Chocolate Pots de Crème
Prep Time
5 mins
Cook Time
1 hr
Total Time
1 hr 5 mins
 

Looking for a quick and easy decadent dessert you can make in under 10 minutes? You'll love these tiny Chocolate Pots de Crème with deep, rich chocolate flavor!

Category: Dessert
Cuisine: American
Keyword: chocolate pots de creme
Servings: 9 (1/3 cup) servings
Calories Per Serving: 306 kcal
Author: JB @ The Grateful Girl Cooks!
Ingredients
  • 5 ounces semi-sweet chocolate chips
  • 3 Tablespoons granulated sugar
  • 5 ounces bitter sweet chocolate , 60%
  • 1 egg , large
  • 1 teaspoon vanilla extract
  • 1 pinch salt
  • 1 cup heavy whipping cream , or half n' half
  • 2 Tablespoons Grand Marnier , Optional
Instructions
  1. Before beginning, place tiny bowls, mugs or ramekins on a large baking sheet. Set aside. Recipe will yield approx. 9 (1/3 cup) servings or 7 (1/2) cup servings.

  2. Put chocolate chips, granulated sugar, vanilla, egg, salt in a blender. If using Grand Marnier (which is optional), add this, as well. Blend these on low for 1 minute, then increase to medium speed for an additional minute. Stop blender, and set aside.

  3. Pour whipping cream into a large microwave safe bowl. Use a large bowl, because the cream will be microwaved, and will rise up some as it heats. (I used a glass bowl so I could see to make sure the whipping cream didn't bubble up and over the top of the bowl). Heat whipping cream in microwave on high power for 2 to 2½ minutes, until the cream is REALLY bubbling (needs to be super hot to cook the egg fully when added to blender).

  4. Place a funnel into the center hole in the top of the blender lid. Place lid onto blender. Turn blender on LOW and blend ingredients already in there for 15 seconds. SLOWLY pour the hot whipping cream through the funnel into the chocolate mixture while mixing on low.  Once you've added all the cream, put your hand over the top of the funnel (to cover), and turn the speed up to HIGH. Let the mixture blend on high for two minutes.  When done, carefully pour the chocolate, (dividing evenly) into serving bowls.

  5. Refrigerate for at least 1 hour (preferably more) before serving. Garnish with whipped cream, if desired (Optional) Can be made 2-3 days in advance. Store, covered with plastic wrap in refrigerator.

Nutrition Facts
Chocolate Pots de Crème
Amount Per Serving (1 (1/3 cup) serving)
Calories 306 Calories from Fat 198
% Daily Value*
Fat 22g34%
Saturated Fat 13g81%
Trans Fat 0.03g
Polyunsaturated Fat 1g
Monounsaturated Fat 6g
Cholesterol 50mg17%
Sodium 22mg1%
Potassium 212mg6%
Carbohydrates 22g7%
Fiber 3g13%
Sugar 17g19%
Protein 3g6%
Vitamin A 431IU9%
Vitamin C 0.2mg0%
Calcium 40mg4%
Iron 2mg11%
* Percent Daily Values are based on a 2000 calorie diet.

Here’s one more to pin on your Pinterest boards!Looking for a quick and easy decadent dessert you can make in under 10 minutes? You'll love these tiny Chocolate Pots de Crème with deep, rich chocolate flavor!

Chocolate Angel Food Mug Cake

Make a master mix with two ingredients , then enjoy an easy “low-calorie” chocolate angel food mug cake any time you want, cooked for only ONE MINUTE in a microwave! Make a master mix with two ingredients , then enjoy an easy "low-calorie" chocolate mug cake any time you want, cooked for only ONE MINUTE in a microwave!

If you’re trying to lose weight or cut calories, but enjoy dessert… you’ll enjoy this recipe for Chocolate Angel Food Mug Cake, made in a microwave in 1 MINUTE!  You’ll feel like you’re “cheating”, but with the cake being only 80 calories, it’s a fast, tasty option to curb a sweet tooth!

My sister Joni told me about the Weight Watchers 3-2-1 Cake. She heard about it, tried it,  and then told me about it. So I just HAD to make this chocolate angel food mug cake, too!

Scroll Down for A Printable Recipe Card At The Bottom Of The Page

Why This Dessert Is Also Called A 3-2-1 Cake

The numbers 3-2-1 refer to the easy way to remember the recipe for each individual mug cake. 3 Tablespoons mix- 2 Tablespoons water- 1 minute in the microwave! Get it?  It is one of the EASIEST ways to quickly satisfy a sweet tooth “attack”, without going overboard!!

The “mix” is made by simply combining dry cake mix with angel food cake mix (the kind that only has you add water). Both dry cake mixes are whisked together until well blended, with no lumps. Store the mix in an airtight, sealed container, then you can use it as needed.

The cake mixes used to make the mug cake.

The recipe makes enough for 46 mug cakes, so there will be plenty! I used 2 quart sized canning jars to store the cake mixture, and taped instructions to each jar for future use.

The dry cake mixes are combined in a large bowl.

I used Devil’s Food cake mix to make my mug cake chocolate flavored, but you can substitute any flavor mix for the Devil’s Food. You can also add 2-3 teaspoons mix-ins like finely chopped nuts or dried fruit, or mini chocolate chips for additional flavor, if you want.

**Please note that adding these additional ingredients will raise the caloric value!! The cake by itself with no additional filling or topping equals 80 calories per serving, AND if you follow WW, the point value is 2 Points Plus, or 3 Smart Points.**  

The chocolate mug cake mix is stored in airtight containers until needed.

Okay, I Made The Mix. How Do I MAKE The Chocolate Mug Cake?

Once you’ve made the Master Mix, when the craving for something a little sweet mug cake hits, make the cake. For one single chocolate mug cake, place 3 Tablespoons mix into a straight sided microwave safe mug.

Measuring the mug cake mix into microwaveable mug.

Add 2 Tablespoons water, and mix well with a spoon or fork until mixture is smooth.

Water is added to the cake mix in mug.

Ingredients for the mug cake are stirred together in the coffee cup before cooking.

Microwave for 1 minute on HIGH power. Remove mug from microwave; let it sit and cool down a little bit. It will come out looking like this…

The cake cooks for one minute in the microwave.

It can be eaten straight from the mug, OR you can run a butter knife around edges and gently remove the cake from the mug onto a plate.

Chocolate angel food mug cake can be eaten plain, without any additional toppings.

Serve the mug cake plain for least amount of calories (80), or top it with frosting, ice cream, fruit, powdered sugar, frozen yogurt, and/or chocolate syrup.

Chocolate mug cake, topped with powdered sugar and chocolate syrup.

Now can you see why it is commonly called a 3-2-1 Mug Cake?  THREE tablespoons of prepared mix, TWO tablespoons of water, and ONE minute in the microwave!!! It’s a perfect mix to keep on hand, so when the urge for dessert hits you can satisfy your craving with a slightly “healthier” solution!

Sure hope you will make this mug cake mix and will enjoy having it on hand in your kitchen for those “gotta have something sweet now” emergencies… ha ha!

Looking For More CAKE Recipes?

You can find all of my recipes in the Recipe Index, located at the top of the page. I have quite a few delicious cake recipes, including:

Interested In More Recipes?

Thank you for visiting this website. I appreciate you using some of your valuable time to do soIf you’re interested, I publish a newsletter 2 times per month (1st and 15th) with all the latest recipes, and other fun info. I would be honored to have you join our growing list of subscribers, so you never miss a great recipe!
There is a Newsletter subscription box on the top right side (or bottom) of each blog post, depending on the device you use, where you can easily submit your e-mail address (only) to be included in my mailing list.

You Can Also Find Me On Social Media:

Facebook page: The Grateful Girl Cooks!
Pinterest:
The Grateful Girl Cooks!
Instagram:
jbatthegratefulgirlcooks

Author's signature

Recipe Source: https://simple-nourished-living.com/weight-watchers-3-2-1-microwave-mug-cake/

0 from 0 votes
Chocolate Angel Food Mug Cake
Prep Time
2 mins
Cook Time
1 min
Total Time
3 mins
 
Make a master mix with two ingredients , then enjoy an easy "low-calorie" chocolate mug cake any time you want, cooked for only ONE MINUTE in a microwave!
Category: Dessert
Cuisine: American
Keyword: mug cake
Servings: 46 cakes
Calories Per Serving: 72 kcal
Author: JB @ The Grateful Girl Cooks!
Ingredients
For Cake Mix:
  • 1 box (15.25 - 18.25 ounces) Devil's Food cake mix
  • 1 box (16 ounces) Angel Food cake mix (the type that only needs water-one step)
To Make One Mug Cake:
  • 3 Tablespoons of the combined dry cake mix
  • 2 Tablespoons water
Instructions
  1. Whisk both dry cake mixes together until well blended, with no lumps. Store in an airtight, sealed container. I used canning jars to store the cake mixture, and taped instructions to jar.
  2. When ready to make one mug cake, place 3 Tablespoons mix into a straight sided microwave safe mug. Add 2 Tablespoons water, and mix well until mixture is smooth.
  3. Microwave for 1 minute on HIGH power. Remove mug from microwave; let it sit and cool down a little bit. It will be ready to eat straight from the mug, OR you can run a butter knife around edges and gently remove the cake from the mug onto a plate. Serve the cake plain for least amount of calories (80), or you can garnish cake with frosting, ice cream or frozen yogurt, fruit, powdered sugar (sifted) and/or chocolate syrup.
Recipe Notes

TIP# 1 - You can substitute any flavor cake mix for the Devil's Food.
TIP # 2 - May also add 2-3 teaspoons additional mix-ins like finely chopped nuts or dried fruit, or mini chocolate chips for additional flavor. Please note that adding these additional ingredients will raise the caloric value.

Nutrition Facts
Chocolate Angel Food Mug Cake
Amount Per Serving (1 cake)
Calories 72
* Percent Daily Values are based on a 2000 calorie diet.

Here’s one more to pin on your Pinterest boards!Make a master mix with two ingredients , then enjoy an easy "low-calorie" chocolate mug cake any time you want, cooked for only ONE MINUTE in a microwave!

Karen’s Delicious Apple Cobbler

Four ingredients and thirty minutes is all you need to make this EASY and delicious apple cobbler for dessert!Four ingredients and thirty minutes is all you need to make this EASY and delicious apple cobbler for dessert!

If you’re looking for an EASY dessert that can be made quickly, may I suggest  this simple recipe for Karen’s Delicious Apple Cobbler? You only need 4 ingredients and 30 minutes to make this amazing dessert! It’s REALLY quite tasty!

Scroll Down For A Printable Recipe Card At The Bottom Of The Page

Why This Apple Cobbler Is Named After My Friend, Karen

When I was a newlywed 40 years ago, my husband and I moved from Southern California to a small town in Southern Oregon. I was privileged to meet a woman named Karen at the church where my husband was the Music Pastor.

Karen sang in our choir, had an amazing voice, and an even sweeter personality and infectious laugh. She graciously invited us over for meals, became a dear friend, and even let me do our laundry at her home several times… THAT was also a huge gift because it meant I didn’t have to hang out at the local laundromat for hours.

Karen made this apple cobbler for us once (40 years ago), and I loved it.  Being a newlywed, and loving to cook, I asked her if she would share her recipe with me. She laughed and told me how incredibly easy it was to make (a big plus!), and gave it to me.

I named the recipe after her and wrote it on the recipe card, so I wouldn’t ever forget who gave it to me. I’ve made this recipe many times over the years, and finally decided to add it to my blog.  Karen passed away quite suddenly in 2014, but her sweet spirit, love, zest for life, and memories live on in every person she poured herself into, including ME!

How EASY Is This Apple Cobbler To Make?

Here’s how to make this… it’s so very EASY!  Preheat oven to 350° F. Lightly grease a 13×9 pan (or two smaller sized pans) with non-stick spray.  Spread fruit pie filling evenly in pan.

Apple pie filling is spread into baking pans.In medium bowl, mix butter, yellow cake mix and chopped nuts until crumbly.

Butter is blended into dry ingredients using a pastry blender.

Chopped pecans are added to dry ingredients for cobbler

Dry ingredients, butter and pecans are crumbly and ready to top apple cobbler.

Sprinkle this dry mixture evenly over the apple pie filling. The cobbler is usually made in a 9×13 pan, but this time I made it in a square pan (8×8) and a 9 inch cake pan, so I could give one away to a friend recovering from surgery, yet still have one for our family.

Crumb topping has been placed on top of the apple pie filling in baking pan.

Bake at 350° F. for approximately 30 minutes, or until bubbly and crumb mixture is light golden brown on top. Remove pan to a wire rack and let cool down slightly before serving.

Two pans of Karen's delicious apple cobbler are cooling on wire rack after baking.

Once cobbler has cooled down a bit, serve up individual portions.  This cobbler tastes best served slightly warm, with a big ol’ scoop of vanilla ice cream on top!

Karen's Delicious Apple Cobbler is serving in ramekin with a scoop of ice cream.

This cobbler is so very easy to make, and truly is quite scrumptious!

Do You Enjoy Cobblers And Crisps?

Speaking of cobblers, if you enjoy this type of dessert you might be interested in other cobbler and crisp recipes on this blog. I have quite a few cobbler recipes. Some of them are Strawberry Cobbler, Blackberry Cobbler, or Old-Fashioned Peach Crisp. You might also enjoy learning about the history of cobblers, crisps, pandowdy, etc.

A spoonful of Karen's delicious apple cobbler is ready to eat!

It’s wonderful to have a recipe card for an apple cobbler that is yummy and soooo simple to make, permanently stored in my recipe box (and now on my blog)!  With every bite, I am reminded of the sweet friend who gave it to me, and miss her very much! Have a great day, and be sure to check out ALL my recipes in the Recipe Index, located at the top of the page.

Interested In More Recipes?

Thank you for visiting this website. I appreciate you using some of your valuable time to do soIf you’re interested, I publish a newsletter 2 times per month (1st and 15th) with all the latest recipes, and other fun info. I would be honored to have you join our growing list of subscribers, so you never miss a great recipe!
There is a Newsletter subscription box on the top right side (or bottom) of each blog post, depending on the device you use, where you can easily submit your e-mail address (only) to be included in my mailing list.

You Can Also Find Me On Social Media:

Facebook page: The Grateful Girl Cooks!
Pinterest:
The Grateful Girl Cooks!
Instagram:
jbatthegratefulgirlcooks

Author's signatureRecipe Source: Karen Cobb Nelson

0 from 0 votes
Karen's Delicious Apple Cobbler
Prep Time
5 mins
Cook Time
30 mins
Total Time
35 mins
 

Four ingredients and thirty minutes is all you need to make this EASY and delicious apple cobbler for dessert!

Category: Dessert
Cuisine: American
Keyword: apple cobbler
Servings: 12 servings
Calories Per Serving: 342 kcal
Author: JB @ The Grateful Girl Cooks!
Ingredients
  • 1 can apple pie filling (21 ounces)
  • 1 cube butter , at room temperature
  • 1 yellow cake mix
  • 1 cup walnuts or pecans , chopped
  • Non-stick spray
Instructions
  1. Preheat oven to 350° F. Lightly grease a 13x9 pan (or two smaller sized pans) with non-stick spray.
  2. Spread fruit pie filling evenly in pan.
  3. In medium bowl, mix butter, yellow cake mix and chopped nuts until crumbly. Sprinkle this dry mixture evenly over the apple pie filling.
  4. Bake at 350° F. for approximately 30 minutes, or until bubbly and crumb mixture is light golden brown on top. Remove pan to a wire rack and let cool down slightly before serving. This cobbler tastes best served slightly warm, with a big ol' scoop of vanilla ice cream on top!
Nutrition Facts
Karen's Delicious Apple Cobbler
Amount Per Serving (1 serving)
Calories 342
* Percent Daily Values are based on a 2000 calorie diet.

Here’s one more to pin on your Pinterest boards!Four ingredients and thirty minutes is all you need to make this EASY and delicious apple cobbler for dessert!